When you click on links to various merchants on this site and make a purchase, this can result in this site earning a commission. Affiliate programs and affiliations include, but are not limited to, the eBay Partner Network.
Wow, that's brutal for San Diego in Feb! If you live near the ocean its cooler than inland so it must be cooking in the foothills..
Balmy 65 here today, we're getting some of that same heat wave you are. But still down in upper 20's overnight.
Had top strut mounts replaced and 4 wheel alignment. Fixed my squeaky / noisy suspension problem. Now it sounds like my TT (silent). Can't believe the difference.
Replaced engine mounts on my 99 c2. Went with Rein oem. Should have been a one hour job max. Turned into a multiple day project when one of the nuts seized on the old mount. The bolt unthreaded from the mount with seized nut attached. Had to take the bolt and nut to Precision Tune. They were able to remove the nut. Got mounts installed. When I went to reassemble and install the two bolts for the secondary air pump i discovered the bolts would not fasten - they just fell into the holes. Turns out there are speed nuts attached to rubber grommets. The grommets disintegrated after 20 years and the speed nuts were just dangling from the grommets. So I have to order two speed nuts with the rubber grommets and all will be right.
friendly tip - Make sure your mounts come with nuts. Or order them with the mounts if unsure.
shifting does seem a little smoother and perhaps a little smoother idle. Mounts were replaced just because they were 20 years old.
Uh...apparently I was pretty challenged just doing the project, much less taking pictures and creating videos of the project. A few takeaways from the project:
I used the Mantra kit as supplied by Crutchfield. I am pretty happy with the trim kit. The instructions could have been a little better, but all in all were pretty thorough.
I opted for the wiring kit. The wiring kit worked well. I did not connect the brake switch wire to the brake switch. I used a brake bypass kit that negates the need to have to have the brake on to perform certain functions of the head unit. Do a brake wire bypass search on Amazon, they have several.
The upholstered side trim on each side of the center stack is removed by pulling the forward ends loose out, away from their clips, then sliding it rearward, toward you. I forgot that minor detail, something I should have known about with all the different write ups and videos I had seen and read.
I decided to remove the plastic lower center stack frame, which made it much easier to route the HVAC control wiring into the lowest opening. It only required removing 4 screws to do that. The only down side I can see with doing this is the reveal line between the upper and lower center stacks is a bit wider than it was before I did the work. I might take the side trims off and see if I can raise the lower center stack by shimming it up to take out any slop in the screw slots on the frame.
The portion of the wiring route between the rear camera location and the head unit is somewhat challenging. There is very thick and relatively firm firm foam rubber insulation behind all the interior trim panels. I ended up removing all the rear deck panels, the passenger side, interior rear quarter panel trim and the section of foam insulation at the rear quarter panel and the door threshold, as well as the passenger footwell under dash panel. As I wrote originally, I was a little sore the next day from the contortions required to do that work. I used a 16� long 3/8� drill bit to create a space for the wiring to pass by removing the tail light, and the grommet the tail light wiring passes through, then drilled through the main wiring grommet and through the foam insulation. You must be careful here. You do not want to damage that wire bundle. My sunroof drain also passed through near that location. I did not know about the sunroof drain until after I had pushed the drill bit through. Luckily, I missed it by a 1/2� or so. I used a 3� long HVAC zip tie that I had in my collection of stuff to push through the grommet and foam, then taped the wiring to it and pulled it through the grommet and the foam.
One snafu that cost an hour or so of delay was the HVAC unit would not slide completely into the lower space. It would get within around 3/8� of being flush, but would not go further. After much head scratching and measuring I finally determined that the ~1/8� ridges on the top, rear sides, about 2� long, needed to be ground down slightly. Once I did that, the unit fit in the space perfectly.
The microphone for the phone was just clipped to the top of the A pillar trim. I am not really sold on that location, but it probably is the ideal location, acoustically. I watched one video where one of the dummy switch fillers on the drivers side of the console was drilled to fit the diameter of the microphone perfectly. That installation looked ridiculously good. I may reroute my microphone to near that location and temporarily mount it test out the performance. If it performs at least close to the A-pillar location, I think I will do the permanent mount in the console.
I have not received the camera yet. Ordered straight from China, right before the Lunar New Year celebration started. Also right before the coronavirus outbreak started...so it might be awhile before I receive that. It will mount utilizing one of the license plate light lens locations. A combination light/camera assembly is made to fit the license plate light opening, maintaining the light and providing the mount for the camera. I will update the project when I receive the camera....some day.
Hopefully this makes sense. Feel free to ask questions, I would be happy to respond.
Very nice! I did the double-din last year and have been very happy with it, but did not attempt a back-up camera. Agreed 100% on the Crutchfield wiring harness - made the new radio a plug-and-play.
Daryll
Thanks for the info on yours earlier, even though these are 19's I'm expecting good things when they get mounted, just need to find my original Lug bolts
I did not do anything today...just admired it in the garage....with all its rock chips in the front bumper and windshield looks sandblasted....and I still love my car.
Then pondered for a bit, and thought about the list of things I will do to it in the spring: Remove front bumber cover, clean radiators, put in the $5 screens on the scoops(home depot) , change sparkplugs and oil tubes, may be clean the engine from all the oil and grime.....and then continue driving it......
Yanked the cans off the back, and performed the Fister mod finally. 1st drive this morning was marvelous and reminded me of a smoother version of my 65Ghia
I did not do anything today...just admired it in the garage....with all its rock chips in the front bumper and windshield looks sandblasted....and I still love my car.
Then pondered for a bit, and thought about the list of things I will do to it in the spring: Remove front bumber cover, clean radiators, put in the $5 screens on the scoops(home depot) , change sparkplugs and oil tubes, may be clean the engine from all the oil and grime.....and then continue driving it......
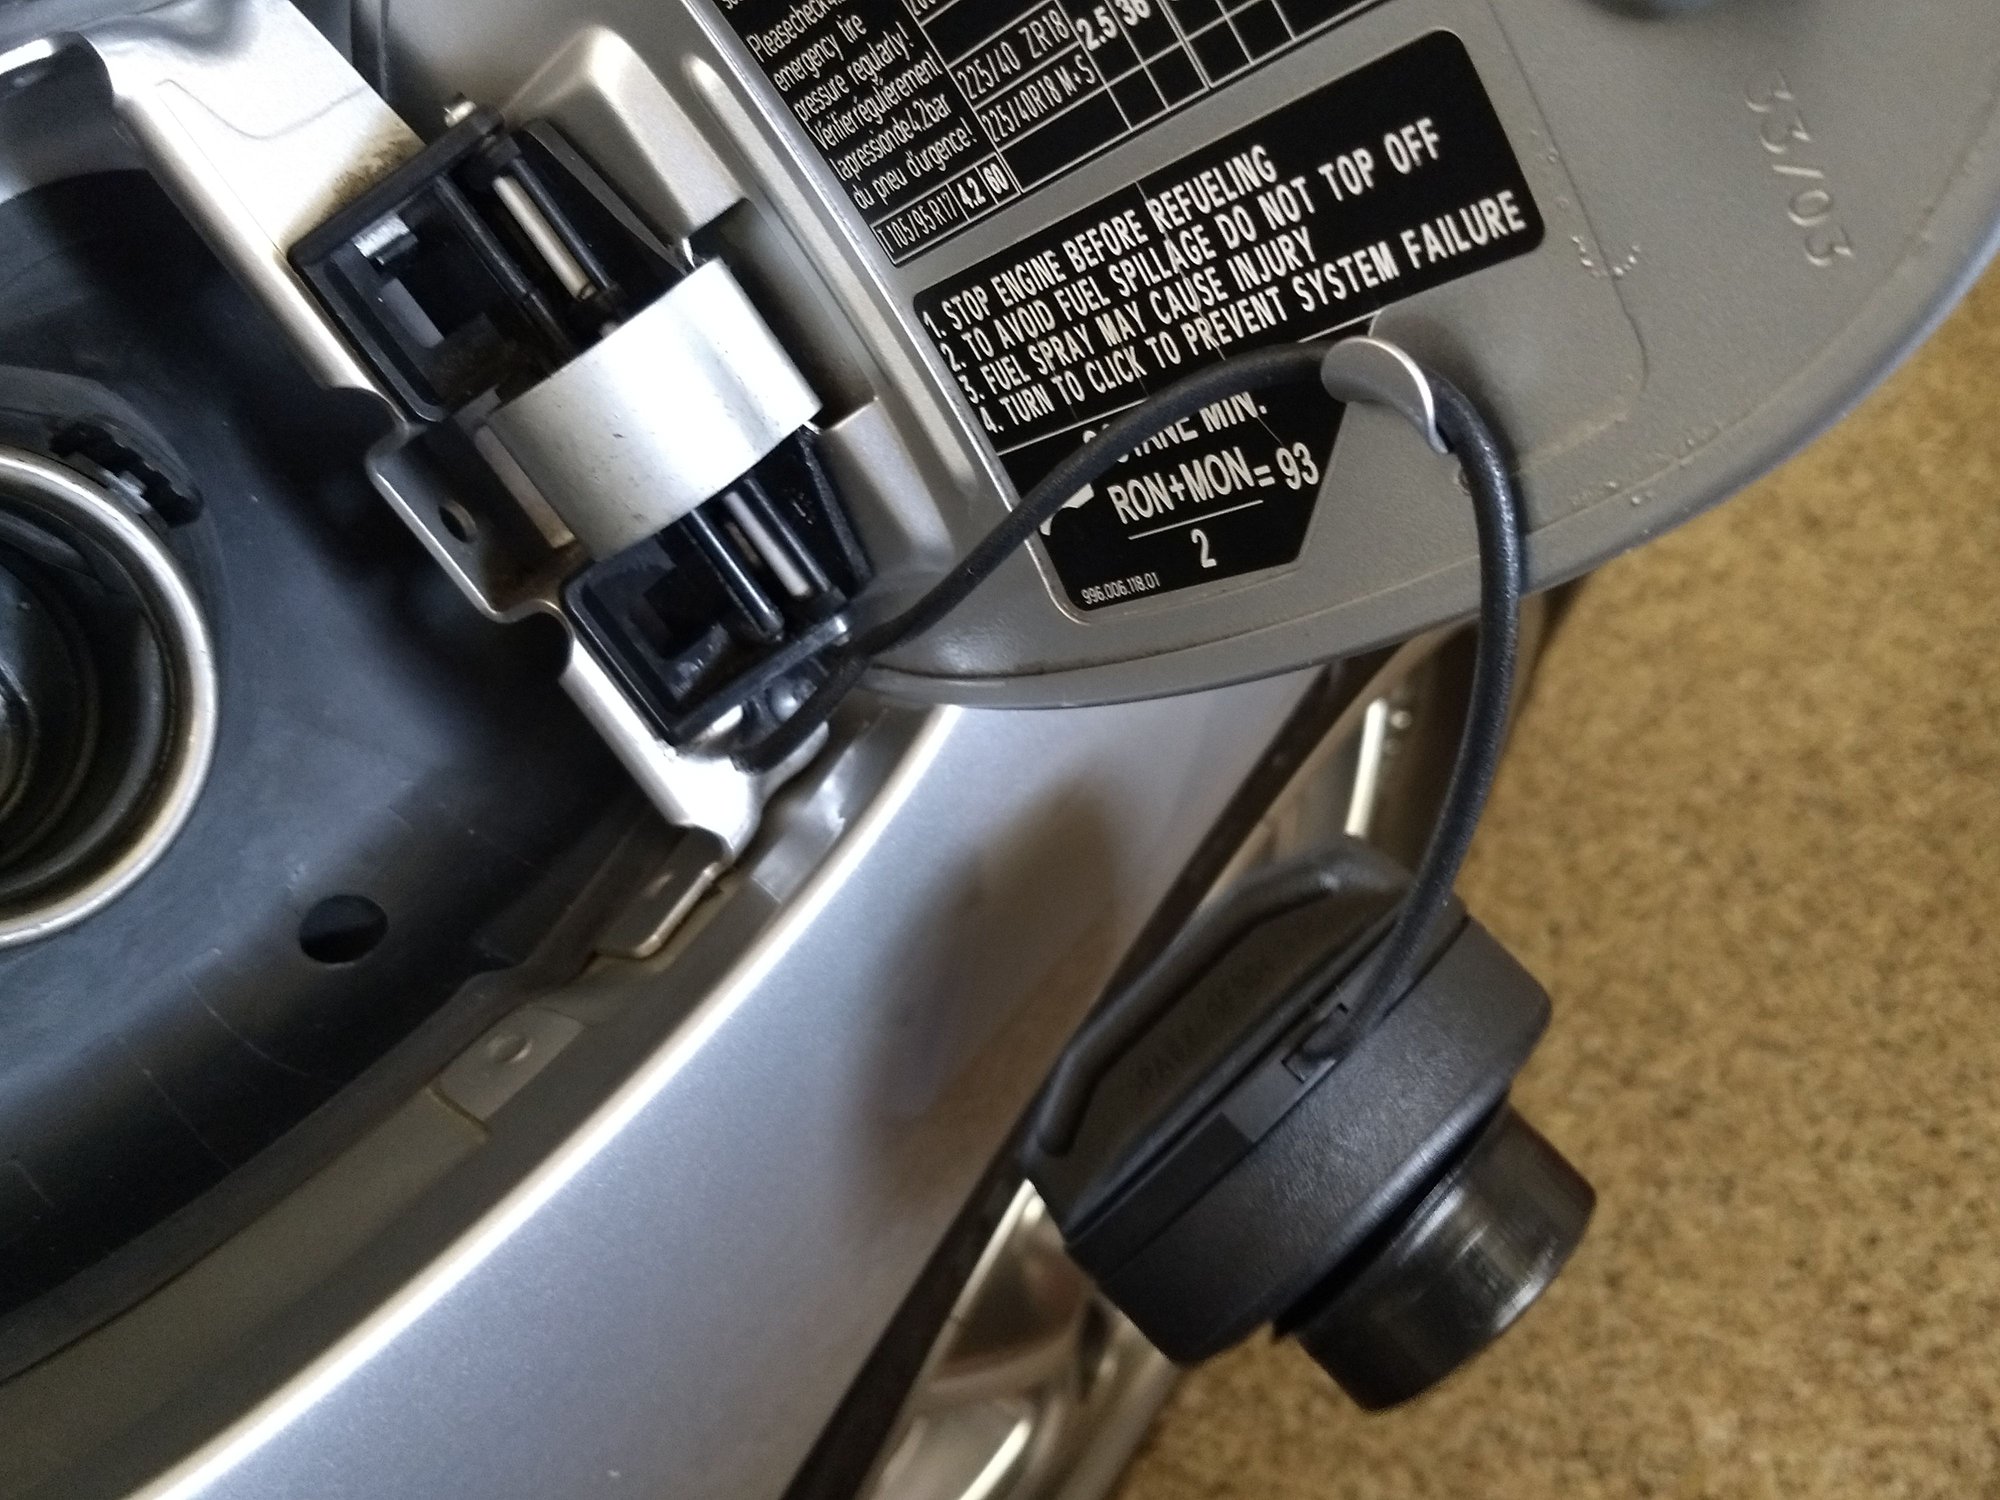
Replaced my gas cap, the broken lanyard had bugged me for years. When you order the replacement cap from Porsche the kit doesn't include the little plastic push pin needed to connect the lanyard to the car so I had to have the dealer send one to me. Now nicer than dealing with a loose cap.
I also did this a few weeks ago - was getting intermittent CEL's that would show up then go away after 25 miles or so. It turned out that the gasket on the cap had cracks in it... Haven't gotten a CEL since I replaced it...
Looked all over the car; no wheel lock key to be found. Of course, prior owner said he didn't have it either. He owned car for several years and the tires on the car are relatively new. So, that really doesn't compute but I don't see why he'd lie about it if he had it. Whatever . . .
Anyway, just going to order a replacement key from the dealer, assuming they can identify which key needs to be purchased. I'm planning to buy a new OEM set of wheels for the car which will probably require new lugs because I'm switching for aftermarket 19s to stock 18s. Would rather buy new OEM lugs to match the new OEM wheels when the time comes.
I purchased our 996.2 cab last summer and didn�t pay attention to the installed wheel locks. Fast forward 6 months, a flat tire and the discovery of no wheel lock key. I used the 11/16� 12 point socket hack to get the wheel off. I ordered a titanium set of lugs without locks off eBay and installed the ones I could. I took the car down to discount tire and they removed the remaining wheel locks. The car is garage parked and driven to places I consider safe so not too concerned about wheel theft.
 02-01-2020, 07:45 PM