
So what did you do to your 928 Today......
 04-12-2011, 02:15 AM
#706
Archive Gatekeeper
Rennlist Member
Rennlist Member
That ain't filth, that's gold paint. Bead blasting is surprisingly effective on oil filler caps, just make sure you shake all the beads out of the insides before re-installing. 
Thread specific content: Today I built a 9293 tool:


Thread specific content: Today I built a 9293 tool:

 04-12-2011, 08:35 AM
#708
Three Wheelin'
I've also been toying with adding a strut at the side to prop it open. I removed it of course for serious work, but anytime you have to pop the cover for a quick look it is a pain that it doesn't stay all the way up (at least on my car).[/QUOTE]
=================================================
Yes, 1/4" should work too.
Martin, no need to prop up cover. I installed a 2" wide velcro (backed up with glue) on the cover and underneath (where the cover hits when open). Works like a charm
=================================================
Yes, 1/4" should work too.
Martin, no need to prop up cover. I installed a 2" wide velcro (backed up with glue) on the cover and underneath (where the cover hits when open). Works like a charm
04-12-2011, 05:31 PM
#710
replaced timing belt and idlers on my 81, 10am -6pm........... next job slightly binding left side rear brake,maybe handbrake cable or caliper will strip it tomorrow.
04-12-2011, 06:16 PM
#711
Rennlist Member
Join Date: Oct 2005
Location: Gatineau, Qu�bec, Canada
Posts: 5,170
Received 1,289 Likes
on
490 Posts
Still trying to remove the rear shocks pins...
https://rennlist.com/forums/928-foru...ns-seized.html
I'm still on the passenger side and as the pin doesn't want to move in the hub, I'm at removing the hub from the car.
A lot of fun.

https://rennlist.com/forums/928-foru...ns-seized.html
I'm still on the passenger side and as the pin doesn't want to move in the hub, I'm at removing the hub from the car.
A lot of fun.
04-12-2011, 10:43 PM
#712
Just applied leather another brand of Leather Restoration goo to the interior. This version was Voodoo Blend from Surf City Garage. It definitely did a better job than the Armor All Leather Care Gel goo. Not perfect but looking better.
04-12-2011, 11:32 PM
#713
Rennlist Member
Finally found the source of my right front suspension noise (popping/knocking when turning at low speed.) The upper ball joint finally has enough movement that i could see. Time to buy a rebuilt Upper Control Arm from 928 Intl.
I did finally come up with a way to pry on the upper joint without damaging the boot. With the wheel off I used a bottle jack to load the suspension and take tension of the upper ball joint. I was then able to get my 12" bar inserted vertically with the toe of the walking foot slipped under the RDK wiring and under the edge of the joint housing on the control arm and the heel resting on the top of the spindle. From there it was easy to see the slight vertical movement of the control arm relative to the spindle. Below is a picture of the type bar I am talking about.
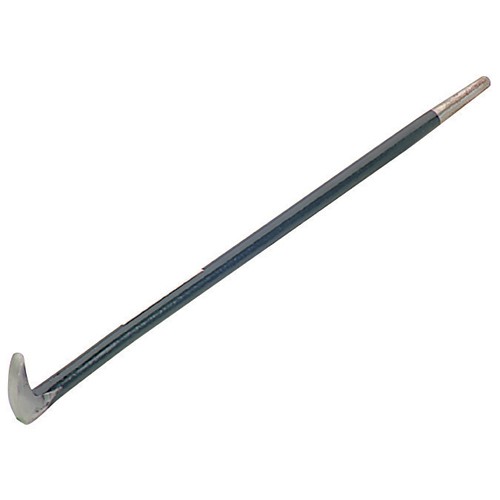
I did finally come up with a way to pry on the upper joint without damaging the boot. With the wheel off I used a bottle jack to load the suspension and take tension of the upper ball joint. I was then able to get my 12" bar inserted vertically with the toe of the walking foot slipped under the RDK wiring and under the edge of the joint housing on the control arm and the heel resting on the top of the spindle. From there it was easy to see the slight vertical movement of the control arm relative to the spindle. Below is a picture of the type bar I am talking about.

 04-13-2011, 09:45 AM
#715
Pro
Join Date: Dec 2010
Location: Palgrave, Ontario, Canada
Posts: 700
Likes: 0
Received 2 Likes
on
2 Posts
Got my repaired drivers seat back from upholsterer - new leather and foam on bolster (http://i1229.photobucket.com/albums/...h/IMG_1692.jpg). Starting to test if Leatherique products can do what is claimed for leather restoration.
Last edited by martinss; 04-13-2011 at 09:51 AM. Reason: typo
04-13-2011, 09:50 AM
#716
Pro
Join Date: Dec 2010
Location: Palgrave, Ontario, Canada
Posts: 700
Likes: 0
Received 2 Likes
on
2 Posts
 04-13-2011, 08:11 PM
#717
Chronic Tool Dropper
Lifetime Rennlist
Member
Lifetime Rennlist
Member

Cam covers coming off. Pictures this evening.
Back to work!
Back to work!
04-13-2011, 10:44 PM
#718
Drifting
How about a video of the sound (if that makes sense)
 04-13-2011, 10:56 PM
#720
Rennlist Member
On my 81, Completed the rebuild and rewire of the 14 pin harness, reinstalled the spider, vacuum lines, radiator - now just need to get the top auto trans cooler hose remade tomorrow, and start her up.