When you click on links to various merchants on this site and make a purchase, this can result in this site earning a commission. Affiliate programs and affiliations include, but are not limited to, the eBay Partner Network.
John.berg. No unfortunately you will need new Xm vehicle box as stated. What I would do is get the new box and transfer services from Cayenne to new box.
This^. I have already personally tested and done this. The good news is that you can use your existing XM antenna if you can run the antenna lead into the PCCM+ mounting area, which shouldn't be a problem since most antenna leads are 25' long +/-. The other good news is that the new Sirius/XM receiver you will have to buy only costs about $60. The Sirius/XM pigtail from the PCCM+ plugs right into the new satellite receiver cable. You can leave your existing Cayenne receiver in place -- it won't interfere. The system simply ignores it just like it ignores the CD Changer. Since I have the Bose system, I did not need to use the MOST terminal loop with the PCCM+, so I just used it to terminate the CD Changer connection and pulled both the CD Changer and the old Cayenne Sirius/XM receiver out of the car. If you do that, you must make sure you maintain the MOST circuit by plugging the original MOST connection for the Navigation back into the Nav unit or you will interrupt the MOST loop. If you have a *second* MOST termination loop, you could pull the Nav unit as well, but I left mine in because it makes a nice, usable shelf next to the CD Changer bracket (and I didn't have a second MOST termination loop).
Last edited by JustinCase; 01-31-2023 at 02:23 PM.
Hi MAXW. How did they connect your audio control line converter? Was it connected out from your PCM speaker line output?
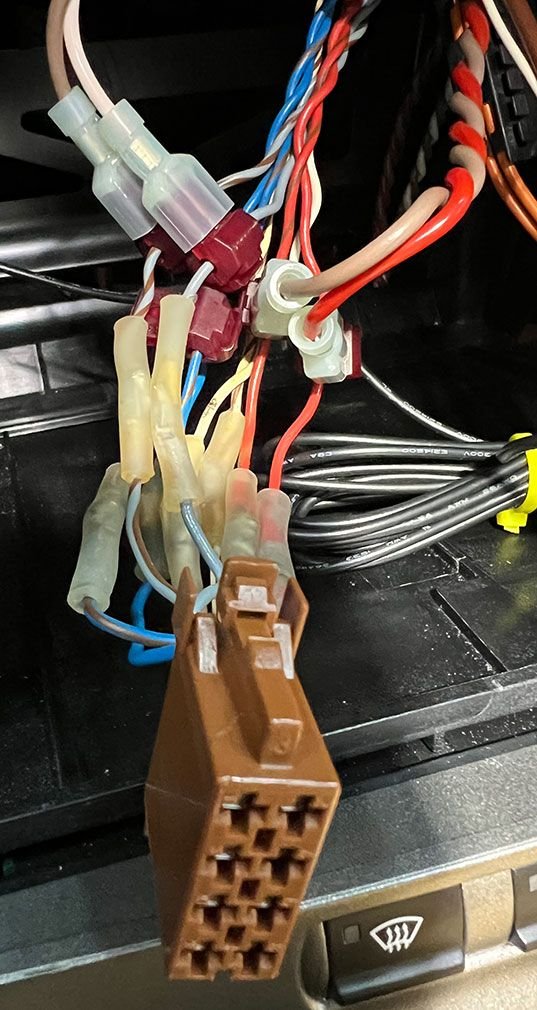
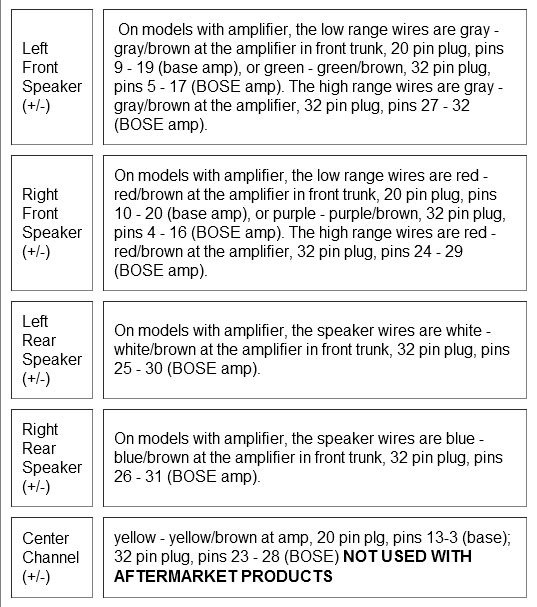
Yes - it's connected to the PCM speaker line out which is the brown plug. Can see here the wires tapped are the front right (red and red/brown) and front left (gray and gray/brown):
Found this helpful wire reference:
Source of this speaker line info is from this vendor: https://cai-store.com/pages/c2-snap-in-amplifier-installation
Also for clarification to all - none of this a concern or applicable to anyone just updating a fully stock system (Bose or non-Bose). My car is a non-Bose but had the stock amp replaced with aftermarket amp using a line out converter.
First of all, there are no cams to turn or screws to take out. You have to remove the side panels (again), and if you have the Bose system and a cab, the subwoofer (again). Then you press in the four silver clips on the end nearest the front of the unit. These clips are actually spring-loaded levers, so the closer to the end behind the front of the unit, the more leverage you have and the (slightly) easier it is. The top left one must be done almost entirely by feel as it is up high enough to be almost out of sight.
Obviously, you cannot press and hold all four levers/clips in at the same time, so I worked one side loose and pulled it out past the locking point, then went over to release the other side the same way. I found it easier to start on the left (harder) side first, then carefully release the right (easier) side. Some creative verbal persuasion is useful here, so don't hold back. It's definitely fiddly. My left index finger was a little sore for a while after.
Like everything else in life, once you've successfully done it, it's easier, making you wonder why you found it so difficult the first time. But it is difficult the first time.
Don't forget to protect your console with a heavy towel or blanket so you have a place to land the unit after it is out. I put my car in second gear (i.e., pulled back and in gear) and take off my parking brake first, then I lay a doubled-up packing blanket over everything. From then on, no worries.
Just got back in town and finally got my PCCM+ unit out. The four lever/clips should be activated by the hex nut but the set on the PCCM+ is much more delicate than the set in the original PCM. The original PCM hex locking mechanism has a more solid quarter turn functionality. The PCCM+ hex locking mechanism is easily bent out of alignment and the two screws holding down the hex bolt can easily be screwed out of sync. Somehow the top right clip was pulled out to the point where I couldn't push it back in without some force. I finally got it loose by bending one of flimsy brackets in and bending it back once I removed the PCCM+ unit. So my tip for the hex lever/clip locks is to first make sure they can be easily manually pushed in before putting the PCCM+ all the way in. Do not use the hex bolt at all.
Once I got the PCCM+ unit freed from the four brackets, I ran into another obstacle. I didn't tape down the MOST adapter box which then acted as another theft deterrent. I had to use a bar to push the MOST adapted box down to finally free the PCCM+ unit. That's my second tip, tape the MOST adapter box down!
My other problem was that the canbus connection. I ended up unplugging and plugging back each adapter to the car and got it to properly connect to finally get the button lights, temp and trip working. Once I got it working, I carefully inserted the PCCM+ unit again. Naturally the canbus connection somehow got lost again. Just like you said, I was able to release the PCCM+ from the four clips within seconds. I unplugged and replugged the connections again and the second time it stay connected.
I still need to get the FM/AM antenna connected. I read through what I have found online and still don't know how to do it.
Yes - it's connected to the PCM speaker line out which is the brown plug. Can see here the wires tapped are the front right (red and red/brown) and front left (gray and gray/brown):
Found this helpful wire reference:
Source of this speaker line info is from this vendor: https://cai-store.com/pages/c2-snap-in-amplifier-installation
Also for clarification to all - none of this a concern or applicable to anyone just updating a fully stock system (Bose or non-Bose). My car is a non-Bose but had the stock amp replaced with aftermarket amp using a line out converter.
Just got back in town and finally got my PCCM+ unit out. The four lever/clips should be activated by the hex nut but the set on the PCCM+ is much more delicate than the set in the original PCM. The original PCM hex locking mechanism has a more solid quarter turn functionality. The PCCM+ hex locking mechanism is easily bent out of alignment and the two screws holding down the hex bolt can easily be screwed out of sync. Somehow the top right clip was pulled out to the point where I couldn't push it back in without some force. I finally got it loose by bending one of flimsy brackets in and bending it back once I removed the PCCM+ unit. So my tip for the hex lever/clip locks is to first make sure they can be easily manually pushed in before putting the PCCM+ all the way in. Do not use the hex bolt at all.
Once I got the PCCM+ unit freed from the four brackets, I ran into another obstacle. I didn't tape down the MOST adapter box which then acted as another theft deterrent. I had to use a bar to push the MOST adapted box down to finally free the PCCM+ unit. That's my second tip, tape the MOST adapter box down!
My other problem was that the canbus connection. I ended up unplugging and plugging back each adapter to the car and got it to properly connect to finally get the button lights, temp and trip working. Once I got it working, I carefully inserted the PCCM+ unit again. Naturally the canbus connection somehow got lost again. Just like you said, I was able to release the PCCM+ from the four clips within seconds. I unplugged and replugged the connections again and the second time it stay connected.
I still need to get the FM/AM antenna connected. I read through what I have found online and still don't know how to do it.
Funny we have the opposite opinion here - I think it's significantly improved with the new design on the locking mechanism. I struggled with the prior plastic ones making sure I didn't turn it too far (which I did). The new design is straight forward, turn the hex nut to the right to tighten them down to bring in the retainer arms and it cleanly collapses them to allow it to easily remove. Maybe you were turning the hex the wrong way? The only negative from the old is you need to turn it more revolutions than just the 180 degrees like before - but it seems fool proof to me to screw up. I've removed it a couple times playing around with it. Take a look at post #943 from 964hans as an image reference - may help.
Regarding your antenna - take a look at post #704 from Biggiglypanda - that set me straight and may be what you're missing. The antenna connections for the back of the PCCM+ are straight forward, but you may have missed this needed step.
I think one of my clips were faulty or bent to begin with. I was really careful assembling and inserting the unit. When I went to try to remove the PCCM+ I was expecting the same crisp start stop points when turning the hex bolt. The one that was stuck was harder to turn. I may have mangled the other clips trying remove them with my fingers. The unit fits really snug in there as is. Anyone else trying to use theirs should see how the hex bolt works before sliding their PCCM+ unit all the way in.
Thank you for sharing where the antenna post is. This thread is getting really long with everyones tips. From post 704 it looks like I needed to pull back the carpet more. I was expecting to see those antenna wires by just removing the side panel.
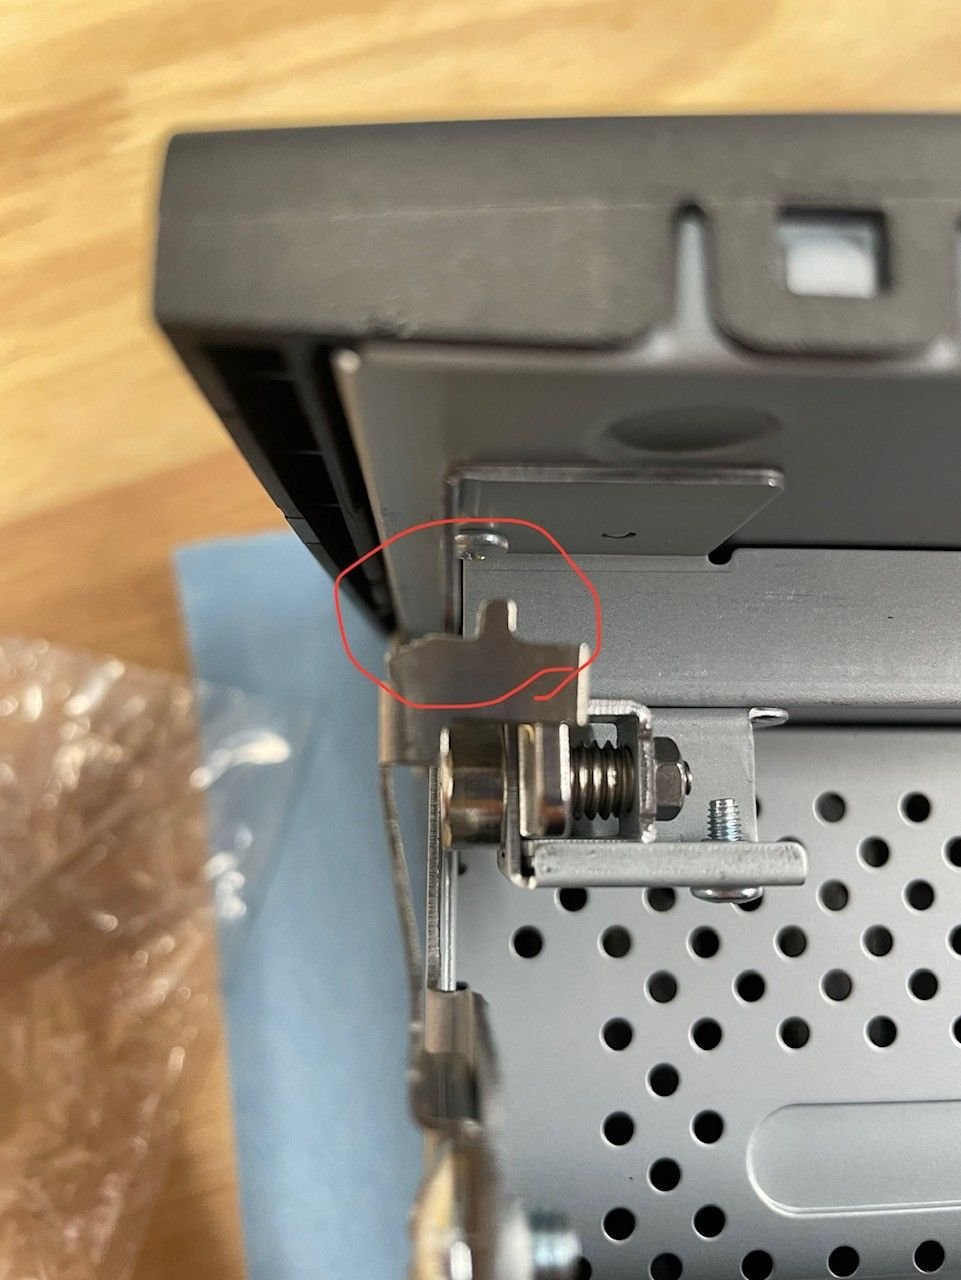
Actually, one minor thing came up last night while I was assembling the brackets and the tray. That is, make sure that the little fingers circled below are on the inside of the metal tab that is screwed to the backside of the front of the unit. If you've ever taken your factory PCM out, these are the metal sliders that click into place and keep the unit snug in the frame. If you go to put on the brackets from the side of the PCCM+ (like I accidentally did on the other side), those fingers will be on the outside of the tab and will not allow you to slide it into place. I'm glad I caught that last night before I actually started the install on my car, as it would have been frustrating to have to unplug everything to figure out why it wasn't sliding into place.
Wish I read this before I installed my PCCM+ unit. This is exactly what happened to my top right bracket. It would not push in so I could remove it. I finally used a short screwdriver to force it in which only bent the bracket screwed into the front of PCCM+ shown in the part of the photo circled in red which I bent back into place. To me there are too many small pieces in the bracket assembly that can go out of alignment. Before inserting the PCCM+ unit, I would carefully use the hex bolts to move the brackets into the down position. I'd just rely on the one screw on the right you need to screw down anyways to place the right side panel back in.
>>> EDIT: Before someone inserts their PCCM+ in their console, can you please confirm if the hex bolt can push the lock bracket into the unlock position with an allen wrench like you can in the original PCM unit? From the picture above, it looks like you can't. It looks like it only acts to block the lock from opening, not actually pushing it to the unlock position.
Woohoo! This post helped me complete my PCCM+ install. Fortunately I didn't have to remove the the PCCM+ unit back out to install the antenna loop. Just needed to remove one torx screw by the power outlet on the right side. The heavy carpet is held down by two Velcro pieces.
Woohoo! This post helped me complete my PCCM+ install. Fortunately I didn't have to remove the the PCCM+ unit back out to install the antenna loop. Just needed to remove one torx screw by the power outlet on the right side. The heavy carpet is held down by two Velcro pieces.
Just a comment for those owning LH-drive Cabriolets with Bose systems -- this area shown in the above post is in the passenger footwell just past the far end of the subwoofer. You have to remove the subwoofer first, then you can have access to this area.
For those looking for a US source for the PCCM+, Gaudin in Las Vegas has it in stock and has the SD Nav Card in stock as well. I purchased both yesterday and they shipped same day via Fed Ex to me in TX. They're down to 2 units per their website.
I bought the SD Nav Card before seeing the issue about maps.
Any word from Porsche Grapevine/Porsche Classic on the maps issue (I saw 2 members from TX who said they escalated)? When I get mine installed I will also reach back out to Gaudin--will kind of suck that the GPS will not work around or to Texas or any other state after NY alphabetically.
Thanks for that info. I tried two other browsers, then finally was able to get to the manual using a VPN connection. Could be that the manuals are regionally blocked, at least that's the way it seems. I'm in USA...
Can you please post them somewhere? I'm a Mac person who doesn't have a VPN to make it work and they won't open in either Safari or Chrome on my Mac. Thanks in advance.
Thanks fritzcurtis. The PCCM+ should arrive Friday but I likely won't have a chance to install it until after Valentine's day. Hope you're surviving in Dallas. I'm out in NE TX about 80 miles east of Texarkana, and I see DFW got the worst of it. Glad the weather was this week--I will be at the Springsteen concert on 2/10 and crossed my fingers every day since I bought the tickets, that the roads would not be snowy/icy. Looks like next week is all clear.
Thanks fritzcurtis. The PCCM+ should arrive Friday but I likely won't have a chance to install it until after Valentine's day. Hope you're surviving in Dallas. I'm out in NE TX about 80 miles east of Texarkana, and I see DFW got the worst of it. Glad the weather was this week--I will be at the Springsteen concert on 2/10 and crossed my fingers every day since I bought the tickets, that the roads would not be snowy/icy. Looks like next week is all clear.


 01-31-2023 | 02:14 PM