What did you do to your 996TT today?
 04-11-2016, 02:09 PM
#2431
Three Wheelin'
Supplies:
-factory headlight removal tool
-dishwashing soap
-sponge
-spray bottle with water
-paper towels
-blue painters tape
-bucket for water
-UV/heat resistant clearcoat
-sanding equipment-- sandpapers and sanding block/sanding sponges/sanding cloth
*****this sanding method doesn't have to be exact. it depends on the condition of your lens, if its not too bad there is no need to use really gritty paper.. the goal is to use the least harsh method possible.. the harsher you go, the harder it is to restore) --- I used 400 grit for my 1st pass, 800 for my 2nd pass, 1200 for my 3rd, 2000 for my 4th and 3000 for my 5th.. Perhaps I could have gotten away with less sanding, but I wanted to be as close to perfection as possible and with any body work or paint application, your prep surface is what is going to determine your finished look. You have to make the judgement call on this.
1) remove front storage compartment lining and plug over headlight removal bolt, use factory supplied tool to unlock headlight and lift from its slot.
2) use dishwashing soap and water to give the headlamp a thorough cleaning, then rinse it all off. You want as close to zero debris and contaminents on the surface when you start.
3) you can either remove the chrome washer nozzle cover, or tape it off with blue painter's tape. I taped mine off by cutting it to fit and tucking the edges under. I used 2 layers of tape just in case the sanding scratched through the first layer. I also taped the first layer horizontally and the second vertically, to help prevent clearcoat overspray from seeping through just in case it went on too heavy.
4) Take your harshest grit sandpaper and soak it in water for a minute or two, spray the headlight down with water, and start sanding using the sanding block to apply even pressure. Don't bear down, let the grit do the work not your muscles. Sand smoothly and evenly and in one direction (ie- all horizontal strokes or all vertical strokes) back and forth across the entire lens. Spray the lens frequently and either spray your sandpaper off or dunk it in your water bucket to clean it. Keep it wet, you do not want it to dry out. You'll start to see milky/colored particles in the water as you sand, this is what you want. Keep sanding it until you have an even/consistent frosted look. Keep sanding until the imperfections start to disappear... If there are imperfections that aren't coming out, you may need to go to a harsher grit, you have to be the judge. When you think it looks good, clean the headlight off with water to get rid of any debris that may have gotten on it or particles from sanding that weren't removed. You may need to go back and start sanding again if you have any imperfections. Look at it from different angles, hold it up to the light at eye level, move it around to try and make things catch the light. This is the longest step and most important. Sometimes it is hard and takes a while to sand all the way through the old/discolored coating. This is your base, if you don't get any imperfections off of the lens in this step, it won't be 100% gone in your finished product.
***quick note about direction of sanding.. I plan out what grit I will be using before I start and make sure that when I make my final sanding pass with the least gritty paper, that it will be a pass using horizontal motion to finish with.. This isn't necessary and I have no evidence to prove this is better, but it's something my grandfather told me 20+ years ago and it always worked well lol.
5) Take your one step less harsh grit (ie- you start with 400, now go to 800) and start sanding. If you were sanding horizontally before, now you go vertically. Sand until you cannot see any more scratches going the direction of the previous sanding passes. Shouldn't take too long to make them all disappear if you didnt use too much pressure. When it is a uniform frosted appearance again, time to go to next paper.
6) Sand in the other direction this time. Going for the same thing. Get rid of all of the evidence that it was sanded in a different direction. Uniform appearance. Repeat this process swapping directions and grits until you have reached your final grit. You will notice that the lamp starts to look more clear/polished with each change in grit. I always try to make my final grit be a horizontal pass. Make sure the tape over the chrome nozzle cover is still there if you did not remove the nozzle cover.
7) After the final pass, rinse the lens thoroughly with water ***but do NOT dry it!!! Let it air dry!!! Dont let anything touch the lens!! It can take a while, I fanned it with a magazine then used my wife's handheld hair dryer to finish it up. Make sure it is 100% dry, no spec of moisture.
8) When it is completely dry, you are ready to clearcoat. Follow the instructions for your specific clearcoat to prepare the paint. Here is why I like to end horizontally: I was taught to paint in the same direction that you finished sanding.. Whether or not it actually makes a difference or if it is just an old man's tale that I follow, it has always worked well for me.. It is easier to paint this type of part horizontally than vertically. If you haven't sprayed clear coat before or painted before, test it out on something to get an idea of how it will lay and how the spray comes out. I have an old fender that I practice body work on, since it is clearcoat I guess you could realistically spray anything that you dont mind becoming glossy. Whenever you are ready, put a layer on the headlight. Your paint may vary, the particular paint I used recommends the first layer to be light, the 2nd layer a little heavier, and 3rd layer will be the heaviest you will use. Any layers after 3rd layer would need to match it. I put a pretty light but consistent layer across the entire lens, make sure you cover all of the visible surface without over-doing it.
9) When your first layer is done, follow the recommended guidelines for your second layer. Mine was to apply 2nd layer after 10-15 minutes. I did that, painting in the same direction as the 1st layer. I painted all of my layers in the same direction
10) Apply 3rd layer per your guidelines. I ended at 3 layers. I let my assembly dry on the bench overnight and on the next morning I removed tape from the chrome cover and reinstalled it reverse order as removal. I waited 5 days and cleaned them up and added a coat of polish/paint protectant.
It's really easy. It just is more nerve-wracking than anything knowing you are taking sandpaper to a pretty pricy headlamp.
Sorry for the length.
 04-11-2016, 10:26 PM
#2435

 04-12-2016, 01:56 AM
#2436
Burning Brakes
(I've noticed some people don't follow links, so here's the story again)
You are seeing correctly, but its a replacement cluster. My original, pulled at 47K miles or so* was giving error messages on the oil level - which wasn't fixed with a new sender. As a last resort, I bought a cluster with 996 (yes) miles showing and no error messages. Still have the old cluster with over-rev & miles to date. Hoping to find a recovery service. So I can move the PROM info to the new cluster.
* fully documented by my shop
04-12-2016, 10:09 AM
#2437
Instructor
Join Date: Jul 2009
Location: Hartsdale, NY (Westchestah)
Posts: 237
Likes: 0
Received 1 Like
on
1 Post
Was able to sneak into the garage and install a normal throw 997 shifter.
Honestly, it's kind of alarming how different and how much better it feels. At $240 for a factory part that you use every single time you get in the car, it's a no-brainer (I know I'm not the first to do this but just to reinforce).
Honestly, it's kind of alarming how different and how much better it feels. At $240 for a factory part that you use every single time you get in the car, it's a no-brainer (I know I'm not the first to do this but just to reinforce).
04-12-2016, 11:25 AM
#2438
Three Wheelin'
Send me the highest resolution photos you can manage (really good cell phone photos should be fine) ckjustice at gmail.com from up close to the lens and a few different angles of the area you are referring to, or post in here if you would like. Mine looked faded on the inside, but they came out ok. I can let you know if it was similar to what I dealt with.
 04-12-2016, 12:08 PM
#2440
Burning Brakes
04-12-2016, 01:26 PM
#2441
Former Vendor

(I've noticed some people don't follow links, so here's the story again)
You are seeing correctly, but its a replacement cluster. My original, pulled at 47K miles or so* was giving error messages on the oil level - which wasn't fixed with a new sender. As a last resort, I bought a cluster with 996 (yes) miles showing and no error messages. Still have the old cluster with over-rev & miles to date. Hoping to find a recovery service. So I can move the PROM info to the new cluster.
* fully documented by my shop
You are seeing correctly, but its a replacement cluster. My original, pulled at 47K miles or so* was giving error messages on the oil level - which wasn't fixed with a new sender. As a last resort, I bought a cluster with 996 (yes) miles showing and no error messages. Still have the old cluster with over-rev & miles to date. Hoping to find a recovery service. So I can move the PROM info to the new cluster.
* fully documented by my shop
04-12-2016, 10:39 PM
#2442
Send me the highest resolution photos you can manage (really good cell phone photos should be fine) ckjustice at gmail.com from up close to the lens and a few different angles of the area you are referring to, or post in here if you would like. Mine looked faded on the inside, but they came out ok. I can let you know if it was similar to what I dealt with.
yeah will do just as soon as I can. cheers!
04-17-2016, 09:59 PM
#2443
Instructor
installed my GMG adjustable ARB's today with the OE drop links at OE ride height as the 1st step moving to coil overs. no project pics as we were in a hurry to get out to run hwy 25 south of Hollister before the noon hour. after the install we lowered the car down from the lift and readied for out drive.
we did take a moment to recreate a shot from spring of 2001 of my pops' 1st vette and my 1st 911 in red.. picture of a picture
then our recreation today with his 2nd vette and my second 911 in black....
we did take a moment to recreate a shot from spring of 2001 of my pops' 1st vette and my 1st 911 in red.. picture of a picture
then our recreation today with his 2nd vette and my second 911 in black....
04-17-2016, 10:47 PM
#2444
I installed my new Bilstein B8 struts with H&R springs, new top mounts, and new strut bearings. Love it so far. Great upgrade from stock.

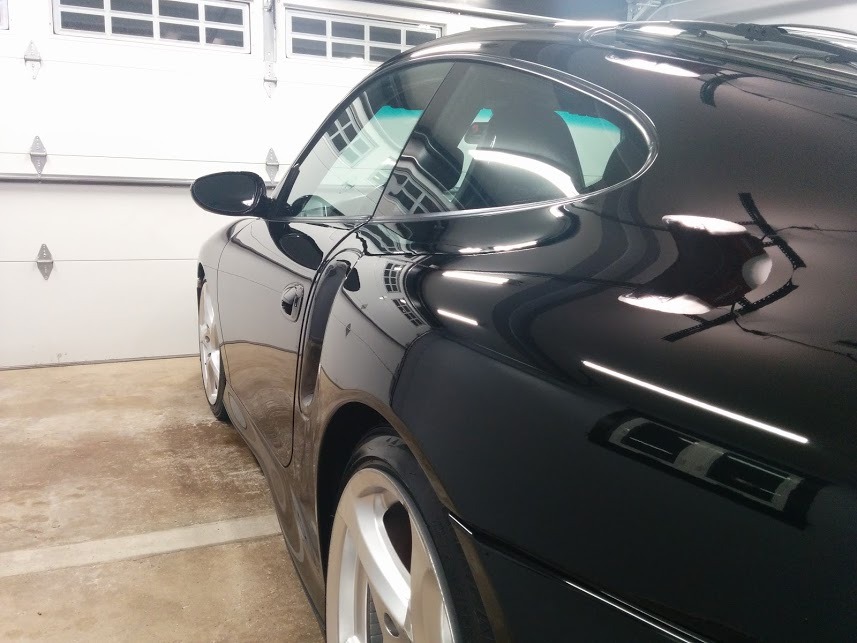
To celebrate my new suspension, i finished polishing and waxing the turbo as well:
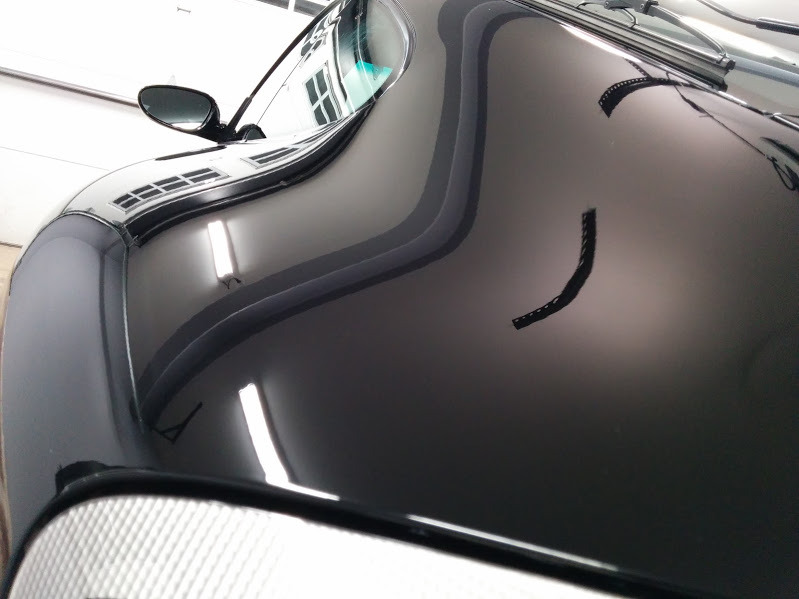
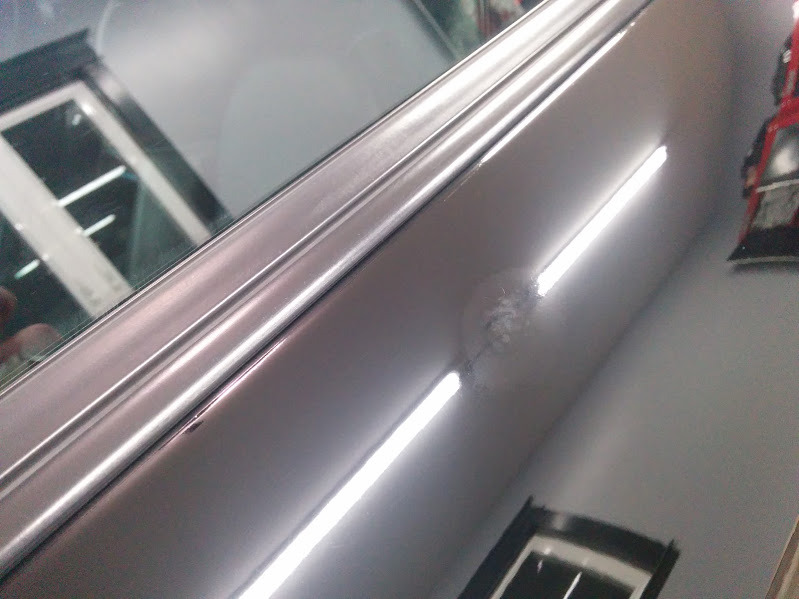
Unfortunately, I discovered the hard way that someone sanded through the clear in this spot. I made things much worse by thinking it was an imperfection in the clear

To celebrate my new suspension, i finished polishing and waxing the turbo as well:


Unfortunately, I discovered the hard way that someone sanded through the clear in this spot. I made things much worse by thinking it was an imperfection in the clear
