When you click on links to various merchants on this site and make a purchase, this can result in this site earning a commission. Affiliate programs and affiliations include, but are not limited to, the eBay Partner Network.
have you noticed any difference? with the BMC over stock?
.....
Originally Posted by DC911S
Installed BMC air filters today. Dropped a torx socket bit that went under the airbox and had to use a coat hanger to fish it out. Its a tight work space to get the airbox cover off. Not much room to get the screws out.
Twas a gorgeous day in Dallas. So, I went to work early. Got everything done that I needed to lickety split. Then went driving the Porsche, stopped by Boardwalk Ferrari in Plano. The FXX-K (not my pic) was on display. Impressive piece of machinery. Looks like a space ship more than a car.
T
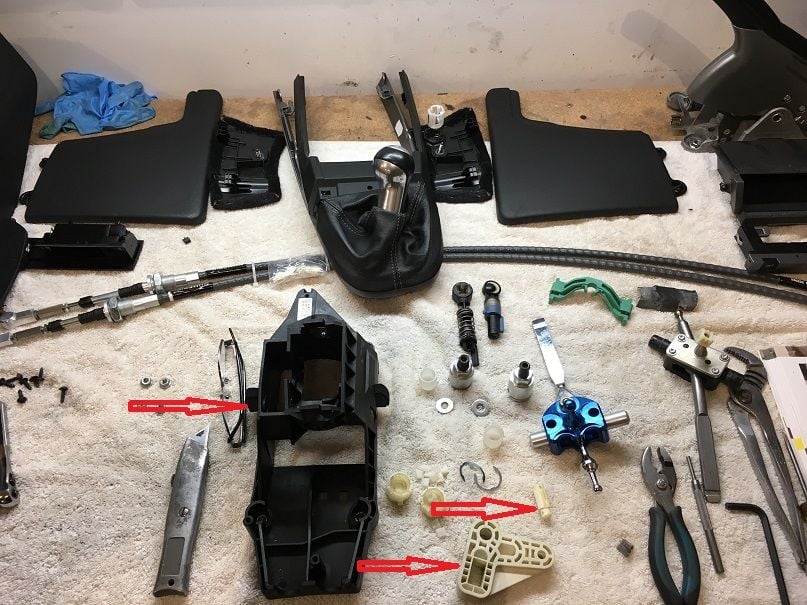
Installing my B&M "knock off" SSK and Numeric cables today. Doing some shimming/tightening of the shift linkage at the lever as well to tighten up the overall feel.
Everything went great! I ended up modifying the reverse linkage lever to take up the play in the cradle by drilling through the plastic pin and installing a bolt and nylock nut. Pic added below for clarity. Zero play whatsoever in the shifter now. As for the cheap $44 Ebay "knock off" shifter I'm nothing but impressed. It's a very well made billet aluminum body with adjustable delrin bushings. Coupled with the Numeric cables the shifting is night and day! Smooth as butter, right amount of throw reduction (25%ish) and perfect ergo's.
One interesting and noteworthy add when re-installing the original rubber boot that shrouds the cables as they pass through the body. The access is not good from underneath. Solution: slightly trim the "bell shape" that resides on the outside and install it from inside the car. Small amount of lube goes a long way here...
i'm a bit lost here...nothing new unfortunately....
but where does the bolt go through? can you show another pic, thanks,
Originally Posted by German888
Everything went great! I ended up modifying the reverse linkage lever to take up the play it had in the cradle by drilling through the plastic pin and installing a bolt and nylock nut. Pic added below for clarity. Zero play whatsoever in the shifter now. As for the cheap $44 Ebay "knock off" shifter I'm nothing but impressed. It's a very well made billet aluminum body with adjustable delrin bushings. Coupled with the Numeric cables the shifting is night and day! Smooth as butter, right amount of throw reduction (25%ish) and perfect ergo's.
One interesting and noteworthy add when re-installing the original rubber boot that shrouds the cables as they pass through the body. The access is not good from underneath. Solution: slightly trim the "bell shape" that resides on the outside and install it from inside the car. Small amount of lube goes a long way here...
but where does the bolt go through? can you show another pic, thanks,
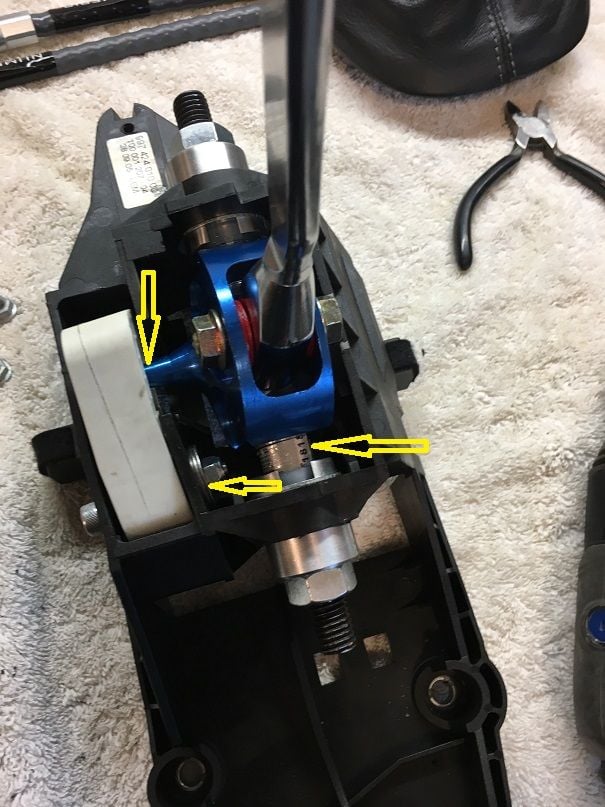
Your lucky day! I realized I snapped this pic with my phone just prior to installing it. Really wishing I would have taken more time to photo document this whole process but if anyone has any questions feel free to PM me.
Arrow points out the bolt location as well as the 2 small washers on the "nut end" to shroud the plastic pin "retainer prongs". It's necessary to space the prongs so as to not compress the pin. As installed I'm only applying pressure on the black plastic frame which has the effect of taking out the play. It's also necessary to drill approx. 2mm through the pin itself since the hole only goes through to the prongs where it's solid for 2mm.
Another arrow points out shim stock which wasn't really necessary but I added to remove a nats *ss amount of play I could feel between the delrin cup and almuminum bushing. Most if not all the play gets removed when you adjust the cups but I'm a bit ****.
Last arrow up top points to the ball end which interfaces with the reverse linkage. Just want to point out this is a major area of play in the stock setup and fortunately the ball end from the el cheapo ssk kit fits this opening with a zero tolerance fit. Something I considered to be more luck than anything else. I fully expected to be welding on a bead and then machine down to achieve the fit I was hoping for.
Keep thinking of tid bits to add. When cutting out the original bushings I found a super easy method that won't have you hacking up the frame itself. I saw one post where a guy's frame came out looking like it was passed through a meat grinder!
Take a utility knife and press firmly down "parallel to the frame" on the edge of each prong not biting off more that 1-2mm and the whole prong will literally break off cleanly. It surprised me how easily each prong broke. Was expecting to be hacking away for an hour and it ended up taking 2-3 minutes to have both out cleanly and without a scratch to the frame. You can rotate the bushing to keep your work centered up top as you go but keep in mind there is a raised "locator" key in the bore. When you rotate the original bushing you'll feel the bushing overcoming the key. What I noticed here was the bushing material is more sacrificial than the bore material so little or no damage to the key occurred. Got lucky...
I should probably do a DIY. Sorry if this is derailing the thread... Not my intention.
One more note. The aluminum bushings did not in my case fit the bore of the OE cage worth a damn. Good news is they were to big which is way better than to small. I chucked mine into a drill press by extending the adjusting bolt way out which will leave you plenty of room to grab. Work slowly with 220 emery cloth or sandpaper and mic or test fit it frequently to the bore opening. Once your within .02mm you'll have a sweet tolerance fit. If you don't have a drill press you could use a standard drill or simply lock the bushing into a vice via the nut and use an emery strip and a shoe shine technique....
Lot's of added little tasks but the whole process start to finish took me 2-3 hours tops.
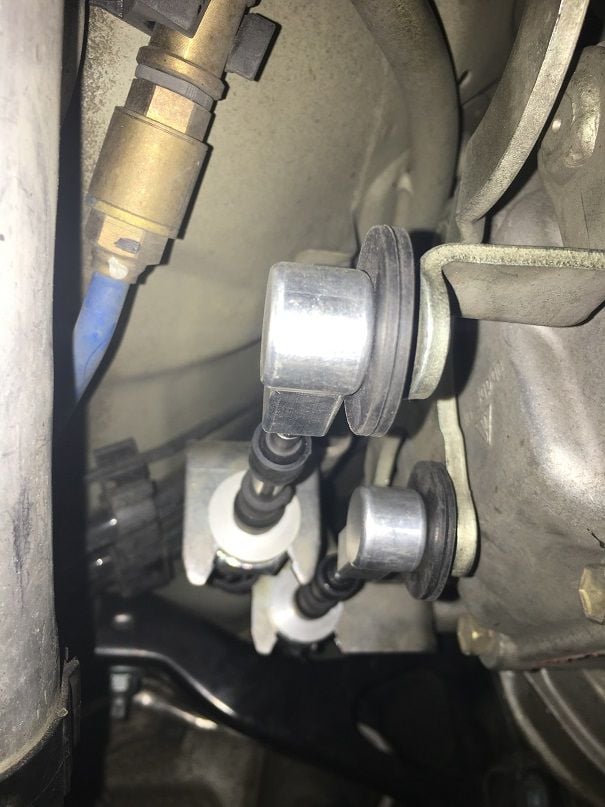
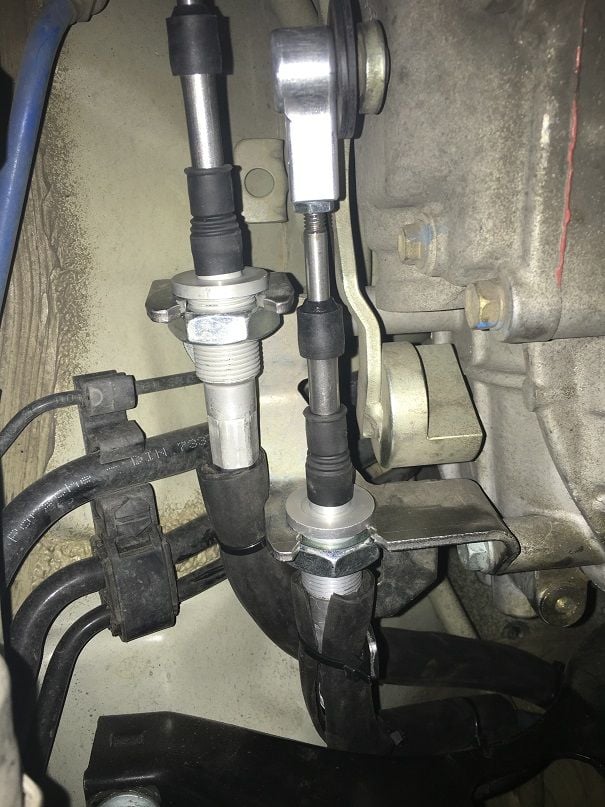
Couple more pics of the Numeric cables at the gearbox end. Notice the use of rubber washers between the ball & socket. Supposedly a noise issue if you do not have them installed. They were not apart of the OE assembly on my car but sourced them from the local hardware store. My dealer claimed they were no longer available to order. A fellow Rennlister was very helpful and supplied the dimensions of his OE washers for reference. Re-used the fluted rubber sleeves from the OE cables with zip ty's. Another noise suppressing exercise...
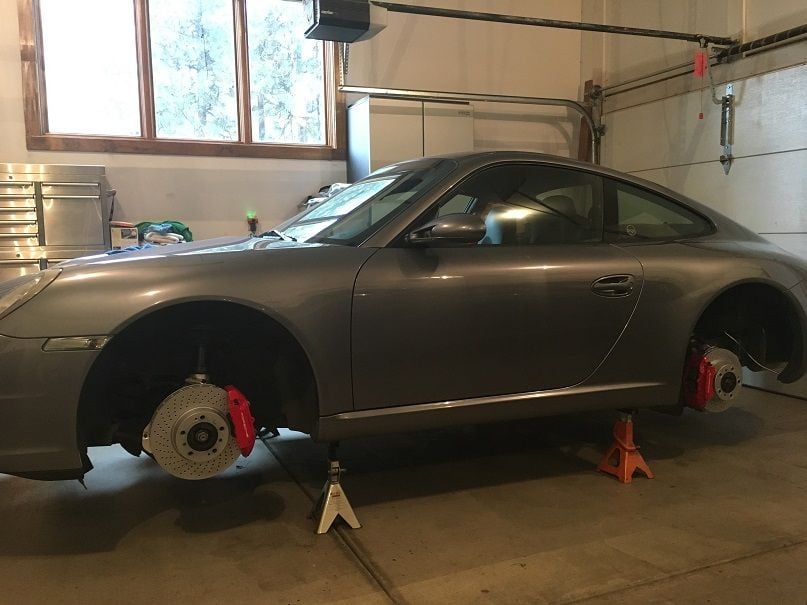
Pic of the car on stands as I performed the work. I heard it mentioned that replacing the cables without a lift was not advised. Other than not working on your back I see no other advantage to doing this mod on a lift.
IMHO I would give 50% of the improved feel to the cables. The Numeric cables are so much more robust than OE. They resist flexing forces much more and have a proper termination at both ends. Not even close in quality and function.
My air filters were pretty dirty and needed changed. Feels like it's breathing better with the BMG filters and a bit more revy. Cruised at 120 for a bit and it wanted to do more.
I noticed the passenger seat in my 997.1 was a little loose. I was able to rock it front/back about a 1/4". It bothered me and I'm OCD, so I unbolted the seat to take a look. I pulled the long plastic trim piece off (raise the seat all the way and remove 3 small torx screws - 1 is visible from the outside, 2 are from the inside). I randomly checked this bolt and it was loose (T-30 if I recall). Tightened it up and voila, no more loose seat.

 11-16-2016, 06:51 PM