When you click on links to various merchants on this site and make a purchase, this can result in this site earning a commission. Affiliate programs and affiliations include, but are not limited to, the eBay Partner Network.
The original GPS antenna is under the front hood near the airfilter on the right hand side. I decided to put mine also under the fornt hood as this gives better reception than just placing it under the dash. There is a reason Porsche put it there. So, open the battery cover. Remove the battery. Somewhere near the battery, about where the steering wheel is, you will find a round 2-3" rubber seal. You can also feel this from the inside, a bit above of the accelerator. I removed it, cut it, and ran the GPS antenna cable and one USB cable (USB-A) through it. Near the battery under the plastic cover there is some space, where you can place the GPS mouse facing forward right onto the metal. You will see it. The mouse comes with adhesive tape. The USB cable I am using to attach a 4G modem to, which I attached to the plastic cover using dual sided adhesive foam tape. This way I can access my SIM card anytime and do not need the nasty teathering in my iPhone. The HU will see this 4G dongle either as Ethernet Adapter or if the dongle can open a WIFI cell and route between WIFE/4G you can also Wifi connect.
Last point: The unit comes with 5 USB ports. You will need to have access to some of these for updates from a USB stick, playing files, etc. My setting was:
USBA -> 4G
USBB -> DAB+ reciever
USB1 -> available
USB2 -> available
USB 5V -> available, just power source
What I did, I like it clean... :-)
I got myself a used CD-BOX (997.552.663.00) in the bay. I removed the CD trays. Just open the trays, and then you will need to push down two little plastic pins, which stop the tray from being pushed out alltogether by the springs. I cut a rectangular hole into the back of the CD box using a Dremel tool (you have that in the US?). I ran the USB wires from the HU near the glove box, again, use textile tape and find places to either lock the cables into existing cable guides or attach them with ziplockers to existing harness. Near the glove box I used like 10-12" USB extension cables. I run the plugs of these extension cables through the hole in the CD box, and connected the other side to the USB ports of the HU harness. By doing this, it will be easy to just disconnect the USB extensions, kn case the glove box needs to be removed one day.
I again attached the USB ports in the CD box with dual sided foam tape. The CD box can be easily unscrewed with two torx screws. 1 minute job. Nice clean look and USB access behind glove box cover. You may want to put the USB plugs a bit into the CD-box (to the back), so you have enough space to close the glove box with a USB stick attached to it.
Tools required:
Set of Torx screwdrivers - TX20,TX25,TX30
Set of metric wrenches
Allen Key set with rounded head (to remove the cup holer unit)
Textile adhesive tape
Soft foam
Cable Zips
Box cutter
Adhesive soft foam tape
The original GPS antenna is under the front hood near the airfilter on the right hand side. I decided to put mine also under the fornt hood as this gives better reception than just placing it under the dash. There is a reason Porsche put it there. So, open the battery cover. Remove the battery. Somewhere near the battery, about where the steering wheel is, you will find a round 2-3" rubber seal. You can also feel this from the inside, a bit above of the accelerator. I removed it, cut it, and ran the GPS antenna cable and one USB cable (USB-A) through it. Near the battery under the plastic cover there is some space, where you can place the GPS mouse facing forward right onto the metal. You will see it. The mouse comes with adhesive tape. The USB cable I am using to attach a 4G modem to, which I attached to the plastic cover using dual sided adhesive foam tape. This way I can access my SIM card anytime and do not need the nasty teathering in my iPhone. The HU will see this 4G dongle either as Ethernet Adapter or if the dongle can open a WIFI cell and route between WIFE/4G you can also Wifi connect.
Last point: The unit comes with 5 USB ports. You will need to have access to some of these for updates from a USB stick, playing files, etc. My setting was:
USBA -> 4G
USBB -> DAB+ reciever
USB1 -> available
USB2 -> available
USB 5V -> available, just power source
What I did, I like it clean... :-)
I got myself a used CD-BOX 997.552.663.00. I removed the CD trays. Just open the trays, and then you will need to push down two little plastic pins, which stop the tray from being pushed out alltogether by the springs. I cut a rectangular hole into the back of the CD box using a high speed cutting tool. I ran the USB wires from the HU near the glove box, again, use textile tape and find places to either lock the cables into existing cable guides or attach them with ziplockers to existing harness. Near the glove box I used like 10-12" USB extension cables. I run the plugs of these extension cables through the hole in the CD box, and connected the other side to the USB ports of the HU harness. By doing this, it will be easy to just disconnect the USB extensions, in case the glove box needs to be removed one day. I again attached the USB ports in the CD box with dual sided foam tape. The CD box can be easily unscrewed with two torx screws. 1 minute job. Nice clean look and USB access behind glove box cover. You may want to put the USB plugs a bit into the CD-box (to the back), so you have enough space to close the glove box with a USB stick attached to it.
Tools required:
Set of Torx screwdrivers - TX20,TX25,TX30
Set of metric wrenches
Allen Key set with rounded head (to remove the cup holer unit)
Textile adhesive tape
Soft foam
Cable Zips
Box cutter
Adhesive soft foam tape
Again, next post needs to be reviewed by moderators (are they doing it?) Mine didn't get released and I am probably not a spammer at face value. At least I saved the text for later.
The harness is plug 'n' play. Your link is just an adapter. If you have diversity there is no way in Porsche to make use of it unless you have a PCM as it is fully proprietary. You cannot make this work with an adaptor. Antenna Diversity Control Unit and Radio need to be designed to work with each other. That said, it may still just work (Without diversity) if you just plug the supplied Antenna adaptor into the Antenna Fakra connector coming from the diversity unit and leave the curry coloured Fakra plug just lying around. However, the 997s without PCM system came without diversity from the factory, so it is not a major drawback and the diversity control unit may just fallback to one Antenna if the curry Fakra diversity remains unconnected.
Best is, if someone who just connected the OEM antenna Fakra with supplied adapter comments if FM still is ok. I took the route of new antenna amplifier because I wanted DAB+ as well. (DAB+ is digital radio in Euopre, but delivered terrestrial other than XM which is satellite)
With regards to GPS Antenna, USB ports and microfone you will need to do some installation.
For the MOST adaptor you need to unpin the FX cables from the Quadlock plug, remove the plastic cap of the plug of the new MOST unit and pin the FX cables into the plug. Takes 10 seconds. You will see this, when you have the harness in the car and compare plugs.
It seems you have a 997 facelift S convertible. Same as I have. So I can confirm everything works if done correctly.
my post above answers exactly everything with photos the exact options specific to this exact unit. i even took the time to update the post re what to and not to get if in north america vs EU.
Originally Posted by mjposner
Apparently whats app won't work with China. I sent a chat request to the store.
I assume I need the head unit, and the most adapter. Is that it? Plug n Play or extra wiring?
for us North american guys , skip DAB... not used here. and the fakra antenna + oem FM antenna works.
Originally Posted by bleedingedge
The harness is plug 'n' play. Your link is just an adapter. If you have diversity there is no way in Porsche to make use of it unless you have a PCM as it is fully proprietary. You cannot make this work with an adaptor. Antenna Diversity Control Unit and Radio need to be designed to work with each other. That said, it may still just work (Without diversity) if you just plug the supplied Antenna adaptor into the Antenna Fakra connector coming from the diversity unit and leave the curry coloured Fakra plug just lying around. However, the 997s without PCM system came without diversity from the factory, so it is not a major drawback and the diversity control unit may just fallback to one Antenna if the curry Fakra diversity remains unconnected.
Best is, if someone who just connected the OEM antenna Fakra with supplied adapter comments if FM still is ok. I took the route of new antenna amplifier because I wanted DAB+ as well. (DAB+ is digital radio in Euopre, but delivered terrestrial other than XM which is satellite)
With regards to GPS Antenna, USB ports and microfone you will need to do some installation.
For the MOST adaptor you need to unpin the FX cables from the Quadlock plug, remove the plastic cap of the plug of the new MOST unit and pin the FX cables into the plug. Takes 10 seconds. You will see this, when you have the harness in the car and compare plugs.
It seems you have a 997 facelift S convertible. Same as I have. So I can confirm everything works if done correctly.
The original GPS antenna is under the front hood near the airfilter on the right hand side. I decided to put mine also under the fronthood as this gives better reception than just placing it under the dash. There is a reason Porsche put it there. So, open the battery cover. Remove the battery. Somewhere near the battery, about where the steering wheel is, you will find a round 2-3" rubber seal. You can also feel this from the inside, a bit above of the accelerator. I removed it, cut it, and ran the GPS antenna cable and one USB cable (USB-A) through it. Near the battery under the plastic cover there is some space, where you can place the GPS mouse facing forward right onto the metal. You will see it. The mouse comes with adhesive tape. The USB cable I am using to attach a 4G modem to, which I attached to the plastic cover using dual sided adhesive foam tape. This way I can access my SIM card anytime and do not need the nasty teathering in my iPhone. The HU will see this 4G dongle either as Ethernet Adapter or if the dongle can open a WIFI cell and route between WIFE/4G you can also Wifi connect.
Last point: The unit comes with 5 USB ports. You will need to have access to some of these for updates from a USB stick, playing files, etc. My setting was:
USBA -> 4G
USBB -> DAB+ reciever
USB1 -> available
USB2 -> available
USB 5V -> available, just power source
What I did, I like it clean... :-)
I got myself a used CD-BOX 997.552.663.00. I removed the CD trays. Just open the trays, and then you will need to push down two little plastic pins, which stop the tray from being pushed out alltogether by the springs. I cut a rectangular hole into the back of the CD box using a high speed cutting tool. I ran the USB wires from the HU near the glove box, again, use textile tape and find places to either lock the cables into existing cable guides or attach them with ziplockers to existing harness. Near the glove box I used like 10-12" USB extension cables. I run the plugs of these extension cables through the hole in the CD box, and connected the other side to the USB ports of the HU harness. By doing this, it will be easy to just disconnect the USB extensions, in case the glove box needs to be removed one day. I again attached the USB ports in the CD box with dual sided foam tape. The CD box can be easily unscrewed with two torx screws. 1 minute job. Nice clean look and USB access behind glove box cover. You may want to put the USB plugs a bit into the CD-box (to the back), so you have enough space to close the glove box with a USB stick attached to it.
Tools required:
Set of Torx screwdrivers - TX20,TX25,TX30
Set of metric wrenches
Allen Key set with rounded head (to remove the cup holer unit)
Textile adhesive tape
Soft foam
Cable Zips
Box cutter
Adhesive soft foam tape
yes re Sirius XM - but i am guessing due to licensing issues in NA, the DAB unit wont work here - and there is no Sirius XM available for these types of china decks.
re the fakra adapter + antenna I am reading mixed reports re the quality - i will definitely test throughly upon my install and chat with you.
Also add your self to the Facebook 997 modification retrofit group there is a huge thread there i started with many of us around the world buying this exact specific 2020 owTowsin unit, and providing insight there re installation and other insight.
Originally Posted by bleedingedge
Yes, aware that DAB is not used in the US. You guys have Sirius XM :-)
Technically I'd expect the OEM windshield antenna cannot be that great as you loose diversity. I just spent an hour or so to sneak this antenna (dipol) https://www.arsshop.de/wohnmobilante...it-verstaerker behind the front bumper. Didn't want to remove the bumper, as this is significant work. So i just removed the bumper screws inside the trunk and pushed the cable into the slot between the car body and the plastic bumper.
I should know more tomorrow. Will spend some time to test DAB and FM with this antenna vs OEM windshield without diversity for FM.
I requested to join the FB group.
[EDIT] Now the moderators approved all my posting tries at once...bit of doubleposts now... not my fault :-)
would you mind taking a few photos here and there every once in a while?
i am going to pm you - and look for u not he fb 997 retroFit forum
thank you for all your help thus far
Originally Posted by bleedingedge
Technically I'd expect the OEM windshield antenna cannot be that great as you loose diversity. I just spent an hour or so to sneak this antenna (dipol) https://www.arsshop.de/wohnmobilante...it-verstaerker behind the front bumper. Didn't want to remove the bumper, as this is significant work. So i just removed the bumper screws inside the trunk and pushed the cable into the slot between the car body and the plastic bumper.
I should know more tomorrow. Will spend some time to test DAB and FM with this antenna vs OEM windshield without diversity for FM.
I requested to join the FB group.
[EDIT] Now the moderators approved all my posting tries at once...bit of doubleposts now... not my fault :-)
Hello, I have a big problem with Bluetooth pairing.. anyone has struggled with this? it is just not working properly. The first time I turned on the h unit it basically took 2 minutes to get wireless CarPlay to work and it was flawless, but after that, every time i go back into the car and insert the key (which turns on the unit) the Bluetooth connection does not work. It says paired but it never connects. Even from the phone it will eventually say connected after clicking on the Bluetooth device for the HU but in the head unit it will not go into connected and nothing Bluetooth dependent will work. Any ideas? Erasing all data and resetting will get it to work again until hu is turned off. Then Bluetooth will no longer connect. I’ve done the fester 4 times and every time I have the same issue.
On other news...
Railing for mounting seem to be correct on the 997.2 unsure if I will need any additional retaining brackets but it seems not.
Most box (fiber optic to rca) works but fader is lost as the box has only 1 left and 1 right audio output. If u decide to install this unit make sure you center your fading before removing you old unit
Reverse signal works perfect for the rear view camera although I have not found any time delay setup (ideally you want to leave the reverse view a few seconds extra after shifting out of park) I might use a timer relay for that
Volume control is not an issue with a USB volume control from eBay
The optional obd2 diagnostics does not seem to work. After Bluetooth pairing (which will not reconnect when the unit is turned off) the unit is recognize by the torque software but it will not connect to the cars computer
are you on stock firmware? Or are you using a modded one?
I am using HAL9k and there is an app called bluetooth. Try pairing there. Delete all relevant pairings from your phone first.
I am not having the issue at all with BT, although on HAL9k my zlink stopped working.
My ELM OBD btw shows the same symptoms on HAL9k. I can connect to the bluetooth adapter, but torque does non connect to the ECU. Tried an iPhone Wifi based OBD dongle on my 911 this one connects to the ECU and reads data.
I was under the impression before I moved to the modded ROM torque pro worked but not enirely sure.
You may want to backup your stock rom (so you can go back) and try a modded rom, and see if your issue is hard- or software related.
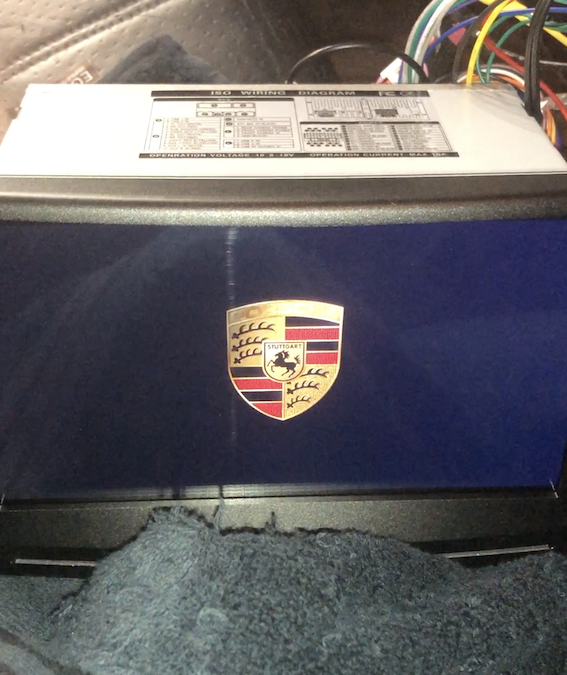
I purchased one of these from AliExpress and thought I would share my experience. I ordered the following, and had to pay shipping (�25) and UK import duty (�30) on top:
So I ordered the base unit + BOSE MOST Converter + DAB (Digital Radio in Europe) + Wireless Apple CarPlay + Internal tyre pressure monitors
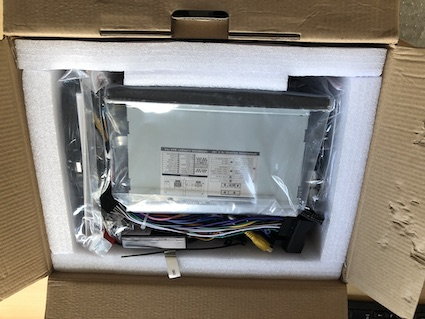
It arrived, packaged well, and with a bunch of wires.
The short version is that if you don't have BOSE this is absolutely plug and play, except you need to fix it in the car - see below.
Wiring I had to do:
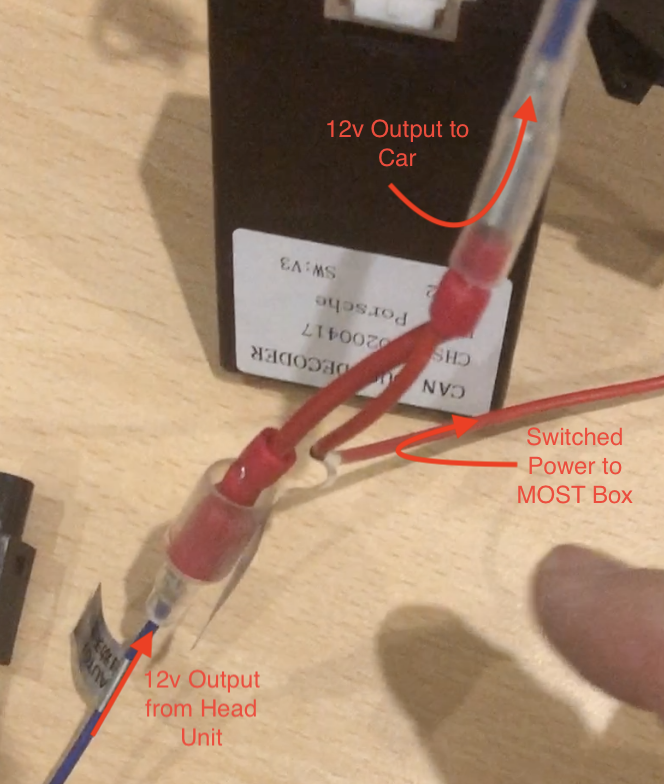
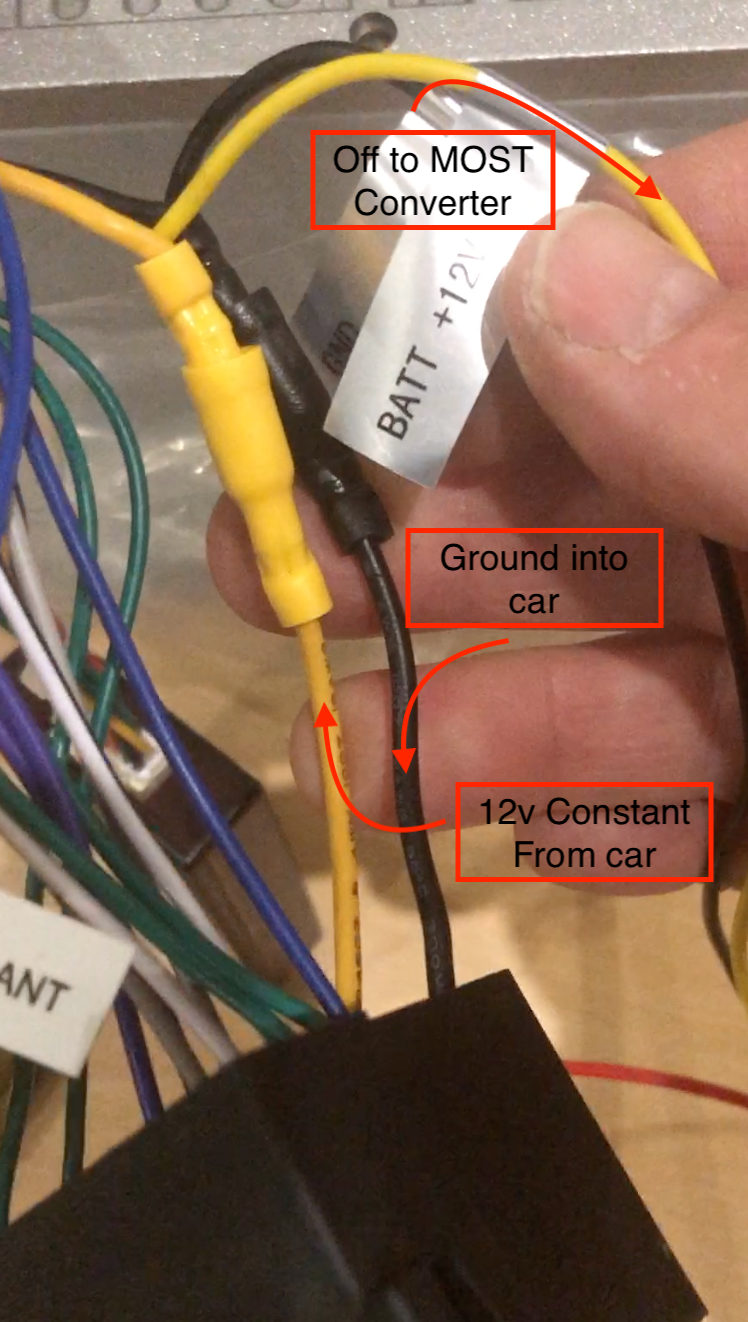
The MOST converter needs constant (yellow) and switched power (red), and earth (black). I took these from the harness provided:
Constant and earth I spliced into the same on the provided Harness
Switched I took out of the Head Unit power out (I had to splice this but since it was a bullet connector I simply made up a two-into-one bullet 'Y'
No Porsche wires were harmed in the making of this film, as they say
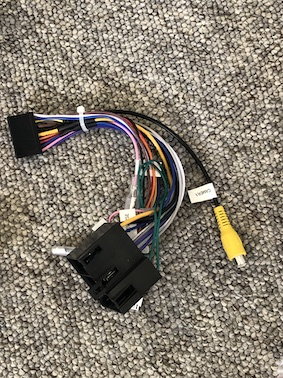
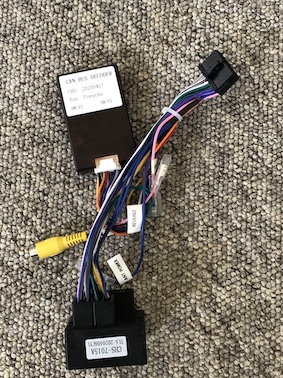
Nothing else needed wiring. It really was Plug and Play. Below is the PCM 2.1 harness as supplied:
And the PCM 3 harness as supplied (of no use to me except for the CANBUS unit which unplugs from here and plugs into the other harness):
The Head Unit:
Comes with full pin descriptions, in English, should you wish to rewire it:
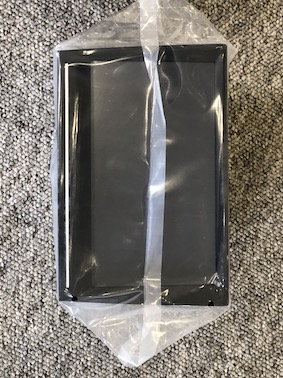
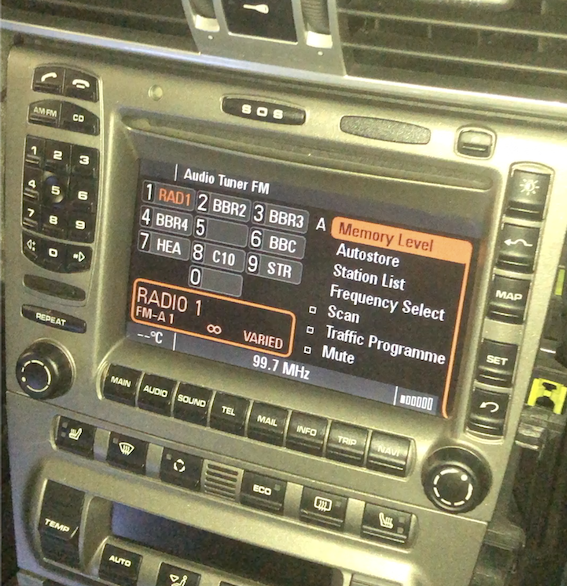
The front is very plain - no buttons, nothing:
The unit is black so I have yet to solve the issue of colour matching it to my volcano / anthracite / other grey - I can confirm the Connects2 facia is nowhere near. But I can also confirm that the head unit facia unscrews so for the brave you might swap it over - but note it appears to hold on the display and something else - so not sure swapping it over would be very easy anyway. At some stage a can of spray paint will come into effect but I am still mulling that one over.
The Rear of the unit has a power connector and an 'everything else' series of connectors. These are all different sizes so you cannot get them mixed up.
It comes with 5 (count them) USB ports - I used 2 for the tyre pressure system and the Digital Radio and am trying to think of what to do with the other 3.
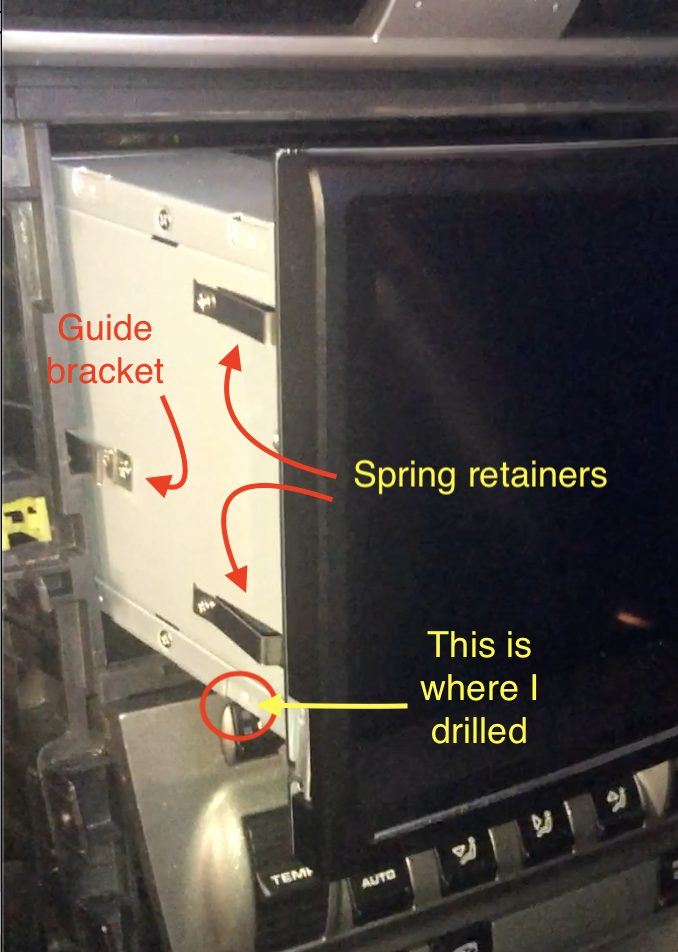
So far, so good. The unit even fits perfectly BUT...
The retainers do not.
On the side there is a metal bracket that slides perfectly down the channels in my cubby. So far, so good.
There are 4 spring-loaded retainers, designed (I guess) to fit the corresponding retainers for Porsche. They do not.
I spent a long time thinking about this and even started taking the unit apart but then chickened out.
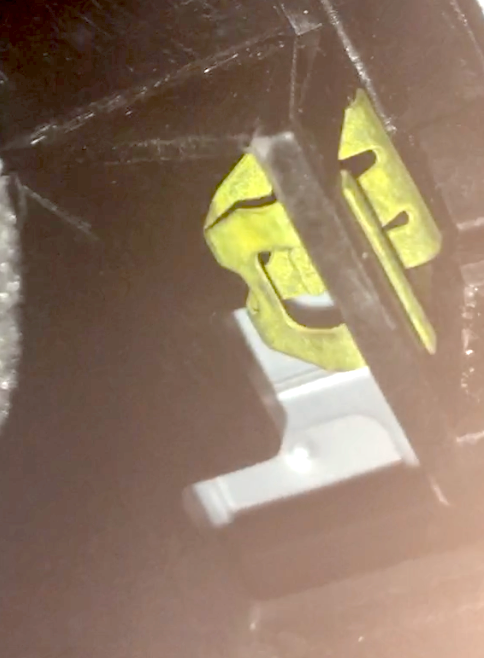
Eventually I drilled, very carefully, a hole through the circled mark on each side and, using a screw and washer, used this to hold the unit. On the Porsche side the screw goes through an existing gap in the cage so again, no damage or change to the car. Unfortunately I do not have a great photo of this but this is what I do have for the left side:
And so I switched on the unit... to be met with this as a boot screen:
The unit powered up into a simple but effective car launcher with loads of apps pre-installed including YouTube, Google Maps, iGo maps, Play Store, Radio, TV... it goes on. In fact you can download anything you want from the Google Playstore.
The steering wheel volume, mute, change screen and phone buttons work out of the box. The other wheel I have not yet learnt to program but there is a function to do so in the menu. Watch this space.
I also installed digital radio and put the aerial behind me in the rear passenger window. Crystal clear.
The mic I routed to be next to the stock microphone on the steering wheel binnacle. Works well.
There is loads of space behind the cubby hole in the central transmission to drop wires etc into.
I drilled a hole into the glove box (only noticeable damage I did to the car) and have 3 USB sockets there.
In summary:
Good Bits:
The base Unit is a fraction of the price of even the harnesses needed to replace with a modern unit. Add on what you want but go nuts, in my opinion.
You do not need to spec a sound balancer - its in the software (this is an option on AliExpress so ignore it)
If you don't have BOSE it truly is plug and play and, indeed, you would do well to get the plugs in the wrong place - it is pretty much idiot-proof
I reckon I could put the base unit into a car in less than an hour, including panels, fitting etc - and I am not an auto electrician.
The sound is excellent - I have no feedback, or whine (tried to set original unit vol at c.75% before pulling the key but its a complete guess)
It fits the slot perfectly and looks very modern
Apple CarPlay is fantastic
Its better than my wife's 2011 Cayenne (PCM3.1, with Digital Radio) by a mile - except she has a TV module the kids love. But I have YouTube...
You can download any wallpaper you want and indeed a range of Car Launchers that make it look less like a tablet and more like a normal car stereo
Bad bits:
Its black, if you have a Gen 1 - if you have a Gen 2 you are in the money.
Fixing it took a lot of thought but actually once I committed to the holes, was really easy - a lot easier than getting the old one out
I am not a native Android user so I am not sure I really have the knack of it - I'll get better with time
Apple CarPlay doesn't always connect but that might be because I keep messing with the WiFi at home, downloading software. Again, there's something I don't understand I hope
It does not automatically connect to my home WiFi (possibly something to do with CarPlay, or a setting I haven't found)
Overall I am more than happy with it - I am bloody ecstatic. I have gone from this:

 05-14-2020, 11:59 PM