When you click on links to various merchants on this site and make a purchase, this can result in this site earning a commission. Affiliate programs and affiliations include, but are not limited to, the eBay Partner Network.
7) Yea I think you�re overthinking this. I spent about 20 hours total on my install. Looking back at it now, the only thing I had to do was connect all the cables that it came with to the back of the unit. Then cut the harness that wasn�t meant for my car. Crimp the MOST box onto the three respective wires. Check for continuity on those three wires to make sure the crimp is good. Check for the power wire on the HU�s harness that it is connected to an ignition power and not constant. Slap it back in and call it a day. If I were to do it all over again, I would have had it all done in 2 hours or less. Doesn�t help that Heregoes units don�t really come with instructions or troubleshooting steps.
So you�re saying that from factory Heregoes units are pinned wrong? And that what should be ignition power is pinned to constant power?
Not gonna lie. I’ve got the pre-**** fascia Owtosin PX6 and, though the ***** are a tad ostentatious on the newer ones, seeing those of y’all with them makes me a little envious. Kinda wish there was a retrofit **** and button fascia kit.
I hear you but they would never do that; and you can damage the unit. I damaged one of mine screwing around.
While I didnt mind having no *****/buttons as i have MF steering wheel, the newer design does look and work much better (as it should).
Also the silly, nipple ***** dont look nearly as a bad on a black 997.2 center stack such as your car.
Originally Posted by scadams
Possibly stupid question. I’ve got the OwTosin PX6. I had an issue today where it hung and wouldn’t turn off/sleep. Like I had the car off and locked and it was still on. All it needed was a simple reboot to resolve the issue but for the life of me I couldn’t find anywhere in the settings to perform such a simple operation.
I had to disconnect the battery to shut it off. After that it came on and works fine.
So, does anyone know how I can reboot this thing when necessary without disconnecting the battery?
Sorry to jump on this topic, but it is associated, but I have the opposite problem….. my installation has resulted in the volume being TOO LOUD even at the lowest setting.
Any ideas folks?
Do you have Sound Package Plus in your car?
if so you will need the Hi-Lo adapter, it's an analog bypass adapter that outputs directly from the RCA outputs.
I believe someone that I troubledShooted here on this thread made their own.
So you�re saying that from factory Heregoes units are pinned wrong? And that what should be ignition power is pinned to constant power?
It was pinned wrong for my car. I don�t know what car you have. Initially the HU would not turn off even after I have locked my car and walked away from it. Then I did what the guy on YouTube did a few post back and took the multimeter to find the wire that loses power after taking the keys out. I have a time stamp on his vid. Then I repinned it to that wire and now it turns off.
@MattDevoCustoms - you've done such a kicka$$ job on helping everyone here with these units. THANK YOU brother!
@Einsteiny - for a clean, flicker free install, where both cam power + can gnd are connected (i know that some ppl dont connect the cam GND), my method is
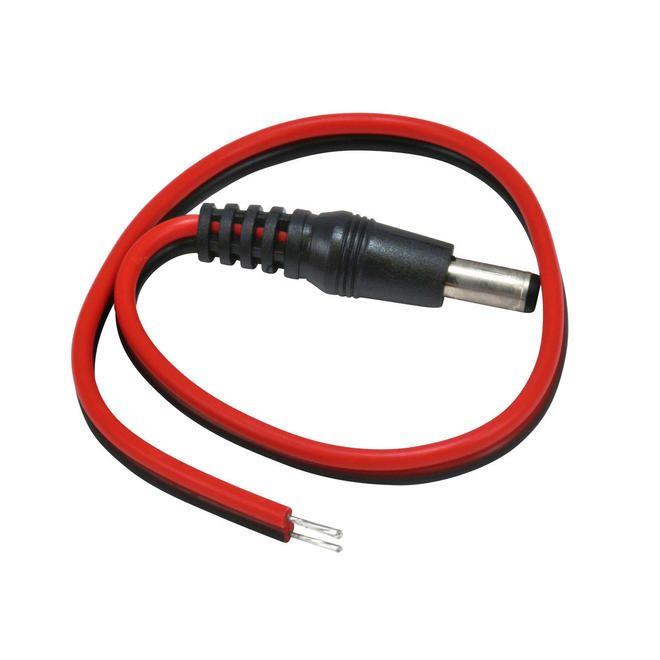
1) dc extender cable - plugs directly into the camera itself. Route this cable from the back of the car alongside the RCA video cable. There is no extra work involved here. The camera's DC output can plug into this extender cable. The method is the same for the front camera.
2) dc pigtail cable - plugs directly into the dc extender above on one end, and the other end splices directly into the android UNIT 6-pin camera harness camPWR + camGND.
Now the camera is fully powered and grounded by the head unit. You can turn on both front and rear cameras via the F-cam app (quallComm units) - i know the 16 pin more cost-effective units may have a cam app (rockcam?). You can now turn on the front camera from my steering wheel or from the headunit button. It's VERY useful when parking, approaching ramps, curbs etc.
Avoid splicing the the camera gnd into the tail light harnesses thick ground wire - in my experience this gives flicker in the camera.
Let the head unit power + gnd the cameras FULLY.
As for the reverse trigger - the reverse signal (black with blue stripe cable in the tail light harness/underDriversSeat/main kick panel) is to be fed into the head units reverse trigger (pink cable in either the main harness of the 6 pin cam harness).
To save time, I wound't bother getting the reverse trigger from the kick panel (some 2005 cars like mine they use a diff damned color for this despite the schematics) nor from the drivers seat. Skip both as its added unnecessary work.
Since we have to pop off the tail light to route the video camera cable + the DC extender cable, the least and most direct way is to steal this reverse trigger from the tail light harness. It's the smallest stack of wires and will be found the fastest and easiest.
For you auto guys or 997.2 MT guys (you lucky bastards), you don't even have to bother with the reverse trigger step at all - the canbus module (always buy this) correctly detects reverse trigger and sends the signal directly to the pink reverse trigger cable in the main harness of the android unit.
The reverse trigger step is only for .1 MT owners
i have enclosed photos of the DC extender + pigtail cables (some cameras may come with the pigtails already).
I'll be back to report on the newest iteration 8/256gb Qualcomm of these units in about a month. This should be top of the line hardware for this sort of thing (from what I've been told).
Also, people have been asking me privately if I will design another faceplate. The answer is maybe; as I would do things much differently based on this first experience.
But I still say DON'T WAIT. This faceplate is pretty good even though not exactly designed to my original specs.
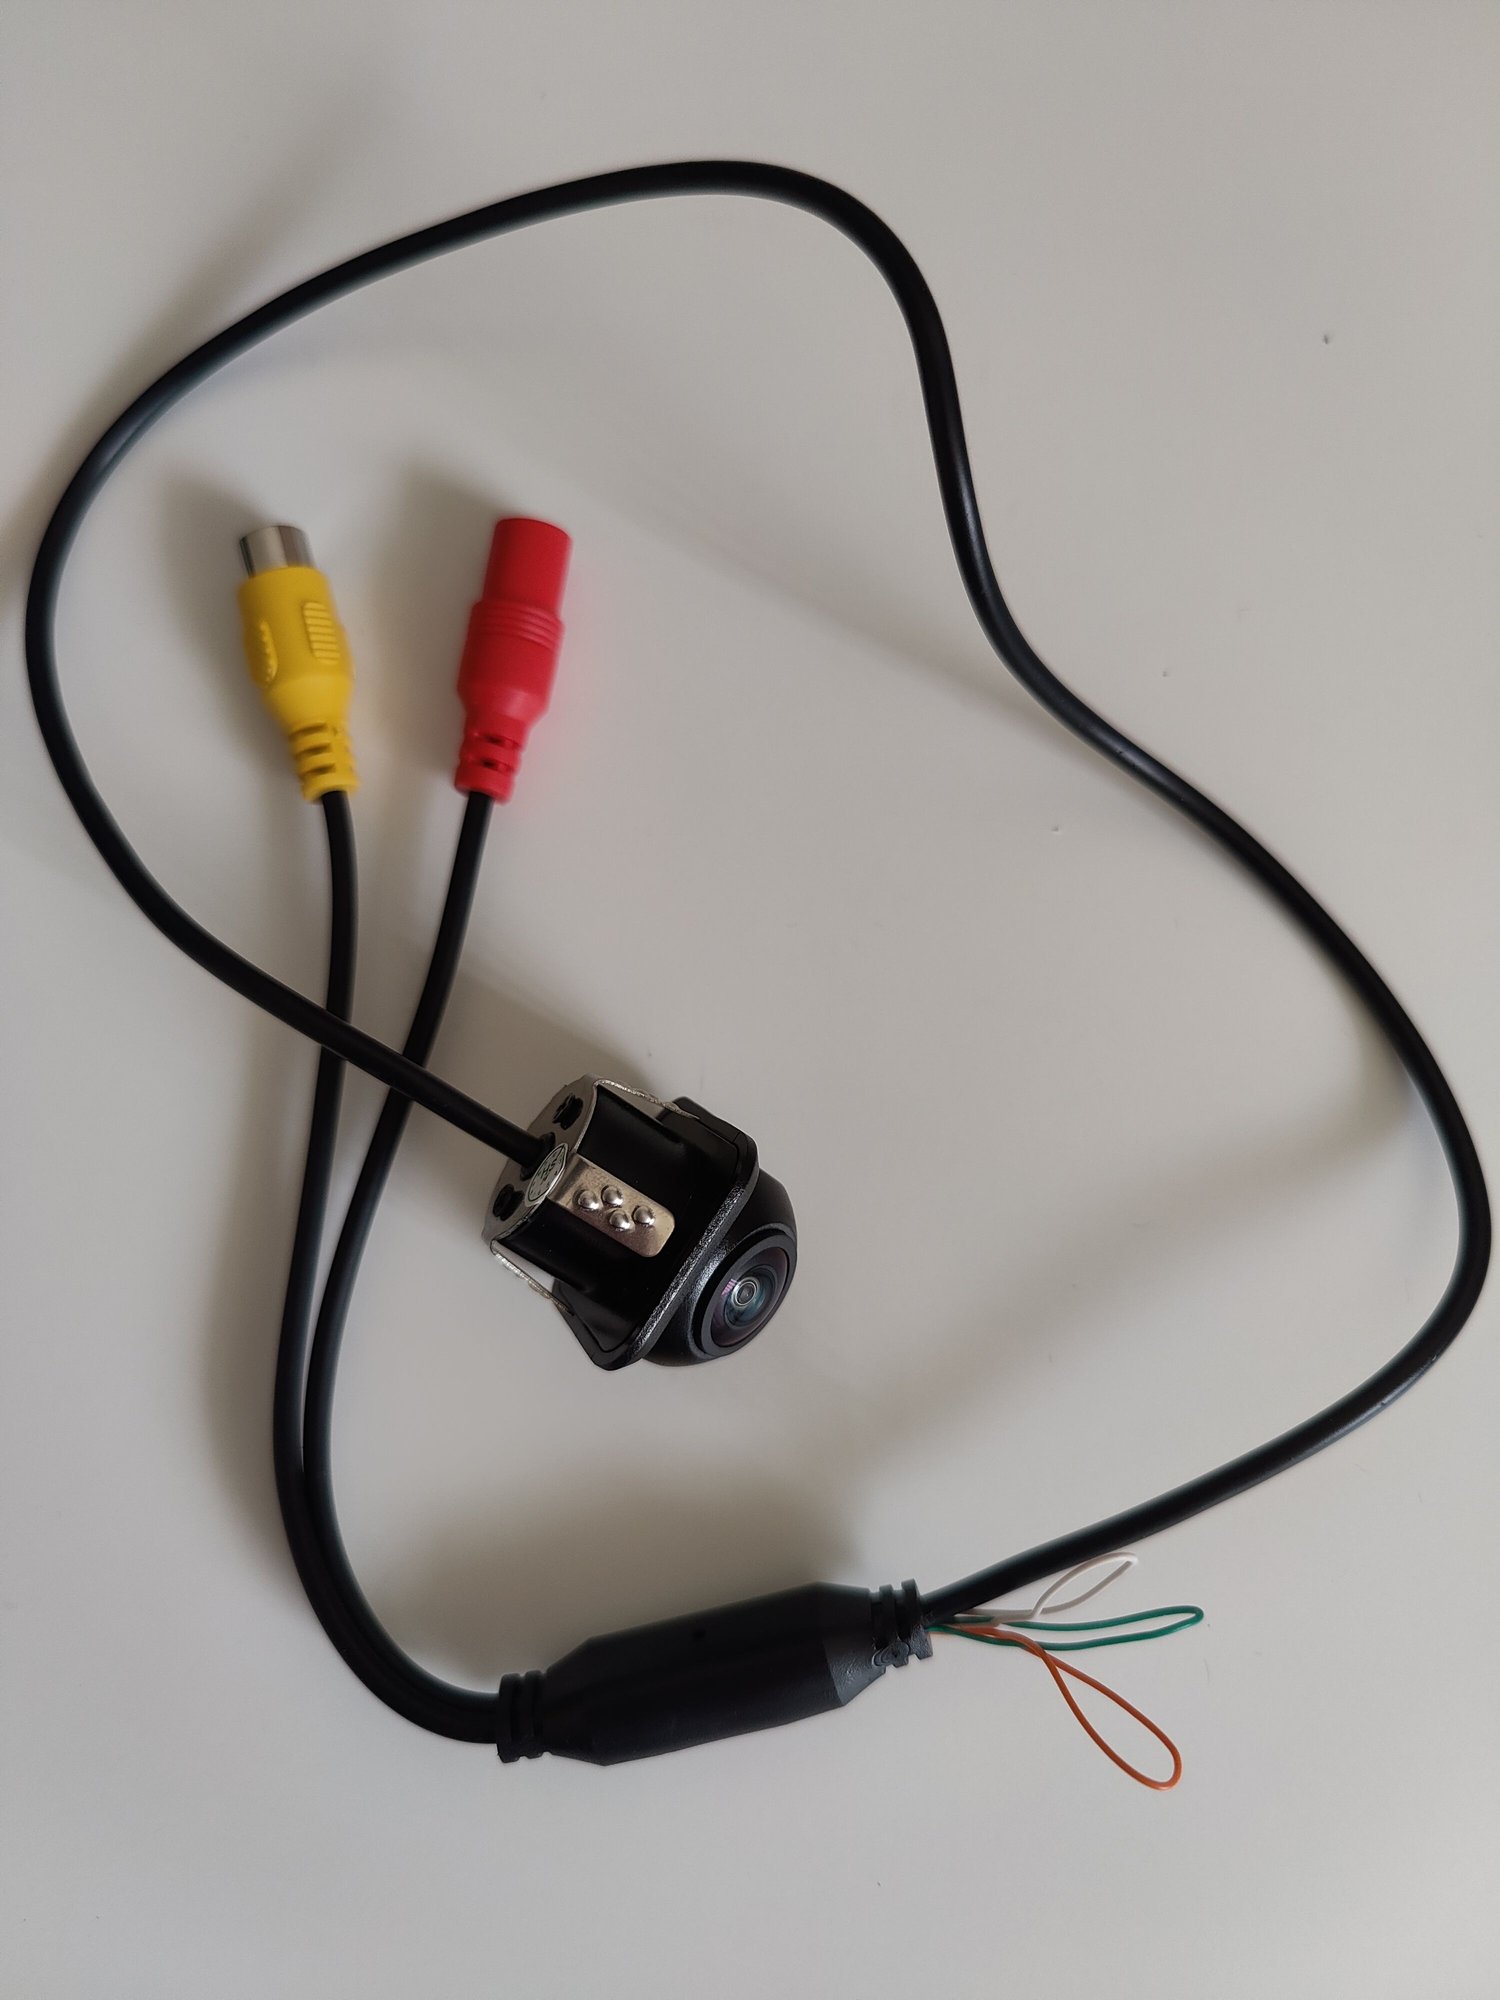
one final thing - some people have been asking me re cameras themselves - specifically the camera cable colors to set from AHD, mirror, reverse lines. The cameras should come with its instructions. Personally i disable the lines coming out from the cameras, leave in AHD (high defintion mode), and depending on if your using the camera as a front of rear camera, in reverse mode the camera will need to be MIRRORED (so cut / don't cut the wires accordingly)... and TEST all of this before mounting and drilling.
Good luck.
Originally Posted by Einsteiny
Thanks Matt for your quick reply which makes sense. Should have mentioned I'm installing an Aliexpress Android Unit. I've since scoured YT videos and found one which explains Michael's suggestion.
I'm planning to run a single 18 gauge wire with the video RCA/piggy back convenience wire. At the HU 18 gauge will connect to the HU CAM +12v output, RCA to rear cam IN and the piggy back to reverse trigger (pink).
Down the back, 18 gauge will connect to cam power, RCA to CAM RCA and convenience wire to tail light reverse wire (Blue/Black) in tail light harness. I'll ground the CAM to tail light harness as well (brown is ground).
Originally Posted by MattDevoCustoms
are you installing a camera for a PCCM HU or another Android-based unit?
Michael is saying that one should run a separate (power+ground) wire from the camera to the PCCM, and to only use the piggyback red wire attached to the camera video signal (yellow RCA plugs) if the PCCM needs an external trigger to know when the car is in reverse (which would come from the tail lights).
In the (2) 997.1 installs I've done with aftermarket rear cameras, on the camera end I simply connect the red piggyback wire to the camera +12v, leaving the ground wire disconnected. At the HU end, the red piggyback wire connects to the HU CAM +12v output, and the reverse trigger (pink) on the main harness is wired to the tail light output from under the driver seat.
So you�re saying that from factory Heregoes units are pinned wrong? And that what should be ignition power is pinned to constant power?
For what it's worth, I made all the connections and bench tested using an old 12v computer supply prior to going near the car which ensured my connections were good and saved time messing about in the cockpit. Wasn't able to test the Bose amp on the bench but was able to see the MOST was properly connected.
My cameras didn't come with instructions. If anyone has experience with which is the mirror and parking lines wire please let me know. Otherwise, I'll gamble and progressively snip each one
Rear - I had to cut the white cable ONLY to remove the lines
front - cut white (remove lines. Then cut the green (eliminate mirroring)
In both cases don’t cut orange a keep HD mode
Can't guarantee but should work!! - the change camera iterations very quickly without saying much.
Originally Posted by Einsteiny
My cameras didn't come with instructions. If anyone has experience with which is the mirror and parking lines wire please let me know. Otherwise, I'll gamble and progressively snip each one
For you auto guys or 997.2 MT guys (you lucky bastards), you don't even have to bother with the reverse trigger step at all - the canbus module (always buy this) correctly detects reverse trigger and sends the signal directly to the pink reverse trigger cable in the main harness of the android unit.
I'm going to be tackling the reverse camera install this weekend. I just want to make sure I understand.
I have a 997.2 MT...so you're telling me that all I need to do is plug in the yellow RCA cable to my head unit, find a power and ground and that's it? You said don't use the power and ground from the tail lights, so what if I took power and ground from the same wires to my head unit? Or even the same wires to my MOST box? That means I will need some Tee taps?
I picked this one up based on the recommendations of other rennlist users
- dont use power and ground from the tail lights.
- yes use power and ground from the head unit directly. use the SPECIFIC camera power and camera ground that is in the DEDICATED camera harness for the head unit (6 pin) - this is for the QUALLCOMM models. i am not sure what the harness looks like for the more cost effective models but i am certain there is one.
i believe you are mistaking using random power and ground sources for your camera (like from the most box) - i dont mean that AT ALL.
and yes, the canbus adapter when plugged into the new head unit correctly - should deal with the reverse trigger signal.
Originally Posted by A911Fan
I'm going to be tackling the reverse camera install this weekend. I just want to make sure I understand.
I have a 997.2 MT...so you're telling me that all I need to do is plug in the yellow RCA cable to my head unit, find a power and ground and that's it? You said don't use the power and ground from the tail lights, so what if I took power and ground from the same wires to my head unit? Or even the same wires to my MOST box? That means I will need some Tee taps?
- dont use power and ground from the tail lights.
- yes use power and ground from the head unit directly. use the SPECIFIC camera power and camera ground that is in the DEDICATED camera harness for the head unit (6 pin) - this is for the QUALLCOMM models. i am not sure what the harness looks like for the more cost effective models but i am certain there is one.
i believe you are mistaking using random power and ground sources for your camera (like from the most box) - i dont mean that AT ALL.
and yes, the canbus adapter when plugged into the new head unit correctly - should deal with the reverse trigger signal.
Ok, thanks for clarifying. Sorry just want to double confirm. In post 1229, the picture where cable 9 is, that is the 6 pin harness you're talking about? There are two nubs, how will I know which is the camera power and camera ground?
Ok, thanks for clarifying. Sorry just want to double confirm. In post 1229, the picture where cable 9 is, that is the 6 pin harness you're talking about? There are two nubs, how will I know which is the camera power and camera ground?
That's not the quallcomm unit that I worked with when designing and testing the faceplate, as stated in my post.
I looks like the correct harness - but I'm not sure which nub is which.
But black is likely ground, the other one is likely power - also ... I could be wrong but looking at the harness from afar - it doesnt look like a front camera is supported on these 7862 units?

 03-22-2024, 06:29 PM