When you click on links to various merchants on this site and make a purchase, this can result in this site earning a commission. Affiliate programs and affiliations include, but are not limited to, the eBay Partner Network.
Guys, I have 2 questions:
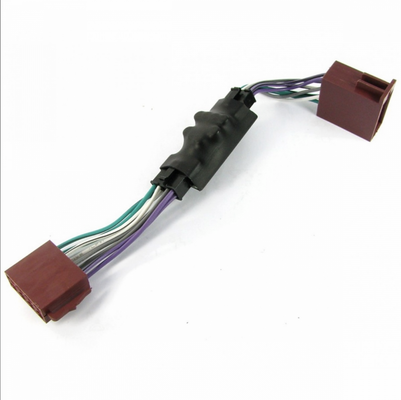
1) ISO adapter with resistance for high gain to amp - is that this one on the pic that should work? In the link the adapter is different -> https://www.design911.co.uk/fu/prod1...cts2-CTTPO001/
2) if anyone has his PCCM+ mounted in Porsche Center in a car with PCM1, Bose, without fiber optic?
I am curious about because I have a problem with volume gain and static noise (unit was mounted by Porsche Center).
Moreover as I know the guys very well, only solution which they found for the moment and probably should work is that thread here
This is done if you go into the settings menu and hold the VOLUME symbol on the display for aprox 10 seconds. Now I got amp switch power without bypassing the yellow adaptor.
Next page..
but�
Still noise and high gain on the volume�
So after some research I ordered an ISO adapter with resistance for high gain to amp. This is a common problem on other cars when using after market stereo with OEM Amp
Basically this adapter takes down the output volume from the new head unit.
This sorted out everything and now it works perfect.
1) where did you find the instructions re: switching to Amp via holding down the Volume button for 10s? I just read the included instruction manual, but could not find that info. I am looking to specifically change the setting to LINE level from SPEAKER level. Do you happen to know where I could find info like that?
2) after installing the PCCM+ into my 996, I ran into the same issue you did--high gain and volume despite switching to Amp. Where exactly did you plug that ISO adapter? I am trying to figure out what it could connect to.
PCCM Plus - Shows car is moving when its stationary.
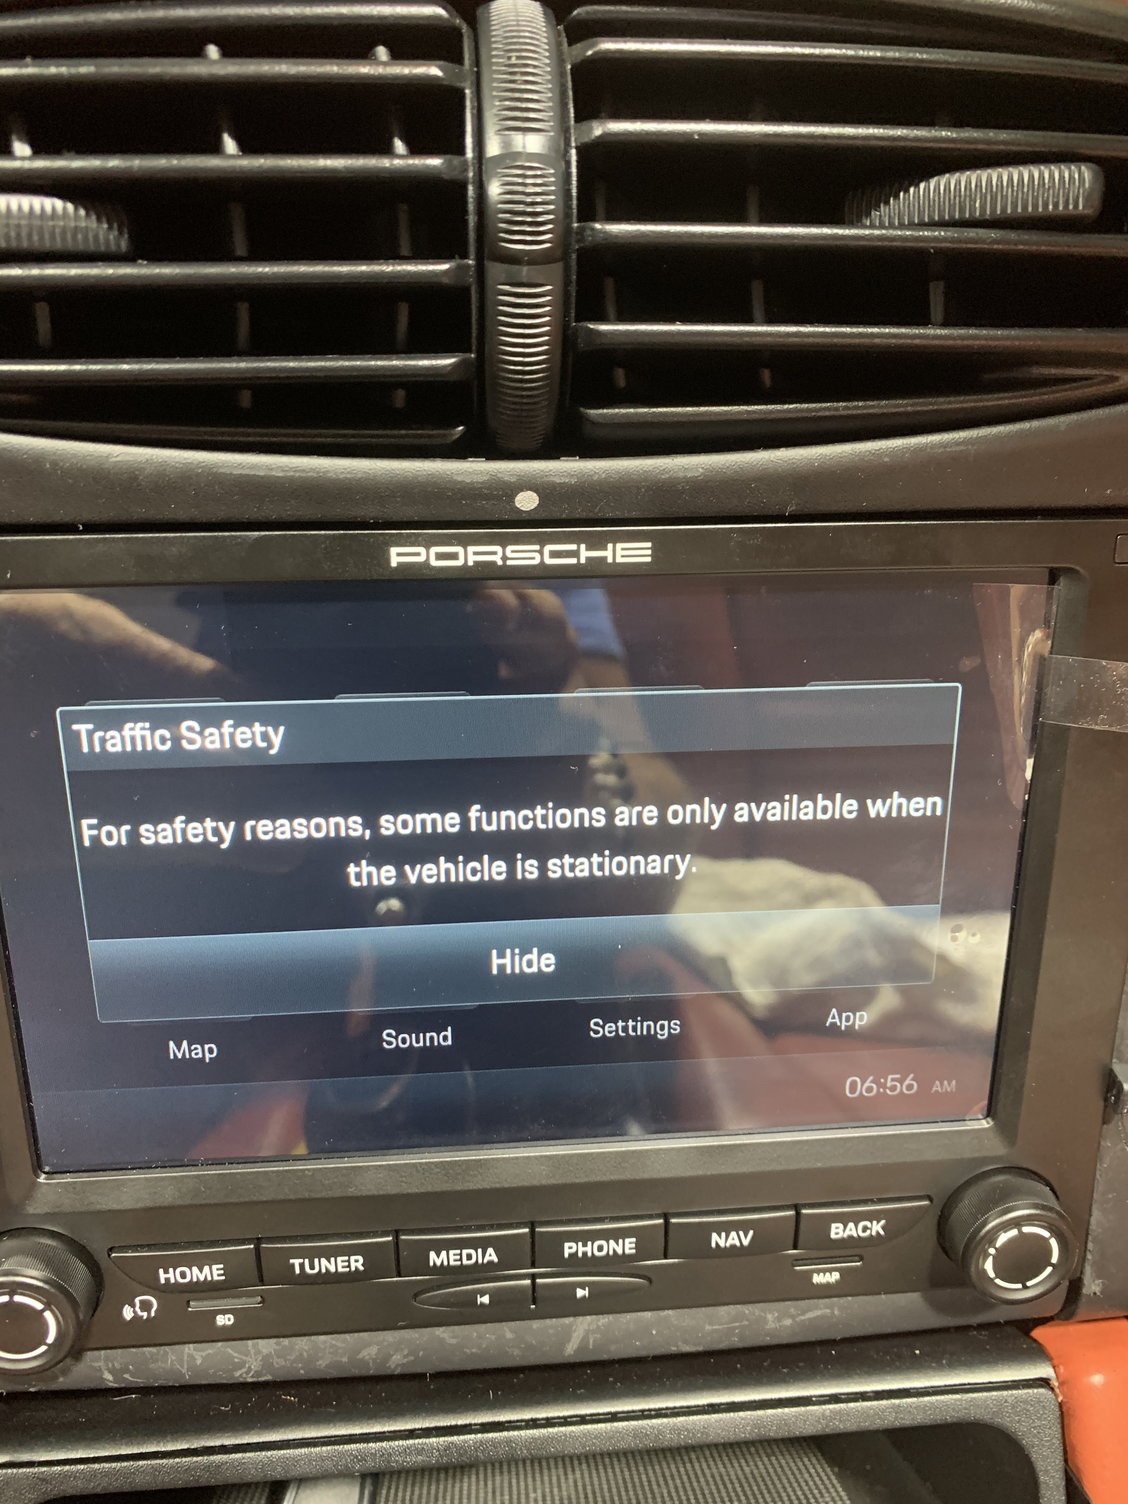
Installed the PCCM Plus in my 2000 Boxster S with little to no problems. Sounds and features are a definite upgrade and shows how bad the door speakers are. I had previously upgraded the other speakers. However, after the first drive - got this message on the screen when I try to go to Settings to finish the set up and the car is NOT moving - "Traffic Safety - For safety reasons, some functions are only available when the vehicle is stationary". The unit thinks the car is moving and its not! I can't access Settings! Any idea how to resolve?
Just completed install of PCCM PLus on 2003 996 C4cab
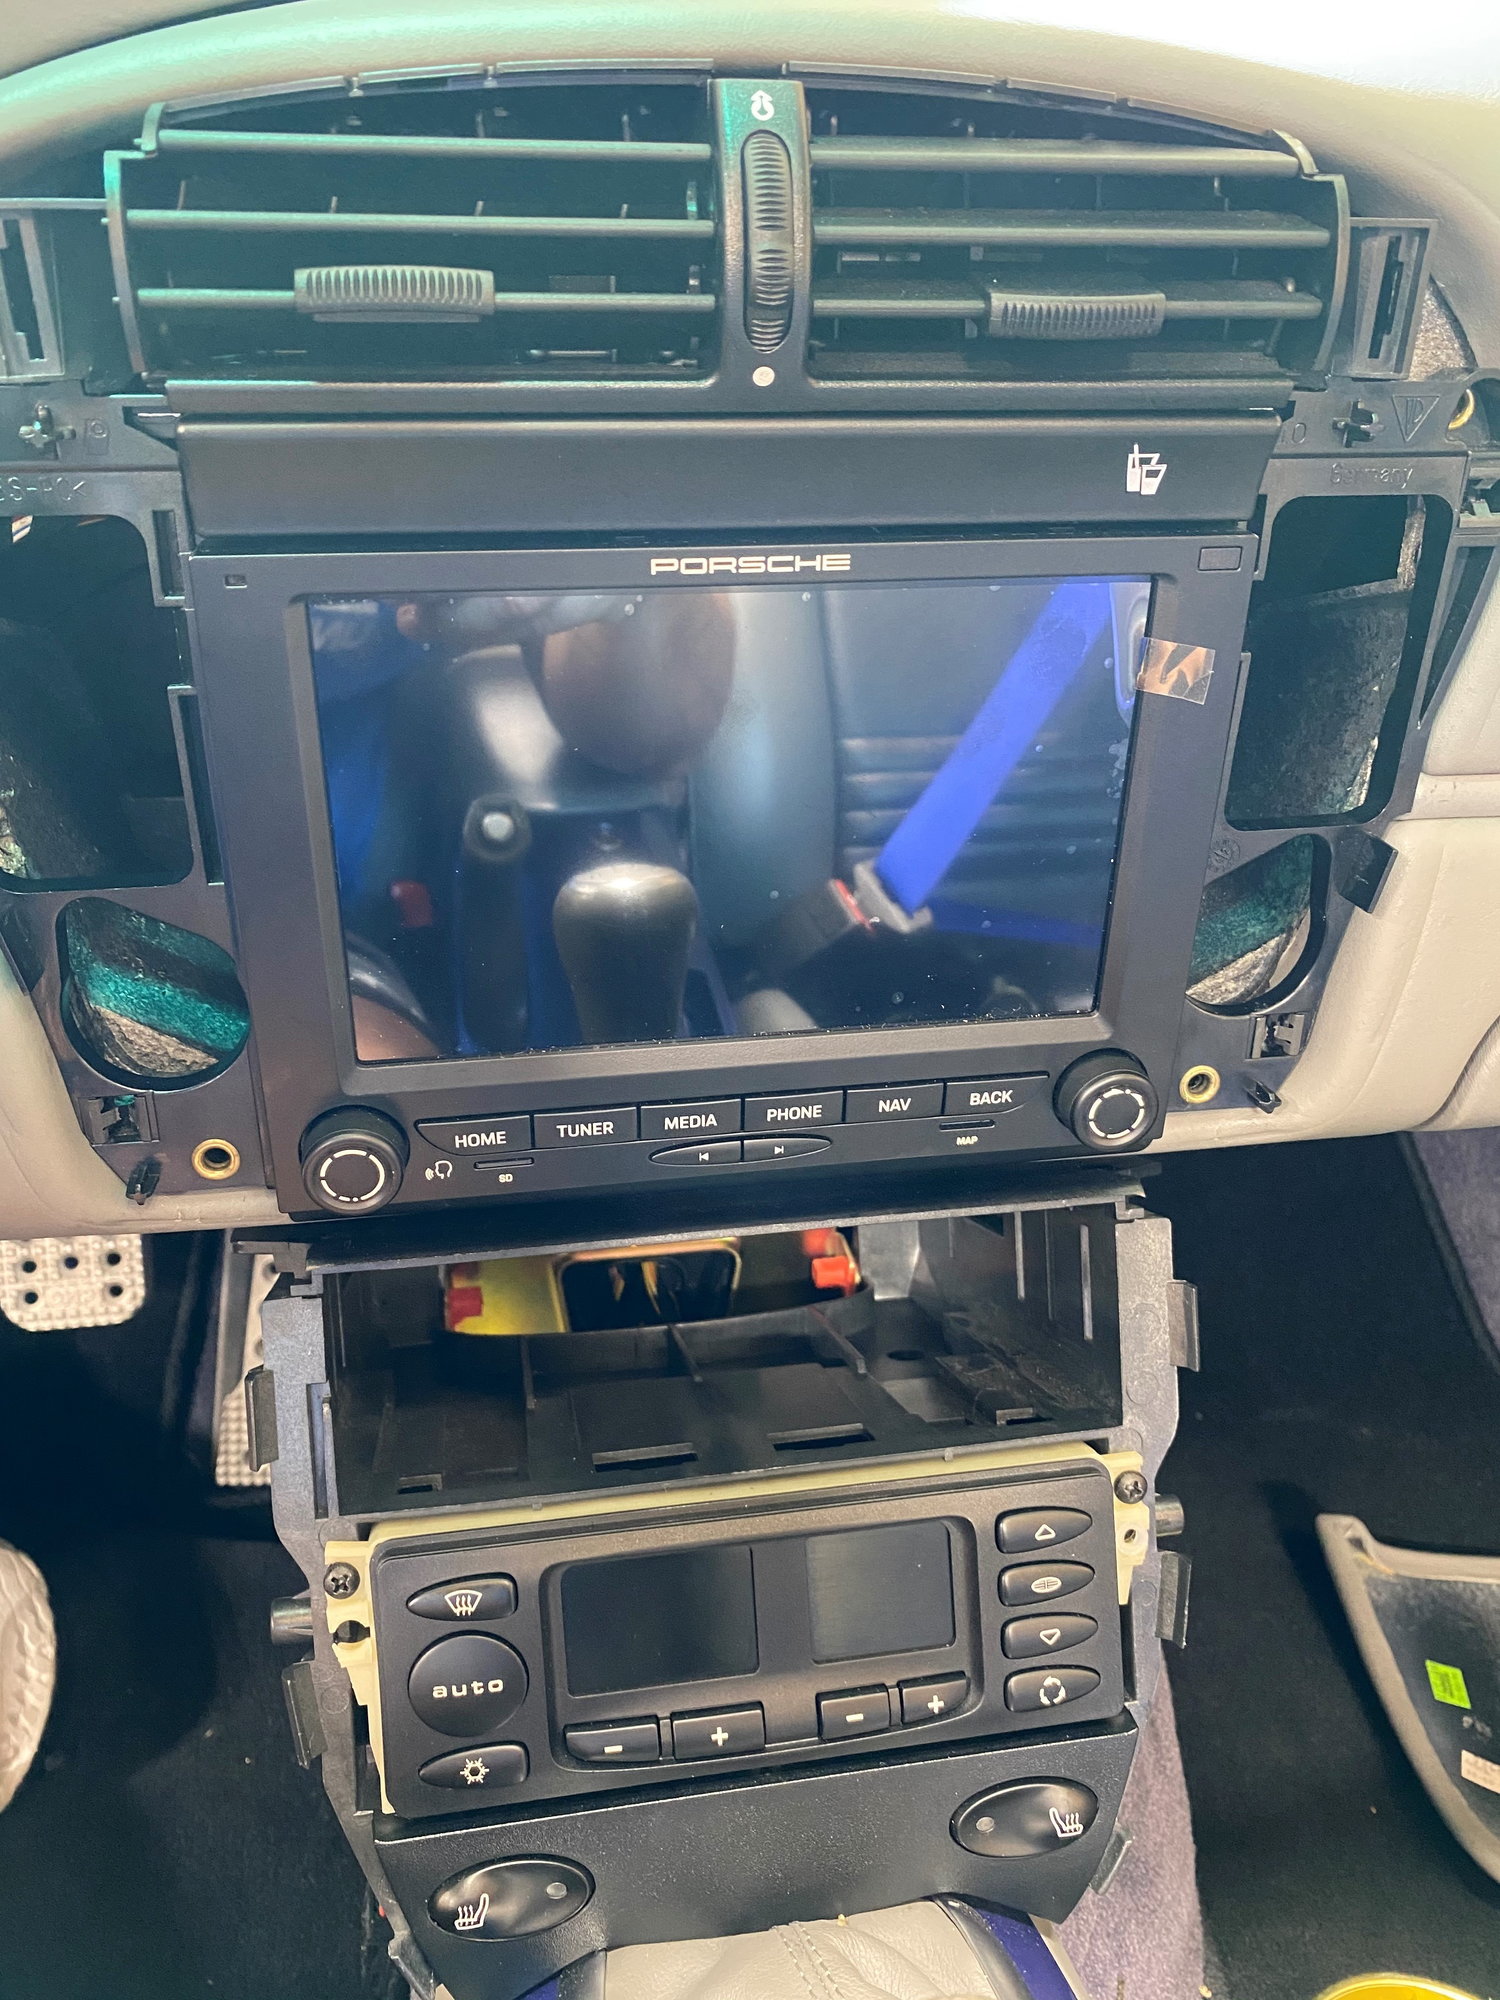
Just finished replacing my porsche CDR23 with the new PCCM plus. While it ultimately turned out fine, the lack of instructions and clear notification you will need to purchase a new storage cubby to fit in the higher console slot after you reposition the AC controls can delay the process (I recommend you not buy the porsche cubby and instead purchase the $30 Metra Dash kit that comes with the correct cubby size from Amazon or Best Buy (model 99-9605B). It fit perfectly and also provided a thin surround for the AC controls vs. having to use another trim piece. The Porsche cubby is approx $80. The Metra Looks identical to the porsche cubby.
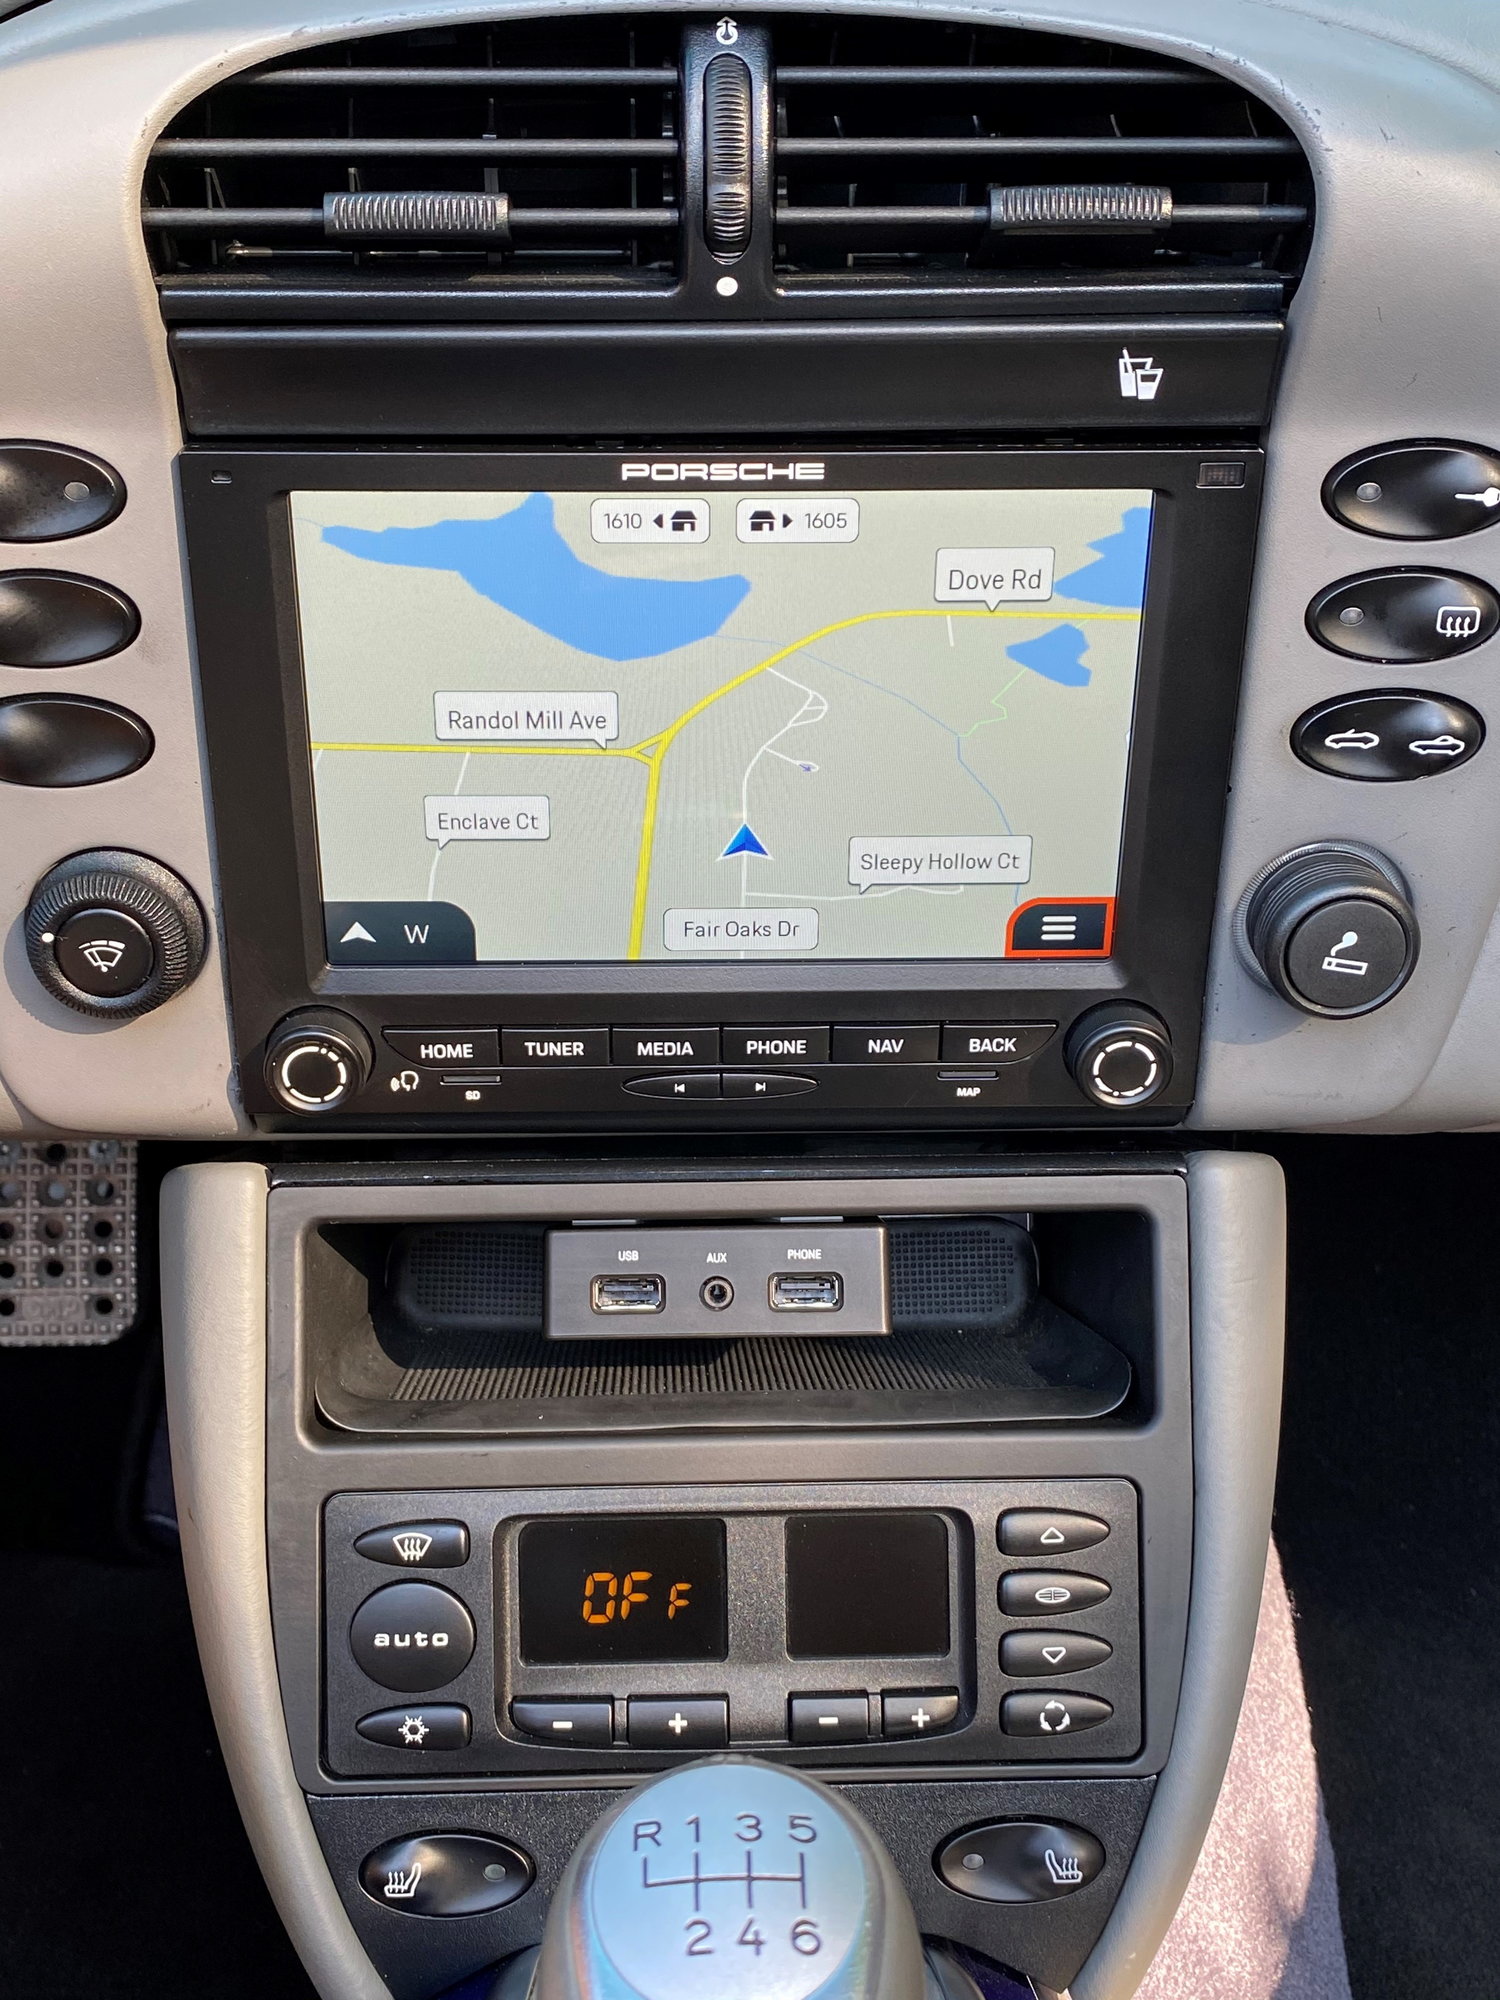
I have the Bose Most systems so once I connected the DAC and cables supplied the sound was great from the start. (the PCCM Plus is a 45Watt per channel head unit so its actually more powerful that the bose AMP that came with the car. I also installed a SiriusXM receiver ($49 from Best Buy) that you will need to purchase if you want XM stations.
If you install yourself you will need to cut off some of the tabs on the existomer console mount to fit the Double DIN PCCM Plus into the previous (2) single Din slots. The only other issue I has was the cables for the USB block are too short to make an easy connection to the unit once you install them. I ran the cables the shortest distance and still they were too short to connect easily.
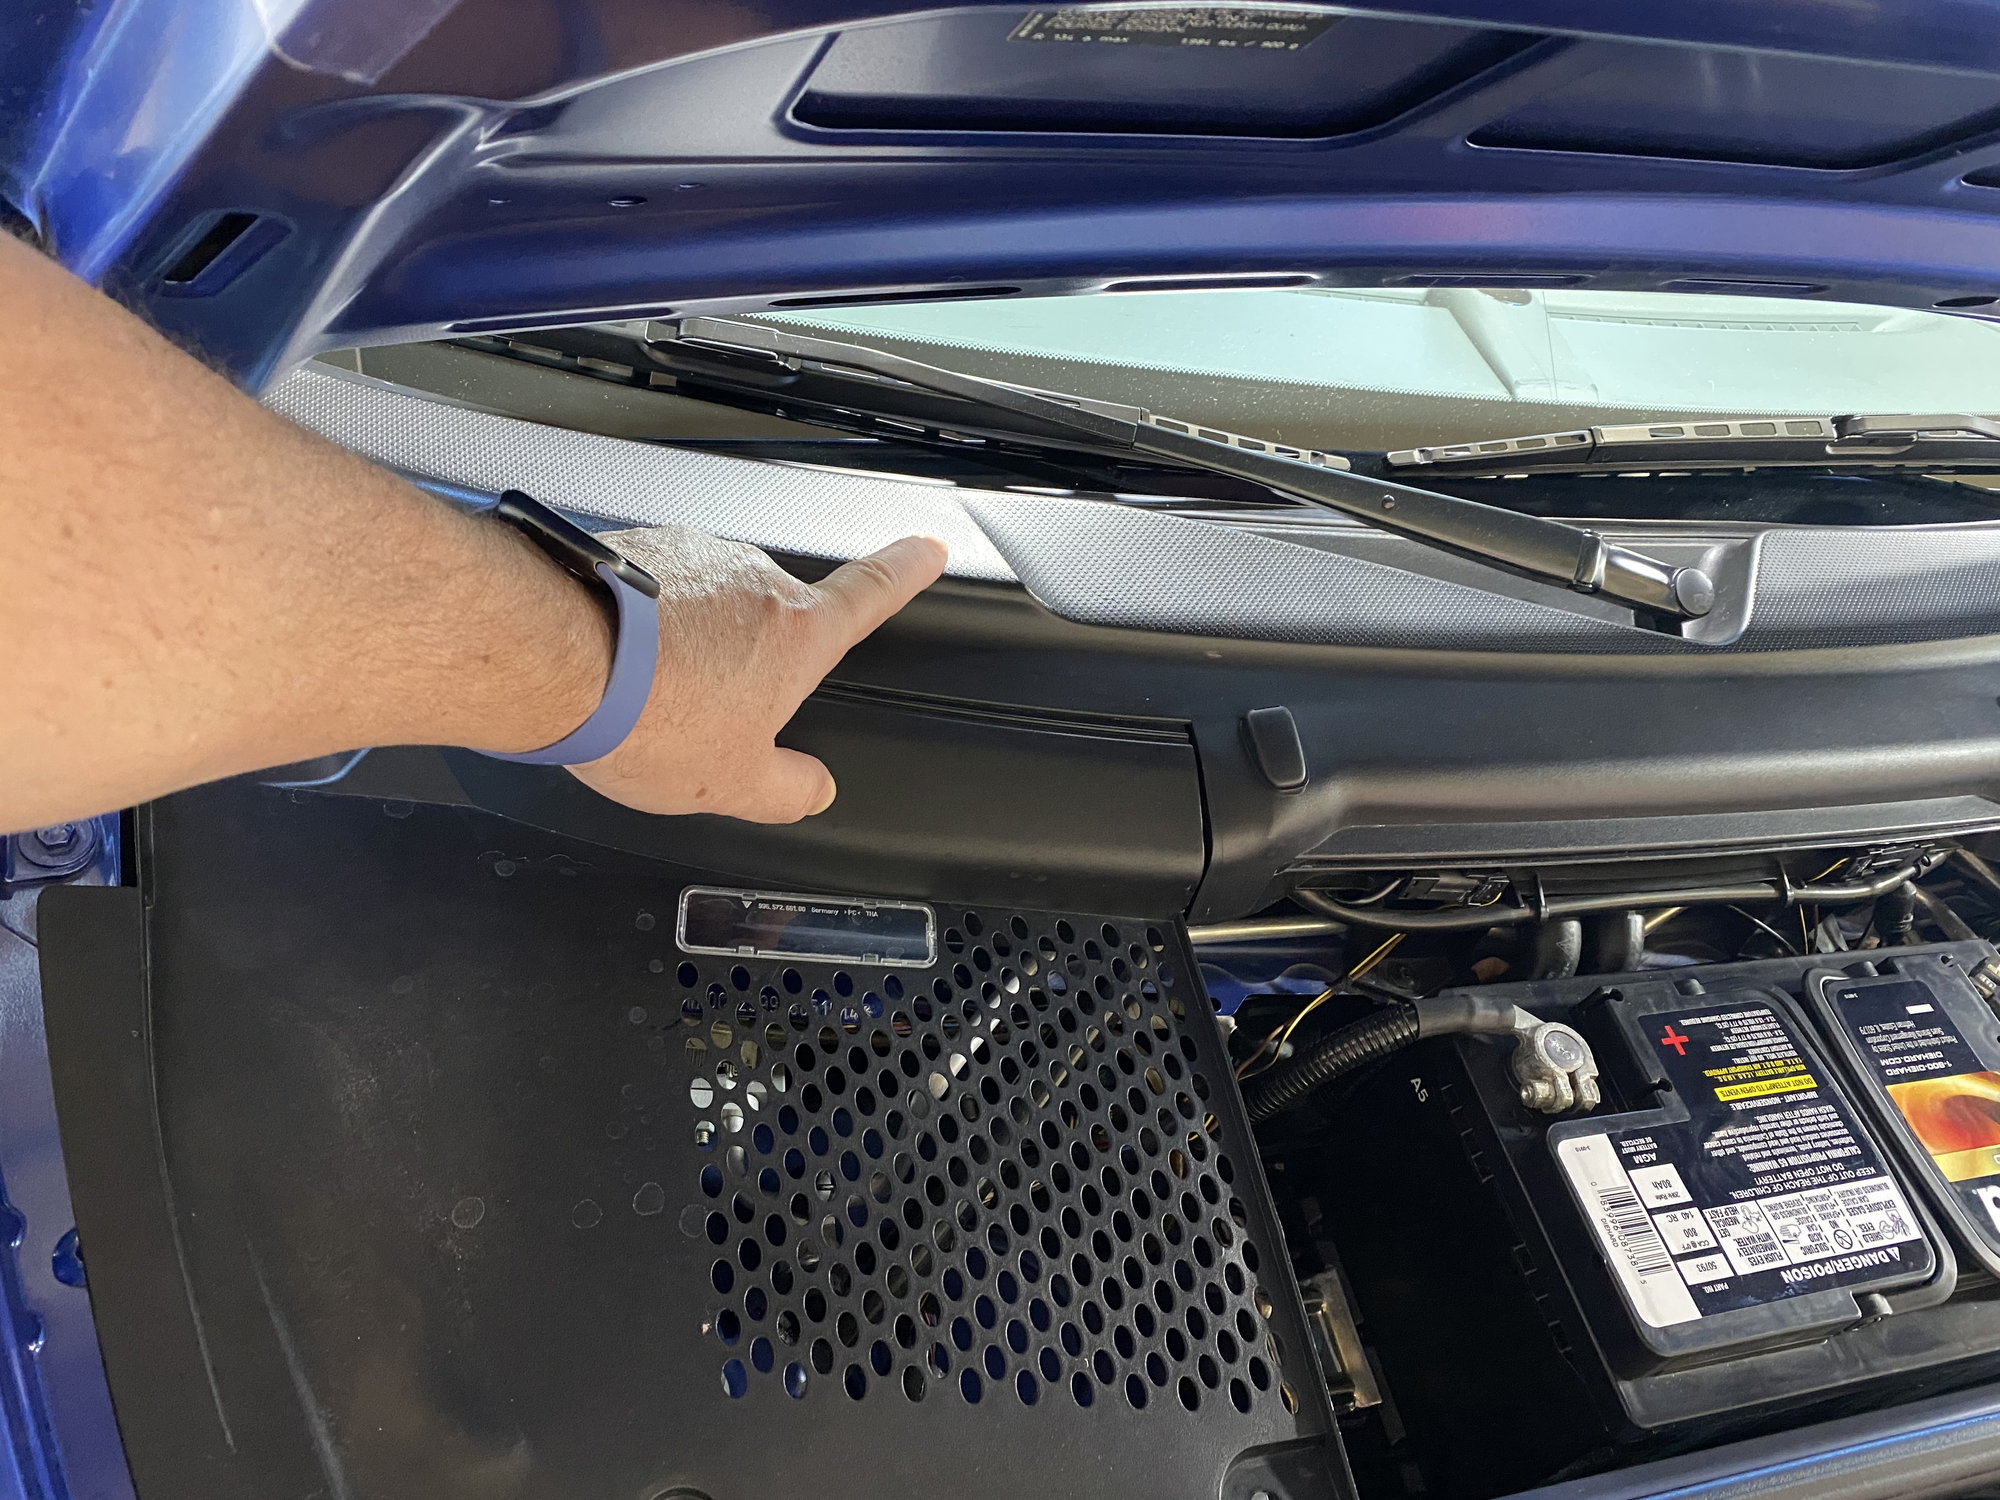
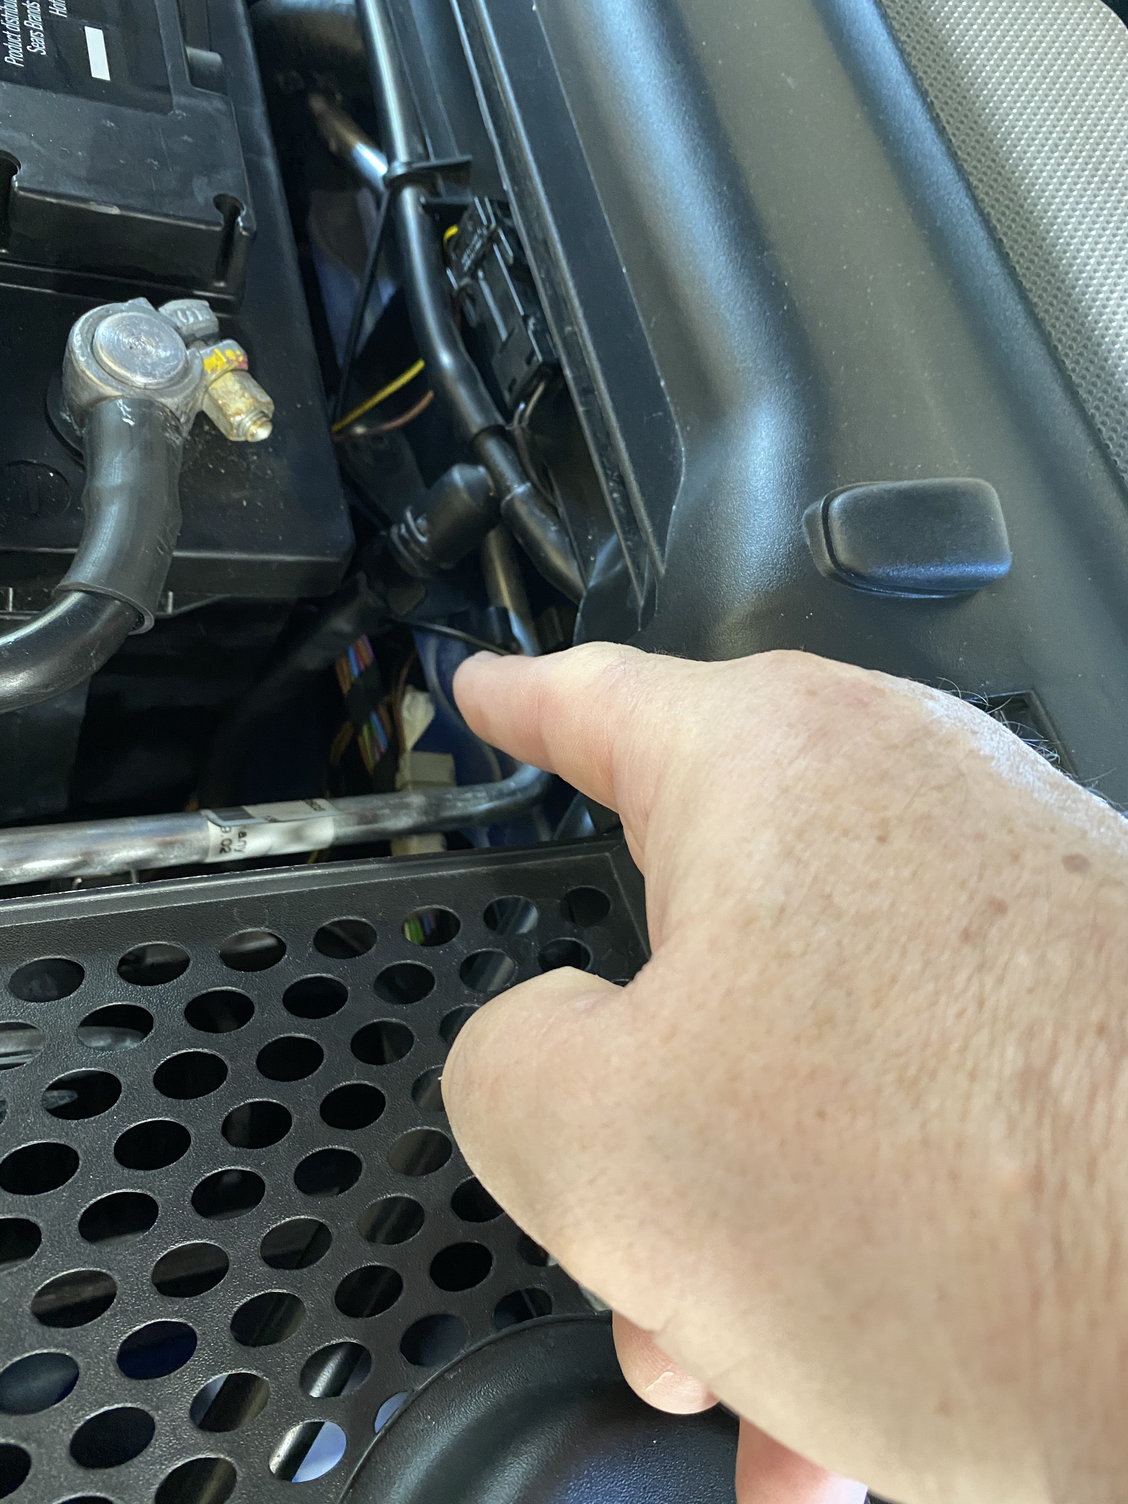
Lastly the GPS and XM Antennas were mounted under the plastic trim in front of the windshield and I ran both cables through the 3 inch unused rubber gasket hole right behind the battery (remove the battery to access) that comes out inside the car right above the brake pedal. The are out of sight and the signal strength for both is great. I am very happy with the outcome and the sound is obviously much better than a 17 year old radio. Test fitting the unit prior to finishing the install. Completed install...
I installed the GPS antenna �puck� and the Sirius antenna puck in the same spot on opposite sides of the car to avoid and potential interference. (see photo where finger is pointing). Both signals easily penetrate the plastic and I have full signals from both. I ran the cables from the pucks through the unused rubber 2.5 inch �plug� behind the battery to gain easy access to the cabin of the car. The rubber plug comes out right above the break pedal to give you a clear path to the back of the radio. The location of the plug is right behind finger picture #2. You will need to poke a hole in the rubber plug ams penetrate the thin insulation pad. Taped the GPS puck here. Double sided auto tape with top of puck facing up. Sirius puck is in same place on opposite side of car. Location of rubber plug to gain access to the cabin
I installed the GPS antenna �puck� and the Sirius antenna puck in the same spot on opposite sides of the car to avoid and potential interference. (see photo where finger is pointing). Both signals easily penetrate the plastic and I have full signals from both. I ran the cables from the pucks through the unused rubber 2.5 inch �plug� behind the battery to gain easy access to the cabin of the car. The rubber plug comes out right above the break pedal to give you a clear path to the back of the radio. The location of the plug is right behind finger picture #2. You will need to poke a hole in the rubber plug ams penetrate the thin insulation pad. Taped the GPS puck here. Double sided auto tape with top of puck facing up. Sirius puck is in same place on opposite side of car. Location of rubber plug to gain access to the cabin
Curious, why didn't you use the factory location for these antennas? Have you had problems with older GPS antennas?
Both the pucks are magnetized ( pretty strong too) so you can mount them to any piece of flat metal that has a clear path the the sky that does not go through metal. I had read other people them right under the plastic and it worked fine. MUCH easier than removing inside trip and pillar pieces and installing them inside the cabin.
toom me a total of 30 minutes to install both the the radio.
Yes, the Sirius receiver fits easily in the shelf provided as part of the PCCM plus kit. Plea to of room for the DAC converter and a he Sirius receiver.
tape both down with double sided tape.
Yes, the Sirius receiver fits easily in the shelf provided as part of the PCCM plus kit. Plea to of room for the DAC converter and a he Sirius receiver.
tape both down with double sided tape.
Curious, why didn't you use the factory location for these antennas? Have you had problems with older GPS antennas?
The location for the factory PCM 1&2 antenna was right under the middle of the front windshield where the flashing security light is located on the dash. There is a black plastic cover that pops off, and a space for the antenna. I am not sure that the PCCM + gps antenna is the same form factor as the original factory PCM antenna.
 09-26-2020, 03:54 PM