When you click on links to various merchants on this site and make a purchase, this can result in this site earning a commission. Affiliate programs and affiliations include, but are not limited to, the eBay Partner Network.
Fussed around with my squeaks n rattles - seatbelts
I wanted to see if I could stop some squeaking from what I see thought were the seat belt shoulder / b pillar covers. I found this helpful post over on renntech (I think)... It's always nice to learn something new🤪 all credit to "them" over there.
<snip>
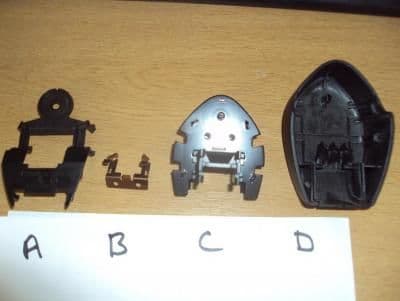
This is to help all those who have removed the seat belt adjuster the wrong way (I did it too, that�s how I know) and couldn�t get the cover back on. Firstly remove the piece that is still attached to the seat belt adjusting mechanism. You do this by levering it off. It is clipped in place with a centering pin into the seat belt fixing bolt. It makes a strange noise but it will come off. I used a proprietry trim removing tool, but a large screwdriver should work. Refer to attached photo You then have a metal piece C, a plastic piece A. You will also have the cover D, that you took off before, with the metal clip B in it . Remove B from D Insert C into D Refit B into D (this will hold item B in place) Lastly clip in item A You now have the whole item in one piece, which can be refitted to the car.
Hope that�s some help.
</snip>
Finally found and installed some manual 997 sport seats and some black leather rear seats. No more sea of gray? Yes, please. I�ll be adding some install pics, lessons learned and tips to the 997 seat swap thread tomorrow.
I love these seats!
Those seats, depending on price, are on my to-do, for next year or the year after. Hey it's good to plan and dream. I might just go for aftermarket reclining buckets as well tho. Need to go try some recaro or a good cheaper option. Corbeau maybe? https://corbeau.com/sportline-rrx/ mmm plaid 👍
looking forward to your update.
I wanted to see if I could stop some squeaking from what I see thought were the seat belt shoulder / b pillar covers. I found this helpful post over on renntech (I think)... It's always nice to learn something new🤪 all credit to "them" over there.
<snip>
This is to help all those who have removed the seat belt adjuster the wrong way (I did it too, that�s how I know) and couldn�t get the cover back on. Firstly remove the piece that is still attached to the seat belt adjusting mechanism. You do this by levering it off. It is clipped in place with a centering pin into the seat belt fixing bolt. It makes a strange noise but it will come off. I used a proprietry trim removing tool, but a large screwdriver should work. Refer to attached photo You then have a metal piece C, a plastic piece A. You will also have the cover D, that you took off before, with the metal clip B in it . Remove B from D Insert C into D Refit B into D (this will hold item B in place) Lastly clip in item A You now have the whole item in one piece, which can be refitted to the car.
Hope that�s some help.
</snip>
My solution for getting rid of the squeaking was swapping out those parts for the GT3 version (996-803-541-00-01C). Price difference is absurd. $3ish for the GT3 version vs $100+ for the standard 996 one.
Those seats, depending on price, are on my to-do, for next year or the year after. Hey it's good to plan and dream. I might just go for aftermarket reclining buckets as well tho. Need to go try some recaro or a good cheaper option. Corbeau maybe? https://corbeau.com/sportline-rrx/ mmm plaid 👍
looking forward to your update.
Well done. Pulls some color from the paint so it all goes together. Breaks up the sea of gray too. I�m looking to do something similiar with my Meridian Metalic someday
Well done. Pulls some color from the paint so it all goes together. Breaks up the sea of gray too. I�m looking to do something similiar with my Meridian Metalic someday
My solution for getting rid of the squeaking was swapping out those parts for the GT3 version (996-803-541-00-01C). Price difference is absurd. $3ish for the GT3 version vs $100+ for the standard 996 one.
My solution for getting rid of the squeaking was swapping out those parts for the GT3 version (996-803-541-00-01C). Price difference is absurd. $3ish for the GT3 version vs $100+ for the standard 996 one.
This is unquestionably the tip of the century!!!!!!
Looks much better than the original non-GT3 version, and presumably less prone to falling off. Mine fell off when barely touched while putting something in the back seat. It has been on my "to do" list for a long time to figure out how to put it back on after my initial attempt failed. Glad I procrastinated because replacing with the GT3 cover will be much better.
I'm already doing the math on the performance and handling gains from the reduced weight of the GT3 part!
Replaced my brake pads today. Several times. . I got Genuine Porsche brake pads from Pelican Parts. Grabbed the box with the large letter "F" on it, jacked up the passenger side front and replaced the pads. Jacked up the driver side front and replaced the pads. Jacked up the driver side rear and the new pads wouldn't fit. Reading the very small print it says that it fits 996 Turbo and 996 Carrera 4 rear and 996 Carrera 1999-2001 front. So the box with the large letter "F" on it was actually the rear pads. The letter "F", which I thought indicated "Front" was just a storage location designation sticker applied by Pelican. The rear pads fit the front and rear, the front pads only fit the front. So if I started at the rear I wouldn't have had to do the job multiple times. On a plus side I could now do this job in record time.
 10-21-2022, 06:17 PM


") . I got Genuine Porsche brake pads from Pelican Parts. Grabbed the box with the large letter "F" on it, jacked up the passenger side front and replaced the pads. Jacked up the driver side front and replaced the pads. Jacked up the driver side rear and the new pads wouldn't fit. Reading the very small print it says that it fits 996 Turbo and 996 Carrera 4 rear and 996 Carrera 1999-2001 front. So the box with the large letter "F" on it was actually the rear pads. The letter "F", which I thought indicated "Front" was just a storage location designation sticker applied by Pelican. The rear pads fit the front and rear, the front pads only fit the front. So if I started at the rear I wouldn't have had to do the job multiple times. On a plus side I could now do this job in record time.
. I got Genuine Porsche brake pads from Pelican Parts. Grabbed the box with the large letter "F" on it, jacked up the passenger side front and replaced the pads. Jacked up the driver side front and replaced the pads. Jacked up the driver side rear and the new pads wouldn't fit. Reading the very small print it says that it fits 996 Turbo and 996 Carrera 4 rear and 996 Carrera 1999-2001 front. So the box with the large letter "F" on it was actually the rear pads. The letter "F", which I thought indicated "Front" was just a storage location designation sticker applied by Pelican. The rear pads fit the front and rear, the front pads only fit the front. So if I started at the rear I wouldn't have had to do the job multiple times. On a plus side I could now do this job in record time.
