New! 9m93 Speedster widebody - full build in detail
 12-14-2009, 05:00 PM
#121
Addict
Rennlist
Site Sponsor
Rennlist
Site Sponsor
Thread Starter

Sorry, maybe I should rephrase that?
Come the day that 5 people deliver 5 993 convertibles off at 9m with 5 complete sets of new & used Speedster parts to build them, we'll happily talk about a group buy discount.
Is that Fairy Nuff?
 12-15-2009, 12:27 PM
#122
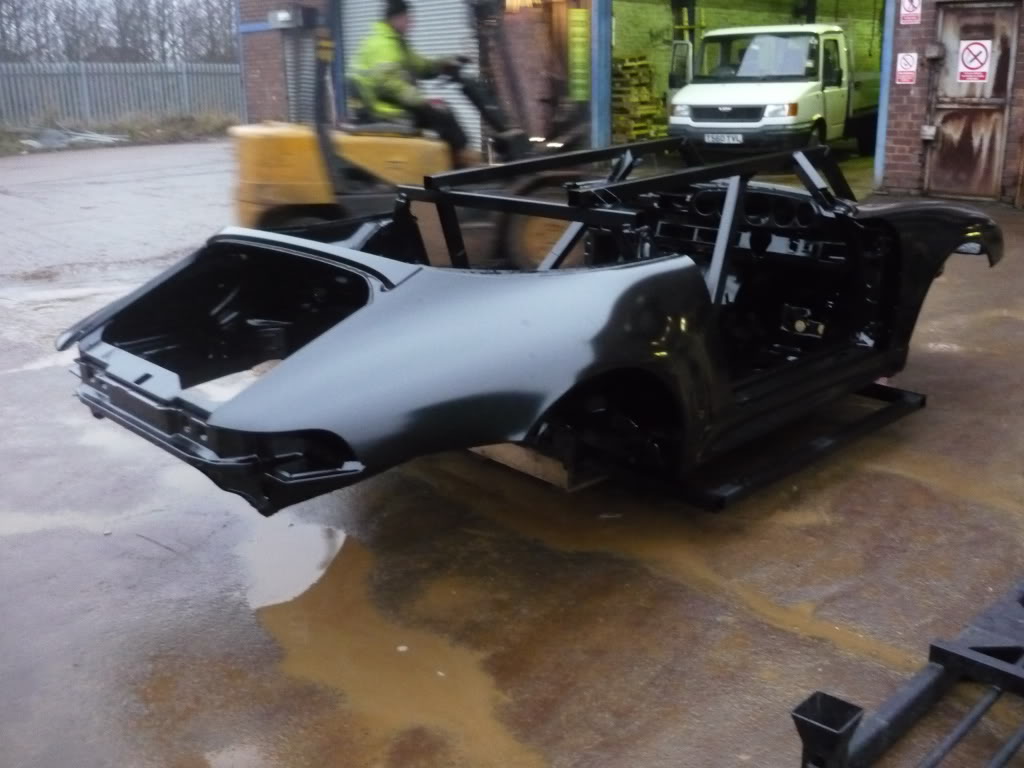
Well the completed shell is now ready for collection having just been electro coated, the paint filling all those nooks & crannies.
Hopefully it will be back in 9M on Friday, ready to receive more attention – and a lick of paint!


Graham
Hopefully it will be back in 9M on Friday, ready to receive more attention – and a lick of paint!
Graham
12-15-2009, 01:15 PM
#123
Rennlist Member
Wow, it is really starting to come together!
Looks like it is already painted, I can only imagine what it will look like completed.
Thanks for sharing,
--Joe
Looks like it is already painted, I can only imagine what it will look like completed.
Thanks for sharing,
--Joe
12-15-2009, 03:36 PM
#124
Rennlist Member
Join Date: Apr 2006
Location: Rainforest (Vancouver, BC)
Posts: 7,570
Received 1,033 Likes
on
464 Posts
") 12-15-2009, 03:48 PM
12-15-2009, 03:48 PM
#126
Not powder coat - full immersion dipping in one big tank of paint! Car -ve / Paint +ve (or other way around!)
Same process as manufactures use - in fact I believe done in amongst your regular Brit made cars in a multi-million pound purpose made plant no less!
Graham
Same process as manufactures use - in fact I believe done in amongst your regular Brit made cars in a multi-million pound purpose made plant no less!
Graham
12-15-2009, 08:38 PM
#127
Nordschleife Master
Not powder coat - full immersion dipping in one big tank of paint! Car -ve / Paint +ve (or other way around!)
Same process as manufactures use - in fact I believe done in amongst your regular Brit made cars in a multi-million pound purpose made plant no less!
Graham
Same process as manufactures use - in fact I believe done in amongst your regular Brit made cars in a multi-million pound purpose made plant no less!
Graham
 12-15-2009, 08:52 PM
#128
Addict
Rennlist
Site Sponsor
Rennlist
Site Sponsor
Thread Starter
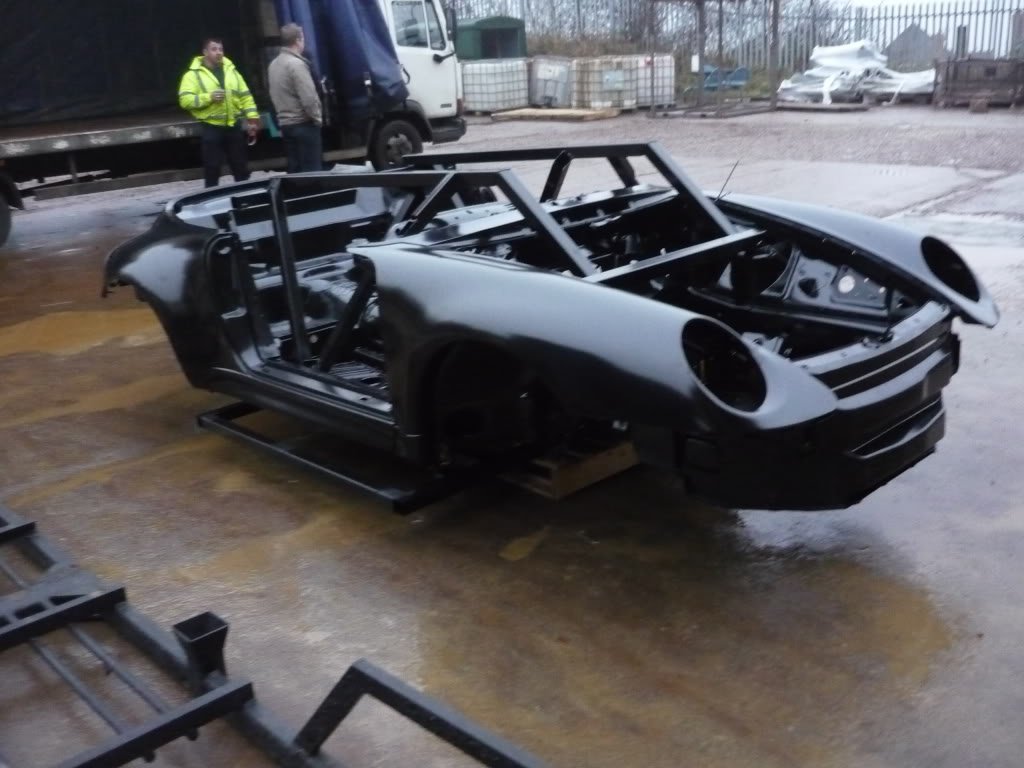
OK, I can see that some further explanation of the e-coat process that Graham's shell has gone through is necessary. The entire treatment consists of two main stages: Paint removal and preparation followed by the E-coating itself.
Here's the paint removal process stages that you can see in the photographs above:
1. All heavy organic coatings including underseal, filler, mastic sealants, anti-vibration materials, adhesives, etc. are broken down and de-natured using an advanced dehydration process.
2. The remaining organic compounds ie. paint, grease, oil and carbon, together with the remnants from Stage 1 are removed via immersion in a strong alkaline hydrocarbon solution for several hours and then rinsed. This leaves the mild steel free of any organic contaminants.
3. Corrosion is now removed via immersion in a dilute solution of inhibited hydrochloric acid. Inhibitors prevent the acid from attacking the mild steel and will only allow it to break down the corrosion. This is followed by immersion in an alkaline rinse before going immediately to the next stage.
4. An advanced agitated alkaline neutralisation and passivation immersion process designed to give maximum penetration leaves the component or shell in a bright, preserved condition. This is then followed with a high pressure manual wash containing a neutralising preservative which drives preservative into the folds, seams and recesses of the component or shell and will cause the water to evaporate quickly leaving a dry, bright and stable mild steel finish.
Then the shell is taken to another plant for the e-coating process. As Graham mentioned earlier, the e-coating or electrodeposition method of painting uses electrical current to deposit the paint, working on the principal of "Opposites Attract". The process is designed to offer 1000 hours salt spray resistance and is widely regarded as the best available anti-corrosion paint system for mild steel with the key benefit that as a full immersion process it provides excellent penetration into seams and hollow chassis sections (and roll cage tubes). These are the 14 stages involved:
1. Immersion alkaline clean, operating temperature of 140�-160�, removes light surface oxides & any remaining lubricants.
2. Spray alkaline clean, operating temperature of 140�-160�, applies cleaner with oscillating
spray nozzles to remove stubborn light surface oxides & remaining lubricants.
3. Water rinse at ambient temperature, removes soils loosened by cleaner & cleaner residue.
4. Rinse conditioner at ambient temperature, prepares the metal surface to accept the Zinc
Phosphate coating.
5. Zinc Phosphate immersion at temperature of 125�, applies a Trimetal Zinc Phosphate
coating as a corrosion protective base for the paint coating.
6. Water rinse at ambient temperature, removes the Zinc Phosphate salts and stops Zinc Phosphate reaction.
7. Immersion non-chrome seal rinse at ambient temperature, supplements the Zinc Phosphate coating to enhance corrosion protection.
8. Reverse Osmosis water rinse at ambient temperature, a purifying rinse to remove excess
phosphate and sealer. Lowers the surface conductivity of the part to prepare it for e-coating.
9. Repeat reverse osmosis rinse.
10. Electro-Coat bath at temperature of 95�, applied with positive charged paint to the negative charged bodyshell to give the shell an even thickness electro deposition paint coating on the inside & outside of all surfaces.
11. Reverse osmosis permeate rinse at ambient temperature, removes excess e-coat from the parts & counter flows excess paint solids back to the e-coat tank.
12 . Reverse osmosis water permeate spray at ambient temperature, applies a permeate spray to assist in the removal of excess e-coat, again counter flowing paint solids back to the e-coat tank for maximum efficiency.
13. Final r.o. water permeate rinse at ambient temperature to remove excess e-coat from the parts.
14. Oven cure at 185�C.
..... which then leaves you with a bodyshell beautifully finished in an even black 30 micron thick primer coating, as seen in the photo above.
So no, it's not powder coating.
12-15-2009, 08:54 PM
#129
Addict
Rennlist
Site Sponsor
Rennlist
Site Sponsor
Thread Starter
I'm fairly confident that my lotto #s should result in a massive payoff sometime before February. Please schedule me in for late February for a couple Speedster builds (One in Blue Turquoise, the other in black), a couple 9M RS conversions like the black RS/CS you finished this time last year (one in Blue Turquoise, the other in Viper Green), and quite possibly a couple GT2 reps (one in, again, Blue Turquoise the other in GP White or Guards Red.). I'd hope this could be seen as my own personal group buy.
 12-16-2009, 05:16 AM
#131
Although I'm sure Colin would love me to break open another of my childrens piggy banks and raid the booty, at this moment in time, the motor & transmission will remain stock - it aint broke, so don't need fixing!
2010 will be an 'enjoy the car year' (I hope), but as the 993 is the least powerful car in my current fleet, it may well get a re-fresh in Winter 2010.
I believe either 3.8 or 4.0 litres may work quite well? It depends how the advertising promotion deal goes with 9M
Graham
2010 will be an 'enjoy the car year' (I hope), but as the 993 is the least powerful car in my current fleet, it may well get a re-fresh in Winter 2010.
I believe either 3.8 or 4.0 litres may work quite well? It depends how the advertising promotion deal goes with 9M
Graham
12-16-2009, 05:37 AM
#132
Addict
Rennlist
Site Sponsor
Rennlist
Site Sponsor
Thread Starter
12-16-2009, 10:19 AM
#133
Nordschleife Master
 Kidding aside, I'm wondering why the car had to go through the dipping process. I'm sure it's the most thorough way to completely clean the body and prep it for paint, but I would imagine many projects like this just disassemble what's necessary to install the Speedster-unique parts, and then prep those areas with the rest of the car for paint. Is it because you're doing a color change as well or did the car's body have corrosion in the nooks and crannies as many do after 15 years of road work?
12-16-2009, 11:15 AM
Kidding aside, I'm wondering why the car had to go through the dipping process. I'm sure it's the most thorough way to completely clean the body and prep it for paint, but I would imagine many projects like this just disassemble what's necessary to install the Speedster-unique parts, and then prep those areas with the rest of the car for paint. Is it because you're doing a color change as well or did the car's body have corrosion in the nooks and crannies as many do after 15 years of road work?
12-16-2009, 11:15 AM
#134
Hi JP
The car was I'm glad to say corrosion free - my 993 was born in 97, so only a baby! But with so much internal & external welding & grinding it would be so much better to start the painting process with a perfectly clean shell.
Plus building up layers of paint on old paint's never a good idea for that show finish!
The car started blue - and will end up blue - just different a different shade! To completely bare metal a tub removing all the old underseal etc would have eaten up hours in the bodyshop plus never guaranteed that we would have sealed in some potential corrosion - this way it should be damn near perfection!
Graham
12-16-2009, 11:22 AM
#135
Nordschleife Master
Hi JP
The car was I'm glad to say corrosion free - my 993 was born in 97, so only a baby! But with so much internal & external welding & grinding it would be so much better to start the painting process with a perfectly clean shell.
Plus building up layers of paint on old paint's never a good idea for that show finish!
The car started blue - and will end up blue - just different a different shade! To completely bare metal a tub removing all the old underseal etc would have eaten up hours in the bodyshop plus never guaranteed that we would have sealed in some potential corrosion - this way it should be damn near perfection!
Graham
The car was I'm glad to say corrosion free - my 993 was born in 97, so only a baby! But with so much internal & external welding & grinding it would be so much better to start the painting process with a perfectly clean shell.
Plus building up layers of paint on old paint's never a good idea for that show finish!
The car started blue - and will end up blue - just different a different shade! To completely bare metal a tub removing all the old underseal etc would have eaten up hours in the bodyshop plus never guaranteed that we would have sealed in some potential corrosion - this way it should be damn near perfection!
Graham