When you click on links to various merchants on this site and make a purchase, this can result in this site earning a commission. Affiliate programs and affiliations include, but are not limited to, the eBay Partner Network.
Received a yellow block ISO 6 pin connector to RCA out, to use to get line level outs to my aftermarket amp. No joy. On the bench, there is no discernible signal out from any of the outs. I need to send 4 channels out (2 Rear 2 Front) to my amp and it doesn't appear I am able to do that with this unit. Is there a setting that may need to be activated (that any android experienced users may have seen)?
[QUOTE=Steve W;18706912]So to make it simple, unless you make your own cables, and ok without the extra shielding, just buy the following stuff out there and plug it together:
Plug this female cable onto the main board socket and this will be your CarPlay/AA port. I think the cable color order is backwards, or it's the picture, so unpin the wires and rearrange in the correct color order as necessary to match the original cable.:
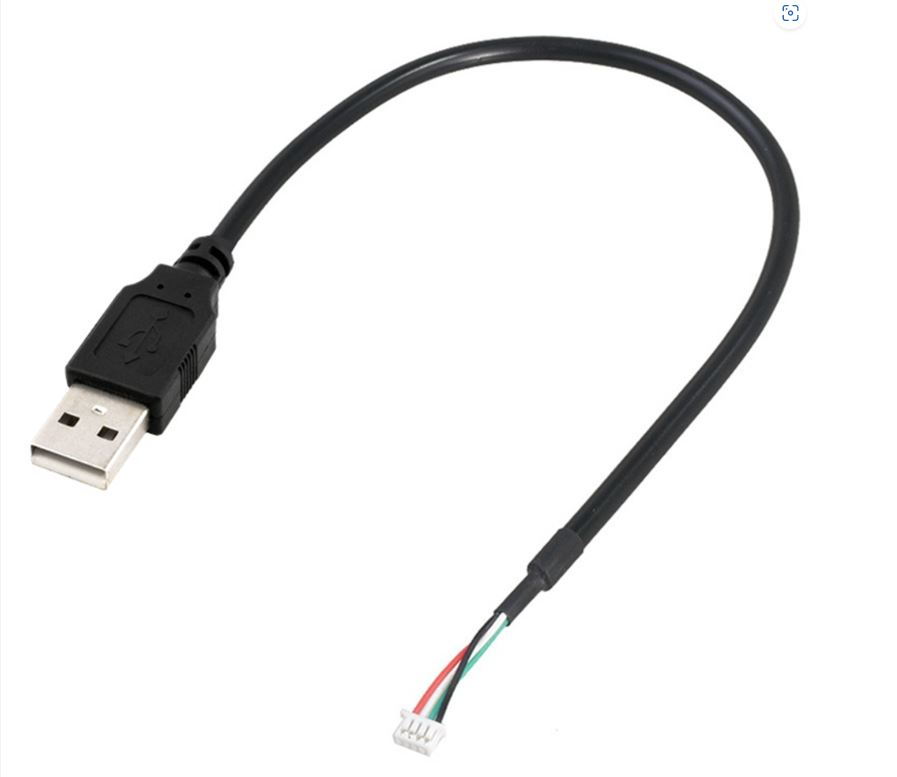
Next take the male USB cable and plug the small white connector onto the other socket (behind the PCCM front USB socket). Make sure plug into the connector so the red/white/green/black wires match in sequence with the original header cable, in the picture the wire colors are backwards so you'll probably need to unpin and rearrange. There's usually a tiny nub on the underside of the plastic connector that you'll need to shave off with a razor so it keys into the 6pin socket correctly. Compare the ends of the four pin and 6 pin connectors to see the differences:
I can't order this cable via the AliExpress link. Can any of you help me with that?
So to make it simple, unless you make your own cables, and ok without the extra shielding, just buy the following stuff out there and plug it together:
Plug this female cable onto the main board socket and this will be your CarPlay/AA port. I think the cable color order is backwards, or it's the picture, so unpin the wires and rearrange in the correct color order as necessary to match the original cable.:
Next take the male USB cable and plug the small white connector onto the other socket (behind the PCCM front USB socket). Make sure plug into the connector so the red/white/green/black wires match in sequence with the original header cable, in the picture the wire colors are backwards so you'll probably need to unpin and rearrange. There's usually a tiny nub on the underside of the plastic connector that you'll need to shave off with a razor so it keys into the 6pin socket correctly. Compare the ends of the four pin and 6 pin connectors to see the differences:
I can't order this cable via the AliExpress link. Can any of you help me with that?
For moving the CarPlay USB to the back, is anyone able to put together a step-by-step for dummies? Maybe it's too late in the night, but that last post just flew over my head.
Is it possible to buy all these parts elsewhere? AliExpress is giving me a May delivery date... Would love to try this mod out this weekend.
Does anyone know where I can get this stuff domestically? Are you all really ordering on AliExpress with multi-month waits?
I did order the four cables from Aliexpress. Worked out to two shipments. Both originally May 25, but one has already quickened to Apr 20. I expect they may quicken further. I am still on back order for the PCCM+, so no hurry (Gaudin shows in stock but trying to save a couple hundred by buying elsewhere).
Although I’m not keen on installing PCCM+ twice, I will likely install it ‘as is’ first and get it all set up and checked working properly (especially Apple Carplay) for a period of time before I void the warranty by opening up and applying the USB swap mod. As these Aliexpress cables are not shielded, I don’t know how I could determine if using them degrades performance without first understanding how the PCCM+ works with original cables.
Does anyone know where I can get this stuff domestically? Are you all really ordering on AliExpress with multi-month waits?
I hear ya. Unfortunately, even Walmart (online) , Amazon and eBay all peddle wares from China so shipping time is similar. It is coming quicker than the stated time and order more than one (they're cheap enough) in case you mess it up.
I RMA'ed my map SD card last week, and the replacement showed in the mail today. I can confirm that the new SD card works in WA state. Gaudin handled the RMA great.
Oh one more thing. I also noticed like others that, with the faulty card, using GPS to set the time would result in UTC time instead of the local TZ. I suspected that was the fault of the map card - it couldn't display my WA maps so it probably didn't have the TZ info too. I didn't change my TZ in the android control panel, and decided to wait for the replacement card. The new card enables the unit to set the right TZ automatically.
Agreed regarding Gaudin, they were excellent to work with. Handled the SD card swap seamlessly.
Regarding the USB and relocating to the back of the unit, I think I�ve come to the realization that until someone on here wants to start a side business of making the six pin cable (which may never happen) or starts doing the conversion to the back of the unit as a service, I may just leave mine on the front of the unit. However if there�s true step by step instructions at some point for it, then maybe I�d give it a try. Just not confident enough in my abilities to do this until there�s a step by step guide with all parts that are known to work.
Hoping to install my unit in April as I just got my car out of storage. Thanks to everyone for the helpful info that will hopefully make the install easy.
Agreed regarding Gaudin, they were excellent to work with. Handled the SD card swap seamlessly.
Nice. Suncoast punted the SD card problem to local dealers, so I just contacted mine to see if I can get replacement through them. Glad to hear these new cards work.
Wish I read this before I installed my PCCM+ unit. This is exactly what happened to my top right bracket. It would not push in so I could remove it. I finally used a short screwdriver to force it in which only bent the bracket screwed into the front of PCCM+ shown in the part of the photo circled in red which I bent back into place. To me there are too many small pieces in the bracket assembly that can go out of alignment.
This should be added to the DIY sticky. When installing the brackets, make sure the top locking tabs are on the INSIDE of the stops on the unit. If they are on the OUTSIDE, the locking tabs cannot be pushed in for removal. The unit will still go into the dash, but it cannot come out without bending the stop (firm push with screwdriver). Learned this this hard way.
I removed those off my PCCM, they are annoying and serve little purpose.
When installed the bottom clamp works just fine
and the side cheeks of the console keep it all snug
Can someone confirm: is this unit a 4 channel unit or 2 channel? This entire thread only mentions 2 channels coming from the 12 pin section and it appears that the standard yellow connector section of the ISO C1 connector has no output signal. They managed to design this as 2/10 difficultly when removing factory setups and ignoring aftermarket setups ... many owners have cars that PO's have made audio changes to.
Can someone confirm: is this unit a 4 channel unit or 2 channel? This entire thread only mentions 2 channels coming from the 12 pin section and it appears that the standard yellow connector section of the ISO C1 connector has no output signal. They managed to design this as 2/10 difficultly when removing factory setups and ignoring aftermarket setups ... many owners have cars that PO's have made audio changes to.
Try going to CAR > Settings > Volume (hold for 10-15 sec). Change from CAN to AMP mode.
Nice. Suncoast punted the SD card problem to local dealers, so I just contacted mine to see if I can get replacement through them. Glad to hear these new cards work.
That is unfortunate. I was concerned that Gaudin would do the same, but they were happy to send a pre-paid label and ship out the new card. When I originally inquired about the unit at my dealer, they had no idea what I was talking about and didn't seem as interested to look into when they'd be receiving them. Hence I ordered from Gaudin. I didn't feel right having my dealer handle the swap when I originally purchased from Gaudin, I wanted one place to go to in order to handle this.
Originally Posted by maiko
This should be added to the DIY sticky. When installing the brackets, make sure the top locking tabs are on the INSIDE of the stops on the unit. If they are on the OUTSIDE, the locking tabs cannot be pushed in for removal. The unit will still go into the dash, but it cannot come out without bending the stop (firm push with screwdriver). Learned this this hard way.
Do you have a pic of how it's supposed to look? Thanks for posting and making us aware.

 03-28-2023, 11:41 AM