
Cheap Android Head Unit Review!
 02-28-2023, 04:07 PM
#691
Nordschleife Master
in case i missed this - this should explain everything clearly.
the pink wire (there are 2 of them) are reverse trigger inputs. the primary reverse trigger is on the main 20-pin main harness (technically comes out of the canBus unit) along with main rear cam RCA input , the 2ndary reverse trigger is on the 6-pin video harness only (which has the front cam RCA input as well as CamPWR + CamGND, and ANOTHER rear cam RCA input). Both pink wires (primary + 2ndary) are routed to the same circuit inside the unit. Both rear cam RCA inputs (primary + 2ndary) are also routed to the same rear RCA video input circuit inside the unit.
NEITHER pink reverse trigger wires provides power to the camera. All it does is wait to receive a 12v signal (to be spliced to the reverseLight wire) from the black/blue taillight / kickPanel (yes they are the same wire). Upon receiving the 12v, you will hear a 'click' and the unit will flip into reverseCamera RCA input mode. As it does this, camPWR (from the 6-pin video harness) will now fire up and sends out 200ma, which is used to power the camera (both front and rear cameras is to be spliced here and hence BOTH cameras turn on at the same time). This way the cameras are ONLY when needed (ie. in REVERSE or when the fCam app is on), extending the life of the cameras (they are not to ever recieve a constant 12V). Once the car is no longer in reverse, the pink reverse trigger stops receiving a signal... the unit will flip out of reverse cam RCA input mode (the cams will still be powered for up to 10 more seconds ).
The reason why 2 pink wires can be 'tied' together via the metal adapter is because the primary reverse trigger for the autoTranCars can come from the canBus module (a pink wire comes out of the canbus module, which gets tied to the pinkWire going into the primary 20 pin harness). In this case the black/blue wire connections arent needed.
To get the unit + cameras working as intended, BOTH rear + front cameraPWR + camGND are to be spliced to the 6-pin videoCam-specific harness. This ensures clean power + gnd to the camera reducing any chances of flicker caused from bad splices or shared GND. The trick to make this happen is to also fish a DC extension cable when fishing the videoCam (yellow RCA + red 22 guage) cable.... one end of the DC extension cable plugs into the cam, while the other end plugs into the cameras supplied black + red wired connectors ... which will splice into the PCM itself.
Now the 22 guage red cable (the one attached to the yellow RCA video cable) is ONLY to be used in the case where we have a manual transmission car needing to transfer the reverseLight signal (from the tail light) and on the pcm end, will be spliced into either the primary or 2ndary pink reverse trigger cables (either will work).
This ensures the reverse camera will work the same way oem car systems work - they are powered by the PCM ONLY, but power to the cameras occur when the PCM receives a reverse input trigger signal.
Now that only the PCM powers the cameras - the beauty is that the Fcam app - being a built in (hardware) android app actually fires up the camPWR (in the 6 pin video harness) and turns on both cameras whenever the fCam app is on. Also being an android (hardware) app, the fCam app is one of the few apps that can actually be mapped to the pcm buttons, or steering wheel button. The default display is the front cam when using the fCAM app - you can see how useful this will be by just clicking a button on the steering wheel when approaching a ramp/curb and the front parking camera output shows on the screen.
While your at it, you can check out the rear camera as well while in any gear. Also when wired correctly this way, you can set it in the secret menu for the front camera Delay. It is a feature that after the car comes out of reverse, the front camera will come on (for up to 10 seconds, you can set to less or turn off this feature completely) before switching back automatically to whatever previous app you were running. This is very useful for multi-point turns in tight spots as you will automatically see both front + rear cams as you switch gears, without having to do anything. And after 10 seconds, the power to both front + rear cameras automatically turns off reducing battery drain and increasing the life of the cameras (as should be).
With the new generation of AHD cameras and reverse cams also being front cameras too, make sure that you cut/don't cut the wires that pertain to
- AHD
- image mirroring
- parking lines
to the correct settings, depending on the application and preference. I dont bother with the ugly parking lines out of the camera - as they can be set via various lengths in the PCM (not to mention for the auto 911 owners, the steering angle sensor info will actually get the reverse lines to move via the canBus i believe. But remember to cut (or not cut) the line that sets image mirroring, depending on if you use the camera for front, or reverse (mirrored image) cam.
1)so rear cam go to cam power from the PCM - so the new PCM pink lead actually provides power to the rear camera? So its not a passive sensing wire but an active powered wire that triggers when fcam launches? If I don't have the CANBUS reverse trigger (07 997.1 manual) then will shifting into reverse not trigger the PCM? If so I should then tie the red wire from the camera bridging cable in front to the pink and in rear to the camera red input?
2)I read about being able to use the blue/black backup wire to trigger/power the rear camera red lead. This can be done front or back but regardless if done this way the camera will only power when the reverse light is on so fcam won't work correct? Shouldn't matter if the blue/black is sourced from the rear light or from the firewall/fuse circuit because is the same blue/black wire correct?
3) so you take the pink PCM wire and bridge it to the rear camera power. Then you run a separate bridge wire from the blue/black to the pink trigger wire off the harness? You don't tie the two pink wires together?
SOLVED my rear camera issue.
The PCM was not getting any signal to trigger the camera input. I had not wired the red accessory wire of the video bridge cable to the rear tail power, so the PCM end was not feeding any trigger signal to the two pink rear camera wires of the PCM+Canbus.
So it works great upon shifting into reverse but Fcam won't recognize the rear camera bc its only "ON" when I shift into reverse. The only way that Fcam would work by my guess is if the camera was on constant power or acc power (blue acc power to red bridge video cable red wire) and then the reverse light signal from the blue/black triggers the pink trigger wire
Last edited by myw; 02-28-2023 at 05:31 PM.
 02-28-2023, 04:09 PM
#692
Nordschleife Master
Unless we can group together a single batch order of 50 units - It wont be happening.
Last edited by myw; 02-28-2023 at 04:52 PM.
02-28-2023, 04:13 PM
#693
Nordschleife Master
did you use a custom harness to get RCA outputs out of the oem pcm? Or was it directly ISO->ISO connector. Out of the basic android to RCA -> mostHur, or oem ISO speaker outs - i am not up to date with car audio connectors.
Last edited by myw; 02-28-2023 at 04:32 PM.
02-28-2023, 04:49 PM
#694
Nordschleife Master
I started with a Parrot Bluetooth unit, then a Mobridge or Dension (don't remember) then to a Mr 12v. All of them had a bit of alternator whine and had complicated interfaces. They "cheapened" the feel of the car. This unit is the opposite - it brings it to 2023 and beyond with a seamless integration!
02-28-2023, 05:05 PM
#695
Rennlist Member

Many years ago, Dension was the only way to get Phone to BT, and other features with the car, at that time it was the way to go,
it was the breakthrough at the time! Just like the android units of today.
it was the breakthrough at the time! Just like the android units of today.
02-28-2023, 05:19 PM
#696

I made a custom harness. Replaced the pins in the ISO connector and then put RCA connectors on the end of a 4 pair twisted cable.
The following users liked this post:
myw (02-28-2023)
02-28-2023, 05:20 PM
#697
Nordschleife Master
i just used the tranzitBlu HF instead. 80$. while it was an fm Transmitter - it physically used the FM line as a hardwired analog connection. RDS info too. it was insane value for the money - and it was during the dension era.
02-28-2023, 05:29 PM
#698
Rennlist Member
How did music or phone sound with it?
Last edited by larrytrk; 02-28-2023 at 05:31 PM.
03-01-2023, 09:12 AM
#700
The drill ones like that:
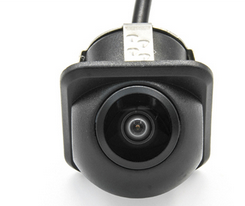
Or the ones with a braket like this:
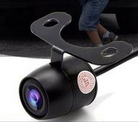
Or something completly different?
I'm about to get the Owtosin unit to replace my button-less XTRONS unit. Will change the rear camera for a AHD one (also change from license plate to drill one) and as I'll be at it, I'll add the front camera for good measure.
I am also thinking of removing old systems as the NAV and the Telephone. Remove them phisically and add a MOST loop to ensure the MOST fibre loop continuity.
The following users liked this post:
myw (03-01-2023)
03-01-2023, 09:16 AM
#701
@leloupgris
here is a link to the camera that myw mentioned.
https://www.aliexpress.us/item/32568...andl_shipto=US
It has the bit included. Looking at adding one in the front but still considering mounting options. I need it as i'm not nice to my front bumper....
here is a link to the camera that myw mentioned.
https://www.aliexpress.us/item/32568...andl_shipto=US
It has the bit included. Looking at adding one in the front but still considering mounting options. I need it as i'm not nice to my front bumper....
I am also looking for a front camera mounting option.
03-01-2023, 10:09 AM
#702
Nordschleife Master
let bob@owTowsin know you want the Michael wong camera -there will be no mistakes this way.
If anything pm me directly and I will go over ur order to make sure no mistakes re options + specs and bob will get back you directly.
re camera - I used this cam front AND back
There is a new low profile rear backup cam that goes into the bulb light that won�t require drilling but is more of a pain in the butt to install as drilling is fast and easy.
Of course the drilled cam will look better as it�s still in the middle.
For the drill cam in the front bumper - make sure to lemme know b4 you drill - you don�t want to drill into one of the attachment brackets in the front bumper retrainer frame - I was able to figure out the measurements of where the bracket points WOULDNT be �. without removing the bumper.
Last edited by myw; 03-01-2023 at 10:10 AM.
The following users liked this post:
scadams (08-25-2023)
03-01-2023, 10:27 AM
#703
Nordschleife Master
while installing a front cam I would recommend routing a gps extension cable adapter so you can use the factory gps puck with your new androidCommunicationSystem
you just have to buy the correct adapter (and if it doesn�t work out you can still route the gps puck) to the drunk at the same time and mount it on the opposite side of the oem spot.
Last edited by myw; 03-01-2023 at 11:30 AM.
03-02-2023, 12:51 AM
#704
let bob@owTowsin know you want the Michael wong camera -there will be no mistakes this way.
If anything pm me directly and I will go over ur order to make sure no mistakes re options + specs and bob will get back you directly.
re camera - I used this cam front AND back
There is a new low profile rear backup cam that goes into the bulb light that won�t require drilling but is more of a pain in the butt to install as drilling is fast and easy.
Of course the drilled cam will look better as it�s still in the middle.
For the drill cam in the front bumper - make sure to lemme know b4 you drill - you don�t want to drill into one of the attachment brackets in the front bumper retrainer frame - I was able to figure out the measurements of where the bracket points WOULDNT be �. without removing the bumper.
If anything pm me directly and I will go over ur order to make sure no mistakes re options + specs and bob will get back you directly.
re camera - I used this cam front AND back
There is a new low profile rear backup cam that goes into the bulb light that won�t require drilling but is more of a pain in the butt to install as drilling is fast and easy.
Of course the drilled cam will look better as it�s still in the middle.
For the drill cam in the front bumper - make sure to lemme know b4 you drill - you don�t want to drill into one of the attachment brackets in the front bumper retrainer frame - I was able to figure out the measurements of where the bracket points WOULDNT be �. without removing the bumper.
Yes for the backup cam that goes into the plate light I had to remove the bumper because there was no way to plug it to the harness without doing so, the wire was too short. As I want to get an AHD one, I will change it for a drill one as it looks better in my opinion.
By the way, is your discount code expired? I tried it yesterday to no avail.
Please also document this when going this route . I have yet to do this.
while installing a front cam I would recommend routing a gps extension cable adapter so you can use the factory gps puck with your new androidCommunicationSystem
you just have to buy the correct adapter (and if it doesn�t work out you can still route the gps puck) to the drunk at the same time and mount it on the opposite side of the oem spot.
Regarding the GPS, this is good advice but I already installed the GPS puck in my previous install next to the factory location. I thought about using the original one, but I wondered if it wouldn't be less precise as it's almost 20 years old. I don't know if there's any change in technology in these pucks. I will probably remove also the old one.
03-02-2023, 01:32 PM
#705
Nordschleife Master
while the wire can be too - alot of the time by undoing the top bumper screws can help.
your old xtrons gps puck can be used still - for the most part the tech hasn�t changed - and the oem pucks imo are of higher quality then aftermarket pucks.
as for my code - which link are you using?
My face plate bejng used on cheap wholesale/public units that are of the stereotypical cheap Chinese units (quality and components). If the link offers 1g/16g low end cpus - and not the px5 px6 and QCM - quallComm - then it�s not mine.
There are substantial internal and rear external differences (despite given access to my front plate).
Thanks for the feedback. I will add it to the basket.
Yes for the backup cam that goes into the plate light I had to remove the bumper because there was no way to plug it to the harness without doing so, the wire was too short. As I want to get an AHD one, I will change it for a drill one as it looks better in my opinion.
By the way, is your discount code expired? I tried it yesterday to no avail.
I will make sure to document it. But it shouldn't be too complicated.
Regarding the GPS, this is good advice but I already installed the GPS puck in my previous install next to the factory location. I thought about using the original one, but I wondered if it wouldn't be less precise as it's almost 20 years old. I don't know if there's any change in technology in these pucks. I will probably remove also the old one.