Notices
996 Forum 1999-2005
Sponsored by:

blown engine

Thread Tools
 
Search this Thread
 
Old 11-25-2016, 08:55 PM
  #751  
Ahsai
Nordschleife Master
 
Ahsai's Avatar
 
Join Date: May 2005
Posts: 7,328
Received 62 Likes on 47 Posts
Default

Originally Posted by Schnell Gelb
What ? You didn't dismantle it to polish it down to the last nano particle? LOL
Thank you anyway. And particularly for the best M96 rebuild thread by far !
Haha, I did think about taking it apart to inspect it but then I think it's probably not needed.
Old 11-27-2016, 07:00 PM
  #752  
Noz1974
Burning Brakes
 
Noz1974's Avatar
 
Join Date: Feb 2013
Posts: 774
Likes: 0
Received 59 Likes on 40 Posts
Default

Originally Posted by Schnell Gelb
Duncan, It would be interesting to see a photo of the 'plug' that seals the IMS tube. I doubt many Rennlisters have ever seen one.
There is no plug at the bearing end once the bearing is removed it's open, the plug is at the other end which slots into the oil pump!
Old 11-27-2016, 07:20 PM
  #753  
Schnell Gelb
Drifting
 
Schnell Gelb's Avatar
 
Join Date: Apr 2014
Location: Los Angeles
Posts: 2,333
Likes: 0
Received 23 Likes on 18 Posts
Default

We are discussing "The Solution" by Raby/LN. I respectfully suggest you reconsider your comment about the plug Duncan and I discussed.
"Factory IMS shafts are not plugged, which is why we have to supply a specially manufactured plug with the IMS Solution" ,So said Jake Raby
Post 107:
http://986forum.com/forums/performan...upgrade-6.html
Old 11-27-2016, 11:21 PM
  #754  
Flat6 Innovations
Former Vendor
 
Flat6 Innovations's Avatar
 
Join Date: Nov 2010
Location: Cleveland Georgia
Posts: 6,968
Received 2,282 Likes on 899 Posts
Default

Originally Posted by Noz1974
There is no plug at the bearing end once the bearing is removed it's open, the plug is at the other end which slots into the oil pump!
The plug is installed with the IMS Solution only. This is done to keep the IMS tube from filling with oil, thereby reducing available oil within the engine by 3/4 of 1 quart.

Watch the IMS Solution installation video at www.theimssolution.com to see how this is installed.
Old 11-28-2016, 01:57 AM
  #755  
Ahsai
Nordschleife Master
 
Ahsai's Avatar
 
Join Date: May 2005
Posts: 7,328
Received 62 Likes on 47 Posts
Default

And in the meantime it's growing...

Old 11-28-2016, 08:32 AM
  #756  
AWDGuy
Three Wheelin'
 
AWDGuy's Avatar
 
Join Date: Mar 2011
Posts: 1,782
Received 8 Likes on 7 Posts
Default

amazing
Old 11-28-2016, 12:18 PM
  #757  
cringely
Racer
Thread Starter
 
cringely's Avatar
 
Join Date: Sep 2012
Location: So Cal
Posts: 415
Received 43 Likes on 26 Posts
Default

Amazing photos, almost works of art. Looking forward to seeing the final result
Old 11-28-2016, 01:20 PM
  #758  
Ahsai
Nordschleife Master
 
Ahsai's Avatar
 
Join Date: May 2005
Posts: 7,328
Received 62 Likes on 47 Posts
Default Cylinder heads

Originally Posted by AWDGuy
amazing
Originally Posted by cringely
Amazing photos, almost works of art. Looking forward to seeing the final result
Thanks guys!

The beautiful machine work from Len, Hoffman Automotive Machine.


Ultrasonically cleaned


Diamond milled deck


See how clean the SAI ports/passages are at the exhaust ports!


New springs, valve seals, valve retainers, and intake valve seats. Stage 1 port work


Mating surfaces inspected and cleaned again before mating
Old 11-28-2016, 01:36 PM
  #759  
Ahsai
Nordschleife Master
 
Ahsai's Avatar
 
Join Date: May 2005
Posts: 7,328
Received 62 Likes on 47 Posts
Default Nickies

A few more glamour shots before I bolted the heads on.


Old 11-28-2016, 01:42 PM
  #760  
Ahsai
Nordschleife Master
 
Ahsai's Avatar
 
Join Date: May 2005
Posts: 7,328
Received 62 Likes on 47 Posts
Default 3.8L Head Gaskets


Dry fitting the gasket to check proper fit
Old 11-28-2016, 01:49 PM
  #761  
Ahsai
Nordschleife Master
 
Ahsai's Avatar
 
Join Date: May 2005
Posts: 7,328
Received 62 Likes on 47 Posts
Default Torquing the head bolts

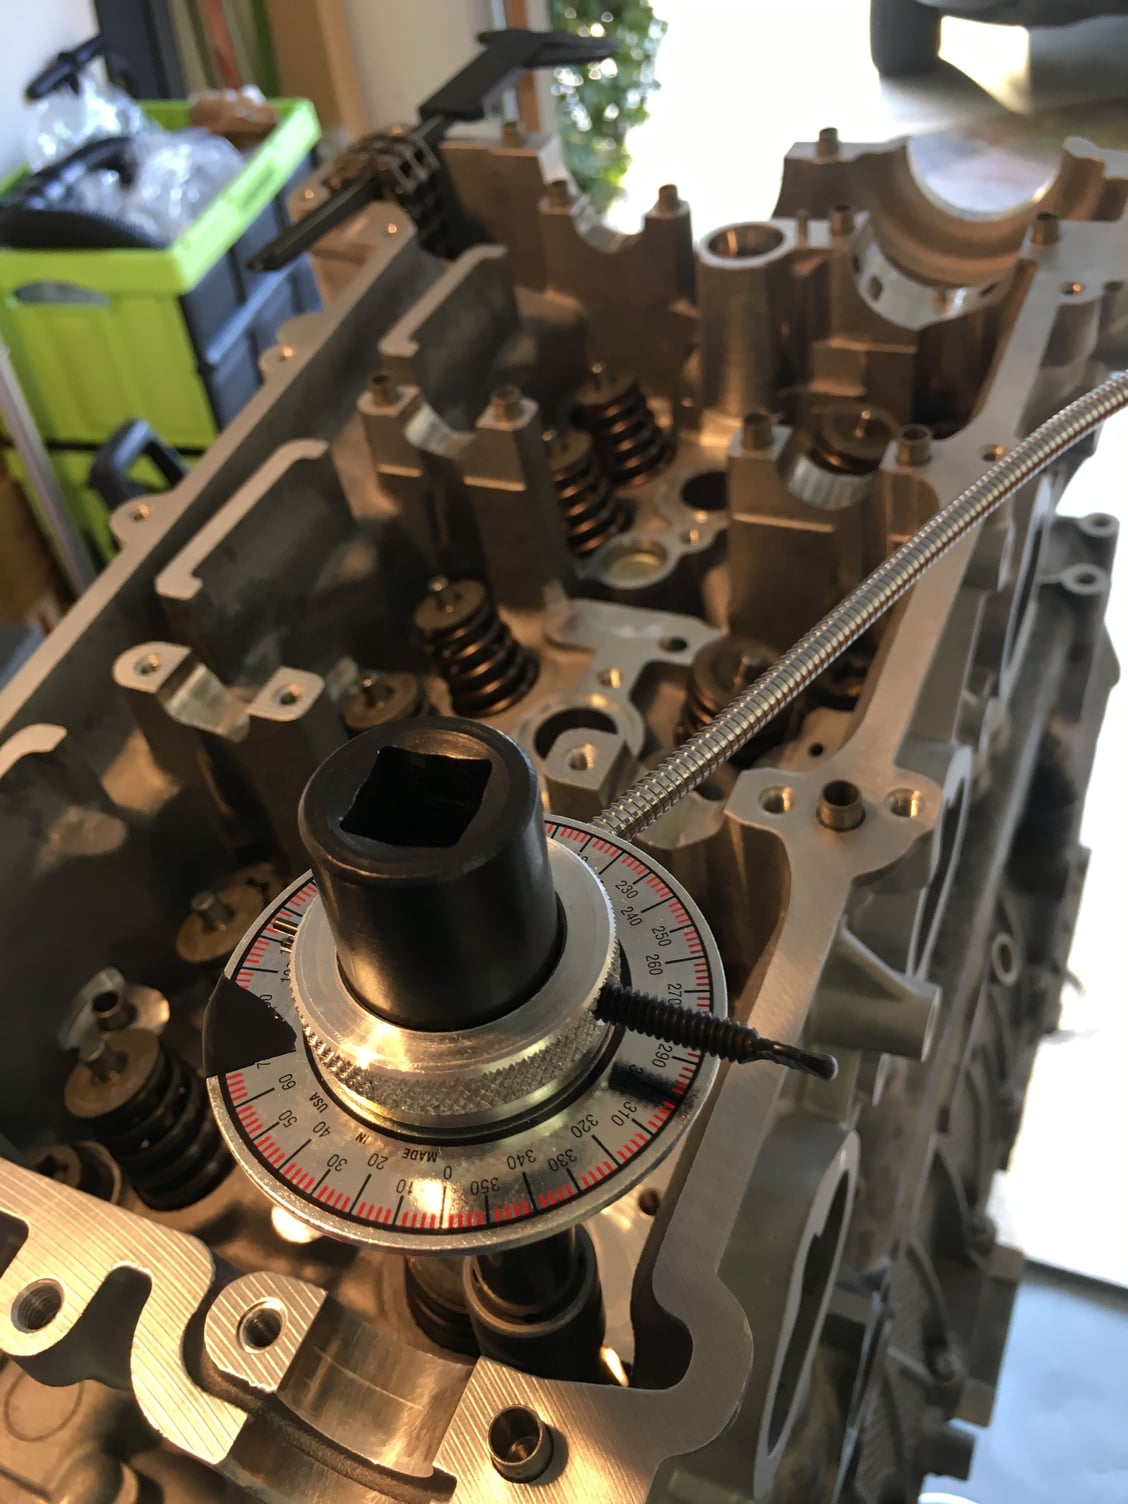
The head bolts are torque-to-yield and are $12 each (you need 24 bolts) so better not make any mistakes!


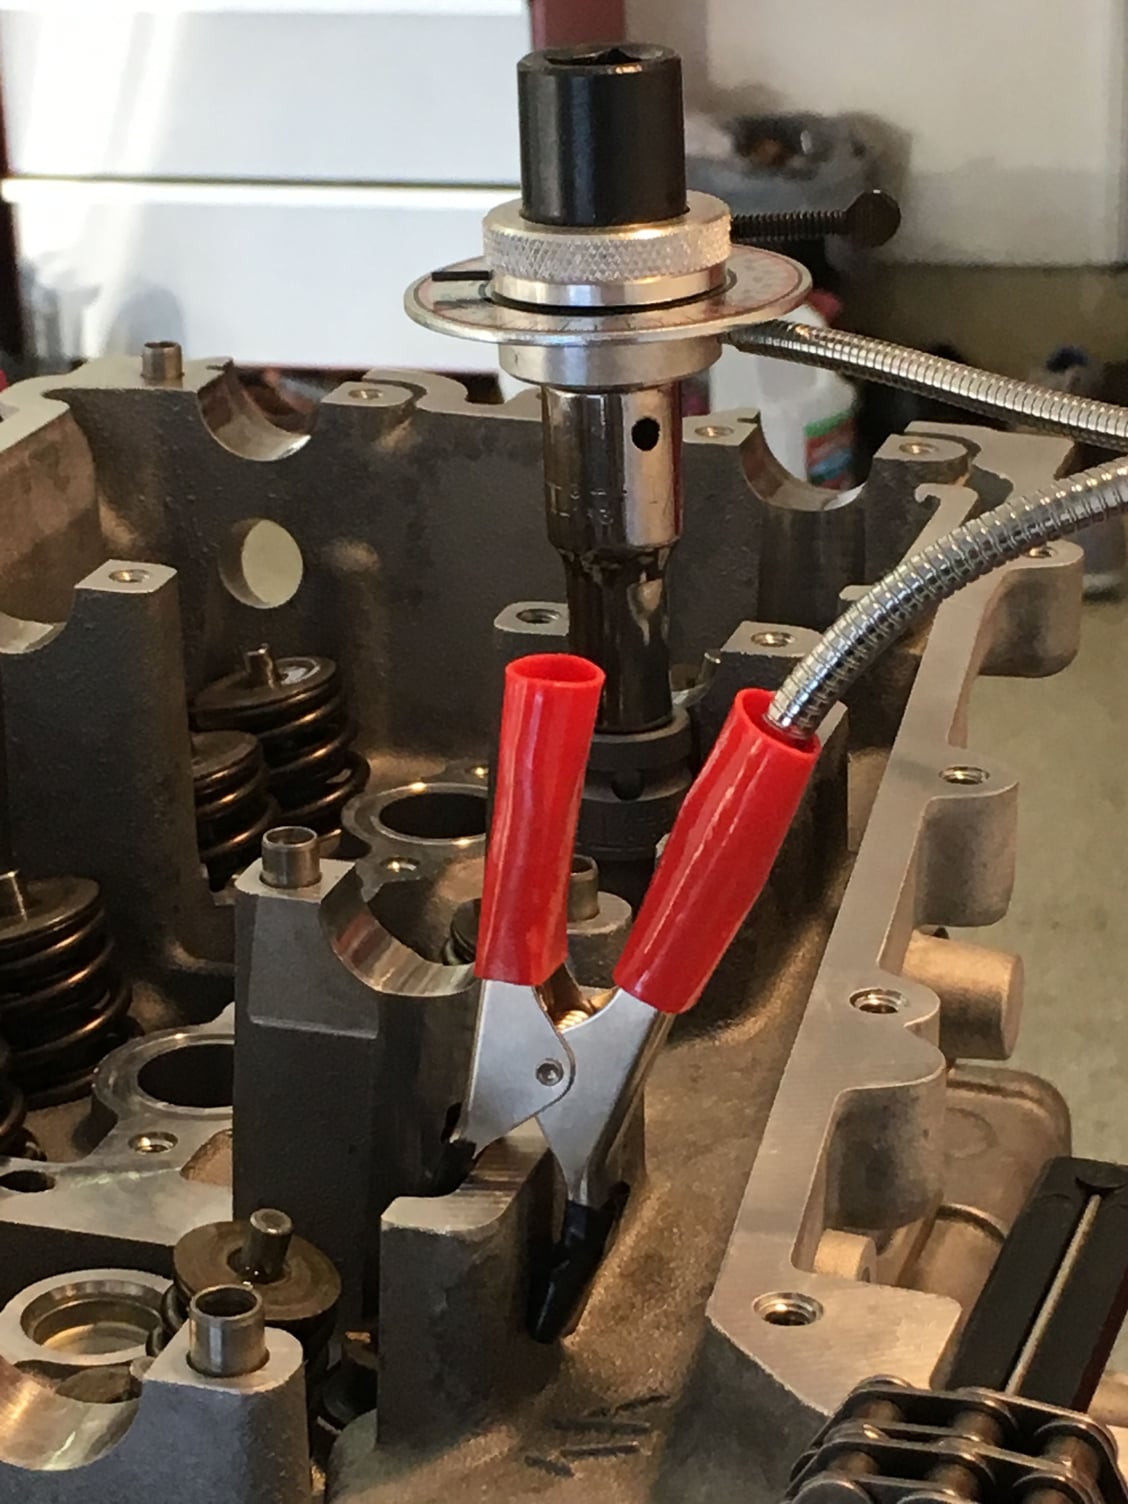
In Jake's class we used a Snapon digital angle gauge. Here I just used a long 1/2" ratchet and a simple Lisle angle gauge to save some $. Worked like a charm albeit more time to setup.


Tape at 70 degrees to aid reading


All the bolts are marked and sanity checked at the end after each round of angle torquing (total 2 rounds)


Set at 0 degree at the beginning with some torque applied to take up any slack (not shown)

Last edited by Ahsai; 11-28-2016 at 02:53 PM.
Old 11-28-2016, 04:25 PM
  #762  
Ahsai
Nordschleife Master
 
Ahsai's Avatar
 
Join Date: May 2005
Posts: 7,328
Received 62 Likes on 47 Posts
Default Lifter cradle, cams and cam cover


Lifter cradle ultrasonically cleaned by Len


Cam cover ultrasonically cleaned by Len. The cams were cleaned and polished by a local machine shop.


The 3 o-rings behind the lifter cradle...very easy to forget.


Cradle installed
Old 11-28-2016, 04:40 PM
  #763  
Esfoad
Racer
 
Esfoad's Avatar
 
Join Date: Sep 2016
Location: Budd Lake, NJ
Posts: 453
Received 21 Likes on 19 Posts
Default

Wow, just WOW!
Old 11-28-2016, 10:36 PM
  #764  
Slakker
Rennlist Member
 
Slakker's Avatar
 
Join Date: Dec 2013
Location: Edmond, OK
Posts: 4,748
Received 240 Likes on 108 Posts
Default

!!!
Old 11-29-2016, 03:58 AM
  #765  
Charlie129
AutoX
 
Charlie129's Avatar
 
Join Date: Jan 2015
Posts: 14
Likes: 0
Received 0 Likes on 0 Posts
Default

Hello Duncan,

you really do a great job, with accuracy and love in all details!
Great pictures, we can see that you like what you do

Best regards!


Quick Reply: blown engine


All times are GMT -3. The time now is 06:44 PM.