When you click on links to various merchants on this site and make a purchase, this can result in this site earning a commission. Affiliate programs and affiliations include, but are not limited to, the eBay Partner Network.
Come on Yaz... I'm no savage. Plus, when you have cup mirrors, you run cup mirrors
Glad you kept the cup mirrors! They look great.
Easy stuff and early night, long day ahead tomorrow. Uprights and wing, finished up the aero catch hood latches for good and for Yaz - I installed the mirrors
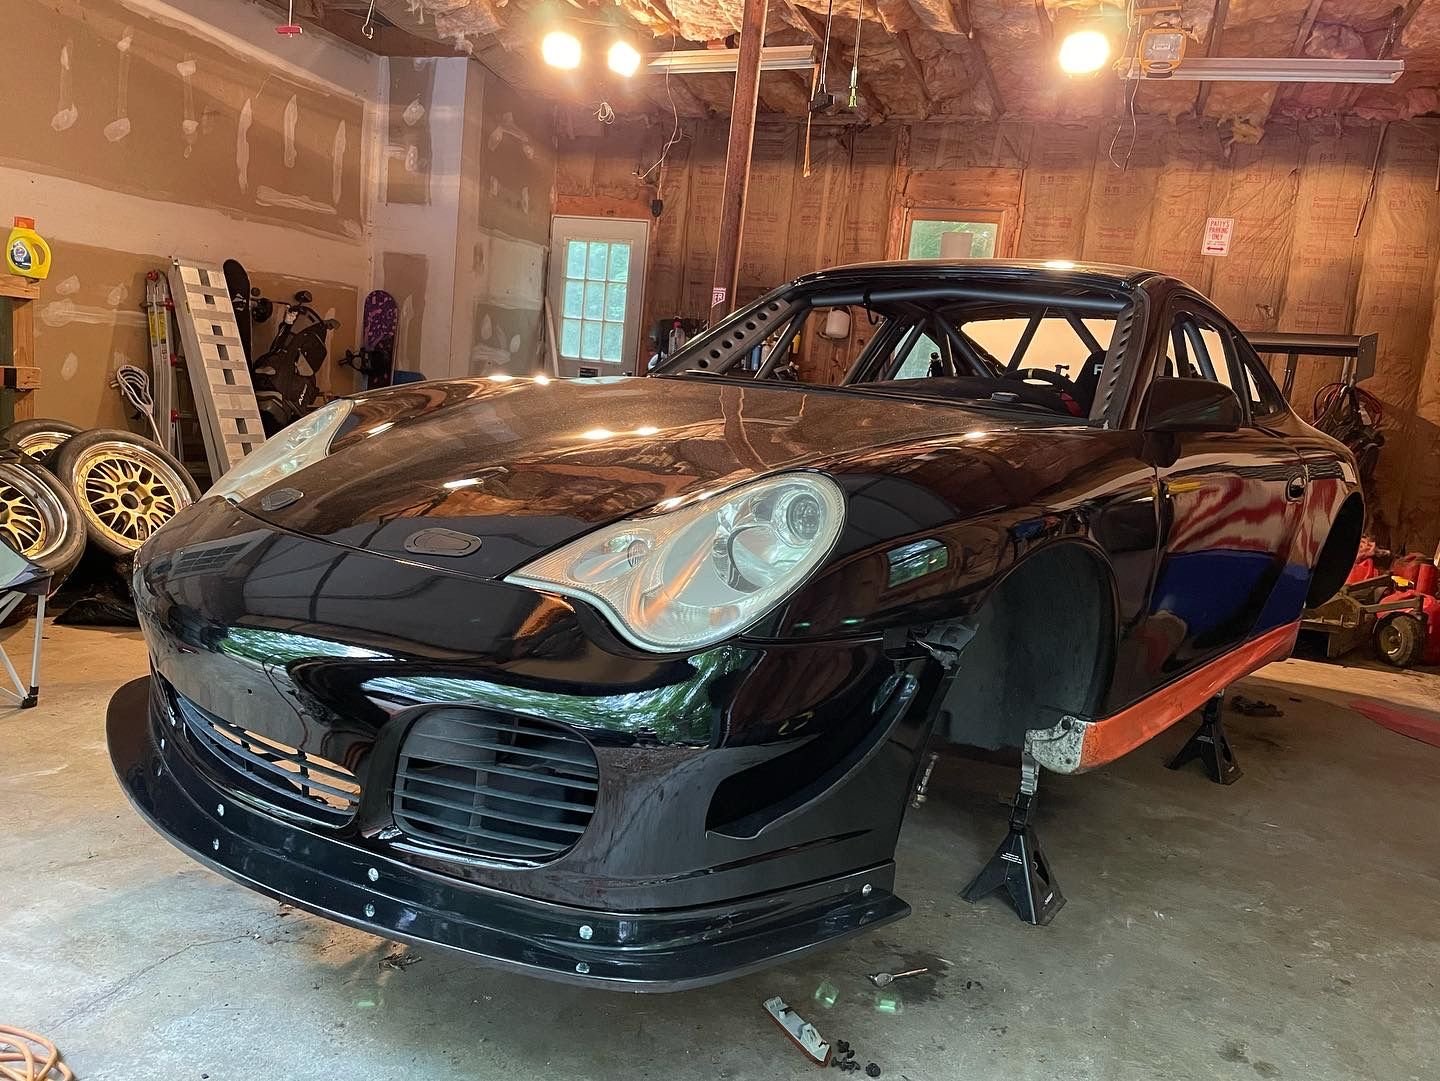
Kinda sad to see the rear deck and wing painted. But glad you kept the orange side skirts.
Your car looks awesome.
Can’t wait to see it all put back together.
Thanks guys ! I know you were fond of the Gulf colors Bruce - I was too, it was fortuitous as at the time, I had no budget to get the parts painted haha, so it really worked out. Was time for a change though, I gotta keep inching closer to the car thats in my head
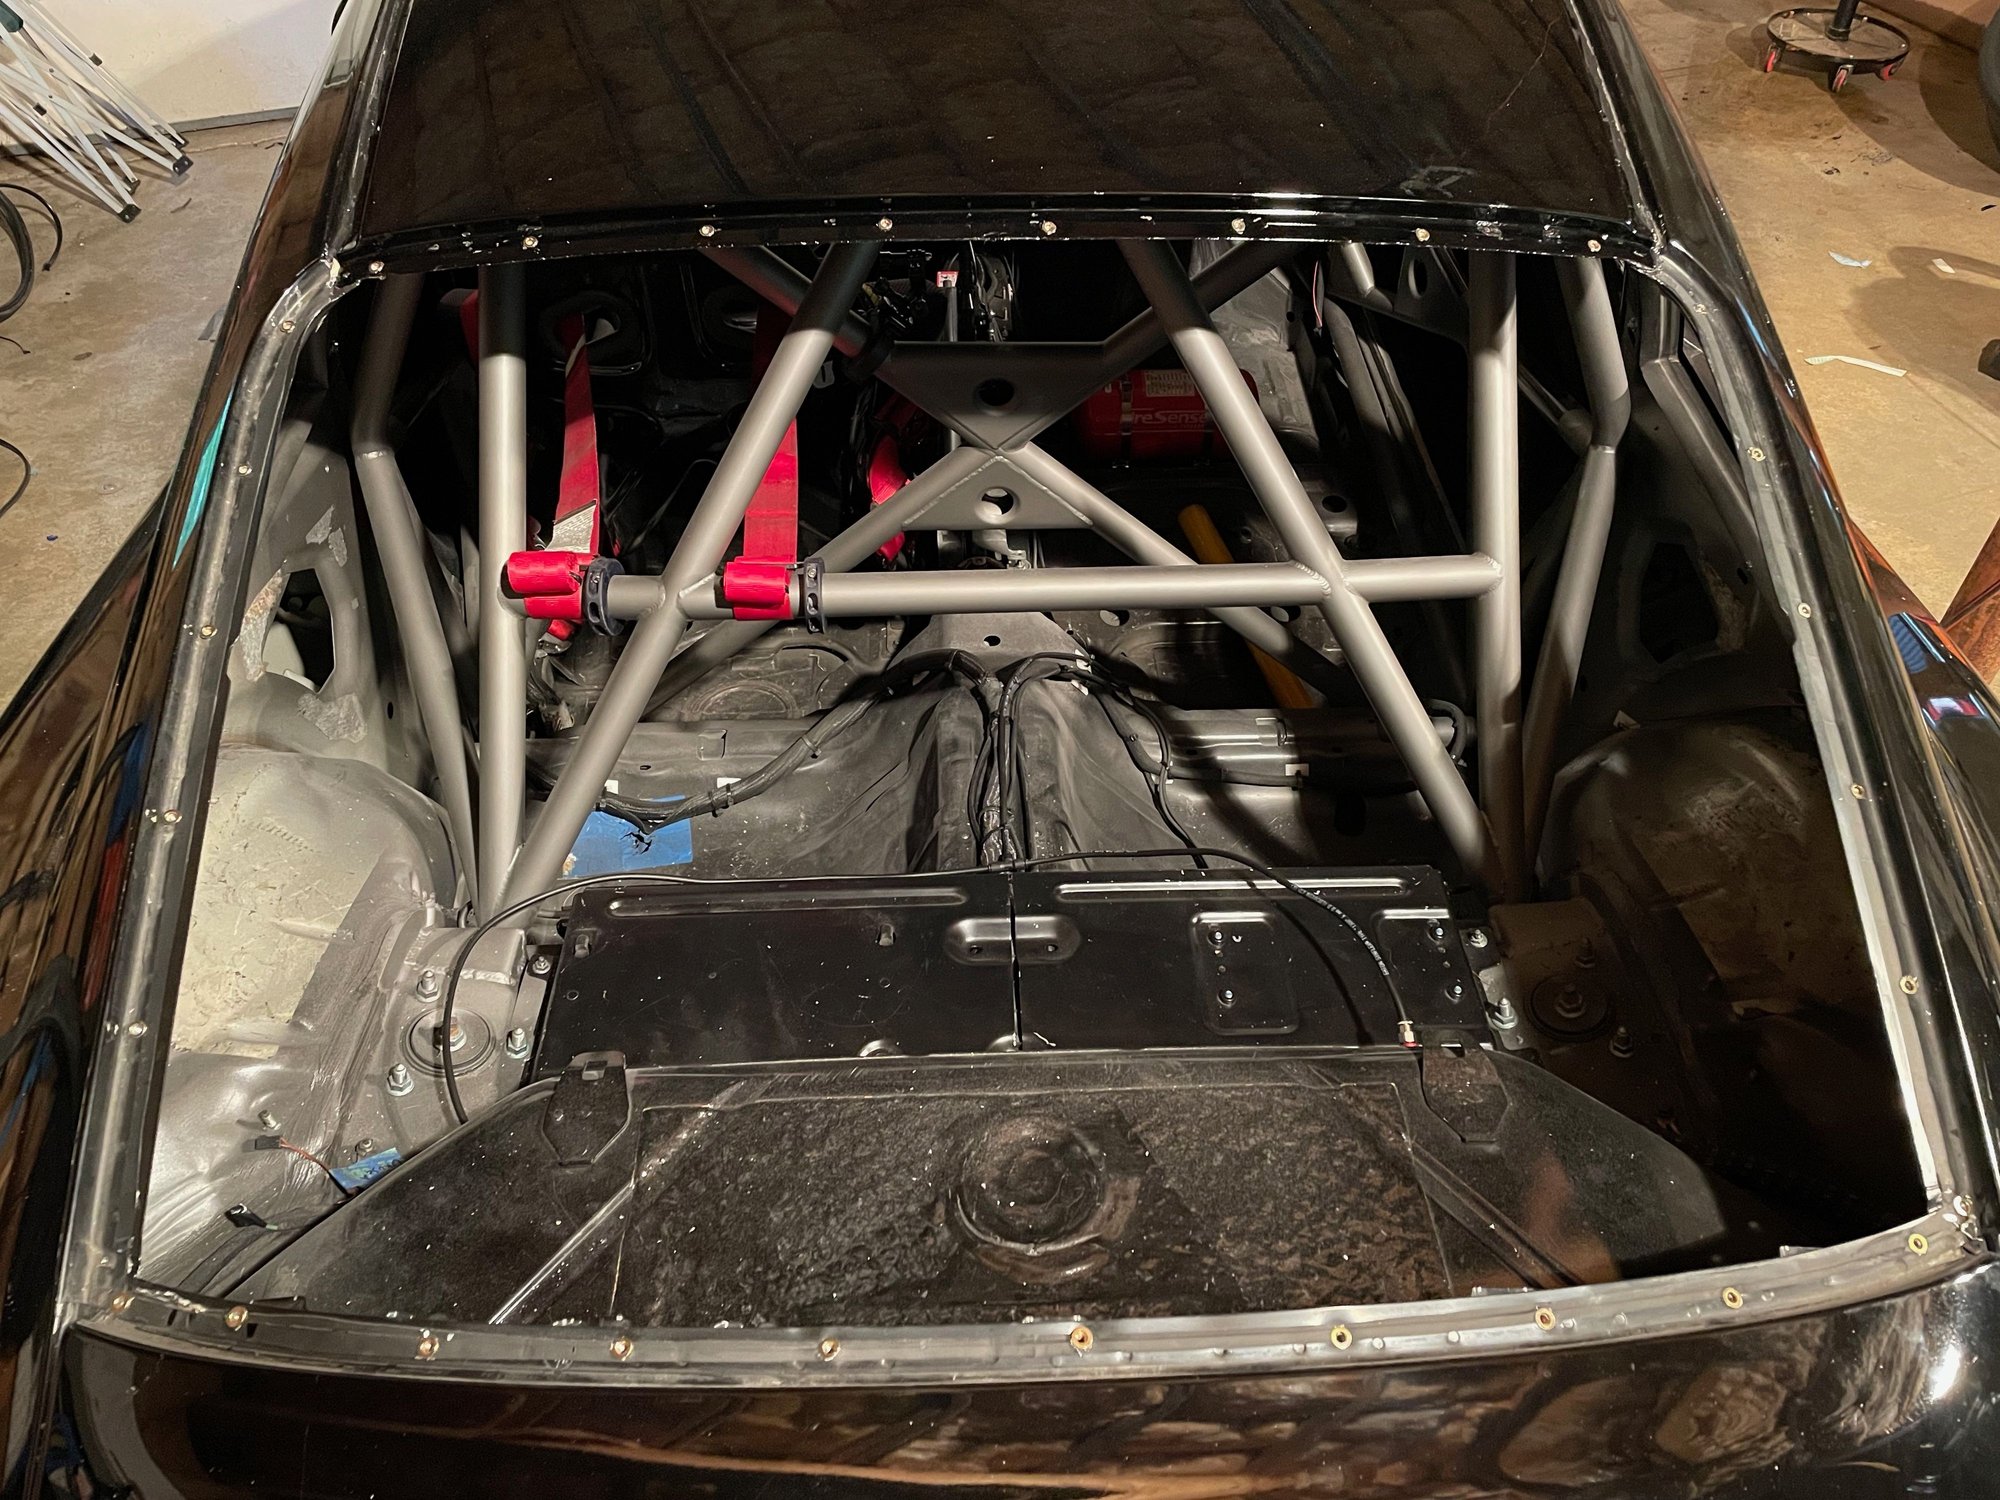
Today Pt. 1
Drilled about 30 holes in the car
Spent 1st half of the day working on rear lexan before I put it in the air. We are all mocked up, need to paint the boarder and order and receive the finish hardware and a couple strips of aluminum but hard part behind me.
Today Part 2... Making it look like it belongs in the junk yard.... again.
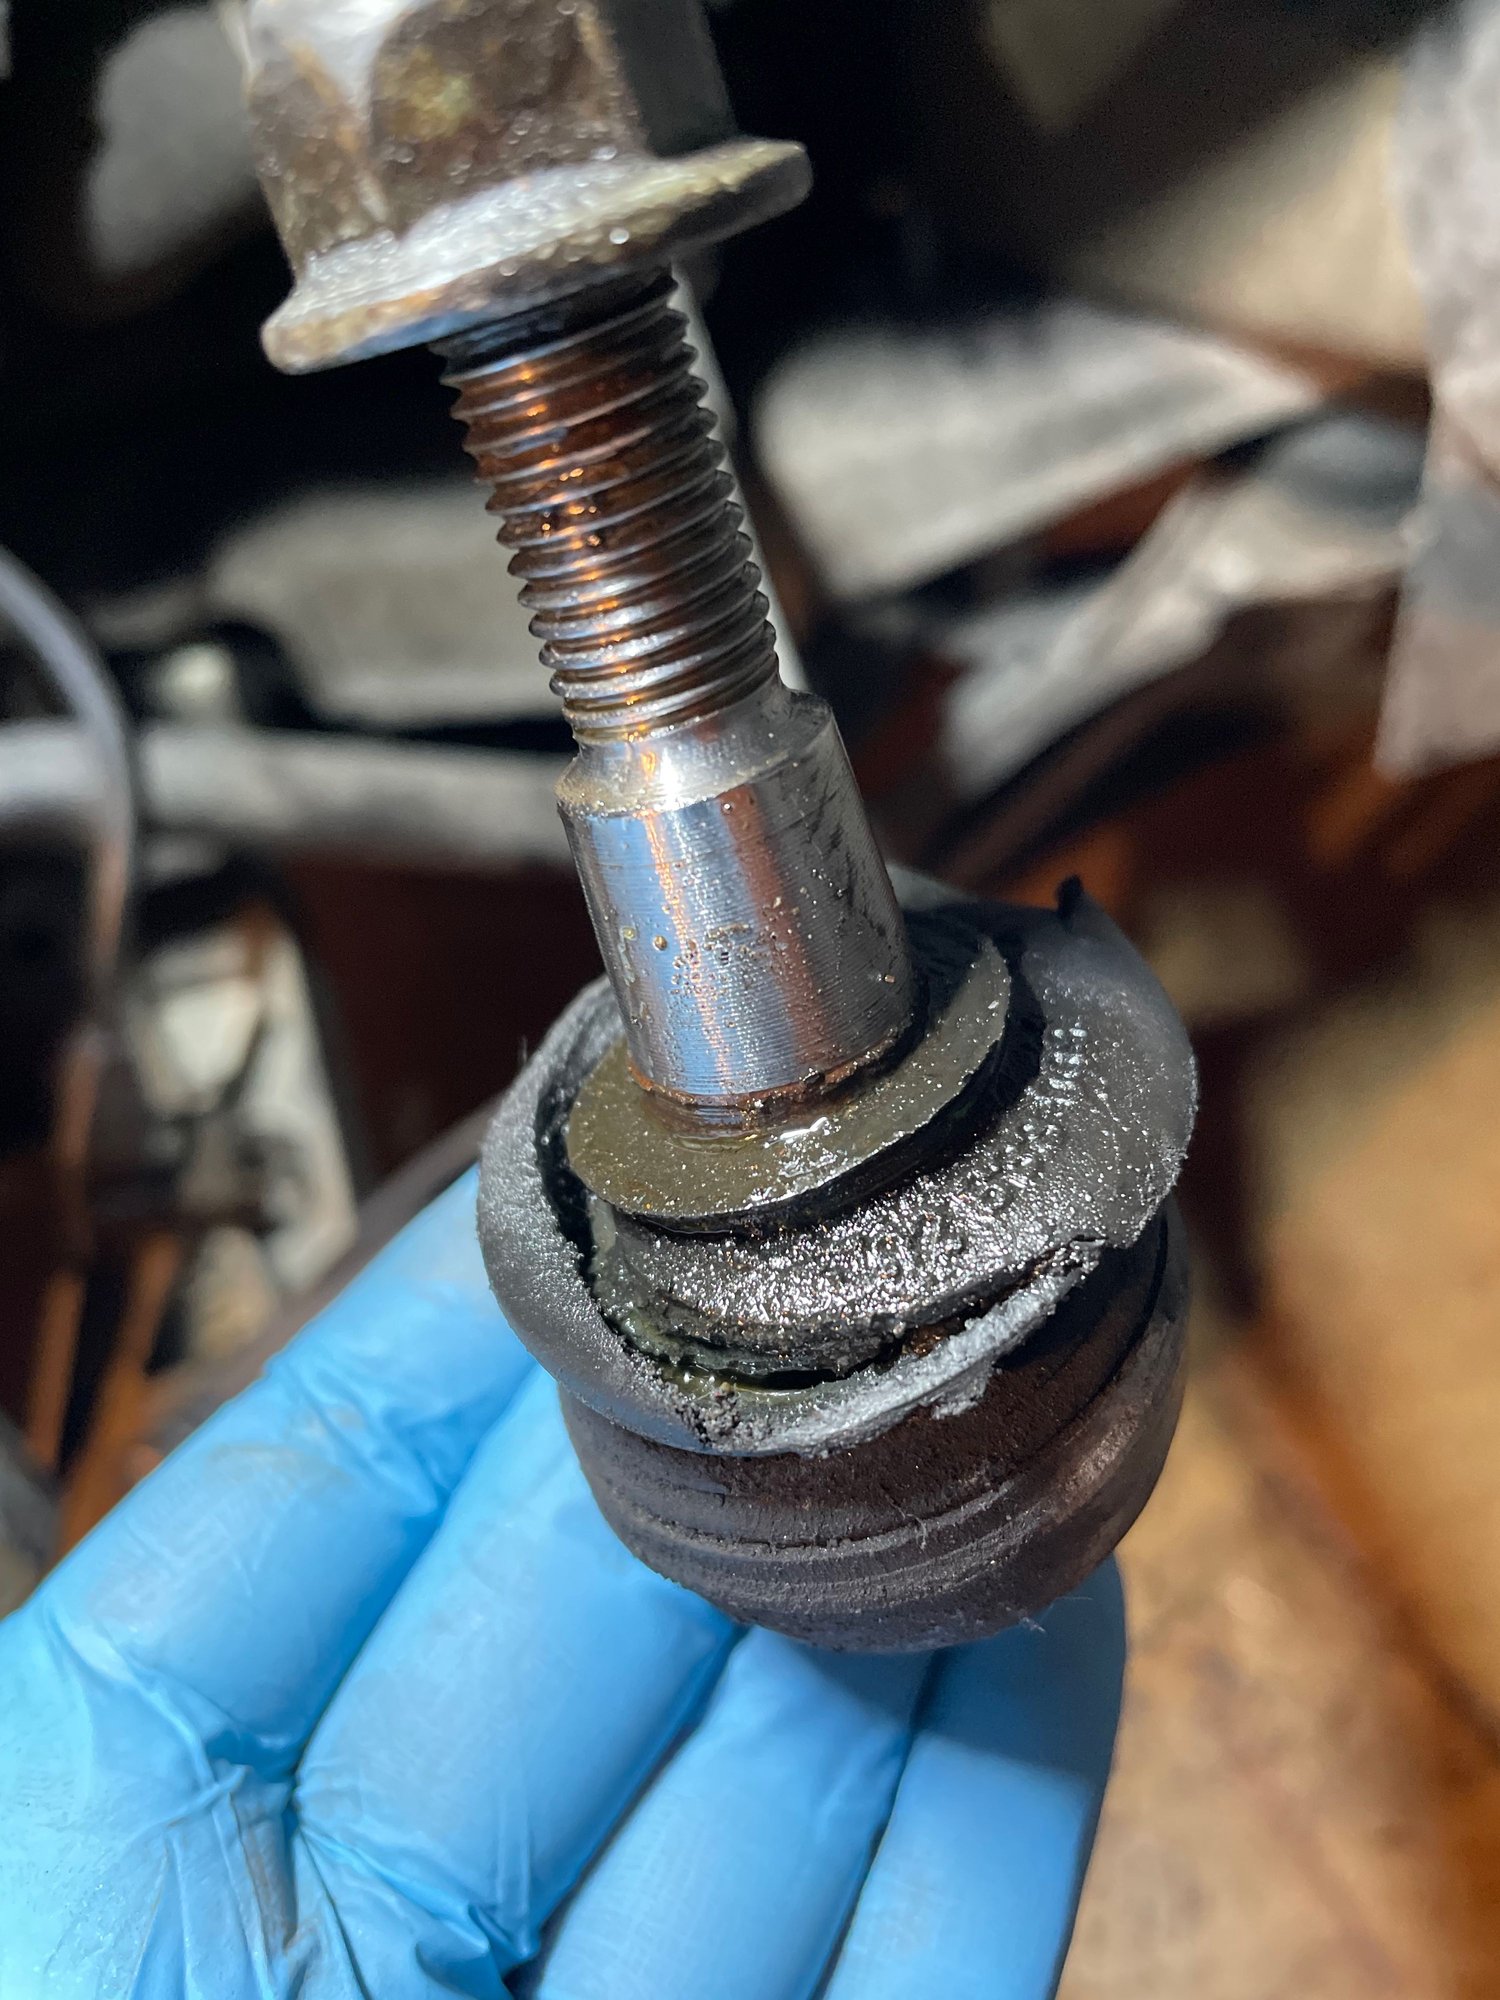
Thanks to my guy @De Jeeper almost having his wheel fall off, I was convinced to replace the wheel bearings... So, off with her head... I mean hubs. The fronts are very straightforward, lot more going on with the rear - that said the only part I damaged was the ball joint on one of the Elephant control arms in the front... Lucky for me, @theprf has a spare on the shelf (he's smart like that) and is going to let me borrow it. Other than that, the only part that needs replacing is the right side tie rod, I have had a pair of bump steer adjustable tie rods in the parts bin for a while so I'll likely just throw them off and start off with factory settings.
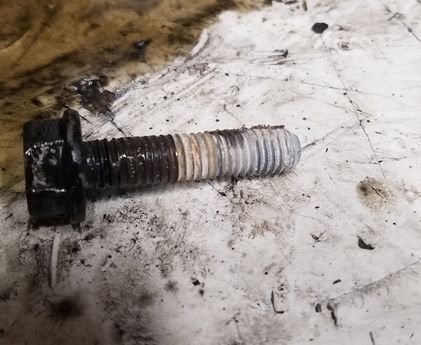
Smoked tie rod
The Elephant LCA was NOT coming out without a fight, I had a nut 1/2 threaded on I was using for the tool to press on during removal, as you can see I used too much force on the tool and sheared the threads of the ball joint... ***** Effer. Thanks Aaron for saving the day on this.
After a fair amount of swearing, and a few Bud Lites.
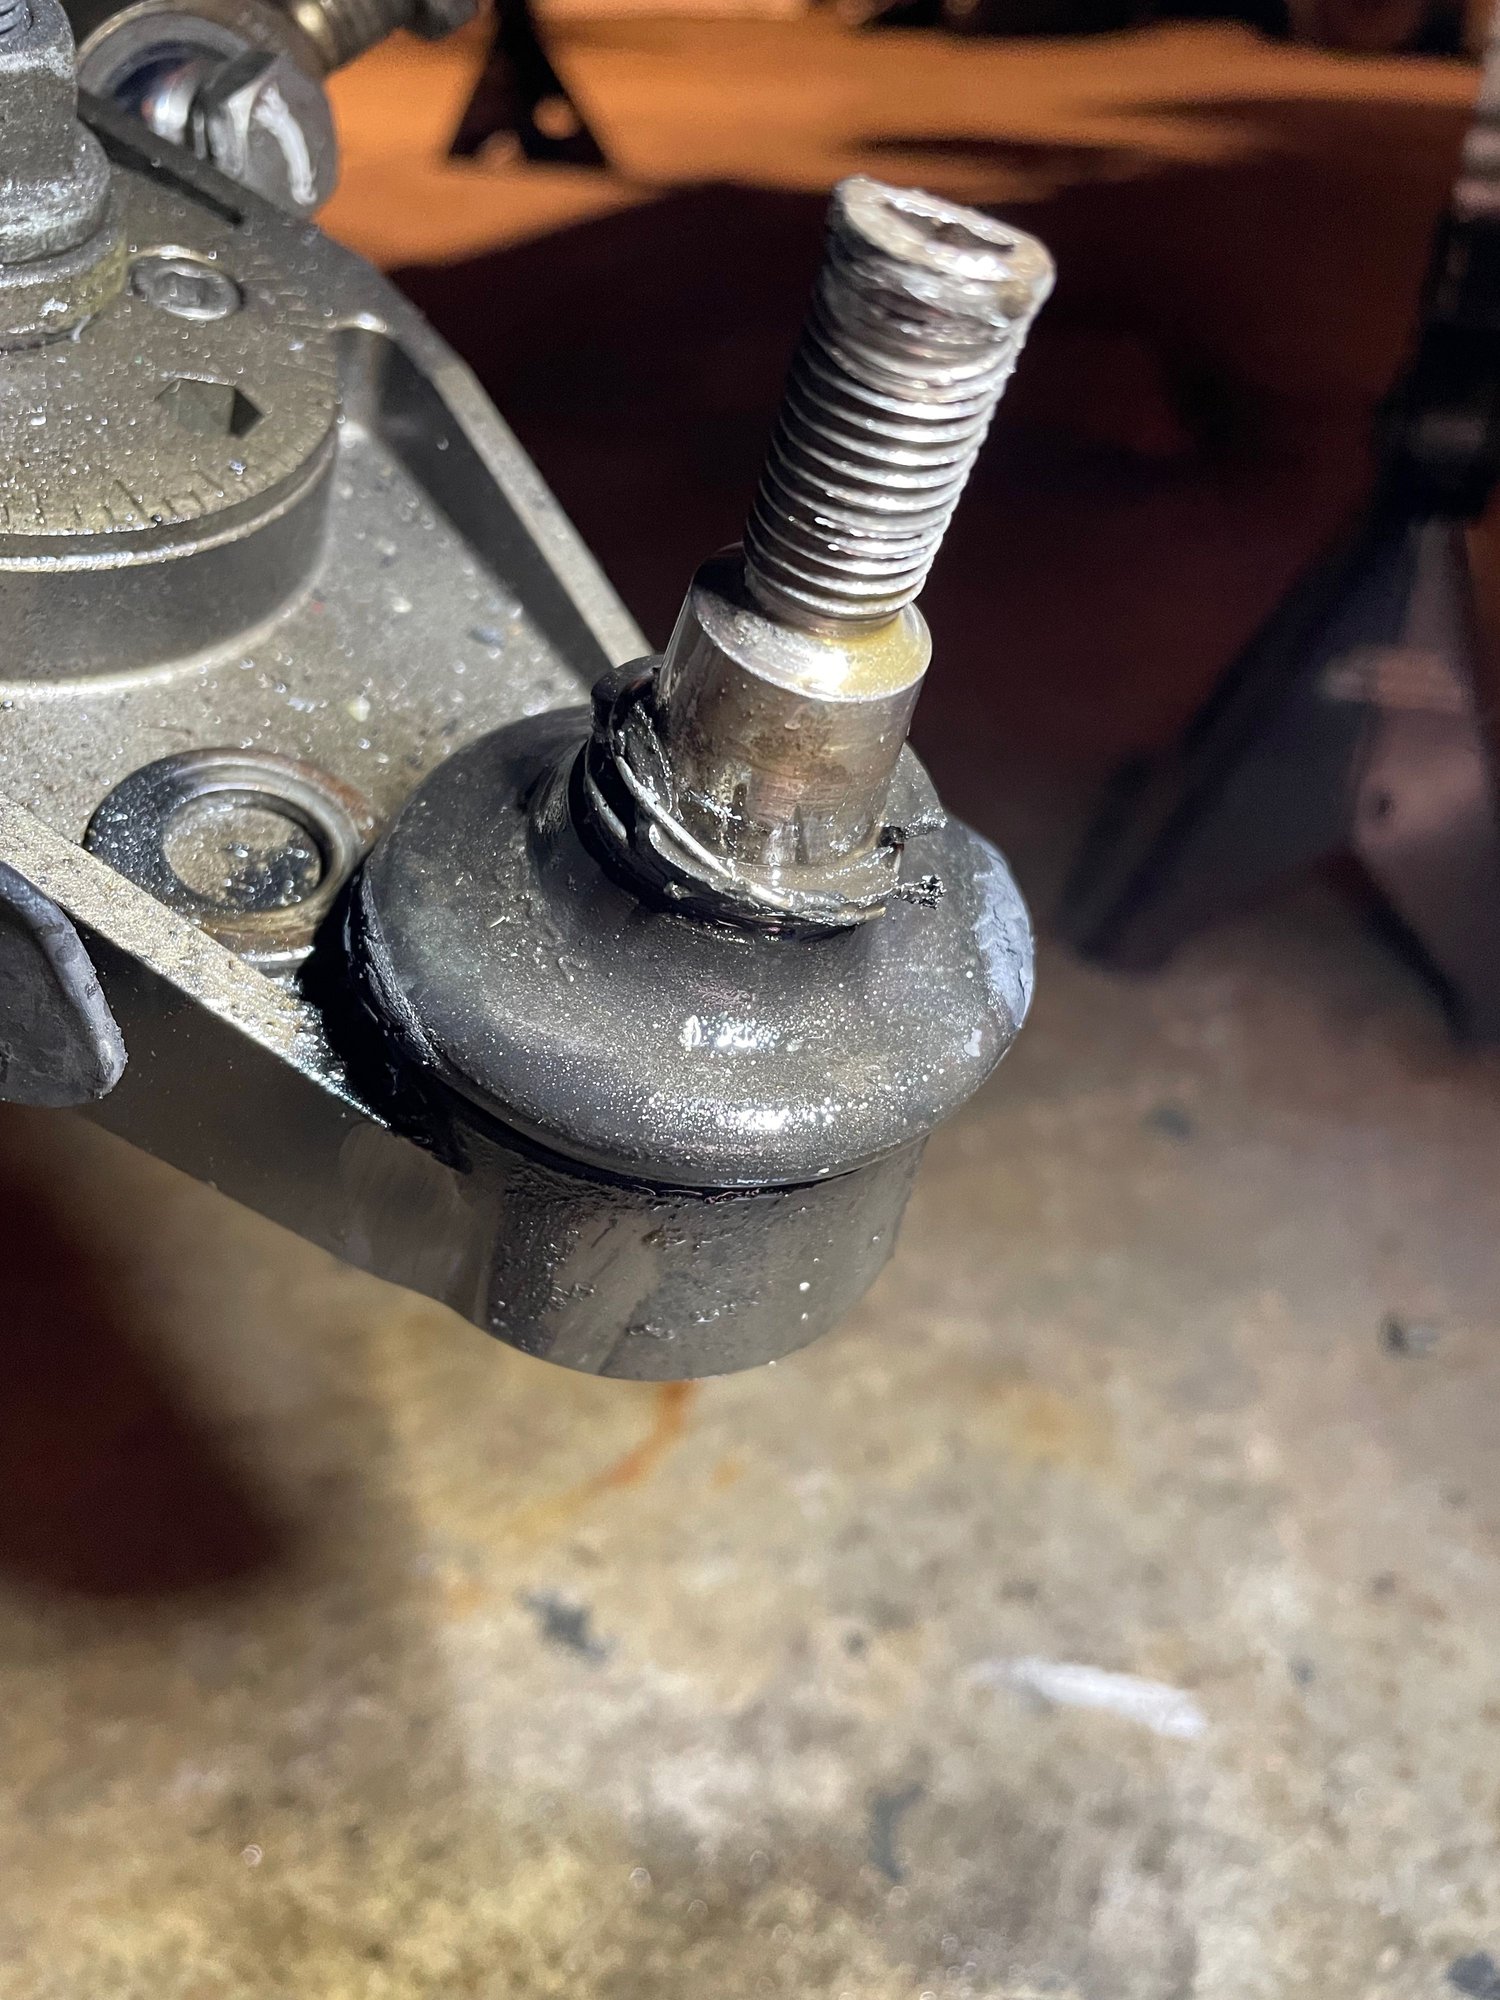
When I refreshed my suspension, I used this gearwrench ball joint separator. The opening was just wide enough to everything on the 996. Low risk of tearing a boot unlike a pickle fork, and long as you keep a nut on the ball joint threads, you don't damage those either. For the low cost, I certainly think it's worth having in the DIY arsenal.
P.s. car looks great! Cage looks really nice; solid welds. What is the stuff you put on the dash and doors?
Last edited by sweet victory; 06-19-2022 at 02:47 AM.
I used the same type ball joint separator and always keep nuts on for the tool to push on as opposed to the ball joint stud. On the LCA, the nut sheared through the threads, you can see in the photo, the rest of the damage was done after the thing was already junk.
The boot on the tie rod was trash before she got touched by the separator. For removing ball joints, this is the only tool I use, I do kinda hate removing ball joint though haha.
My similar ball joint separator worked flawlessly for years on many various makes and models.
But 3 weeks ago I used it on a Hyundai and the balljoint wouldn’t budge.
I destroyed the balljoint removing it to replace upper and lower control arms.
Luckily I was able to find one, just one, Hyundai balljoint in all of Houston TX.
I had no problems on the other side.
Amazing progress on the car, you are in beast mode !!
FWIW on the ball joint removal. That was caused by the installing the nut being "over-torqued". Using the proper ball joint press, once you got to maximum pressure on the stud, if you had taken a big brass drift and a 32oz ball-peen hammer and hit the side of the knuckle, it would have came loose without destroying the stud..
In the old days using a 32oz ball-peen straight to the side of the cast iron knuckles would jar the joint loose, common practice, the ball joint press wasn't invented back then, but with all the aluminum knuckles came the ball joint press and they work very very good, as long as the nut is not over-torqued...
The popular YouTube personalities Heidi and Franny still use the old "hammer to the side of the knuckle" technique for ball-joint removal, even on aluminum knuckles (gasp), but they use a big Carpenters "claw-hammer" for the impacting tool... LMAOOO
Last edited by Porschetech3; 06-19-2022 at 06:41 PM.
They should not have been over torqued, those ball joints were torqued to spec on install and I did wack away at the knuckle while the ball joint was under a lot of tension, just wouldn't budge.... I'm not that good of a mechanic but I really tried to get it out without damaging...3 out of 4.
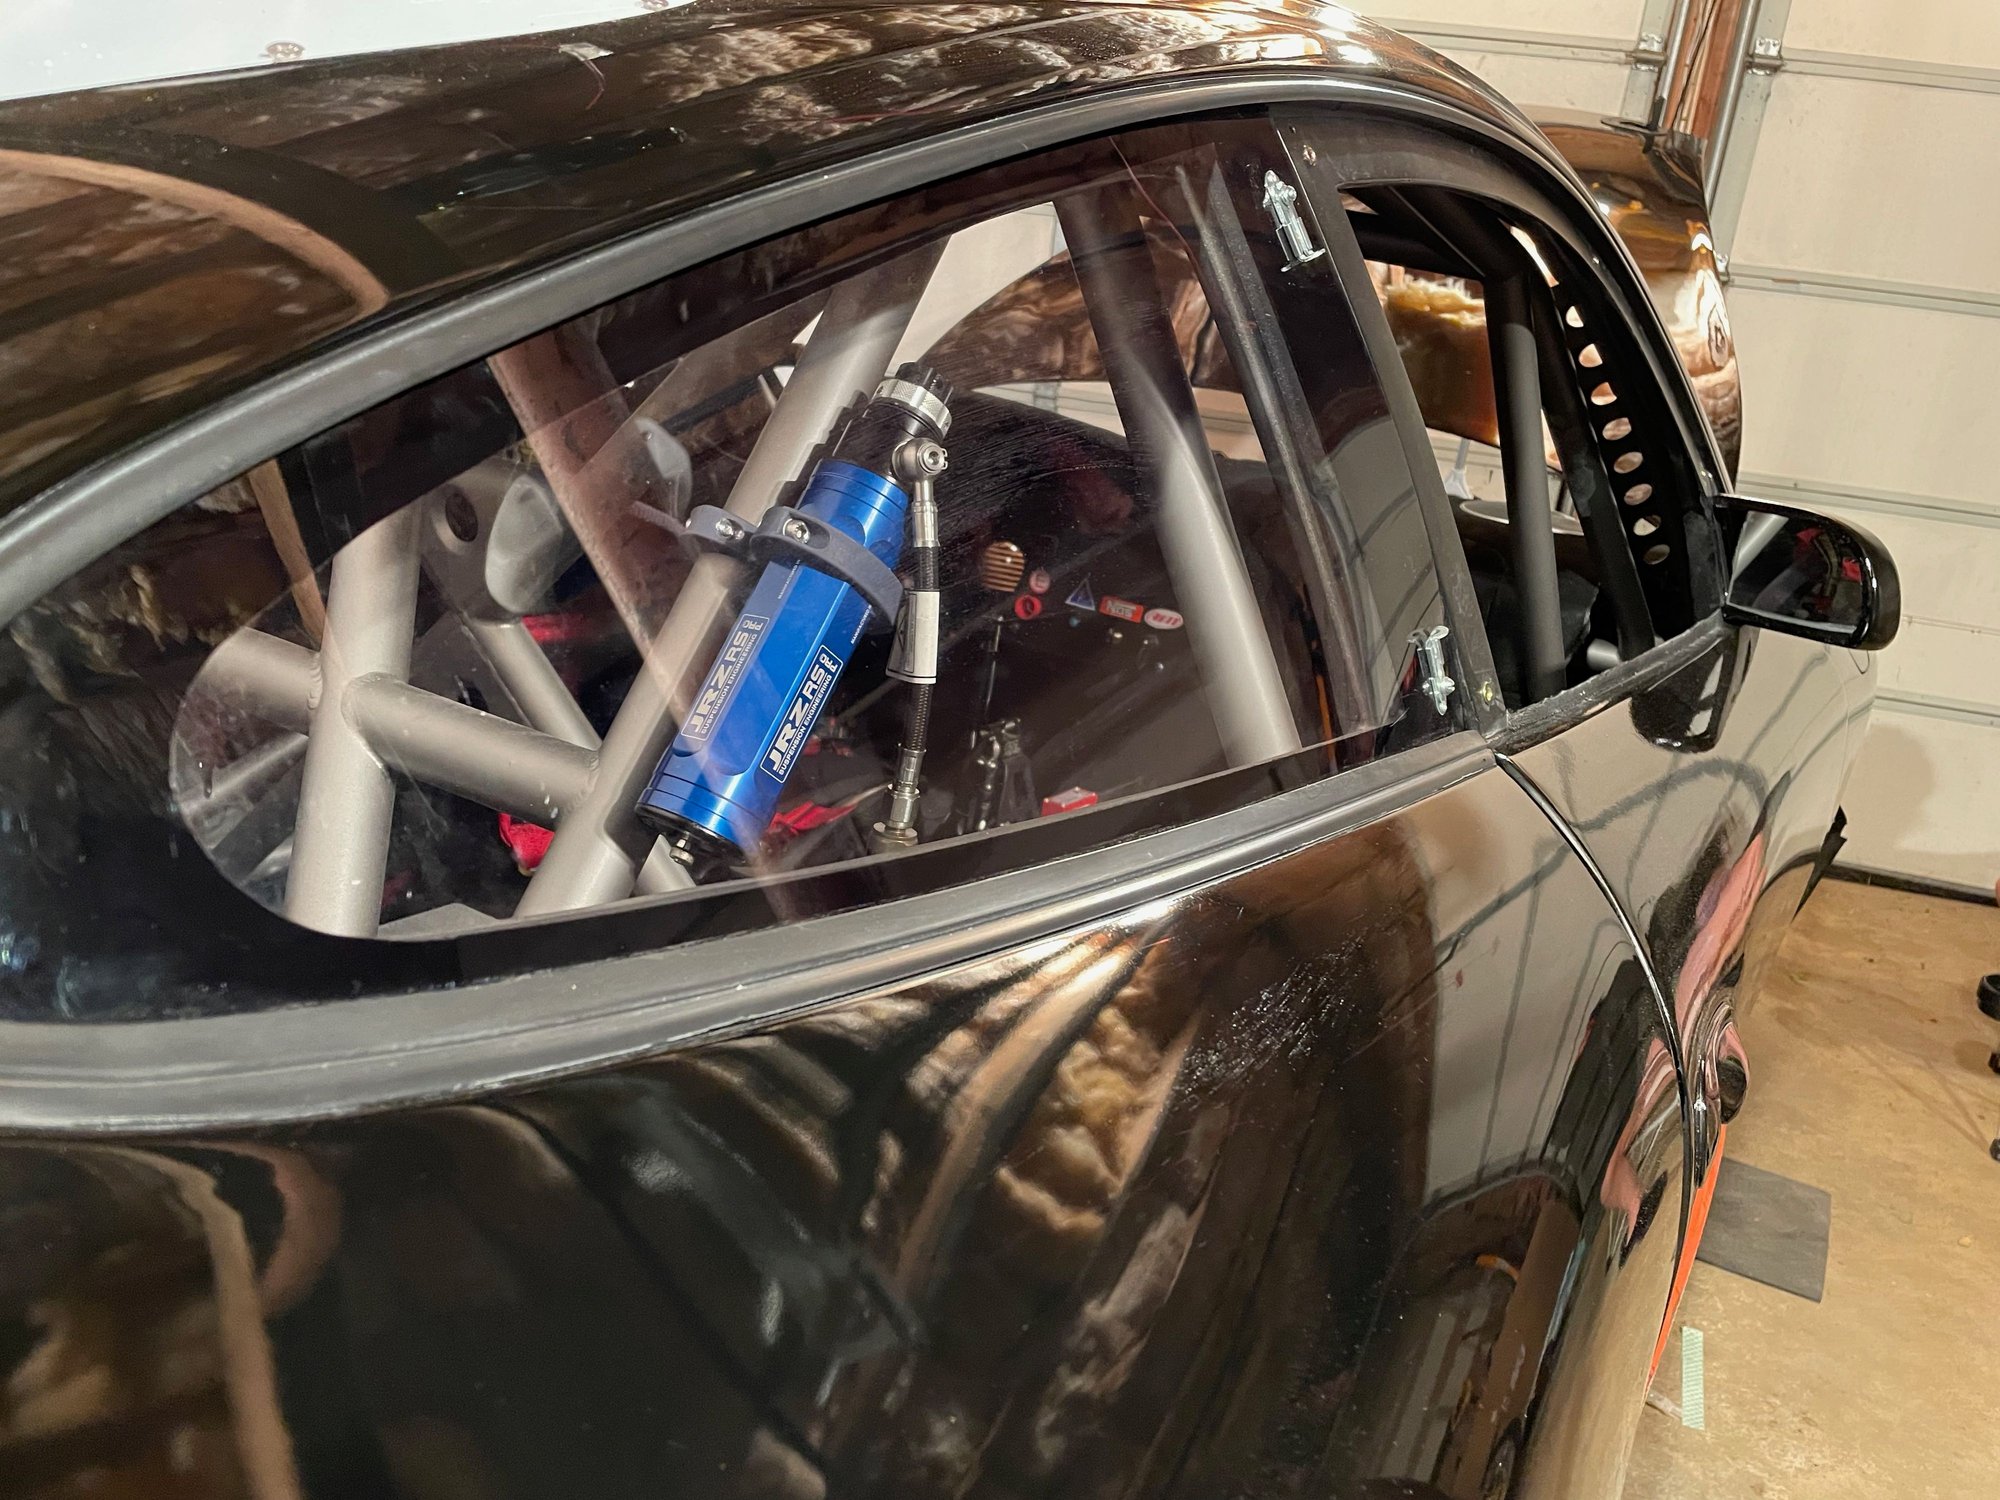
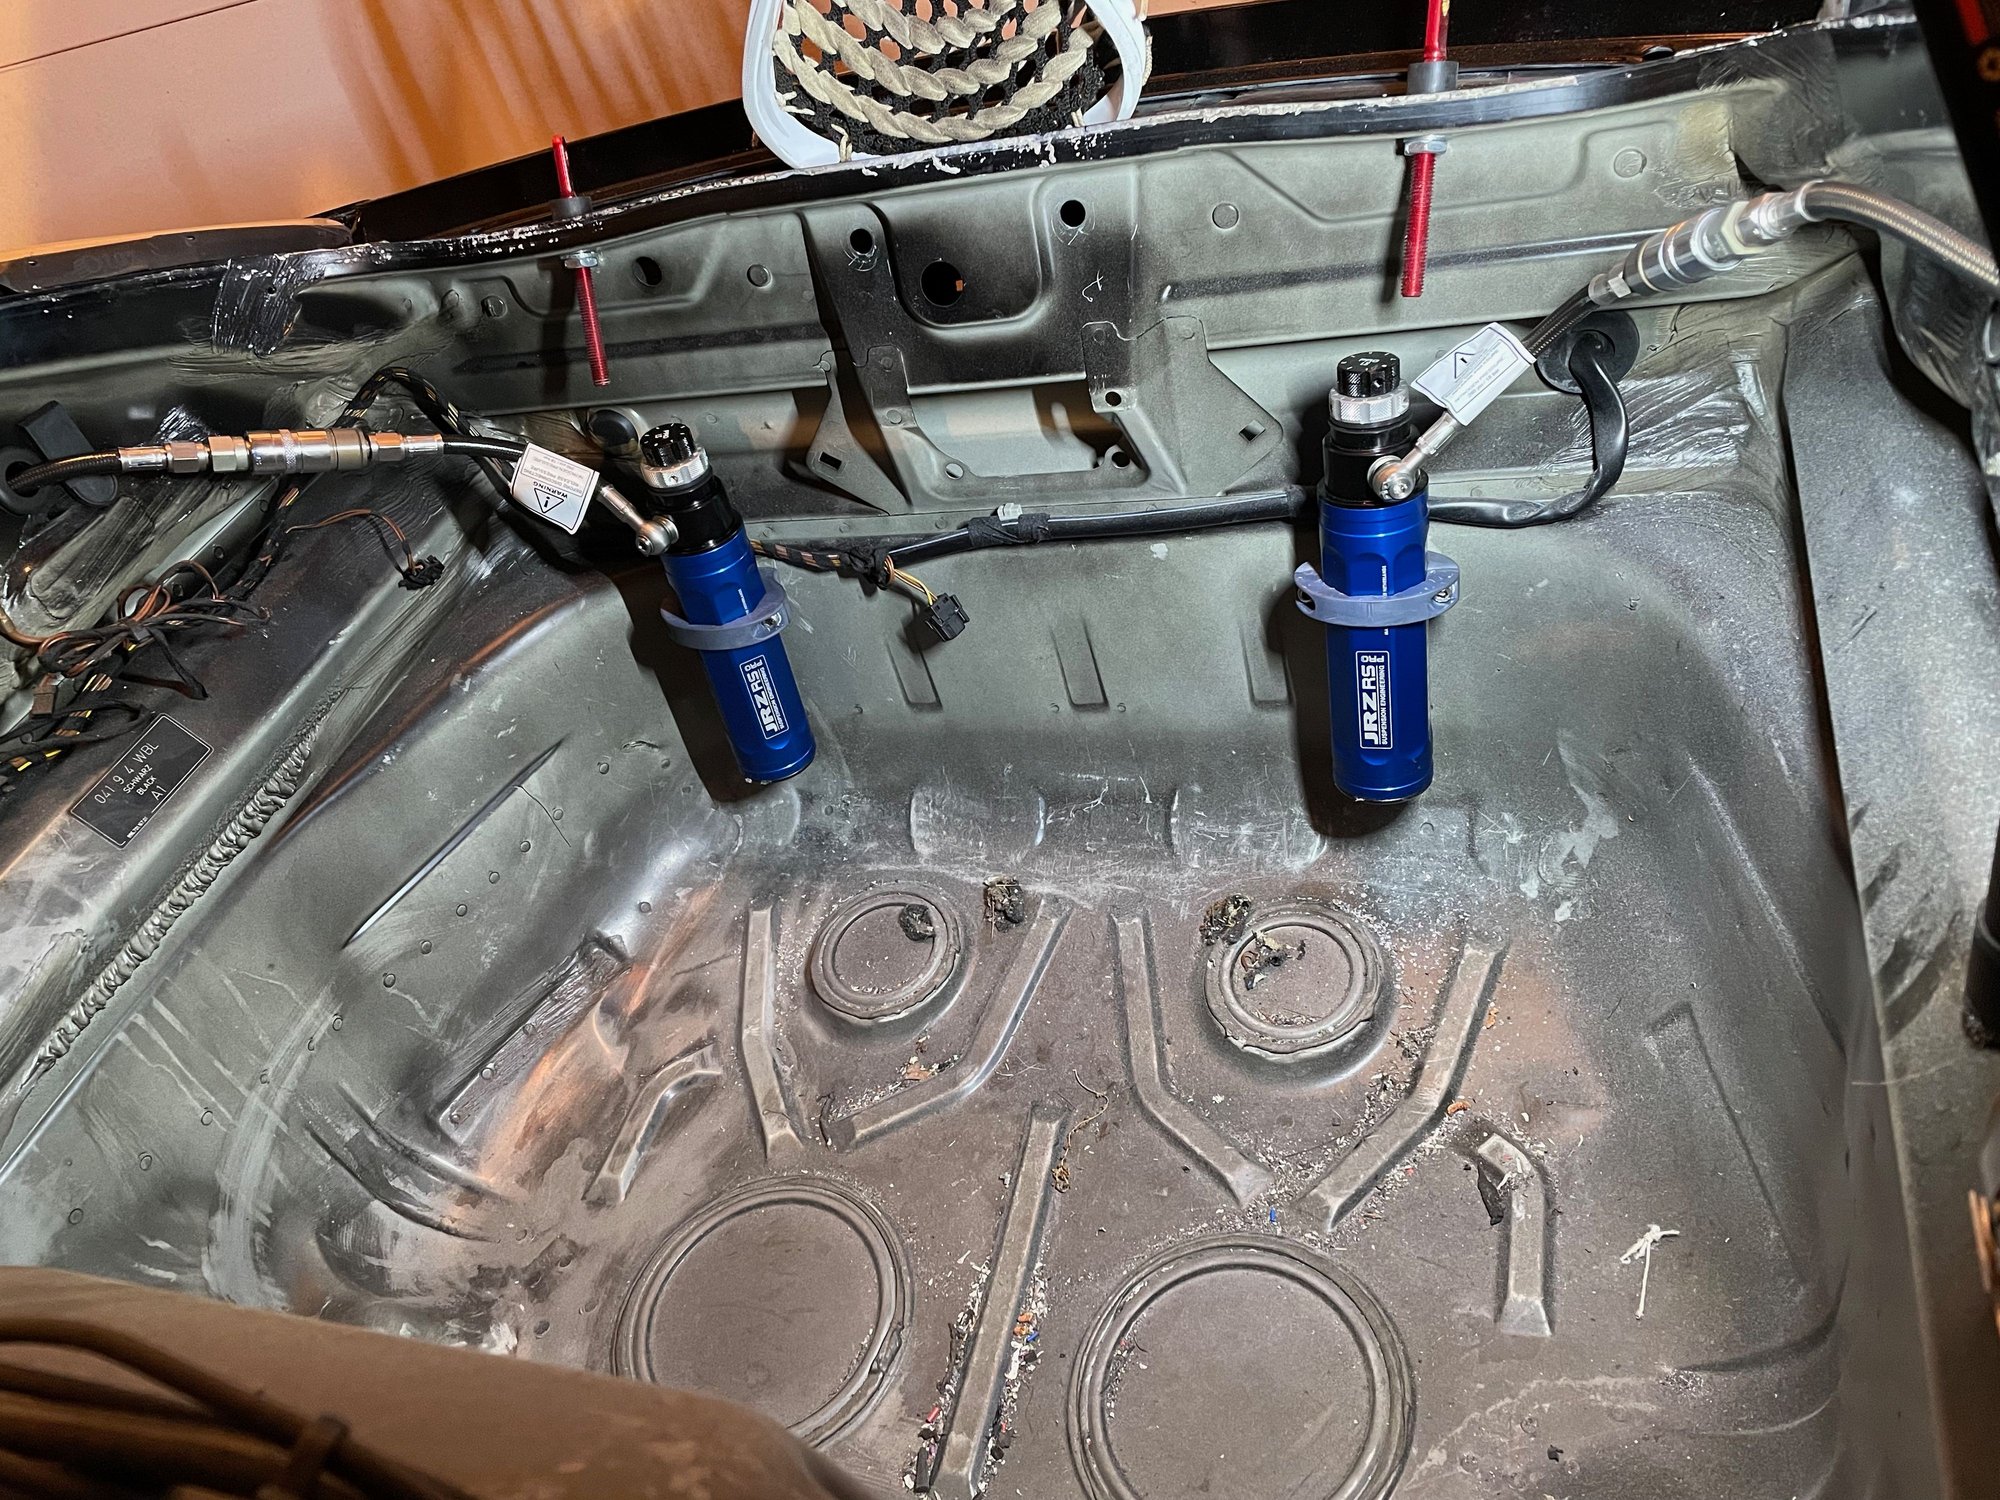
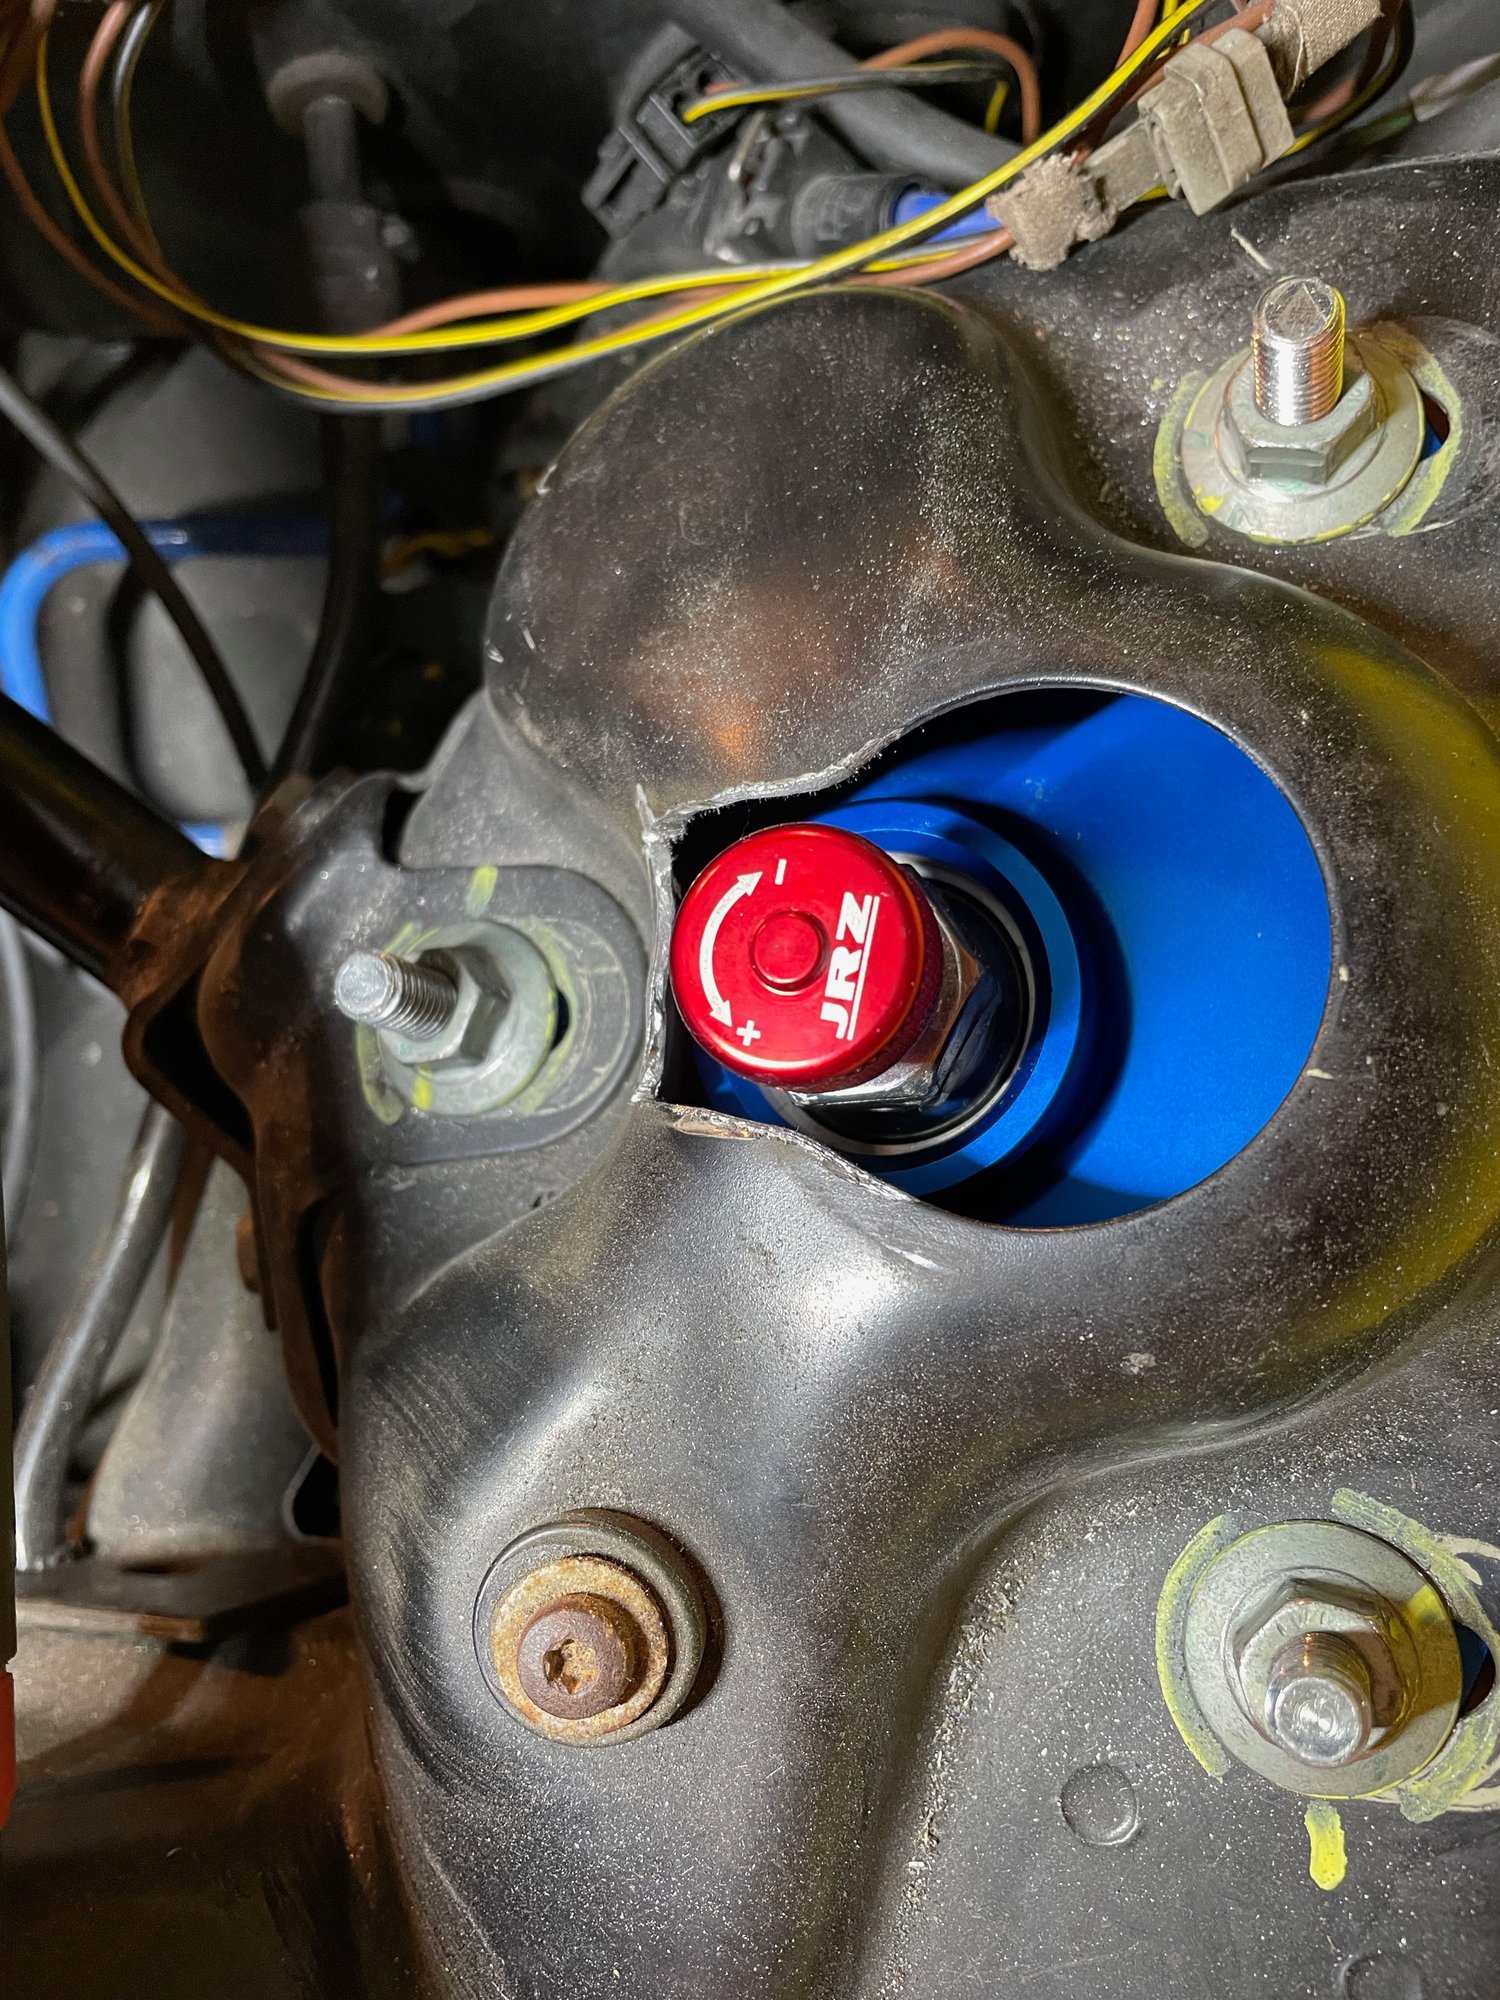
Oooohhhh yeah.... I like that ! @yaz996 mounts at work on the JRZ remote canister... Quick release 1/4 windows make for so much access, really digging although still some work to make them perfect.
Headed to Aaron's @theprf tomorrow evening to get the new bearings installed, he is really nice to help me with the process when I'm sure he has better things to do. Also hopefully get the Elephant LCA ball joint replaced.
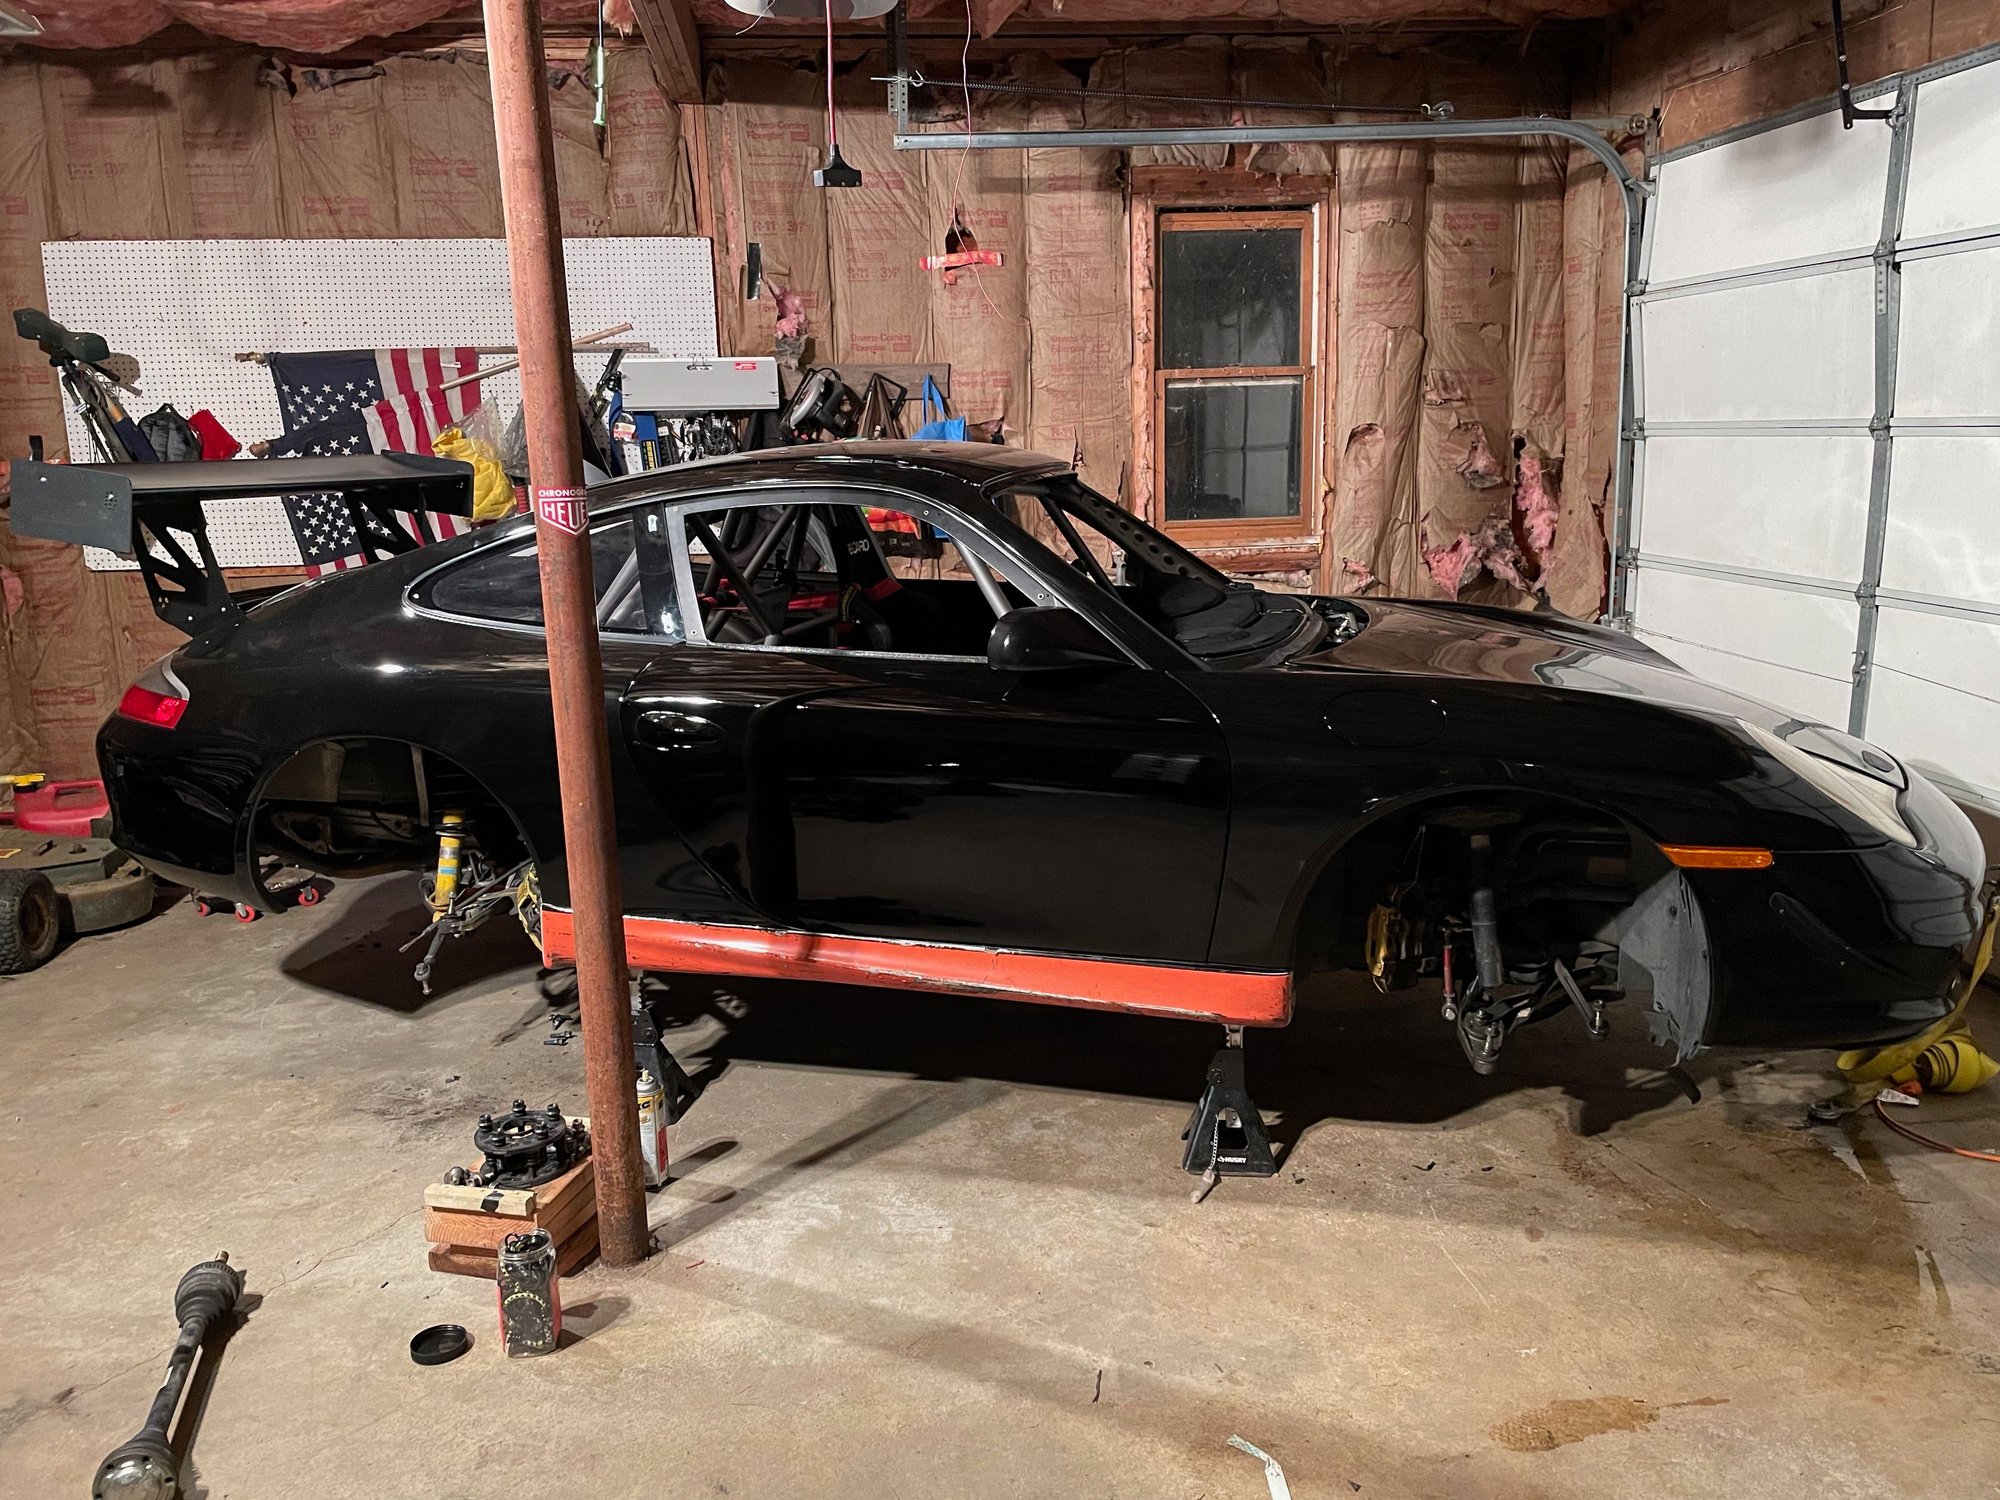
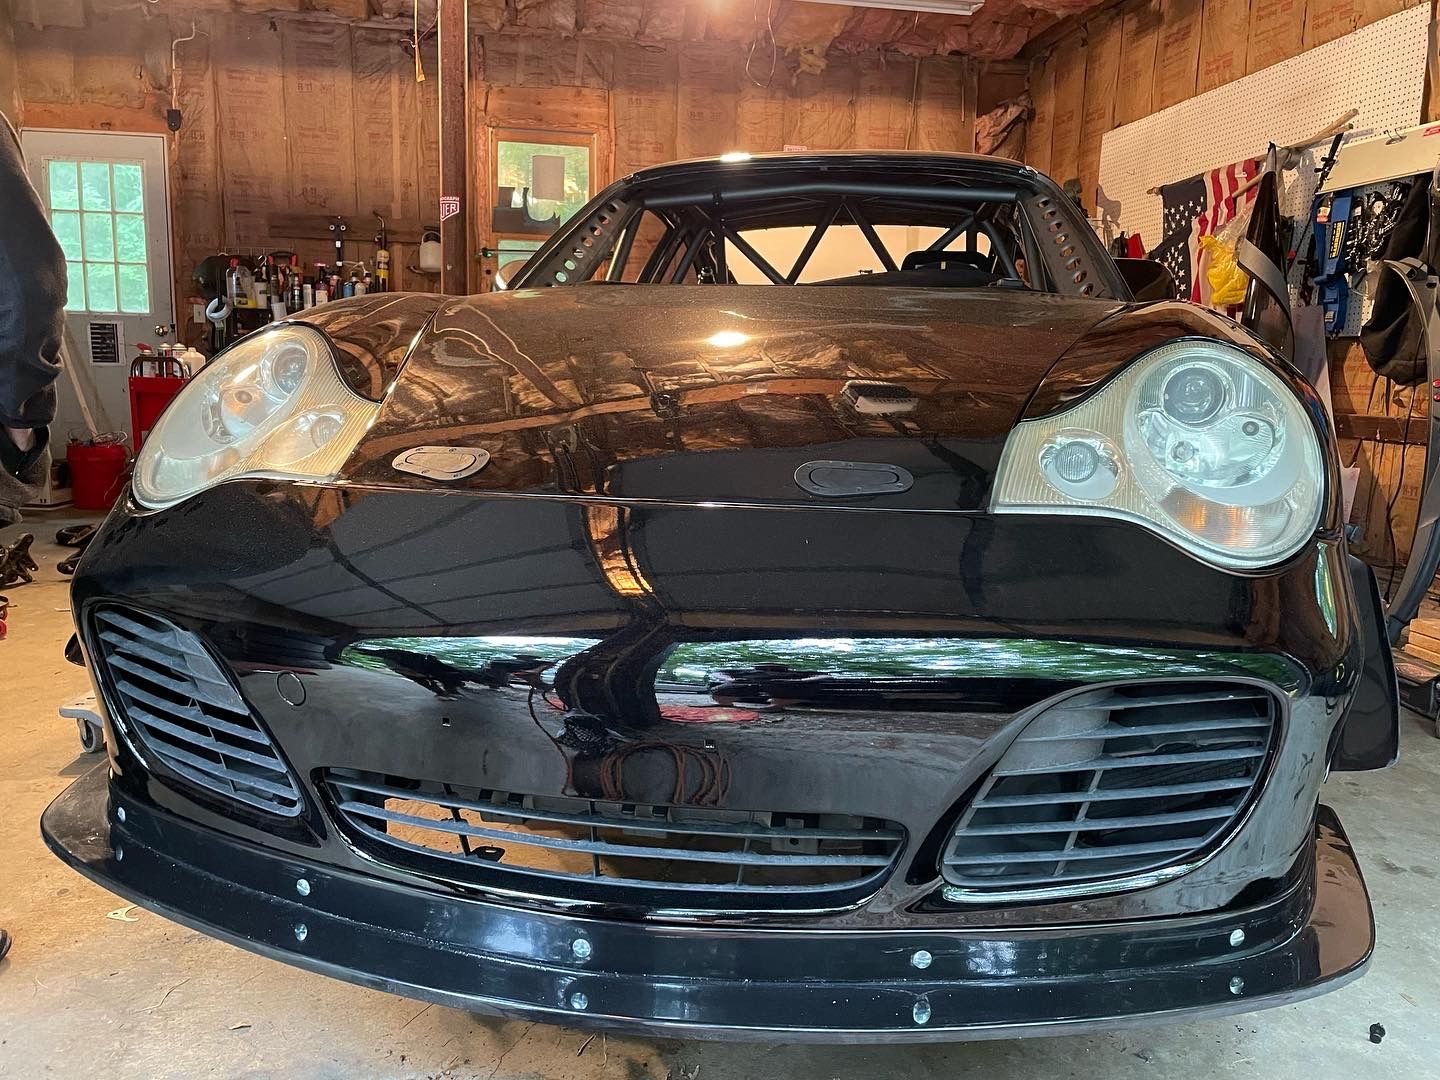
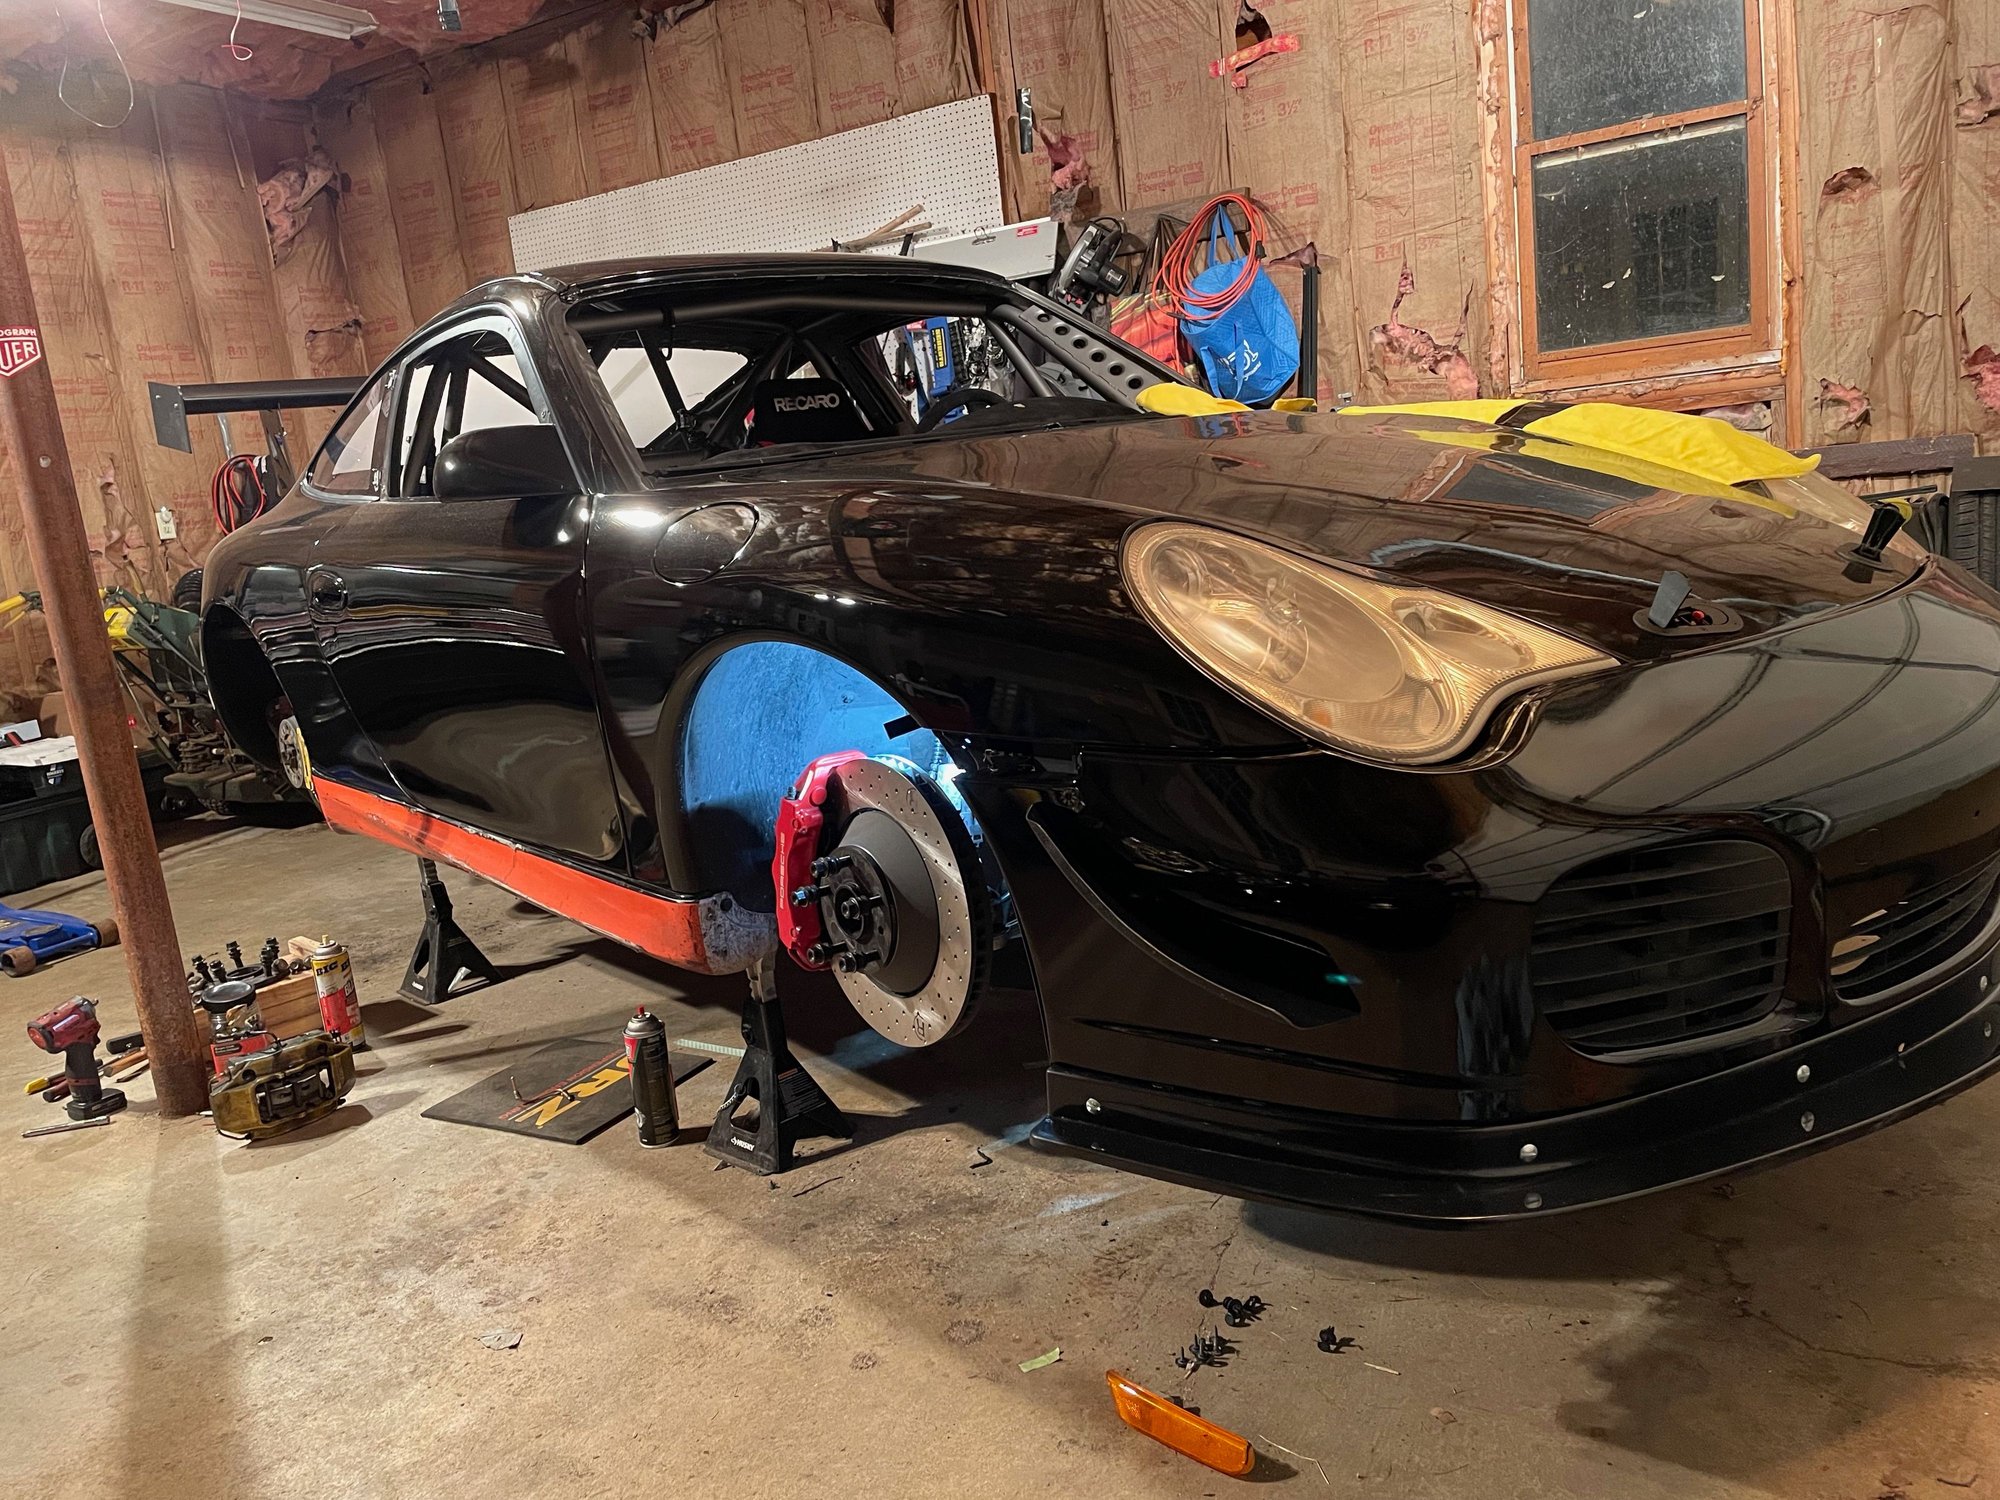
And one more pic of the new bumper because I am STOKED with how it's looking.
Headed to Aaron's @theprf tomorrow evening to get the new bearings installed, he is really nice to help me with the process when I'm sure he has better things to do. Also hopefully get the Elephant LCA ball joint replaced.
...
I just did all four bearings on my 2004 C4S, and be careful removing the bearing retainer plates (just after you press out the hub). On both front knuckles, the two lower bolts were very corroded down into the threads. I couldn't get them out, even with tons of PB blaster soaking for days, and heat to the surrounding knuckle. I finally got them all out, except for one, which of course snapped off in the hole. It delayed me for weeks because I had to find, pay, and wait for a machine shop to drill it out. There was no way I was going to try to do it myself. Drilling steel out of aluminum, especially so close to the press-fit bearing surface (can't enlarge the hole) is beyond my pay grade.
I had to thread-chase the holes, and buy all new bolts. They went back in with loctite down in the threads, but with antiseize all over the upper portion of the shaft! I hope it helps the next guy (likely me!).
I think you and @theprf are masters though in comparison, so you'll be fine.
Edit: Because everyone loves pictures: PB Blaster only penetrated halfway down, after days! The white zinc/aluminum corrosion basically just bonded them together. But at least I got that one out!
Loving your project!! Good luck!
Last edited by jdbornem; 06-19-2022 at 10:54 PM.
Reason: added pictures
Today Part 2... Making it look like it belongs in the junk yard.... again.
Thanks to my guy @De Jeeper almost having his wheel fall off, I was convinced to replace the wheel bearings... So, off with her head... I mean hubs. The fronts are very straightforward, lot more going on with the rear - that said the only part I damaged was the ball joint on one of the Elephant control arms in the front... Lucky for me, @theprf has a spare on the shelf (he's smart like that) and is going to let me borrow it. Other than that, the only part that needs replacing is the right side tie rod, I have had a pair of bump steer adjustable tie rods in the parts bin for a while so I'll likely just throw them off and start off with factory settings.
Smoked tie rod
The Elephant LCA was NOT coming out without a fight, I had a nut 1/2 threaded on I was using for the tool to press on during removal, as you can see I used too much force on the tool and sheared the threads of the ball joint... ***** Effer. Thanks Aaron for saving the day on this.
After a fair amount of swearing, and a few Bud Lites.
The Porsche Motorsport RSR LCAs virtually eliminate the exact problems detailed here. No ball joint tool required. If you need to separate those arms from the wheel carrier you can simply remove the Torx bolt from the bottom of the outer heim joint and pull the arm off of the trunnion pin. It's a 2 minute process. Various length trunnion pins are also available to allow you to adjust roll centers. Same exact concept applies to the tie rods and toe arms where you simply remove the bottom nut and pull of the outer heim joint off of the trunnion pin. Just food for thought if looking at replacement LCA and tie rod options at some point.....
" target="_blank">
" target="_blank">
Last edited by powdrhound; 06-20-2022 at 01:18 AM.
- Wheel bearings replaced, 3 had worn past the point of use. Vast majority of this task goes to @theprf , I brought him the wheel carriers and he did the bulk of the work. Thank you Aaron.
- Replaced the damaged LCA ball joint - again Aaron came up big here having one on the shelf and giving me great pointers on the install.
- Replaced the worn tie rod
- Reinstalled wheel carriers and suspension, the JRZ's needed to have the front top mount studs pressed out and shifted to the high camber configuration, this was an hour pain in the ***. The strut tower had to be clearanced for the additional camber. Thanks John for the advice on both fronts.
- Installed the new front brake package
- Routed and secured the remote canister lines
- Re-installed rear brakes
I think thats it... Really been grinding since getting the car back from paint, haven't had a night that ended before 11 and the last couple have gone well past mid night. While a task may be easy in and of itself, some components of accomplishing it can really eat away the time, the reconfiguration of the top mount studs and shock tower work both being good examples. What may take me an hour with the car in the air, adding those tasks to getting the coilers installed makes it a 3 hour job, tough.
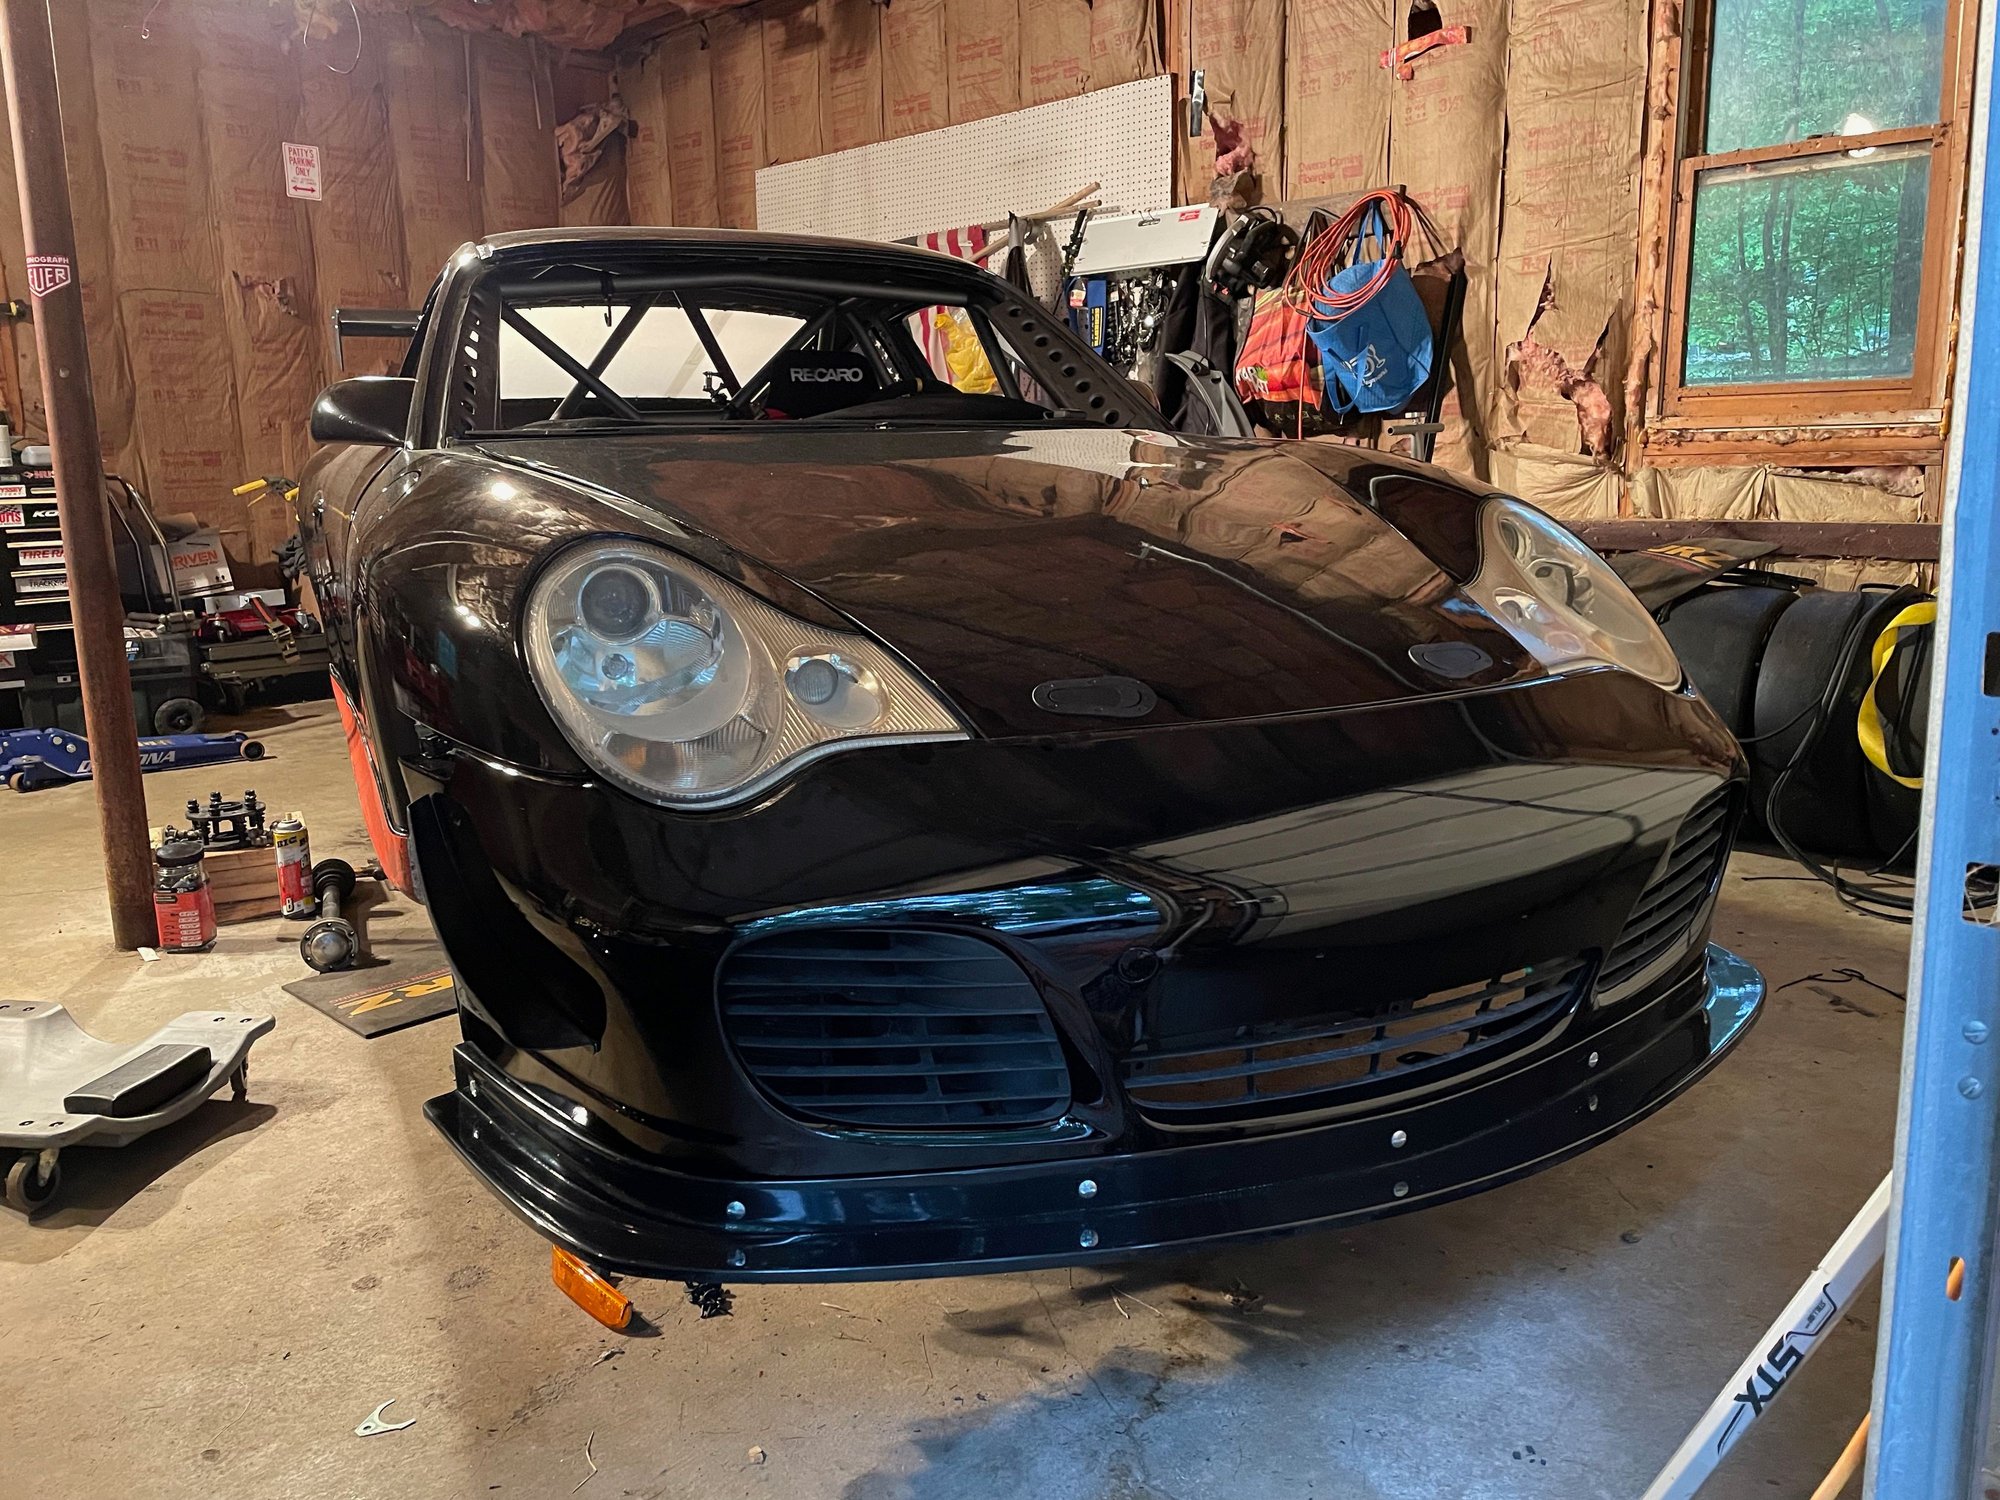
Great progress tonight though and the car could be put on the ground if I needed to, but, I am going to do all the torque requirements tomorrow when I have more energy. The goal was to absolutely be able to have the car on the ground by Friday night as the windshield is being installed Sat AM and the company requires the car to not be on jack stands so I am happy I know I'll get there without too much trouble. The next milestone is Monday night when I drop the car off for corner balance and alignment and I would like my work to be done for all intents and purposes by then.
 06-17-2022, 11:29 PM