
Aussie 964C2 Maintenance Diary (pic heavy!)
 03-13-2013, 11:02 AM
#421
Nordschleife Master

It actually goes from the filter console to the top of the thermostat. 
Mine has the same problem. Nothing major yet, and I have no secondary exhaust to act as a drip tray, but sooner than later I'll have to remove the line and have a hydraulic shop rebuild it. I believe the oil tank needs to come out for access.
Mine has the same problem. Nothing major yet, and I have no secondary exhaust to act as a drip tray, but sooner than later I'll have to remove the line and have a hydraulic shop rebuild it. I believe the oil tank needs to come out for access.
 03-13-2013, 09:29 PM
#422
Burning Brakes
Thread Starter

Yeah, and the thermostat gets its oil from the oil tank 
I suppose...that since the hose is on the suction side of the oil pump, there shouldn't be much risk of it turning into a sprinkler-system...changing that hose looks like a PITA tho
I suppose...that since the hose is on the suction side of the oil pump, there shouldn't be much risk of it turning into a sprinkler-system...changing that hose looks like a PITA tho
03-13-2013, 09:45 PM
#423
Burning Brakes
It actually goes from the filter console to the top of the thermostat.
Mine has the same problem. Nothing major yet, and I have no secondary exhaust to act as a drip tray, but sooner than later I'll have to remove the line and have a hydraulic shop rebuild it. I believe the oil tank needs to come out for access.
Mine has the same problem. Nothing major yet, and I have no secondary exhaust to act as a drip tray, but sooner than later I'll have to remove the line and have a hydraulic shop rebuild it. I believe the oil tank needs to come out for access.
I read a thread where the oil tank can just be loosened to get the oil line from behind it, but I'm taking my tank out since I'm replacing other hoses as well.
03-13-2013, 09:58 PM
#424
Burning Brakes
Thread Starter
I'm tempted to just order a new line, just to keep things simple (and to reduce downtime in case the fabricated line doesn't fit or something).
I'll upload the pics later, but at the moment...it might look like the leak is coming from the union between those two nuts, rather than the swage on the hose.
I'll upload the pics later, but at the moment...it might look like the leak is coming from the union between those two nuts, rather than the swage on the hose.
03-13-2013, 10:20 PM
#425
Nordschleife Master
Careful w/ replacing the line w/ a new line. Others have found that the new line does not meet the OEM standard and can kink.
Read through here
https://rennlist.com/rennforums/showthread.php?t=673897
Read through here
https://rennlist.com/rennforums/showthread.php?t=673897
03-13-2013, 10:38 PM
#426
Burning Brakes
Careful w/ replacing the line w/ a new line. Others have found that the new line does not meet the OEM standard and can kink.
Read through here
https://rennlist.com/rennforums/showthread.php?t=673897
Read through here
https://rennlist.com/rennforums/showthread.php?t=673897
03-13-2013, 11:00 PM
#427
Burning Brakes
Thread Starter
Well, any industrial hydraulic shop will be able to make you a new hose, that's what they do all day for construction equipment etc which are under somewhat more stressful working conditions than being a suction hose for an engine oil pump.
So if the oem hose don't fit, we might as well take a chance and get a custom one...
So if the oem hose don't fit, we might as well take a chance and get a custom one...
03-14-2013, 05:28 AM
#428
Burning Brakes
Thread Starter
After driving to work today, this is the verdict!
Rather helpfully...there are some vertical drips marks on the secondary muffler...
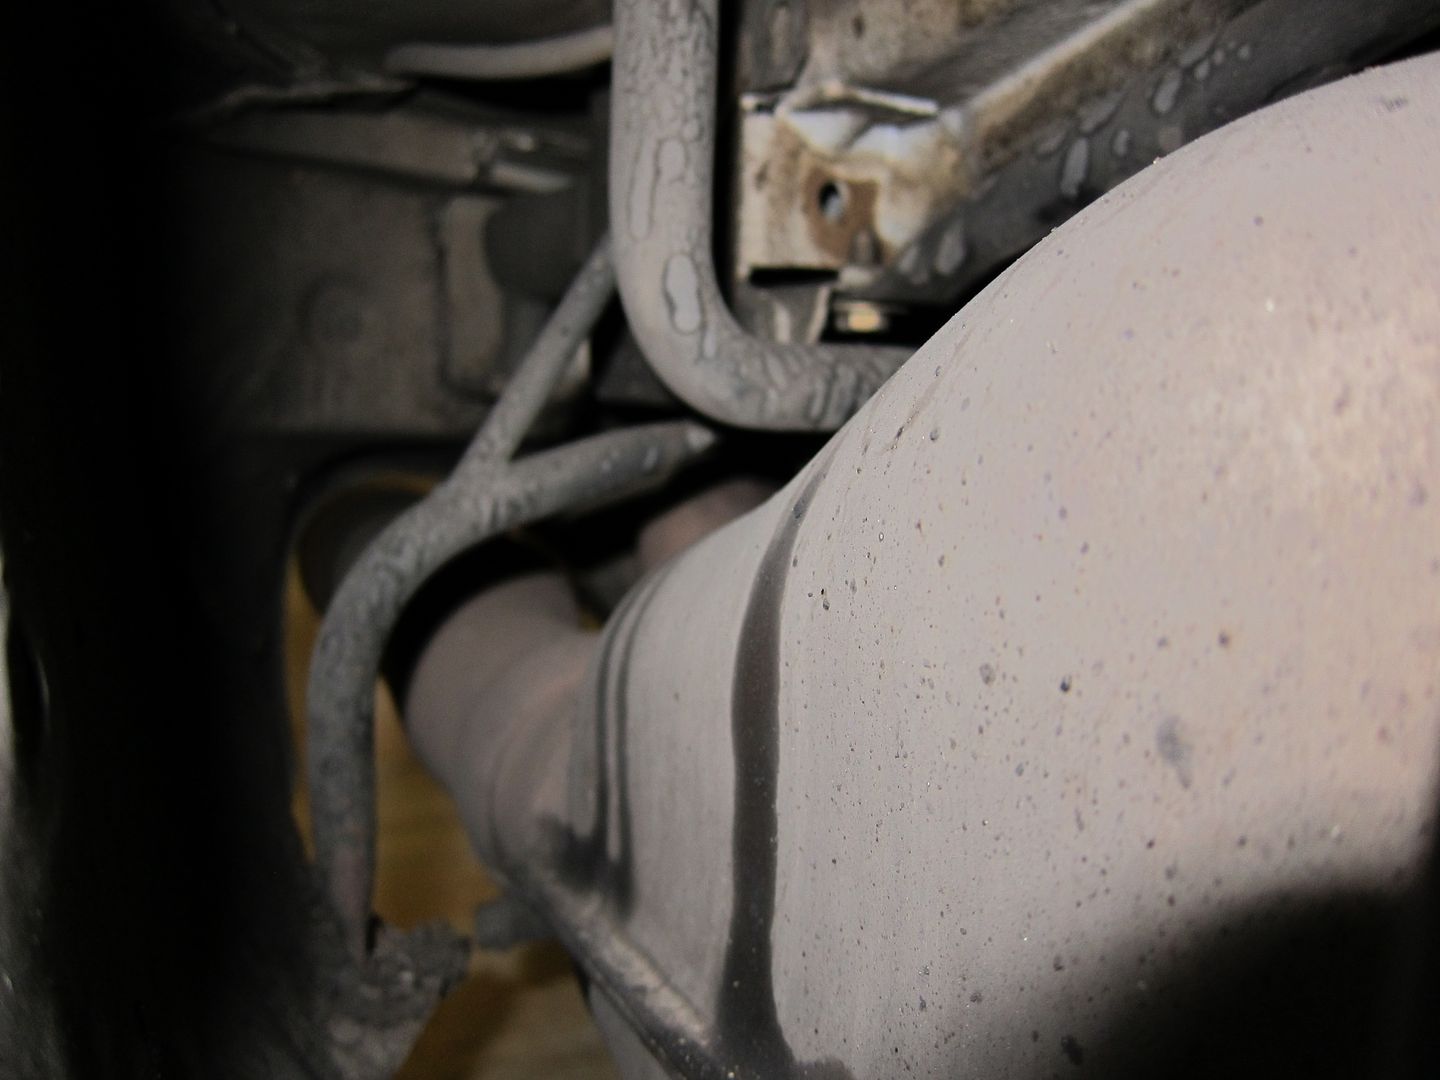
The part where the flexible hose is swaged to the fitting seems dry...
But the spot where the union itself is bolted together...looks wet!
I think we have a winner, folks and if you trace the vertical oil drip on the muffler, it leads to the union, rather than the hose.
I'll have a go at replacing the crush washer inside the union...is it a funny size, or can a generic aluminium sump plug washer do the trick?
Rather helpfully...there are some vertical drips marks on the secondary muffler...
The part where the flexible hose is swaged to the fitting seems dry...
But the spot where the union itself is bolted together...looks wet!
I think we have a winner, folks
and if you trace the vertical oil drip on the muffler, it leads to the union, rather than the hose.I'll have a go at replacing the crush washer inside the union...is it a funny size, or can a generic aluminium sump plug washer do the trick?
03-24-2013, 01:19 PM
#429
Instructor
I have read every posting on this thread. It has taken most of the weekend with interruptions. Babalouie, I am blown away by your big *****, persistence, fearlessness, and constant logical thinking. Your ability to tackle any task and document the process in such a straight forward way is inspiring. It has been a joy to read the past 2 years of improvements to you 964. I think I'll start with changing the keyfob and go from there....ha. Keep calm and chive on dude. I have loved learning through your posts.
By the way, as tech savvy as you are when are you going to upload an avatar? Lets see a pic of you with the car. I feel like I seen the shop and all the sensitive parts of your 964 but not you.
By the way, as tech savvy as you are when are you going to upload an avatar? Lets see a pic of you with the car. I feel like I seen the shop and all the sensitive parts of your 964 but not you.
 But if you really must know...
 04-01-2013, 07:44 AM
#432
Burning Brakes
Thread Starter
You guys might recall that a few months ago, I bought an RS bonnet off eBay. The seller was in another city, and a buddy who lived there was kind enough to collect and store the bonnet for me until we figured out what to do. Having worked in the trucking and courier industry myself, I didn't really have a great deal of confidence that the rather fragile item could be delivered without damage So the convergence of a few public holidays into a 4-day weekend meant that it was a great opportunity to hit the road and collect the bonnet in the trusty family truckster.
And after a 2000km round trip...here it is!

There are some very mild scratches which look like they could be buffed out...

But apart from that, the only damage I can see are the paint on the rear corners being chipped, no doubt from being stored standing up against a wall.

The chips do show a bit of the original paint underneath though...so I think this bonnet was originally attached to a Maritime Blue RS.

I wonder what this number means...its stamped next to the cutout for the frunk light.

Interestingly, the bottom half of the underside is painted in a rough stoneguard paint. And you can just about see a rectangle under the surface, as if a patch was cut out a new metal welded back in.

Rather medieval looking prop rod

As for the colour...well it isn't actually Grand Prix White, but rather a less stark, and more creamy shade. So I'll be dropping this off at my favourite bodyshop for a fresh coat of GPW. I haven't weighed it, but it sure is feathery light! You can easily lift it up with just your pinky finger, but it does feel a little floppy and paper thin.
In other news, I'm still chasing that oil leak. Now, this has been bugging me something fierce, since I like my cars to be as perfect as possible, but perfection isn't a word that comes to mind when you're sitting in traffic, and everyone's giving you the evil eye because there's this cloud of white smoke wafting out from the car's bum And you might also recall that I'd narrowed it down to this fat oil hose that goes into the oil filter console. It sits just above the secondary muffler, so any spilt oil tends to burn off into smoke as it drips onto the hot muffler.

Now, Vandit had some luck in just tightening the oil hose union, so that's a logical first port of call before we get too carried away.

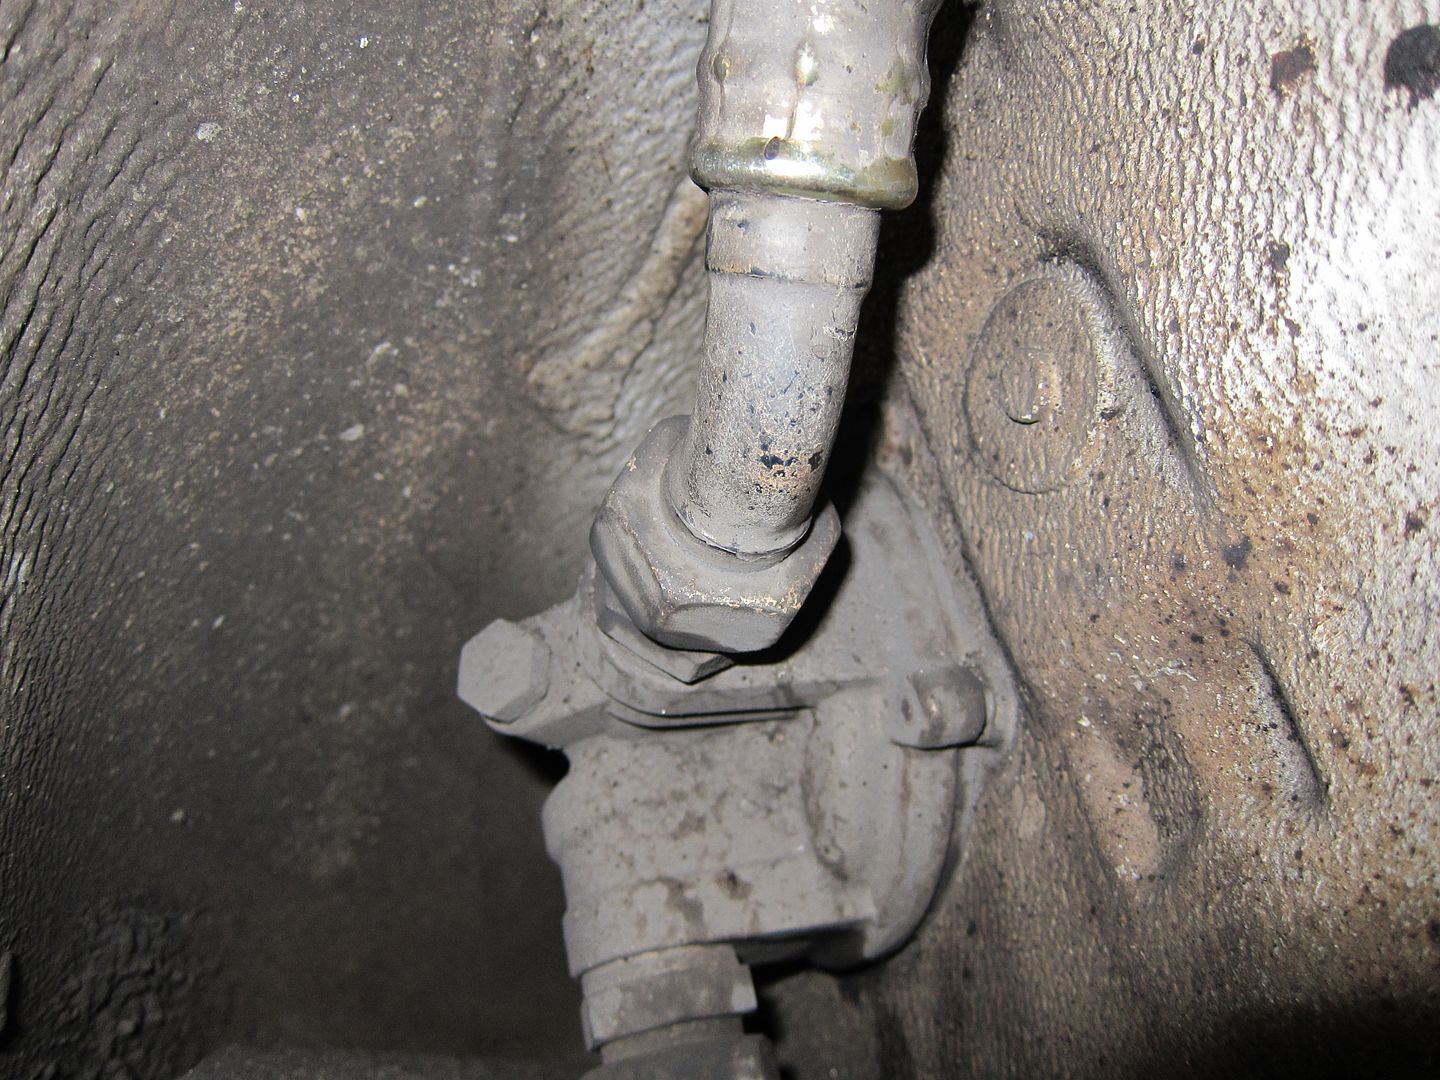
And in order to tighten the union, the secondary muffler needs to come out, which is pretty easy. Just remove these two nuts under the bracket

And the pipe clamp at the rear of the muffler...

...then the (remarkably heavy) item just falls out onto the floor.

Not to tighten that union. First you'll need some really big spanners. 32mm and 36mm open ended ones. Now, you're probably thinking that one of those spanners in that multi pack you bought from the hardware store is a 36, but y'know...you probably don't have one But on the bright side, when the zombie invasion comes, I have two more weapons to add to my arsenal.

It's a little tight in there, but the 32mm spanner locks onto a fitting tht sticks out of the oil filter console, and the big 36 goes on this massive nut that attaches the hose itself. Just loosen it a hair, and then nip it tight.

Then clean everything up and stick it all back together again.

Now, I start the engine and let it warm up all the way, hoping that any leaks will make themselves known. And after a while...aha! There isn't any oil leaking from the newly-retightened union, but there is definitely a small weep from where the rubber part of the hose is crimped onto the metal fitting. No amount of retightening will fix this, basically that hose is toast. Removing and replacing it, however isn't the work of a moment, as we shall see.

The problem is that the other side of this hose winds its way around and behind the oil tank. And I reckon that it's one of those jobs that's easier if you just bite the bullet and remove the oil tank altogether, than try to fudge the hose replacement with it in place. The oil tank is held in place by two rubber mounts, four oil hoses, and a bunch of breather hoses at the top. All of the rubber bits will have gone hard and inflexible, so that oil tank isn't goign to budge for love or money unless the hoses are removed.

The first job is, to clean the area as best you can, to remove as much loose dirt as you can. I find that there are cheap kits of brushes that they sell for cleaning bicycles, and they work really well in this application.

Then you remove the sharkfin sill trim, which comes off pretty easy, it's just held in with two screws and a couple of plastic nuts.

Where it reveals two of the hoses from the bottom of the oil tank...and the big union from the oil hose we want to replace. At the back, you can also see the rubber cotton reel looking thing, which is one of the two oil tank mounts.

You undo that nut, and also the nut for the upper tank mount

I figure there's no point arguing with these old stiff hoses, so I just cut the old ones off (this is the hose from the oil filler spout in the engine bay)

Then I remove the metal oil return hose, which is the easiest way of removing the short stub of hose just below that other hose we just cut.

Then I cut the two lower hoses that attach to the bottom of the oil tank.

And then the tank can be pulled straight back (ie towards the brake disc)

...and the forward end of the fat oil hose is revealed. Obviously in the factory, they installed the hose first, and the tank later.

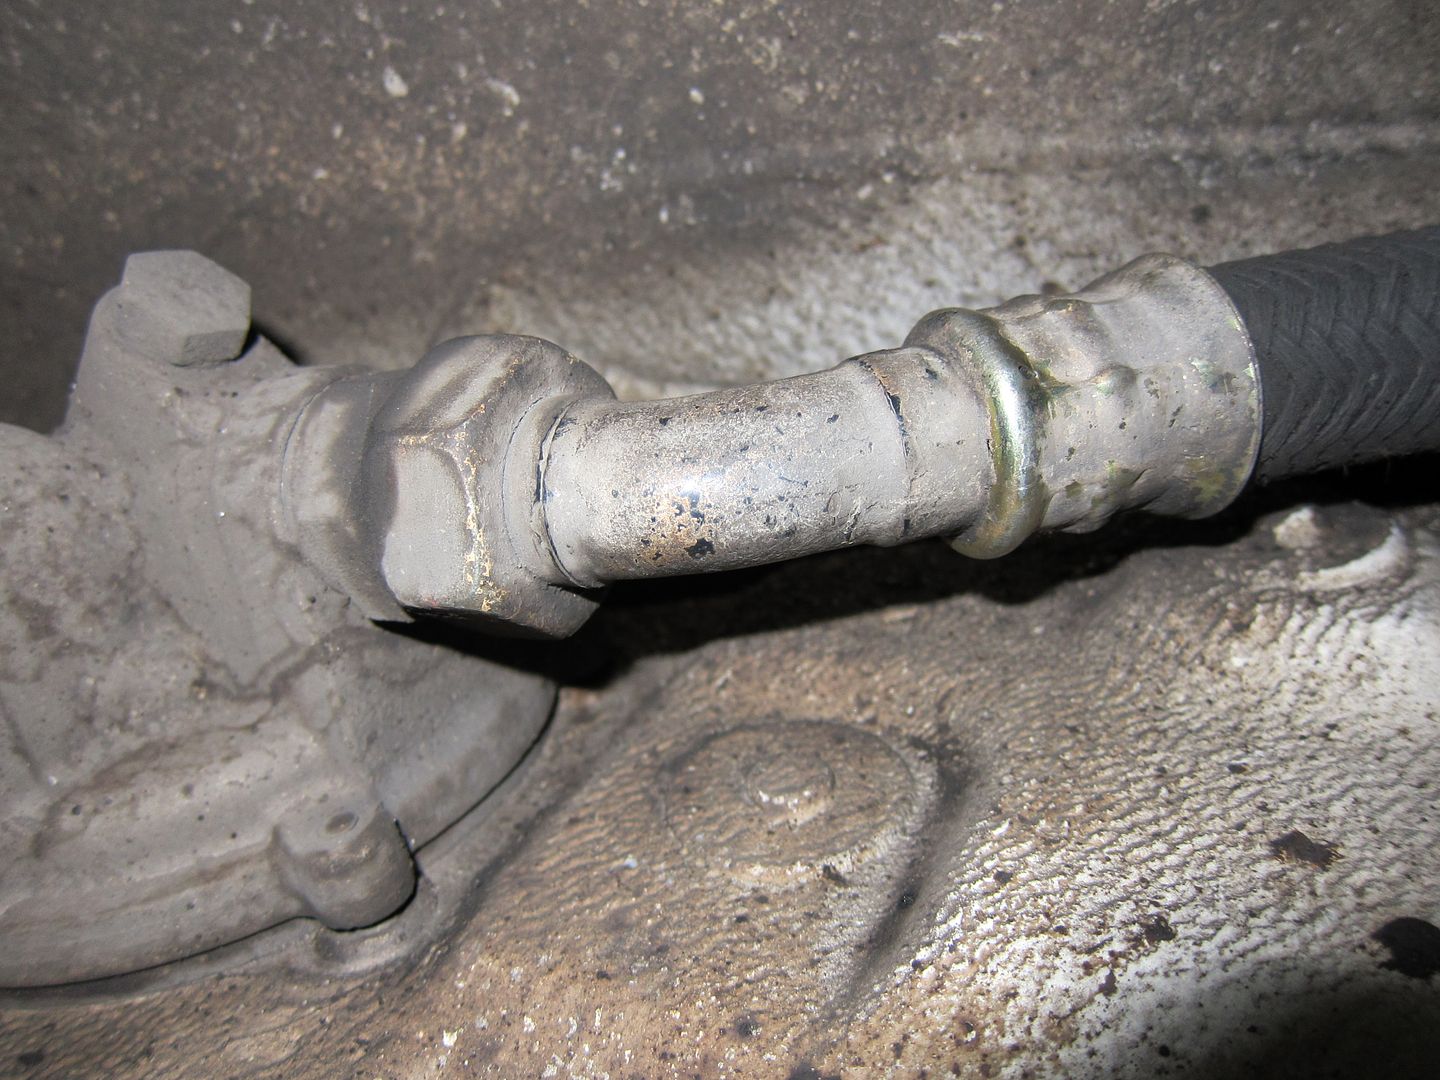
You can now break out the 32 and 36mm wrenches again, to finally remove that pesky leaky hose. You can see, that the hose union attached to a fitting that is conical in profile.

And the part of the hose that fits into it, is an arrowhead in profile. This is a pretty standard fitting for industrial and motorsport fluid hoses.

But the hose is definitely gone...I can actually freely spin the metal pipe against the braided hose. I guess over time, the braided rubber hose has dried up and shrunk a little, so that crimp isn't as tight as it once was.

The plan at the moment is to take the dead hose to an industrial hose shop, and get them to rebuilt it. If you hang around these places (and I have...don't ask), there's a steady stream of guys in overalls walking in all day, with broken hoses for construction and factory equipment, you name it. The guys at the shop will cut the oil fittings off and remake the pipe with a new section of crimped hose.

Now I figure that the bulldozer guys will need hoses which can withstand many thousand psi of pressure, so our measly 70psi of engine oil pressure isn't going to be much of a challenge for the guys at the hose shop to contain. A new factory hose is $300, so I think that leaves plenty in the kitty to get some overkill industrial hose fitted to the old pipe. Let's see how we go...
So the convergence of a few public holidays into a 4-day weekend meant that it was a great opportunity to hit the road and collect the bonnet in the trusty family truckster.And after a 2000km round trip...here it is!
There are some very mild scratches which look like they could be buffed out...
But apart from that, the only damage I can see are the paint on the rear corners being chipped, no doubt from being stored standing up against a wall.
The chips do show a bit of the original paint underneath though...so I think this bonnet was originally attached to a Maritime Blue RS.
I wonder what this number means...its stamped next to the cutout for the frunk light.
Interestingly, the bottom half of the underside is painted in a rough stoneguard paint. And you can just about see a rectangle under the surface, as if a patch was cut out a new metal welded back in.
Rather medieval looking prop rod
As for the colour...well it isn't actually Grand Prix White, but rather a less stark, and more creamy shade. So I'll be dropping this off at my favourite bodyshop for a fresh coat of GPW. I haven't weighed it, but it sure is feathery light! You can easily lift it up with just your pinky finger, but it does feel a little floppy and paper thin.
In other news, I'm still chasing that oil leak. Now, this has been bugging me something fierce, since I like my cars to be as perfect as possible, but perfection isn't a word that comes to mind when you're sitting in traffic, and everyone's giving you the evil eye because there's this cloud of white smoke wafting out from the car's bum
And you might also recall that I'd narrowed it down to this fat oil hose that goes into the oil filter console. It sits just above the secondary muffler, so any spilt oil tends to burn off into smoke as it drips onto the hot muffler.Now, Vandit had some luck in just tightening the oil hose union, so that's a logical first port of call before we get too carried away.
And in order to tighten the union, the secondary muffler needs to come out, which is pretty easy. Just remove these two nuts under the bracket
And the pipe clamp at the rear of the muffler...
...then the (remarkably heavy) item just falls out onto the floor.
Not to tighten that union. First you'll need some really big spanners. 32mm and 36mm open ended ones. Now, you're probably thinking that one of those spanners in that multi pack you bought from the hardware store is a 36, but y'know...you probably don't have one
But on the bright side, when the zombie invasion comes, I have two more weapons to add to my arsenal.It's a little tight in there, but the 32mm spanner locks onto a fitting tht sticks out of the oil filter console, and the big 36 goes on this massive nut that attaches the hose itself. Just loosen it a hair, and then nip it tight.
Then clean everything up and stick it all back together again.
Now, I start the engine and let it warm up all the way, hoping that any leaks will make themselves known. And after a while...aha! There isn't any oil leaking from the newly-retightened union, but there is definitely a small weep from where the rubber part of the hose is crimped onto the metal fitting. No amount of retightening will fix this, basically that hose is toast. Removing and replacing it, however isn't the work of a moment, as we shall see.
The problem is that the other side of this hose winds its way around and behind the oil tank. And I reckon that it's one of those jobs that's easier if you just bite the bullet and remove the oil tank altogether, than try to fudge the hose replacement with it in place. The oil tank is held in place by two rubber mounts, four oil hoses, and a bunch of breather hoses at the top. All of the rubber bits will have gone hard and inflexible, so that oil tank isn't goign to budge for love or money unless the hoses are removed.
The first job is, to clean the area as best you can, to remove as much loose dirt as you can. I find that there are cheap kits of brushes that they sell for cleaning bicycles, and they work really well in this application.
Then you remove the sharkfin sill trim, which comes off pretty easy, it's just held in with two screws and a couple of plastic nuts.
Where it reveals two of the hoses from the bottom of the oil tank...and the big union from the oil hose we want to replace. At the back, you can also see the rubber cotton reel looking thing, which is one of the two oil tank mounts.
You undo that nut, and also the nut for the upper tank mount
I figure there's no point arguing with these old stiff hoses, so I just cut the old ones off (this is the hose from the oil filler spout in the engine bay)
Then I remove the metal oil return hose, which is the easiest way of removing the short stub of hose just below that other hose we just cut.
Then I cut the two lower hoses that attach to the bottom of the oil tank.
And then the tank can be pulled straight back (ie towards the brake disc)
...and the forward end of the fat oil hose is revealed. Obviously in the factory, they installed the hose first, and the tank later.
You can now break out the 32 and 36mm wrenches again, to finally remove that pesky leaky hose. You can see, that the hose union attached to a fitting that is conical in profile.
And the part of the hose that fits into it, is an arrowhead in profile. This is a pretty standard fitting for industrial and motorsport fluid hoses.
But the hose is definitely gone...I can actually freely spin the metal pipe against the braided hose. I guess over time, the braided rubber hose has dried up and shrunk a little, so that crimp isn't as tight as it once was.
The plan at the moment is to take the dead hose to an industrial hose shop, and get them to rebuilt it. If you hang around these places (and I have...don't ask), there's a steady stream of guys in overalls walking in all day, with broken hoses for construction and factory equipment, you name it. The guys at the shop will cut the oil fittings off and remake the pipe with a new section of crimped hose.
Now I figure that the bulldozer guys will need hoses which can withstand many thousand psi of pressure, so our measly 70psi of engine oil pressure isn't going to be much of a challenge for the guys at the hose shop to contain. A new factory hose is $300, so I think that leaves plenty in the kitty to get some overkill industrial hose fitted to the old pipe. Let's see how we go...
Last edited by Babalouie; 04-01-2013 at 08:13 AM.
04-01-2013, 08:22 AM
#434
Burning Brakes
Thread Starter
04-01-2013, 11:33 AM
#435
Nordschleife Master
Nice work dropping the tank. I think I'm overdue on replacing that big line on my own car. The one buried under the heat exchangers also needs replacing.
When I loosened that rear union, it wasn't the one from the console to the thermostat, it was the one from the motor to the console and it was in order to rotate the hardline slightly because it was contacting the bend on the primary exhaust.
When I loosened that rear union, it wasn't the one from the console to the thermostat, it was the one from the motor to the console and it was in order to rotate the hardline slightly because it was contacting the bend on the primary exhaust.