
Aussie 964C2 Maintenance Diary (pic heavy!)
 08-08-2011, 11:23 AM
#1
Burning Brakes
Thread Starter

I was in the process of tapping out another DIY thread, when I thought it might be more fun if I kept them all in one ongoing build thread 
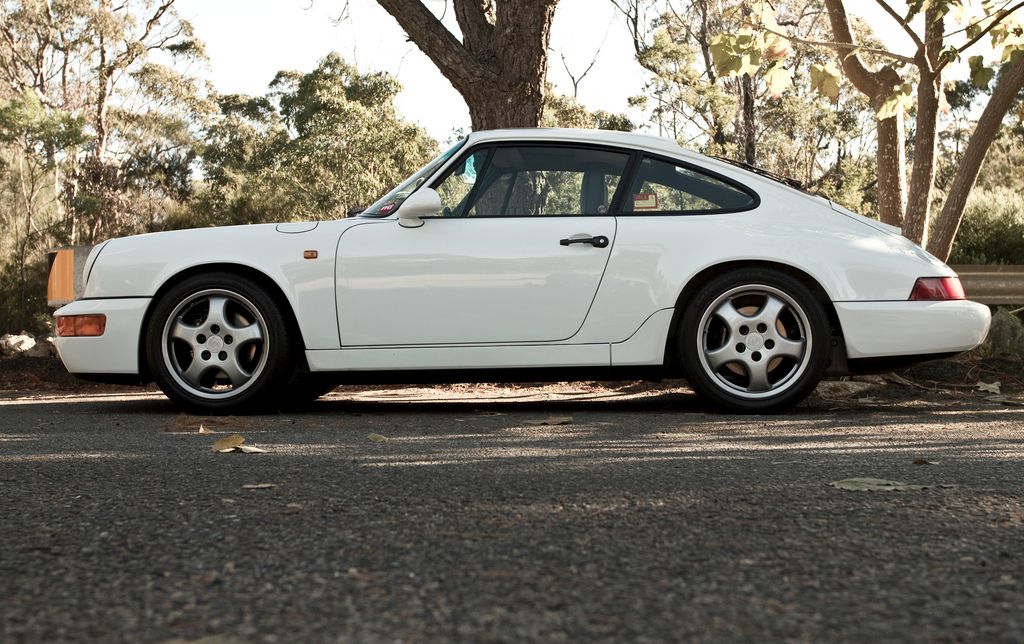
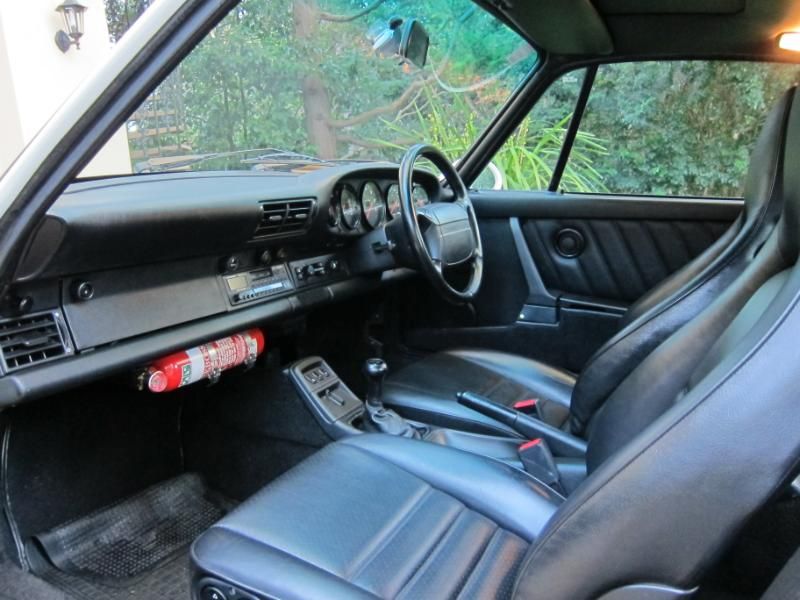
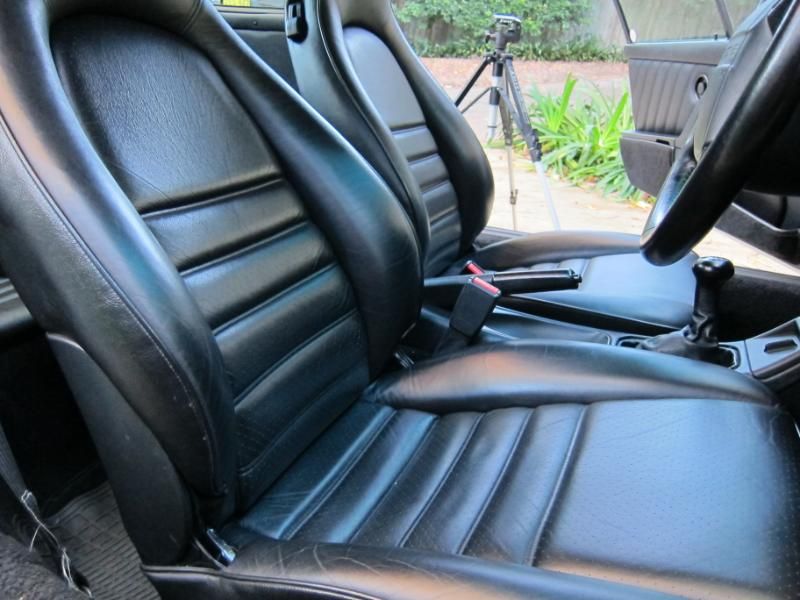
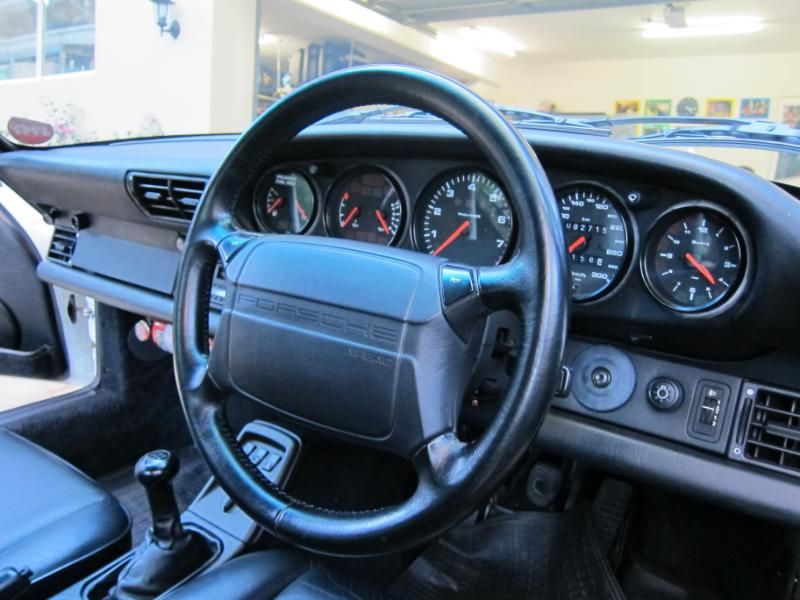
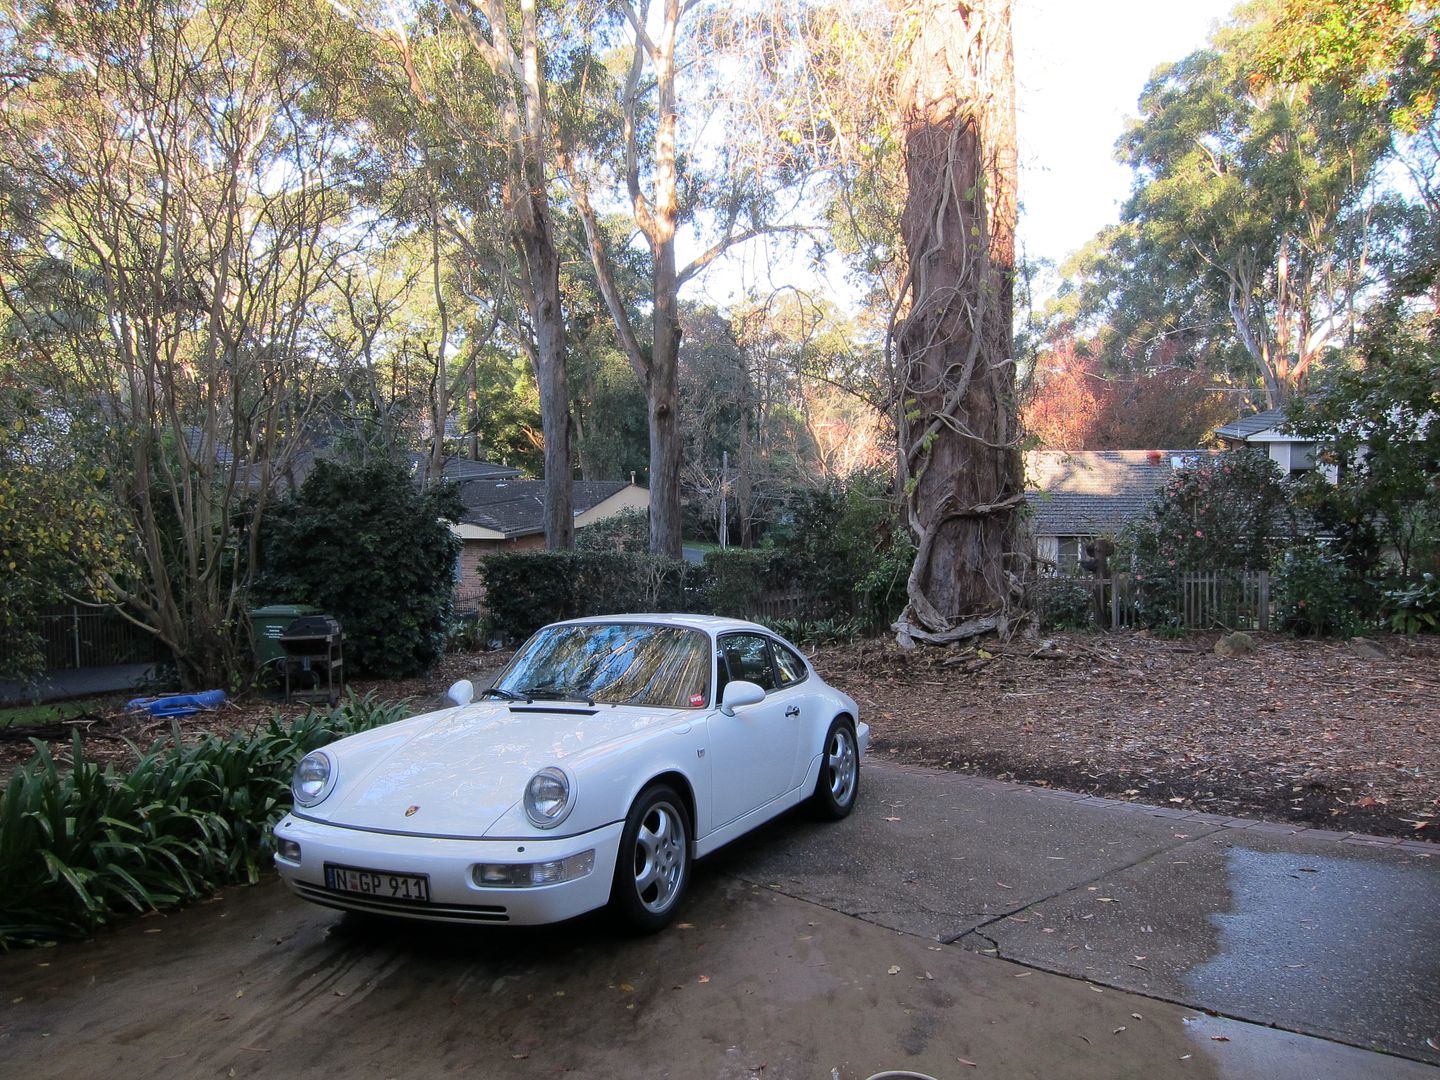
So anyway, here's my new pride and joy. She's a 1993 C2, nicely optioned with rear wiper, RDS Symphony stereo upgrade, sunroof, cruise control and comfort seats (which I presume are just electric versions of the regular seats).
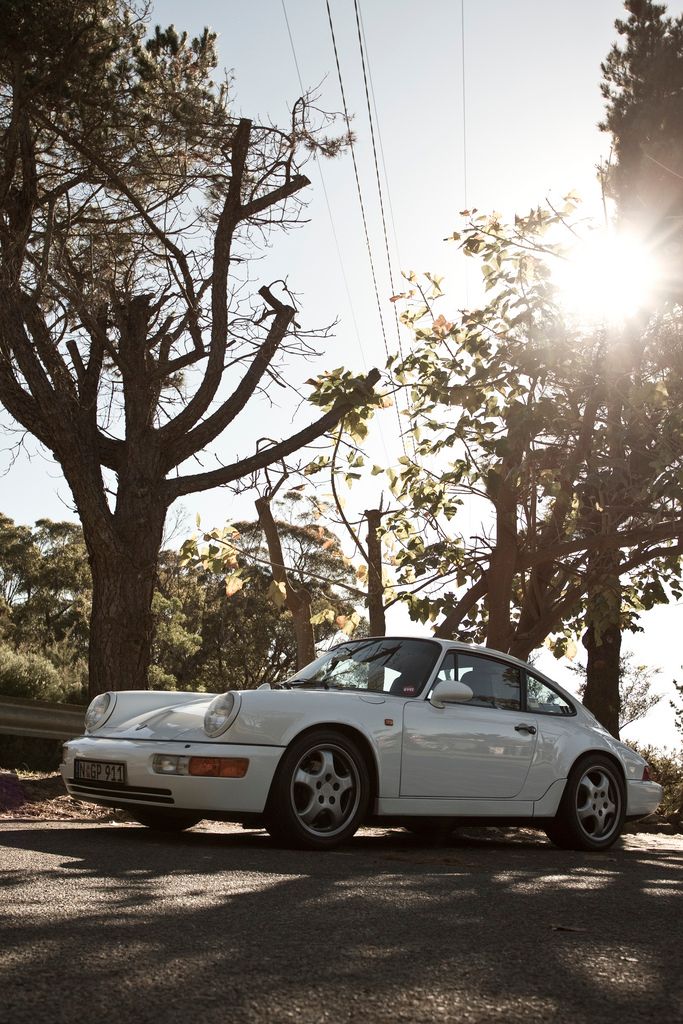
Somewhere along the way after the car left the factory, an LSD, replica Cup1s, Cup Pipe and a Bilstein HD/Eibach combo found their way onto the car. I'm not unhappy about this, obviously
I hail from Sydney, Australia and am a first-time P-Car owner. I also love DIY, so figuring out how this nifty little sports car ticks has been a lot of fun. It certainly is very different from what I'm used to working on (which is older Japanese cars).
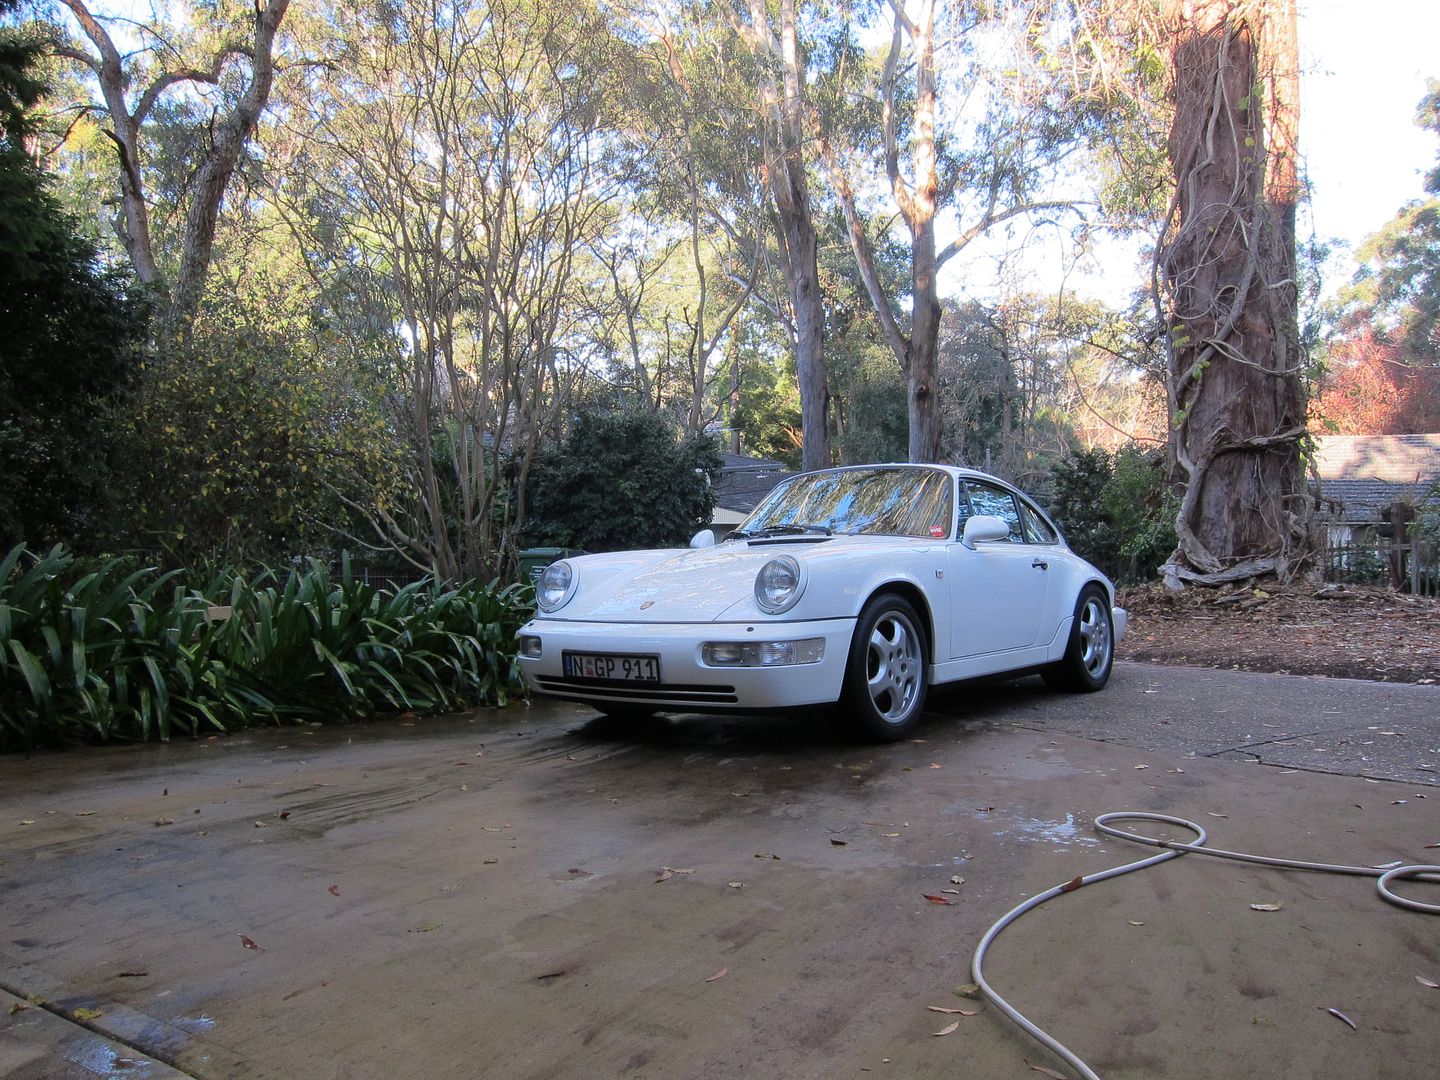
I really am very, very lucky. The 964 spent the last 8 years as a pampered part of a 5-Porsche collection.
The previous owners of the car took such good care of it, that I'm actually a little embarassed to be using it daily now, and getting it rained on and dirty.
But while the car was in amazing cosmetic condition, being little-used for most of the past decade did leave its mark, and there were quite a few items on the PPI that were age-related.
None of them were dealbreakers, and so I bought the car! First thing was to get an overdue service done, which was performed by the same specialist that did the PPI, Autohaus Hamilton. I asked them to do tackle some of the big things on the list, and so in addition to the usual annual service, they also replaced the wishbone bushes, engine mount and clutch soft hose.
After that, the car felt great, and I really enjoyed my entry into the 911 world
And I was itching to start the fun stuff, which is modding
The guy I bought the car from, is a total Porsche nut. When you go into his garage, the walls are covered in Porsche memorabilia and posters, and you can't help but notice all the trophies from road rallies too. His Targa Tasmania ride is a Carrera 3.0 RSR, and so he's got all sorts of bits and pieces lying about the place. One of the things I scored with the car was a set of 964 manifolds, loom, sensors and ecu.
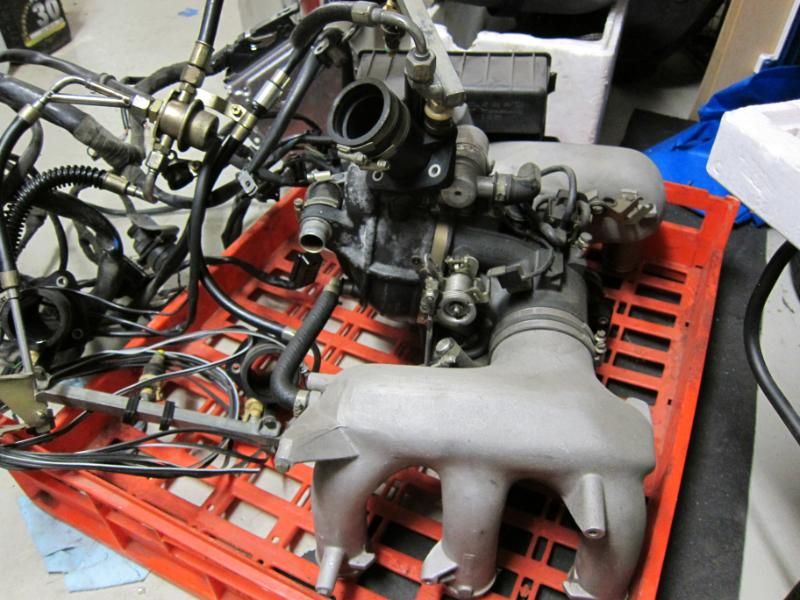
It's a complete setup with fuel rails, injectors, the whole deal. It's from an early 964, so has the cast alloy manifolds (mine has the later plastic ones). But it's good to know I got all these little bits and pieces for a rainy day.

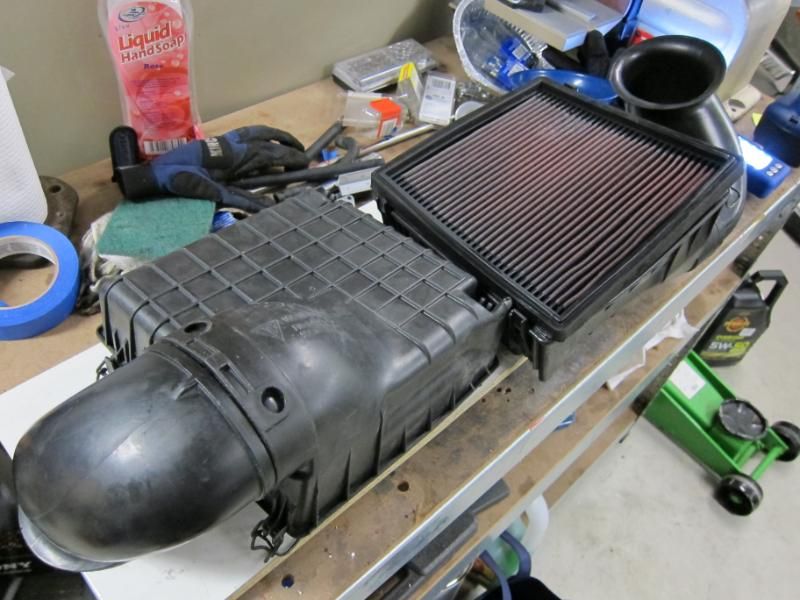
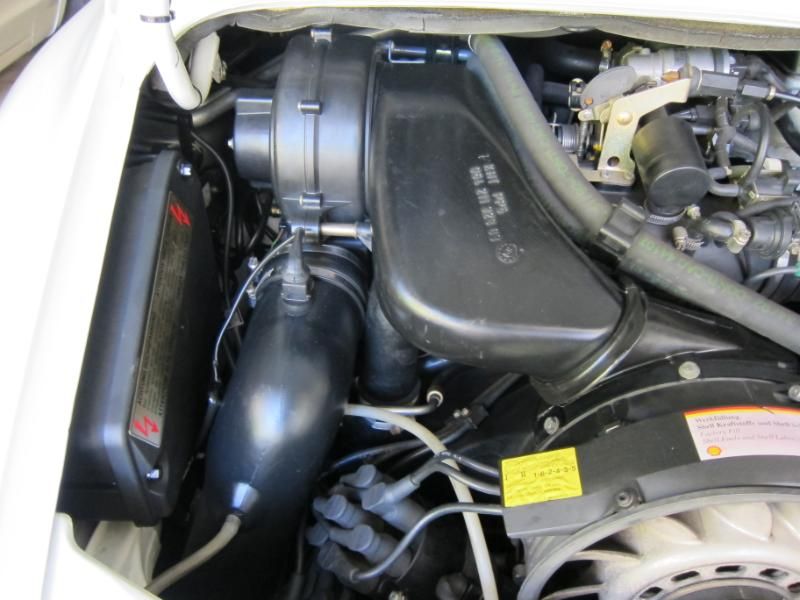
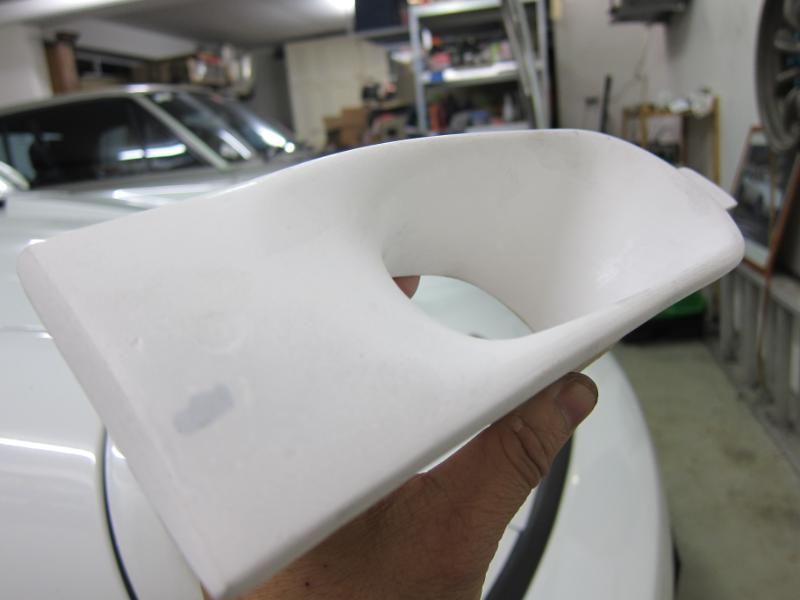
...and of course it also comes with an airbox You can see the internal bellmouth it has.
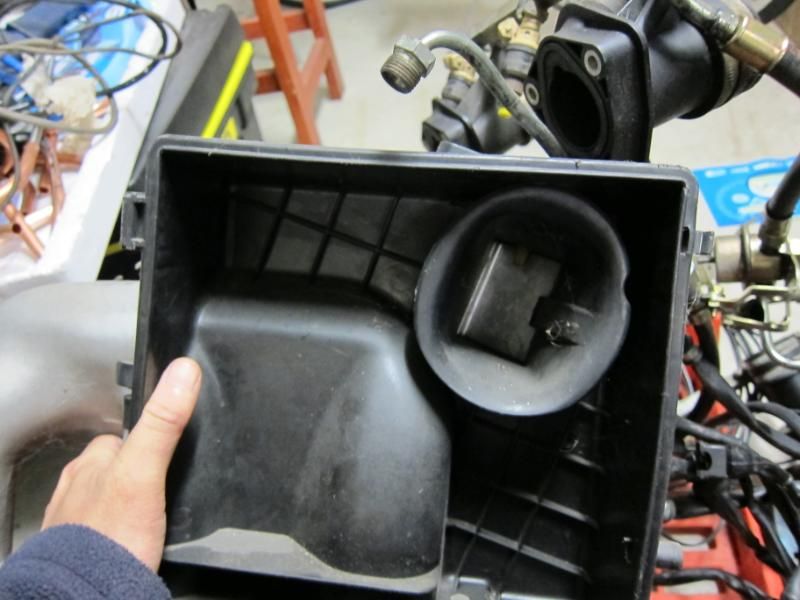
The airbox lid is the same as mine though, so at this stage you're probably thinking exactly what I'm thinking...
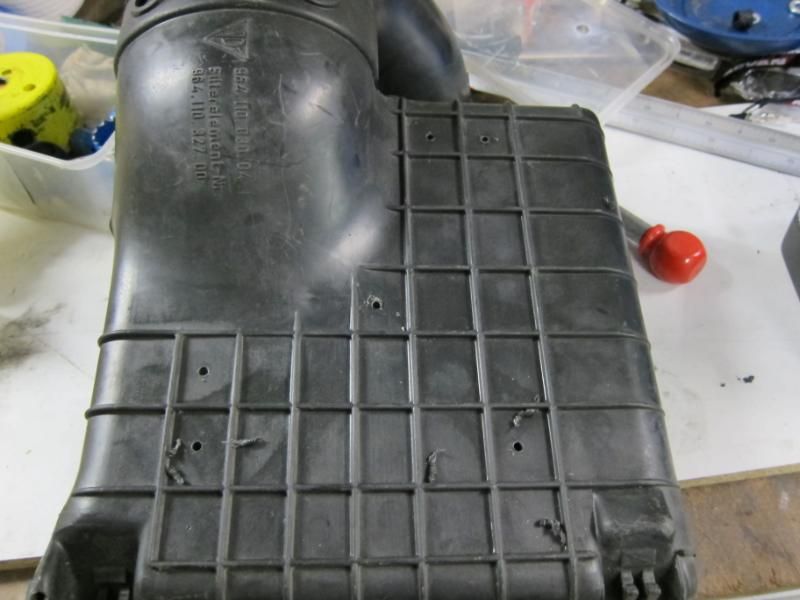
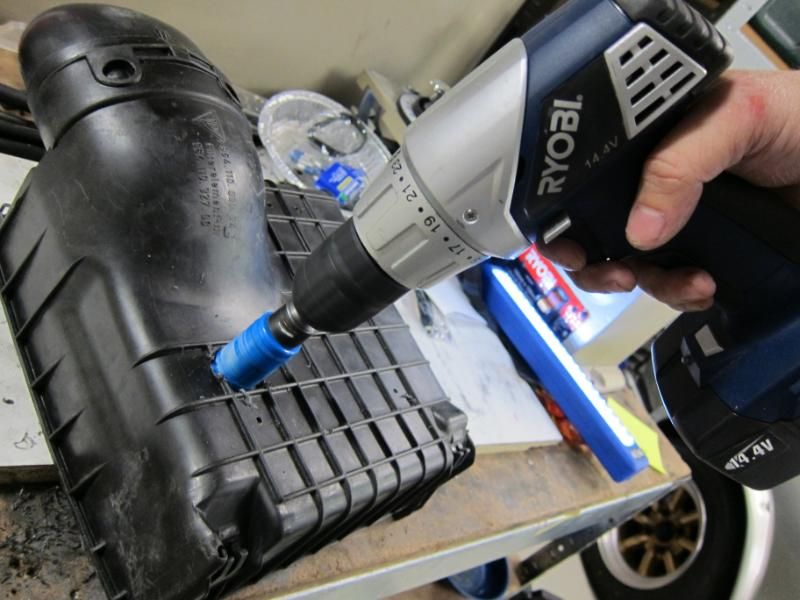
First I drill some holes, and those raised ridges will be a great help in cutting the lid later.
Then I cut some holes at the corners with the holesaw
Then all we have to do, is join the dots
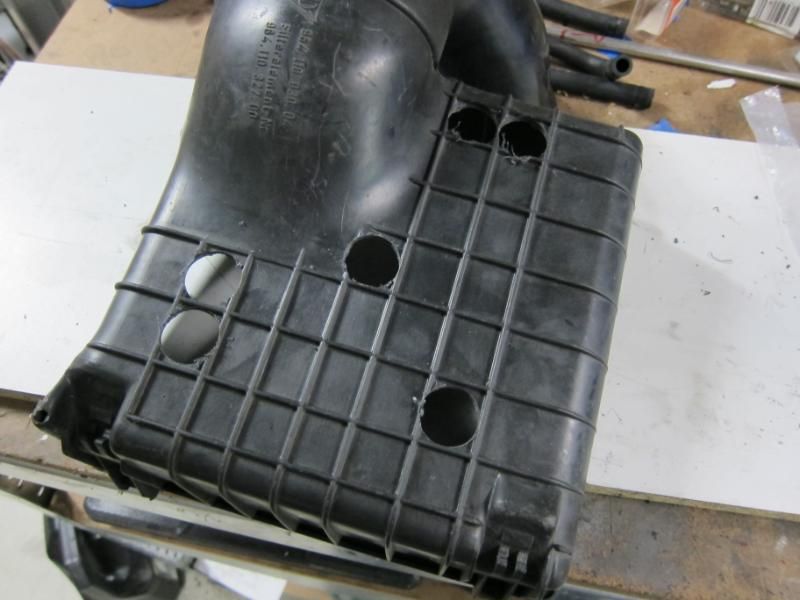
...cut between the holes with a jigsaw
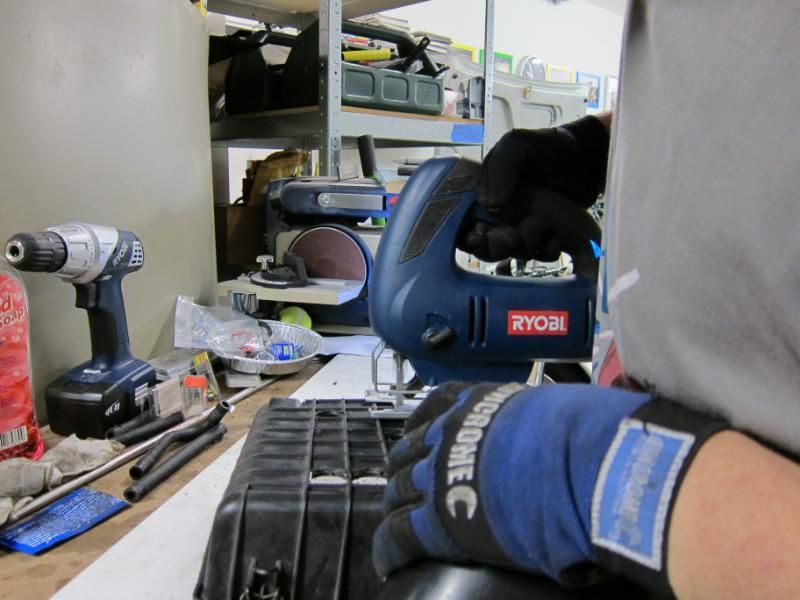
Clean it up with a file, and here we go! As you can see, the previous owner fitted a K&N panel filter, I'll give it a clean later.
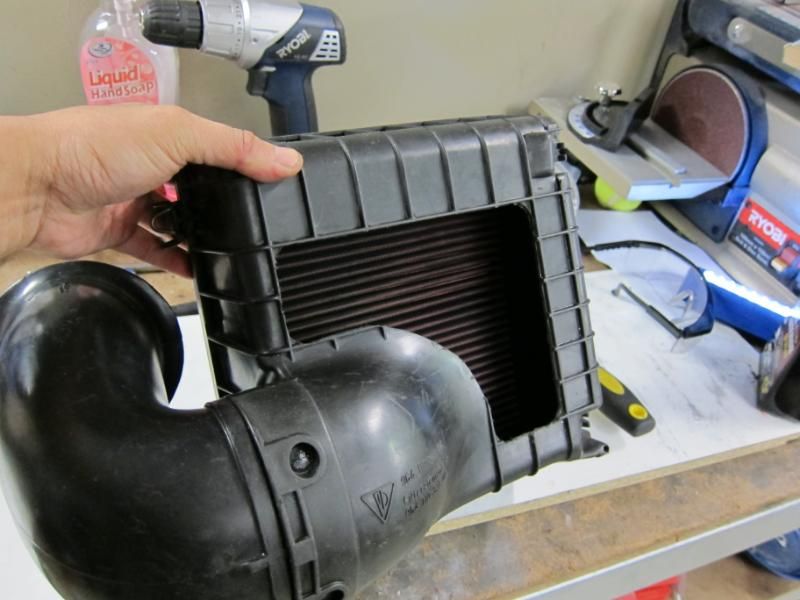
It's not as nice-looking as the carbon Fabspeed one, but I would imagine that it should work just as well....I left the snorkel on, so unless you're really curious it appears stock at a glance.
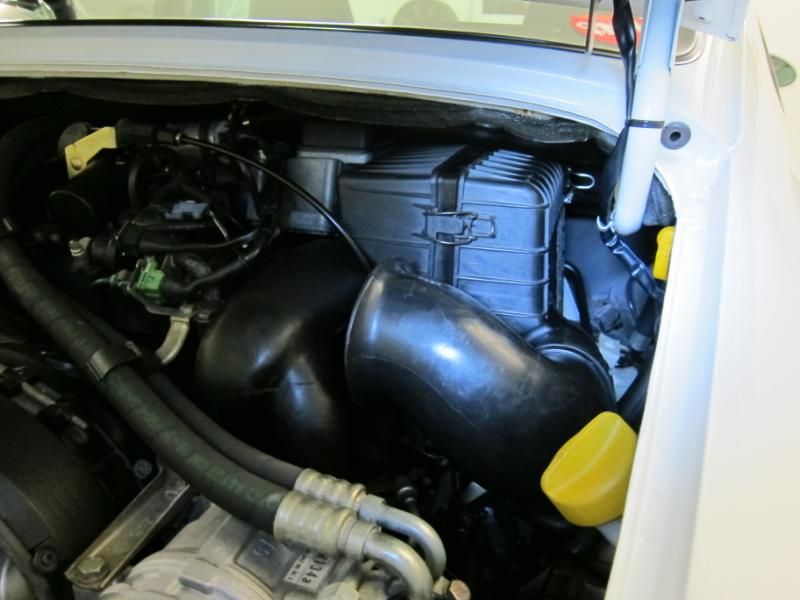
And it does work! There is more induction noise (pretty much what you would expect if we'd fitted a pod) it's very nice and throaty under load now, and there is a little bit more pep (which is quite possibly psychological, I admit)
But while I was out driving, the electric seat packed up! All the switches were dead, so I suspected a blown fuse....and what a magnificent fusebox the 911 has! 41 fuses, all numbered, with a very nice chart on the lid to tell you what is what. Plus a whole bunch of spare fuses in the middle of the box too.

The fuse was fine, it turned out to be a plug under the seat came undone This becomes a recurring feature of my car...I am a little bit vertically-challenged, so I motor the seat all the way forward, and at one point the electric seat will go dead. That's my cue to reach behind the seat and plug the cable back in The seat seems quite willing to motor so far forward that it pulls the plug right out of its socket.
So anyway, here's my new pride and joy. She's a 1993 C2, nicely optioned with rear wiper, RDS Symphony stereo upgrade, sunroof, cruise control and comfort seats (which I presume are just electric versions of the regular seats).
Somewhere along the way after the car left the factory, an LSD, replica Cup1s, Cup Pipe and a Bilstein HD/Eibach combo found their way onto the car. I'm not unhappy about this, obviously
I hail from Sydney, Australia and am a first-time P-Car owner. I also love DIY, so figuring out how this nifty little sports car ticks has been a lot of fun. It certainly is very different from what I'm used to working on (which is older Japanese cars).
I really am very, very lucky. The 964 spent the last 8 years as a pampered part of a 5-Porsche collection.
The previous owners of the car took such good care of it, that I'm actually a little embarassed to be using it daily now, and getting it rained on and dirty.
But while the car was in amazing cosmetic condition, being little-used for most of the past decade did leave its mark, and there were quite a few items on the PPI that were age-related.
None of them were dealbreakers, and so I bought the car!
First thing was to get an overdue service done, which was performed by the same specialist that did the PPI, Autohaus Hamilton. I asked them to do tackle some of the big things on the list, and so in addition to the usual annual service, they also replaced the wishbone bushes, engine mount and clutch soft hose.After that, the car felt great, and I really enjoyed my entry into the 911 world
And I was itching to start the fun stuff, which is modding
The guy I bought the car from, is a total Porsche nut. When you go into his garage, the walls are covered in Porsche memorabilia and posters, and you can't help but notice all the trophies from road rallies too. His Targa Tasmania ride is a Carrera 3.0 RSR, and so he's got all sorts of bits and pieces lying about the place. One of the things I scored with the car was a set of 964 manifolds, loom, sensors and ecu.
It's a complete setup with fuel rails, injectors, the whole deal. It's from an early 964, so has the cast alloy manifolds (mine has the later plastic ones). But it's good to know I got all these little bits and pieces for a rainy day.
...and of course it also comes with an airbox
You can see the internal bellmouth it has. The airbox lid is the same as mine though, so at this stage you're probably thinking exactly what I'm thinking...
First I drill some holes, and those raised ridges will be a great help in cutting the lid later.
Then I cut some holes at the corners with the holesaw
Then all we have to do, is join the dots
...cut between the holes with a jigsaw
Clean it up with a file, and here we go! As you can see, the previous owner fitted a K&N panel filter, I'll give it a clean later.
It's not as nice-looking as the carbon Fabspeed one, but I would imagine that it should work just as well....I left the snorkel on, so unless you're really curious it appears stock at a glance.
And it does work! There is more induction noise (pretty much what you would expect if we'd fitted a pod) it's very nice and throaty under load now, and there is a little bit more pep (which is quite possibly psychological, I admit)
But while I was out driving, the electric seat packed up! All the switches were dead, so I suspected a blown fuse....and what a magnificent fusebox the 911 has!
41 fuses, all numbered, with a very nice chart on the lid to tell you what is what. Plus a whole bunch of spare fuses in the middle of the box too.The fuse was fine, it turned out to be a plug under the seat came undone
This becomes a recurring feature of my car...I am a little bit vertically-challenged, so I motor the seat all the way forward, and at one point the electric seat will go dead. That's my cue to reach behind the seat and plug the cable back in The seat seems quite willing to motor so far forward that it pulls the plug right out of its socket.
Last edited by Babalouie; 08-08-2011 at 01:08 PM.
 08-08-2011, 11:34 AM
#3
Burning Brakes
Thread Starter
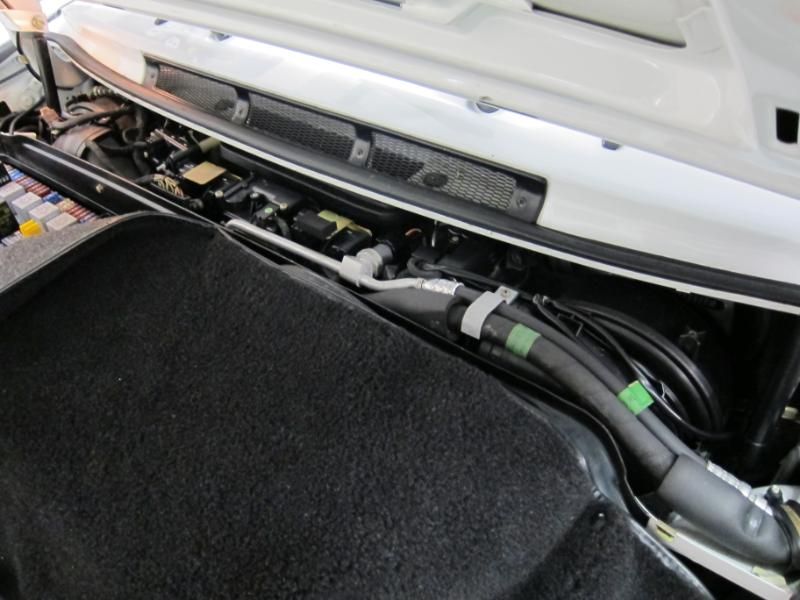
However....and I guess you knew this was coming....it hasn't been all rosy. First problem was the heater. Even with the fan turned up to its maximum, there was only a tiny feeble stream of hot air coming out of the vents, but when it started to blow fuses on a regular basis, I figured something was up. It was then that I discovered the previous owner's stash of spare fuses...no less than ten spare fuses in one of the door bins.
The fuse it was blowing was #1 on the main board, which is for the cabin blowers. Now, if the cabin fans were seizing or something, then this would explain both the blowing fuses and the feeble flow of air.
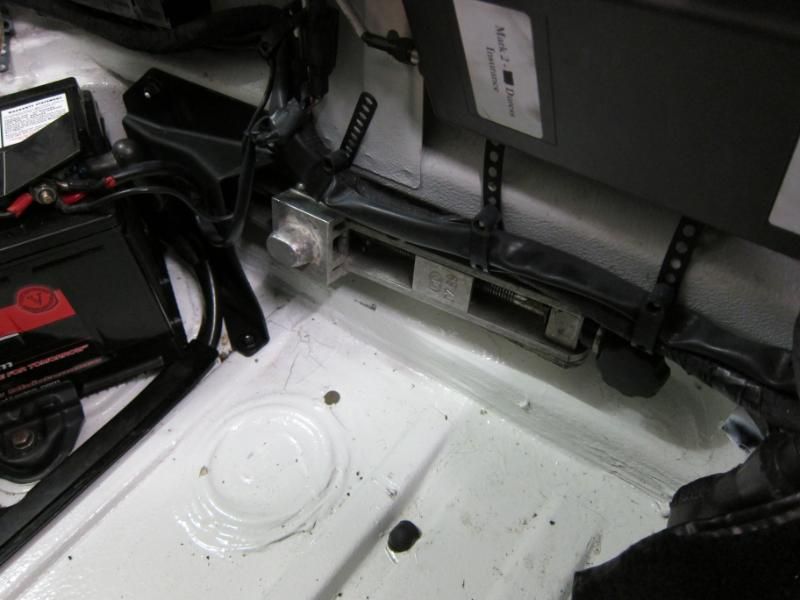
This is bad news, because the HVAC system is mostly jammed into this area in front of the cowl:
...remove that plastic cover to reveal the blower fans and various servos that run the system.
Here's one blower fan on the passenger side...
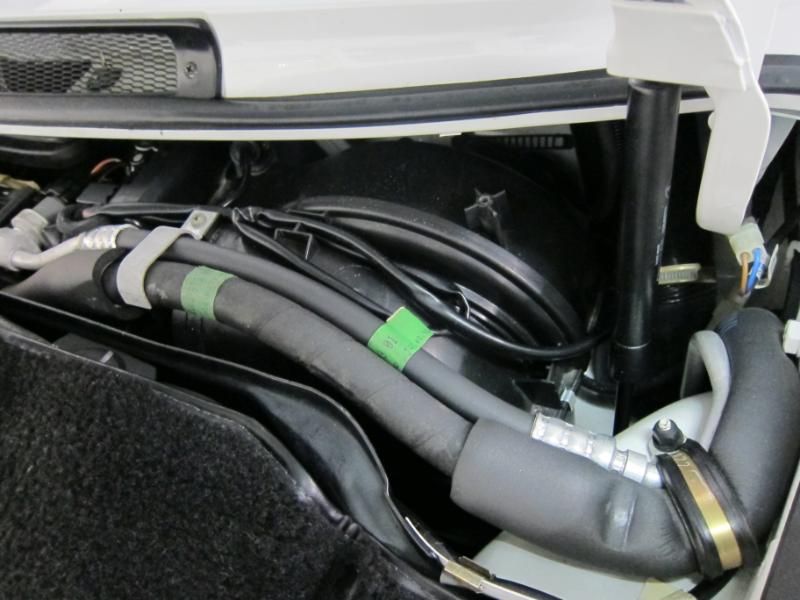
...and his mate on the driver's side.
In between are the various servos and amplifiers that run the HVAC system.
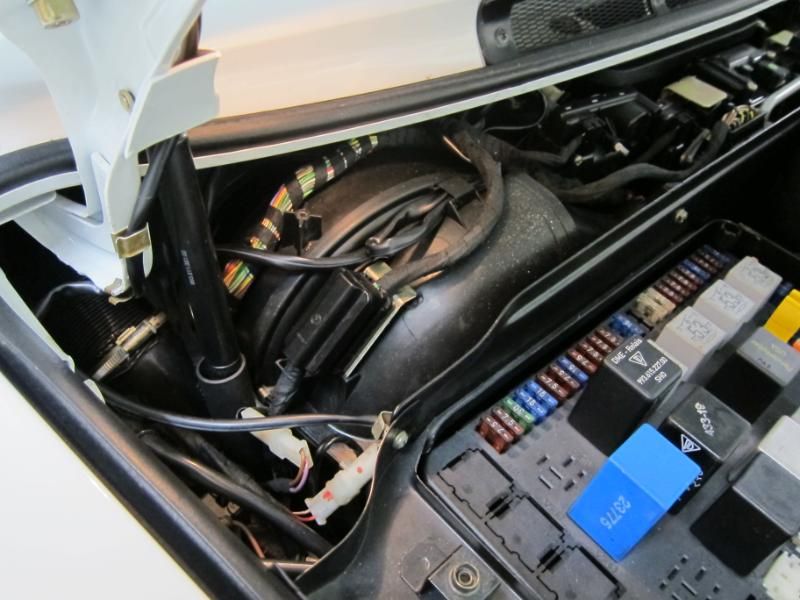
I really, really didn't want to mess around with the blowers, since they're not only expensive, but look like a real pain to access. Then I started to rummage around the engine bay, when I put my hand on the heater blower fan. Even with the cabin heater on, it was clear that it wasn't running at all!
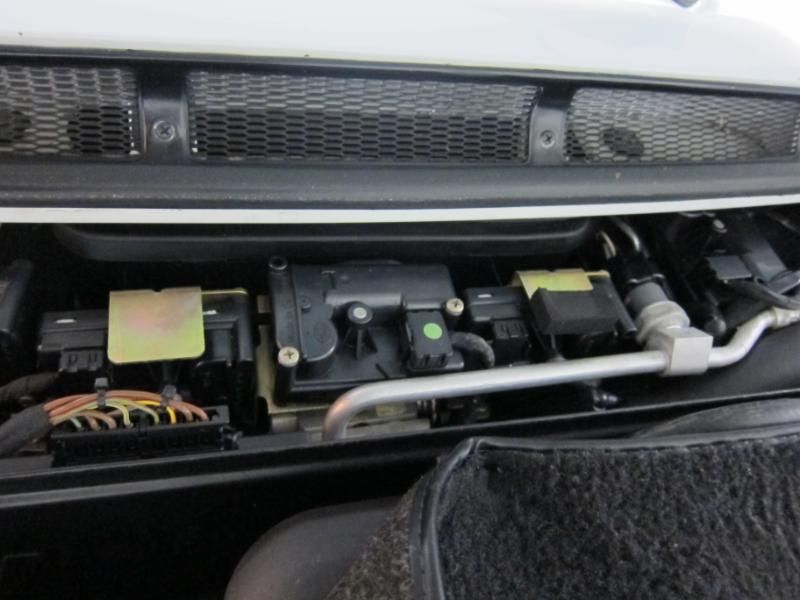
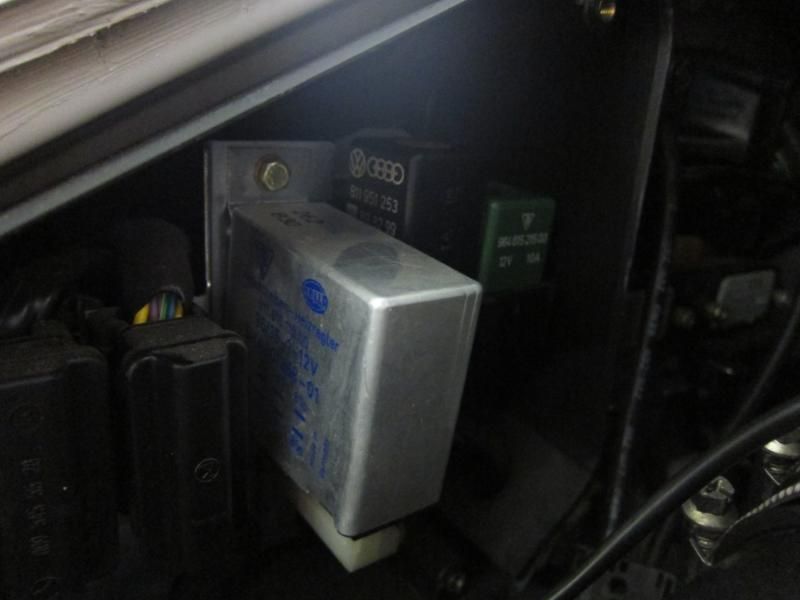
My first instict is maybe that the fuse is blown, which lives in this small fusebox in the engine bay.
The fuse turned out to be fine, but then I noticed something weird out of the corner of my eye. The relay for the heater blower (that big one with the Audi rings on it) wasn't on straight. I wiggled it, and it was loose, so I pushed it firmly home, and the moment I did...the heater blower fan kicked into life!
And now the whole thing worked as it should. The system pretty much starts to feed hot air through the vents within a minute or so of starting the engine, and with the big blower fan back in action, there was now a huge gale of hot air coming through the vents.
For about a week, life was good (and toasty-warm too). But then disaster struck...which is covered in this thread HERE.
With that sorted, I decided to treat myself with some good old retail therapy The cars I'm used to restoring tend to be only sold in Japan, and since most restoration shops there don't ship overseas, getting parts is a little tricky. So it was a pleasant surprise to discover how much easier it is to get parts for the 911. This, of course is also the path to financial ruin, but for the time being it's nice to be able to order stuff and a box of goodies appears a week later I'm not used to this at all.
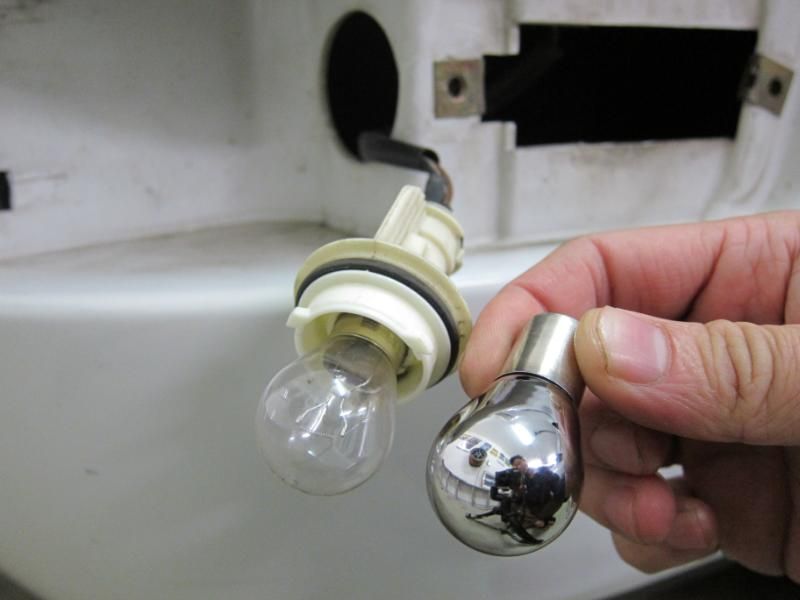
First easy mod was clear indicators from Design911 in the UK.
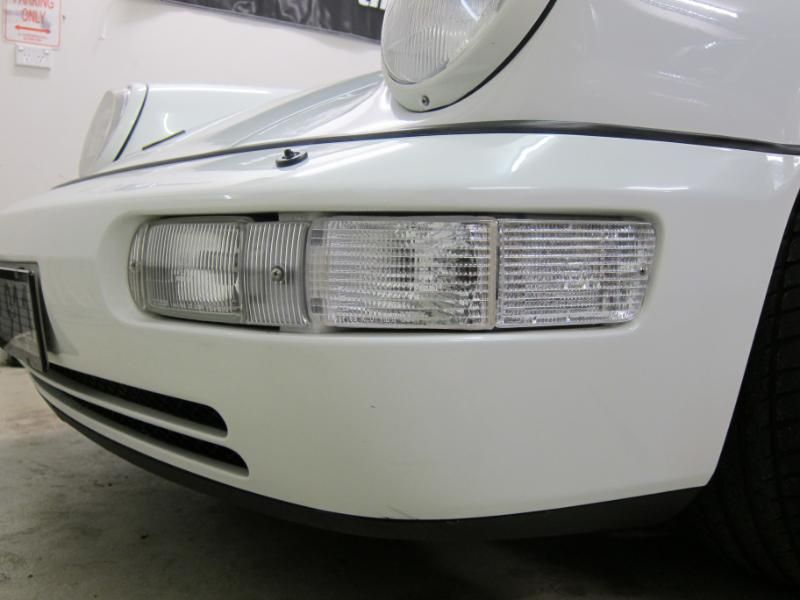
Which run these bulbs which appear silver, but illuminate as orange. The oem indicator units are very nicely made pieces from Bosch and Hella, and these....well, aren't but unless you look at the backside of them, they seem fine.
The fender indicator is swapped for a clear one too btw. I'm not so convinced that the clear look works on a white car, since now you have this big expanse of white...
Especially since I will fit the 911RS brake ducts, which will be colour coded white too.
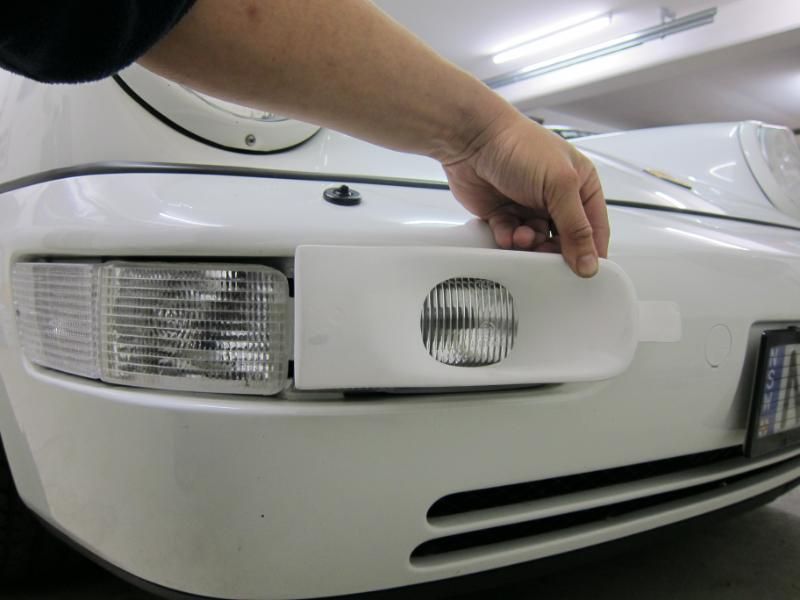
This will take a bit of preparation before I can fit them though. You probably can't tell from the pic, but they're very roughly finished in fibreglass, and will take some sanding and filling before being ready for paint. Also I'll have to drill the mounting holes too, and cut the bumper a little.
I eventually fit the RS Ducts in a thread HERE.
Second cab off the rank is to do something about this. It's a cassette holder that lives at the back of the centre console. Now, I don't mind having it, since it's a cool little reminder of the period of the car, but the fact is, only one little tape drawer works. The rest are stuck.
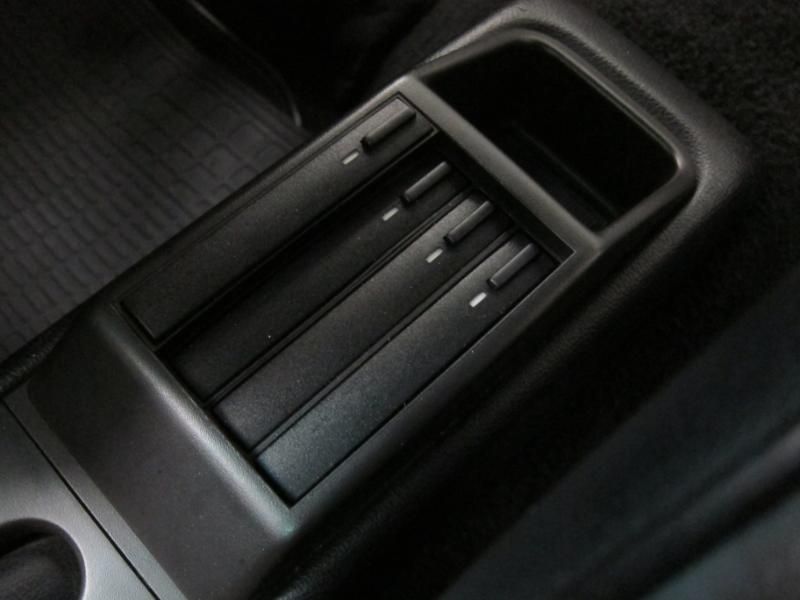
I don't like things that don't work, so it's being replaced by this coin tray.
It looks like it'll accommodate an iPhone quite snugly, so when I fit a new head unit, I might run the iPhone cable to here.

Next thing is the ignition surround. Mine's actually quite good.
But for $6 for a new oem one, it makes sense to change it. They just screw in place, so it's easy to twist them off.
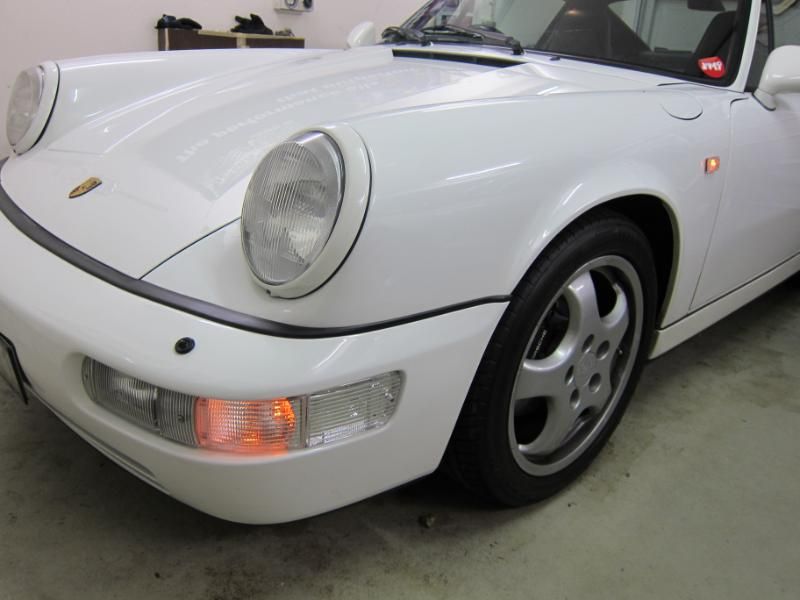
I was surprised to see how the clear indicators turned out in the pics, they came out a lot more spangly than in real life.
If anything, they give the car a little too much of a plain look, so I'm not sure if I like them (I've since swapped back to the orange oem indicators)
Ahh...retail therapy...
The fuse it was blowing was #1 on the main board, which is for the cabin blowers. Now, if the cabin fans were seizing or something, then this would explain both the blowing fuses and the feeble flow of air.
This is bad news, because the HVAC system is mostly jammed into this area in front of the cowl:
...remove that plastic cover to reveal the blower fans and various servos that run the system.
Here's one blower fan on the passenger side...
...and his mate on the driver's side.
In between are the various servos and amplifiers that run the HVAC system.
I really, really didn't want to mess around with the blowers, since they're not only expensive, but look like a real pain to access. Then I started to rummage around the engine bay, when I put my hand on the heater blower fan. Even with the cabin heater on, it was clear that it wasn't running at all!
My first instict is maybe that the fuse is blown, which lives in this small fusebox in the engine bay.
The fuse turned out to be fine, but then I noticed something weird out of the corner of my eye. The relay for the heater blower (that big one with the Audi rings on it) wasn't on straight. I wiggled it, and it was loose, so I pushed it firmly home, and the moment I did...the heater blower fan kicked into life!
And now the whole thing worked as it should. The system pretty much starts to feed hot air through the vents within a minute or so of starting the engine, and with the big blower fan back in action, there was now a huge gale of hot air coming through the vents.
For about a week, life was good (and toasty-warm too). But then disaster struck...which is covered in this thread HERE.
With that sorted, I decided to treat myself with some good old retail therapy
The cars I'm used to restoring tend to be only sold in Japan, and since most restoration shops there don't ship overseas, getting parts is a little tricky. So it was a pleasant surprise to discover how much easier it is to get parts for the 911. This, of course is also the path to financial ruin, but for the time being it's nice to be able to order stuff and a box of goodies appears a week later I'm not used to this at all.First easy mod was clear indicators from Design911 in the UK.
Which run these bulbs which appear silver, but illuminate as orange. The oem indicator units are very nicely made pieces from Bosch and Hella, and these....well, aren't
but unless you look at the backside of them, they seem fine.The fender indicator is swapped for a clear one too btw. I'm not so convinced that the clear look works on a white car, since now you have this big expanse of white...
Especially since I will fit the 911RS brake ducts, which will be colour coded white too.
This will take a bit of preparation before I can fit them though. You probably can't tell from the pic, but they're very roughly finished in fibreglass, and will take some sanding and filling before being ready for paint. Also I'll have to drill the mounting holes too, and cut the bumper a little.
I eventually fit the RS Ducts in a thread HERE.
Second cab off the rank is to do something about this. It's a cassette holder that lives at the back of the centre console. Now, I don't mind having it, since it's a cool little reminder of the period of the car, but the fact is, only one little tape drawer works. The rest are stuck.
I don't like things that don't work, so it's being replaced by this coin tray.
It looks like it'll accommodate an iPhone quite snugly, so when I fit a new head unit, I might run the iPhone cable to here.
Next thing is the ignition surround. Mine's actually quite good.
But for $6 for a new oem one, it makes sense to change it. They just screw in place, so it's easy to twist them off.
I was surprised to see how the clear indicators turned out in the pics, they came out a lot more spangly than in real life.
If anything, they give the car a little too much of a plain look, so I'm not sure if I like them (I've since swapped back to the orange oem indicators)
Ahh...retail therapy...
08-08-2011, 11:53 AM
#4
Burning Brakes
Thread Starter
One of the things on the PPI was that the a/c ballast resistor was fried.
This DIY fix I cover in this thread HERE.
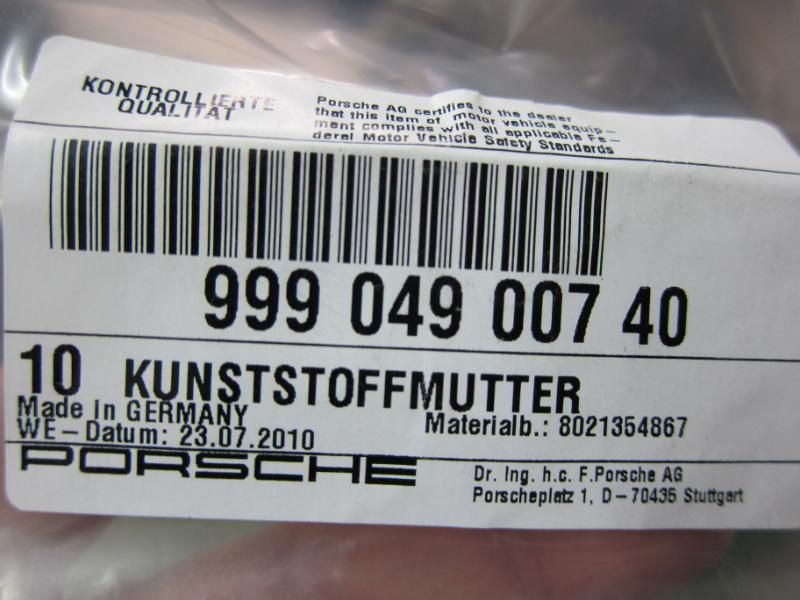
One thing my car didn't come with, is the plastic barrier to hold the jack in place (the jack was just wrapped in a towel!) so I ordered those parts from my friendly local Porsche dealer. They were just a little more expensive than from Pelican, $10 for the plastic barrier, and $8 for the nut.
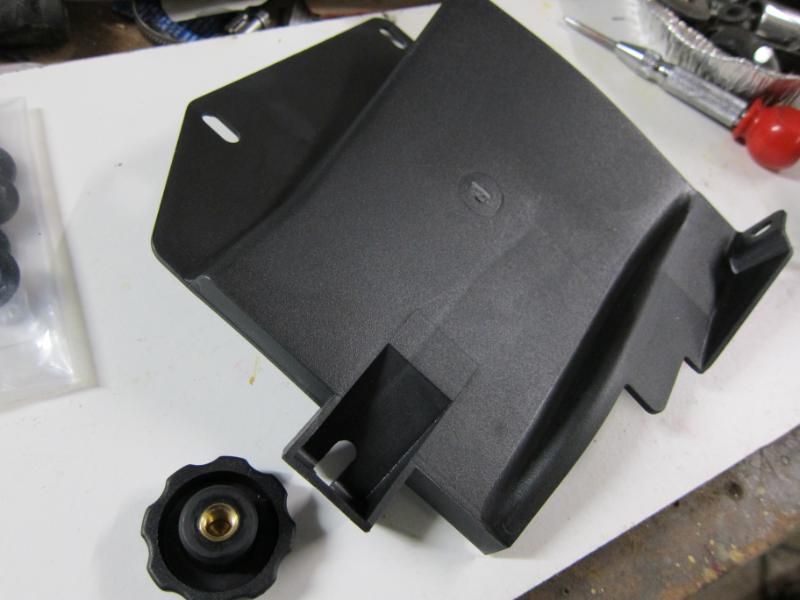
I took a gamble that the plastic nuts that hold on the wheelarch liners would work and they do for 3 of the mounting points.
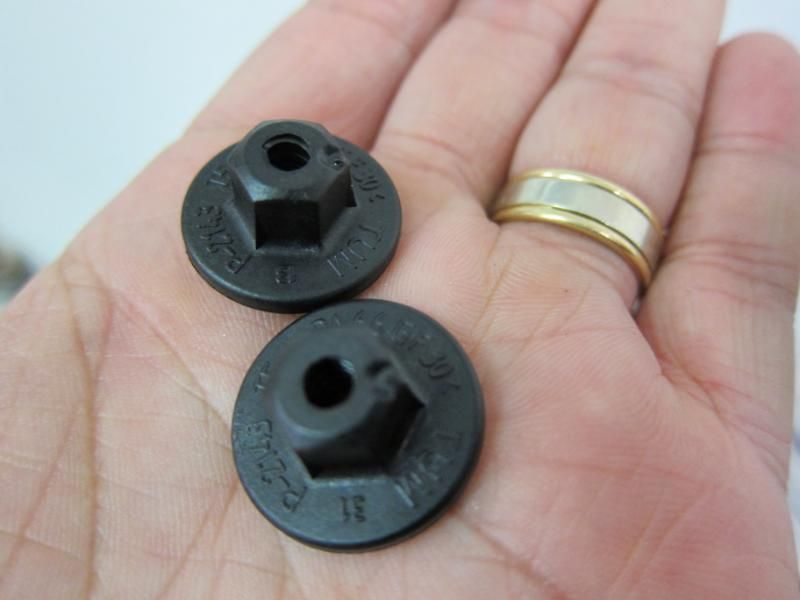
The 4th is on the extreme left, and the big inbuilt washer bit of the plastic nuts make it too bulky to fit in that spot. But it's plenty sturdy with just 3 nuts holding it on (50c each)
Mind you, the plastic nuts are rather colourfully named
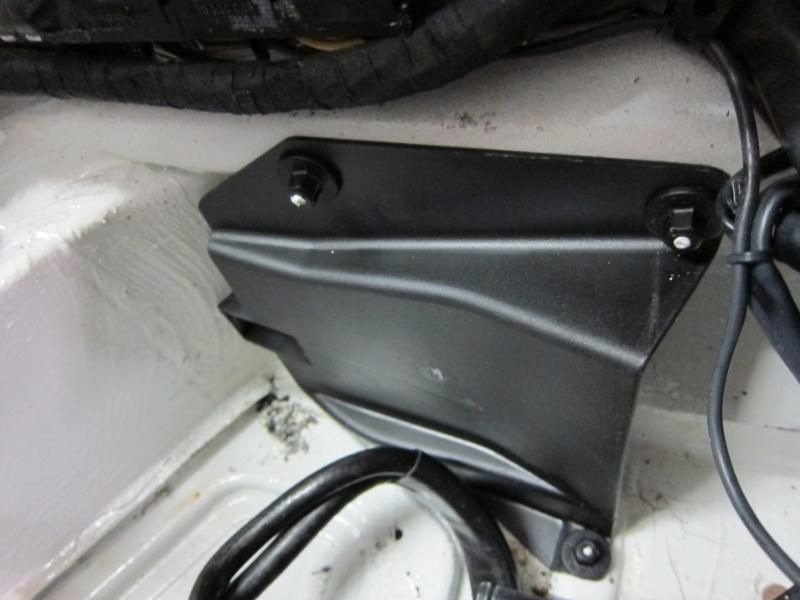
With jack in place...
The plastic barrier is pretty strong, and prevents the unbolted end of the jack from rubbing against the live battery cables.
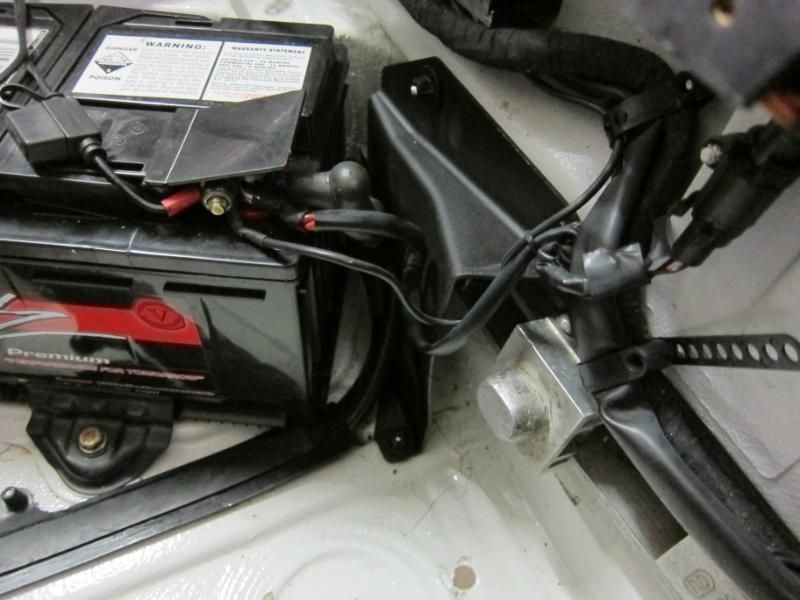
I'm actually pretty surprised that Porsche still stocks random items like this for the older models, and even more shocked that they're only $10ea! Mind you, my local Porsche dealer today did quote me a price of $30 for a single wheelnut....so it's Pelican to the rescue
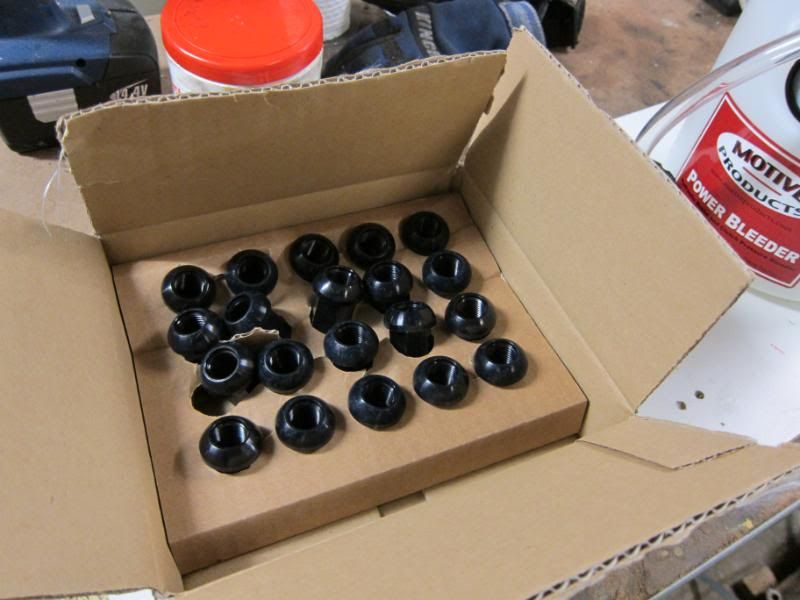
911 wheelnuts are alloy, so they're nice and light like the fancy japanese aftermarket wheelnuts, but rather oddly the anodising seems to flake off with corrosion eventually
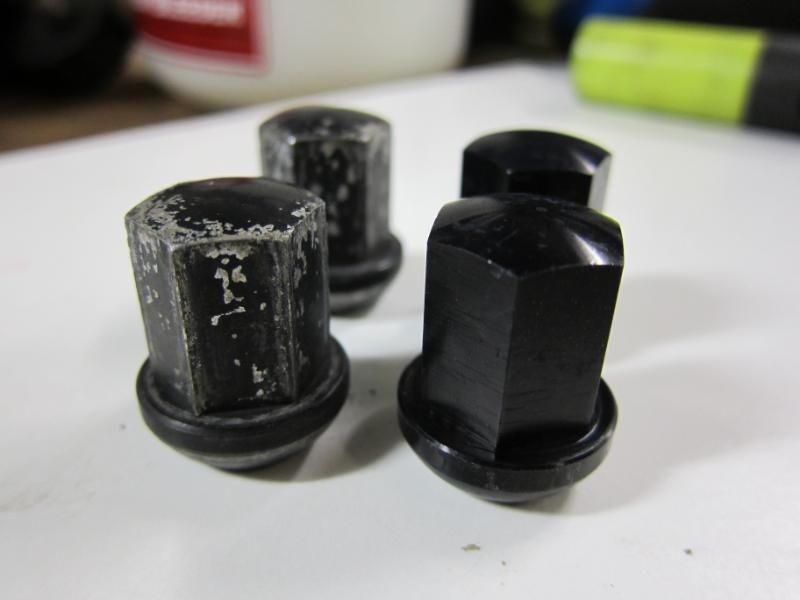
So it's a little unsightly.
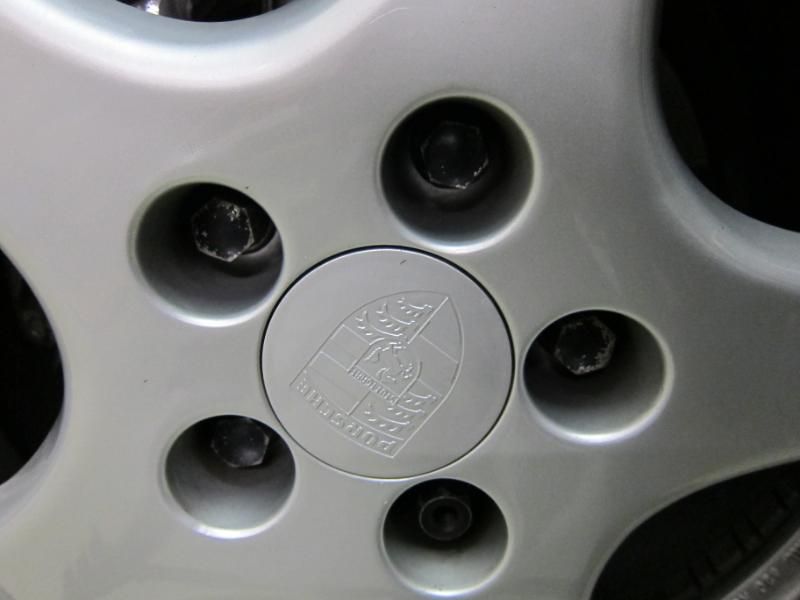
Much better!
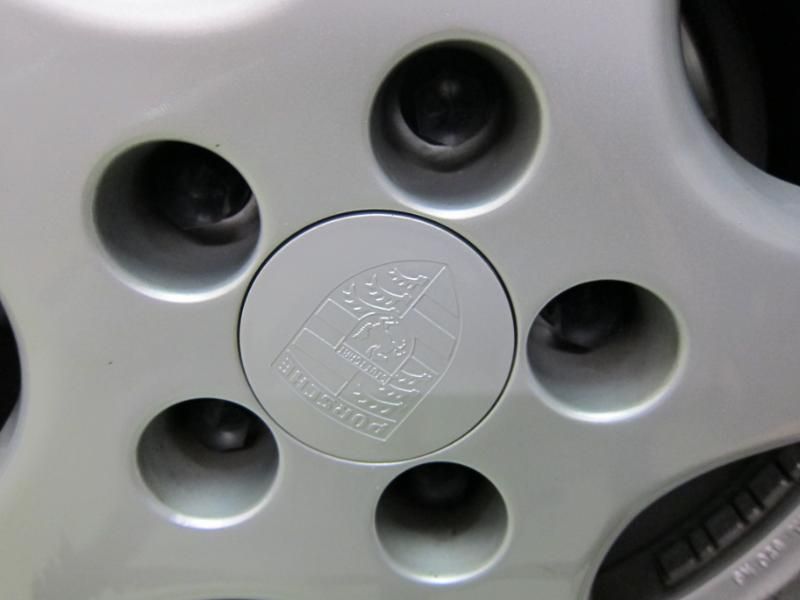
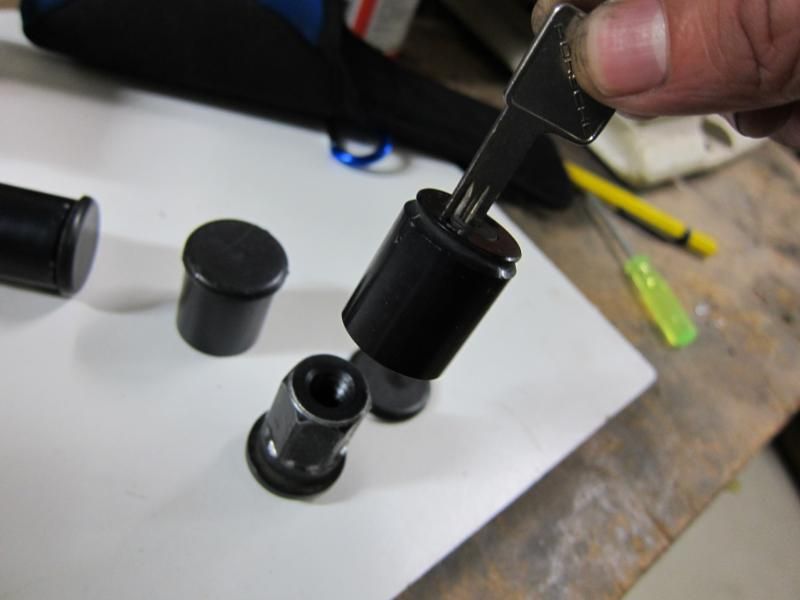
I also ordered a 5th wheelnut per wheel to replace the oem locknuts, which were starting to get stuck. A few times the key would just pull out in my hand, with the lock cover still stuck in place.
This DIY fix I cover in this thread HERE.
One thing my car didn't come with, is the plastic barrier to hold the jack in place (the jack was just wrapped in a towel!) so I ordered those parts from my friendly local Porsche dealer. They were just a little more expensive than from Pelican, $10 for the plastic barrier, and $8 for the nut.
I took a gamble that the plastic nuts that hold on the wheelarch liners would work and they do for 3 of the mounting points.
The 4th is on the extreme left, and the big inbuilt washer bit of the plastic nuts make it too bulky to fit in that spot. But it's plenty sturdy with just 3 nuts holding it on (50c each)
Mind you, the plastic nuts are rather colourfully named
With jack in place...
The plastic barrier is pretty strong, and prevents the unbolted end of the jack from rubbing against the live battery cables.
I'm actually pretty surprised that Porsche still stocks random items like this for the older models, and even more shocked that they're only $10ea! Mind you, my local Porsche dealer today did quote me a price of $30 for a single wheelnut....so it's Pelican to the rescue
911 wheelnuts are alloy, so they're nice and light like the fancy japanese aftermarket wheelnuts, but rather oddly the anodising seems to flake off with corrosion eventually
So it's a little unsightly.
Much better!
I also ordered a 5th wheelnut per wheel to replace the oem locknuts, which were starting to get stuck. A few times the key would just pull out in my hand, with the lock cover still stuck in place.
08-08-2011, 11:59 AM
#5
Burning Brakes
Thread Starter
Now this is where it gets a little more serious 
Anyway, one of the things wrong with the car when I got it, was a sticky gearchange. It was noted in the pre purchase inspection, and when I got the car serviced, they changed the clutch softline. That helped a lot, but the gearchange was occasionally sticky, especially when you were coming out of gear. Going into the next gear was fine, but when you were knocking it out of gear it was as if you hadn't pressed the clutch all the way. It was also quite random, most of the time it was fine, it only acted up sometimes.
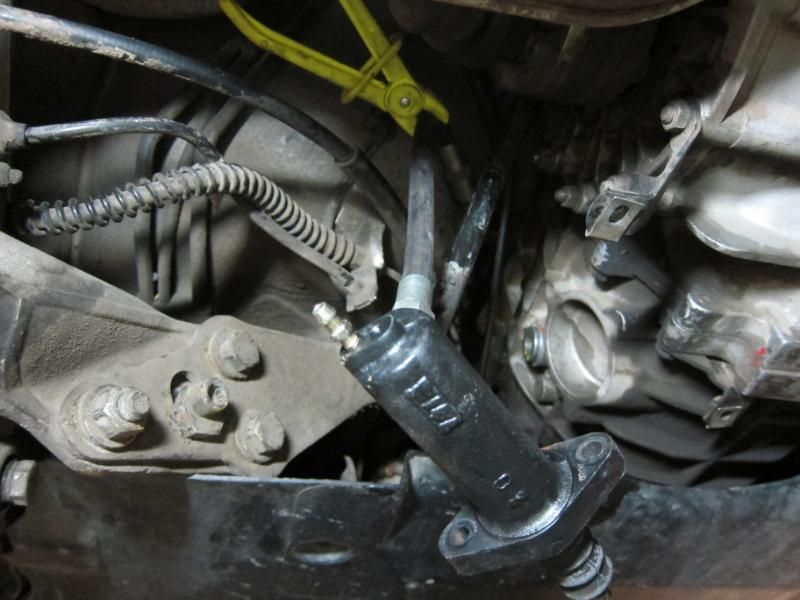
So that told me that maybe the clutch slave was on the way out. The softline was definitely leaking, but once that got fixed, I've found that the next thing in the system becomes the hydraulic weak link and then starts to leak....and maybe when you lifted the clutch, it occasionally sucked in some air, which meant that the next press of the pedal was soft. So here's a new clutch slave cylinder.
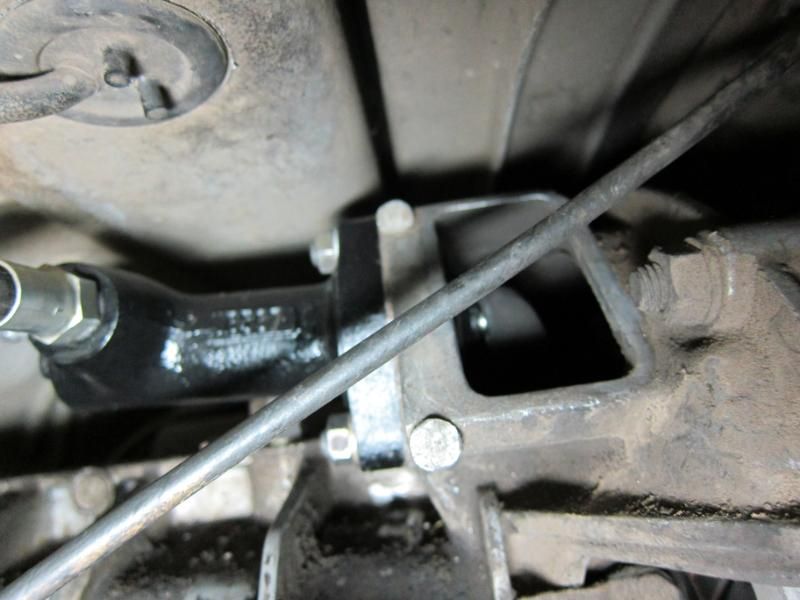
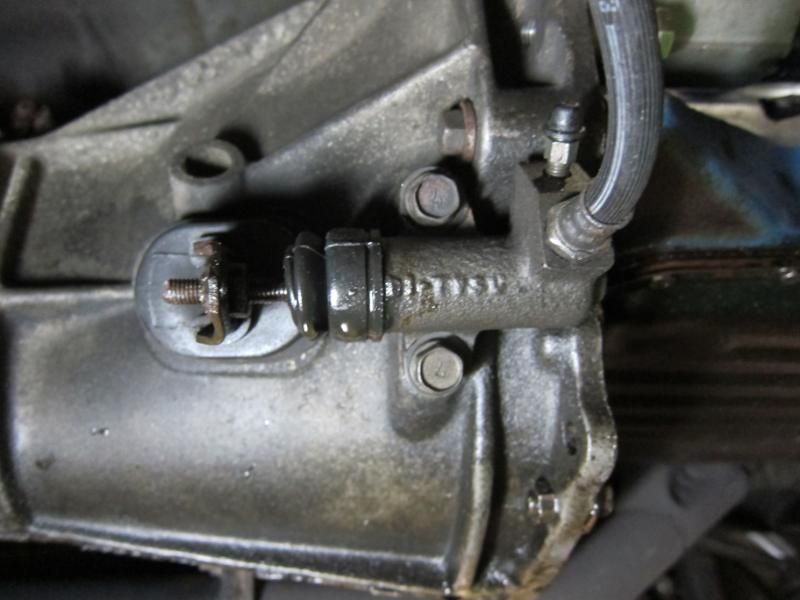
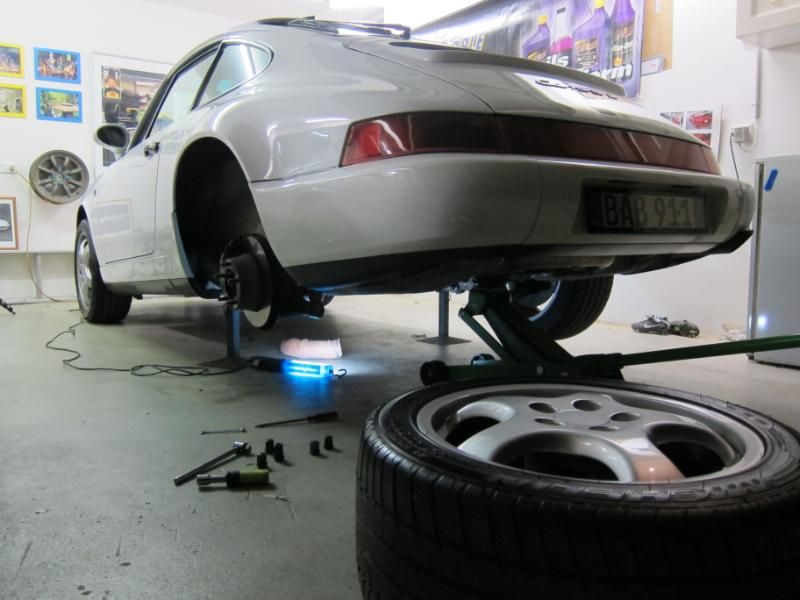
They're $175 bought locally, but $75 from Pelican Parts. But, as with many jobs on the 911, access is a little challenging. To get to the slave cylinder, you jack up the back of the car and remove the passenger wheel. Do you see it yet?
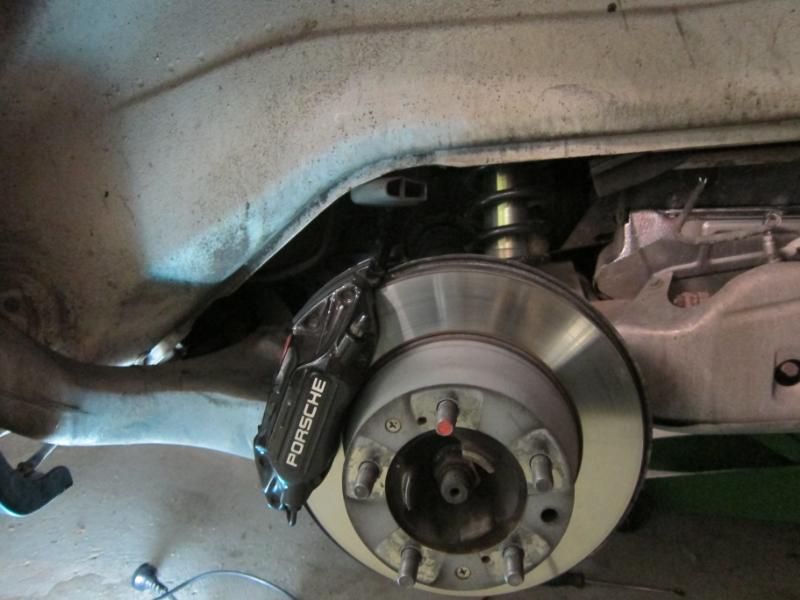
Now do you see it?
Okay, how about now?
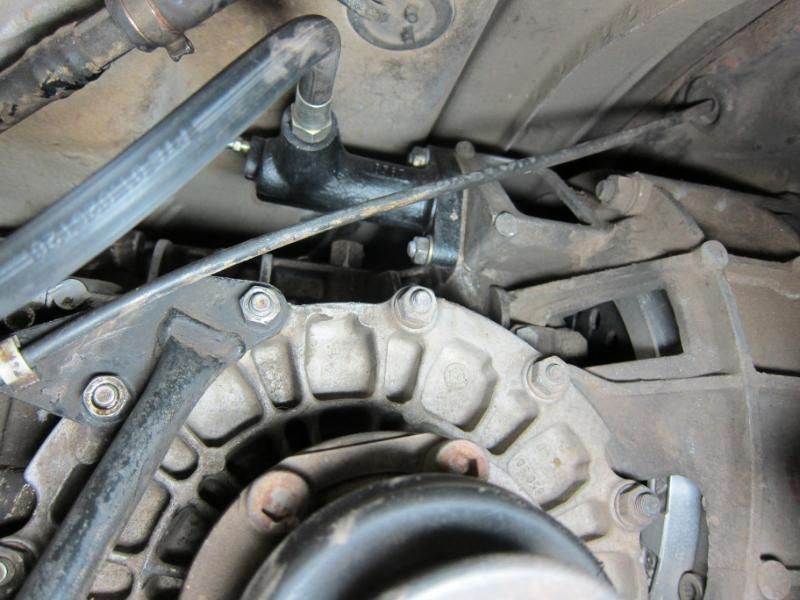
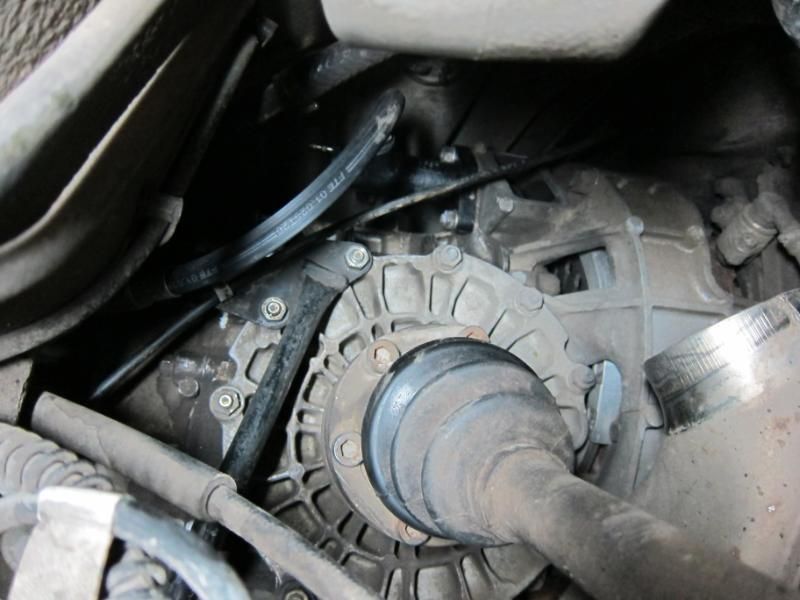
That's right, it's on top of the gearbox, right on the centreline of the car. And if you reach in from across the brake disc, you can only get one arm in there to undo all the nuts and loosen the hose.
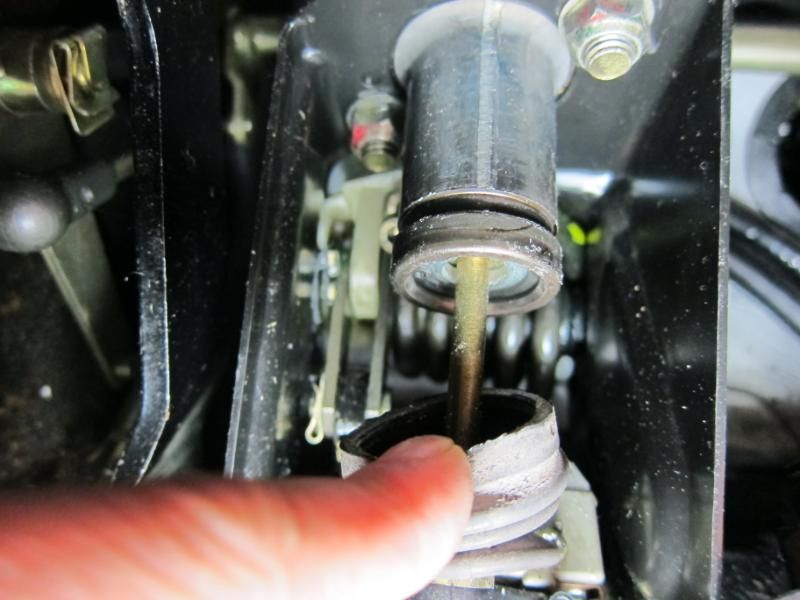
To fit the new one, first you put some grease on the end of the rod
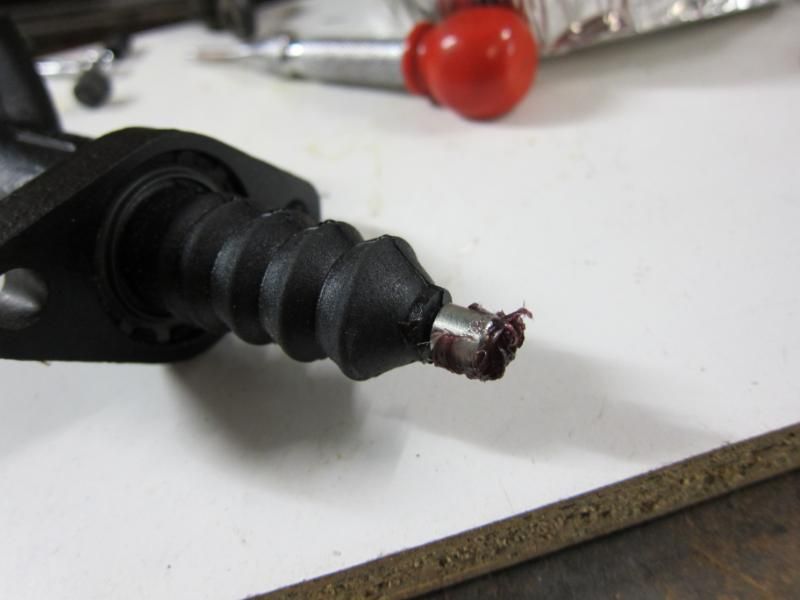
And then it's a bit of a hassle to refit it. There is a heavy spring loading on the piston, and so you have to push the slave in place, and if you let go, the spring will pop it out of position. So it's a bit of a hassle to try to hold it in place, and get the retaining nuts started on those studs. Oh by the way, the clutch fork is inside the bellhousing, so Porsche kindly provides this rectangular access panel, so that you can line up the slave cylinder rod with the cup in the clutch fork. After it's all buttoned up, you refit this rubber plug over the hole.
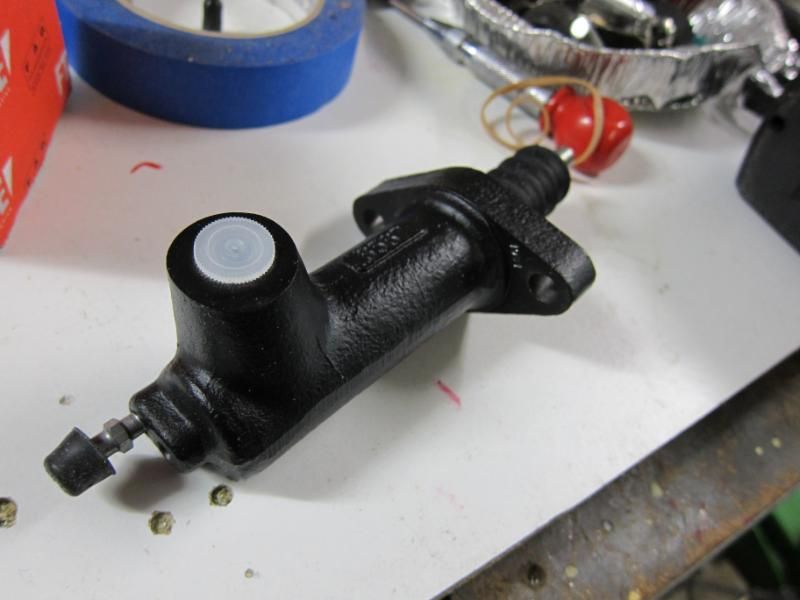
This seemed to make it a little better, but a few days later it went back to its old sticky shifting self. So I figured that master was now the weak link, and so that had to be changed too. In a 911, this entails mucking around the pedal area...
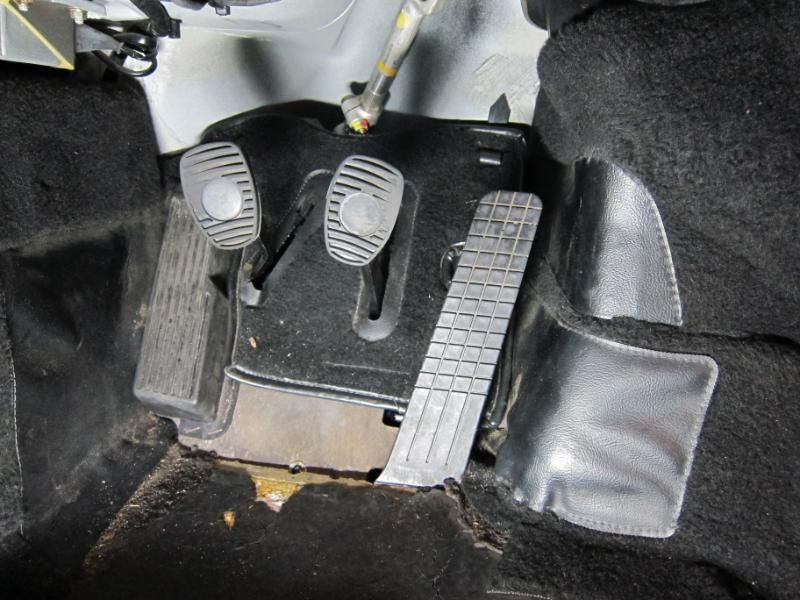
Unscrew the pushrod for the throttle pedal, and it flips down to reveal the wooden board behind.
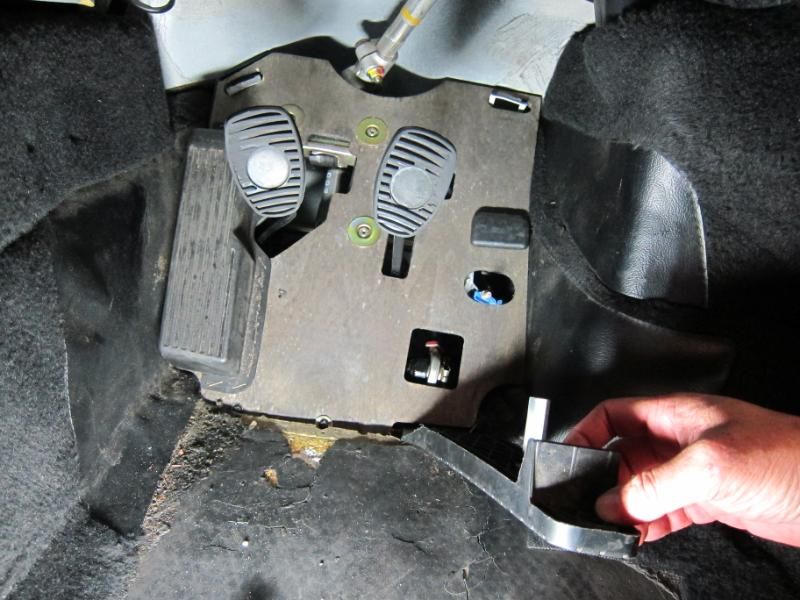
That removes with a few screws, to reveal the guts of the floor hinged pedals. And there's the clutch master cylinder, mounted vertically next to the clutch pedal, and fed by that 6mm flexible blue hose.
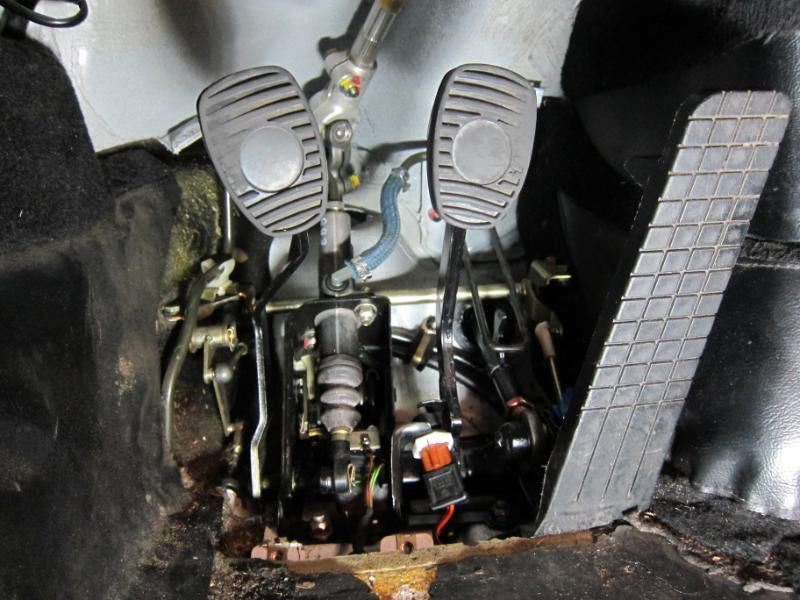
The old master looked ok, and was dry inside the boot, although there had to be something wrong, since everything downstream of it had been renewed, and the gearshift was still quite stiff.
BTW the brake pedal hooks up to a pushrod, which disappears into the front boot, where I presume the master cylinder lives.

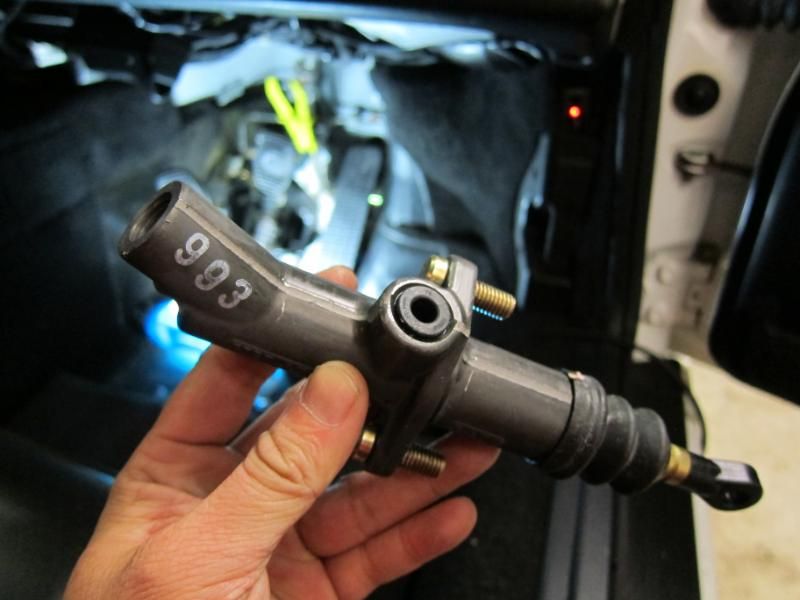
The new clutch master, interestingly it's a 993 part number that's provided for 964, and it's also made of alloy instead of the usual steel, so is noticeably light. The outlet is a hardline fitting that goes on the left, and the inlet is a push-fit into that rubber grommet in the middle.
Refitting the clutch master was simple enough, but now we had the challenge of bleeding a largely dry clutch hydraulic system, which I have to say, was a task that I totally underestimated in terms of its difficulty
Anyway, one of the things wrong with the car when I got it, was a sticky gearchange. It was noted in the pre purchase inspection, and when I got the car serviced, they changed the clutch softline. That helped a lot, but the gearchange was occasionally sticky, especially when you were coming out of gear. Going into the next gear was fine, but when you were knocking it out of gear it was as if you hadn't pressed the clutch all the way. It was also quite random, most of the time it was fine, it only acted up sometimes.
So that told me that maybe the clutch slave was on the way out. The softline was definitely leaking, but once that got fixed, I've found that the next thing in the system becomes the hydraulic weak link and then starts to leak....and maybe when you lifted the clutch, it occasionally sucked in some air, which meant that the next press of the pedal was soft. So here's a new clutch slave cylinder.
They're $175 bought locally, but $75 from Pelican Parts. But, as with many jobs on the 911, access is a little challenging. To get to the slave cylinder, you jack up the back of the car and remove the passenger wheel. Do you see it yet?
Now do you see it?
Okay, how about now?
That's right, it's on top of the gearbox, right on the centreline of the car. And if you reach in from across the brake disc, you can only get one arm in there to undo all the nuts and loosen the hose.
To fit the new one, first you put some grease on the end of the rod
And then it's a bit of a hassle to refit it. There is a heavy spring loading on the piston, and so you have to push the slave in place, and if you let go, the spring will pop it out of position. So it's a bit of a hassle to try to hold it in place, and get the retaining nuts started on those studs. Oh by the way, the clutch fork is inside the bellhousing, so Porsche kindly provides this rectangular access panel, so that you can line up the slave cylinder rod with the cup in the clutch fork. After it's all buttoned up, you refit this rubber plug over the hole.
This seemed to make it a little better, but a few days later it went back to its old sticky shifting self. So I figured that master was now the weak link, and so that had to be changed too. In a 911, this entails mucking around the pedal area...
Unscrew the pushrod for the throttle pedal, and it flips down to reveal the wooden board behind.
That removes with a few screws, to reveal the guts of the floor hinged pedals. And there's the clutch master cylinder, mounted vertically next to the clutch pedal, and fed by that 6mm flexible blue hose.
The old master looked ok, and was dry inside the boot, although there had to be something wrong, since everything downstream of it had been renewed, and the gearshift was still quite stiff.
BTW the brake pedal hooks up to a pushrod, which disappears into the front boot, where I presume the master cylinder lives.
The new clutch master, interestingly it's a 993 part number that's provided for 964, and it's also made of alloy instead of the usual steel, so is noticeably light. The outlet is a hardline fitting that goes on the left, and the inlet is a push-fit into that rubber grommet in the middle.
Refitting the clutch master was simple enough, but now we had the challenge of bleeding a largely dry clutch hydraulic system, which I have to say, was a task that I totally underestimated in terms of its difficulty
Trending Topics
08-08-2011, 12:20 PM
#8
Burning Brakes
Thread Starter
To set the scene, coincidentally I also had to replace the clutch slave on my other car, which is a vintage japanese coupe. It's front engined and rwd in the conventional sense, and the clutch master is mounted high on the firewall.

...and it's a straight shot of tubing vertically downwards for about 10 inches, where you find the clutch slave.
Bleeding it is quite simple. You open the bleed nipple, and start to feed fluid into the reservoir. Gravity flows the fluid down into the slave, and any bubbles blow upwards and vent into the reservoir. And that's it....if it takes more than 5 minutes, you're doing it wrong
So it was with this mindset, that I approached the task of bleeding the 911 But, when you think about it, the 911 has none of the features that made the Skyline so easy to do. Firstly, the line from the master to the slave is not a vertical straight shot...it's a horizontal pipe that runs most of the length of the car, and it's also a pipe with lots of kinks and upward u-bends where air can be trapped. Also the reservoir isn't sitting on top of the master...it's in the boot, and feeds the master via a thin 6mm tube. The master is also vertical, so the reservoir has to fill the master from the bottom-up. In the Skyline, Mother Nature lends you a hand in bleeding, but with the 964, she was nowhere to be seen
Now there are many DIY threads on RL that recommend the Motive Power Bleeder. But they aren't sold here....so I tried my luck with conventional bleeding techniques. Which is to say: fill the reservoir, then get a friend to pump the clutch pedal by hand, while you open and close the bleed nipple on the slave.
Well, this didn't work at all. After an hour, my friend's hand was reduced to a dessicated, lifeless claw, and we'd fed about 500ml of fluid through the system. But the clutch pedal would just flop uselessly to the floor if you pressed it. My theory was that the clutch master wasn't priming between pedal strokes....because of the layout, the master fills very slowly with fluid from the reservoir, so it was only getting half-full between bleeding strokes.
But a memory of working on an old Peugeot 505 way back in uni days gave me an idea. The Pug Haynes manual recommended a weird way of bleeding the slave cylinder. You attached a tube from the nearest brake caliper to the clutch slave, and then by pumping the brake pedal, you pressure-bled the clutch by forcing brake fluid backwards through the circuit.
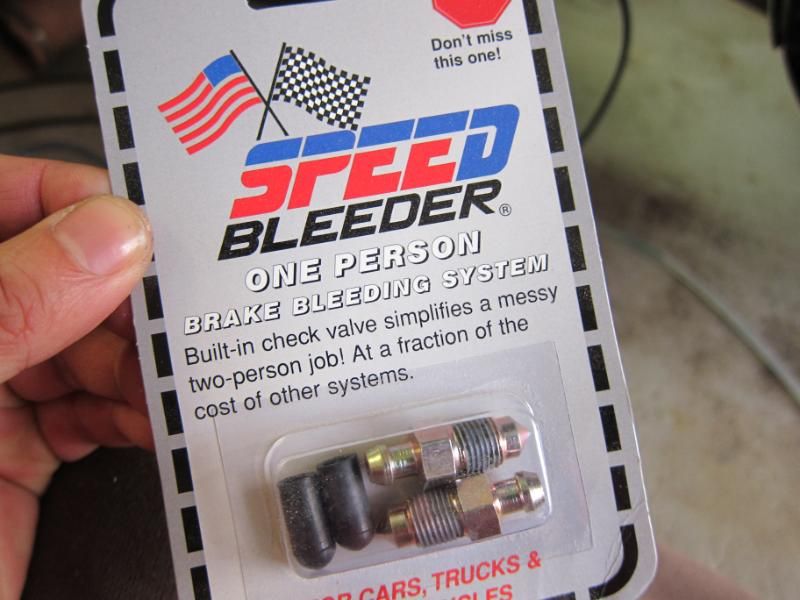
Now, I fit all my cars with these gadgets, Speedbleeders, which replace the stock bleed nipples, with special ones which have a one-way valve built in. So you can pump fluid out, but it will never suck fluid (or air) back in on the pedal upstroke. Great for when you can't get someone to help you. But I haven't fitted them to the car, since I mistakenly only ordered four of them, and for the 911 you need eight
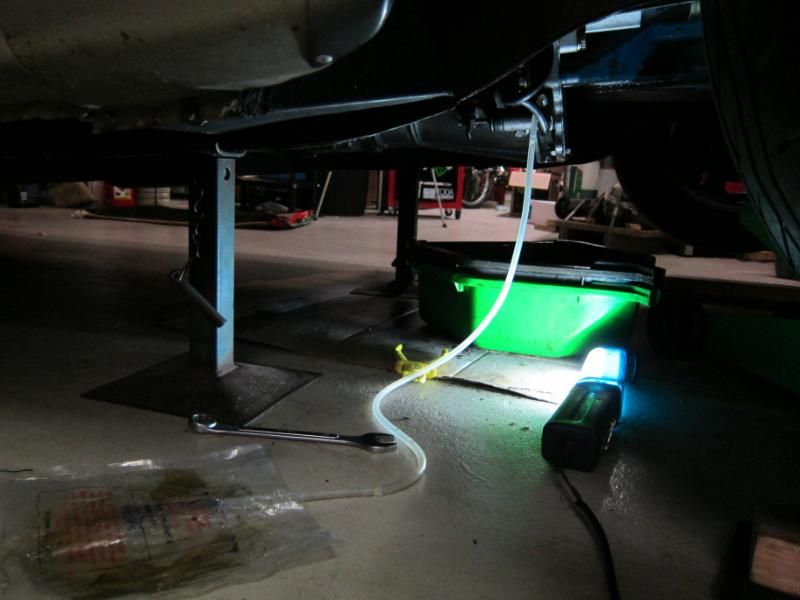
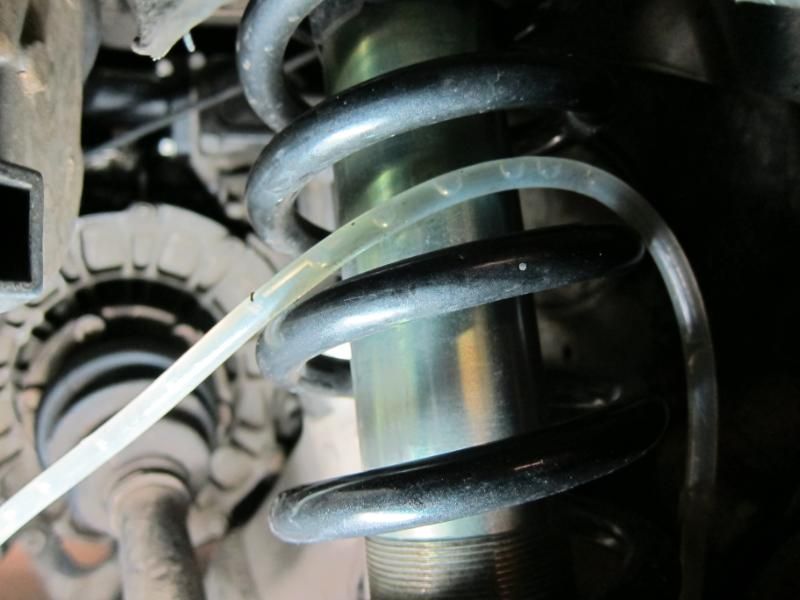
So with a Speedbleeder fitted to the rear caliper, I ran a tube from the caliper...
To the clutch slave. I then opened both bleed nipples a quarter turn, and slowly began to pump the brake pedal.
And it started to work! You could see the blue brake fluid start to flow into the reservoir, to the accompaniment of some gurgling sounds from the clutch master....the brake and clutch share the same reservoir, so as the fluid returns from the clutch side, it refills the brake-side.
And when the level suddenly dropped a lot, it looked like a big air pocket had been purged.
But after all this...we STILL didn't have a pedal The master was definitely primed, so I thought that the culprit was the slave. It's mounted high, and the hose goes downwards from it. So when we reverse-bleed, it's very effective in moving a column of fluid towards the front of the system, but because air bubbles will try to stay at the top, I reckoned we had an air pocket in the slave.
So I unbolted the slave, and let it hang down. Then it got reverse-bled from the caliper, the idea being that any bubbles would be purged upwards into the hose, and thence along the rest of the system to burp into the reservoir. For good measure, I worked the piston of the slave cylinder by hand to pump any air pockets out of it and up into the hose.
This actually worked too...it did burp, and the level in the reservoir dropped again....but we still didn't have a pedal!
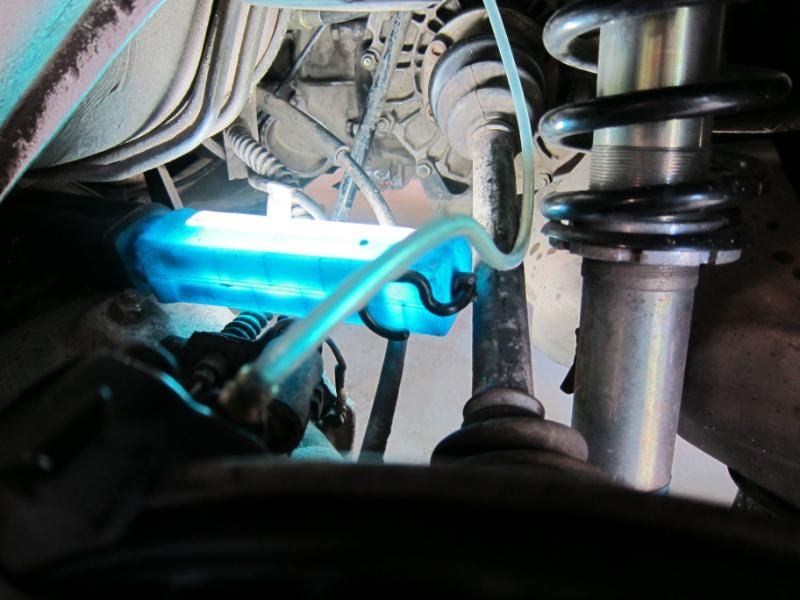
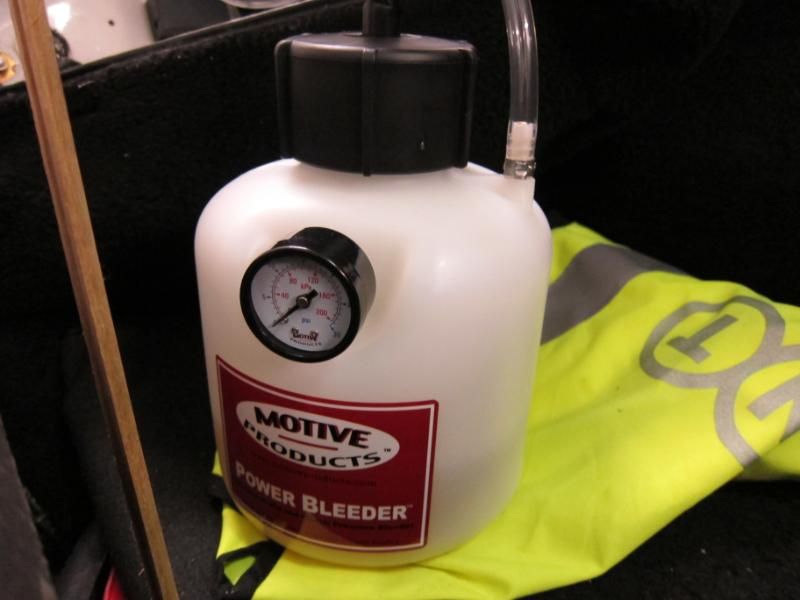
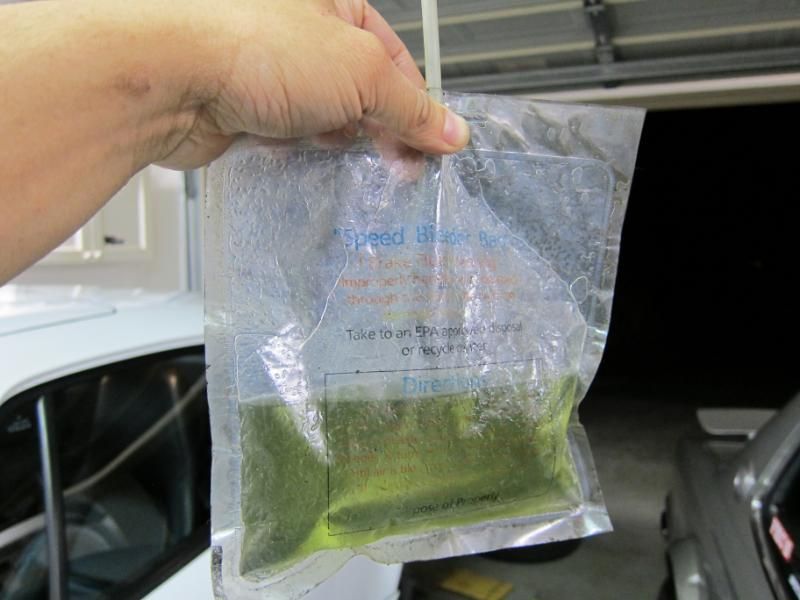
It was pretty much at this point that I went onto Pelican Parts...and ordered a Motive Power Bleeder
The Motive Pressure bleeder
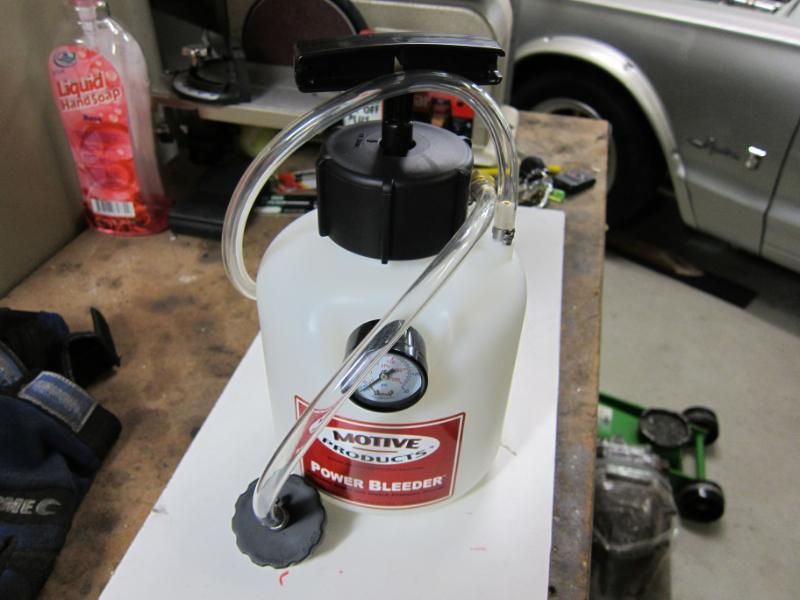
First you fill the power bleeder with brake fluid
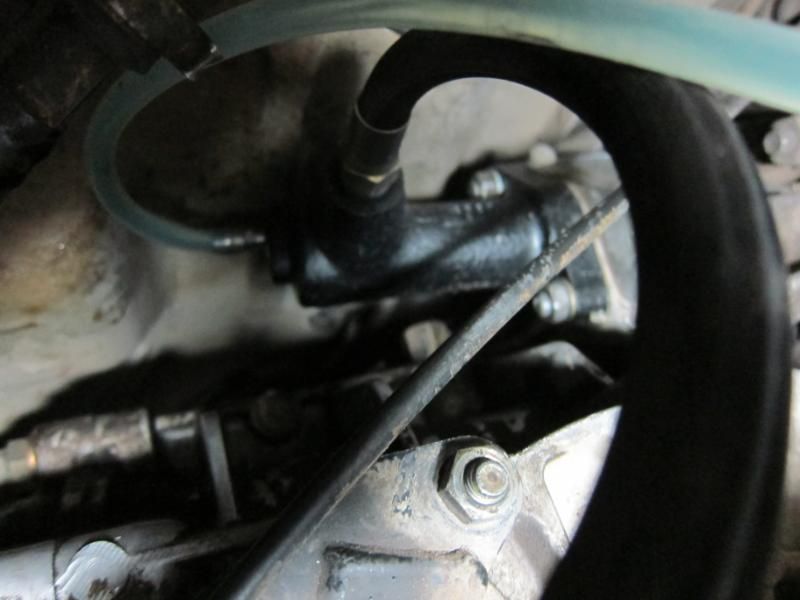
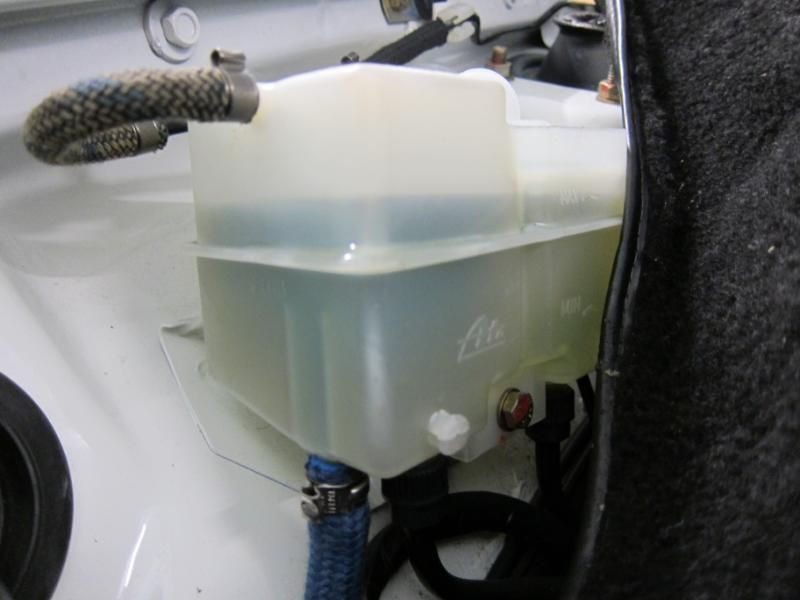
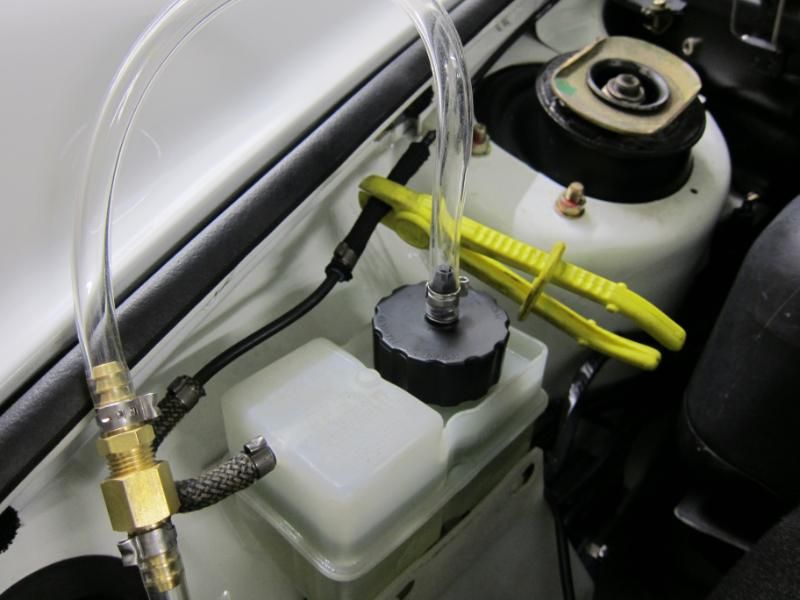
You attach the Porsche-specific cap onto the reservoir, and then clamp the overflow line (why does the 911 have an overflow tube on the reservoir?)
Pump it to 10psi...
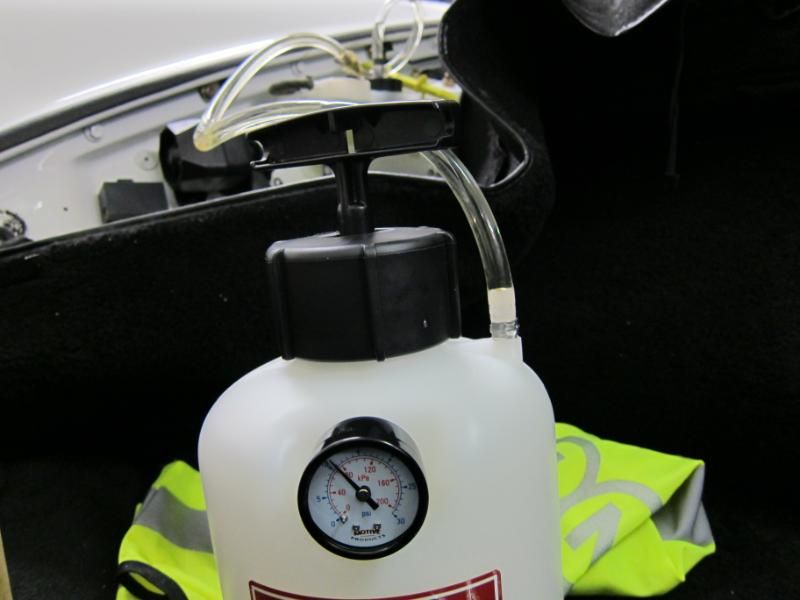
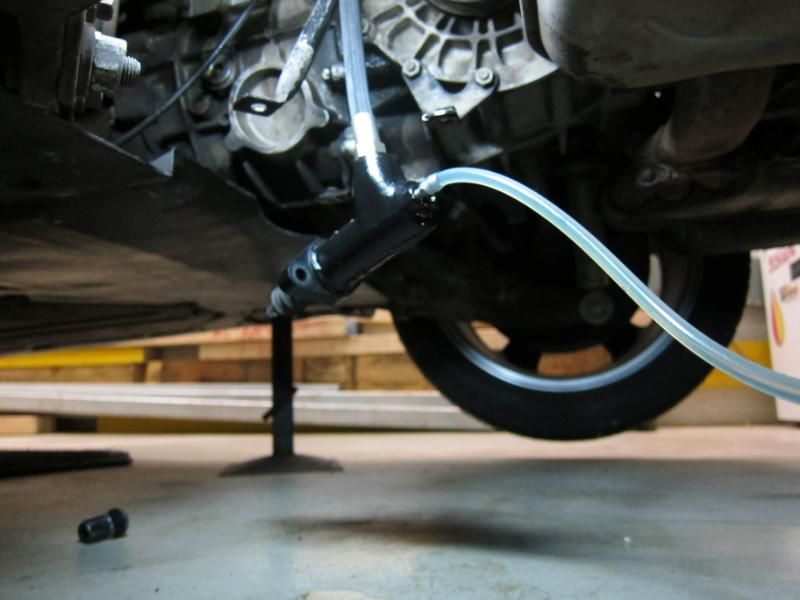
...attach a tube and bleed bag to the clutch slave, and just open the tap! Immediately fluid starts to flow out in a healthy stream. A few bubbles pop out, and after about 200ml has flowed through the system, I figured I was just about done when....BUBBLES!
There must have been quite an air lock in the middle of the system somewhere, as quite a lot of bubbles came out in succession, then the fluid went clear again. Now, I've bled this thing backwards, forwards and sideways in the past week, so I'll be damned if I know where they were hiding, but well...it seems that there was still air in the line.
After about 350ml was passed through the system with no more bubbles, I called it a day.
But the power bleeder still had a lot of fluid in it, so I thought I'd bleed the brakes while I was at it. All you do, is attach a tube and open the bleed nipple and let the old fluid flow out.
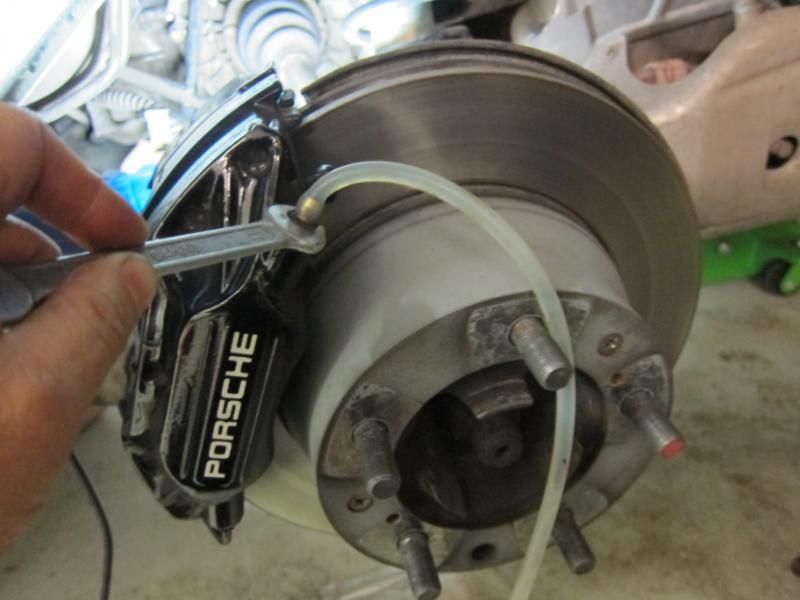
The power bleeder was great to use and good bang for the buck at US$50 (plus shipping). It has a fair bit of capacity, so I only had to pump it up 3 times for bleeding all 4 brakes and the clutch (about 750ml of fluid passed in all).
When you're using it, it pumps fluid into the reservoir, which becomes full. But when you're down to bleeding the last corner, you tip the power bleeder on its side, so that its feed tube inside is exposed. At that point it pumps air instead of fluid into the reservoir, and you just bleed the last corner until the fluid level in the reservoir goes down to the correct level.
It's so easy to use! I'm a big fan of Speedbleeders (and I have them in every car) but this is a much better solution. And I'm impressed that it managed to get some air out that my regular bleeding method didn't.
So...how is the clutch? Much better. The gearshift I would say is smoother than it's ever been since I've had the car, and is quite acceptable. Not as light a japanese gearchange and is a bit "chunky", but is a big improvement on what it was before. Not quite a knife through butter...more like a crowbar through cheese, but I think that's sorta how it's meant to be,
....but it's still not quite right. There's a certain inconsistency about it which tells me there's still something possibly wrong. Anyway...after changing the master, the slave, the softline and bleeding the living bejeezus out of it...I think there is just one more place to look.
...and it's a straight shot of tubing vertically downwards for about 10 inches, where you find the clutch slave.
Bleeding it is quite simple. You open the bleed nipple, and start to feed fluid into the reservoir. Gravity flows the fluid down into the slave, and any bubbles blow upwards and vent into the reservoir. And that's it....if it takes more than 5 minutes, you're doing it wrong
So it was with this mindset, that I approached the task of bleeding the 911
But, when you think about it, the 911 has none of the features that made the Skyline so easy to do. Firstly, the line from the master to the slave is not a vertical straight shot...it's a horizontal pipe that runs most of the length of the car, and it's also a pipe with lots of kinks and upward u-bends where air can be trapped. Also the reservoir isn't sitting on top of the master...it's in the boot, and feeds the master via a thin 6mm tube. The master is also vertical, so the reservoir has to fill the master from the bottom-up. In the Skyline, Mother Nature lends you a hand in bleeding, but with the 964, she was nowhere to be seen Now there are many DIY threads on RL that recommend the Motive Power Bleeder. But they aren't sold here....so I tried my luck with conventional bleeding techniques. Which is to say: fill the reservoir, then get a friend to pump the clutch pedal by hand, while you open and close the bleed nipple on the slave.
Well, this didn't work at all. After an hour, my friend's hand was reduced to a dessicated, lifeless claw, and we'd fed about 500ml of fluid through the system. But the clutch pedal would just flop uselessly to the floor if you pressed it. My theory was that the clutch master wasn't priming between pedal strokes....because of the layout, the master fills very slowly with fluid from the reservoir, so it was only getting half-full between bleeding strokes.
But a memory of working on an old Peugeot 505 way back in uni days gave me an idea. The Pug Haynes manual recommended a weird way of bleeding the slave cylinder. You attached a tube from the nearest brake caliper to the clutch slave, and then by pumping the brake pedal, you pressure-bled the clutch by forcing brake fluid backwards through the circuit.
Now, I fit all my cars with these gadgets, Speedbleeders, which replace the stock bleed nipples, with special ones which have a one-way valve built in. So you can pump fluid out, but it will never suck fluid (or air) back in on the pedal upstroke. Great for when you can't get someone to help you. But I haven't fitted them to the car, since I mistakenly only ordered four of them, and for the 911 you need eight
So with a Speedbleeder fitted to the rear caliper, I ran a tube from the caliper...
To the clutch slave. I then opened both bleed nipples a quarter turn, and slowly began to pump the brake pedal.
And it started to work! You could see the blue brake fluid start to flow into the reservoir, to the accompaniment of some gurgling sounds from the clutch master....the brake and clutch share the same reservoir, so as the fluid returns from the clutch side, it refills the brake-side.
And when the level suddenly dropped a lot, it looked like a big air pocket had been purged.
But after all this...we STILL didn't have a pedal
The master was definitely primed, so I thought that the culprit was the slave. It's mounted high, and the hose goes downwards from it. So when we reverse-bleed, it's very effective in moving a column of fluid towards the front of the system, but because air bubbles will try to stay at the top, I reckoned we had an air pocket in the slave.So I unbolted the slave, and let it hang down. Then it got reverse-bled from the caliper, the idea being that any bubbles would be purged upwards into the hose, and thence along the rest of the system to burp into the reservoir. For good measure, I worked the piston of the slave cylinder by hand to pump any air pockets out of it and up into the hose.
This actually worked too...it did burp, and the level in the reservoir dropped again....but we still didn't have a pedal!
It was pretty much at this point that I went onto Pelican Parts...and ordered a Motive Power Bleeder
The Motive Pressure bleeder
First you fill the power bleeder with brake fluid
You attach the Porsche-specific cap onto the reservoir, and then clamp the overflow line (why does the 911 have an overflow tube on the reservoir?)
Pump it to 10psi...
...attach a tube and bleed bag to the clutch slave, and just open the tap! Immediately fluid starts to flow out in a healthy stream. A few bubbles pop out, and after about 200ml has flowed through the system, I figured I was just about done when....BUBBLES!
There must have been quite an air lock in the middle of the system somewhere, as quite a lot of bubbles came out in succession, then the fluid went clear again. Now, I've bled this thing backwards, forwards and sideways in the past week, so I'll be damned if I know where they were hiding, but well...it seems that there was still air in the line.
After about 350ml was passed through the system with no more bubbles, I called it a day.
But the power bleeder still had a lot of fluid in it, so I thought I'd bleed the brakes while I was at it. All you do, is attach a tube and open the bleed nipple and let the old fluid flow out.
The power bleeder was great to use and good bang for the buck at US$50 (plus shipping). It has a fair bit of capacity, so I only had to pump it up 3 times for bleeding all 4 brakes and the clutch (about 750ml of fluid passed in all).
When you're using it, it pumps fluid into the reservoir, which becomes full. But when you're down to bleeding the last corner, you tip the power bleeder on its side, so that its feed tube inside is exposed. At that point it pumps air instead of fluid into the reservoir, and you just bleed the last corner until the fluid level in the reservoir goes down to the correct level.
It's so easy to use! I'm a big fan of Speedbleeders (and I have them in every car) but this is a much better solution. And I'm impressed that it managed to get some air out that my regular bleeding method didn't.
So...how is the clutch? Much better. The gearshift I would say is smoother than it's ever been since I've had the car, and is quite acceptable. Not as light a japanese gearchange and is a bit "chunky", but is a big improvement on what it was before. Not quite a knife through butter...more like a crowbar through cheese, but I think that's sorta how it's meant to be,
....but it's still not quite right. There's a certain inconsistency about it which tells me there's still something possibly wrong. Anyway...after changing the master, the slave, the softline and bleeding the living bejeezus out of it...I think there is just one more place to look.
08-08-2011, 12:35 PM
#9
Burning Brakes
Thread Starter
The Motive Power Bleeder is an absolutely brilliant gadget, honestly if you are doing the clutch hydraulics on the 911, getting one is a no brainer, and as a bonus, you now also have this really foolproof way of bleeding the brakes too!
But after searching RL (...a LOT ) my last port of call involved taking out the pedal cluster. You undo the clips for the clutch and brake pushrods, then undo the 4 nuts holding it to the floor, then the 2 nuts holding on the clutch master, and you can wiggle the pedals free.

Once it's on the bench, as you can see there is a jackshaft that runs along the bottom of the pedal assembly.

And in particular, the clutch has a bellcrank that is staked to the jackshaft with a springy roll pin. When I grabbed the bellcrank, I could feel a bit of slop between it and the clutch pedal...the pedal had maybe 20mm of movement at the top before the bellcrank moved. So this, I think is a prime culprit for the sticky gearshift, in that the slop in the bellcrank prevented the clutch master from getting the benefit of a full pedal stroke.

But it's quite clear that someone's tried to fix this before, because the rollpin is (rather oddly...) spot welded to the bellcrank. The rollpin is a tubular spring, so when it's hammered into that hole, it's meant to be a snug fit, so I don't know why someone would have thought that welding it would help...

First I grind off the spot welds with the dremel.

Then drive out the roll pin with a pin punch.

And out it comes. You can see the hole in the jackshaft that it passes through. I was worried that maybe the hole in the jackshaft might be a bit flogged out and ovalised, but when I put the butt of a 6mm drillbit through it, it seemed fine.

And here's the reason for the slop. The roll pin is tubular, and if you look closely, there is a crack in it. So as you depressed the pedal, the tube would collapse slightly at the crack, and the jackshaft would have to squash the rollpin before you get any movement at the bellcrank.

Here's a new rollpin, which cost all of $3.35 from Porsche, but now I'm wondering if maybe I should go a different way. So I got an M6 bolt, with an unthreaded bit that's about the same length as the rollpin.

Shorten it to suit...

There wasn't enough space on one end to accommodate the nut, so I made some D-shaped washers

The M6 bolt was a very snug fit and had to be tapped into place with a hammer and punch, but once in, it was rock solid, with no slop at all. It didn't look like it would fall out, but just to be sure I fitted a nylock nut to hold it in place.

Plenty of room for the bolt head and nut. I think the rollpin is a bit of a flawed idea, since that little pin has to transmit quite a lot of torque via the pedal and that clutch is pretty heavy. So the tubular rollpin would squash a little as part of normal operation, and eventually it cracks. Porsche must have figured this out too, because on the 993 model that followed, I believe that the bellcrank is splined to the jackshaft. But the solid bolt should be a permanent fix.

Clean and lube the jackshaft with some fresh grease and button it all back together...

And into the car it goes.


The verdict? The gearshift is FIXED....but you know...anything can be made better.
Firstly, in the interests of full disclosure and unbiased consumer advice I have to point out that I am in the very lucky position of being sponsored by Royal Purple
The gearbox oil in the 964 is fresh, having been changed by Autohaus Hamiltons when they did an annual service for me after I bought the car. Not sure what brand they used (I'm sure it's very nice) but I've always had a good experience putting this stuff into my gearboxes.
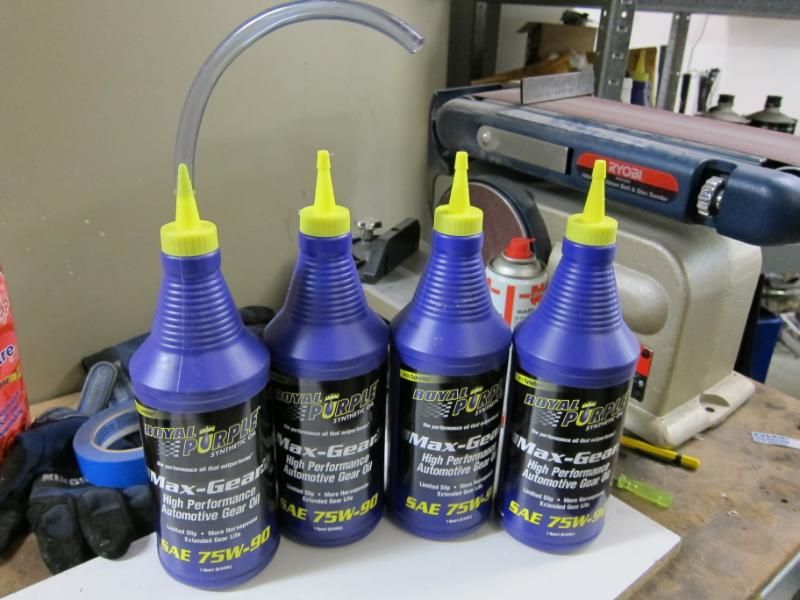
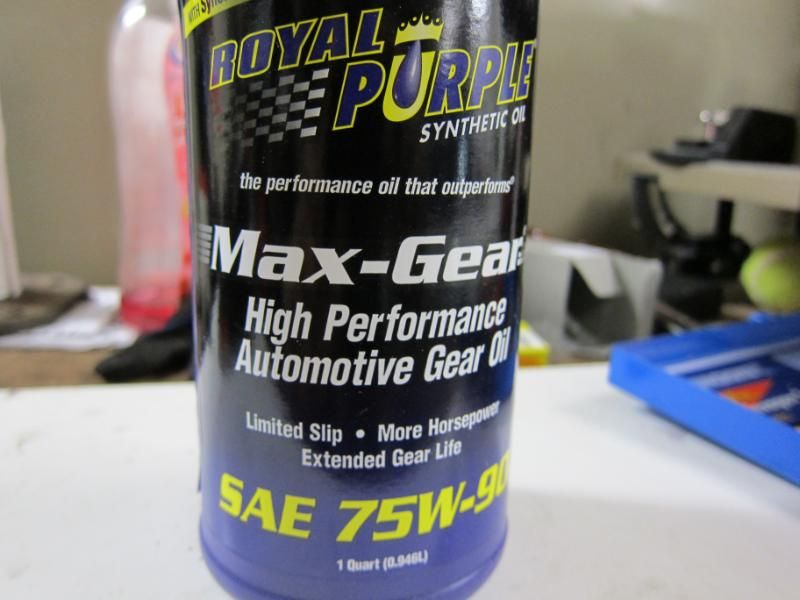
It's Royal Purple MaxGear 75/90W, which is a fully synthetic gear oil that is compatible with LSDs, and I've run it for years in pretty much everything with great results.
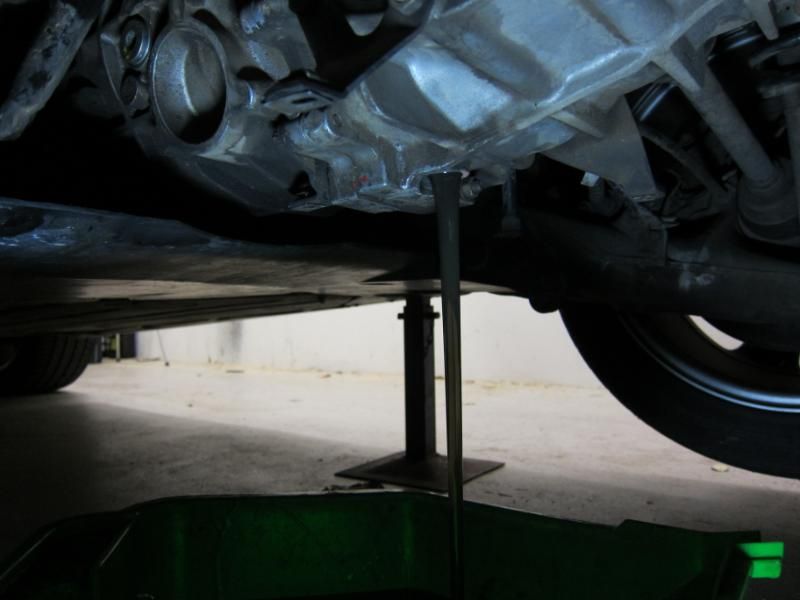
The first step is to loosen the fill plug. It's always a good idea to loosen the fill plug first, that's because if you do the drain plug first, you might discover that the fill plug is in a weird spot, and something is in the way, so your spanner doesn't fit (or maybe it's just plain stuck...). If you end up in that predicament, you're basically screwed unless you can somehow turn the car upside down to fill the gearbox using the drain plug
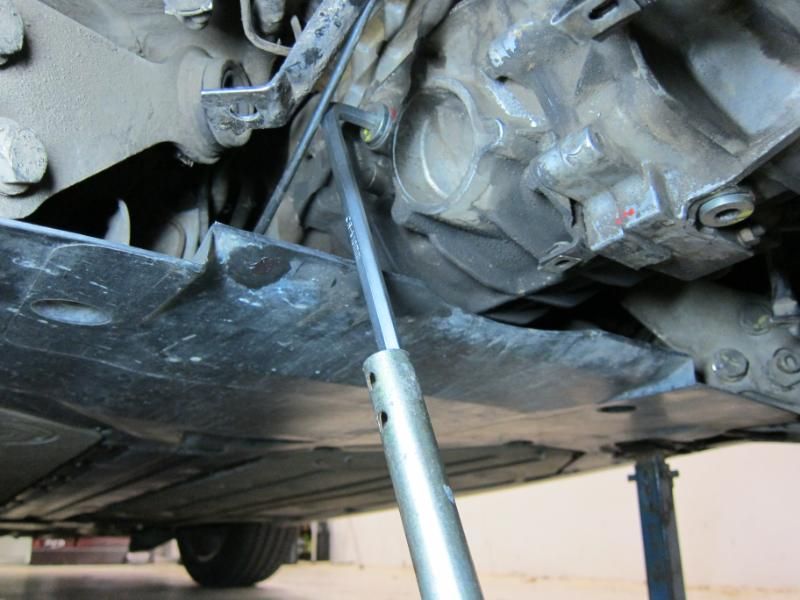
The drain plug is at the bottom, and is the same 10mm allen bolt.
And out the old stuff comes. It's only a few thousand kms old, but looks a little on the black side. Hamiltons did say that the old oil they drained out was really very old, so maybe there was some residual stuff inside?
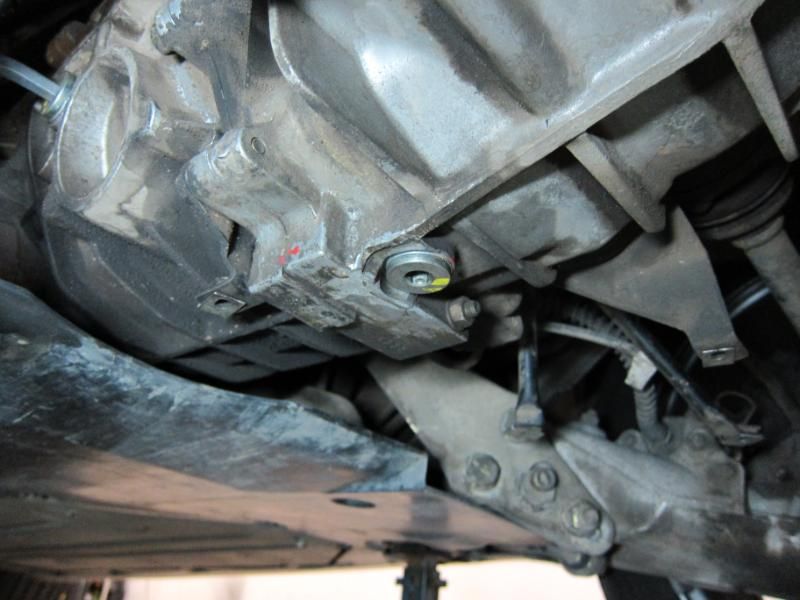
You might be wondering what the catch is at this point....surely there is some sort of weird Porsche-911 thing where in order to put oil in the gearbox, you have to remove the front suspension first or something? Um...well no. Rather oddly, it's just like any other car in this respect :lol:
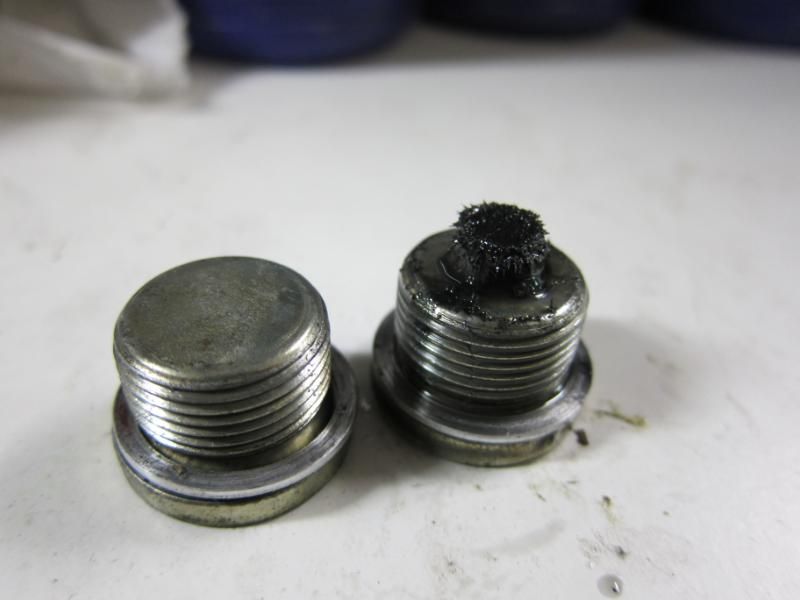
The plug on the right is the drain plug, which is magnetic. A little, but not too much metal hair stuck to it.
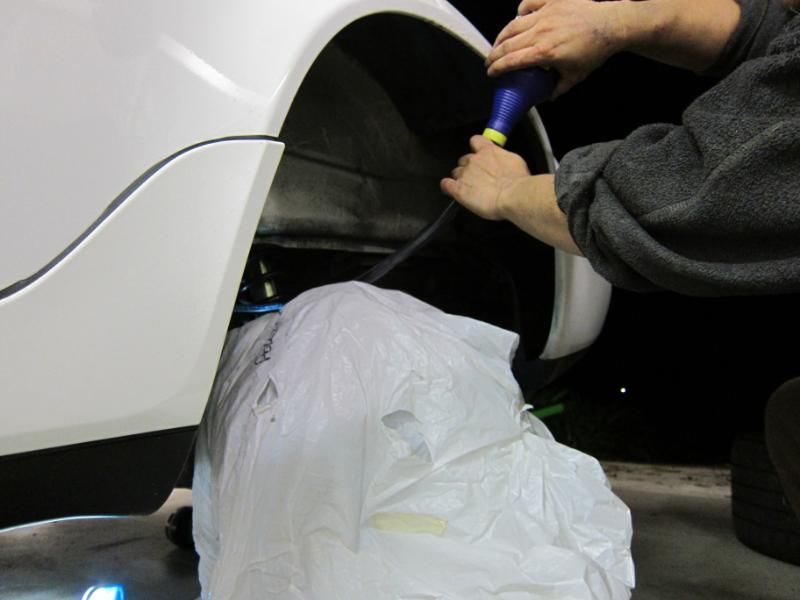
I used to have this nifty 500ml metal syringe for filling gearboxes and diffs, but it seems to have grown legs and disappeared, so I just used a length of normal 16mm plastic tube. 16mm is also handily the diameter of the fill hole, so it jams in there snugly and doesn't fall out. Also when the gearbox is full, you can see the oil seeping out of the fill hole along the clear tube, so that's your cue to rip the tube out and jam the fill plug in. The 911 transaxle takes 3.6L, or just under 4 quarts. And oh yes, it's also good practice when you do something like this, to cover the brakes with a sheet, because spilled oil and brake pads really don't get along.
So how does it go? BEWDIFUL....it really, really is slicker shifting now with the good oil in it. It's still kinda baulky on the 1-2 shift, but overall the gearshift has a more effortless, well oiled (boom-tish) feel to it.
Cross my heart/scout's honour
But after searching RL (...a LOT
) my last port of call involved taking out the pedal cluster. You undo the clips for the clutch and brake pushrods, then undo the 4 nuts holding it to the floor, then the 2 nuts holding on the clutch master, and you can wiggle the pedals free.Once it's on the bench, as you can see there is a jackshaft that runs along the bottom of the pedal assembly.
And in particular, the clutch has a bellcrank that is staked to the jackshaft with a springy roll pin. When I grabbed the bellcrank, I could feel a bit of slop between it and the clutch pedal...the pedal had maybe 20mm of movement at the top before the bellcrank moved. So this, I think is a prime culprit for the sticky gearshift, in that the slop in the bellcrank prevented the clutch master from getting the benefit of a full pedal stroke.
But it's quite clear that someone's tried to fix this before, because the rollpin is (rather oddly...) spot welded to the bellcrank. The rollpin is a tubular spring, so when it's hammered into that hole, it's meant to be a snug fit, so I don't know why someone would have thought that welding it would help...
First I grind off the spot welds with the dremel.
Then drive out the roll pin with a pin punch.
And out it comes. You can see the hole in the jackshaft that it passes through. I was worried that maybe the hole in the jackshaft might be a bit flogged out and ovalised, but when I put the butt of a 6mm drillbit through it, it seemed fine.
And here's the reason for the slop. The roll pin is tubular, and if you look closely, there is a crack in it. So as you depressed the pedal, the tube would collapse slightly at the crack, and the jackshaft would have to squash the rollpin before you get any movement at the bellcrank.
Here's a new rollpin, which cost all of $3.35 from Porsche, but now I'm wondering if maybe I should go a different way. So I got an M6 bolt, with an unthreaded bit that's about the same length as the rollpin.
Shorten it to suit...
There wasn't enough space on one end to accommodate the nut, so I made some D-shaped washers
The M6 bolt was a very snug fit and had to be tapped into place with a hammer and punch, but once in, it was rock solid, with no slop at all. It didn't look like it would fall out, but just to be sure I fitted a nylock nut to hold it in place.
Plenty of room for the bolt head and nut. I think the rollpin is a bit of a flawed idea, since that little pin has to transmit quite a lot of torque via the pedal and that clutch is pretty heavy. So the tubular rollpin would squash a little as part of normal operation, and eventually it cracks. Porsche must have figured this out too, because on the 993 model that followed, I believe that the bellcrank is splined to the jackshaft. But the solid bolt should be a permanent fix.
Clean and lube the jackshaft with some fresh grease and button it all back together...
And into the car it goes.
The verdict? The gearshift is FIXED....but you know...anything can be made better.
Firstly, in the interests of full disclosure and unbiased consumer advice
I have to point out that I am in the very lucky position of being sponsored by Royal Purple The gearbox oil in the 964 is fresh, having been changed by Autohaus Hamiltons when they did an annual service for me after I bought the car. Not sure what brand they used (I'm sure it's very nice) but I've always had a good experience putting this stuff into my gearboxes.
It's Royal Purple MaxGear 75/90W, which is a fully synthetic gear oil that is compatible with LSDs, and I've run it for years in pretty much everything with great results.
The first step is to loosen the fill plug. It's always a good idea to loosen the fill plug first, that's because if you do the drain plug first, you might discover that the fill plug is in a weird spot, and something is in the way, so your spanner doesn't fit (or maybe it's just plain stuck...). If you end up in that predicament, you're basically screwed unless you can somehow turn the car upside down to fill the gearbox using the drain plug
The drain plug is at the bottom, and is the same 10mm allen bolt.
And out the old stuff comes. It's only a few thousand kms old, but looks a little on the black side. Hamiltons did say that the old oil they drained out was really very old, so maybe there was some residual stuff inside?
You might be wondering what the catch is at this point....surely there is some sort of weird Porsche-911 thing where in order to put oil in the gearbox, you have to remove the front suspension first or something? Um...well no. Rather oddly, it's just like any other car in this respect :lol:
The plug on the right is the drain plug, which is magnetic. A little, but not too much metal hair stuck to it.
I used to have this nifty 500ml metal syringe for filling gearboxes and diffs, but it seems to have grown legs and disappeared, so I just used a length of normal 16mm plastic tube. 16mm is also handily the diameter of the fill hole, so it jams in there snugly and doesn't fall out. Also when the gearbox is full, you can see the oil seeping out of the fill hole along the clear tube, so that's your cue to rip the tube out and jam the fill plug in. The 911 transaxle takes 3.6L, or just under 4 quarts. And oh yes, it's also good practice when you do something like this, to cover the brakes with a sheet, because spilled oil and brake pads really don't get along.
So how does it go? BEWDIFUL....it really, really is slicker shifting now with the good oil in it. It's still kinda baulky on the 1-2 shift, but overall the gearshift has a more effortless, well oiled (boom-tish) feel to it.
Cross my heart/scout's honour
08-08-2011, 12:37 PM
#10
Burning Brakes
Thread Starter
Now that the clutch and gearshift seem to be working sweetly, I decided to work on some other part of the car that didn't give me a nervous twitch everytime I thought about bleeding clutches.
...like replacing the distributor caps for example

There's two dizzies and twelve plugs, and they're tucked way down there. So to get access the heater tube on the left has to come out.

Spark plugs are a leeeetle bit harder to get at. If you look really, really hard, there is a spark plug boot in this picture. No, really.

So with the heater tube out of the way, you can see how the plug wires all intertwine (which makes removing them even harder)

6 of the plugs are accessible (sort of) from inside the engine bay, and the other six are below. I had a vague plan to change the plug wires, but this grommet looks like a gnarly customer to deal with.

So anyway...out with the dizzy caps

And you can see the little toothed belt that drives one of the distributors. Also the quaint mechanical advance weights

Rotors tips looked ok...not in such bad shape

Dizzy caps okayish too...

But we might as well fit the new ones

The plug wires were the kind that are quite hard to get off, but fit back on with a really satisfylingly loud click

Thankfully the leads are all numbered (there are 12 of them!) and there is a helpful plug location sticker, which is a little dried out and bubbled from all the radiated heat from the engine.

So I got a new one.

Seems a little smoother afterwards, but there prolly wasn't much wrong with the originals anyway.

I actually have plug wires and spark plugs to fit, and I even got the factory service tool for getting the hard-to-reach plugs in and out. But er....yeah I might leave that for another day when I have a few more hours to throw at the job
...like replacing the distributor caps for example
There's two dizzies and twelve plugs, and they're tucked way down there. So to get access the heater tube on the left has to come out.
Spark plugs are a leeeetle bit harder to get at. If you look really, really hard, there is a spark plug boot in this picture. No, really.
So with the heater tube out of the way, you can see how the plug wires all intertwine (which makes removing them even harder)
6 of the plugs are accessible (sort of) from inside the engine bay, and the other six are below. I had a vague plan to change the plug wires, but this grommet looks like a gnarly customer to deal with.
So anyway...out with the dizzy caps
And you can see the little toothed belt that drives one of the distributors. Also the quaint mechanical advance weights
Rotors tips looked ok...not in such bad shape
Dizzy caps okayish too...
But we might as well fit the new ones
The plug wires were the kind that are quite hard to get off, but fit back on with a really satisfylingly loud click
Thankfully the leads are all numbered (there are 12 of them!) and there is a helpful plug location sticker, which is a little dried out and bubbled from all the radiated heat from the engine.
So I got a new one.
Seems a little smoother afterwards, but there prolly wasn't much wrong with the originals anyway.
I actually have plug wires and spark plugs to fit, and I even got the factory service tool for getting the hard-to-reach plugs in and out. But er....yeah I might leave that for another day when I have a few more hours to throw at the job
08-08-2011, 01:05 PM
#11
Burning Brakes
Thread Starter
Next thing I have to do, is to sort out the sunroof, which has been upgraded from "noisy" to "stuck". Parts are on their way from the UK as we speak
Then there's a 100-cell cat to fit, then braided brake lines, then the new stereo...
Then there's a 100-cell cat to fit, then braided brake lines, then the new stereo...
08-08-2011, 03:41 PM
#15
Racer
Join Date: Feb 2005
Location: Sweden
Posts: 382
Likes: 0
Received 0 Likes
on
0 Posts