

Aussie 964C2 Maintenance Diary (pic heavy!)
 04-01-2013, 07:50 PM
#436
Burning Brakes
Thread Starter

I reckon my hose was goooooone. The way it works, is that the metal pipe has a barbed end to it, which the braided hose slides over and then that crimped section locks it all down tight. But in my case, you can spin the hose against the barbed fitting quite freely! I reckon if this was on the pressure side of the oil pump, rather than the suction side, the hose would probably have popped off its fittings by now.
 04-06-2013, 09:22 AM
#437
Burning Brakes
Thread Starter
Since the last post, I dropped off the old oil hose at my local Pirtek for rebuilding. Barry, who runs the place, mainly spends his time fixing industrial hoses, and recognised it immediately as a Porsche hose, but not for good reasons! Barry said that the oem hose is really very much a light-duty, low-cost item, with the cheaper style of sheetmetal crimps. Apparently he rebuilds quite a lot of them for local Porsche mechs. You'll be pleased to hear that he has even less complimentary things to say about Ferrari hoses 
But a few days later, here we are.

A new hose is $300, so I figured I had a bit of a budget to spend on some nice, high quality hose. I'd told Barry that I wanted a hose that had to be quite flexible, yet not too fat in diameter since space was tight, and resistant to kinking or collapsing under the suction of the oil pump. It also had to be heat resistant, since it lives above the secondary muffler, but abrasion-resistance was probably not a biggie, since the hose is well secured and might only need to cope with the occasional pebble-dashing from road debris. So this was the hose he recommended. It's rated to 3500psi, which should cope nicely with the 70psi of engine oil pressure...

It's much more flexible than the very stiff stock hose, yet no matter how hard you try, it won't kink.

The way Barry replaced the hose, was to cut off the old hose, then slip on a new crimp fitting (basically all the silver bits in this pic), which is then brazed onto the Porsche pipe with silver solder. It's then inserted into this machine and crimped down onto the fresh hose. I asked how strong the solder was, and he said that in this application it was good for 6000psi, so we should be covered

One important thing though, is to make sure that the metal pipe fittings on your old hose haven't rotated as you were manhandling it out of the car. So before I handed the old hose to Barry, I mocked it up in the car, and marked the correct angles of metal pipe to hose with a paint pen.

Now, the new hose goes back in!

It's all very unforgiving though, because the hose has to be EXACTLY in the right spot. The big 36mm fitting allows a few degrees of wriggle-room before it's locked down, and what you need to do, is to get the metal pipe sitting flush against the bodywork, while the rubber hose is forced to bend around the contour of the fenderwell.

This is a little fiddly to do, so it might be easier if you get a mate to hold the pipe in that contorted position, while you tighten the 36mm fitting. If you don't get it right, you'll find that this happens: when you try to refit the oil tank, the oil hose fouls the short pipe that comes out of the side of the tank.

So to be honest, it's something that takes quite a bit of experimentation, as you remove and refit the tank a few times, and it's quite frustrating when it doesn't line up with the mounting holes, and you have to do it all again. But this is the position you want, the oil hose needs to fit into a tiny gap between the bulge on the short oil hose, and the oil tank...unless this is 110% right, the oil tank won't line up with its mounting holes.

Also note that the tank has this rubber guide at the back...

Which has to slot into that bracket right at the back, there.

Needless to say, it does take quite a few goes to get the thing in the right position.
But after that, you bolt down the tank, and fit the new hoses at the bottom, which are a bit of a pain, because you basically have to fit a four inch hose into what looks like a 2 inch gap between the tank pipes. It a bit of a squeeze, but with enough swearing and grunting noises, it's possible to fit the hose at the back after the fact, it's flexible enough to be manhandled into position once the tank is bolted down.

At the other end, the hose just bolts up like before. This shot also tells you why it's important to mark the angles of the hose to the pipes before handing it over to be rebuilt. If the metal pipe was say 90 degrees out of whack, there is no way it would bolt back up again.

One new hose which was a breeze to replace, was the J-pipe that is the engine's oil return line back to the tank.

And then...after triple-checking all the hoses, you're ready to refill with fresh oil! So in goes 6L

But first, I figure we need to do something about the fact that most of the oil lines are now dry. So first I unplug the ecu relay

Then crank the engine over on the starter, for a few seconds at a time. Don't go too crazy, the starter isn't meant to be run continuously. After a few goes, the oil pressure gauge starts to show some interest, which means that the new oil lines are now primed.

Then refit the ecu relay, and kick her in the guts. Check that the oil pressure goes all the way up to maximum, and then check everything for leaks.

After that...you just do the usual oil change rigmarole, where you wait for the oil temp needle to go to 9 o'clock, before slowly topping up the oil until the oil level gauge goes to max. A little tip tho...before you get to this stage, make sure you've removed the dipstick. Otherwise you'll have a nice bend in it afterwards (no prizes for guess how I figured this out)

But after about 15mins of idling, the oil is topped off, and everything is still nice and dry

The new oil hose wasn't cheap at $200, but it still less expensive than an oem hose, and should last longer. After a suitably long drive, everything's still bone dry under there, and for the first time in maybe 6mths, I'm not noticing a whiff of burnt oil when I drive anymore. So this required a suitably quiet celebration

But a few days later, here we are.
A new hose is $300, so I figured I had a bit of a budget to spend on some nice, high quality hose. I'd told Barry that I wanted a hose that had to be quite flexible, yet not too fat in diameter since space was tight, and resistant to kinking or collapsing under the suction of the oil pump. It also had to be heat resistant, since it lives above the secondary muffler, but abrasion-resistance was probably not a biggie, since the hose is well secured and might only need to cope with the occasional pebble-dashing from road debris. So this was the hose he recommended. It's rated to 3500psi, which should cope nicely with the 70psi of engine oil pressure...
It's much more flexible than the very stiff stock hose, yet no matter how hard you try, it won't kink.
The way Barry replaced the hose, was to cut off the old hose, then slip on a new crimp fitting (basically all the silver bits in this pic), which is then brazed onto the Porsche pipe with silver solder. It's then inserted into this machine and crimped down onto the fresh hose. I asked how strong the solder was, and he said that in this application it was good for 6000psi, so we should be covered
One important thing though, is to make sure that the metal pipe fittings on your old hose haven't rotated as you were manhandling it out of the car. So before I handed the old hose to Barry, I mocked it up in the car, and marked the correct angles of metal pipe to hose with a paint pen.
Now, the new hose goes back in!
It's all very unforgiving though, because the hose has to be EXACTLY in the right spot. The big 36mm fitting allows a few degrees of wriggle-room before it's locked down, and what you need to do, is to get the metal pipe sitting flush against the bodywork, while the rubber hose is forced to bend around the contour of the fenderwell.
This is a little fiddly to do, so it might be easier if you get a mate to hold the pipe in that contorted position, while you tighten the 36mm fitting. If you don't get it right, you'll find that this happens: when you try to refit the oil tank, the oil hose fouls the short pipe that comes out of the side of the tank.
So to be honest, it's something that takes quite a bit of experimentation, as you remove and refit the tank a few times, and it's quite frustrating when it doesn't line up with the mounting holes, and you have to do it all again. But this is the position you want, the oil hose needs to fit into a tiny gap between the bulge on the short oil hose, and the oil tank...unless this is 110% right, the oil tank won't line up with its mounting holes.
Also note that the tank has this rubber guide at the back...
Which has to slot into that bracket right at the back, there.
Needless to say, it does take quite a few goes to get the thing in the right position.
But after that, you bolt down the tank, and fit the new hoses at the bottom, which are a bit of a pain, because you basically have to fit a four inch hose into what looks like a 2 inch gap between the tank pipes. It a bit of a squeeze, but with enough swearing and grunting noises, it's possible to fit the hose at the back after the fact, it's flexible enough to be manhandled into position once the tank is bolted down.
At the other end, the hose just bolts up like before. This shot also tells you why it's important to mark the angles of the hose to the pipes before handing it over to be rebuilt. If the metal pipe was say 90 degrees out of whack, there is no way it would bolt back up again.
One new hose which was a breeze to replace, was the J-pipe that is the engine's oil return line back to the tank.
And then...after triple-checking all the hoses, you're ready to refill with fresh oil! So in goes 6L
But first, I figure we need to do something about the fact that most of the oil lines are now dry. So first I unplug the ecu relay
Then crank the engine over on the starter, for a few seconds at a time. Don't go too crazy, the starter isn't meant to be run continuously. After a few goes, the oil pressure gauge starts to show some interest, which means that the new oil lines are now primed.
Then refit the ecu relay, and kick her in the guts. Check that the oil pressure goes all the way up to maximum, and then check everything for leaks.
After that...you just do the usual oil change rigmarole, where you wait for the oil temp needle to go to 9 o'clock, before slowly topping up the oil until the oil level gauge goes to max. A little tip tho...before you get to this stage, make sure you've removed the dipstick. Otherwise you'll have a nice bend in it afterwards (no prizes for guess how I figured this out)
But after about 15mins of idling, the oil is topped off, and everything is still nice and dry
The new oil hose wasn't cheap at $200, but it still less expensive than an oem hose, and should last longer. After a suitably long drive, everything's still bone dry under there, and for the first time in maybe 6mths, I'm not noticing a whiff of burnt oil when I drive anymore. So this required a suitably quiet celebration
 04-06-2013, 10:34 AM
#440
Burning Brakes
Thread Starter
That's a very Australian bit of junk food It's a meat pie (so it's got hamburger and gravy inside), topped with mash potato and mashed peas, plus some more gravy 
It's a meat pie (so it's got hamburger and gravy inside), topped with mash potato and mashed peas, plus some more gravy
04-06-2013, 04:33 PM
#441
This was/is on my to do list & now I can dive in with the Wikipedia of babalouie's pics/help & a few swear words ready.....but I think I'm going to use a buddy's two poster ramp as I'm not bendy like a used to be......thanks for the heads up!!
04-07-2013, 02:27 AM
#444
Race Car
3500 psi ... LoL! Really great pics - thanks again for this thread.
Aren't you tempted to leave those crazy heavy mufflers off or replace them w lighter ones?
Aren't you tempted to leave those crazy heavy mufflers off or replace them w lighter ones?
04-07-2013, 03:38 AM
#445
Burning Brakes
Thread Starter
04-20-2013, 11:33 AM
#446
Burning Brakes
Thread Starter
The good news is...the new oil hoses are working a treat, and that particular corner of the car is drier than a dead dingo's donger (*not actually Australian slang).
But the bad news is...just as I'd gotten the car just where I'd wanted it...some ******* backs into the car and does this to it:

Said ******* then drove off without leaving any details, but thankfully the damage is just paint. And getting the bumper fixed is as good an excuse as any, to get that RS bonnet painted too So at the moment, my car looks like this:

I know my local body shop pretty well, and so I've stripped the bumper for them to save a little money. The RS bonnet is also being painted (they have my stock bonnet to use as a paint sample) and so you'll notice that I've removed the hood shocks too, which I replaced only a couple of months ago. But the RS bonnet has a hood prop rod instead, so the shocks have to be removed.
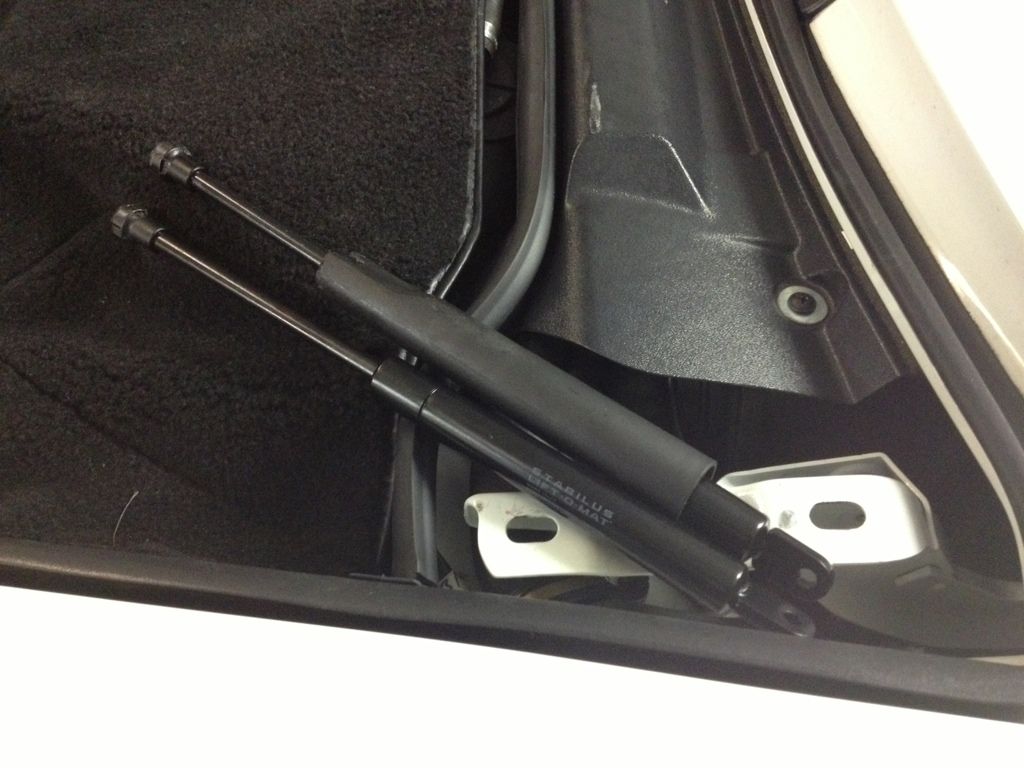
Can't wait to get it all back, so I can put it together. It'll be fascinating to weigh the stock vs RS bonnets! There is an old thread that says that the stock bonnet is 16kg and the RS alloy one is 6kg, but to be honest the weight difference seems bigger than that, with the stock steel bonnet being very heavy to lift by yourself, while the RS one is impossibly light for something so big. We shall see in a couple of days!
But the bad news is...just as I'd gotten the car just where I'd wanted it...some ******* backs into the car and does this to it:
Said ******* then drove off without leaving any details, but thankfully the damage is just paint. And getting the bumper fixed is as good an excuse as any, to get that RS bonnet painted too
So at the moment, my car looks like this:I know my local body shop pretty well, and so I've stripped the bumper for them to save a little money. The RS bonnet is also being painted (they have my stock bonnet to use as a paint sample) and so you'll notice that I've removed the hood shocks too, which I replaced only a couple of months ago. But the RS bonnet has a hood prop rod instead, so the shocks have to be removed.
Can't wait to get it all back, so I can put it together. It'll be fascinating to weigh the stock vs RS bonnets! There is an old thread that says that the stock bonnet is 16kg and the RS alloy one is 6kg, but to be honest the weight difference seems bigger than that, with the stock steel bonnet being very heavy to lift by yourself, while the RS one is impossibly light for something so big. We shall see in a couple of days!
04-21-2013, 07:21 AM
#447
Rennlist Member
Join Date: May 2009
Location: Bucks, Herts, Beds Tri-Border, UK
Posts: 1,167
Received 92 Likes
on
76 Posts
Babalouie, Without getting too geeky, your new oil pipe; when your mate Barry came up with the right pipe recommendation for your requirements did he stick to the same internal diameter as the original? I ask as if this value alters then flow rate and pressure will alter too (plus the usual friction losses, fluid temp etc).
Interesting to note too that there are some lousy put together oil pipes out there doing what is probably the most important job! Ferrari of all people - outrageous!
Interesting to note too that there are some lousy put together oil pipes out there doing what is probably the most important job! Ferrari of all people - outrageous!
04-21-2013, 07:26 AM
#448
Burning Brakes
Thread Starter
I'm sure he would have had to match the rubber hose diameter to the metal-pipe part of the original hose. I'm not sure if it's possible to step-up or down the hose size relative to that pipe.
04-21-2013, 07:59 AM
#449
Rennlist Member
Join Date: May 2009
Location: Bucks, Herts, Beds Tri-Border, UK
Posts: 1,167
Received 92 Likes
on
76 Posts
I would have thought so. You can, for a same fitting/coupling, step up or down (within a range). Just makes you wonder if it's possible to make small improvements with flow rate. But then we could start talking out the need then to get a different spec cooler... it goes on..
Anything else on your to-do list next?
Anything else on your to-do list next?
04-21-2013, 03:47 PM
#450
Burning Brakes
Thread Starter
I would have thought so. You can, for a same fitting/coupling, step up or down (within a range). Just makes you wonder if it's possible to make small improvements with flow rate. But then we could start talking out the need then to get a different spec cooler... it goes on..
Anything else on your to-do list next?
Anything else on your to-do list next?
First order of business is to get everything repainted, and the bumper and RS bonnet fitted. While the whole thing is apart, I'll fit some RS sway bar drop links, and jobs on the "maybe list" while the bumper is off, would be getting the braided hoses going into the oil cooler re-done too (they don't look too bad tho) and fitting some braided brake lines I've had sitting around for years (they were in my very first Pelican order, even from before I bought the car!)
Then after the RS bonnet goes in, it would be a shame not to replicate the RS frunk too, so the carpet will be removed (and if I can find a spare boot carpet, I'll get it re-tailored to look like the shortened RS one) and I'll fit the smaller RS washer tank....and after that it would be a shame not to go the whole hog with the RS rear bumper and front foglight delete plates too
I got outbid on a brake duct kit (it looked similar to the FVD one) and used RS bumper section on Yahoo Auctions Japan recently, but I'm always scouting that and eBay for any tasty RS-bits which might come up for sale.
I'd also like to get a set of the new Advan Neova ADO8Rs to try too