Notices
924/931/944/951/968 Forum Porsche 924, 924S, 931, 944, 944S, 944S2, 951, and 968 discussion, how-to guides, and technical help. (1976-1995)
Sponsored by:
Sponsored by:

Wilson's thread

Thread Tools
 
Search this Thread
 
Old 08-29-2015, 09:44 PM
  #316  
odonnell
Rennlist Member
 
odonnell's Avatar
 
Join Date: Nov 2012
Location: Houston TX
Posts: 4,769
Received 65 Likes on 47 Posts
Default

Originally Posted by Noahs944
Michael, that pic if of Matti's car. I am also curious about his set up. Myself am running all Porsche. That is, *when* I am running.
I can confirm it's a worthwhile upgrade! You'll need a standalone to run an aftermarket coil pack. I was harassing V2 rocket about converting to EDIS using a MegaJolt controller: http://www.autosportlabs.net/MegaJolt_Lite_Jr..

It's been done on a 924S with great results and is not expensive, I think around $250. However if you have a little more spending money, I can't help but make a shameless plug for full standalone, my car pulls harder than ever and is infinitely more reliable.
Old 08-30-2015, 01:40 PM
  #317  
Noahs944
Race Car
Thread Starter
 
Noahs944's Avatar
 
Join Date: May 2013
Location: Calgary, Alberta, Canada
Posts: 4,015
Received 229 Likes on 168 Posts
Default

OK. I GET TO SHOW OFF. I GET TO BRAG DAMN IT.


Old 08-30-2015, 01:55 PM
  #318  
V2Rocket
Rainman
Rennlist Member
 
V2Rocket's Avatar
 
Join Date: Jan 2007
Location: Nashville, TN
Posts: 45,540
Received 646 Likes on 500 Posts
Default

bead blasted?
Old 08-30-2015, 02:37 PM
  #319  
Noahs944
Race Car
Thread Starter
 
Noahs944's Avatar
 
Join Date: May 2013
Location: Calgary, Alberta, Canada
Posts: 4,015
Received 229 Likes on 168 Posts
Default

Yup. Then painted.
Old 08-30-2015, 05:05 PM
  #320  
Noahs944
Race Car
Thread Starter
 
Noahs944's Avatar
 
Join Date: May 2013
Location: Calgary, Alberta, Canada
Posts: 4,015
Received 229 Likes on 168 Posts
Default

Speed chasing threads & scuffing up heads.


Painting all the cam bolt heads for the outside of the cam box (the ones to go internally not painted).

Old 08-30-2015, 05:12 PM
  #321  
Noahs944
Race Car
Thread Starter
 
Noahs944's Avatar
 
Join Date: May 2013
Location: Calgary, Alberta, Canada
Posts: 4,015
Received 229 Likes on 168 Posts
Default

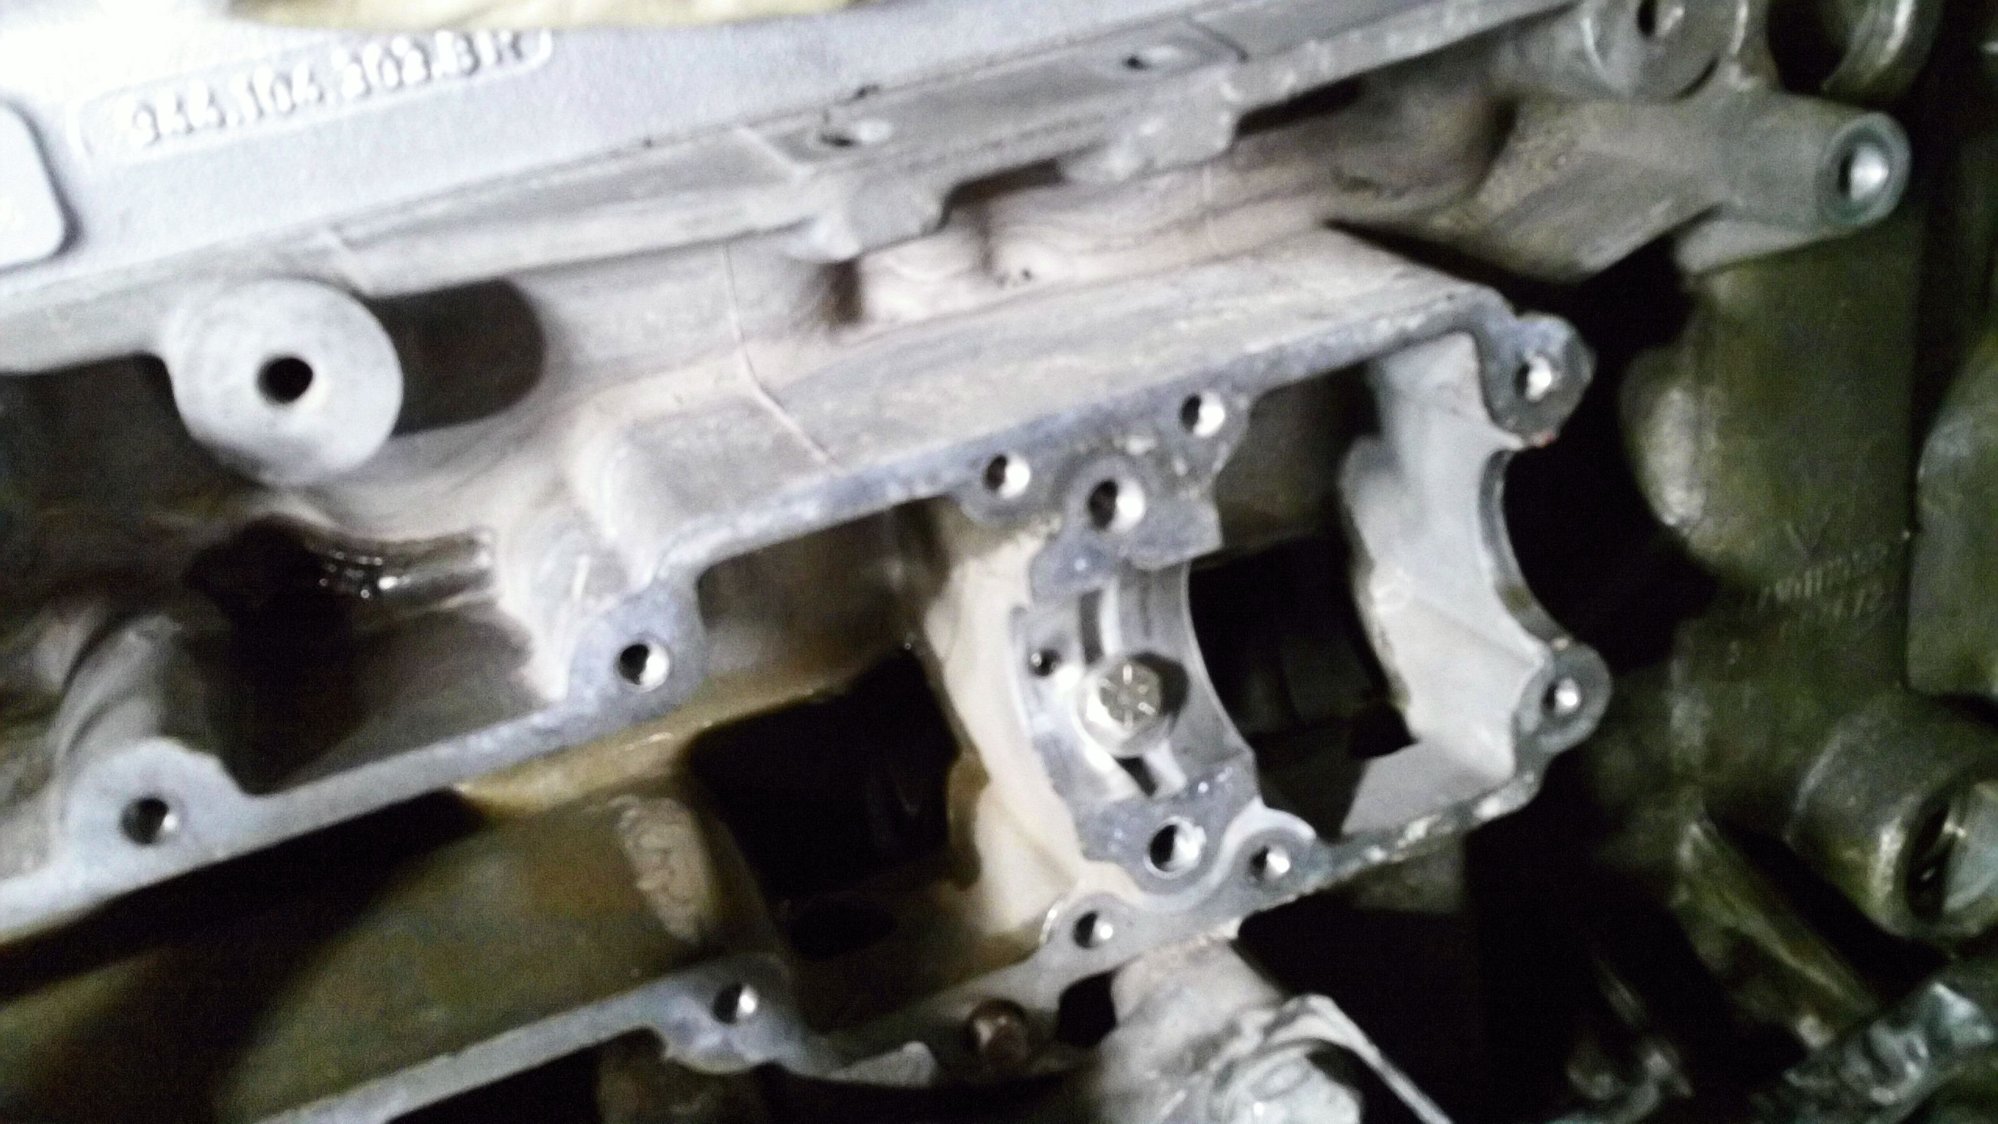
First stage of modifying the B.S. areas was to tap the galleries. tried for metric but the hole size of the gallery preferred a 1/4" bolt. After cleaning the threads I applied loc-tite & they snugged up nicely. Bolt length is about 30mm of thread.

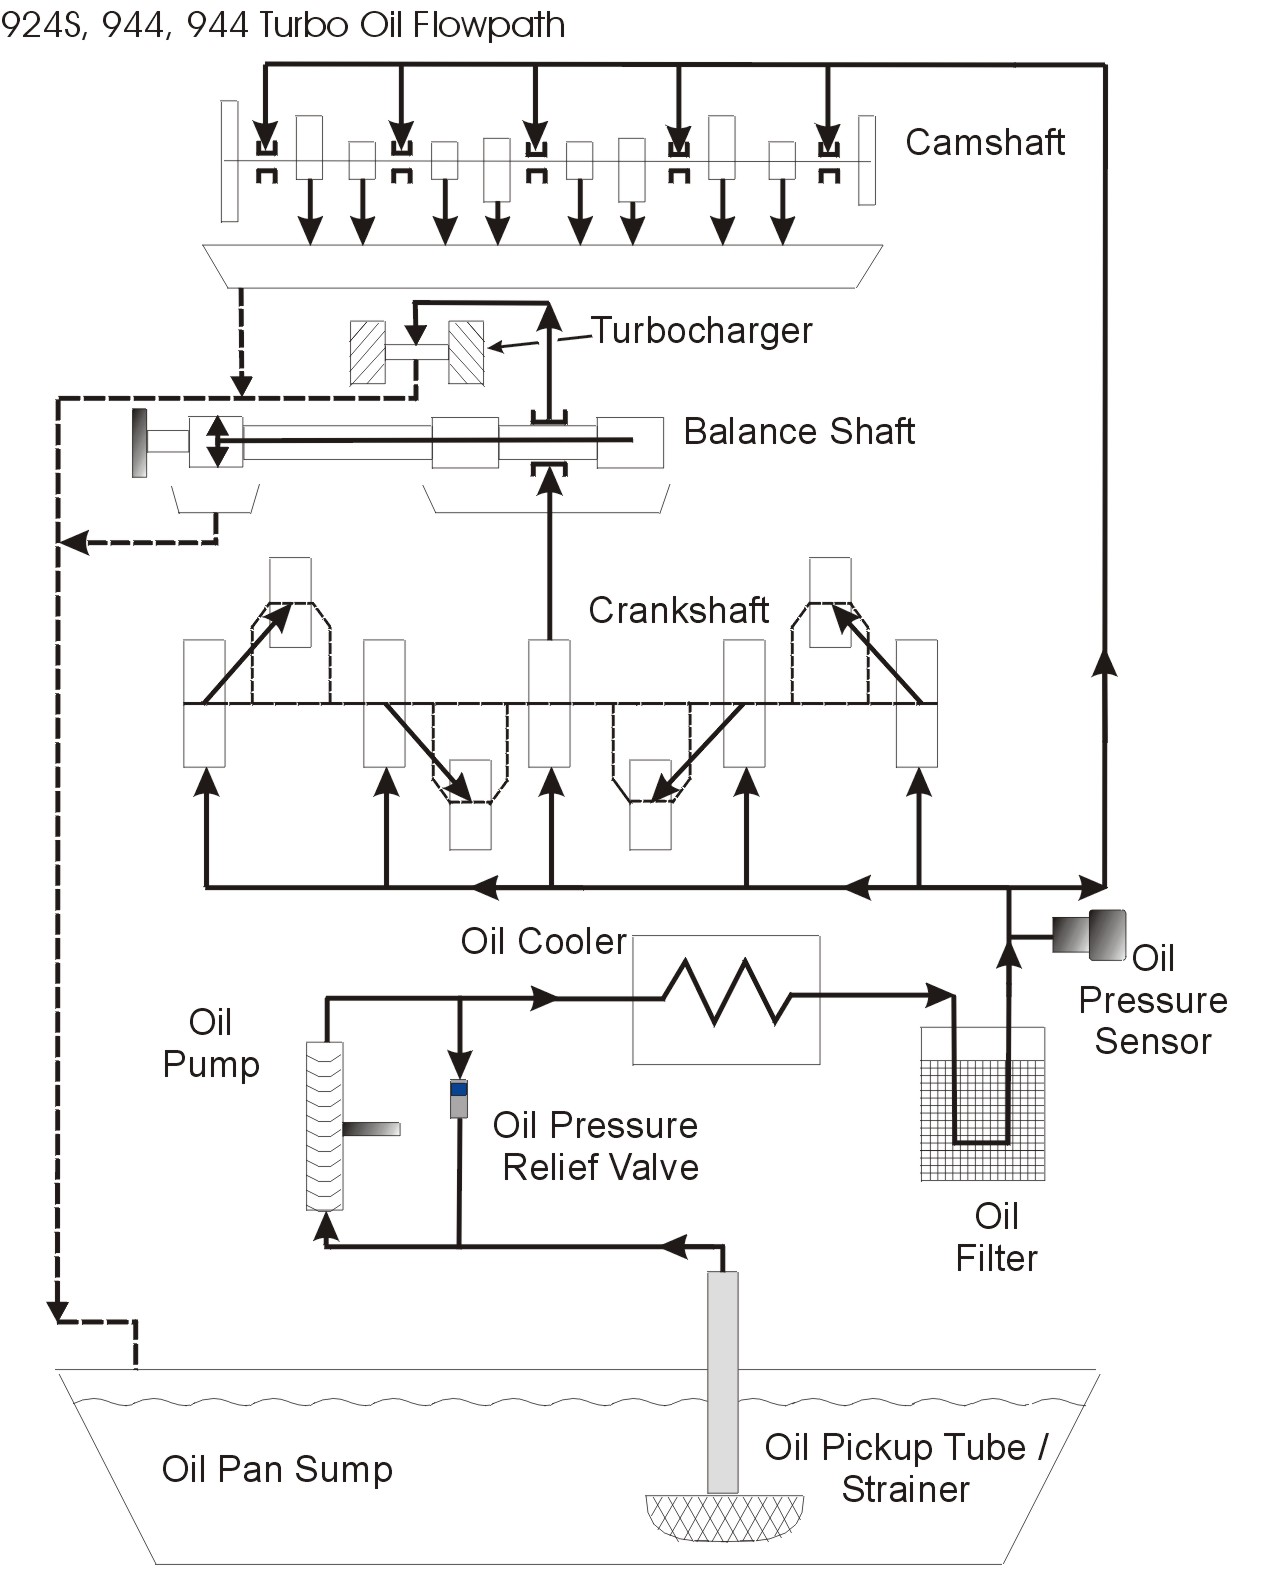
Rumour is this modification helps improve lube to the crankshaft.


Old 08-30-2015, 05:31 PM
  #322  
odonnell
Rennlist Member
 
odonnell's Avatar
 
Join Date: Nov 2012
Location: Houston TX
Posts: 4,769
Received 65 Likes on 47 Posts
Default

I hope you got all the swarf out

Look great though!
Old 08-30-2015, 05:54 PM
  #323  
V2Rocket
Rainman
Rennlist Member
 
V2Rocket's Avatar
 
Join Date: Jan 2007
Location: Nashville, TN
Posts: 45,540
Received 646 Likes on 500 Posts
Default

should help a bit!

Old 08-31-2015, 10:37 AM
  #324  
Noahs944
Race Car
Thread Starter
 
Noahs944's Avatar
 
Join Date: May 2013
Location: Calgary, Alberta, Canada
Posts: 4,015
Received 229 Likes on 168 Posts
Default


Here is the exhaust sound before some minor changes (I think the stage 1 head & increasing length of bigger dia exhaust pipe are the only changes).
Old 08-31-2015, 10:39 AM
  #325  
Noahs944
Race Car
Thread Starter
 
Noahs944's Avatar
 
Join Date: May 2013
Location: Calgary, Alberta, Canada
Posts: 4,015
Received 229 Likes on 168 Posts
Default

Thanks Michael for the informative diagram!!
Old 08-31-2015, 02:09 PM
  #326  
Noahs944
Race Car
Thread Starter
 
Noahs944's Avatar
 
Join Date: May 2013
Location: Calgary, Alberta, Canada
Posts: 4,015
Received 229 Likes on 168 Posts
Default

Balance Shaft delete complete. Hopefully this works.


Old 08-31-2015, 02:15 PM
  #327  
Arominus
Race Car
 
Arominus's Avatar
 
Join Date: Jan 2009
Location: Colorado
Posts: 4,103
Likes: 0
Received 4 Likes on 4 Posts
Default

You did reinforce your oil pickup tube right?
Old 08-31-2015, 05:08 PM
  #328  
Noahs944
Race Car
Thread Starter
 
Noahs944's Avatar
 
Join Date: May 2013
Location: Calgary, Alberta, Canada
Posts: 4,015
Received 229 Likes on 168 Posts
Default

Yes Arominus!! Thanks for checking.

So ready to move on from the leakage. Hate it or love it... I went extreme.

Step 1) 510 anaerobic sealant on head.


Old 08-31-2015, 05:10 PM
  #329  
Noahs944
Race Car
Thread Starter
 
Noahs944's Avatar
 
Join Date: May 2013
Location: Calgary, Alberta, Canada
Posts: 4,015
Received 229 Likes on 168 Posts
Default

Step 2) applied super duper sticky hi-tack gasket sealant to the cam tower. Made sure gasket orientation was correct.


Old 08-31-2015, 05:13 PM
  #330  
Noahs944
Race Car
Thread Starter
 
Noahs944's Avatar
 
Join Date: May 2013
Location: Calgary, Alberta, Canada
Posts: 4,015
Received 229 Likes on 168 Posts
Default

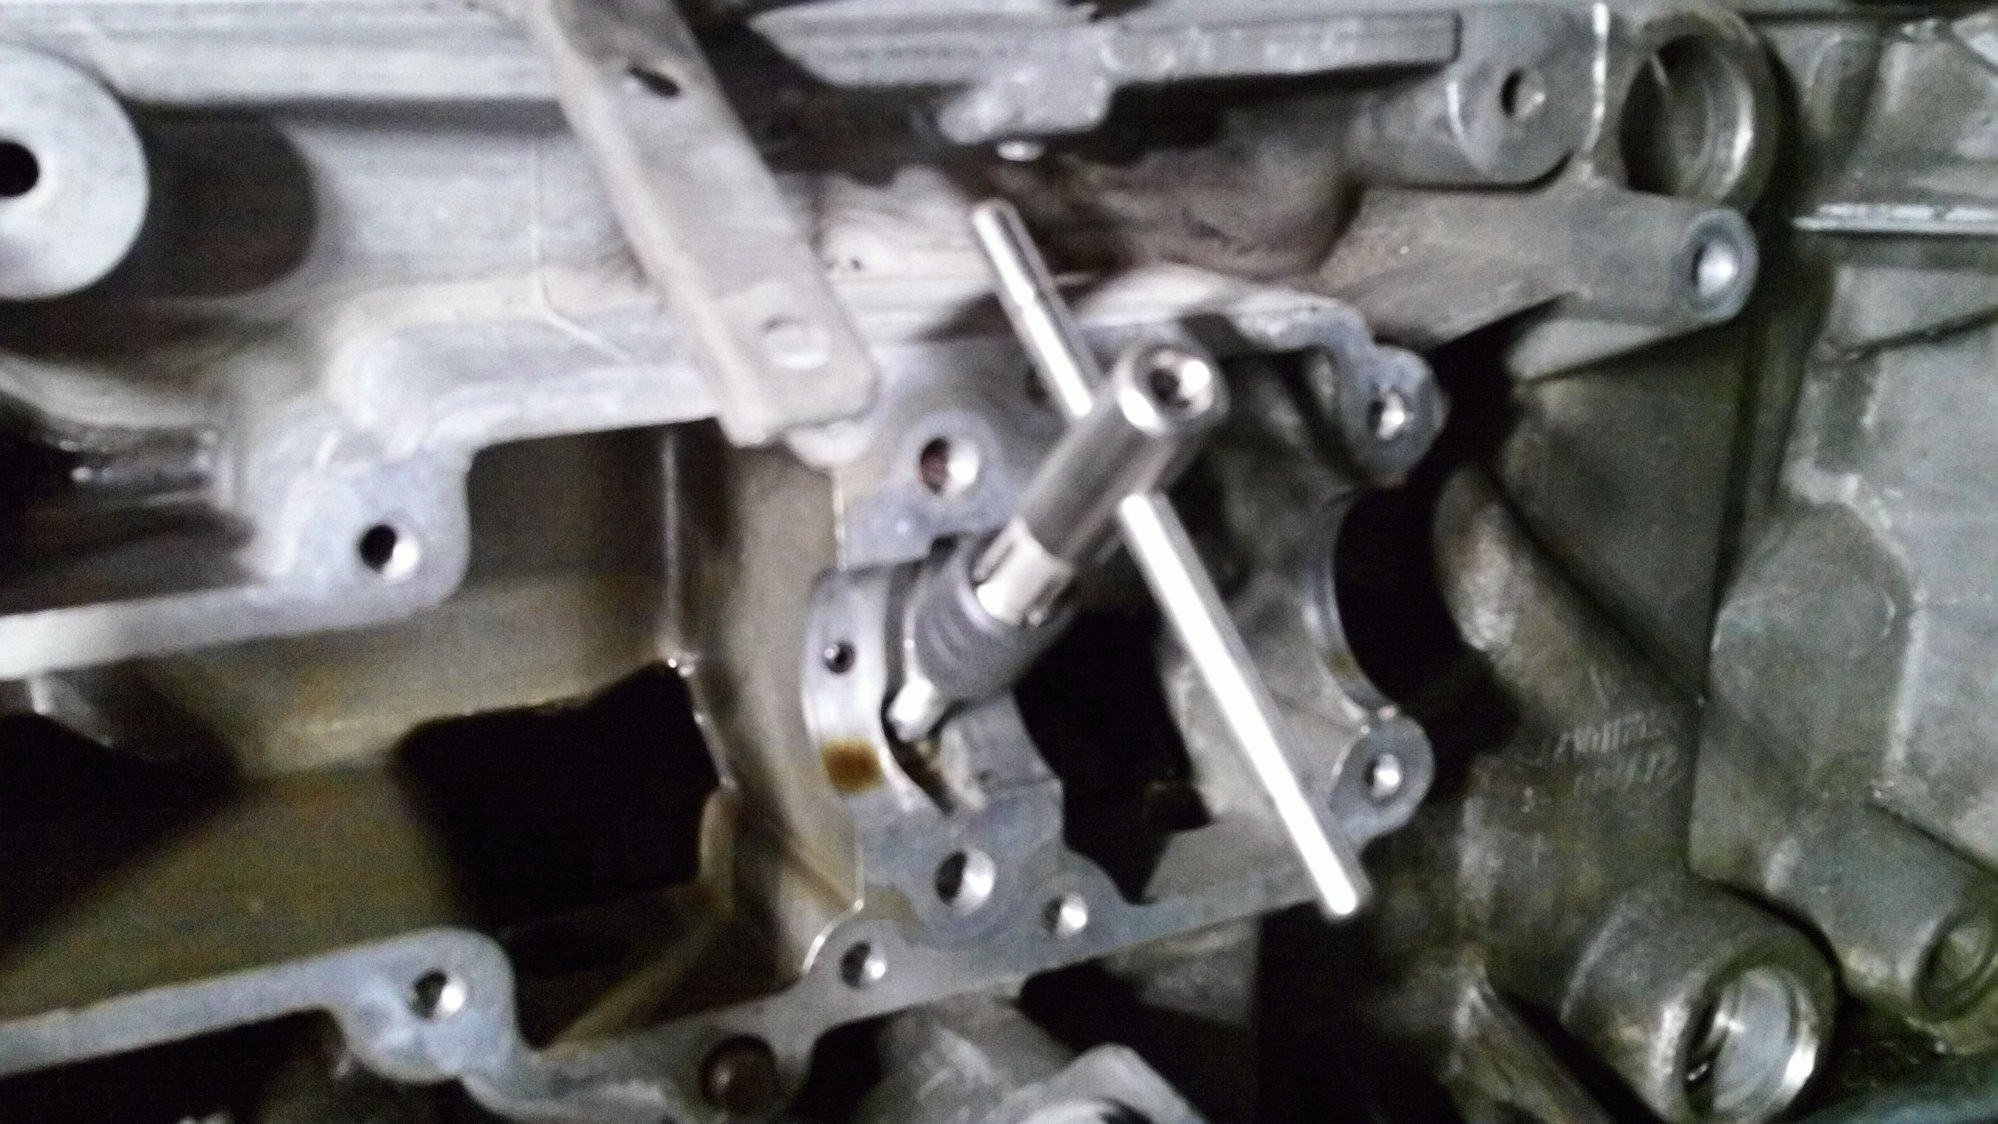
Applied blue loc-tite to bolt threads & ground the bit holder down so from torque wrench to pit, it's all no-flex 3/8" size tools. Cam tower is now installed.
[IMG]https://cimg0.ibsrv.net/gimg/rennlist.com-vbulletin/2000x1124/80-loctite_66640cad9aeec4e58b7cc44a957974d129f7dba7.jpg[/IMG


Quick Reply: Wilson's thread


All times are GMT -3. The time now is 09:11 AM.