
So what did you do to your 928 Today......

 04-17-2011, 08:08 PM
#767
Archive Gatekeeper
Rennlist Member
Rennlist Member
I am helping finish up a 22 year service on Dr Bob's '89S4. 100,000 miles, and honestly a lot of it didn't really need to be touched, but he's sporting all new intake rubber, injectors, fuel lines, vacuum elbows, intake and VC powdercoat, etc.


04-17-2011, 08:25 PM
#768
Rennlist Member
Made the third attempt at attaching the spring clips/clamps to the underside of the front of the rear section of the rear A/C plastic grill. The first attempt was with 5 minute epoxy from Loctite. The second was with real deal JB Weld. This time we are trying some left over bumper repair epoxy. If this doesn't hold I guess it's off to the hardware store for some mo betta stuff.
04-17-2011, 08:56 PM
#769
Racer
Fired the engine up this afternoon, after the fuel line replacement and vacuum line replacement. All looks good  .
.
.
04-17-2011, 09:40 PM
#770
Rennlist Member
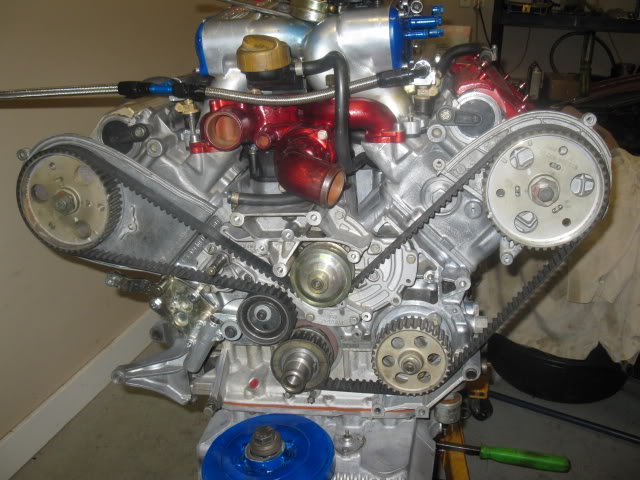
Starting day two of the intake replacement. yesterday was mostly disassemble and clean. Rob Edwards is helping with the technical stuff like getting the electrical connectors from the injectors and the like. A couple of the correct vapor vent hoses should be here later from GB to allow final assembly. So far, all everything in the V has been in ood to excellent condition. Nothing stiff or crispy. Valley contamination is mostly road dirt. No slime or evidence of any leakage. The knock sensor wiring is all of the damage we've found so far.
I need to get the CPS out and replaced. I may have an hour before Rob gets back. Wish me luck!
I need to get the CPS out and replaced. I may have an hour before Rob gets back. Wish me luck!
Are you looking at the oil filler neck, hall sensor, CPS, grounds at the rear of the intake and.......fuel hoses?
To name but a few

 04-17-2011, 09:48 PM
#772
Three Wheelin'
In short it involves sanding with finer and finer grit of sandpaper then polishing, buffing and then wax. I had mine done (if memory serves) with 2000 then 2500 then 3000. It removes damned near all the orange peel and imperfections leaving the paint very close to perfectly smooth. It is amazing the difference in the gloss. A simple way to tell the difference is with your car freshly washed and waxed stand next to it. Look at your reflections in the door glass as compared to the door itself and other areas like the hood, etc. Color sanding makes them close to indistinguishable as far as the reflection goes.
04-17-2011, 11:44 PM
#773
Finished fixing crimped power steering hose, flushed system, replace top and bottom radiator hoses, flushed coolant and took it for a short drive. Pulled into a 7 /11 and she would not start up. Battery drained. So, tomorrow will be pulling battery, cleaning terminals and all ground points. If she charges up fine, yeah. If not, time for a new battery.
04-17-2011, 11:57 PM
#774
Racer
Join Date: Oct 2009
Location: Griffin, Georgia
Posts: 432
Likes: 0
Received 0 Likes
on
0 Posts
Finished the brakes and fluid flush, changed the fuel filter, waiting for the wheels to get her back on the ground.
Last edited by jacal128; 04-17-2011 at 11:58 PM. Reason: miss spell
04-18-2011, 01:38 AM
#776
Chronic Tool Dropper
Lifetime Rennlist
Member
Lifetime Rennlist
Member

Rob and I decided that the brand new top of engine harness he has stashed is in no better condition that one in my engine bay. All the plastic sleeves, boots, insulation, etc. is like new. The only evidence of age that was apparent was the deteriorated insulation on the knock sensor cabling at the sensor end, and the CPS connector on the sensor side, which I managed to crack as I was disassembling. CPS hold-down bolt took a couple whacks on the impact screwdriver to get moving, but once loosened it came out fine; full threads coated with blue loc-tite made it stiff to turn on the way out. The CPS itself then came right out, just a twist with fingers and lifted gently, and it almost flew out of the hole. Clean living on the owner's part (not on purpose, it just worked out that way...) and our dry, no road salt, pretty much rainless lifestyle also have something to do with that I'm sure.
There's a vert slight hnt of fuel seepage at the rail side connector on the rear damper. We opened the connection and retightened it, better but still there. I'll pull it apart again tomorrow for a better inspection of the sealing area. If it's damaged maybe a new damper is in order. All the connections went together fine with just fingers on the fuel line nuts, then tighetened with wrenches, but no misalignment at all.
-----
Can't say enough about the support on this project from Rob Edwards, two solid days of detailed tutoring and hard work on the project. Could not have done it without him.
Hats off and a big thank-you to Greg Brown, who had a couple hoses and trim pieces for the project, and available on a sunny Sunday in SoCal.

 04-18-2011, 08:46 AM
#780
Rennlist Member
Previously on RL we've had interesting discussion on the orientation of the intake stud shoulders.....whats your thoughts?