When you click on links to various merchants on this site and make a purchase, this can result in this site earning a commission. Affiliate programs and affiliations include, but are not limited to, the eBay Partner Network.
WRT DIY vs FYI, are there any detail steps missing here?
The essential steps are there to the best of my knowledge. Of course, there are tons of details not posted because I'm not writing a 10+ page manual. For all the details I'd suggest investing in a factory manual or even take a 2-day class that some companies offer.
Quote from first paragraph of the post- "This is the way I timed the cams on my .1 engine, there are other ways and sequence to do this, and for other model the procedures may differ. The contents are for your entertainment purpose only, I have no accountability should you attempt to do this at home at your own risk."
__________________
PCA National Instructor
TPC Racing stats:
2023 Porsche Sprint Challenge 992 Cup Am Champion
2023 Porsche Sprint Challenge GT4 Pro-Am Team Champion
2022 Porsche Sprint Challenge 992 Cup & 991 Cup Champion
2020 IMSA GT3 Cup Challenge 2nd Championship
2018 IMSA GT3 Cup Challenge 2nd Championship
2016 IMSA GT3 Cup Challenge Champion
2013 IMSA GT3 Cup Challenge Champion
2006 Rolex-24 @ Daytona GT Champion
2004 Grand-Am SGS Class Champion
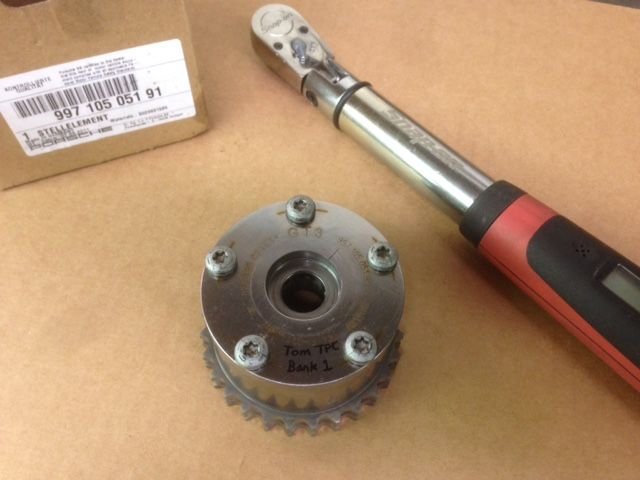
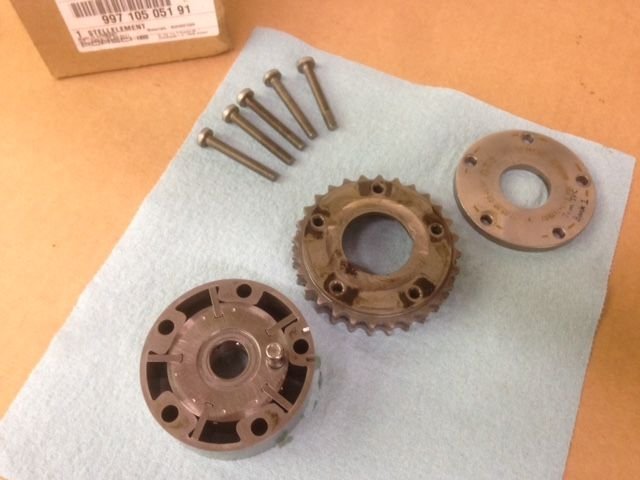
Not sure if anyone has posted one taken apart before. Here's what it looks like.
This is the 997.1 GT3 intake cam actuator. On the 997.1 GT3 only the intake cams have the actuators. The exhaust cams do not. This part number cam actuator was also used on some 997.2 GT3's, which later on was superseded by a different part number.
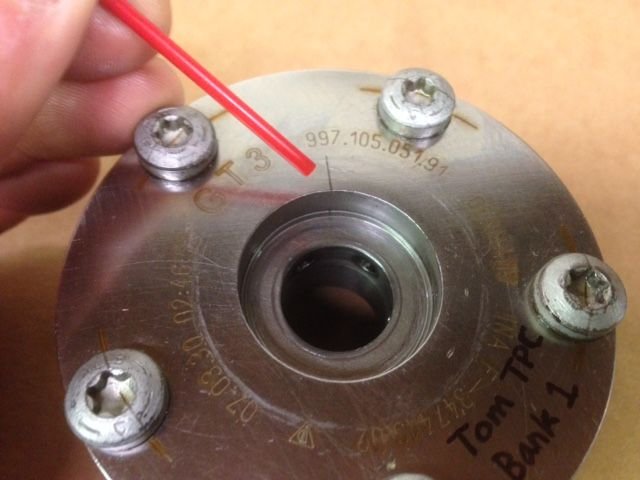
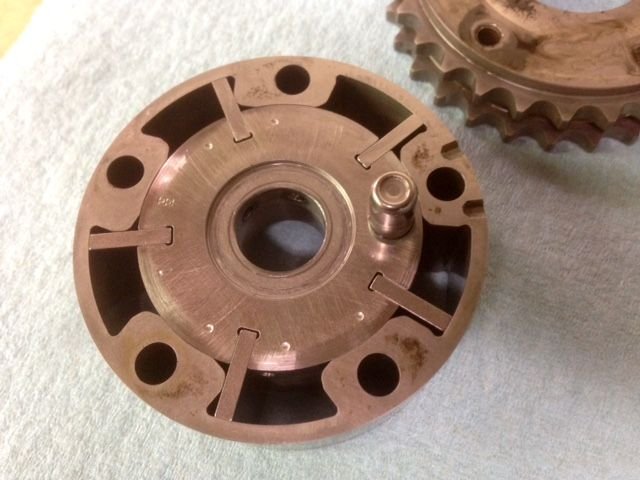
An interesting fact is all the ones I have seen have what looks like a crack or split at where the red stick pointing. But its not a crack. It seems to be a surface line/marking at the exact same location(under the second "9") on every one that I've seen.
Here's the back side. The bolts do go all the way through. Notice the oiling holes that feed pressurized oil into the actuator to make the magic happen.
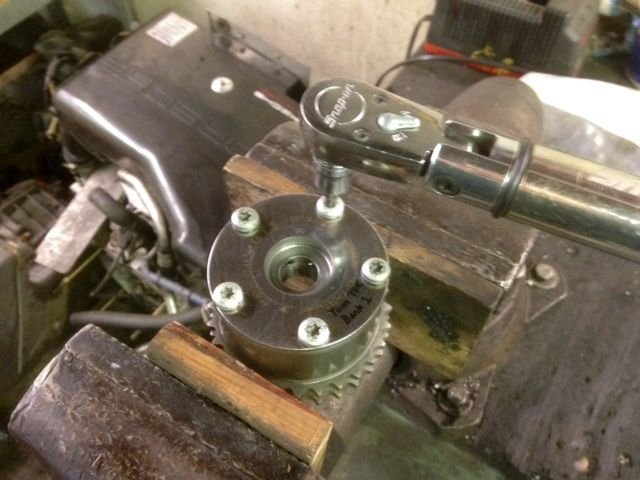
Since torque value for the parameter bolts is not published(at least not that I'm aware of), using a good quality torque wrench I did a reversed torque method to determine torque value. I came up with 10.5 ft-lb consistently on all five bolts. Which is within nominal torque range for M6x1.0 fasteners.
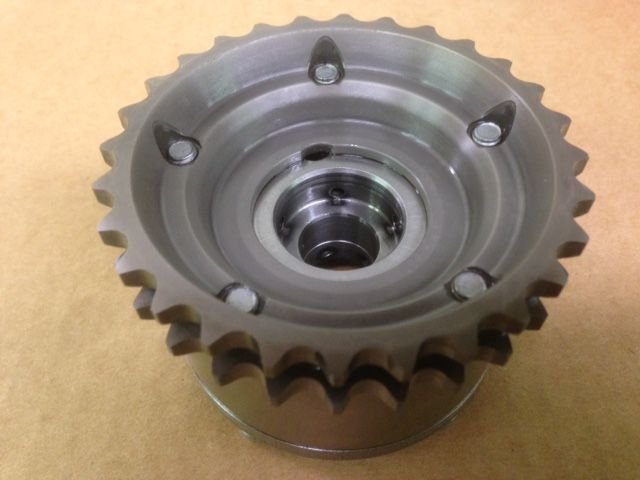
Here's what it looks like taken apart. There are three primary sections: The cover plate, the vane assembly, and the sprocket.
Close up of the vanes. There's a huge range of controlled movement for sure. I believe the advertised range is 52 degrees.
Not sure if anyone has posted one taken apart before. Here's what it looks like.
Very cool; thanks, Tom! I did not think to grab my old ones when they were replaced, so this is very informative. And kudos again for this thread, the amount of information you've provided is staggering.
Originally Posted by Tom-TPC Racing
This is the 997.1 GT3 intake cam actuator. On the 997.1 GT3 only the intake cams have the actuators. The exhaust cams do not. This part number cam actuator was also used on some 997.2 GT3's, which later on was superseded by a different part number.
I can confirm that this is the same intake actuator part number used on the early 997.2 GT3 and RS. It is also the part number that experienced issues with the perimeter bolts backing out on the RS that can lead to serious problems - Porsche replaced at least some under warranty. As the bolts first start to loosen the oil pressure in the actuator will drop, which disables the actuator; if not caught in time, the bolts will machine the aluminum covers creating lots of fine bits to be circulated, then break & fall out sending many large steel bits on a very destructive path.
After installing the RS 4.0 LWFW and following proper break-in procedures, I had the bolts on one actuator start to back out. The first symptom was a slight drop off in power with no noise, warnings or issues noted on any gauges. Not a huge drop off, but definitely noticeable softening above 4k RPM when the actuator is supposed to adjust. I spent only one lap under reduced pace trying to assess the issue (and making sure it wasn't just me being hyper-sensitive or imagining things), then pitted; by the time I made it to the garages it was starting to make a rattle/knocking sound. My engine builder said that I caught it about a soon as humanly possible by being so aware of the engine performance and garaging it so promptly; that saved the engine and a LOT of money.
As a result of these bolt-backing-out failures, Porsche superseded the actuators twice as of last fall, with the then-latest part number ending in 93 (each exhaust actuator has a unique part number, but the latest versions also ended in 93). I have not been able to find what they changed; bolt size, torque value, thread locker, etc., but they seem to have addressed the problem. If installing the LWFW setup, I would strongly encourage updating the actuators to the latest version to match the RS 4.0's. This alone may be sufficient, but personally, to be on the safe side I also added the ATI dampener that Neil and Jamie developed.
Originally Posted by Tom-TPC Racing
An interesting fact is all the ones I have seen have what looks like a crack or split at where the red stick pointing. But its not a crack. It seems to be a surface line/marking at the exact same location(under the second "9") on every one that I've seen.
That is a laser-etched mark which I assume is used for orientation in the assembly/timing process. Of more significance are the laser etched arcs on every bolt head and the cover plate. These can be used to visually inspect whether there has been any loosening of the bolts. Curiously, of the four actuators on a 997.2 statistically it is the right side intake actuator is most commonly affected. In a rare bit of luck, it also happens that this is the most visible and accessible of the actuator covers, and it is possible to remove the cover of the most vulnerable actuator with the engine in the car to inspect the etched marks.
Originally Posted by Tom-TPC Racing
Since torque value for the parameter bolts is not published(at least not that I'm aware of), using a good quality torque wrench I did a reversed torque method to determine torque value. I came up with 10.5 ft-lb consistently on all five bolts. Which is within nominal torque range for M6x1.0 fasteners.
Porsche has done a very good job of not disclosing the torque values of these bolts because they are not designed/recommended to be serviced. My guess is that removing one at a time to loc-tite them would make it unlikely that when properly torqued the laser etchings would realign. New actuators are not cheap, but my builder advised replacing all four with the latest version.
Originally Posted by Tom-TPC Racing
Close up of the vanes. There's a huge range of controlled movement for sure. I believe the advertised range is 52 degrees.
The vanes are physically captured and appear to have a range of about 15 degrees. Even in my case where the actuator was not adjusting, there was zero valve-piston contact; my builder said there couldn't be because it doesn't adjust that much. This would make much more sense than 52 degrees; think about how small timing advance adjustments are in custom tunes. The primary motivator in this design is emission control; as you know, Cup cars used fixed cam timing.
I'd like to add three more comments regarding the actuator.
1) Applying 10.5 ft-lb of the torque during tightening the laser etched line on all five bolts lined up perfectly. The use of Red Loctite is suppose to add 15-30% more holding strength depending on how much is used and the surface prep.
2) I was told by a well-respected dealer tech that some actuators have aluminum bolts. Aluminum bolts should not be re-torqued. Check the bolt material with a magnet before attempting to re-torque.
3) If I was building an endurance race engine that must have variocam function, I'd use bolts with hex heads and I'd drilled and safety wire the bolts to guarantee the bolts won't back out.
You're welcome, Tom.
1. Good to know that the marks lined up. I thought you had new actuators in one of your photos; are you reusing the originals? As a clarification to my post, the bolts backing out appears to be correlated with the higher displacement 3.8L and 4.0L engines; it seems the 3.6L's are much less susceptible.
2. Interesting data point, but surprising if Porsche used two different materials for the fasteners.
3. Another race engine builder made a similar suggestion, so long as there is room for the larger hex heads under the covers, and they thought there would be.
The use of Red Loctite is suppose to add 15-30% more holding strength depending on how much is used and the surface prep.
Good to point that out Tom... Proper surface prep is critical to getting the most out of the Loctite performance. I would also use a good acetone based primer like Loctite 7649.
Hex head bolts and metal locting tabs would also work but lock wiring is the simplest.
I can see the bolt material being alloy apart form the low tensile and shear strengths of alloy there is galvanic issues using dissimilar metals. Gualing would also be an issue.
RK's harmonic damper - front pully was designed with this very issue in mind (as will as the throttle valve screw back outs on the 4.0) will help warrant against this issue. Proven technology.
RK's harmonic damper - front pully was designed with this very issue in mind (as will as the throttle valve screw back outs on the 4.0) will help warrant against this issue. Proven technology.
Yes the RK damper/pulley definitely sounds like a viable solution to prevent harmonic related issues for the bigger displacement engines.
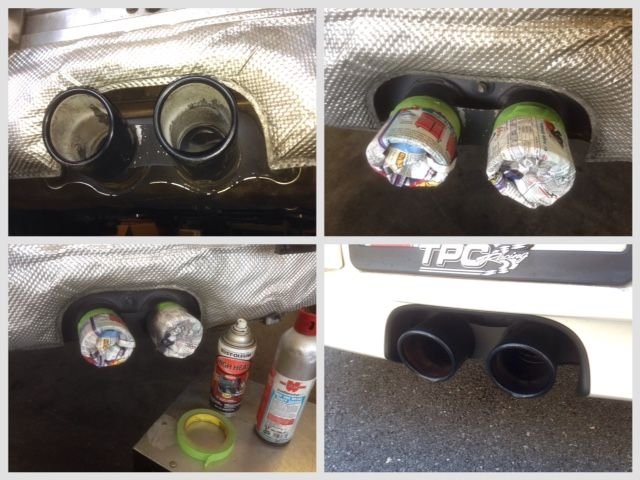
As insignificant as touching up the tailpipes is, to me it just enhances the ownership experience. I feel so fortunate to be able to buy this car(still making payments) and be able to do the work myself.
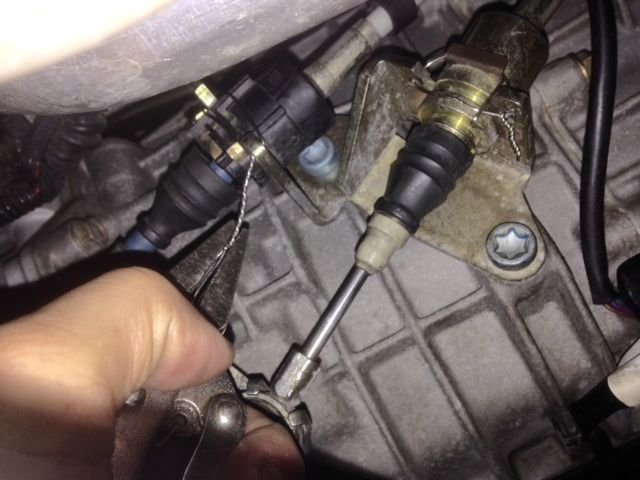
Since I blew my tax return money on new cam actuators and chain tensioners, a new set of cup shift cables aren't in sight for the near future. But I feel like I need to do something about the original cables with 50k miles on them so I safety wires them to the bracket.
Since I blew my tax return money on new cam actuators and chain tensioners, a new set of cup shift cables aren't in sight for the near future. But I feel like I need to do something about the original cables with 50k miles on them so I safety wires them to the bracket.
I've been driving the GT3 to work nearly everyday since I safety wired the shift cable ends. I noticed during rush hour traffic(lots of 2nd/3rd/4th shifts) the shift action at lever feels more precise; more precisely align to the imaginary gate. Actually feels very pleasant to me. I bet the cable ends were moving slightly within the bracket before the safety wire snug them. Just thought to share the observation.
Interesting.
Did you have to drill holes for the safety wire passing though the bracket?
Also did you notice a reduction in the dead play of the shifter lever when in neutral?
I did something similar to the transfer case in a Jeep Wrangler I had in Egypt... If a plastic sleeve failed the cable could pop off the lever coming of the case and you could be stranded with out drive. Not fun when you are 1,500KM from any form of civilization in Egypt/Libya/Sudan.
Custom made a washer and used an R pin to make it physically impossible for it to come off. ....
BTW been meaning so say thank for putting in the the extra time to sharing your knowledge and experiences... Just have not wanted to make a useless post to state just that.
Did you have to drill holes for the safety wire passing though the bracket?
Also did you notice a reduction in the dead play of the shifter lever when in neutral?
Yes. And yes now that you have asked about it. It just makes the car feel "newer", IMO.
Thank you for sharing the Jeep story. We are most creative in desperate time.
Originally Posted by AEsco48
BTW been meaning so say thank for putting in the the extra time to sharing your knowledge and experiences... Just have not wanted to make a useless post to state just that.
Thank you for expressing your thought. Its my pleasure. I enjoy the journey and sharing the experience just as well.
PS- It was nice meeting you at Indianapolis last year.

 03-20-2015, 12:46 PM