When you click on links to various merchants on this site and make a purchase, this can result in this site earning a commission. Affiliate programs and affiliations include, but are not limited to, the eBay Partner Network.
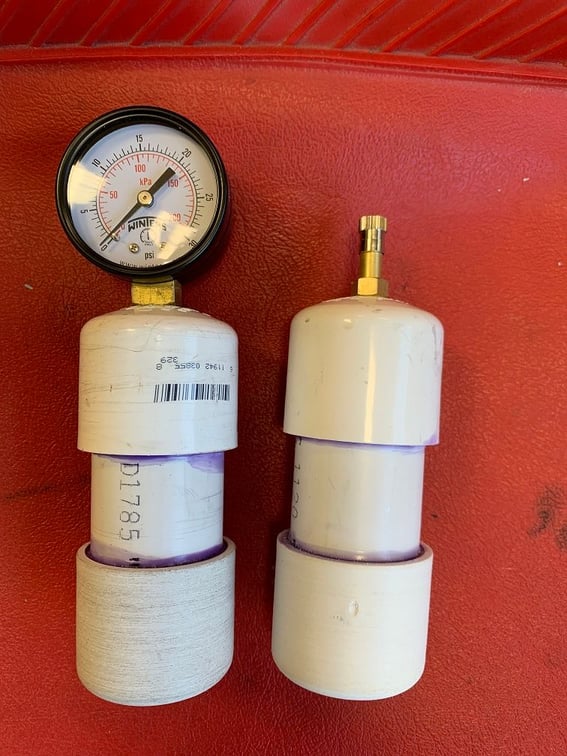
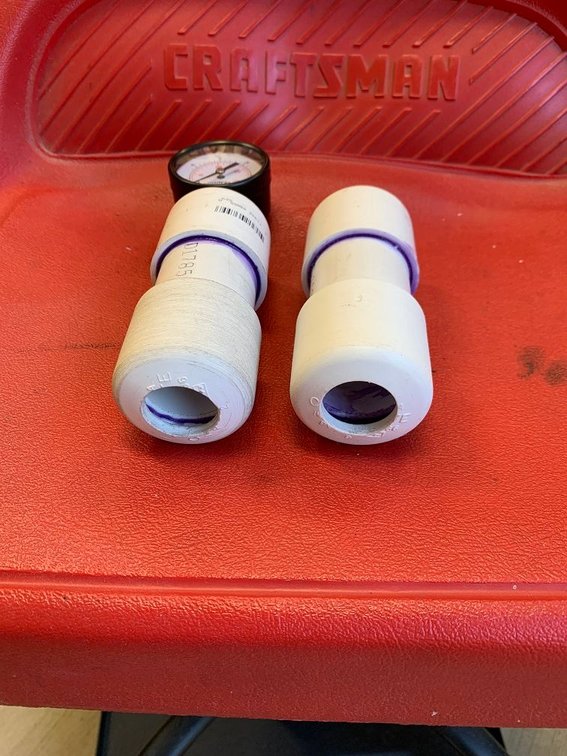
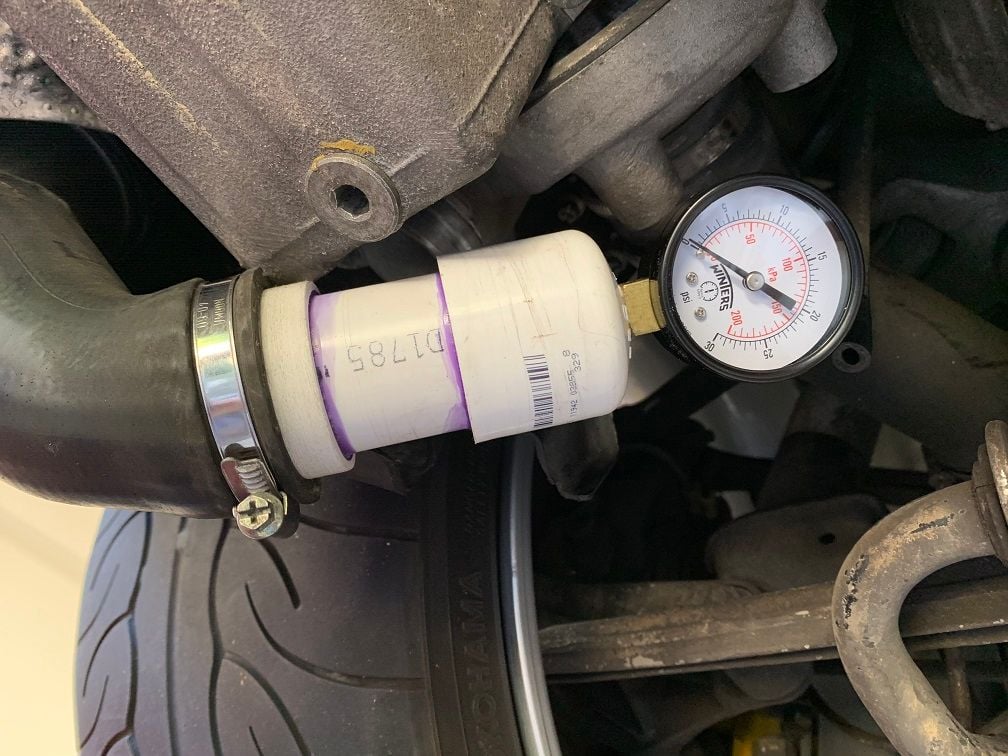
Made up some high-side pressure testers. Read what others had done, but I wanted a tighter fit into the pressure hoses, so I took my dial indicator to the hardware store and found that 1 1/4 PVC end caps have the perfect diameter at 50.5 mm. Turbo outlet is 48 mm. Tank valve, cheap gauge from Amazon, pipe, primer, & glue and another amazingly cheap tool is born. Now I just need my WG actuators to arrive so I can install and do some testing.
I see your turbo drains are in fine and clean order...
So, you disconnect the outflow on the turbos, block one end and put pressure in the other - I take it there should be no leakdown, how long will it hold pressure?
I see your turbo drains are in fine and clean order...
So, you disconnect the outflow on the turbos, block one end and put pressure in the other - I take it there should be no leakdown, how long will it hold pressure?
Actually, I think it will leak down, not sure just how slow it should go.........mostly I will be listening for obvious leakage.......the second I pressurized from the intake I could hear the blown diaphragm in one of the WG actuators. After the WG fix I will be searching out any further leaks......never done this before.
Sunny but a bit chilly drive today, shake down of some new upgrades. Man, I love this car! It is nearly perfectly dialed in and just does everything amazingly well.
I pulled the panels off the bottom to inspect the gubo joint and at 100k it looks perfect. Noticed that the widow weld filling I put in the trans mount about 2 years ago was backing out. Gave it a slight tug and it came out. Perhaps this is because my mount does not have any cracks in it to grip. I will do it again but clean it up real good with a bottle brush next time.
While I was down there I did a boost leak check. Found a real Whistler near the throttle body. Turns out I did not tighten the hose clamp on the Y pipe when I replaced the oil pressure sender, oops. I figured this should make quit a difference now that it is fixed. But I can hardly notice a change. Perhaps because it did not start to leak until it got to 10 Psi it did not effect the initial boost start only full boost. My k24s probably have enough reserve to make up for most of the leak. The old girl is over 100k and going strong, gotta love it. Next project is to start freshening up the suspension. Already did springs and B8 shocks. I think rear lower control arms an toe rods next. Anybody have experience with the vertex auto LCAs with replaceable ball joints?
Actually, I think it will leak down, not sure just how slow it should go.........mostly I will be listening for obvious leakage.......the second I pressurized from the intake I could hear the blown diaphragm in one of the WG actuators. After the WG fix I will be searching out any further leaks......never done this before.
So, when you replace your WGs, and apply pressure, they should open at 14.7psi? And hold say 10psi for a period of time?
I pulled the panels off the bottom to inspect the gubo joint and at 100k it looks perfect. Noticed that the widow weld filling I put in the trans mount about 2 years ago was backing out. Gave it a slight tug and it came out. Perhaps this is because my mount does not have any cracks in it to grip. I will do it again but clean it up real good with a bottle brush next time.
While I was down there I did a boost leak check. Found a real Whistler near the throttle body. Turns out I did not tighten the hose clamp on the Y pipe when I replaced the oil pressure sender, oops. I figured this should make quit a difference now that it is fixed. But I can hardly notice a change. Perhaps because it did not start to leak until it got to 10 Psi it did not effect the initial boost start only full boost. My k24s probably have enough reserve to make up for most of the leak. The old girl is over 100k and going strong, gotta love it. Next project is to start freshening up the suspension. Already did springs and B8 shocks. I think rear lower control arms an toe rods next. Anybody have experience with the vertex auto LCAs with replaceable ball joints?
I have a feeling if you removed your guibo it wouldn't look so good. I only say this because I went through the same process.
So, when you replace your WGs, and apply pressure, they should open at 14.7psi? And hold say 10psi for a period of time?
I need to study the system before chancing an answer, simply because I don't know. At this point my understanding is rudimentary. I believe the factory calls for 4mm of WG arm movement @ 1/2 Bar, so that sounds right........this will be a learning experience, I'll post what happens on the chance it may help someone. But first......time to study the system diagrams. Of course, as many have said before, the car ran fine.........
If they are 1-bar waste gates you want to see the arm start to move at 14psi. BUT, talk to your tuner if you have software (and you should if you are upgrading the waste gates) because different tuners may have different criteria for how they want your waste gates adjusted.
So, when you replace your WGs, and apply pressure, they should open at 14.7psi?
Stock wastegates open at far lighter pressure than 1 Bar when just pressure tested. Mine for example started to open at .42 Bar (6.1 PSI) and were fully open at .52 Bar (7.5 psi), which is pretty much factory spec. This can be adjusted slightly by turning the adjuster rod.
The way our cars make more boost is by using the N75 valve to modulate the pressure that is applied to the wastegate actuator. No voltage applied to N75, full boost pressure applied to the wastegate and it opens well before .7 bar. Voltage applied, and it feeds unboosted intake air to the wastegate, tricking the wastegate to stay closed and keeps building boost. The N75 is modulated very quickly (many times a second) by the ECU, creating the boost requested by the ECU (assuming good wastegates, good hoses, good N75 valve, correct tune in ECU).
My recollection is that tuners really don't need upgraded wastegates until they are requesting in excess of 1.1 or 1.2 Bar. The stock wastegates can be adjusted slightly a well with the adjuster rod to lighly increase the pressure required to crack the wastegates, but are fine for building stage 2 levels of boost.
And hold say 10psi for a period of time?
I'm just guessing here, but i think if you have a 'bad' wastegate diaphragm, isn't going to be some slow leak needing to see if it holds pressure. It will be torn and hold no pressure or the actuator rod might be seized. It will work or it will not.
Here is a crude diagram showing how the N75 feeds two different sources (boosted and unboosted) to the wastegate actuators, modulating the amount of boost actually made.
By the way, wastegate actuator diaghprams and associated N75 plumbing is usually not tested by pressurizing the whole turbo system like you do for normal boost pressure leak testing,, but rather with a small hand-held pressure tester.
Disconnect the hose from the back of the wastegate actuator, connect the pressure tester, pump and note pressure when actuator rod begins to move and when fully open.
You can also disconnect the hose from the output (bottom connector) of the N75 valve, connect the pressure tester, pump and see that *both* rods move and at the same time.

 01-12-2020 | 10:50 PM