When you click on links to various merchants on this site and make a purchase, this can result in this site earning a commission. Affiliate programs and affiliations include, but are not limited to, the eBay Partner Network.
Alright so between this thread and the last one I decided to say screw and attempt this fix. I have some things on order but I went ahead and began disassembly, so far it is way easier than I thought and has taken me about an hour. I am up to the point I need to cut the notch and take the arm off under the dash and then pull out the flap. This is the first project I've personally attempted with my 911 besides wheel spacers and it really is not bad so far. At this point, I would rate it a 3/10 in terms of difficulty. The only tricky part is some of the maneuvering you have to do.
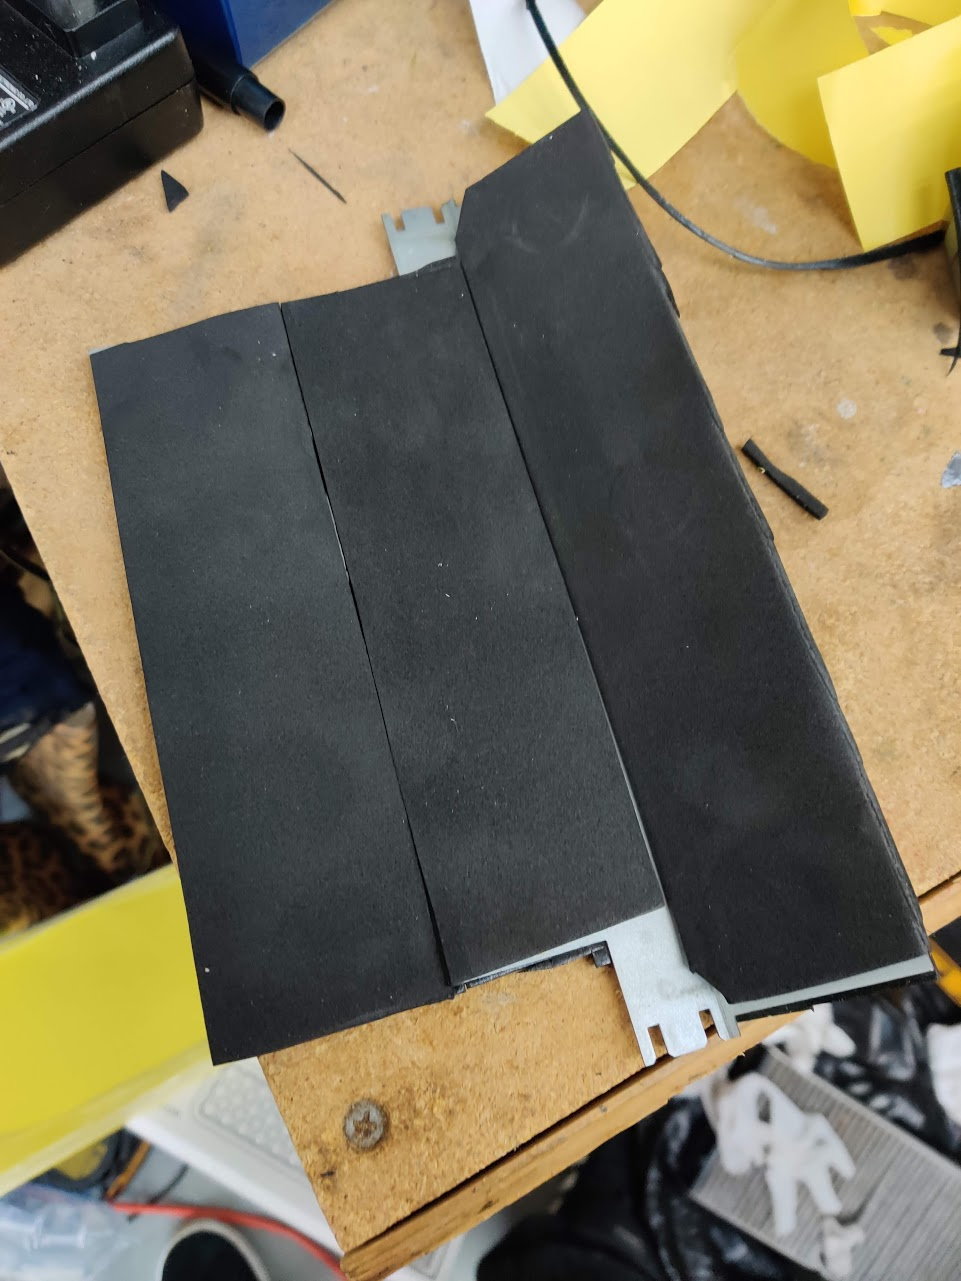
Question, for the foam piece that covers the actual heat radiator, do you put a new seal down? A lot of that stuff got kind of mangled while I was trying to get it off. It's like a sticky putty that has a lot of stretch to it.
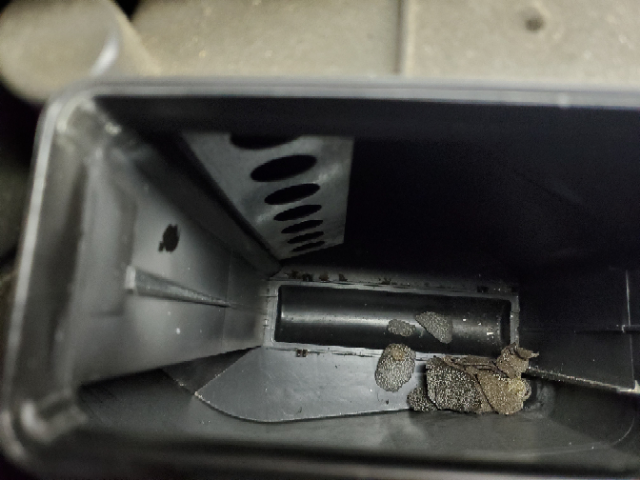
Ok, so once you fix the flap all you have to do is clean the area all around where the heater core came out of... GEEEEEEZZZZZZZ it looks like it's never been cleaned for the life of the car
Is there any particular reason why you don't use aluminum tape (meant for ductwork) instead of foam?
Are you suggesting this is an easier, more efficient, fix/repair than going in through the center dash?
Thank you for the post!
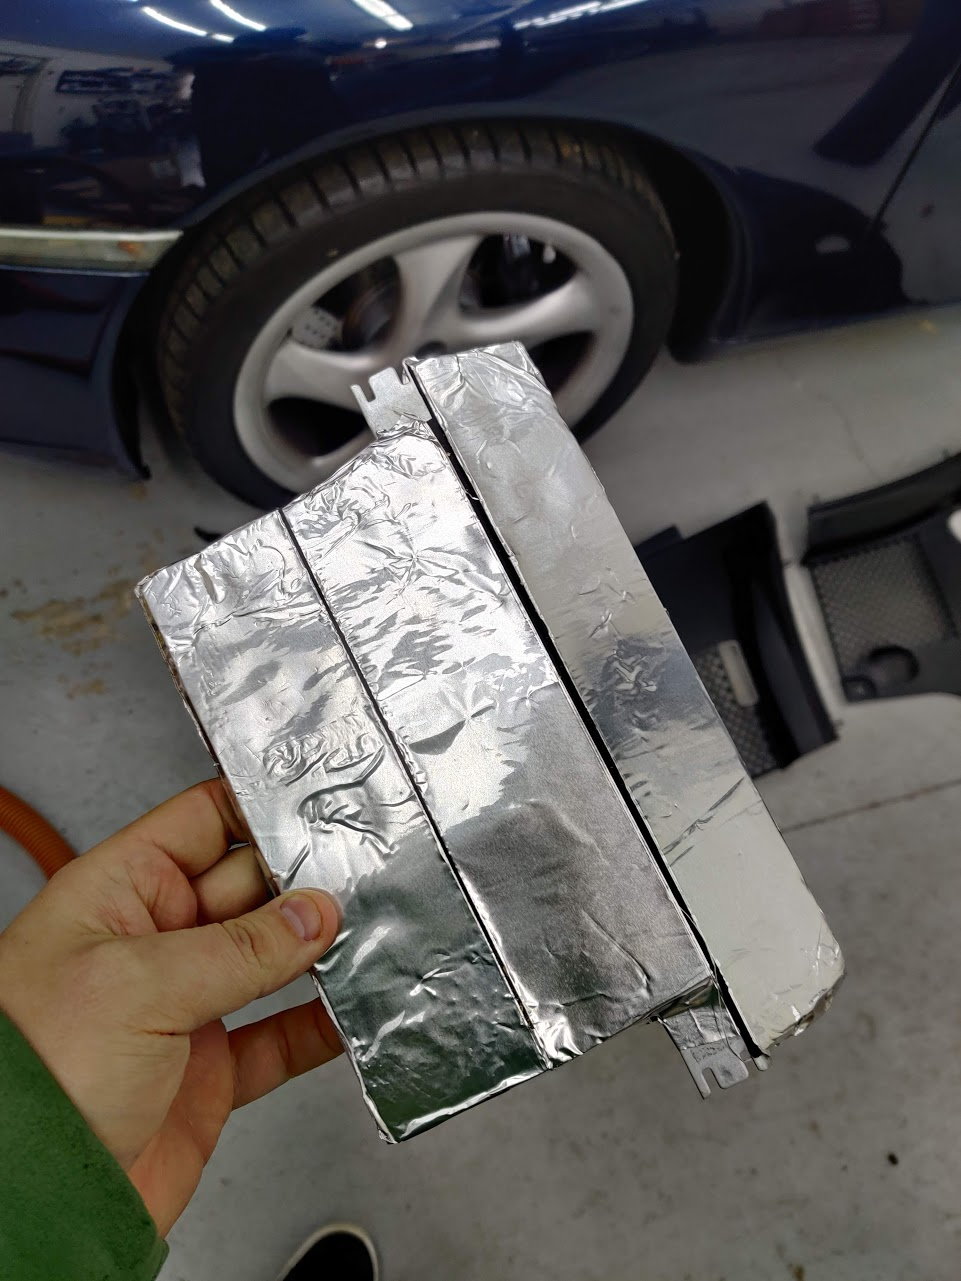
When I fixed mine, I was able to apply HVAC tape to the flapper without removing it from the car. My foam was 100% GONE. Even though I used aluminum tape, my heater began working fantastic right away.
If you have some foam left, you are better off removing the flapper, cleaning it and using foam .. only because it is more 'factory' that way.
When I fixed mine, I was able to apply HVAC tape to the flapper without removing it from the car. My foam was 100% GONE. Even though I used aluminum tape, my heater began working fantastic right away.
I used aluminum HVAC tape also.
Unfortunately I didn't notice as much an improvement in heating as I thought I would...
Just finished up and I now have scolding hot heat again. Reassembly was much harder for me personally. First things first I got the rad back in the box and bolted down and put the rubber cover on before I second-guessed myself on the position of the flap. Had to disassemble and I am glad I did because I had the flap in backward, make sure the point where the smaller and longer part of the flap meets face towards the front of the car. After I got it all bolted up I took it for a drive to get it up to temp and of course my world came crashing down when I had no heat. I got home and had my wife play with the buttons and realized I did not have the arm under the dash oriented the correct way. I popped the arm off and turned the flap by hand and immediately had heat so I knew it was the arm. It is hard to orient yourself down there but it was actually easier with the car on and heat on full blast because then you can pop the arm back on and you know its in the right position.
I have lots of foam and foil left if anyone wants to tackle this just pay shipping and I can send it out provided its less than the cost you could get it. Thanks to the OP for the guide and for answering questions on the fix.
This is an excellent thread. Thank you so much for posting AMCPILOT. I've book marked all the posts I could find on fixing the "blowing foam syndrome" but yours has the best photos and documentation I've seen. Its been on my to-do list for a few months now. One question, since you've done this a number of times now and you've gotten past the learning curve, how long does it take you to do this repair?
A great write-up and good timing as my upper vents are now only blowing cold air. And foam. AMCPILOT: is there a way to remove the vents to vacuum out the chunks of foam, or can you get to them from the heater core area?
Thank you AMCPILOT. Just got back from testing mine, 25F outside and toasty warm inside.
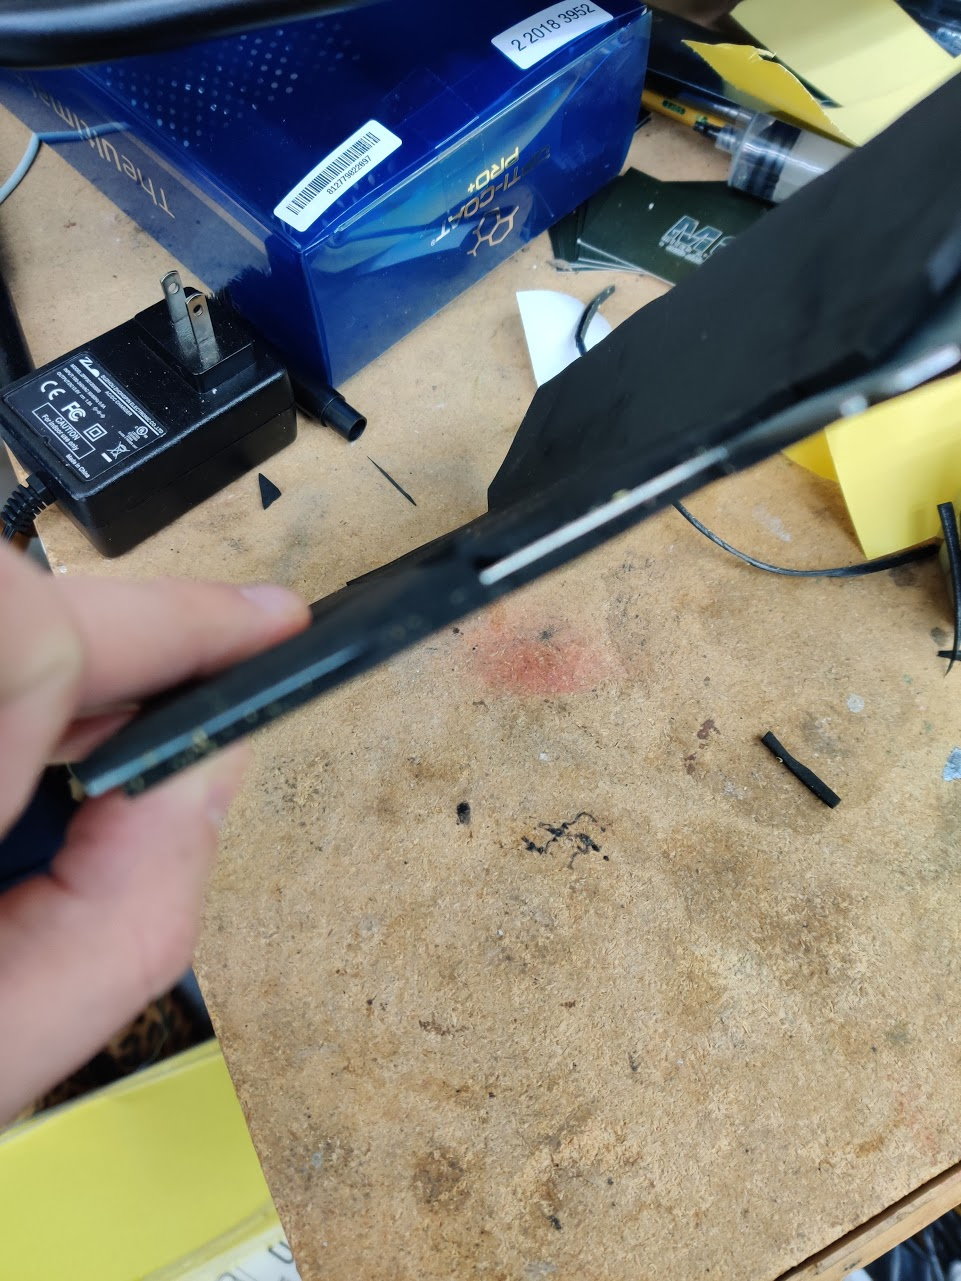
Definitely couldn't have done it without removing the flap. Could have gotten the small side, but not the whole thing.
Took advantage of the opportunity to clean the panels and under the covers so dporto wouldn't pick on me .
As a bonus, found that the PO didn't bother with a battery hold down, so I added one of those.
One suggestion for those who are doing this -- if you have power seats, move the passenger seat back before taking out the battery!
I vacuum as much as possible from the heater core area, then use a vacuum and long pick to pull out any in the vents (don’t have to disassemble anything), and also vacuum the defrost vents.
Wonder why Porsche used foam to cover the little holes instead of just making it a solid plastic piece with a foam surround?
I need to do this eventually as mine has been blowing chunks for years with no signs of stopping.
Porsche isn't the only one, VW, Mercedes, BMW all do it. Supposedly it allows a "little" bit of air to flow, thus the "blending", and it's supposed to be a little quieter.
I'm long time lurker, infrequent poster.
However, I completed this flap repair a couple of months ago, and despite finding helpful threads here and on other forums, I could not find any pictures of what needs done on the bottom interior. Lots of details of the top, like AMCPILOTs great pictures and instructions, but I was really lost trying to figure out what to do on the bottom. So, here are my pictures. I hope this helps someone.
EDIT: There are a few other pictures, including one of the bottom area here: https://www.renntech.org/topic/47275...-out-of-vents/
EDIT: I have a 2004 C4S. Some people have posted that the clips could not be removed on their C4S or otherwise wide-body car. I don't know about theirs, but mine looked as posted here, and by AMCPILOT, and I finally got everything fixed and back together just fine.
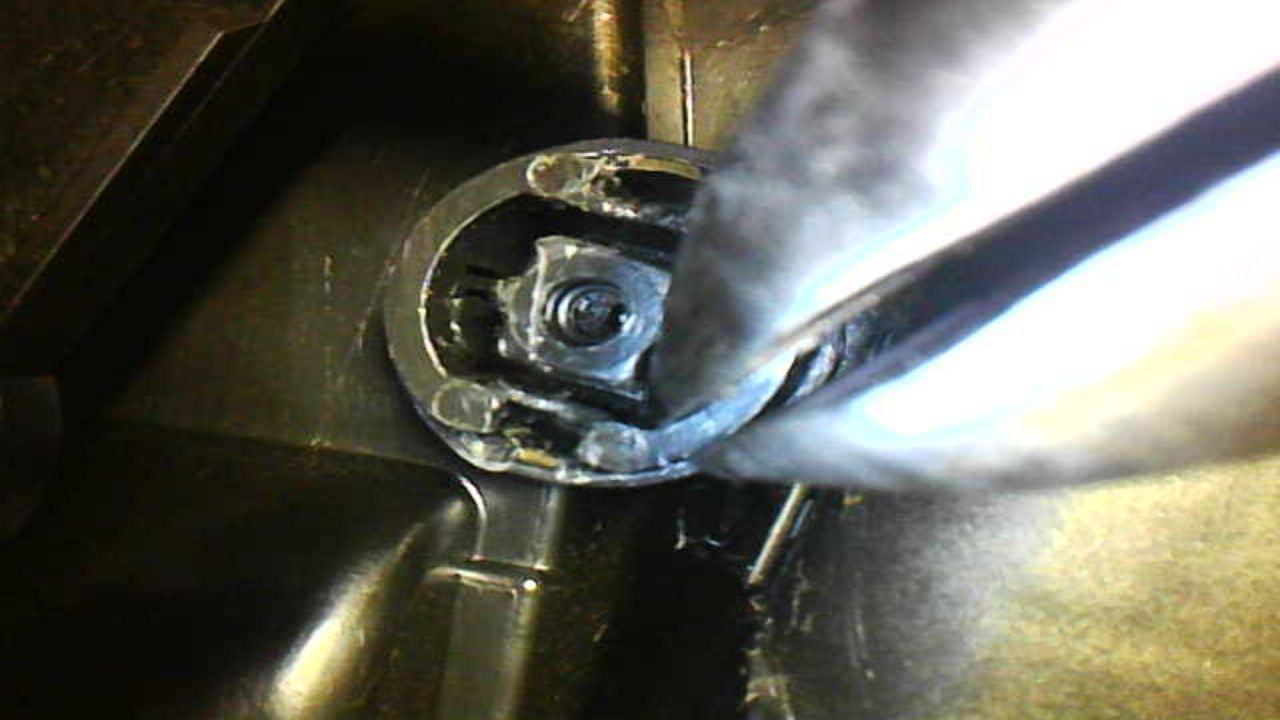
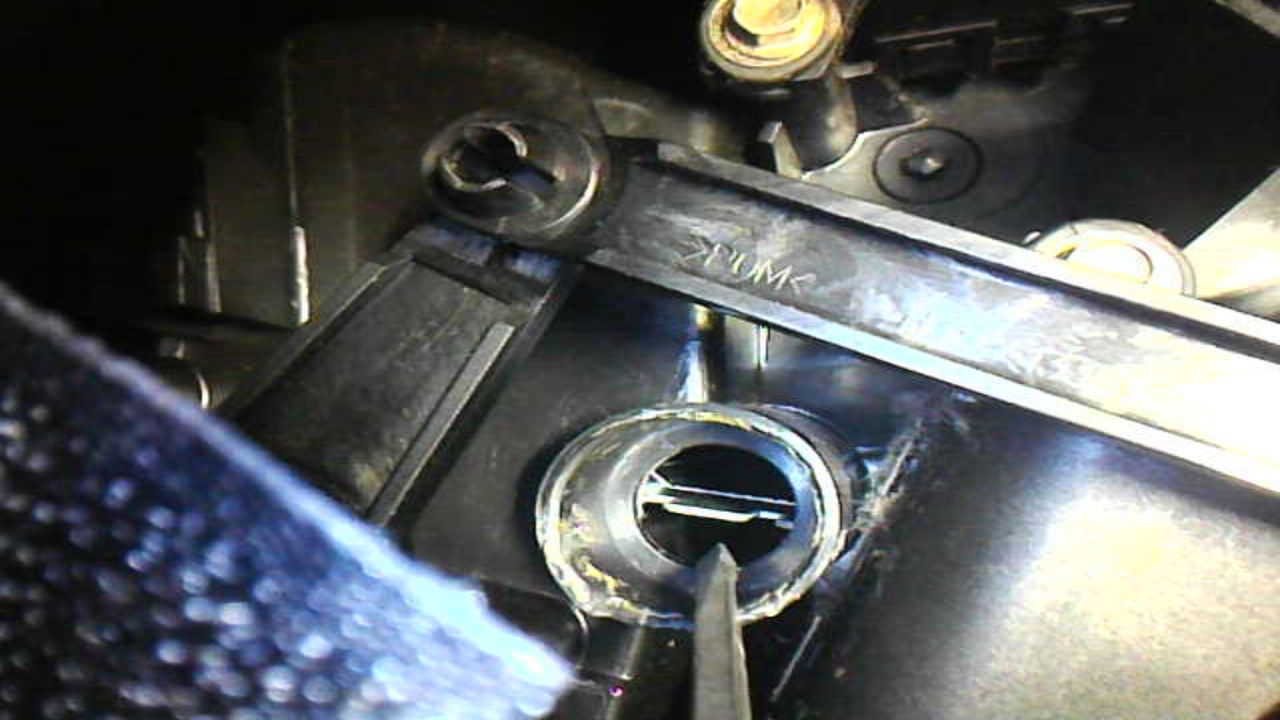
Under the dash. Remove the small screw on the end of the lever arm. Screw removed and arm moved aside. From my boroscope camera (it's that tight down there). I used some long pliers to grab the plastic clip. It was really hard to pull out, since it's clipped onto the flap above. I also used a small screw driver to pry gently. This was the hardest part, and I almost gave up, thinking that I would break something. Success! (bottom of flap is just visible in the hole) Here it is. When putting the flap back, I had to use a small screwdriver to get the flap aligned perfectly so that it clips back into the plastic clip. Once installed, twisting the clip down here should perfectly twist the flap. If there is any slop in the flap rotation, then the clip didn't clip back onto the flap, and is just pushing it around.
Last edited by jdbornem; 03-01-2020 at 08:47 PM.
Reason: added link
 02-25-2020, 07:16 PM


 Just think of how good you'll feel knowing everything is spic and span under the plastics...


 .
.