When you click on links to various merchants on this site and make a purchase, this can result in this site earning a commission. Affiliate programs and affiliations include, but are not limited to, the eBay Partner Network.
3M 2080 G13 GLOSS HOT ROD RED 3in x 5in (SAMPLE SIZE) Car Wrap Vinyl Film
$1.99 on Amazon
I cut a strip along the 5" edge 5/16" wide.
The color side of the film comes with a very thin clear coating that you need to remove before installation. The adhesive on the backside of the tape will not adhere to the clear film when you wrap the tape over itself.
Lastly I used a very thin plastic trim tool to tuck the edges in around and into the circular grooves on the steering wheel that you are covering with this tape.
.
Very cool�yours looks great! I tried it with the same tape (albeit in yellow) but could not make it look as good as yours. Mine definitely looked like a piece of tape I wrapped around the wheel and just didn�t satisfy.
I'll see, in no particular order, if I can answer everyone's questions:
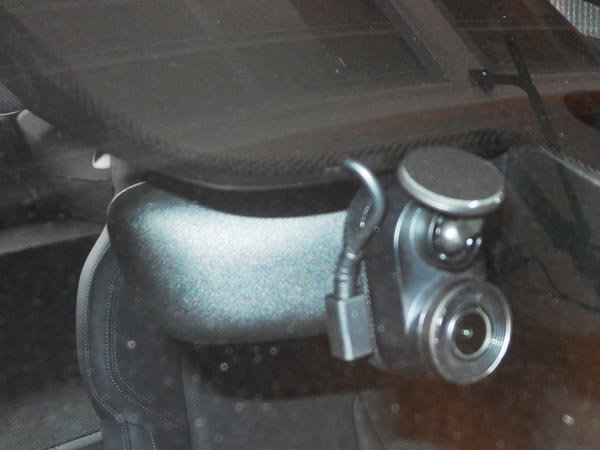
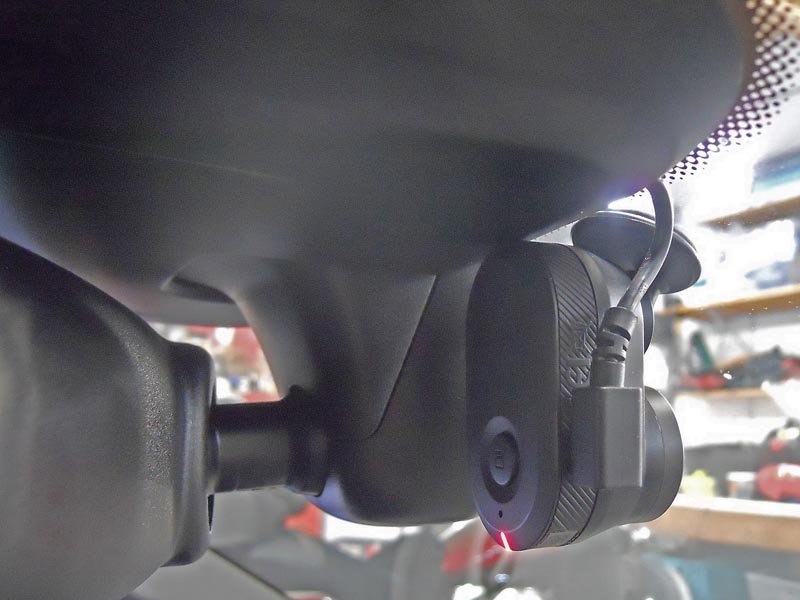
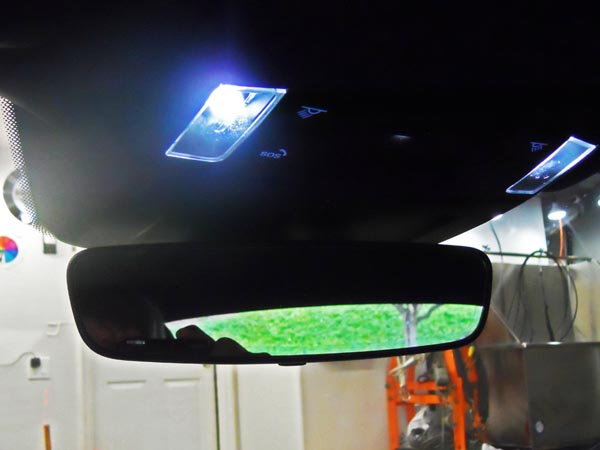
BigWorm is correct. The Camera is very small. So small that I can't see any of it when sitting in the Driver�s Seat as the Mirror hides it completely. Even rom the Passenger Seat you'd be hard pressed to see it without leaning way forward and looking up and to your left. From outside the car it blends in with the Rear View Mirror and the other factory window masking and view ports for other electronics that the car uses.
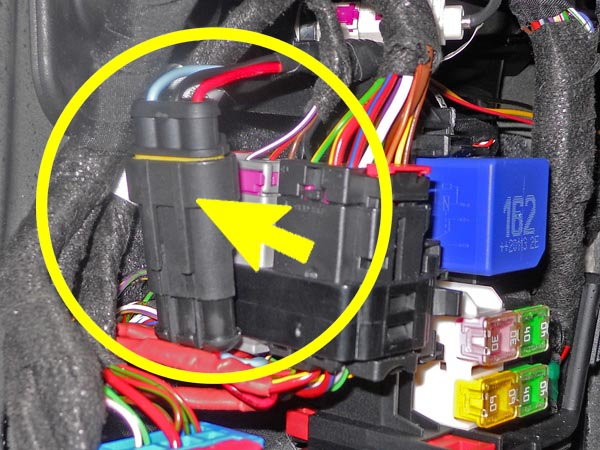
I used the Garmin Parking Mode Cable (P/N: 010-12530-03) and hard wired it into the wiring harness that is behind the Driver's Side Fuse Box Carpet Cover. I would NOT recommend this for the typical DIY. Probably better for most folks to simply tap into the Fuse Terminals as I've seen others do. I use Crimp Connectors, Solder and Shrink Tube on my Splices. I also use a Weather Pack connector (circled in one of the pictures) for the ease and convenience of any future service that might be required.
This Camera can be set in the Parking Mode to trigger based on two different things. First, any Motion within the cameras field of view and Second, Any significant Impact. This choice of options is only available if you use the Garmin Parking Mode Cable and is only shown on the phone app when the Camera is plugged into the Garmin Parking Mode Cable. I found this to be rather important. As delivered, the Camera defaults to both triggers �On�. The result is that any time I, or one of our dogs walked into the garage or anything of any sort (like a bug) moved in the Camera's field of view, it captured this. The result was a lot (and I do mean a LOT) of useless video was captured, that IMHO served no purpose other than to fill my 128 GB Card with garbage. I was able to select �Impact Only� and shut off the �Motion Sensing� function.
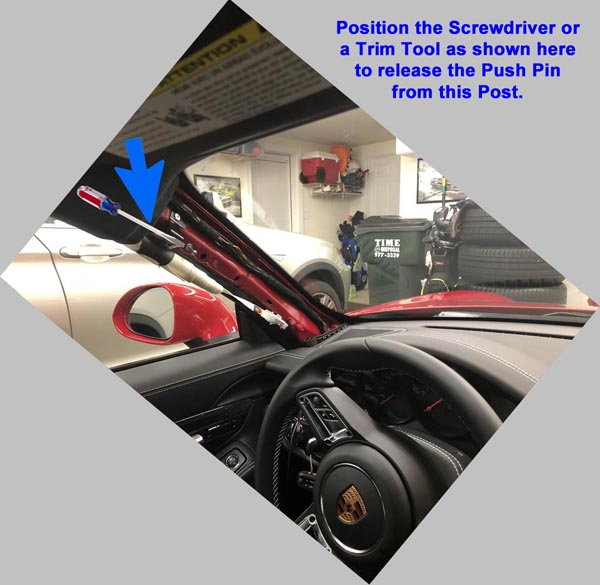
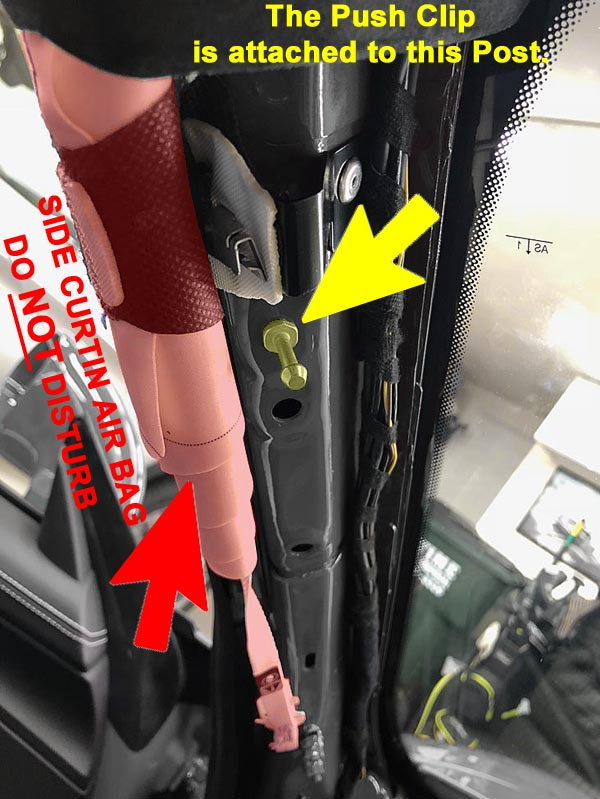
If/when you run the power cable to the Camera, when you route it behind the "A" Pillar be certain to do so on the Windshield side of the "A" Pillar Trim. The Side Curtin Air Bag is on the Door side of the "A" Pillar Trim. Routing the Camera Power Cable on the Door Side of the "A" Pillar Trim might well interfere with the deployment of this Air Bag. This would NOT be a good thing. I took my "A" Pillar Trim Piece off to install my Power Cable on the Driver�s Side. I�ve attached some pictures (some of which I stole from elsewhere on this forum) in an attempt to show how to do this. The release of one of the two clips (the upper clip) that hold this �A" Pillar Trim in place isn't difficult . . . but you have to know where it is and how to get to it without damaging the trim itself. I also used several small zip ties to secure the Power Cable to the existing Wiring Harness that runs along the Window Side of the �A� Pillar.
So why do I have this? First, I have similar cameras on my motorcycles. A video record is quite useful when attempting to resolve the confusion that may ensue following any impact. Particularly one that might occur in a Parking Lot when you�re not there. Second, because I can and saving video footage is an excellent way to annoy my friends with such nonsense, from any (of my amazing) exploits I might want to share.
First, thanks so much for taking the time for posting these instructions. I want to do this, but worried that I�ll mess something up. I need to noodle on it.
Wouldn�t it be great if Porsche offered this as an option, or offered a mirror with a power connection? (And Homelink).
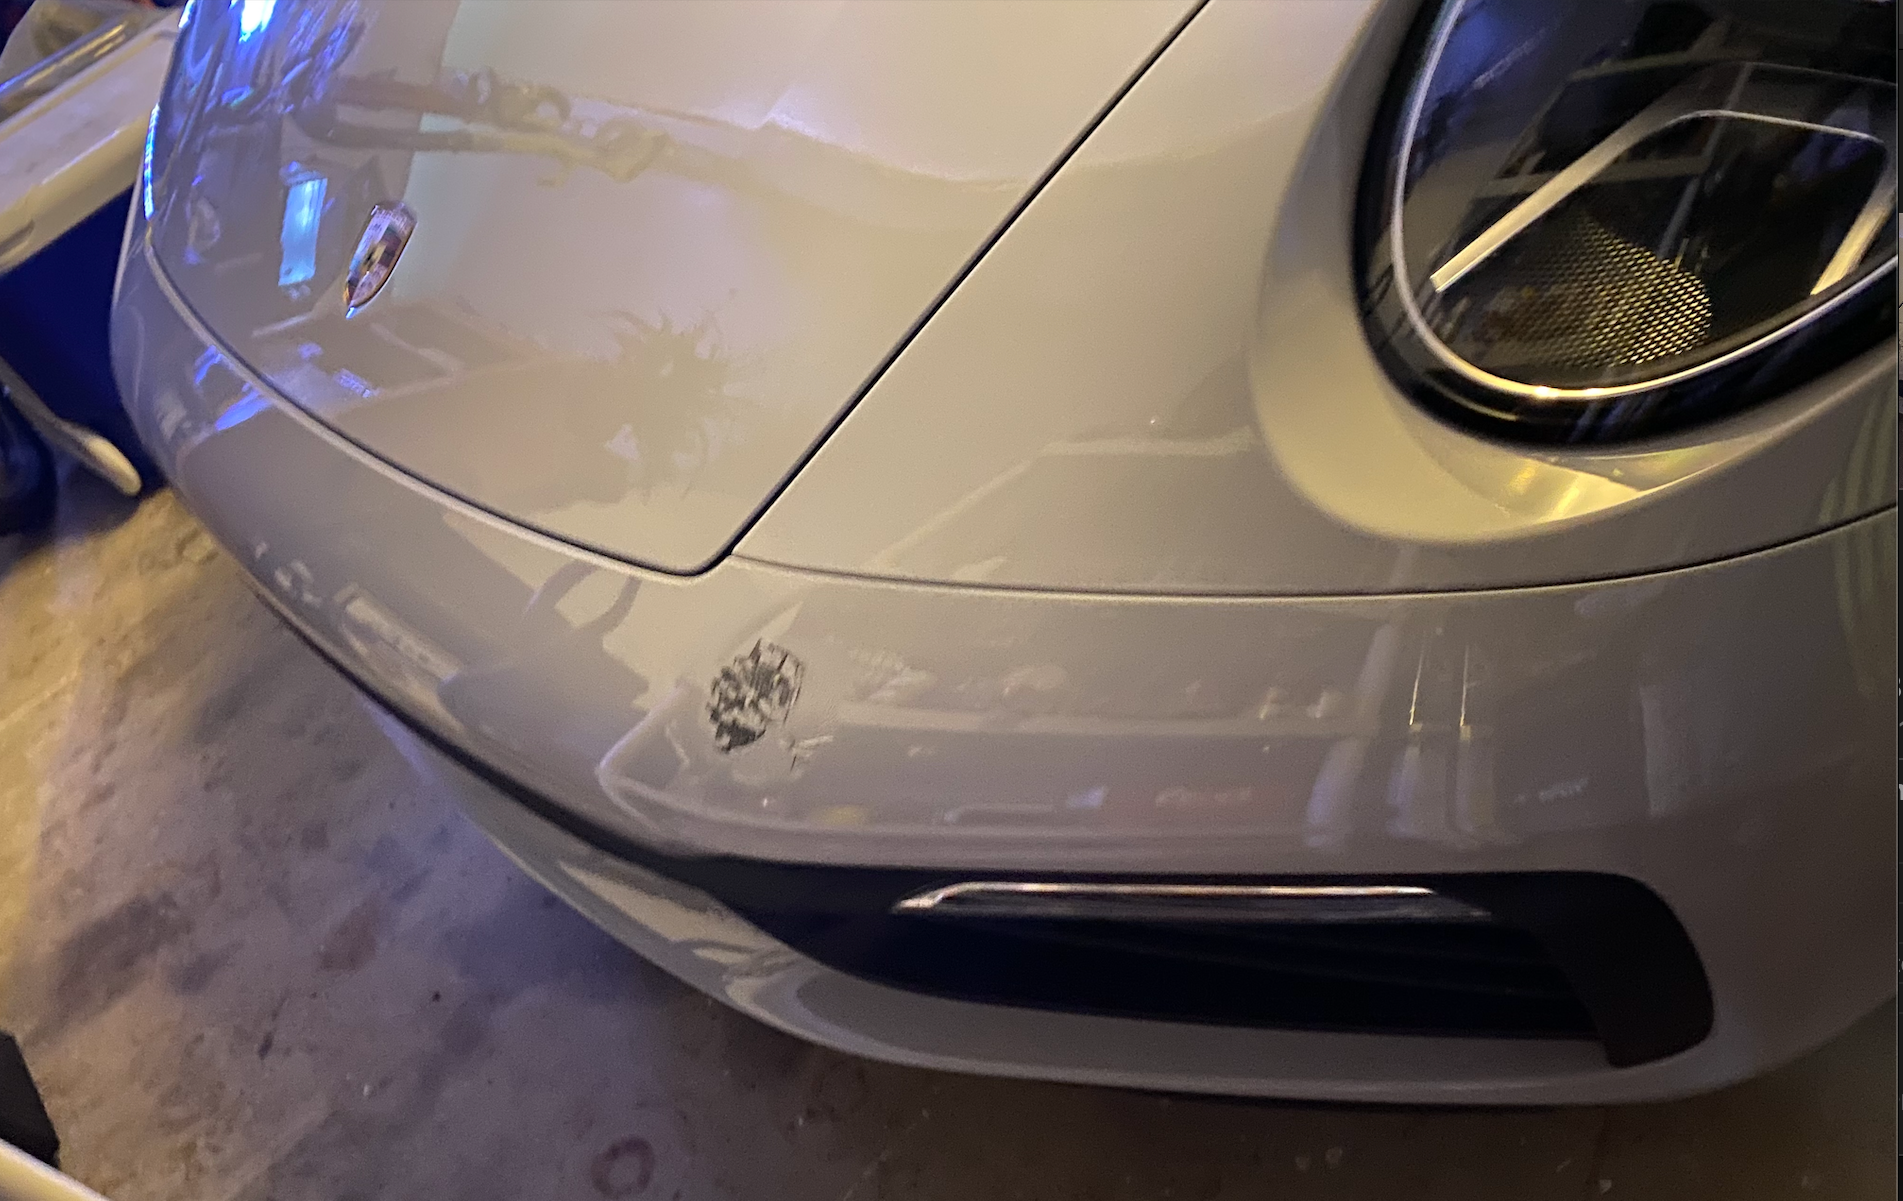
Well I bought a set of dashcams to add to my car and my daily driver over the holidays. Was able to get the daily driver done and was to call the shop back tomorrow to set up a date for the 992. Too late. Parking lot encounter with someone today on my front bumper...hit and run...god how I hate that shyt. No note..NO nothing just a nice scuff that went all the way thru both my clear coat and paint down to the bumper! WTF!!! Thinking SUV or raised/lifted pickup or something as the front is very low. Also was very surprised how thin the paint layer on the bumper was BTW! Not sure if PPL would have helped but welcome to ideas from the group .but since I hadn't had the dashcam install appt for the 992 [dealer just gave me their recs last weekend on a shop to use; was happily same on that did my daily driver]. Unfortunately the parking mode on my uninstalled Thinkware's Q600Pro 2 channel dash which would have at least given me photo/video evidence of the accomplice was useless in the box!
Am pissed but glad it wasn't worse and blessed to have the car still and ability to repair it easily....body shop appt on Monday at Porsche Approved Center...respray in the future I believe give the size though. Get a Dashcam AND install it guys/gals! Parking lot scuff - 8 Jan 2021
Been meaning to respond that this makes my stomach hurt for you.I had a much-less-significant experience on my second day. Turn left-hand turn lanes, I was in the “outside” (or rightmost) lane. The person in the SUV next to me touched my rear fender with the tires, scuffing the PPF and leaving black marks on the paint. I think it will buff out, but I was sick. And they didn’t stop. I followed for a while, and then pulled over to see if they had actually touched (I heard it more than felt it) but then couldn’t find them again.
Been meaning to respond that this makes my stomach hurt for you.I had a much-less-significant experience on my second day. Turn left-hand turn lanes, I was in the �outside� (or rightmost) lane. The person in the SUV next to me touched my rear fender with the tires, scuffing the PPF and leaving black marks on the paint. I think it will buff out, but I was sick. And they didn�t stop. I followed for a while, and then pulled over to see if they had actually touched (I heard it more than felt it) but then couldn�t find them again.
Yeah hopefully a detail shop can fix it. If its not thru the PPF then you should be good but this won't "buff out" as they say. Its thru the clear coat and all layers of plain all the way down to the bumper. About the size of a small fist so they'll need to re-spray the front bumper. Routine fix I know for paint chips and minor bumper scrapes but not one you want to or expect to do on a car that's only 45 days old! . Have body shop appt for a quote tomorrow and Dashcam installation appt on Tue so at least I'd have footage for insurance if needed for something more significant and also law enforcement if ever needed in the future. But yeah feel your pain also....hope your scuff repair goes well.
The only difficulty, if you want to call it that, is it's pretty tight back there once you roll the carpet back and it kinda feels like you're working upside down and backwards so you just have to look at the connectors on the dongle you're installing to see what to disconnect and pull out the little red tab on the existing unit so it unlocks and comes out. It's a little hard to see exactly what you're doing but it's fairly intuitive. Slow and steady it took me 30 minutes and that includes a few tries to open the top more so I could maybe get a better angle in to see what I was doing (I couldn't).
I'm waiting for the Blendmount rearview adaptors to come off backorder so I can install a Uniden r7 radar detector without having to run the line to the fuse box, which I'll likely do with my new Garmin mini dashcam that I got in the mail today, which is something I've never done before but these boards are giving me a lot of confidence to try.
I've been thinking about order this for my cab too. Others said there were some glitches with the windows doing weird things while using this mod and not all functions being available. What has been your experience with this?
He had to tap into the window behavior to fix a spoiler deploy error for some reason. Originally the car would complain that the spoiler wasn�t deploying if you used the one-touch functionality. That has since been resolved, but now the windows:
* Slightly roll up and back down when you open the top (assuming you have the �keep down� option on)
* Rear windows sometimes jitter while closing, and I�ve experienced one case where they only closed 90% after closing the top - but again, only once.
So I’m gathering my confidence to do the wiring to the passenger side fuse box for my new Garmin mini using a regular fuse tap, not this advanced install. I have all the materials to do it. A few things I’m concerned about:
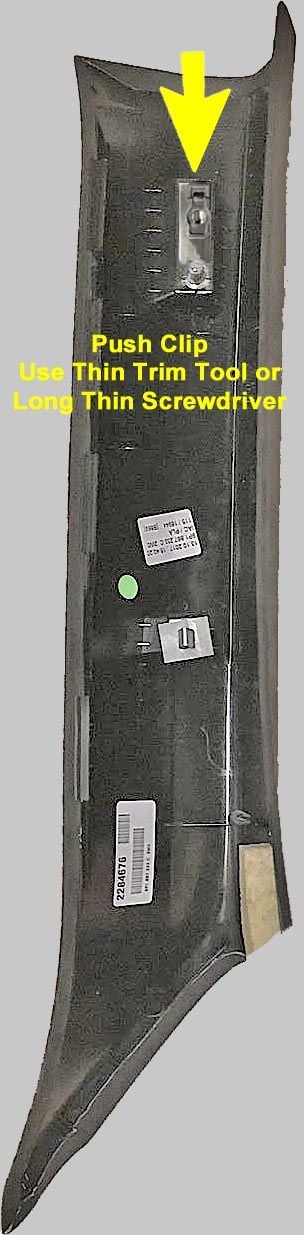
1) removal of the A pillar trim cover. Do I start at the top with a thin trim tool and then slide the long screwdriver in to get to the release button? Is there Velcro at the bottom of that trim or are there other clips that hold it on? Can I break it if I pull too hard or will it just not come off if I don’t release it properly? How hard do you have to pull if you release it? Does it slide off easily if you release it properly?
2) Once that A pillar trim is off do I have to remove any other trim to run the wire down or can I get to the fuse box without removing some other trim? I’m going to install the parking adapter with the Garmin mini so that little adapter can’t be shoved in behind trim, no? It has to go behind the carpet - I was planning to Velcro it to the frame.
3) the carpeted trim piece around the fuse box: I read instructions from previous models and that seems to be a tricky bit of trim to remove. A lot of people break a clip closer to the seat when pulling it off. Do you have any pictures of how that piece comes off or clips in on a 992?
Thanks in advance for any/all help. I’d contribute to a charity of anyone’s choice if they put up a video of the steps above to remove the trim to get to the fuse box on a 992. I can’t find anything recent on YouTube. Not 992s, anyway.
Last question unrelated to install: does anyone have any overheating issues with the Garmin mini using parking mode. Some guy on YouTube claims his gets really hot after it turns on again to regular mode after using parking mode.
So I’m gathering my confidence to do the wiring to the passenger side fuse box for my new Garmin mini using a regular fuse tap, not this advanced install. I have all the materials to do it. A few things I’m concerned about:
So I’m gathering my confidence to do the wiring to the passenger side fuse box for my new Garmin mini using a regular fuse tap, not this advanced install. I have all the materials to do it. A few things I’m concerned about:
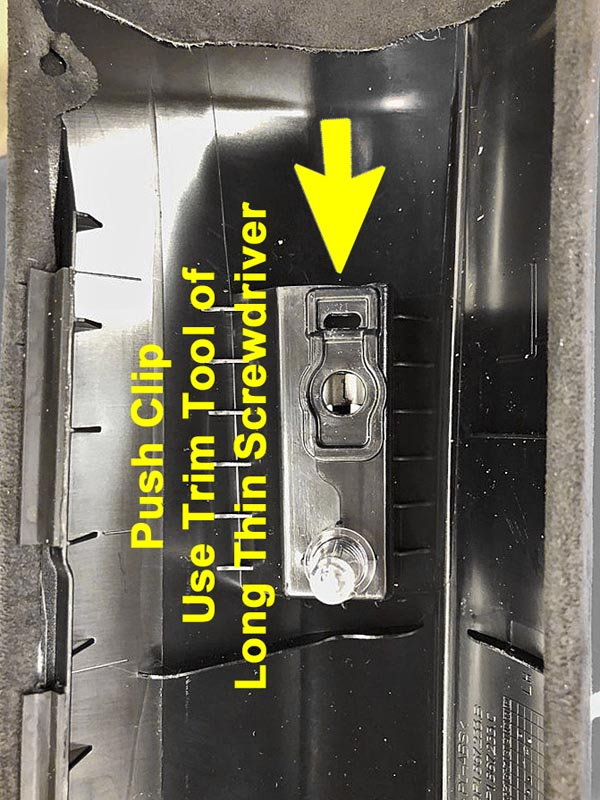
Q1) Removal of the A pillar trim cover. Do I start at the top with a thin trim tool and then slide the long screwdriver in to get to the release button?
A1.) Yes and Yes.
Q2.)Is there Velcro at the bottom of that trim or are there other clips that hold it on?
A2.) No Velcro and Yes there is one other Spring-tension Clip.
Q3.) Can I break it if I pull too hard or will it just not come off if I don’t release it properly?
A3.) Yes, you probably could break it.
Q4.) How hard do you have to pull if you release it? Does it slide off easily if you release it properly?
A4.) Once the Release has been pushed on the A Pillar Trim, it comes out quite easily. Pull the Top out so that the A Pillar Trim Cover pivots at the bottom where it is slightly tucked behind the Dashboard. When you feel the bottom Spring-tension Clip release, pull the A Pillar Trim Cover up.
Q5.) Once that A Pillar Trim is off do I have to remove any other trim to run the wire down or can I get to the fuse box without removing some other trim? I’m going to install the parking adapter with the Garmin mini so that little adapter can’t be shoved in behind trim, no? It has to go behind the carpet - I was planning to Velcro it to the frame.
A5.) You can feed the Wire from the area just above the Fuse Box to the bottom of the A Pillar without moving anything.
Q6) The carpeted trim piece around the fuse box: I read instructions from previous models and that seems to be a tricky bit of trim to remove. A lot of people break a clip closer to the seat when pulling it off. Do you have any pictures of how that piece comes off or clips in on a 992?
A6.) Yes it is, they probably do and no I'm sorry I do not. I believe I posted elsewhere on this forum with pictures of how to do this. There are two other Trim pieces that you need to remove before trying to remove and replace the Carpeted Fuse Box Cover. Otherwise it's probably pretty close to impossible NOT to break a Clip &/or the Guide Pin on the Carpeted Fuse Box Cover. I've attached two pictures that show which Trim Panels have to be removed and replaced in the order in which you need to remove and replace them.
Q7.) Last question unrelated to install: does anyone have any overheating issues with the Garmin mini using parking mode. Some guy on YouTube claims his gets really hot after it turns on again to regular mode after using parking mode.
A7.) Yes it does get fairly warm. Not sure I’d call it hot. It’s never been so hot it is a challenge to handle it. Just warmer than one would expect.
Removal Sequence
.
Replacement Sequence.
Last edited by Bluehighways; 01-19-2021 at 01:26 AM.
Great job on the DIY dash cams - I love the idea but sometimes I think I don�t want to be recorded. Well , at least have my speedo in frame. Maybe those posts should be moved to a 992 technical post so we can alway refer back to them. if anyone is able to - moderators ? Thanks and nice work !

 01-09-2021, 11:44 AM