
Aussie 964C2 Maintenance Diary (pic heavy!)
 05-17-2013, 02:17 AM
#496
Racer
Join Date: Sep 2006
Location: Auckland NZ & Newcastle AU
Posts: 437
Likes: 0
Received 1 Like
on
1 Post
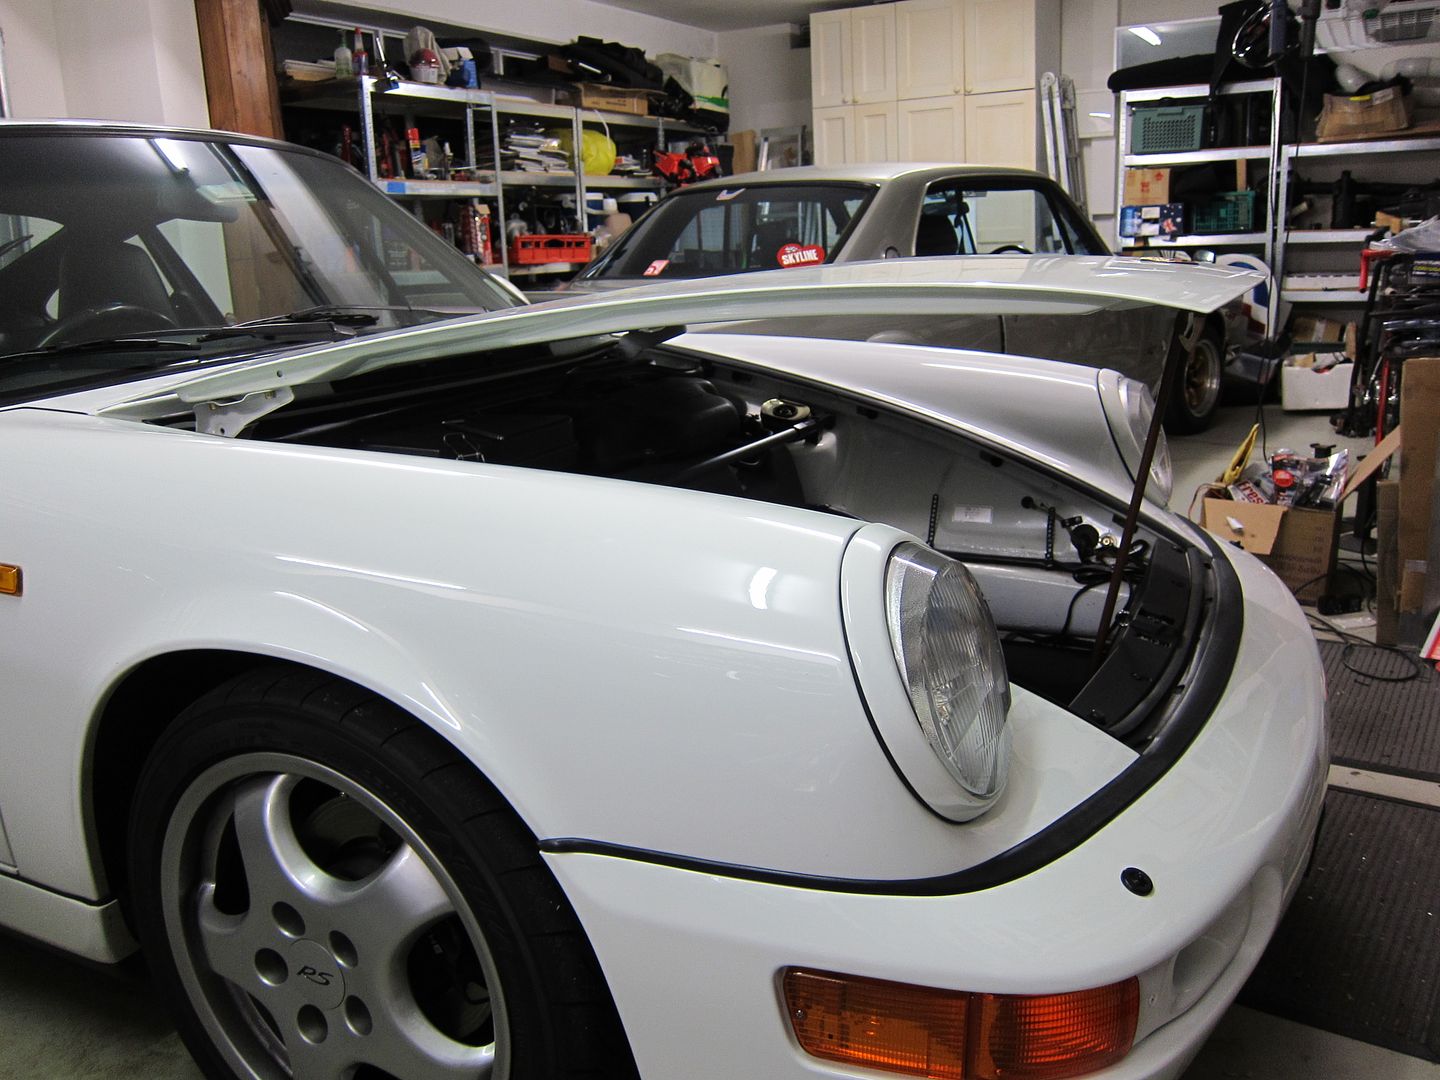
Fantastic Kev, love the functional look for the frunk, and very jealous of your aluminium bonnet.
Have you bumped the insurance value of the car up with all your great work on it?
Have you bumped the insurance value of the car up with all your great work on it?
 05-18-2013, 04:54 AM
#497
Burning Brakes
Thread Starter

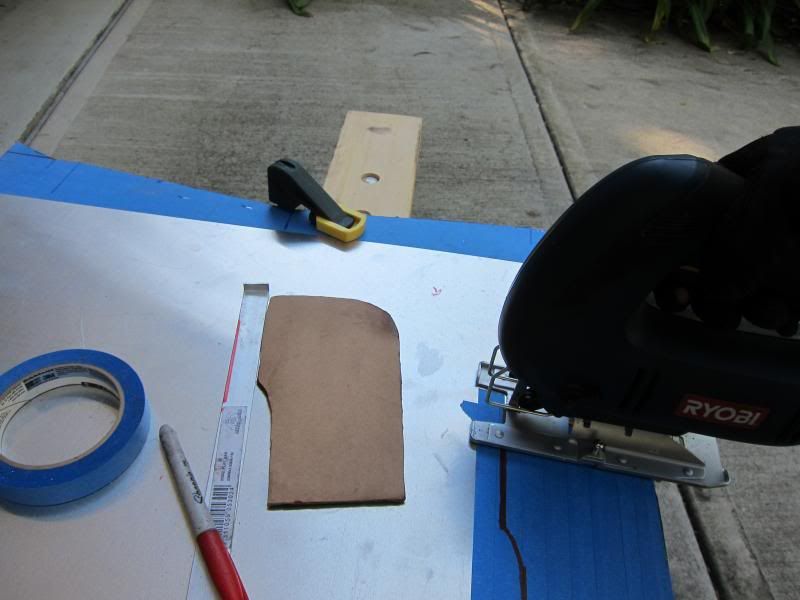
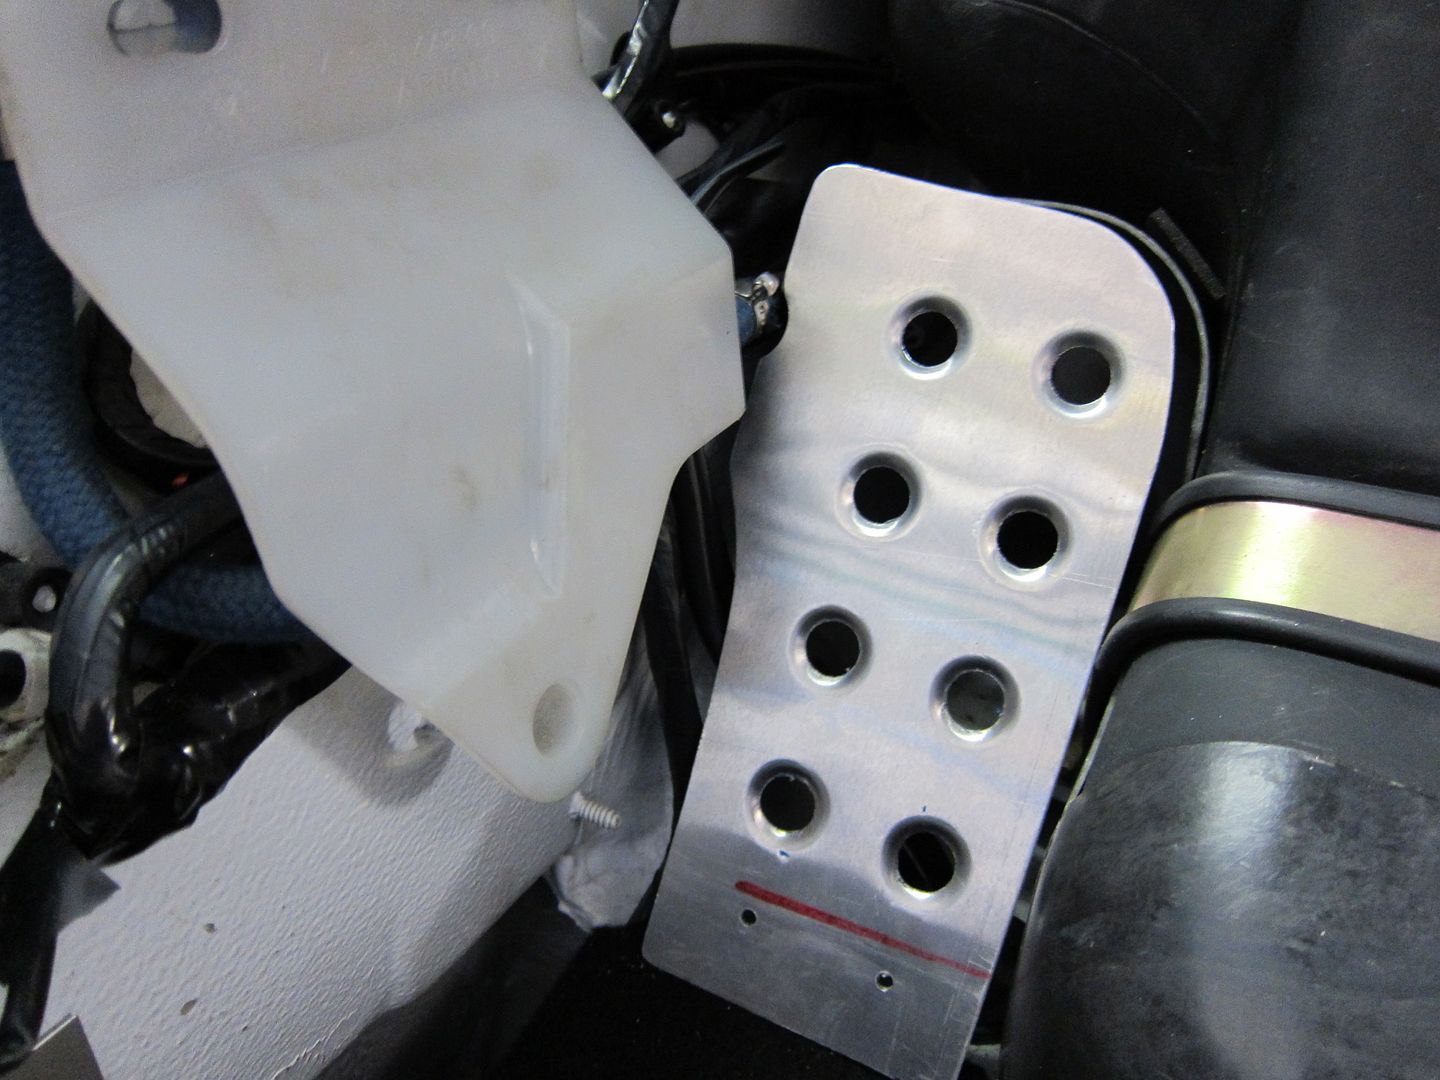
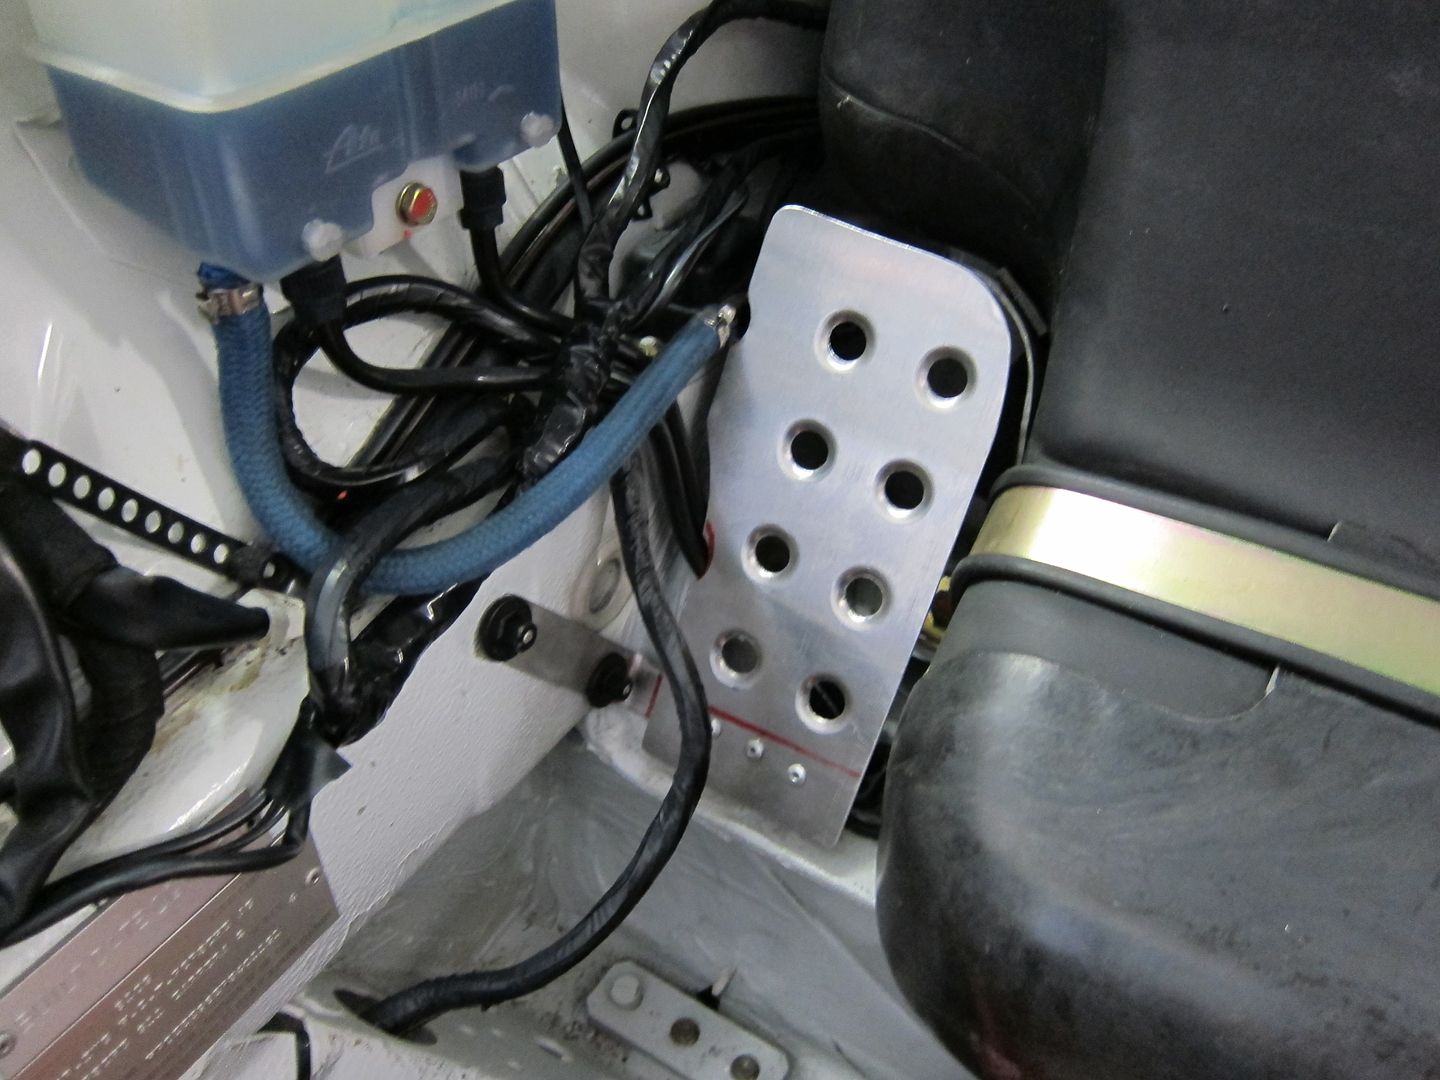
This afternoon, I figured I'd have a go at doing something about that gaping hole next to the fuel tank. First step is making a cardboard template, and then using a jigsaw to cut the shape out of 1.5mm aluminium. I like to put down some masking tape to protect the surface, since it's easy for a stray bit of swarf to put a big ugly scratch down the middle of it when it's on the bench.
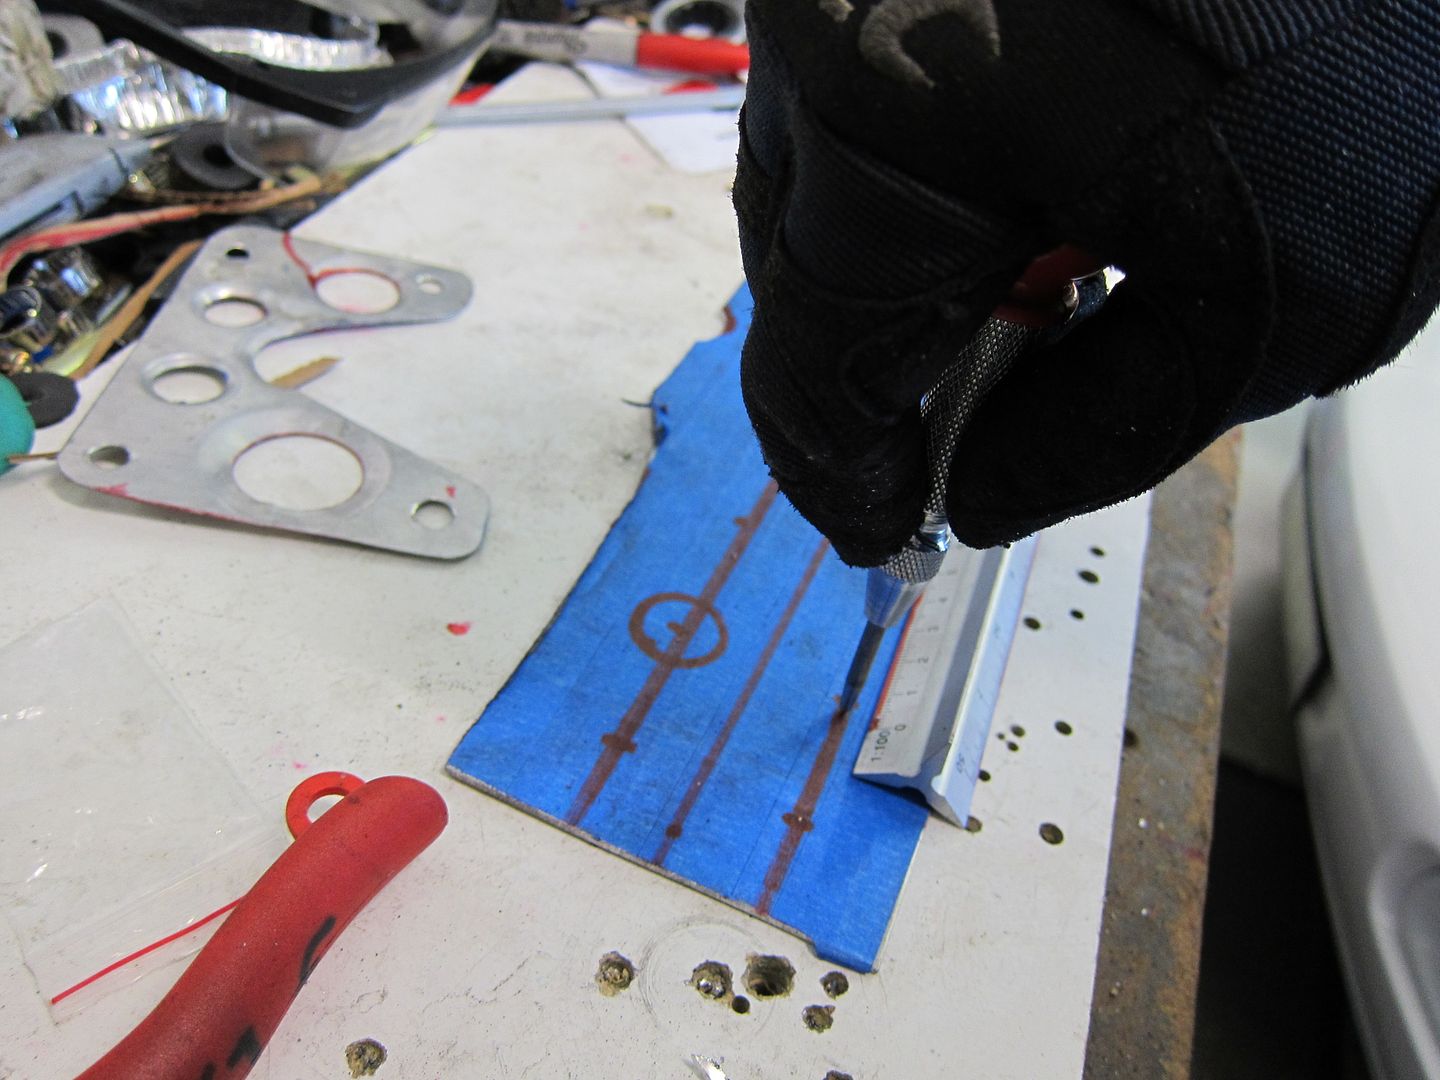
...measure up and mark some holes for drilling, with a centrepunch
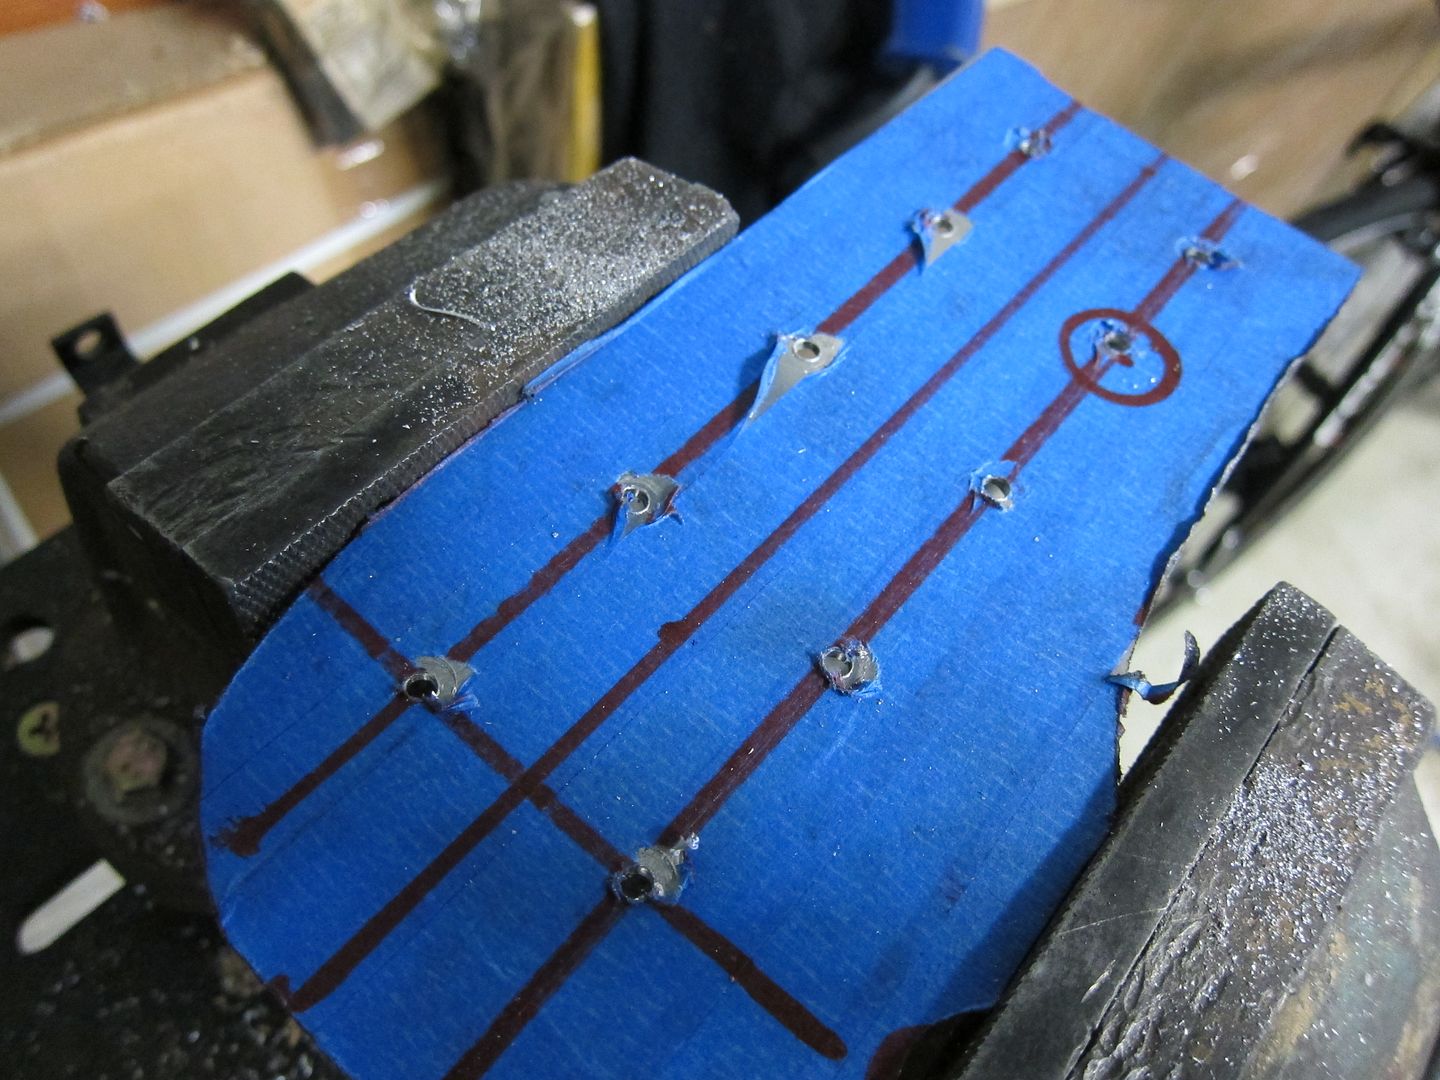
Drill out a bunch of 4mm pilot holes...
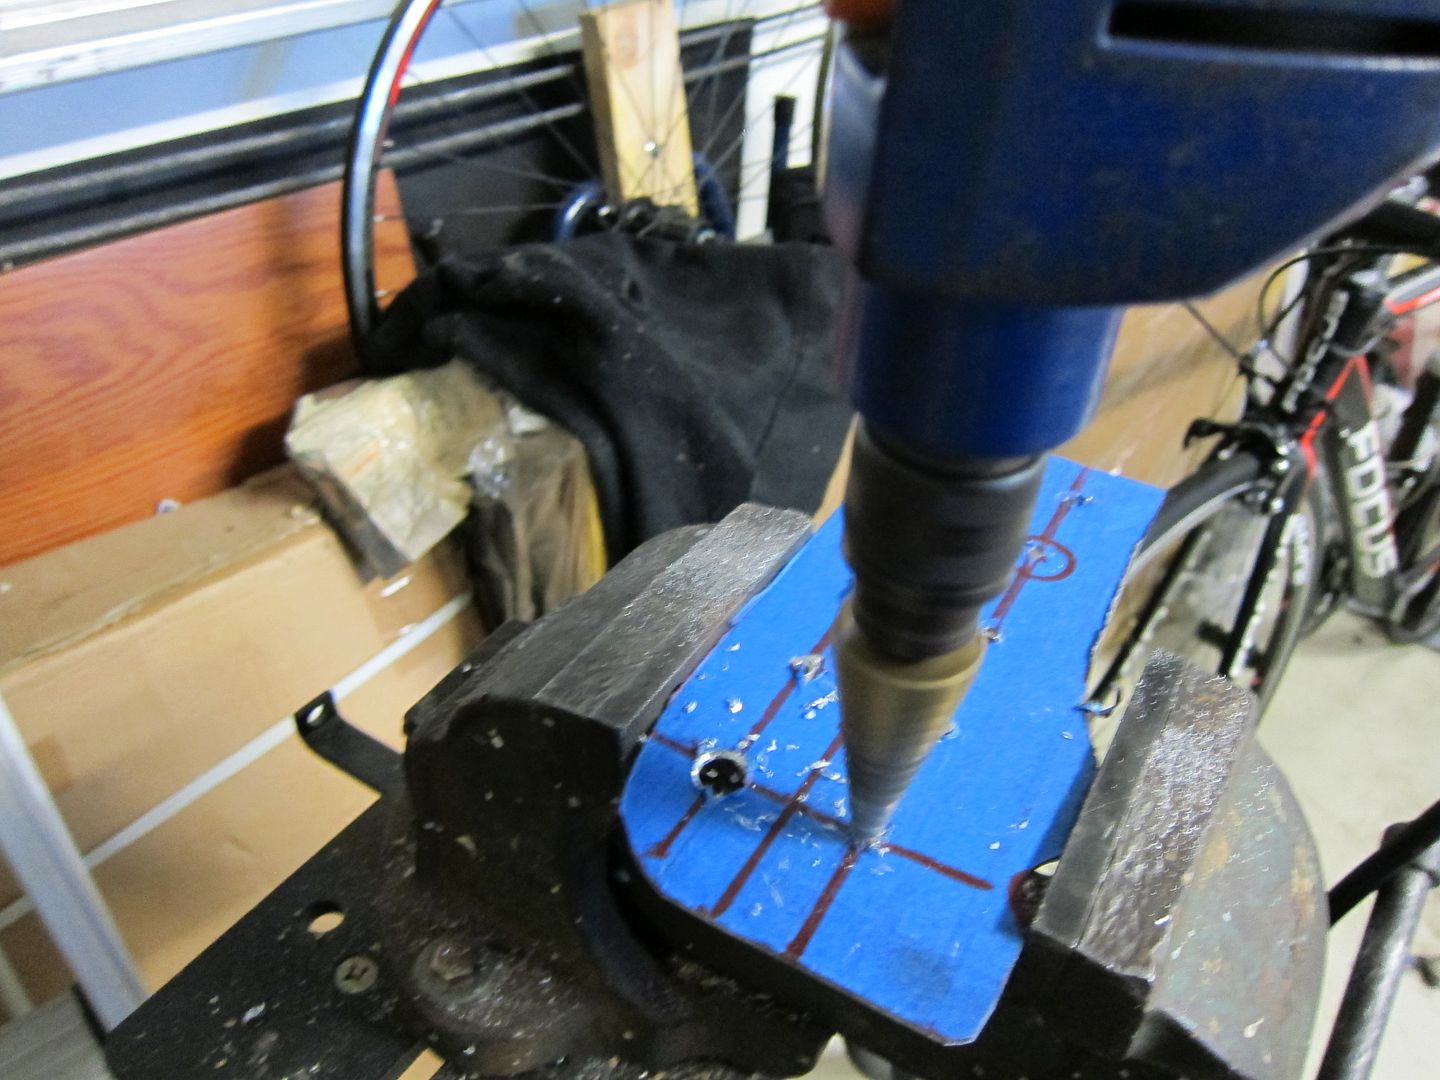
Enlarge the holes to 12mm with a step drill (I find these are the best for cutting big holes in sheet metal)
Now, my favourite garage-gadgets are these, which are called dimple dies. There's a male and female bit, and ...
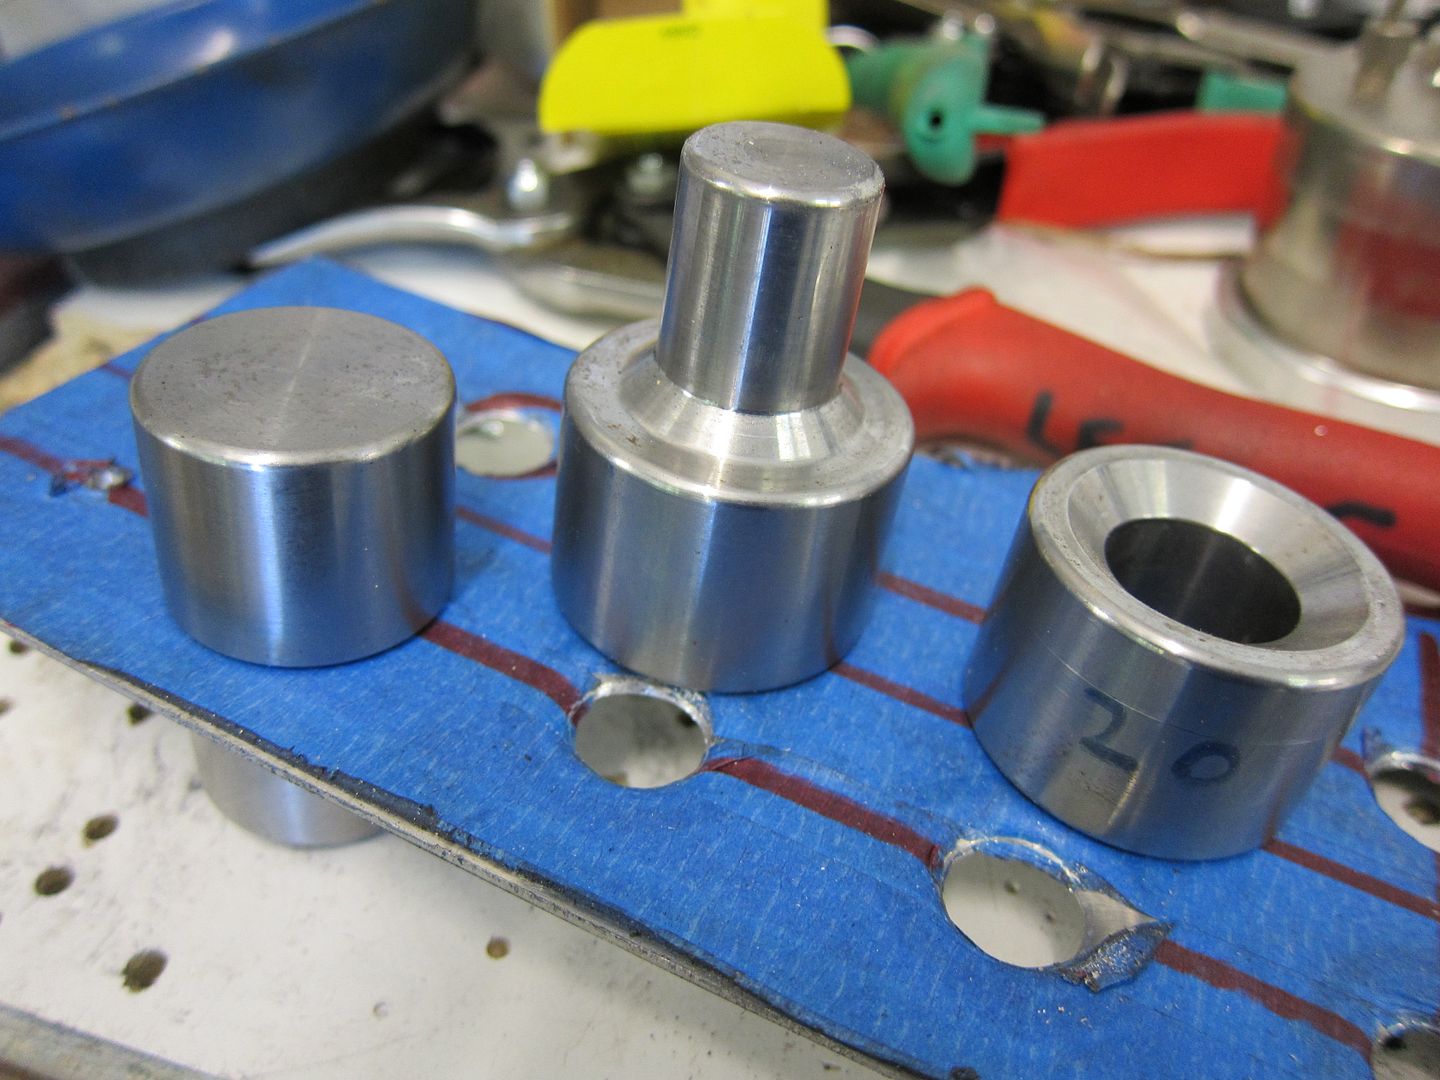
after drilling a hole of the required size, you use a shop press to squish the halves together.
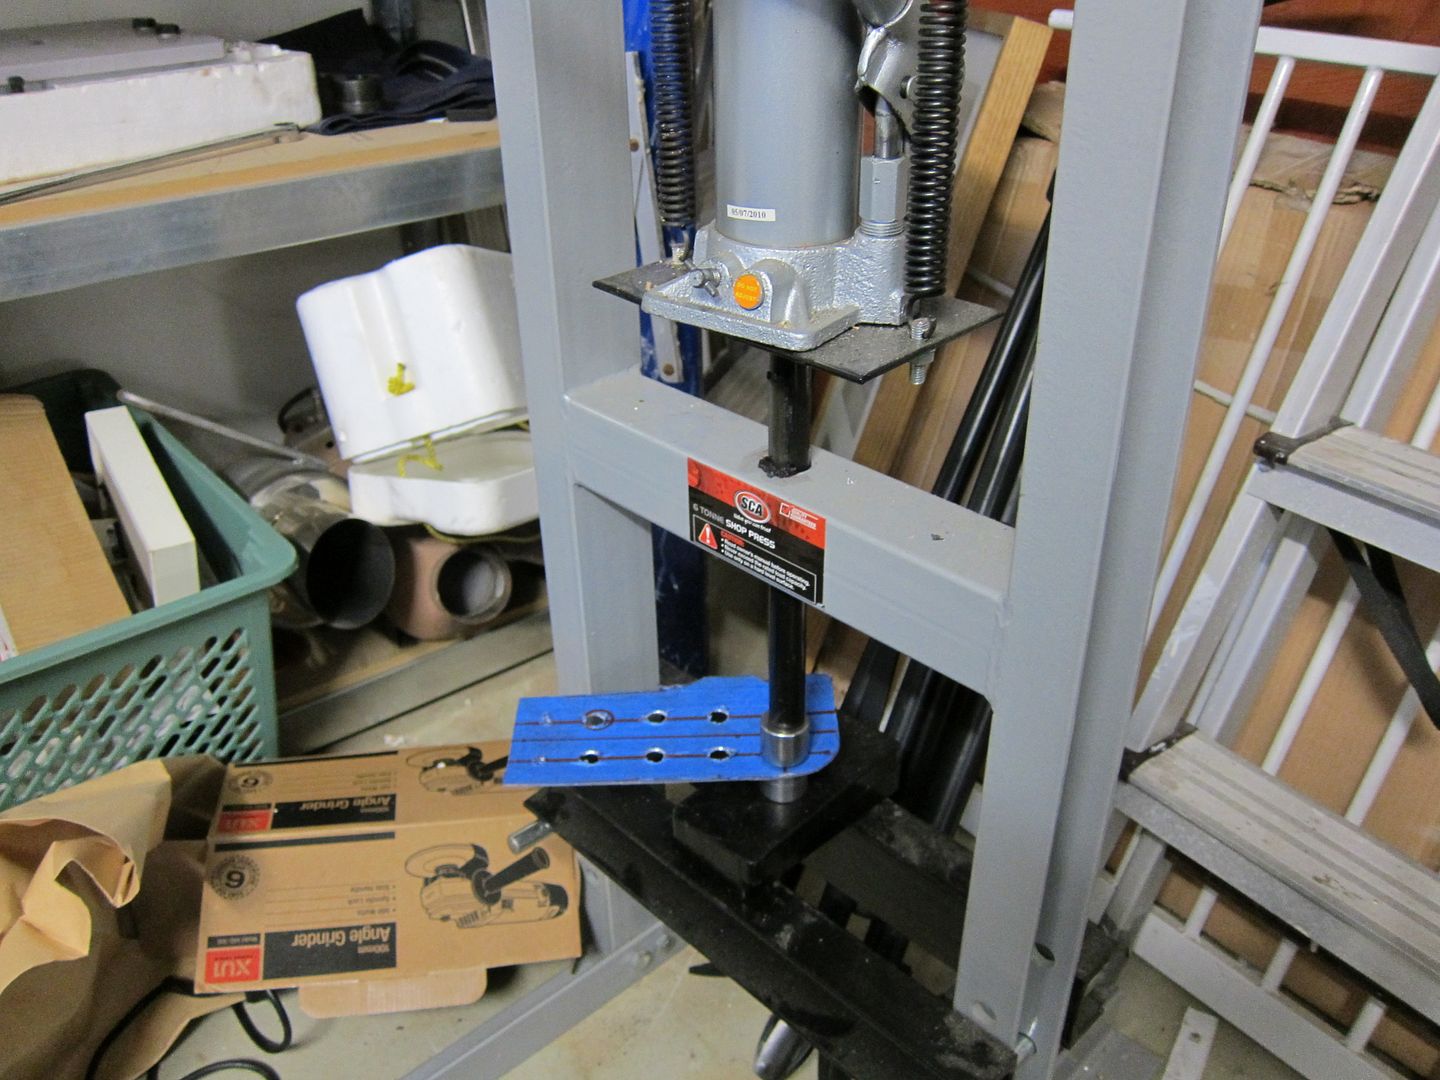
Then clean up the edges on the belt sander, and now we can test fit! The dimple die holes are really just for decoration in this instance, but they do add rigidity and strength (as well as deleting weight) from any sheetmetal
Then cut out a bracket, which in this case has to be a vee-shape because of the weird angle it has to be bent to...
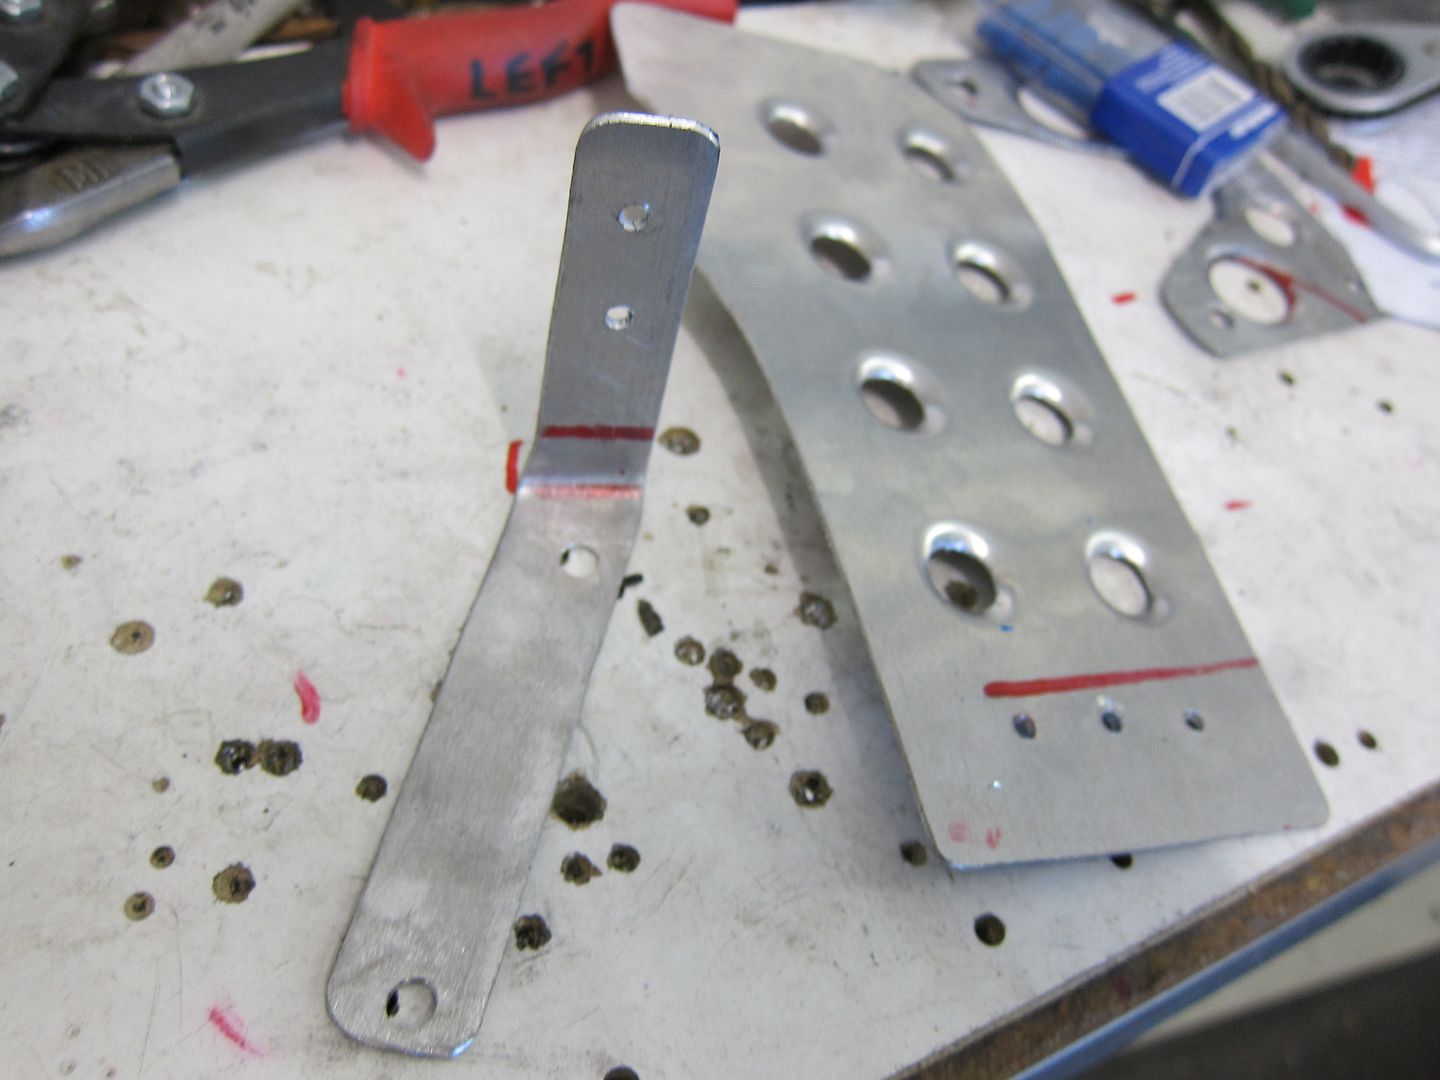
Rivet the bracket onto the piece, and test fit...hmm, it fouls the soft hoses from the brake reservoir a bit, so the piece will have to have a little bend in it to make space. Because I'm using the Porsche plastic nuts (same as the ones used for the wheel arch liner), which have a wide base, the bracket ended up a little more deep than I intended.
I thought about leaving it as bare metal, but I figured that was a little too much of a hot-rod touch for the RS-look I'm going for. So understated black it is (if we don't like it, a squirt of paint stripper will make it all better)
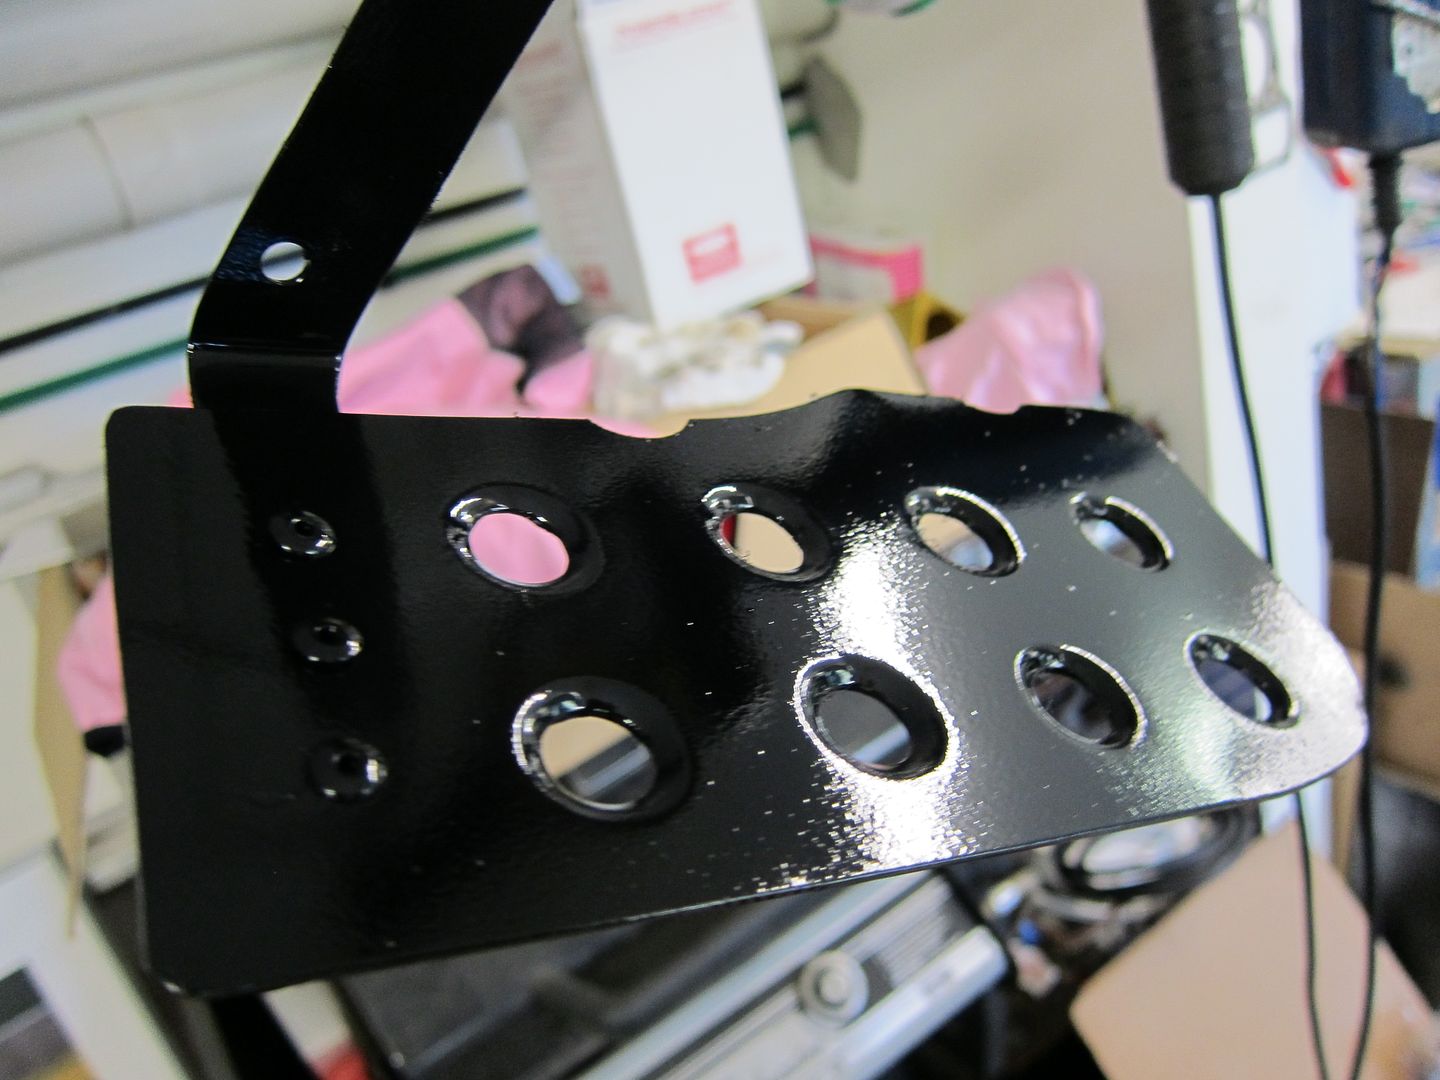
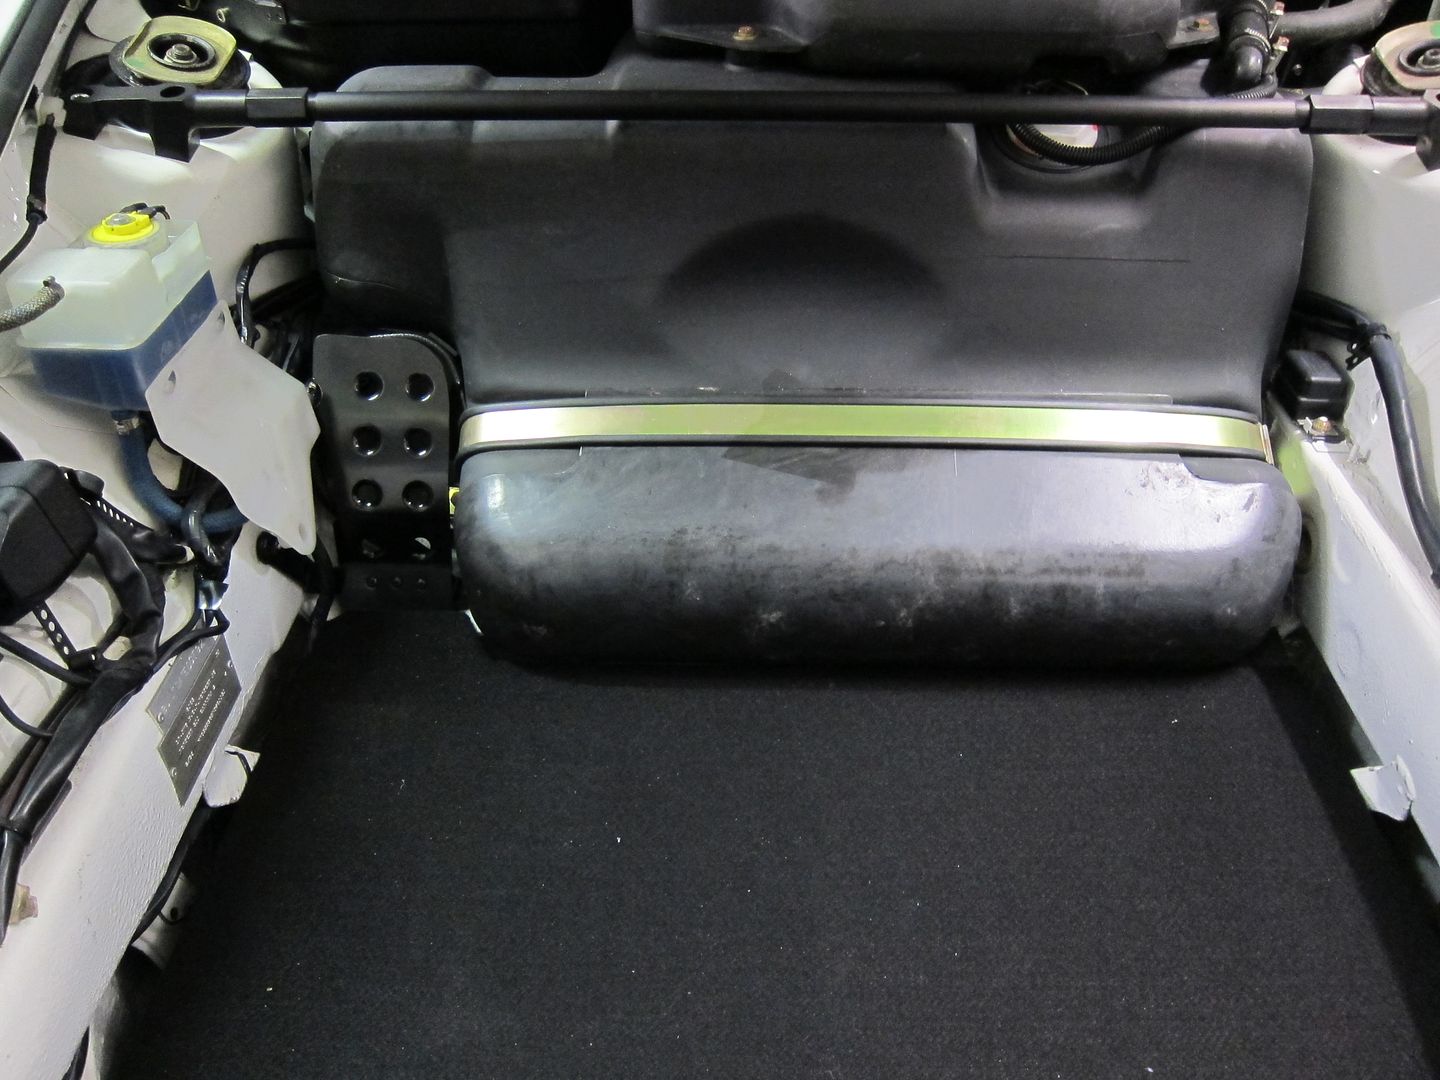
The finished item! You can see that there is now a little bend in it to clear the two hoses going behind it.
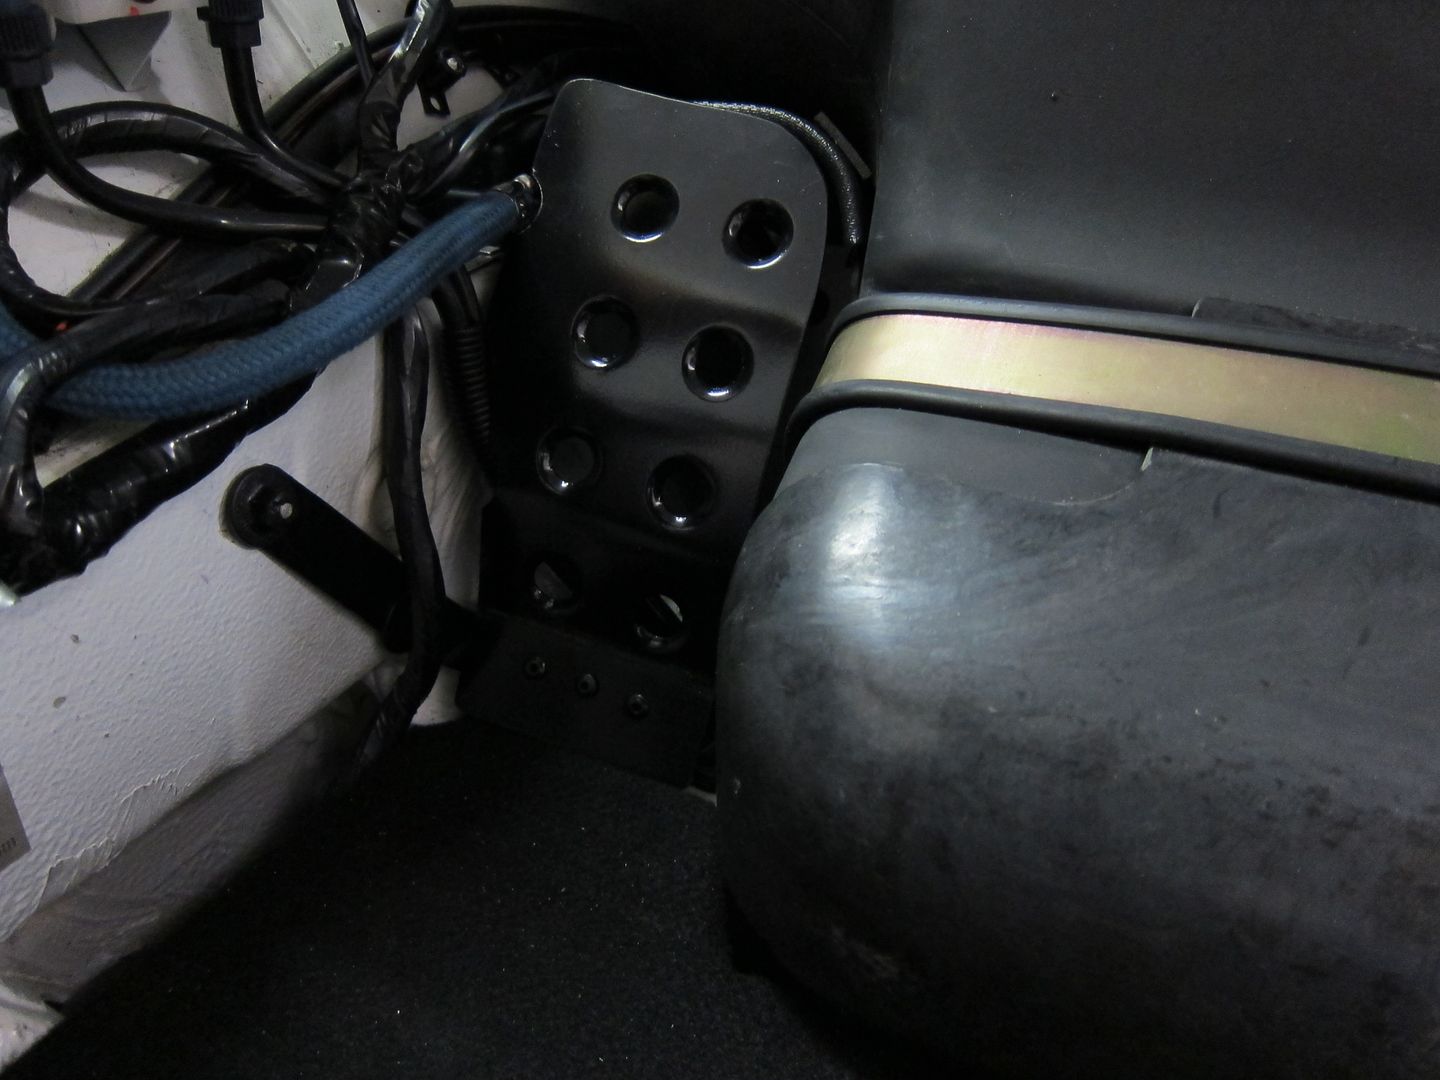
Hmmm...not sure if I'm feeling it, to be honest. I might give it a couple of days to get used to it.
...measure up and mark some holes for drilling, with a centrepunch
Drill out a bunch of 4mm pilot holes...
Enlarge the holes to 12mm with a step drill (I find these are the best for cutting big holes in sheet metal)
Now, my favourite garage-gadgets are these, which are called dimple dies. There's a male and female bit, and ...
after drilling a hole of the required size, you use a shop press to squish the halves together.
Then clean up the edges on the belt sander, and now we can test fit! The dimple die holes are really just for decoration in this instance, but they do add rigidity and strength (as well as deleting weight) from any sheetmetal
Then cut out a bracket, which in this case has to be a vee-shape because of the weird angle it has to be bent to...
Rivet the bracket onto the piece, and test fit...hmm, it fouls the soft hoses from the brake reservoir a bit, so the piece will have to have a little bend in it to make space. Because I'm using the Porsche plastic nuts (same as the ones used for the wheel arch liner), which have a wide base, the bracket ended up a little more deep than I intended.
I thought about leaving it as bare metal, but I figured that was a little too much of a hot-rod touch for the RS-look I'm going for. So understated black it is (if we don't like it, a squirt of paint stripper will make it all better)
The finished item! You can see that there is now a little bend in it to clear the two hoses going behind it.
Hmmm...not sure if I'm feeling it, to be honest. I might give it a couple of days to get used to it.
05-18-2013, 09:35 PM
#499
Racer
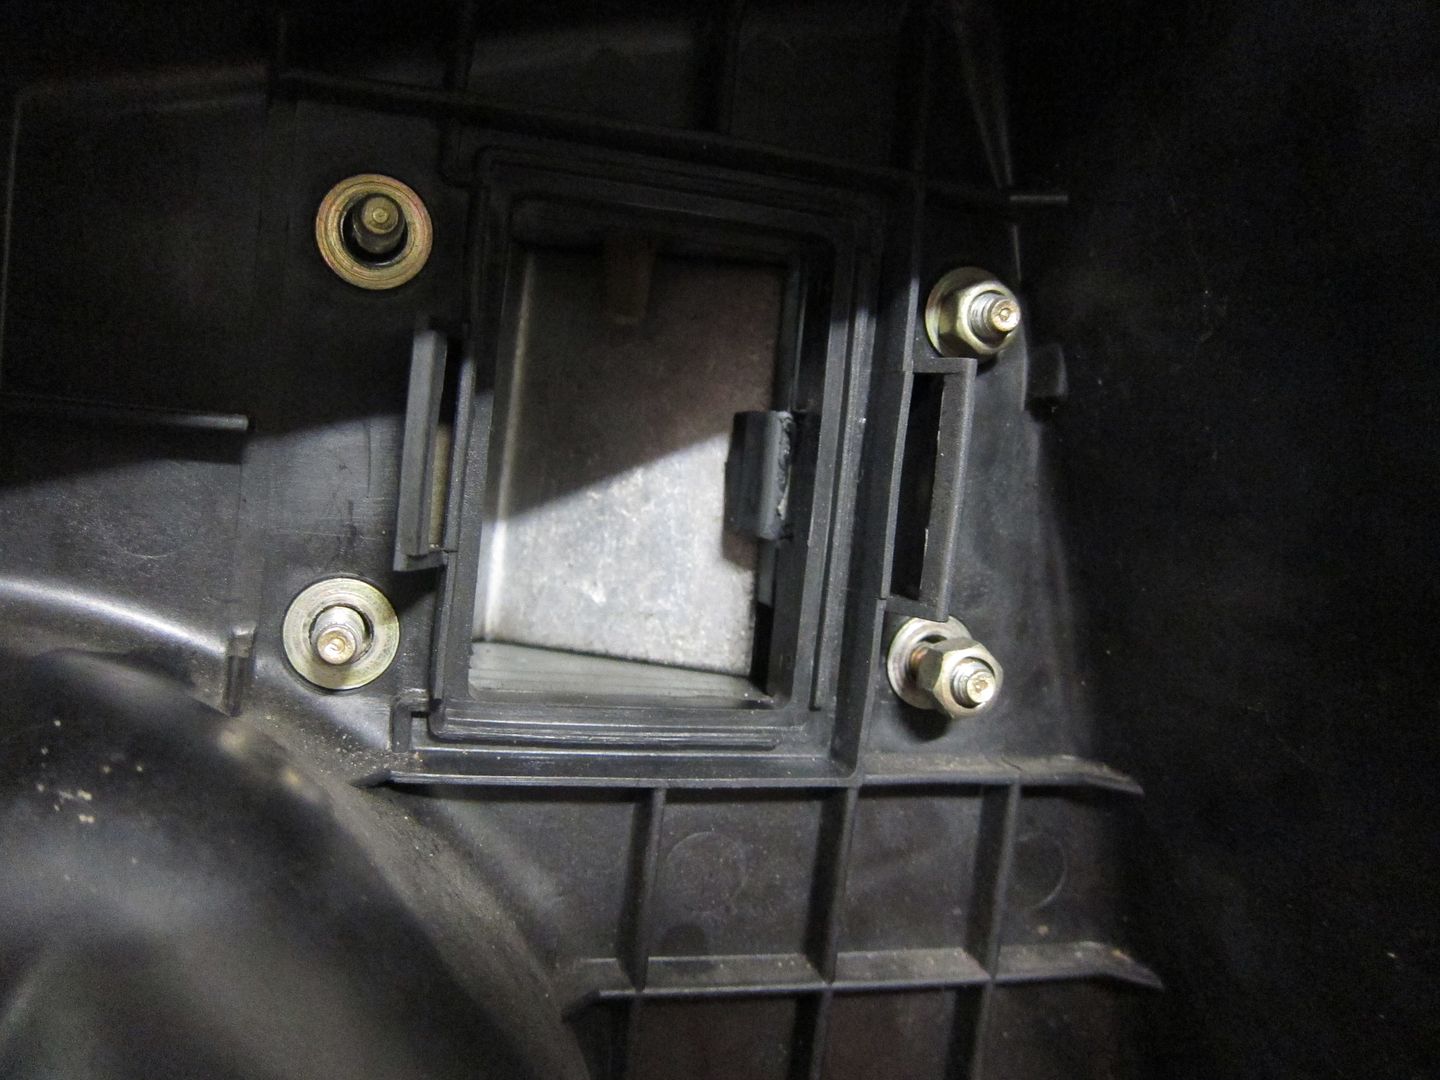
I use that hole for storing my toolkit. The pocket in my mat that fits in the truck that you normally store your toolkit had started to show wear and I find the toolkit fits in there really well and does not rattle or move.
 05-20-2013, 10:44 AM
#501
Burning Brakes
Thread Starter
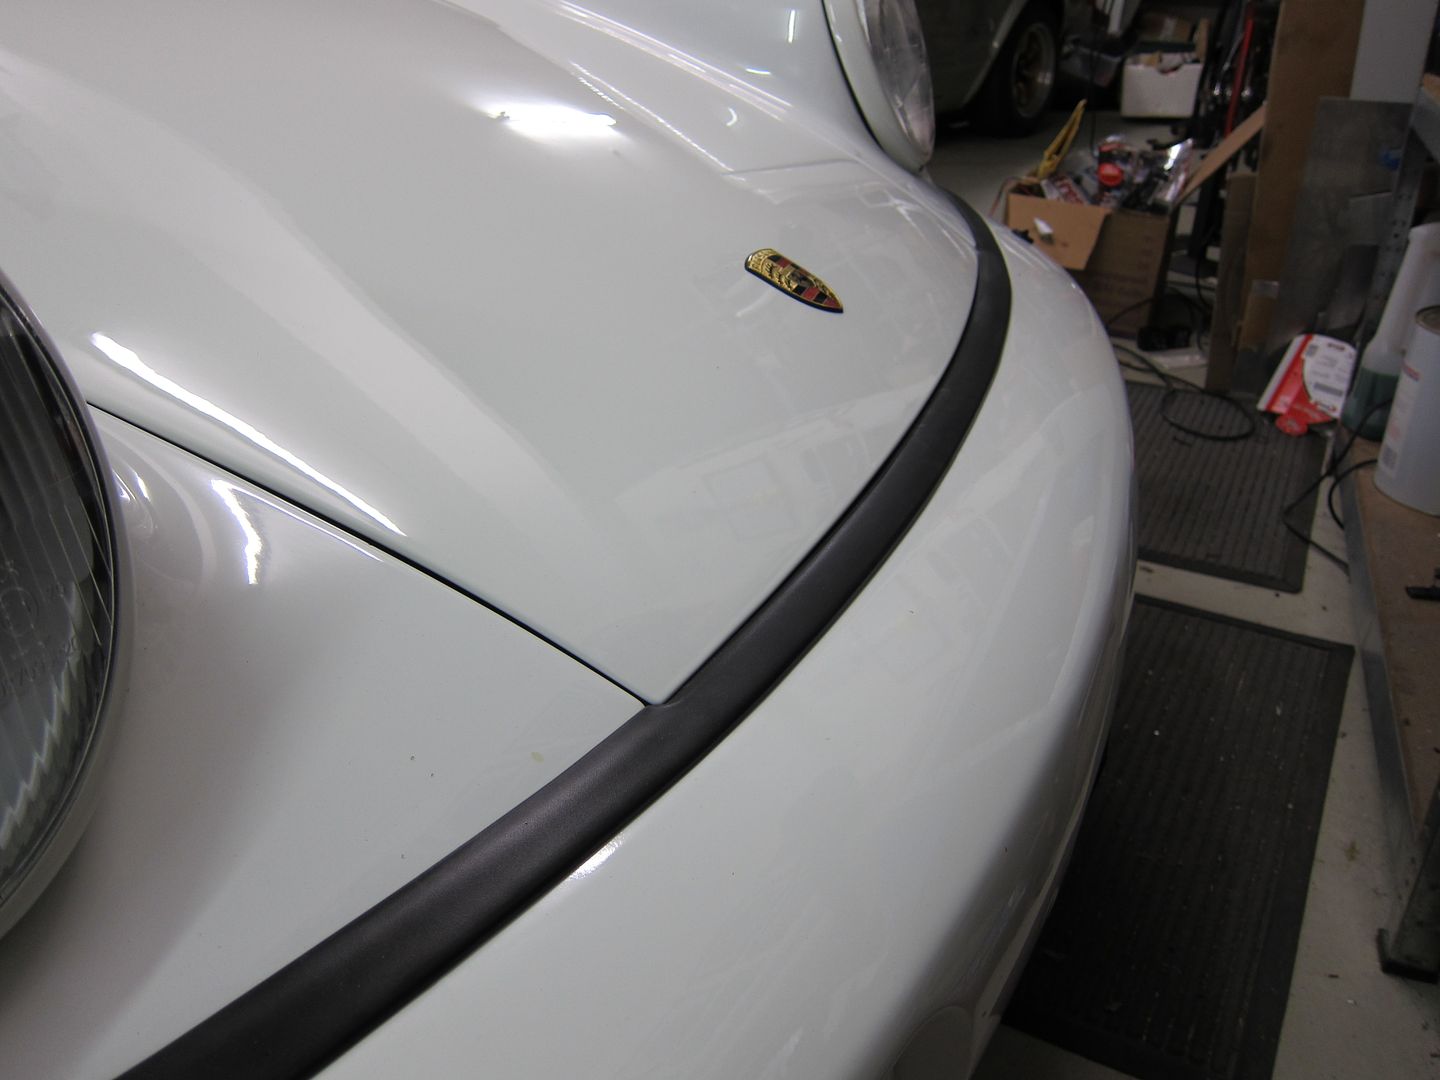
When we aligned the bonnet the other day, we did it a really (in hindsight) dumb way, with the bonnet propped open. So I had to have two mates holding up the bonnet, to prevent it from sliding down on its slots when we loosened the bolts, and I wasn't 100% happy with the resulting fit, as the front edge of the bonnet poked out a little too far past the fender edges.
But of course, the easier way to do it...is like this:
With it only open part-way, you can loosen the bolts as much as you like, and it'll just sit there. So then you can fudge around with it to your hearts content, nip up the bolts and drop it to check the gaps. And after a little experimentation, I think this is the best compromise:
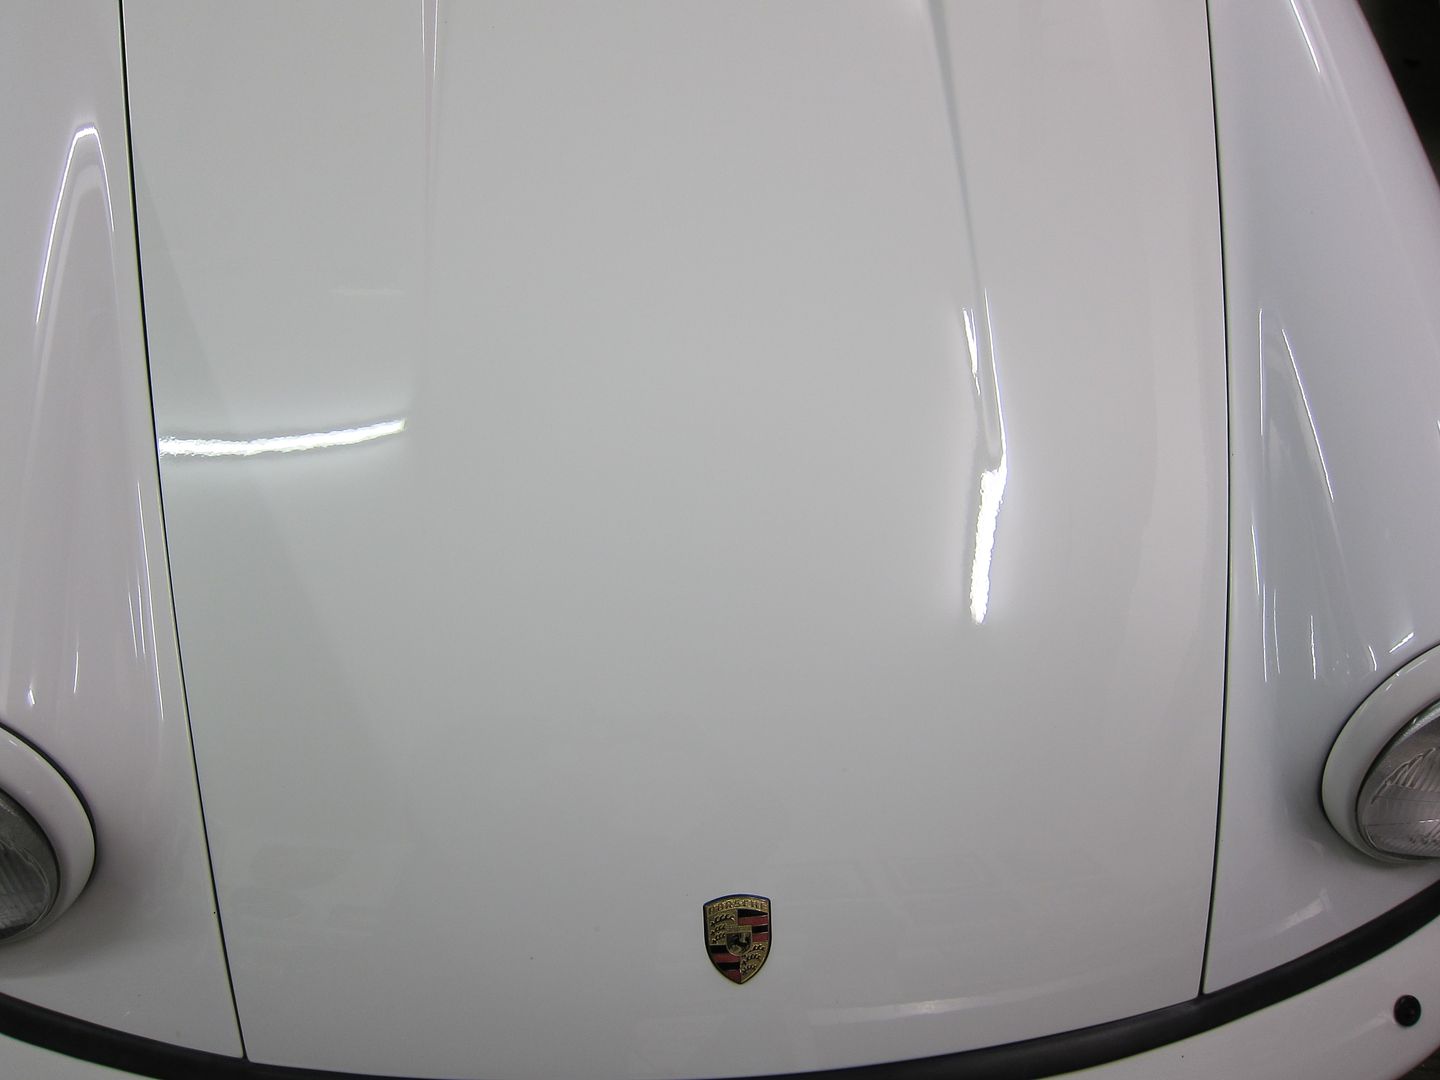
If you look closely, the panel gap on the left is slightly thinner than on the right, but the bonnet edge lines up quite nice with the fenders now...and it's certainly better than it was.
And the gaps at the cowl end are reasonably uniform too.
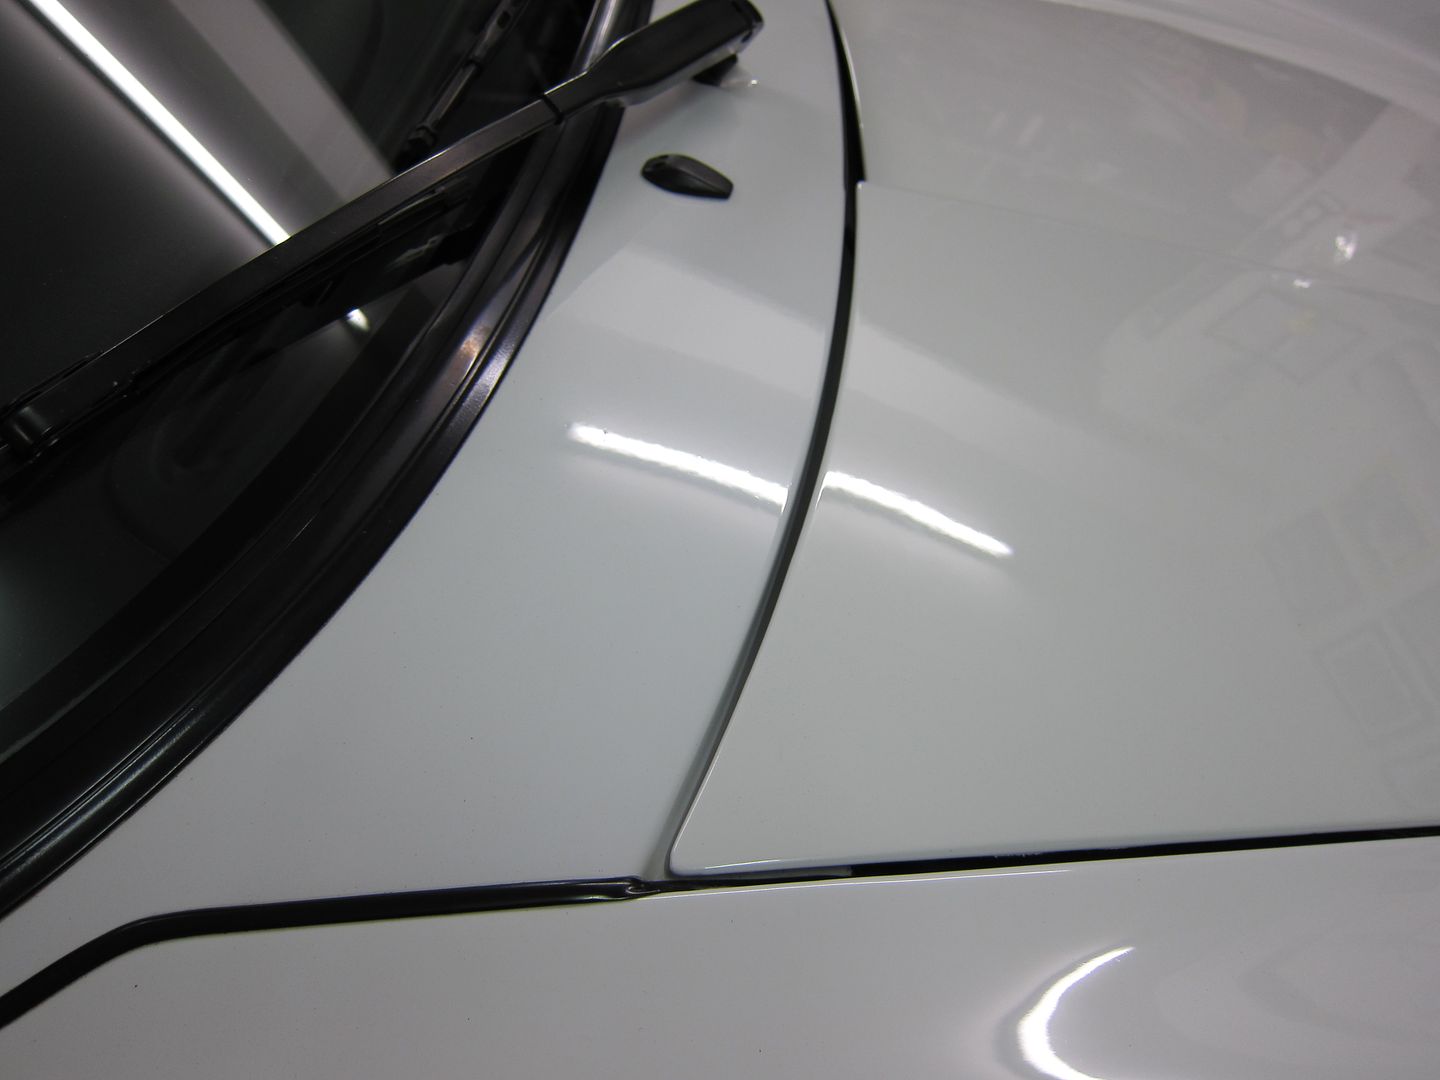
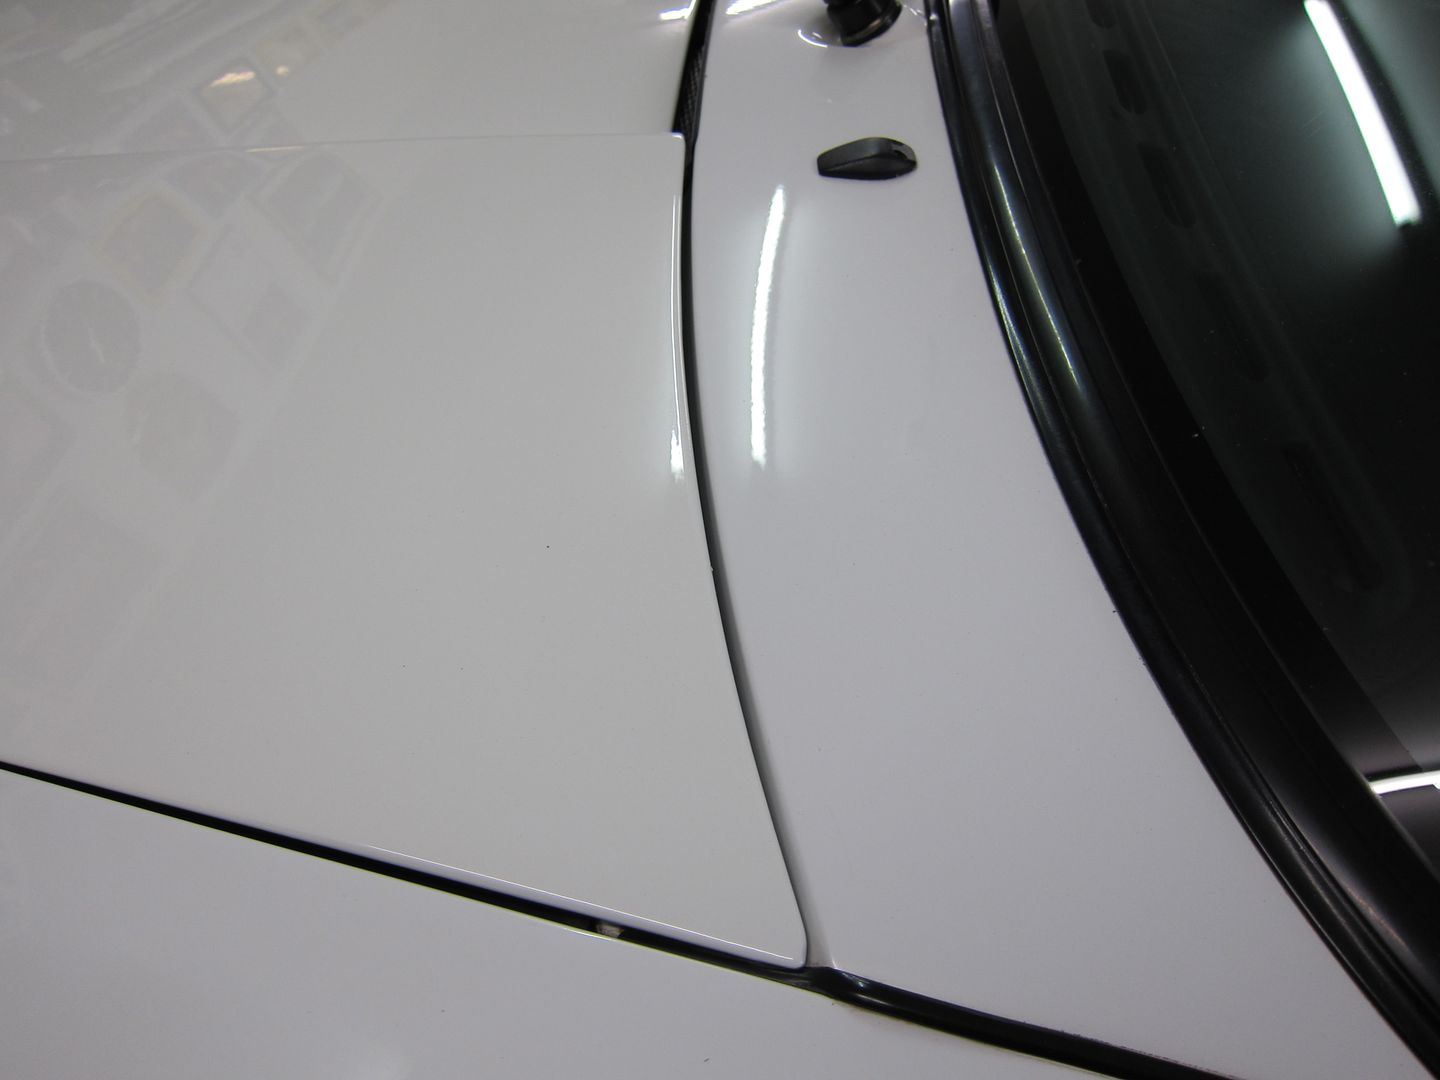
From some angles, the right side corner maybe pokes out a smidge more than the left, but I couldn't get it any better without closing up the panel gap on the sides even more. I think I can live with this.
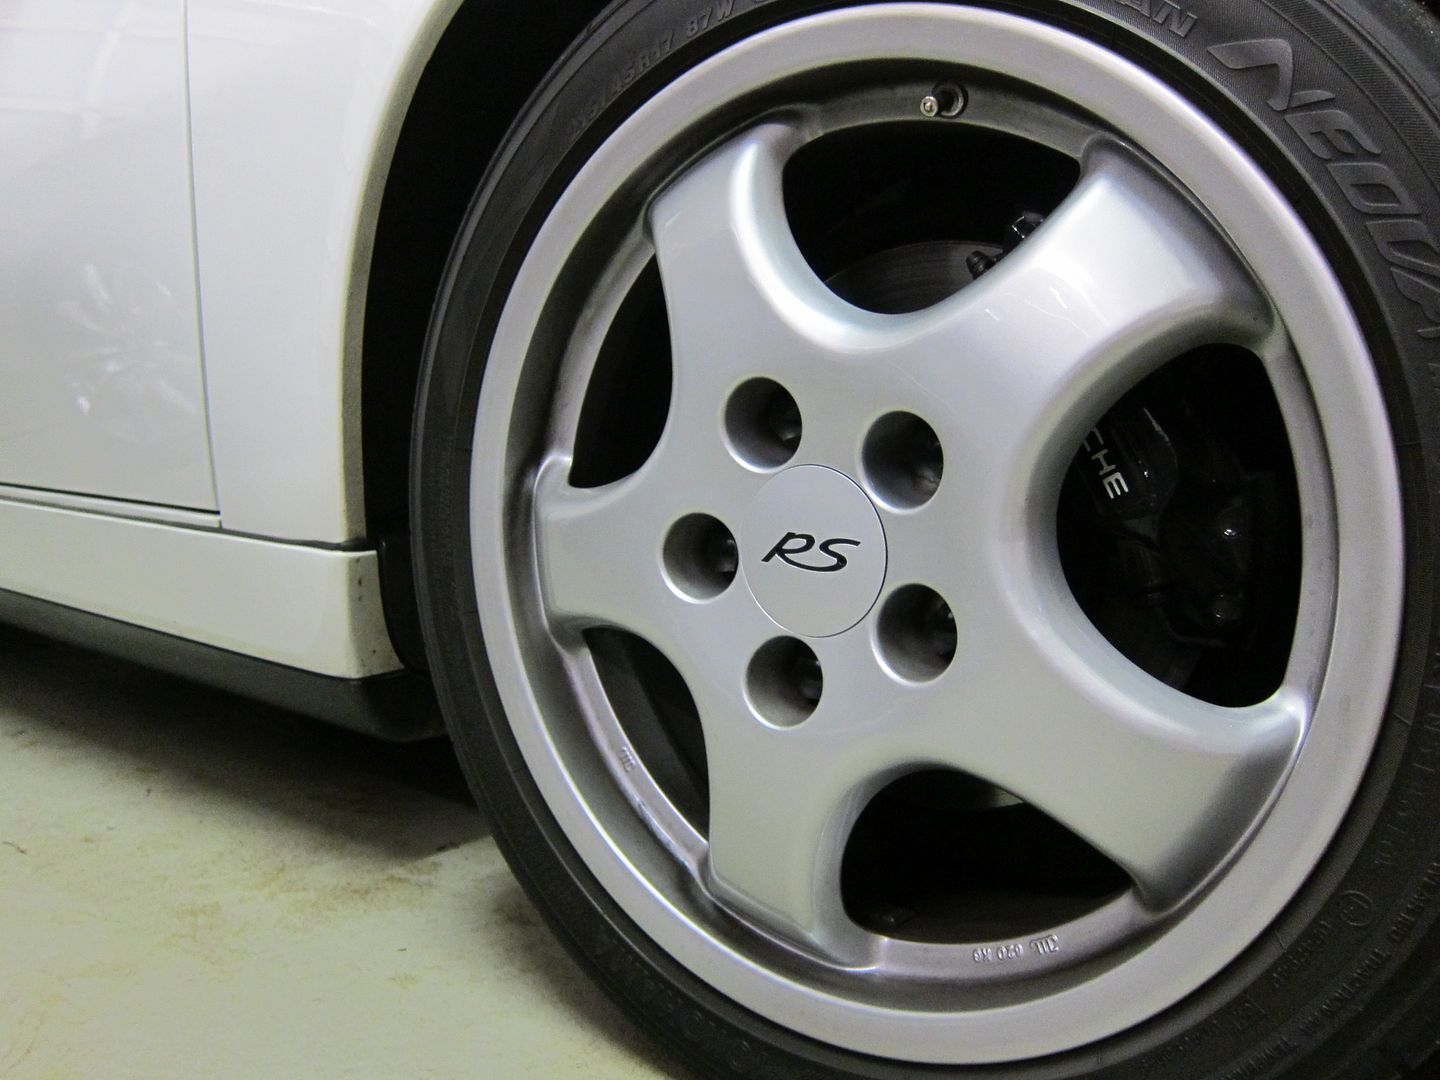
And...to celebrate Rennsport Festival this weekend, I've reinstalled the RS wheel caps
But of course, the easier way to do it...is like this:
With it only open part-way, you can loosen the bolts as much as you like, and it'll just sit there. So then you can fudge around with it to your hearts content, nip up the bolts and drop it to check the gaps. And after a little experimentation, I think this is the best compromise:
If you look closely, the panel gap on the left is slightly thinner than on the right, but the bonnet edge lines up quite nice with the fenders now...and it's certainly better than it was.
And the gaps at the cowl end are reasonably uniform too.
From some angles, the right side corner maybe pokes out a smidge more than the left, but I couldn't get it any better without closing up the panel gap on the sides even more. I think I can live with this.
And...to celebrate Rennsport Festival this weekend, I've reinstalled the RS wheel caps
05-20-2013, 01:47 PM
#502
Nordschleife Master
You're right about the hood/bonnet adjustment being a right PIA. You have to play about with the hinge bolt adjustments and number of washers between the hinges and the hood (the workshop mentions the adding/removing washers). Even, a slight movement of the catch on the hood can affect the panel gaps and height of the hood each side! I seem to have another go at mine ever few weeks....I don't think I'll ever get it to fit perfectly!
05-20-2013, 02:11 PM
#503

Z
PS/ Have you seen the threads regarding using that space for an electric PS pump?
06-25-2013, 12:15 PM
#504
Burning Brakes
Thread Starter
Lately, I've been having a few attempts at getting to the bottom of a few driveability issues. They seem to be quite common 964 maladies, and the first one is the hesitation after a period off the throttle: say you're rolling down a long hill with the throttle closed, and when you hit the pedal again, it seems to take a few heartbeats for the engine to respond.
The second issue, is the poor idle control in low speed, stop-go traffic. My car was particularly bad in this respect, being easy to stall, and reluctant to lope along in gear at tickover without a bit of kangarooing-along.
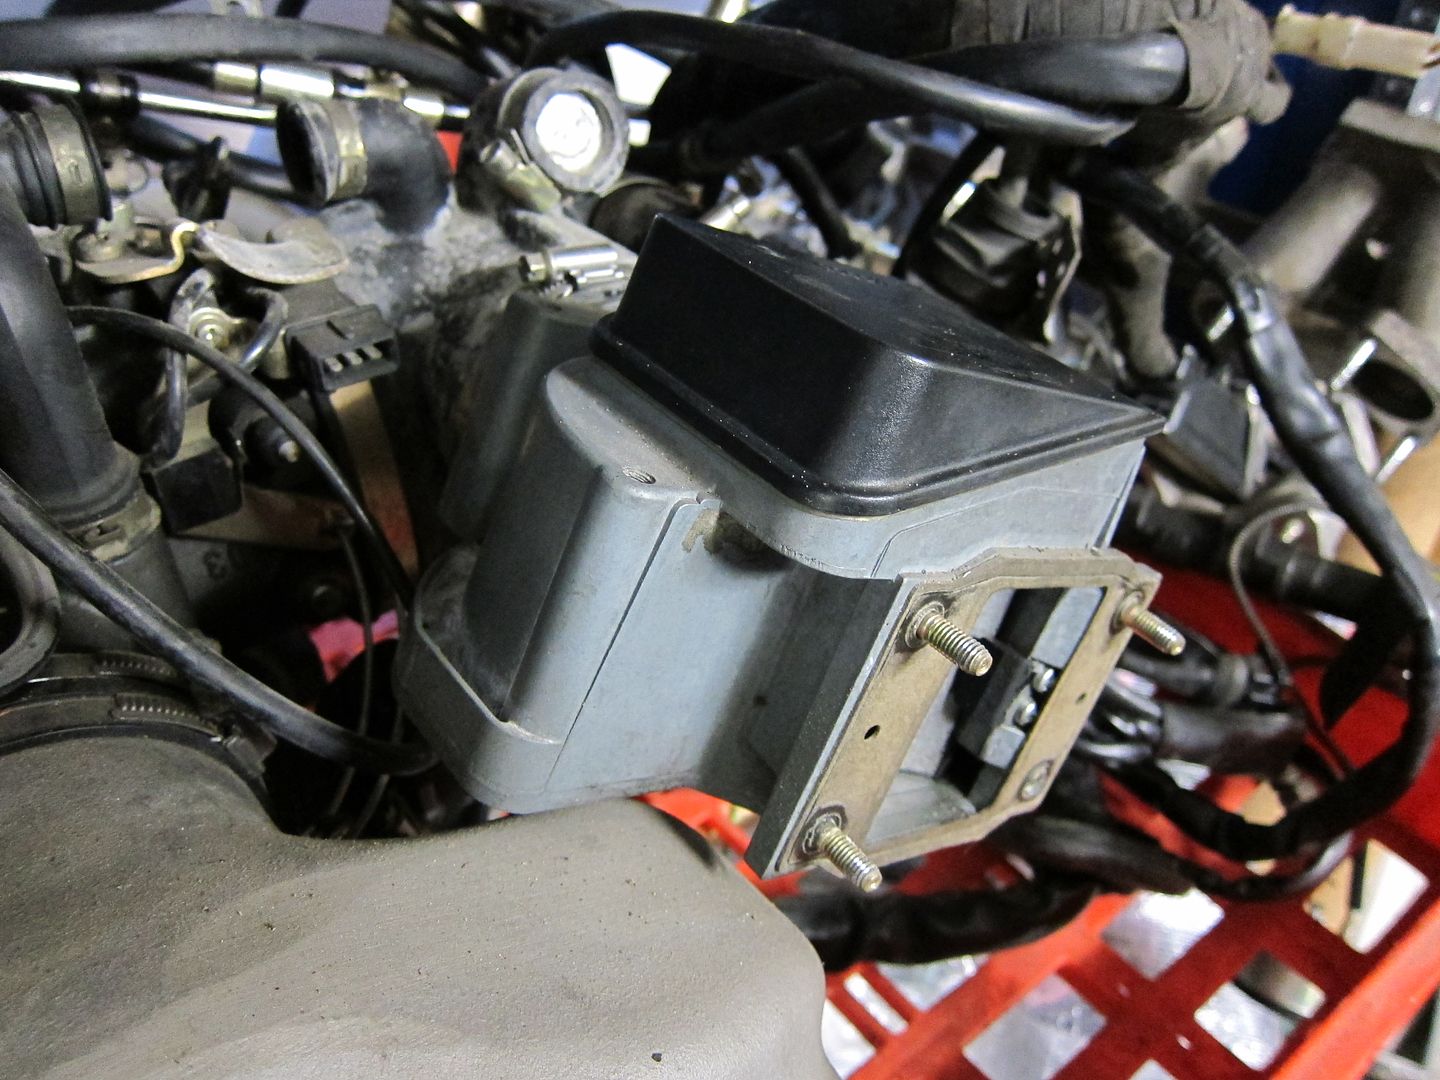
My first thought was that it might be related to the air flow meter, so I begin by rummaging among the pile of bits that I inherited with the car. At the time, I thanked the car's seller (but was a little nonplussed as to what I'd do with all this junk), but over time I've come to realise that al this stuff is actually in really good, low mileage condition.
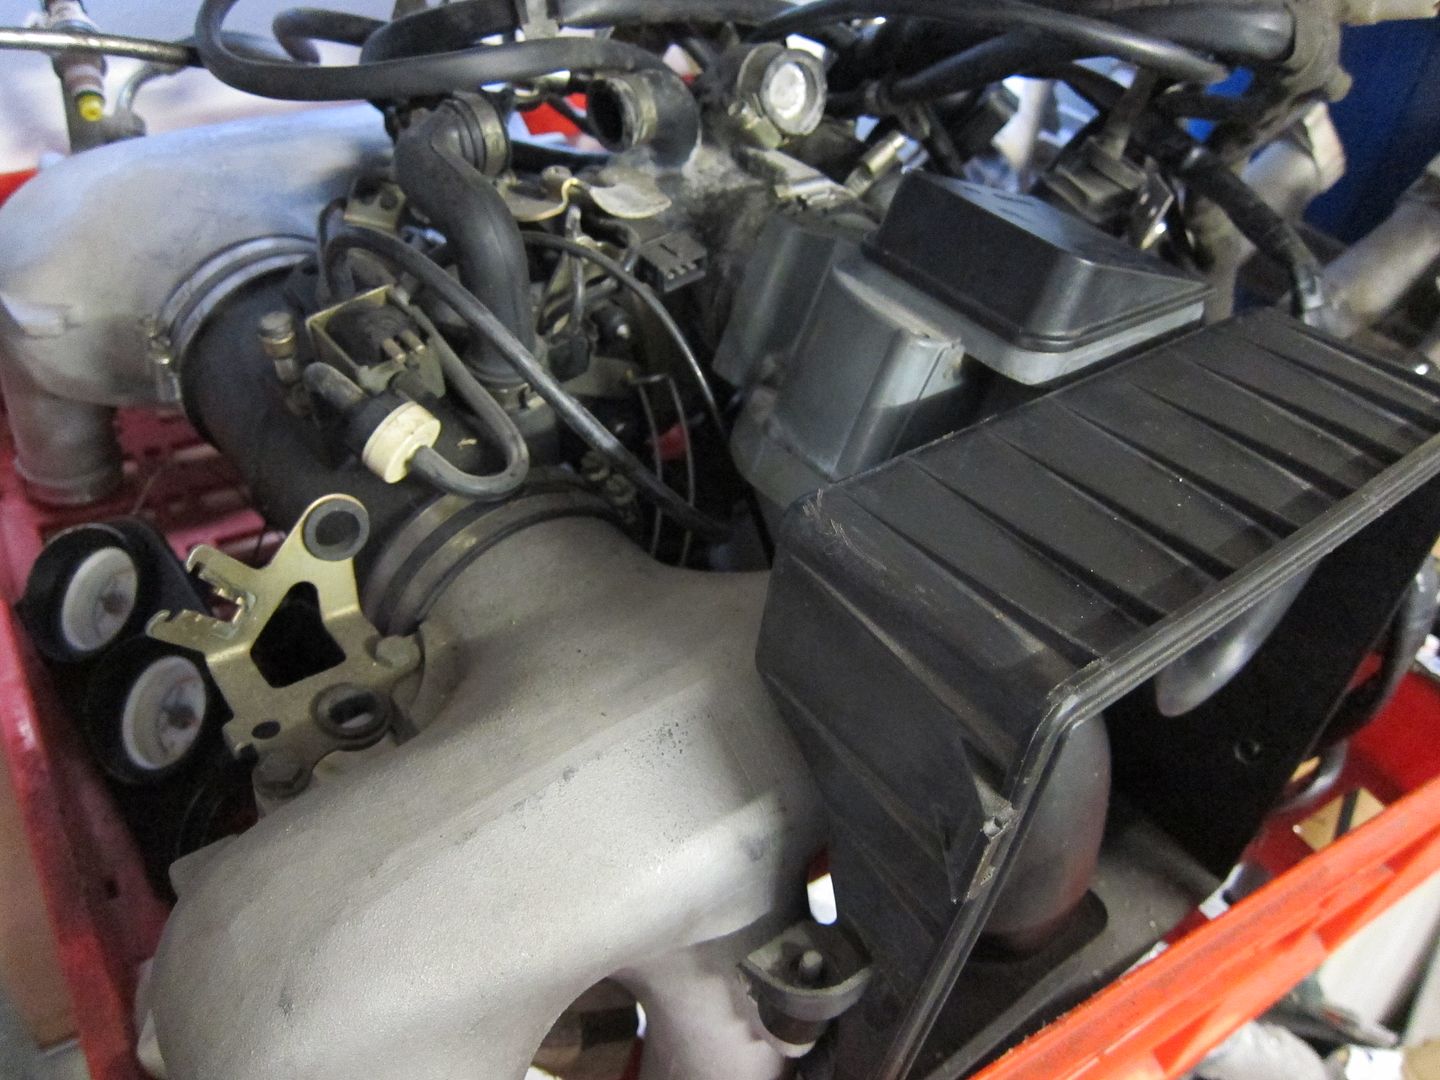
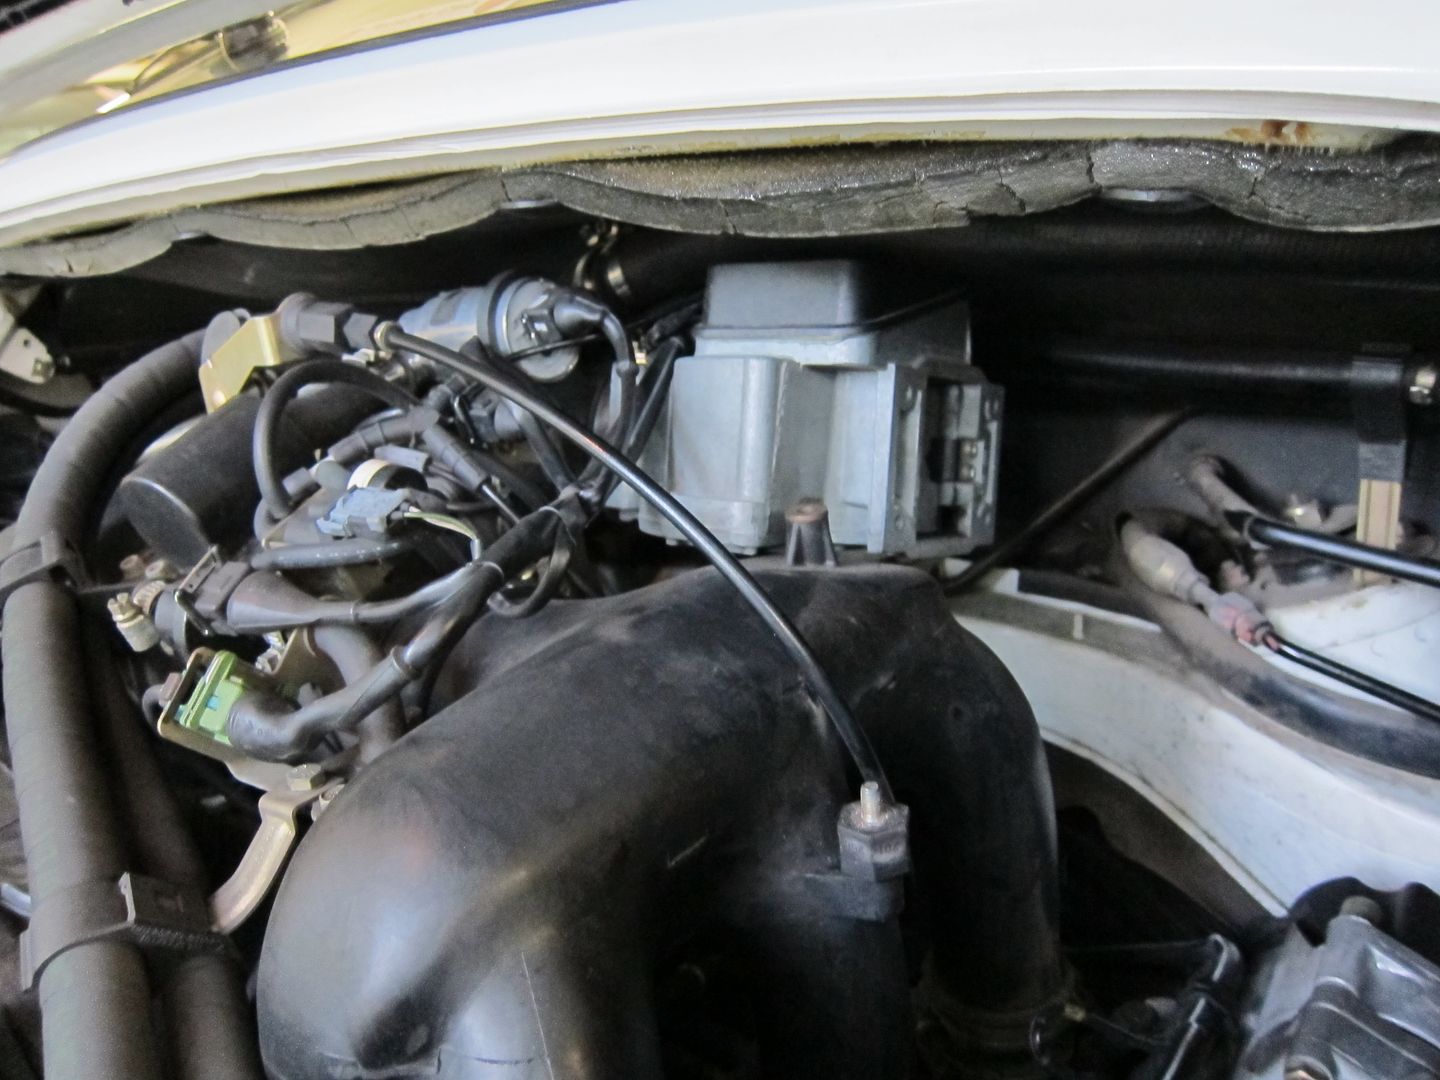
So the first step is to remove the airflow meter from the spare manifold, and first you unclip the air horn from the airbox
That gives access to the nuts that you have to remove, to separate the airbox from the AFM
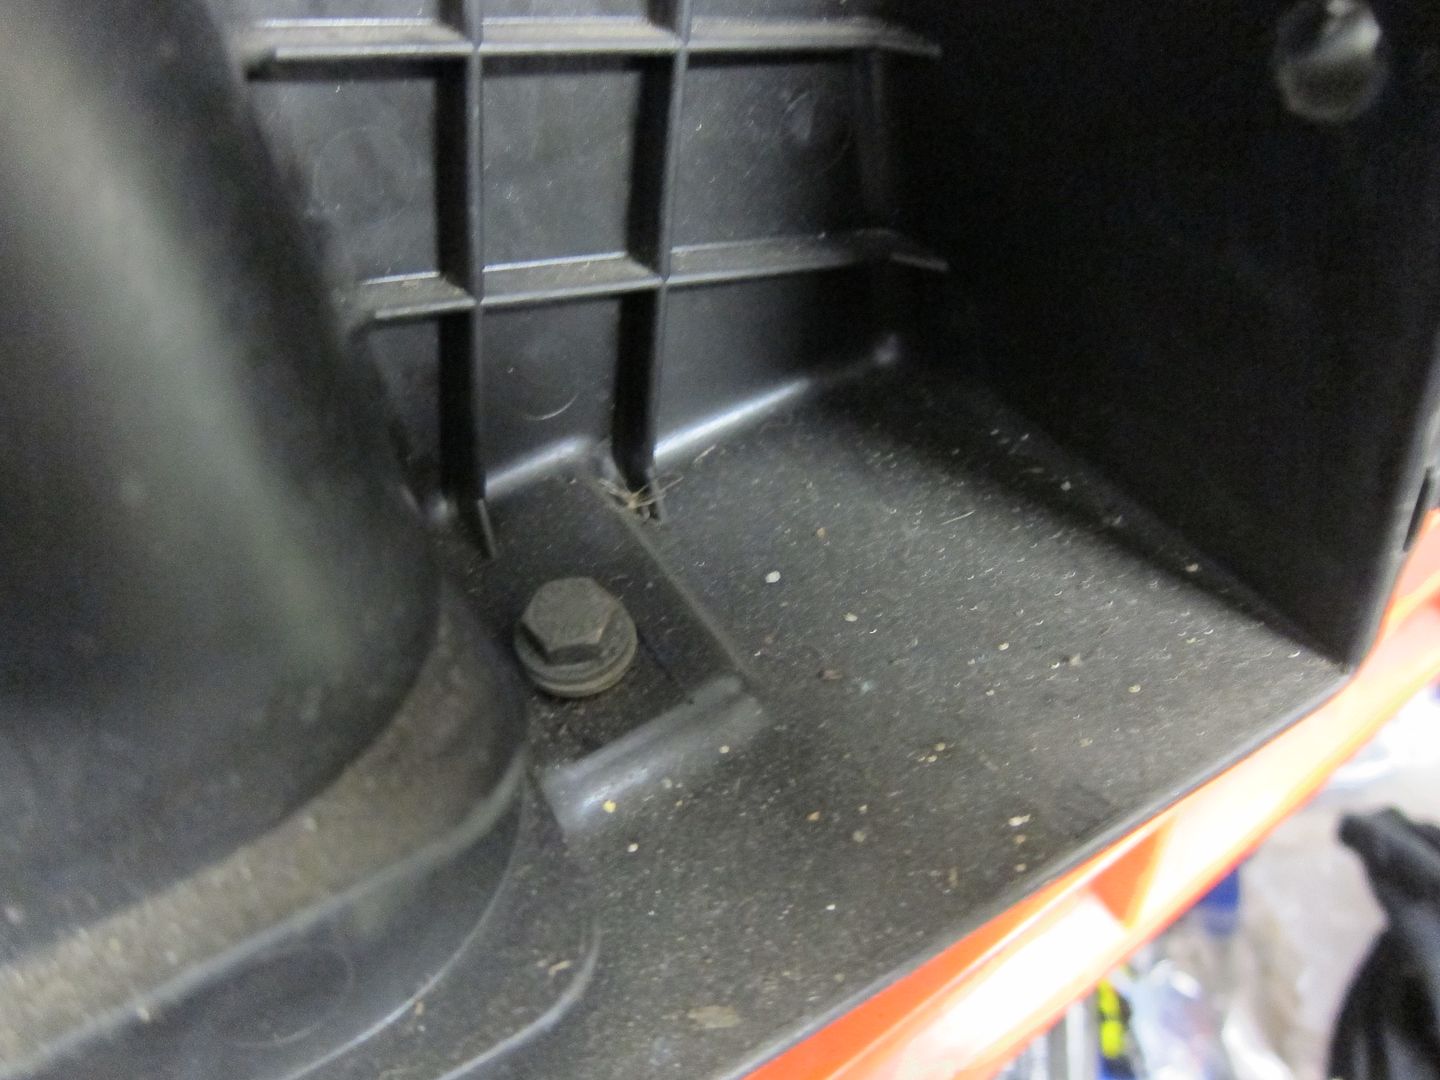
The airbox is also bolted to the manifold, here...
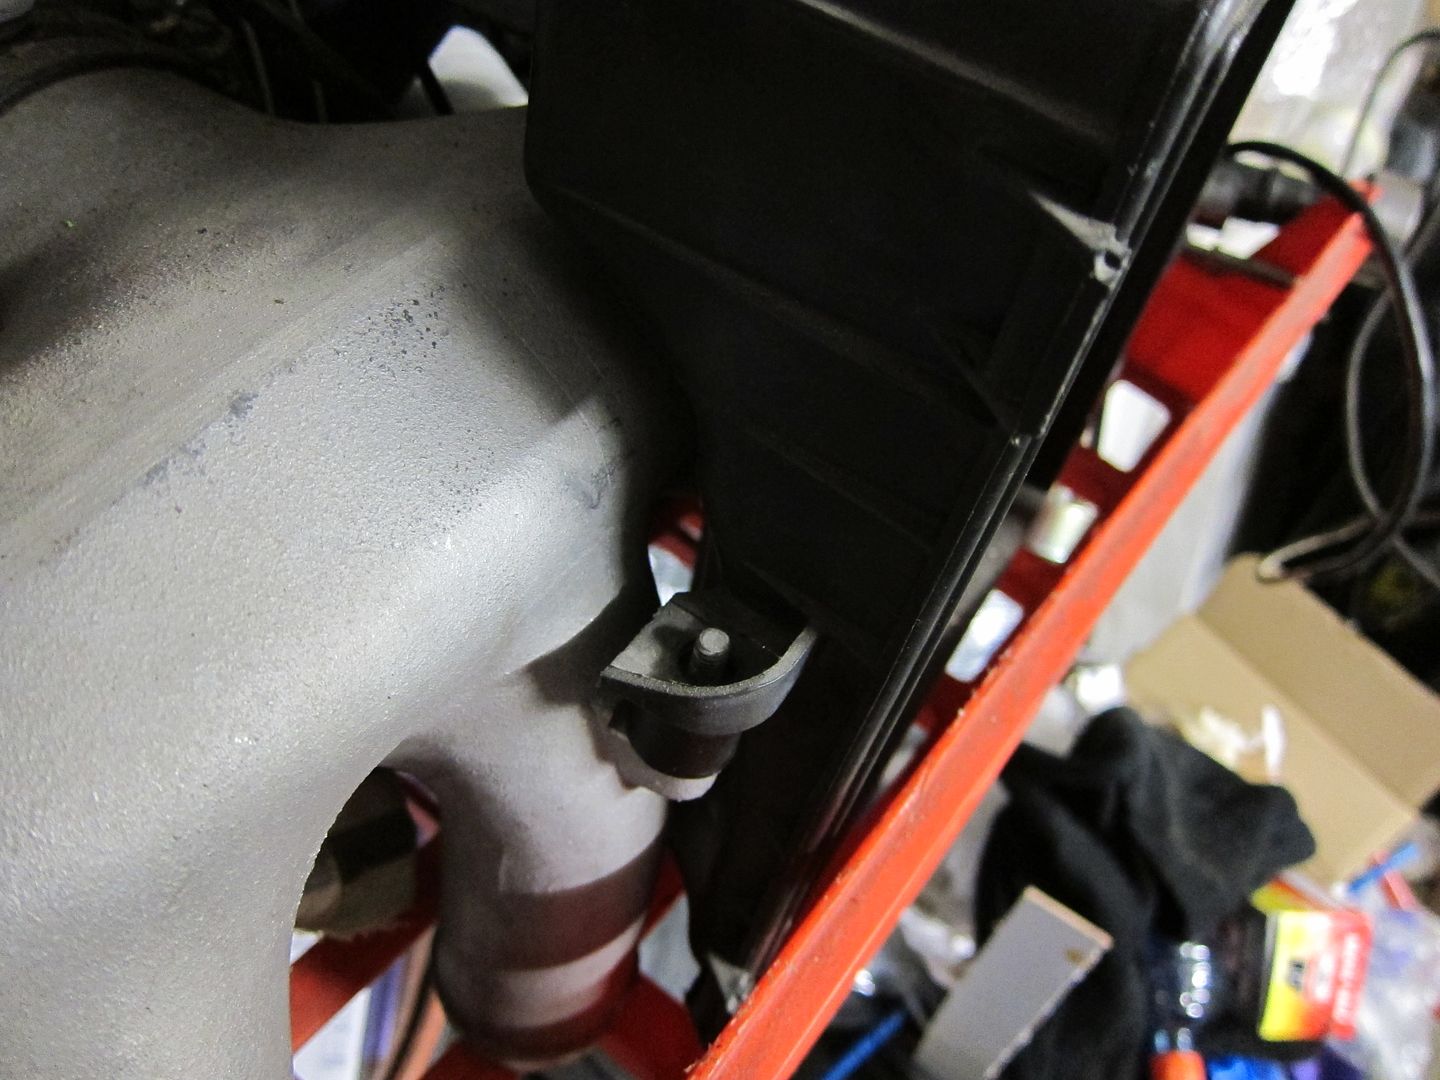
..and inside the airbox here.
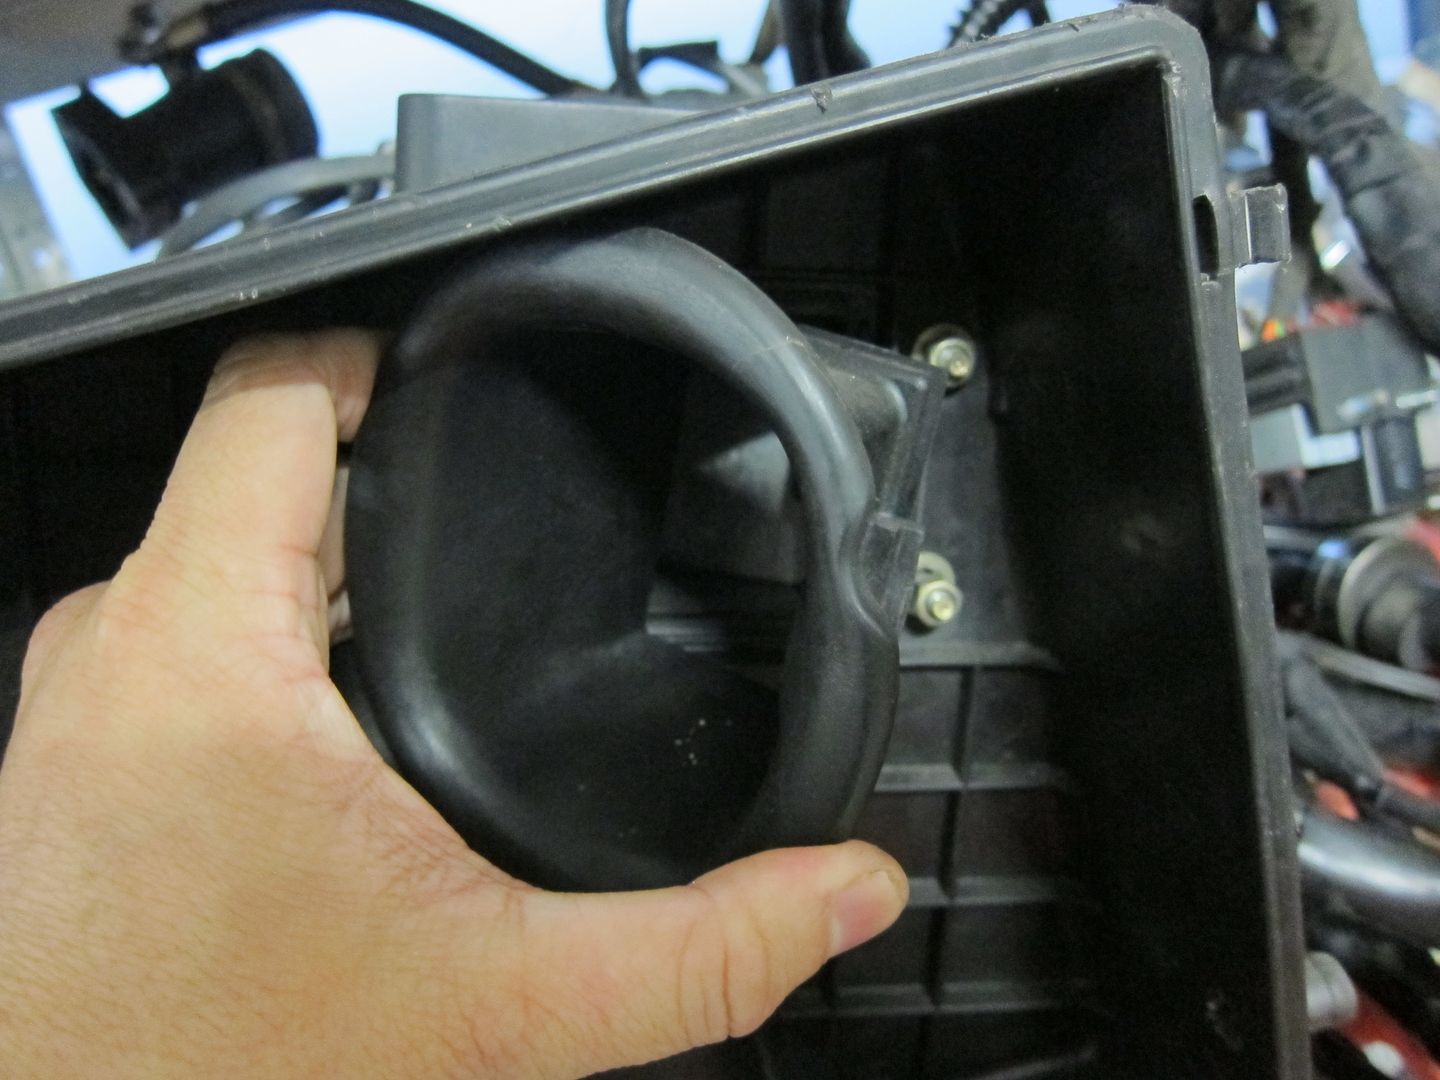
Then, the airbox lifts off, and you just undo a hose clamp, unclip the AFM plug, and the AFM can come right off, too
Now that the (spare) AFM is on the bench, I can test it, and with the flapper closed, the resistance reading is .55 ohms
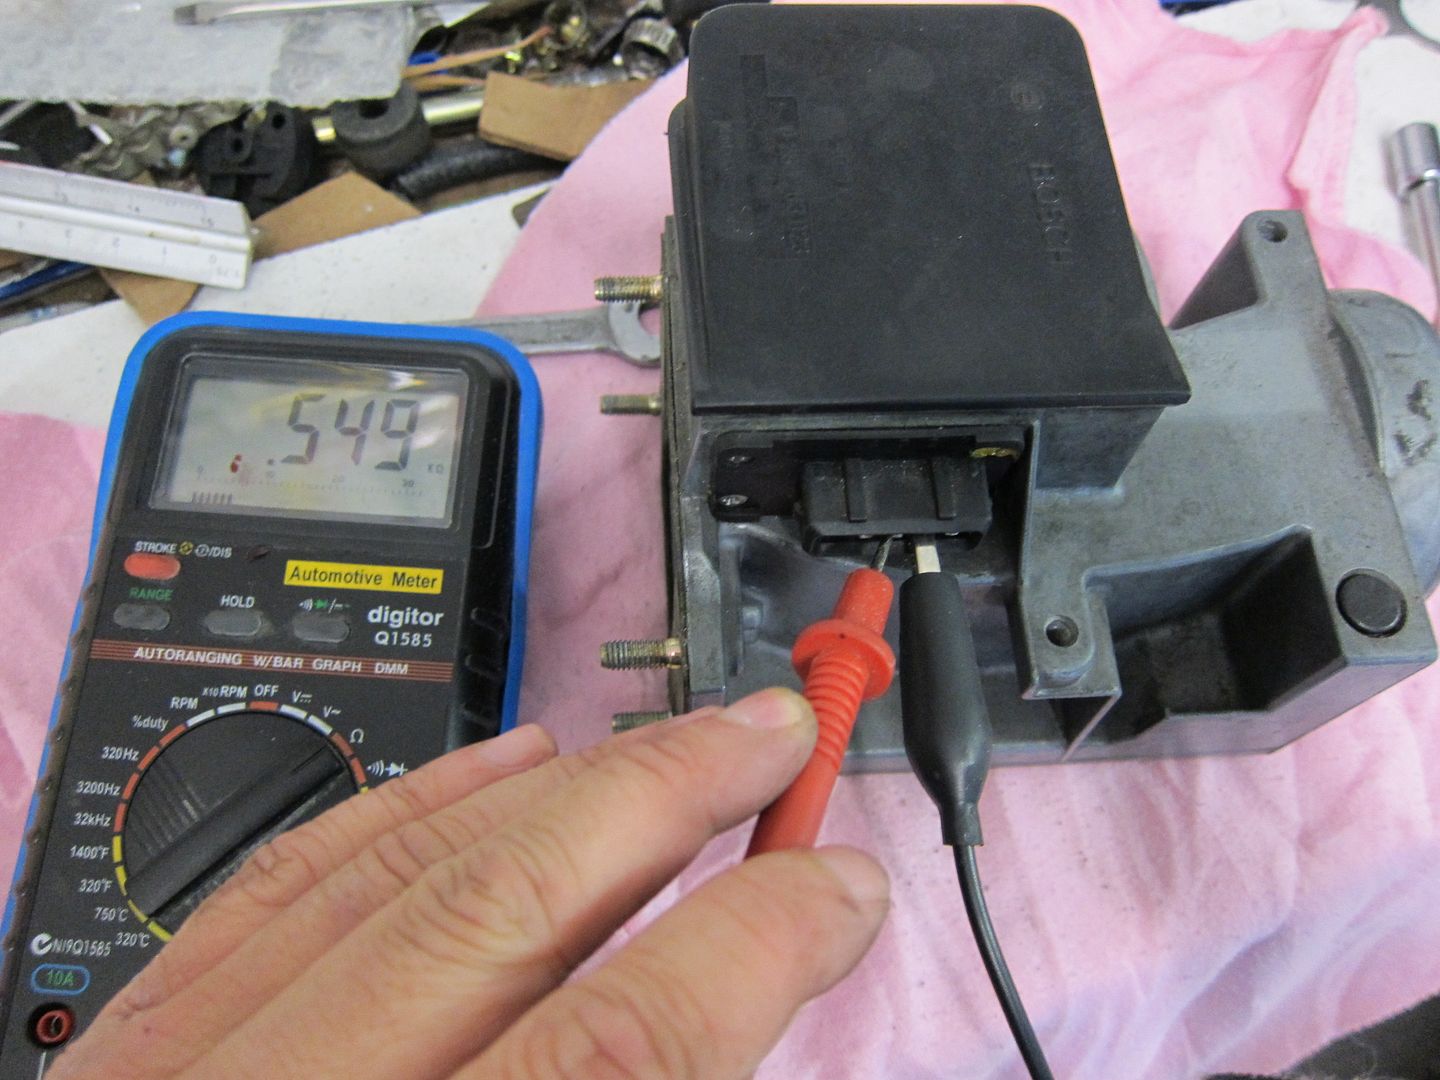
If I crack open the flapper a hair, the resistance rises smoothly to .57 ohms
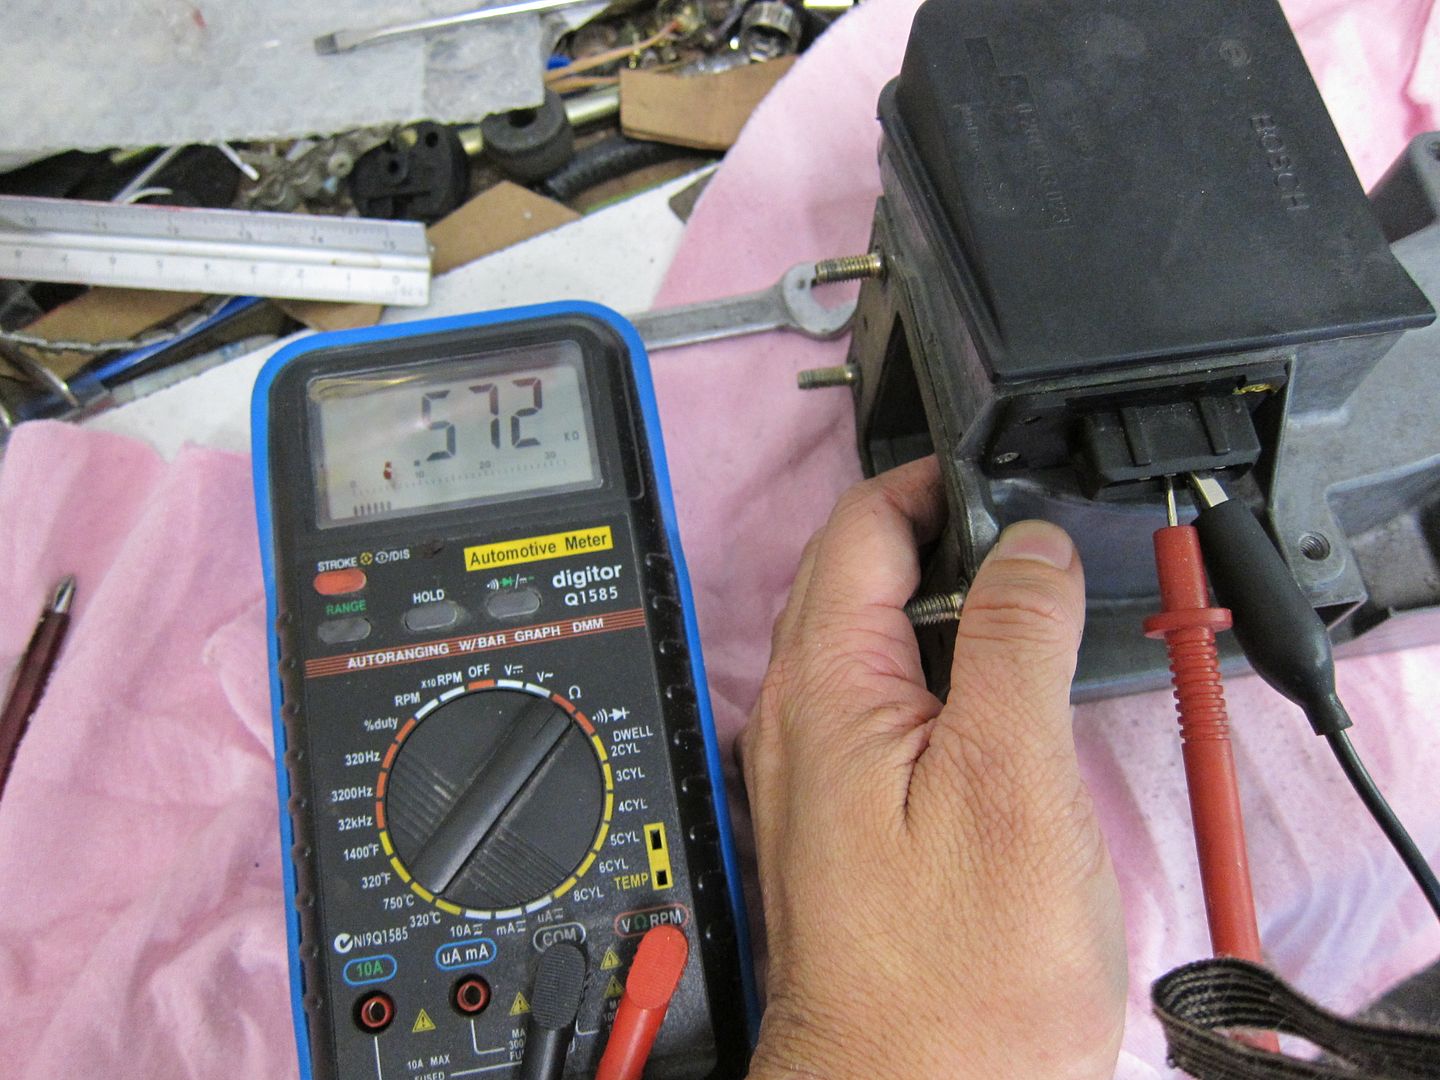
And with the flapper all the way open, the resistance falls to .3 ohms
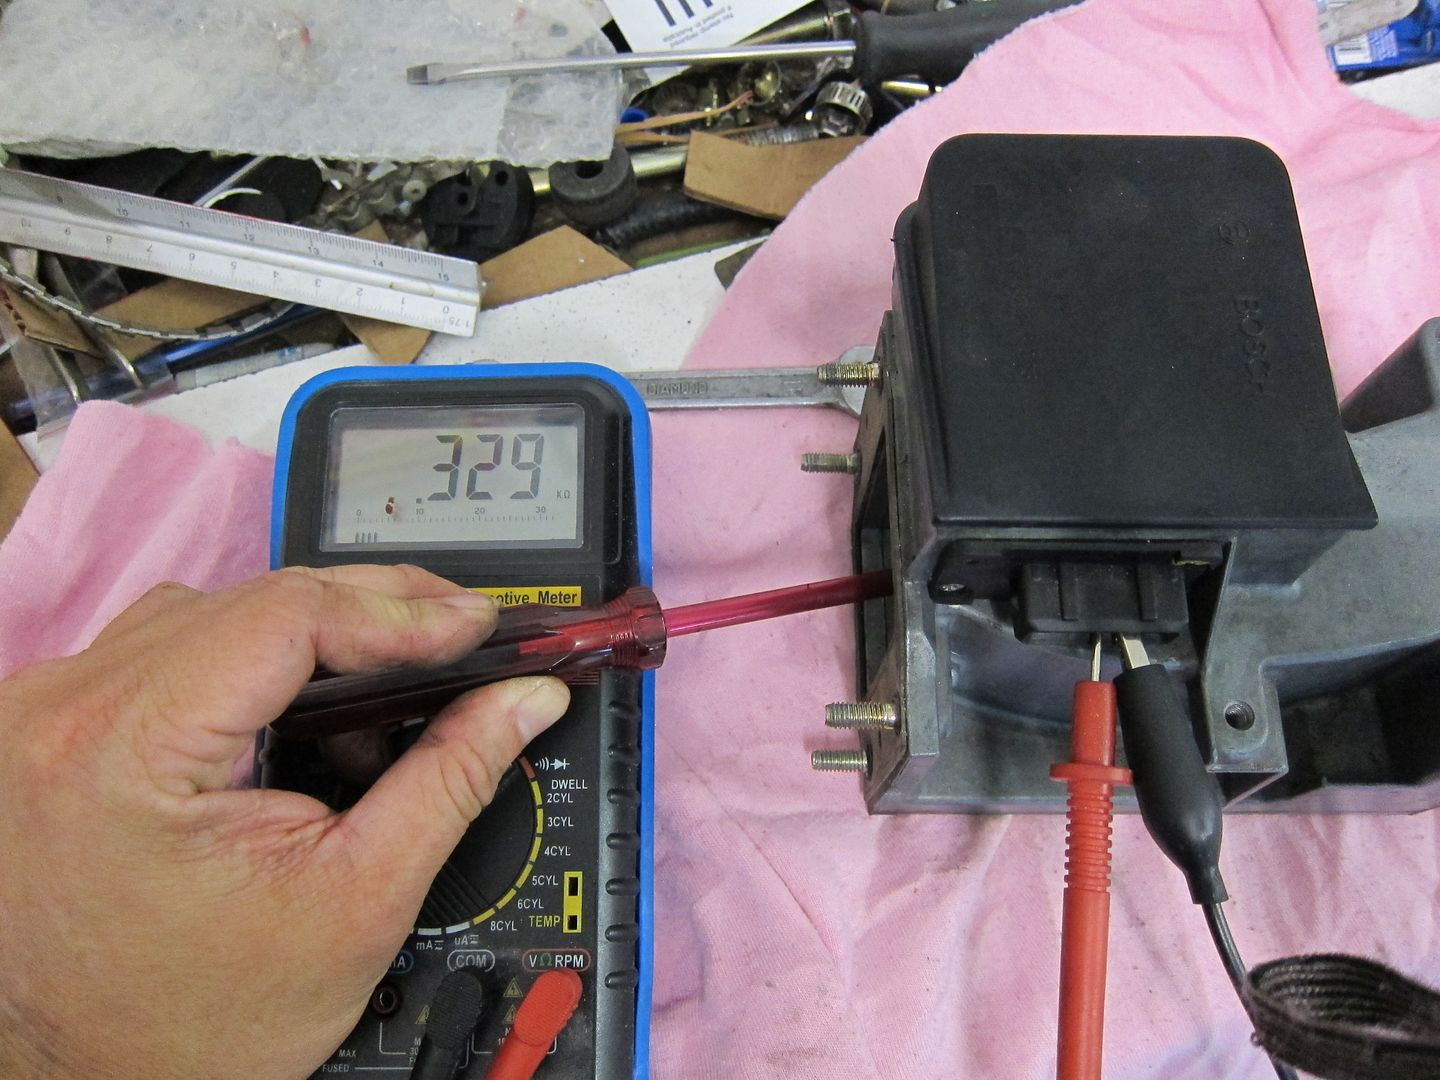
Now, I have no idea if this is actually a good way to test an AFM or not And the factory manual gives a voltage range for testing the AFM instead of resistance (0.25V when closed, and 4.6V when fully-open). But when I repeated the same test with the AFM out of the car, the results were broadly the same. And...I figure, if there was a dead spot on the AFM tracks, then surely it would have given a funny resistance reading? Anyway...notwithstanding that, I swapped the AFM in the car for the spare one anyway, just to see if it might make any difference.
And you know what? It did make a difference. Low-rpm running was a bit crisper, and after a week's driving, I haven't encountered that off-throttle dead spot anymore.
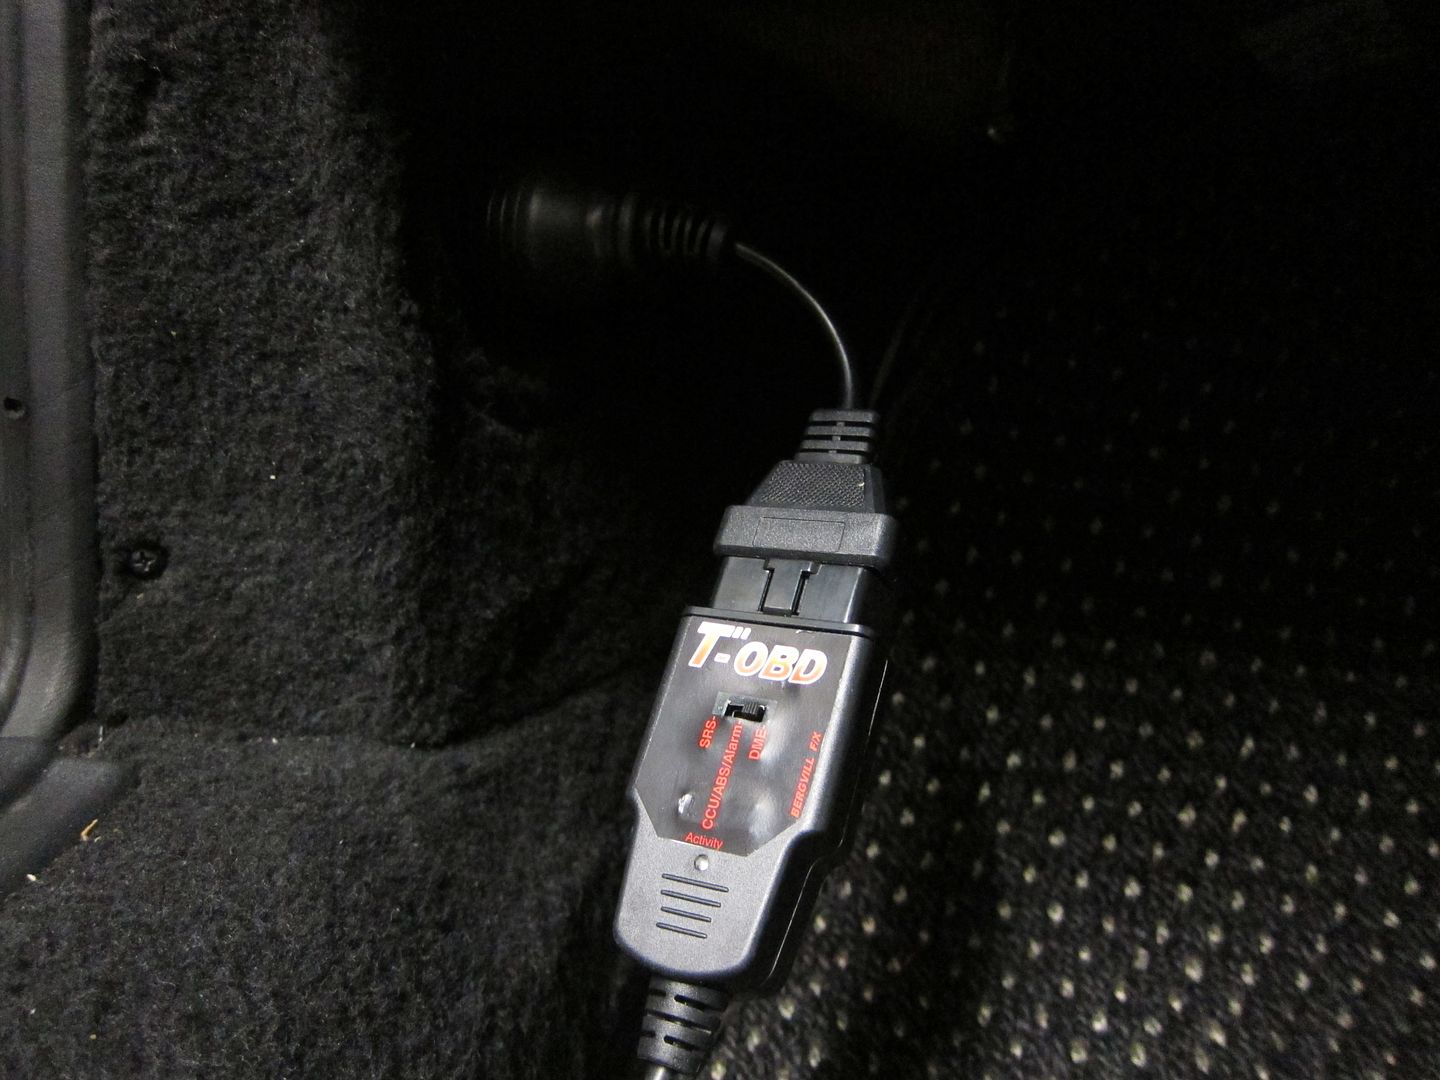
But I figured that there was a better, and easier way of testing the car's electrical parts, and so I went and bought this, a T-OBD from BergvillFX.

What it is, is hardware that allows you to plug a laptop into the diagnostic port of the car, and it works with the free Scantool software. BergvillFX is fellow Rennlister Tore-B, and the Scantool software is courtesy of also fellow Rennlister DougB (people with surnames beginning with B must be very smart). Doug and Tore...thank you
So the first thing you do, is kick your kids off Minecraft, and take their laptop down to the garage
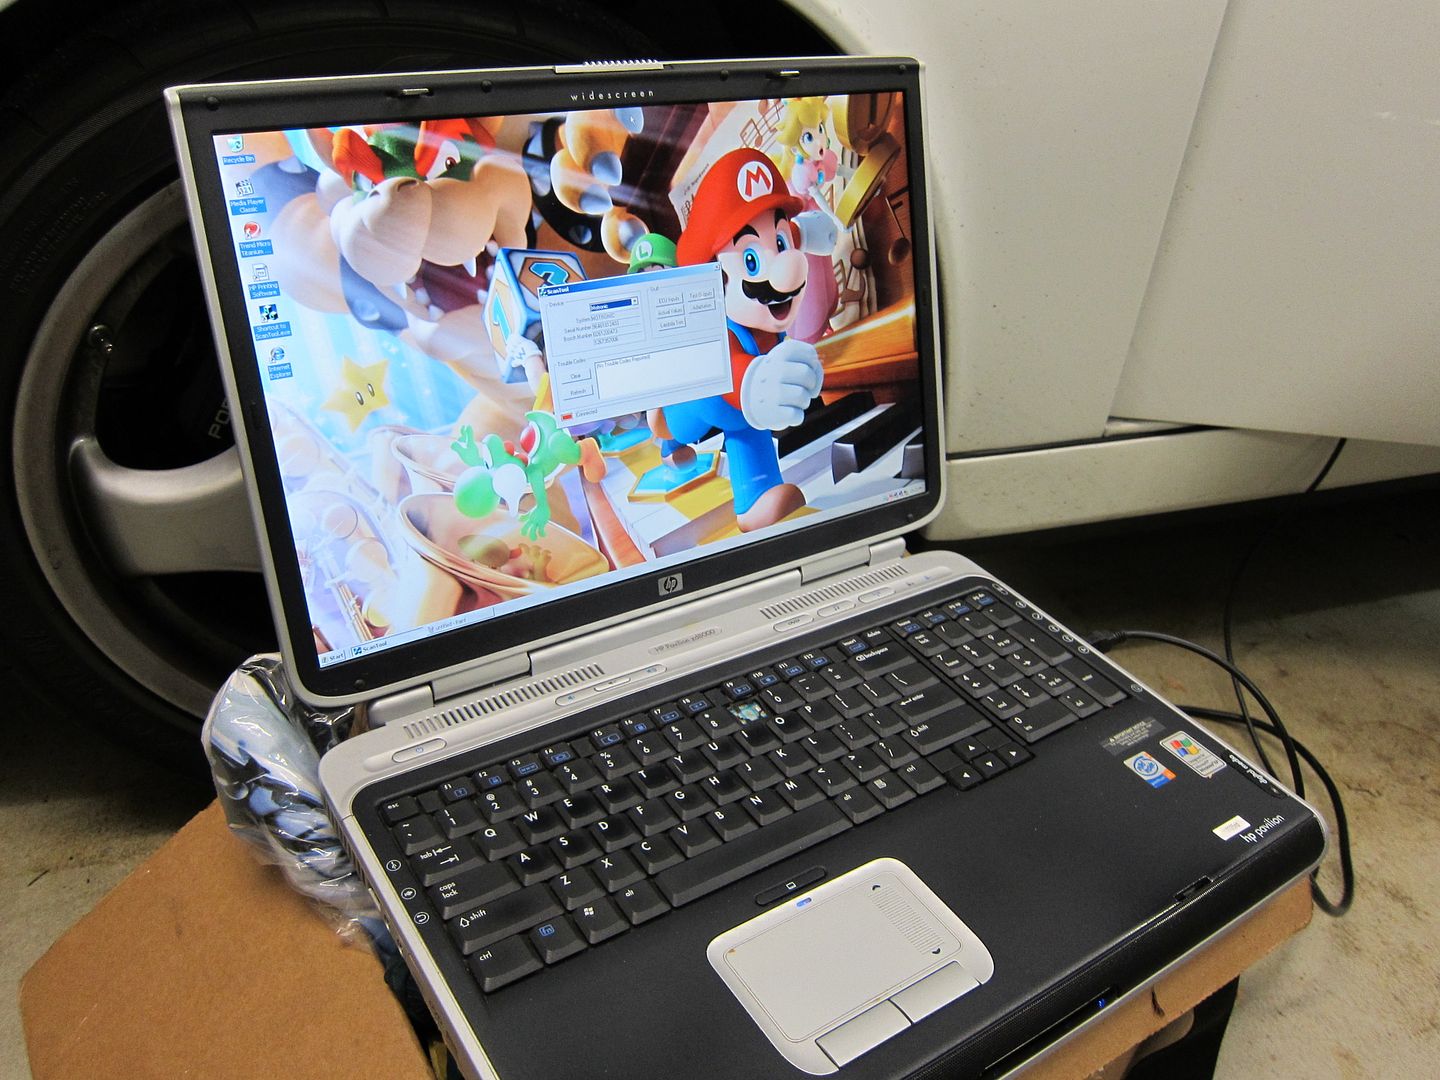
The Scantool software is free, and the instructions at BergvillFX look pretty daunting to an IT-phobic like me, with lots of things like "edit thescantool.ini file with the COM PORT selected"....but there are plenty of screenshots in the step by step instructions, and it's pretty idiot-proof (hey, if I can do it...). Then you just plug in the adapter and fire up the laptop.
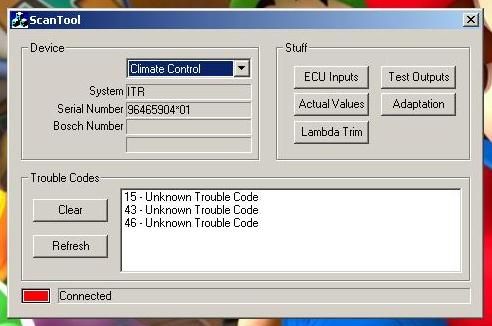
The first screen you see once it connects, is this, and thankfully...no error codes on the DME.

Click on where it says "Motronic", and there's a drop down box, which gives you access to the ABS, Climate Control and TIP menus. You can scroll thru each menu to check for error codes, but the only ones I had were these, in the climate control section. They relate to the engine bay heater blower, which has been removed because I have a Cup bypass pipe back there, so this makes sense.
Then we go back to the "Motronic" menu, and check the ecu inputs. The engine is off at this point, by the way. The AFM (or MAF sensor) is reading 0.25V, just as per factory specs, so this is good. To test if it goes to 4.6V with the flapper open, I'll have to pop the airbox lid off, and move the flapper by hand, while someone reads the screen, but so far, so good. You can also see at this screen, that the idle switch is on, as it should be. Floor the accelerator, and the idle switch should go off, and the WOT switch come on.
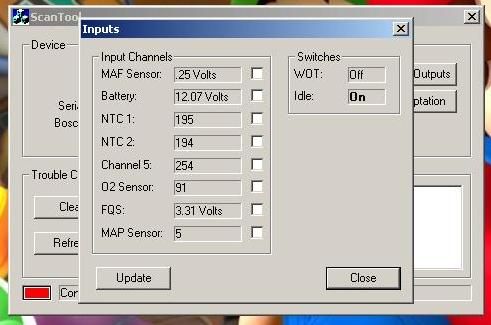
Start the engine, and the battery charge goes to 13.5V (which is good) and the AFM voltage rises to 1.4v, as the airflow prises open the flapper a hair.
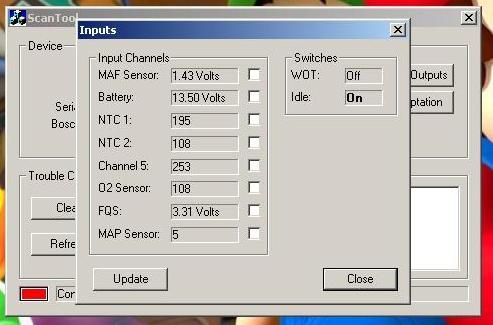
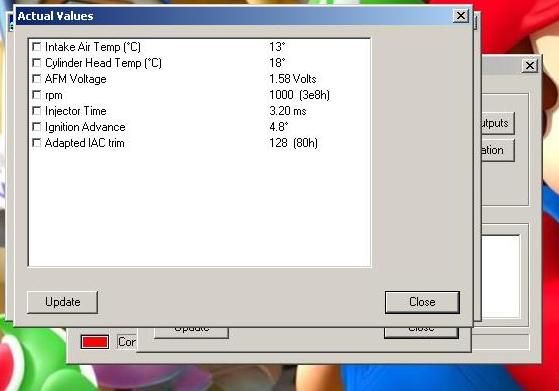
So far, it looks like the idle and WOT switches are working, and the AFM is fine (at low rpm anyway). Next thing to check is the operation of the cylinder head temp sensor. With the engine off, and stone cold, the sensor reads 18C, which sounds about right. Fire up the engine, and the temps rise to 40, then 50 degrees pretty much straight away, and after a long drive the temps max out at 117C (which I think is the upper limit of the sensor, which will read no higher). Phew...cylinder head temp sensor seems ok, too.
Now the last step is the famous Idle Adaptation. Click on the button marked...um..."ADAPTATION", and this box pops up. First, the engine has to be up to operating temp. Turn off the a/c, lights and anything else you got, press the Adaptation button, and then start the engine.
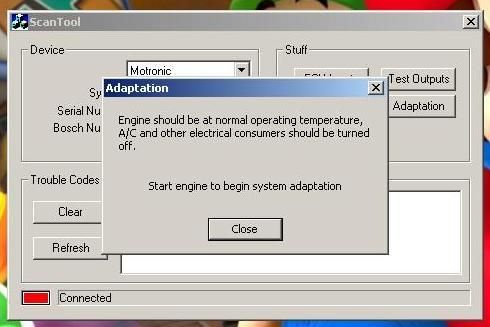
After about 30 seconds or so, it's done!
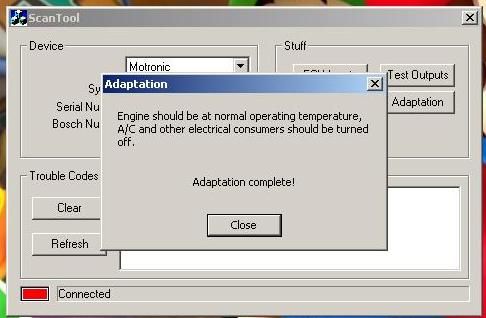
Now what is an Idle Adaptation? Well, as far as I understand it, the adaptation is like a hard reboot of the DME's idle function, so that it returns to factory baseline settings. For some funny reason, you can unplug the battery and walk away from the car for a week, but the DME still will retain the idle settings it's "learned". The only way to reset it, is to do it via the diagnostic port...
And it...WORKS!
Cold starting is definitely easier, and the idle is much smoother and more stable. It's much less easy to stall and the car's happier to mooch along at idle in slow traffic, with your foot off the throttle and no more kangarooing. Replacing the AFM helped remove that dead spot, but the adaptation has made it much more solid at low revs.
I'll report back after a few more days, but so far the adaptation seems to have done the trick. The Scantool and T-OBD is a revelation too, in that you can test a lot of things in the engine, very quickly and without dismantling anything. The next things to play with on the Scantool, is testing the O2 sensor and the max reading on the AFM.
And if any Sydney Rennlisters would like to have a diagnostic session and to have the adaptation done, you are welcome to come over
The second issue, is the poor idle control in low speed, stop-go traffic. My car was particularly bad in this respect, being easy to stall, and reluctant to lope along in gear at tickover without a bit of kangarooing-along.
My first thought was that it might be related to the air flow meter, so I begin by rummaging among the pile of bits that I inherited with the car. At the time, I thanked the car's seller (but was a little nonplussed as to what I'd do with all this junk), but over time I've come to realise that al this stuff is actually in really good, low mileage condition.
So the first step is to remove the airflow meter from the spare manifold, and first you unclip the air horn from the airbox
That gives access to the nuts that you have to remove, to separate the airbox from the AFM
The airbox is also bolted to the manifold, here...
..and inside the airbox here.
Then, the airbox lifts off, and you just undo a hose clamp, unclip the AFM plug, and the AFM can come right off, too
Now that the (spare) AFM is on the bench, I can test it, and with the flapper closed, the resistance reading is .55 ohms
If I crack open the flapper a hair, the resistance rises smoothly to .57 ohms
And with the flapper all the way open, the resistance falls to .3 ohms
Now, I have no idea if this is actually a good way to test an AFM or not
And the factory manual gives a voltage range for testing the AFM instead of resistance (0.25V when closed, and 4.6V when fully-open). But when I repeated the same test with the AFM out of the car, the results were broadly the same. And...I figure, if there was a dead spot on the AFM tracks, then surely it would have given a funny resistance reading? Anyway...notwithstanding that, I swapped the AFM in the car for the spare one anyway, just to see if it might make any difference.And you know what? It did make a difference. Low-rpm running was a bit crisper, and after a week's driving, I haven't encountered that off-throttle dead spot anymore.
But I figured that there was a better, and easier way of testing the car's electrical parts, and so I went and bought this, a T-OBD from BergvillFX.
What it is, is hardware that allows you to plug a laptop into the diagnostic port of the car, and it works with the free Scantool software. BergvillFX is fellow Rennlister Tore-B, and the Scantool software is courtesy of also fellow Rennlister DougB (people with surnames beginning with B must be very smart). Doug and Tore...thank you
So the first thing you do, is kick your kids off Minecraft, and take their laptop down to the garage
The Scantool software is free, and the instructions at BergvillFX look pretty daunting to an IT-phobic like me, with lots of things like "edit thescantool.ini file with the COM PORT selected"....but there are plenty of screenshots in the step by step instructions, and it's pretty idiot-proof (hey, if I can do it...). Then you just plug in the adapter and fire up the laptop.
The first screen you see once it connects, is this, and thankfully...no error codes on the DME.
Click on where it says "Motronic", and there's a drop down box, which gives you access to the ABS, Climate Control and TIP menus. You can scroll thru each menu to check for error codes, but the only ones I had were these, in the climate control section. They relate to the engine bay heater blower, which has been removed because I have a Cup bypass pipe back there, so this makes sense.
Then we go back to the "Motronic" menu, and check the ecu inputs. The engine is off at this point, by the way. The AFM (or MAF sensor) is reading 0.25V, just as per factory specs, so this is good. To test if it goes to 4.6V with the flapper open, I'll have to pop the airbox lid off, and move the flapper by hand, while someone reads the screen, but so far, so good. You can also see at this screen, that the idle switch is on, as it should be. Floor the accelerator, and the idle switch should go off, and the WOT switch come on.
Start the engine, and the battery charge goes to 13.5V (which is good) and the AFM voltage rises to 1.4v, as the airflow prises open the flapper a hair.
So far, it looks like the idle and WOT switches are working, and the AFM is fine (at low rpm anyway). Next thing to check is the operation of the cylinder head temp sensor. With the engine off, and stone cold, the sensor reads 18C, which sounds about right. Fire up the engine, and the temps rise to 40, then 50 degrees pretty much straight away, and after a long drive the temps max out at 117C (which I think is the upper limit of the sensor, which will read no higher). Phew...cylinder head temp sensor seems ok, too.
Now the last step is the famous Idle Adaptation. Click on the button marked...um..."ADAPTATION", and this box pops up. First, the engine has to be up to operating temp. Turn off the a/c, lights and anything else you got, press the Adaptation button, and then start the engine.
After about 30 seconds or so, it's done!
Now what is an Idle Adaptation? Well, as far as I understand it, the adaptation is like a hard reboot of the DME's idle function, so that it returns to factory baseline settings. For some funny reason, you can unplug the battery and walk away from the car for a week, but the DME still will retain the idle settings it's "learned". The only way to reset it, is to do it via the diagnostic port...
And it...WORKS!
Cold starting is definitely easier, and the idle is much smoother and more stable. It's much less easy to stall and the car's happier to mooch along at idle in slow traffic, with your foot off the throttle and no more kangarooing. Replacing the AFM helped remove that dead spot, but the adaptation has made it much more solid at low revs.
I'll report back after a few more days, but so far the adaptation seems to have done the trick. The Scantool and T-OBD is a revelation too, in that you can test a lot of things in the engine, very quickly and without dismantling anything. The next things to play with on the Scantool, is testing the O2 sensor and the max reading on the AFM.
And if any Sydney Rennlisters would like to have a diagnostic session and to have the adaptation done, you are welcome to come over
 06-25-2013, 05:00 PM
#506
Pro
Join Date: Oct 2012
Location: Brockville, On, Canada
Posts: 536
Likes: 0
Received 2 Likes
on
2 Posts
Scantool sounds like a great troubleshooting item. Can you provide us with some of the other features? For example, I have a cabrio and the roof occasionally refuses to open/shut. Would the scan tool tell me if the microswitches are contacting, or is it specifically for engine troubleshooting?
Peter
Peter
06-25-2013, 07:57 PM
#508
Burning Brakes
Thread Starter
1. Turn on the Wii
2. Fire up Mario Party
3. Let nature take its course
Scantool sounds like a great troubleshooting item. Can you provide us with some of the other features? For example, I have a cabrio and the roof occasionally refuses to open/shut. Would the scan tool tell me if the microswitches are contacting, or is it specifically for engine troubleshooting?
Peter
Peter
 06-29-2013, 04:59 PM
#510
Race Car
Nice one Baba - scantool from Tore (and a few other goodies he has) to be ordered soon!
My idle etc... Improved when I replaced my missing TPS with a VAG part I found ...
But still could be improved I hope especially when engine still cold ... Especially 'kangerooing'
Maybe I should replace my missing AFM too!
My idle etc... Improved when I replaced my missing TPS with a VAG part I found ...
But still could be improved I hope especially when engine still cold ... Especially 'kangerooing'
Maybe I should replace my missing AFM too!