

Track car pics
 05-28-2004, 01:29 PM
#166
Addict
Rennlist Member
Rennlist
Site Sponsor
Rennlist Member
Rennlist
Site Sponsor
Join Date: May 2001
Location: Virtually Everywhere...
Posts: 4,820
Likes: 0
Received 5 Likes
on
5 Posts
Good point, George. I think, but am not positive, mine was done safety-over-suspension in mind because the rollbar stood alone for two years while I didn't need the full cage. The car is plenty stiff now, but I can't help but wonder how the suspension tie-in would change things. This gorilla would probably not even notice! 
For those who are listening who may be building a racecar in the future, the relationship you have with your fabricator is vital. My "guy" and I lost the bubble on communication, so, I got what I got. It'll work, but if communication were better things would have been much different. A very compelling reason to learn to do this stuff yourself. Alas, DIY is a toss on economy if you don't plan on building more than one. Comfort with safety is key to the cage construction - just an inch here and there can make all the difference in the world.
For those who are listening who may be building a racecar in the future, the relationship you have with your fabricator is vital. My "guy" and I lost the bubble on communication, so, I got what I got. It'll work, but if communication were better things would have been much different. A very compelling reason to learn to do this stuff yourself. Alas, DIY is a toss on economy if you don't plan on building more than one. Comfort with safety is key to the cage construction - just an inch here and there can make all the difference in the world.
 05-28-2004, 05:25 PM
#167
Race Director
Originally posted by Skip
Good point, George. I think, but am not positive, mine was done safety-over-suspension in mind because the rollbar stood alone for two years while I didn't need the full cage. The car is plenty stiff now, but I can't help but wonder how the suspension tie-in would change things. This gorilla would probably not even notice!
Good point, George. I think, but am not positive, mine was done safety-over-suspension in mind because the rollbar stood alone for two years while I didn't need the full cage. The car is plenty stiff now, but I can't help but wonder how the suspension tie-in would change things. This gorilla would probably not even notice!
Originally posted by Skip
For those who are listening who may be building a racecar in the future, the relationship you have with your fabricator is vital. My "guy" and I lost the bubble on communication, so, I got what I got. It'll work, but if communication were better things would have been much different. A very compelling reason to learn to do this stuff yourself.
For those who are listening who may be building a racecar in the future, the relationship you have with your fabricator is vital. My "guy" and I lost the bubble on communication, so, I got what I got. It'll work, but if communication were better things would have been much different. A very compelling reason to learn to do this stuff yourself.
Originally posted by Skip
Alas, DIY is a toss on economy if you don't plan on building more than one.
Alas, DIY is a toss on economy if you don't plan on building more than one.
For a comparison, we have about $700 into the bender and notcher.
They are both from JD Squared. Their notcher is much better than most you will commonly find available. They are the best bet on a bender. We have one bending die - 1.500" x 4.500" radius. Originally I was going to use 1.750" tubing because it's lighter and stronger, but the tighter bend radius makes it easier to keep the cage tight to the coachwork.
If you have to buy a welder, you can go budget at about $600 or, well, sky's the limit. The one we are using (my neighbor's Miller 210) is about a $1,500 welder.
In our case my two business partners and I are all building cages so it's dirt cheap. The tubing ran about $350 per car and that includes making test bends for each bend (I didn't use templates per se, I made a sample of each bend and used these and other set-up techniques to get the lengths right as well as the angles).
So, without the welder, our cost would have been $1,050 for one, and will be under $600 per car for 3. Actually, that's not true. My neighbor wouldn't take any money so I bought him a $300 compressor as thanks.
Originally posted by Skip
Comfort with safety is key to the cage construction - just an inch here and there can make all the difference in the world.
Comfort with safety is key to the cage construction - just an inch here and there can make all the difference in the world.
One major mistake made by professional and amateur cage builders alike is not tying tubes to a single point and making too many bends (bends are just nature's way of saying "fold here"). Sometimes compromises need to be made as well.
In my case, due to the shallow angles of some cross braces, I could not notch tubes at such a shallow angle. So, I had to weld a few bars next to each other. Not exactly ideal (see the bottom of the door X). If I had a plasma cutter it would have been much easier, but that was not an option.
I also bent the upper front cross bar, but I considered it a good compromisee because it enabled me to tuck it up into a channel in the roof just forward of the sunroof, and this got it away from my head and raised the height of the cage there.
I also bent the dash bar. This was not ideal, but fitting the bar in an early 944 was difficult. I had to choose between a knee capper, above the dash, or through the dash itself. Behind it was not possible for me since I have to retain the heater per the rules.
05-28-2004, 09:55 PM
#168
Addict
Rennlist Member
Rennlist Member
Thread Starter
We are already discussing a full cage after we get the car sorted the rest of the year. Probably should've given it some consideration before hand but we've done this on a budget so far and it has been a good one.
Speaking of the "rest of the year", for those of you in AR, OK, KS, MO,,any others who may want to come/drive in, we(Jim and myself, along with Dave Lindsey + ??) are thinking about renting Hallet for a couple of days in September or October for tuning days. Just stay advised, we will probably start a new thread for it, just as to cover the cost of the track.
Geo, great cleaning effort and great cage!!
05-29-2004, 03:37 AM
#169
Race Director
Originally posted by Ski
Speaking of the "rest of the year", for those of you in AR, OK, KS, MO,,any others who may want to come/drive in, we(Jim and myself, along with Dave Lindsey + ??) are thinking about renting Hallet for a couple of days in September or October for tuning days. Just stay advised, we will probably start a new thread for it, just as to cover the cost of the track.
Speaking of the "rest of the year", for those of you in AR, OK, KS, MO,,any others who may want to come/drive in, we(Jim and myself, along with Dave Lindsey + ??) are thinking about renting Hallet for a couple of days in September or October for tuning days. Just stay advised, we will probably start a new thread for it, just as to cover the cost of the track.
Originally posted by Ski
Geo, great cleaning effort and great cage!!
Geo, great cleaning effort and great cage!!
05-29-2004, 12:54 PM
#170
Addict
Rennlist Member
Rennlist Member
Thread Starter
Since the door glass is gone, Jim cut some plexiglass to fit into the windows when trailering the car down the road - keep it dry inside it it rains. Yes, we will pull the protective cover off later....

05-29-2004, 10:09 PM
#171
Pro

Join Date: Sep 2003
Location: 4th Ring of Hades, aka Houston, TX
Posts: 747
Likes: 0
Received 1 Like
on
1 Post
George, Skip, Ski, et al, I'm currious what sort of weight these complex cages add to the cars. I know the tradeoff is stiffness, but just wonderin' what all that steel weighs? Hundred pounds?
05-29-2004, 11:05 PM
#172
Race Director
Originally posted by TaylorSea4
George, Skip, Ski, et al, I'm currious what sort of weight these complex cages add to the cars. I know the tradeoff is stiffness, but just wonderin' what all that steel weighs? Hundred pounds?
George, Skip, Ski, et al, I'm currious what sort of weight these complex cages add to the cars. I know the tradeoff is stiffness, but just wonderin' what all that steel weighs? Hundred pounds?
I'd guess a couple hundred pounds. But, I only have two bars I'd consider even remotely optional and they probably weigh a total of 5-10lbs.
05-30-2004, 12:15 AM
#174
Addict
Rennlist Member
Rennlist
Site Sponsor
Rennlist Member
Rennlist
Site Sponsor
Join Date: May 2001
Location: Virtually Everywhere...
Posts: 4,820
Likes: 0
Received 5 Likes
on
5 Posts
My last car weight was 2625 with 8 gallons of gas, full dash, door panels, and only the rear half of the cage. Will be getting weighed again in a few weeks. I'm hoping to maintain weight as I'm still removing things. An extra 20# will go with the passenger seat in race trim - and, I finally removed the sunroof.
06-05-2004, 03:14 PM
#175
Race Director
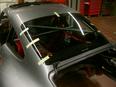
Hey, I thought I'd share some updated photos of my cage here since I shared some before. This is a X post from the 944 forum (I know some of you don't wander over there). The dash is an early dash, so what I did doesn't directly relate to you, but what the heck.
Here are some new photos of my cage progress.....
The passenger X and the dash bar are still just tacked into place, but those welds will be completed soon.
Most of the point of this post is to show the dash mock-up. The face is fitting pretty nicely right now. The piece between the bar and the windshield needs some more work. I thought I had it really nice, but when I installed the heater and defroster ducting I realized I have some more work to do. Once the fitting is done and the brackets for the dash are in place, I will flock the entire dash - something I've been talking about for a while. I'm also going to work on the cracks. I have some ideas, but nothing is final yet, but will before flocking of couse.
Here are some wide shots showing the dash tie-wrapped in place. I still have some final fitment work to do, but 95% of the hard work is done. The dash has been cut in two pieces length-wise.


Here are some close-ups of the connection of the pillar tubes with the door Xs and the dash bar. Notice how the dash bar connects at the same spot as the Xs. This was particularly important since the dash bar was already weakened by bending it at both ends. The bends were a compromise since the alternative was to not have this bar at all because 1) I didn't want a knee-capper, 2) I didn't really want to attach at straight bar above the dash and attach above the connection of the Xs.


Lastly, here is a photo of the cash, dash, seat, and net mocked up. The seat is not bolted down yet, but should be pretty doggone close to its final position.
I'm still trying to work out the net mounts but I have to get the cage padding first. I'm going to use BSCI padding. It's the best around. FIA homologated, it won't melt or burn, and it does the best job of absorbing energy (impacts). But, the padding will get in the way of mounting the net. There really doesn't appear to be room to mount it on the opposite side because the cage tubing is fit so close to the coachwork I can't really fit the mounting bar between the cage bars and the coachwork. So, I have some work to do there.
I am going to try to mount the seat this weekend. Right now it appears it won't, but I didn't follow Skip's directions exactly, so I'm going to loosen all the bolts in the mounting bracket and loosely bolt it to the sliders, which I hope to mount loosely to the seat mounting bosses. Hopefully, this will all work and when I tighten everything up it will all come good. If not, I will fabricate a fixed mount from aluminum angle and flat stock (all 0.250"). I may do this anyway to get a bit more head room.

Here are some new photos of my cage progress.....
The passenger X and the dash bar are still just tacked into place, but those welds will be completed soon.
Most of the point of this post is to show the dash mock-up. The face is fitting pretty nicely right now. The piece between the bar and the windshield needs some more work. I thought I had it really nice, but when I installed the heater and defroster ducting I realized I have some more work to do. Once the fitting is done and the brackets for the dash are in place, I will flock the entire dash - something I've been talking about for a while. I'm also going to work on the cracks. I have some ideas, but nothing is final yet, but will before flocking of couse.
Here are some wide shots showing the dash tie-wrapped in place. I still have some final fitment work to do, but 95% of the hard work is done. The dash has been cut in two pieces length-wise.
Here are some close-ups of the connection of the pillar tubes with the door Xs and the dash bar. Notice how the dash bar connects at the same spot as the Xs. This was particularly important since the dash bar was already weakened by bending it at both ends. The bends were a compromise since the alternative was to not have this bar at all because 1) I didn't want a knee-capper, 2) I didn't really want to attach at straight bar above the dash and attach above the connection of the Xs.
Lastly, here is a photo of the cash, dash, seat, and net mocked up. The seat is not bolted down yet, but should be pretty doggone close to its final position.
I'm still trying to work out the net mounts but I have to get the cage padding first. I'm going to use BSCI padding. It's the best around. FIA homologated, it won't melt or burn, and it does the best job of absorbing energy (impacts). But, the padding will get in the way of mounting the net. There really doesn't appear to be room to mount it on the opposite side because the cage tubing is fit so close to the coachwork I can't really fit the mounting bar between the cage bars and the coachwork. So, I have some work to do there.
I am going to try to mount the seat this weekend. Right now it appears it won't, but I didn't follow Skip's directions exactly, so I'm going to loosen all the bolts in the mounting bracket and loosely bolt it to the sliders, which I hope to mount loosely to the seat mounting bosses. Hopefully, this will all work and when I tighten everything up it will all come good. If not, I will fabricate a fixed mount from aluminum angle and flat stock (all 0.250"). I may do this anyway to get a bit more head room.
06-05-2004, 08:16 PM
#176
Rennlist Member
Join Date: Aug 2003
Location: Corpus Christi, TX
Posts: 398
Likes: 0
Received 0 Likes
on
0 Posts
Good afternoon rennlisters! Bret here on Jims computer, I didn't have the energy to log out and log in - WHAT a day. First - someone find some ALLEN head cam bolts!!!! Right off the bat, stripped the head and had to drill it out. Then the speed and reference sensors were so damn tight that the back one had be knocked out! It actually left the aluminum from its own housing in the block; oh yeah then we had to pull that POS out, which had a $hitty little roll pin forward into the block other than the bolt and allen that hold it in.
BUT, the new RSR clutch is in, engine compartment is clean, cam tower is painted and sealed up - front polished, rod bearings are done, new rings are done and we, well Jim and Shaun are tightening up the oil pan right now. We will probably get the head gasket and head on - torque and then go let loose some torque at Joe's Crab Shack here in Corpus Christi. I'll post a few pics in the morning. We will install the tranny in the morning, then start up front with oil cooler's, get the belts finished(oh yeah we got the water pump done today too), then start up top. Monday electronics and start. Later.
BUT, the new RSR clutch is in, engine compartment is clean, cam tower is painted and sealed up - front polished, rod bearings are done, new rings are done and we, well Jim and Shaun are tightening up the oil pan right now. We will probably get the head gasket and head on - torque and then go let loose some torque at Joe's Crab Shack here in Corpus Christi. I'll post a few pics in the morning. We will install the tranny in the morning, then start up front with oil cooler's, get the belts finished(oh yeah we got the water pump done today too), then start up top. Monday electronics and start
. Later.
06-05-2004, 11:56 PM
#177
Race Director
Originally posted by jwl
BUT, the new RSR clutch is in, engine compartment is clean, cam tower is painted and sealed up - front polished, rod bearings are done, new rings are done and we, well Jim and Shaun are tightening up the oil pan right now. We will probably get the head gasket and head on - torque and then go let loose some torque at Joe's Crab Shack here in Corpus Christi. I'll post a few pics in the morning. We will install the tranny in the morning, then start up front with oil cooler's, get the belts finished(oh yeah we got the water pump done today too), then start up top. Monday electronics and start. Later.
BUT, the new RSR clutch is in, engine compartment is clean, cam tower is painted and sealed up - front polished, rod bearings are done, new rings are done and we, well Jim and Shaun are tightening up the oil pan right now. We will probably get the head gasket and head on - torque and then go let loose some torque at Joe's Crab Shack here in Corpus Christi. I'll post a few pics in the morning. We will install the tranny in the morning, then start up front with oil cooler's, get the belts finished(oh yeah we got the water pump done today too), then start up top. Monday electronics and start
. Later.
Did you take any pix along the way. I'm going to be donig virtually teh same routine on mine soon.


 06-06-2004, 02:26 PM
#179
Race Director
Oh sweet.
You left the block in the car to do the rings and bearings?
I was going to do that, but when I got around to adding up all the stuff I had to do (bearings, rings, belts, rollers, wp, oil pan, clutch) I finally decided to just drop the engine.
You left the block in the car to do the rings and bearings?
I was going to do that, but when I got around to adding up all the stuff I had to do (bearings, rings, belts, rollers, wp, oil pan, clutch) I finally decided to just drop the engine.
06-06-2004, 04:20 PM
#180
Addict
Rennlist Member
Rennlist Member
Thread Starter


Geo, yes we left it in. We had it blocked on the torque tube and tied between the shock towers. This car had 91k on it and it all looked good once we got it out. The turbo ate a bolt from the intake though and its toast.
We just go the crossover on, the head is on, cam tower, turbo is in, twin oil cooler setup is in, A/C delete done(make sure you have the new bolts with your kit if you get one), alternator is mounted, car is timed - all belts and TDC triple checked. Time for sensors and intake, then fuel and last of the electronics. Thought we might START tonight but it'll be tomorrow. Post some pics in a couple of hours.