
'82 16V 4.7L Build - OE+ Goal
 06-17-2011, 06:54 PM
#46
Pro
Thread Starter
Just installed the delrin bushings in the rear shifter linkage pivot. All I have to say is:
Wow. That changed everything!

That may have been the best money-to-improvement fix I've done on this to date.
Wow. That changed everything!
That may have been the best money-to-improvement fix I've done on this to date.
 06-25-2011, 05:01 PM
#47
Pro
Thread Starter
Took the rear tails apart last night to try and figure out why the lamps always looked so dim. Turned out that most of the silver reflective surface had flaked off or just tarnished itself. Spent this afternoon cleaning, light sanding and prepping the lights then sprayed some reflective silver paint back on. Came out much better than I had expected, and now with the lenses back in place, the bulbs are noticeably much brighter.
No before pictures, unfortunately.
No before pictures, unfortunately.
07-28-2011, 11:18 AM
#48
Pro
Thread Starter
Been going well so far, drive it reliably every weekend and in nice weather during the week.
Bought a used Euro intake and throttle body to go on the new motor. Prepping to send that for powdercoating.
Just finished installing a Mystique dual fan set-up, to replace the howling mechanical fan. Pictures soon.
Bought a used Euro intake and throttle body to go on the new motor. Prepping to send that for powdercoating.
Just finished installing a Mystique dual fan set-up, to replace the howling mechanical fan. Pictures soon.
07-28-2011, 12:24 PM
#49
Pro
Looking forward to seeing you at the next GTG in September. Keep up the good work.
07-28-2011, 01:05 PM
#50
Rennlist Member
07-28-2011, 01:14 PM
#51
Pro
07-28-2011, 02:22 PM
#52
Pro
Thread Starter
All that's on my invoice from Roger @ 928's-R-Us is SB-DEL. It may be easier to just give him a call. He's quite helpful.
I planned weeks ahead and was spraying the little allen bolt that holds the linkage to the transmission with penetrating spray. Not a difficult job if you have the proper tools. Getting the linkage off the car is the hardest part, once off the car the bushing replacement itself is really simple.
I planned weeks ahead and was spraying the little allen bolt that holds the linkage to the transmission with penetrating spray. Not a difficult job if you have the proper tools. Getting the linkage off the car is the hardest part, once off the car the bushing replacement itself is really simple.
07-28-2011, 05:02 PM
#53
Pro
Thanks, I'm gonna take a look and see what's what. Sometimes things get sloppy over time and you really don't notice it until you get a new one (like a windshield for example).
07-28-2011, 05:26 PM
#54
Pro
Thread Starter
The boot that is around the linkage is kind of a PITA, a quick spray with some silicone makes removal and installation much much easier.
07-29-2011, 01:04 PM
#55
Pro
Thread Starter
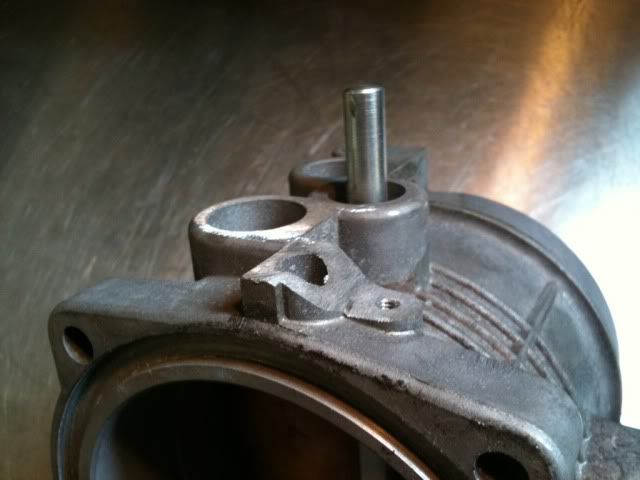
Got side-tracked with all the new bits, so here's my solution to installing a 32V TPS equipped throttle body on a motor that needs to be equipped with idle/wot switches. Also the modifications necessary to fit said 32V TB to the factory '84 J-pipe.
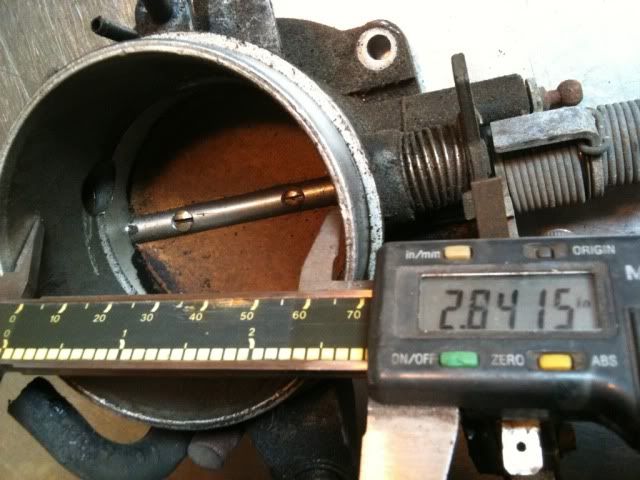
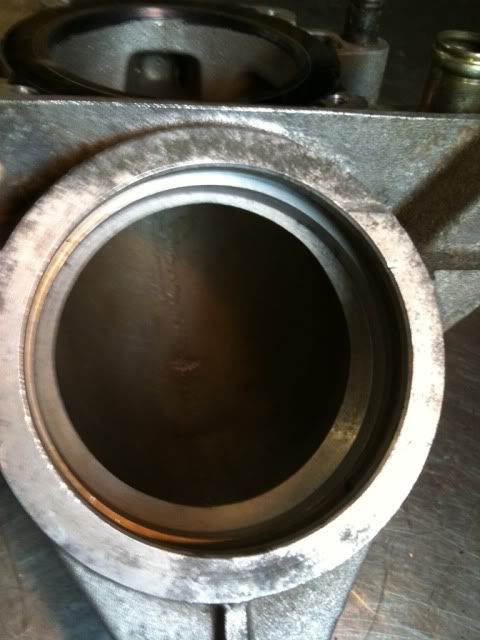
Let's start with the stock '84 throttle body.
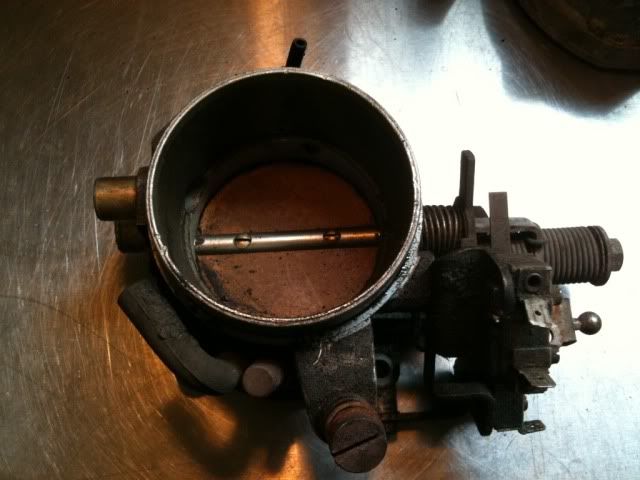
It has a stock exit diameter into the plenum of 2.8XX inches, with the butterfly being slightly smaller than that measurement.
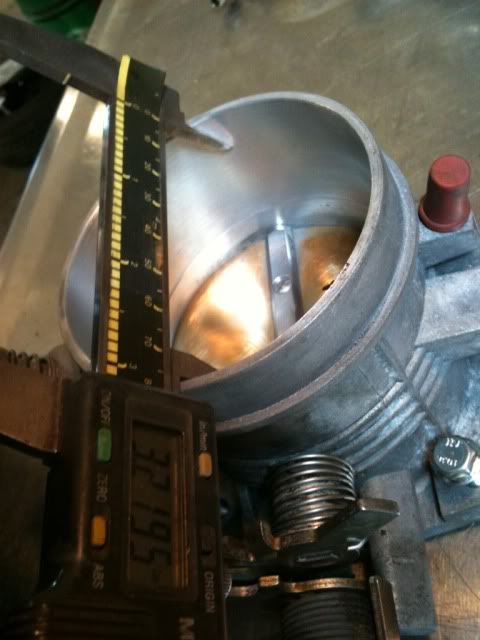
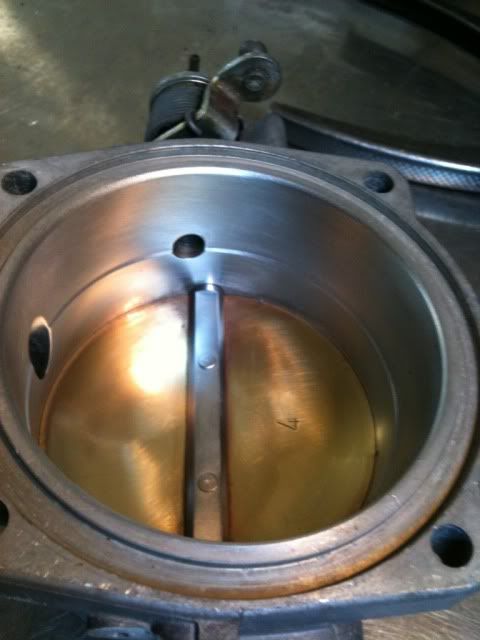
Now the 32V one I'm fitting. The reasoning should be pretty obvious. exit dia. into plenum; 3.2XX inches, again with the butterfly being just smaller.
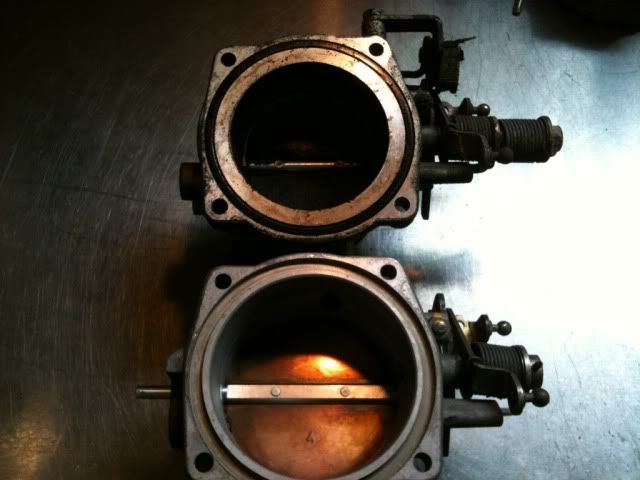
Inlet diameter difference between the two, where it bolts to the j-pipe.
I should note that I've not seen a 32V throttle body before, and this one appears to have had the secondary spring winding pined and then cut off of the linkage. I can only assume this was to lighten the throttle feel, or for some clearance reasoning. I have no history on this throttle body so.... (?)
I've also polished the both sides of the ID, pre and post butterfly with coarse and very fine cross-buffs. Leaves a great smooth finish.
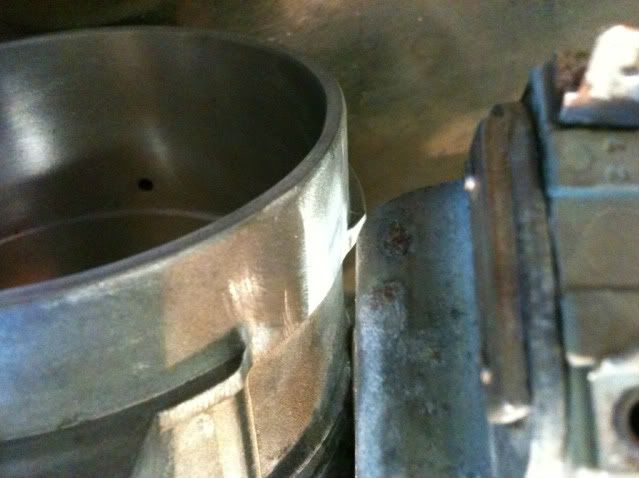
This shows the grinding to clear one of the vacuum ports when the TB is bolted to the j-pipe. You have to do this even just to be able to bolt the TB up. Mine is further ground to be able to still fit the hose and clamp on.
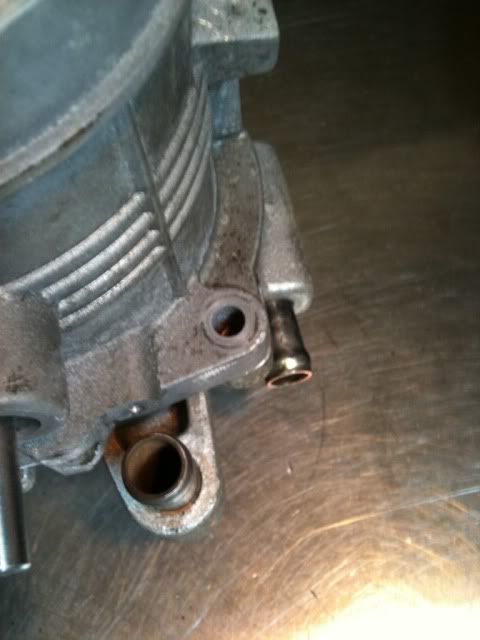
Inked and scribed line showing where the outlet of the j-pipe into the TB will have to be ported and smoothed to match the inlet size of the larger TB.
Inlet side of the j-pipe to the Vane meter will get a similar treatment, and then the entire ID will be smoothed and polished with coarse and fine cross-buffs.
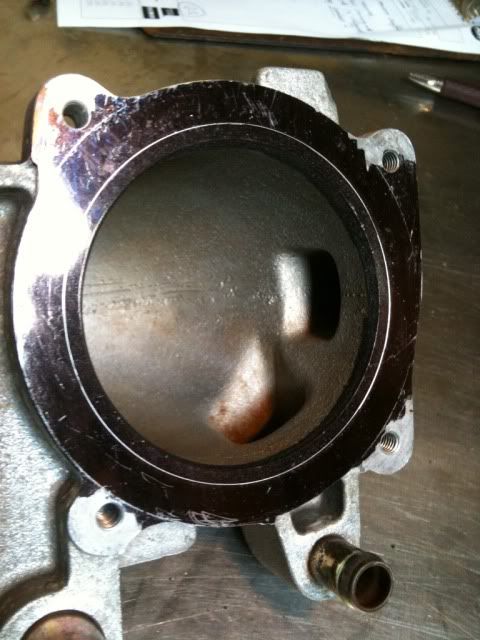
This is the final finish I'll be looking for on all of these parts.
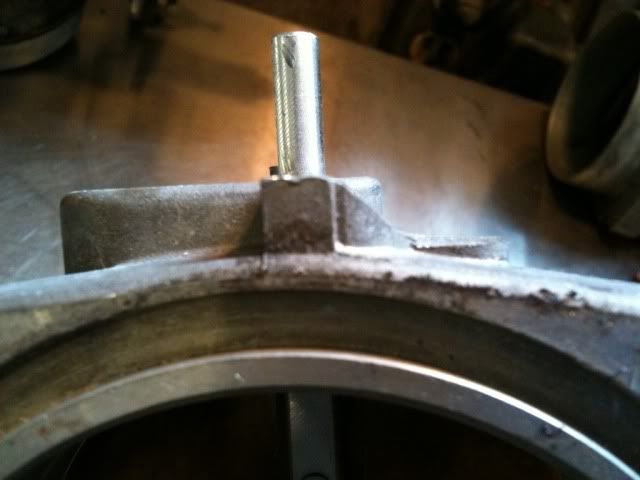
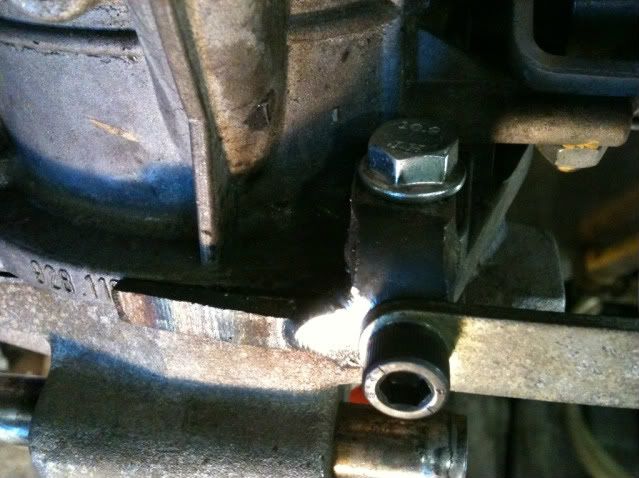
The old TB has cast and tapped bosses for the idle/wot switches to bolt to. The 32V one, does not. I measured and made a simple bracket to locate the switches in as close to the same location, but on the 32V TB. This is the lower bracket (sorry it's upside down). It's a 1/4" thick, 1" wide piece of steel flat stock, cut to a 1/2" width. Clamped tightly in a heavy shop vice, and then pounded over 90 degrees. A 6mm hole drilled center on one half of the bend, and a 6x1mm tapped hole on the other "tab". A longer bolt is needed for the TB mount to make up for the thickness of the bracket. The lower mounting hole of the switch bracket then simply bolts to the threaded hole. The "wing" off of the bracket is just welded on there to prevent the turning of the adapter bracket when the TB bolt is tightened.
Top lip of TB ground down for the top part of the switch bracket. This, I now believe was unnecessary, but won't be cure until I can get a coupler and clamp attached.
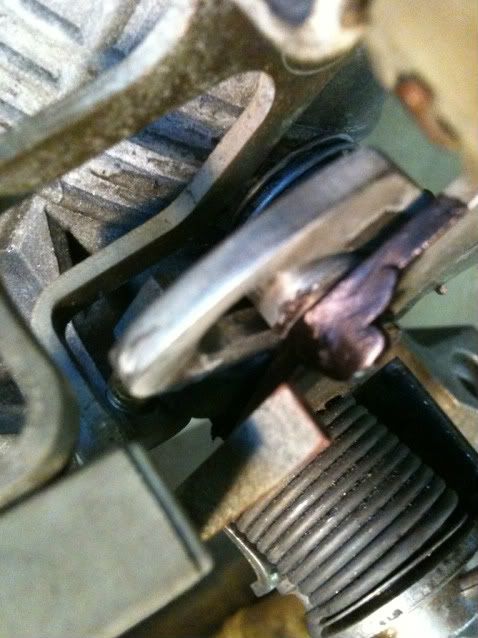
( Note the part in black marker ) This shows the tack-weld build-up I had to add to one of the cams on the throttle linkage. This was added to give a more positive "tab" for the idle switch to activate on. The linkage on the '84 TB is thicker in this area, so I had to make up for it. The "lobe" on the WOT linkage piece was ground down and re-profiled so that only at about 75%+ throttle the switch can be activated. As it was, the switch would be activated as early as 50% throttle.
Let's start with the stock '84 throttle body.
It has a stock exit diameter into the plenum of 2.8XX inches, with the butterfly being slightly smaller than that measurement.
Now the 32V one I'm fitting. The reasoning should be pretty obvious. exit dia. into plenum; 3.2XX inches, again with the butterfly being just smaller.
Inlet diameter difference between the two, where it bolts to the j-pipe.
I should note that I've not seen a 32V throttle body before, and this one appears to have had the secondary spring winding pined and then cut off of the linkage. I can only assume this was to lighten the throttle feel, or for some clearance reasoning. I have no history on this throttle body so.... (?)
I've also polished the both sides of the ID, pre and post butterfly with coarse and very fine cross-buffs. Leaves a great smooth finish.
This shows the grinding to clear one of the vacuum ports when the TB is bolted to the j-pipe. You have to do this even just to be able to bolt the TB up. Mine is further ground to be able to still fit the hose and clamp on.
Inked and scribed line showing where the outlet of the j-pipe into the TB will have to be ported and smoothed to match the inlet size of the larger TB.
Inlet side of the j-pipe to the Vane meter will get a similar treatment, and then the entire ID will be smoothed and polished with coarse and fine cross-buffs.
This is the final finish I'll be looking for on all of these parts.
The old TB has cast and tapped bosses for the idle/wot switches to bolt to. The 32V one, does not. I measured and made a simple bracket to locate the switches in as close to the same location, but on the 32V TB. This is the lower bracket (sorry it's upside down). It's a 1/4" thick, 1" wide piece of steel flat stock, cut to a 1/2" width. Clamped tightly in a heavy shop vice, and then pounded over 90 degrees. A 6mm hole drilled center on one half of the bend, and a 6x1mm tapped hole on the other "tab". A longer bolt is needed for the TB mount to make up for the thickness of the bracket. The lower mounting hole of the switch bracket then simply bolts to the threaded hole. The "wing" off of the bracket is just welded on there to prevent the turning of the adapter bracket when the TB bolt is tightened.
Top lip of TB ground down for the top part of the switch bracket. This, I now believe was unnecessary, but won't be cure until I can get a coupler and clamp attached.
( Note the part in black marker ) This shows the tack-weld build-up I had to add to one of the cams on the throttle linkage. This was added to give a more positive "tab" for the idle switch to activate on. The linkage on the '84 TB is thicker in this area, so I had to make up for it. The "lobe" on the WOT linkage piece was ground down and re-profiled so that only at about 75%+ throttle the switch can be activated. As it was, the switch would be activated as early as 50% throttle.
Last edited by U-928; 07-29-2011 at 06:22 PM.
07-29-2011, 06:29 PM
#56
Pro
Nice work Jeremy. Is the '82 CIS-E?
 07-30-2011, 05:19 PM
#60
Rennlist Member
Just finished installing new steering rack boots, left and right sides. Not a bad job, especially since you can sneak them over the tie rod ends!
Also rebuilt the upper ball joints with the kit from 928 Motorsports. Letting epoxy cure over night, will grease them tomorrow.

May remove the steering rack again tomorrow so I can pull the input shaft cover and seal to see if I can read a part number off of it and get a replacement. It's the only seal leaking and not worth the $85 kit if i really only need one seal.
Also rebuilt the upper ball joints with the kit from 928 Motorsports. Letting epoxy cure over night, will grease them tomorrow.
May remove the steering rack again tomorrow so I can pull the input shaft cover and seal to see if I can read a part number off of it and get a replacement. It's the only seal leaking and not worth the $85 kit if i really only need one seal.
I was told at the PS reman shop (Hydroline) that the leakage is not caused by the endseal but a sealed deeper in the rack. You can't change that seal withou dismantling the rack. So I was told.
But I will help you with keeping my fingers crossed too.