When you click on links to various merchants on this site and make a purchase, this can result in this site earning a commission. Affiliate programs and affiliations include, but are not limited to, the eBay Partner Network.
955 957 Cayenne and 996 Android Head Unit Installation Tutorials
I may have bit off more than I can chew due to various factory audio options in these vehicles but we'll see where this goes!
*****INCOMPLETE POST*****APPROXIMATELY 40% FINISHED AS OF 10/06/18***** Factory camera wiring instructions added 01/06/19
Still need to finish text, finish editing videos, link steps to minutes of video, draw diagrams, choose pictures and diagrams, and credit contributors of solutions from prior threads.
Planning to finish the 955 portion 100% before continuing the 996 portion.
Posting this now because some items have long shipping lead times if people seek to minimize cost. I wish I narrated this in such a way to make the video only 10 minutes but I didn�t plan a script of what I would say and shoot� Lessons learned for next time I make a tutorial on something.
This post applies to 2003-2010 Porsche Cayennes and 1999-2005 Porsche 911 996. I am merging all info and videos into one monster OP so that people with other Porsche models can extrapolate other helpful information for similar installs in their own Pcars.
Disclaimer: Safety first. Proceed at your own risk to yourself and your vehicle and equipment.
Difficulty level: Was a 4/5 when the information was not centralized but hoping this post brings it down to a 2/5 if you don't have to run wires for aftermarket backup camera.
I've installed Android 8.0 head units in my 06 CTT, 06 CTTS, and 01 996 thanks to the information I picked up in 9" Android Radio Install Review thread and similar threads such as....INSERT THREADS. I will now concentrate all the important info here for everyone interested in installing their own but hesitant about proceeding.
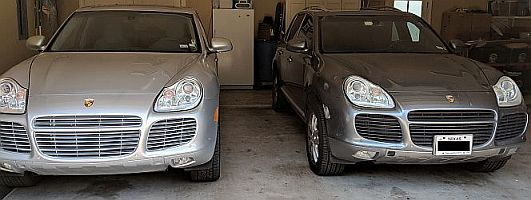
First the obligatory photos of vehicles:
The Titanium 2006 Cayenne Turbo is for sale here.
CTT and CTTS important details going in are PCM, factory backup camera, and Bose package (which communicates via fiber optic MOST).
996 important details going in are non-Bose, Becker radio w/ cupholders up top and CD changer w/ climate down low. People with climate up top may need other parts and can find this discussed at length elsewhere INSERT LINK.
HEAD UNITS :
There are a number of options out there. Some have *****, some have buttons, some have front slots, some have front mics, some are touch only. The most important factors to me were front mic (no need to run mic wire) and Android 8.0. I don't think the OS is easily updated so I wanted the latest available.
(I don't recommend this exact unit because it does not play nice with dimensions of available pre-made kits)
INSERT DIMENSIONS REQUIRED FOR INTERIOR OPENING
If you have a 955 with Bose then you need MOST box. Some ebay auctions include it and some don't. Some give option to pay them ~$75 extra to include it.
I recommend the Android units advertised specifically for the 955 because they are shaped to fit perfectly flush in the dash and steering wheel controls are all mapped and CANbus typically included.
The CTT head unit specs are 1024*600 screen, Android 8.0, PX5 Octa Core+, 4GB RAM, 32GB Flash
ATTEMPTING TO INSTALL IN ASHTRAY OR UNDER GLOVEBOX�WILL RECORD IF SUCCESSFUL Not successful; factory ashtray cig lighter cannot be easily modified.
955 Part 6: extra wire, preferably high quality and smaller than 14 gauge. If you buy the SPDT relay kit you can chop up one of those harnesses and use that wire.
955 Part 7 (optional): 4 Channel MOST box from Russia found by user mrottjers - A couple people installed this and said it gave sound improvements and Fade capability. Personally I'm happy with the 2 channel.
955 INSTALLATION :
YouTube Video part 1 (7m21s) discusses disassembly, FM radio, and GPS
955 Step 1: Turn on car, turn Porsche head unit volume to maximum, and turn car off. (thanks to user hgupta for this suggestion)
955 Step 2: Remove head unit trim with nylon pry bar. Don't break it because replacements are $200+. If the aluminum colored trim separates from the black plastic (one of mine did) you can epoxy it back together and use painters tape and C-clamps to ensure it stays completely together until it bonds.
955 Step 3: Remove Porsche PCM head unit and unplug everything.
955 Step 4: Attach Y-split Fakra to factory radio Fakra females (black and brown). Attach video RCA adapter to factory camera Fakra (green). Attach CANbus to android power harness. Attach Android power harness to factory power and CANbus harnesses. Attach factory fiberoptic connectors to MOST box if you have Bose.
955 Step 5 (optional): Run aftermarket backup camera if you don't have a factory one. Attach SPDT relay if you DO have factory backup camera. Route USB and Aux cables as desired. I have heard 3G is pretty awful on these so I only ran data USB cable.
SPDT theory of operation: The relay operates (switch changes position) when there is 12V across the coil. Without the 12V on the coil, contacts 87a and 30 are connected to each other. When 12V is applied to coil, it is contacts 87 and 30 that are connected.
SPDT wiring instructions:
86 RELAY COIL IN spliced to the orange REVERSE IN wire on the android power harness.
85 RELAY COIL OUT and contact 30 spliced to each other and ground.
The factory camera motor operates to pop out the camera when the blue wire on the porsche factory power harness is grounded.
Blue wire on Porsche factory harness connects to 87 contact.
Nothing connects to 87a contact.
955 Step 6: Run Android head unit GPS to dead space top center of dash. Remove A/C vents first to check for screws and to help route the wire. Unscrew screws if present then remove upper speaker vent. Dremel a notch in the edge so the GPS wire doesn't interfere with speaker vent sitting flush. User levdeb kindly informed me with a helpful photo that some Cayennes have two screws holding the upper speaker vent and those cannot be simply pried off like mine in the video.
955 Step 7: Soldering time. Connect and solder MOST wires for Ground, ACC, and 12V.
MOST ground splices into Android harness ground wire. Add another splice at same time for a ground lug and/or other device grounds.
MOST ACC wire connects to blue AMPCON wire on Android head unit speaker output harness.
MOST BATT 12V wire splices to Android head unit power harness power wire.
MOST RCA wires connect to FRONT OUT L and FRONT OUT R of the Android head unit speaker output harness.
Connect and solder the blue power wire of the split Fakra antenna amplifier to the blue ANT wire on Android head unit speaker output harness.
955 Step 7 Troubleshooting:
Power up the car to test that you have sound. After connecting your phone via bluetooth go to HOME on the head unit and swipe to A2DP app. Alternatively plug in to the AUX input or insert a flash drive into the USB media cable and browse to your music.
In the event that you wired the MOST but can't get any sounds through the car's speakers from head unit, user hgupta suggested bypassing the Android head unit and plugging a low volume audio source into the MOST box directly using something like this $1.50 adapter in order to verify if your problem is MOST or head unit. To Be Continued...
996 Part 4c: or the $150 Euro Motorspeed kit which I remember some saying high quality trim CITATION
INSERT DIMENSIONS OF INTERIOR OPENING OF EACH IF ANYONE HAS DIMENSIONS OF INTERIOR OPENING OF THE $150 KIT PLEASE PM ME. as an engineer it drives me nuts these companies don't provide this most basic piece of information that in itself defines the kit
996 Part 5 (optional):
996 Part 6: extra wire, preferably high quality and smaller than 14 gauge.
996 Part 7 (optional): Porsche OEM cubby part number is 996-552-253-01-01C and costs $70. I'm just using the one from $25 kit.
I believe the following quoted info applies to all three install kits linked above. Adding 996 Part 3 should allow for compatibility with option 680 HiFi audio system and maybe others..
Taken from Suncoast Double Din conversion kit:
"1999-2001 models - Compatible with the standard radio (CDR220) and standard radio (CDR220) with BOSE, or HiFi Sound Systems. Not compatible with cars with PCM radios AND option 680 (HiFi Audio System or BOSE M680 - you will have to create your own speaker wiring).
2002 models - Compatible with all radios.
For 2003-04 models - Due to the MOST fiber optic system, you may need to bypass/replace the factory amplifier for BOSE and HiFi audio systems."
996 Installation : To Be Continued after finishing 955...
Last edited by Jonathan H; Jan 7, 2019 at 03:00 AM.
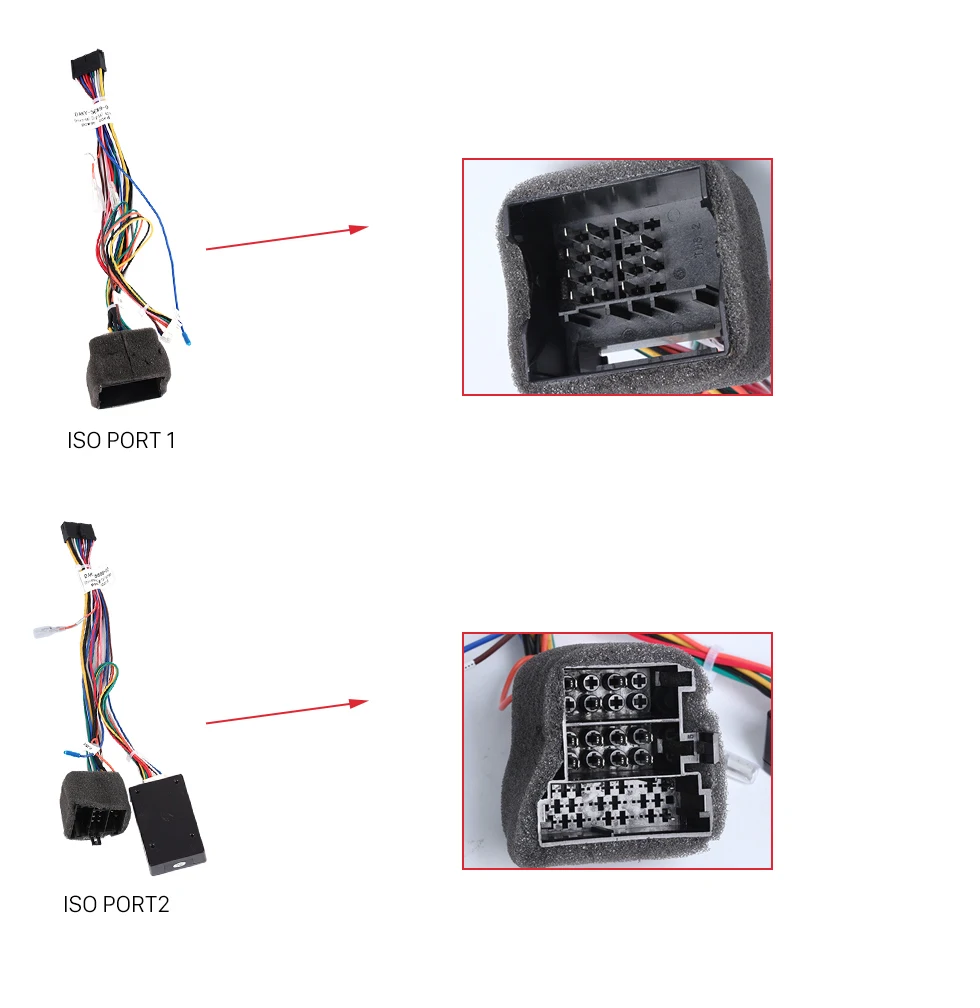
Uh.. is there a reason mine does not have the canbus? (2004) I've been stumped on connecting this radio for months! here are the wires I have (arrows show connection, no power at all!)
Usually these Android units come with two harnesses. One has a single large connector (your second picture), the other has separate connectors. Most people I believe have used the harness with the separate connectors. The CAN Bus interface is usually shipped attached to the harness with the single large connector, you have to transfer it to the other harness (with separate connectors). There is a white connector that branches off of the main harness for the CAN Bus Interface. The CAN Bus wiring is integral to the new connectors/harness. I don't recall ever seeing anyone use the single larger connector you have indicated in the second picture. But for sure the factory connectors you have are different from the connectors in my 2006 CS.
Did you get the two harnesses? Does one have the CAN Bus interface on it?
Yeah, sorry that picture was very poor. I do have that can bus interface connected as you can see by the pic below (red arrows) but I get no power to the radio at all, I contacted the Chinese company that have the radio and they said the "Can bus" is not connected in "image 2" they sent me a picture that looks nothing like the wiring in my cayenne, they had 2 factory harnesses that plugged into that aftermarket harness. I am NOT using the single large connector. I am using the one with separate connectors. the single large does not fit any of my connections. probably the angle makes it look like im using the large.
Yeah, sorry that picture was very poor. I do have that can bus interface connected as you can see by the pic below (red arrows) but I get no power to the radio at all, I contacted the Chinese company that have the radio and they said the "Can bus" is not connected in "image 2" they sent me a picture that looks nothing like the wiring in my cayenne, they had 2 factory harnesses that plugged into that aftermarket harness. I am NOT using the single large connector. I am using the one with separate connectors. the single large does not fit any of my connections. probably the angle makes it look like im using the large.
If your head unit is anything like mine the larger black power plug from the car goes into the connector in the upper part of your picture ( you can see the slots for the clips) the remaining (3 I think) go into corresponding places on the larger part where you now have the power connected.
You need to connect the yellow connector to the new black connector that came with the Android. The yellow connector has 5 wires, but you only need the tow (CAN HIGH and CAN LOW to connect. It's not obvious that they yellow connector will fit, because it goes in the large harness slot with two pins on the far side.
See the two little pins on the right of the right most bottom image? The yellow connector has to connect to those (and clip into place into the slot on that side
^^ This worked perfectly, that yellow connector DOES NOT look like it belongs there, but apparently it does, radio works perfectly. Thank you so much!
Looks like you have the yellow wire from the MOST decoder connected to the yellow wire on the CAN-BUS decoder? I got nothing, no audio, when I tried that...
Looks like you have the yellow wire from the MOST decoder connected to the yellow wire on the CAN-BUS decoder? I got nothing, no audio, when I tried that...
Yes, the Red, Yellow, and Black are connected to the CAN BUS from the MOST. when it was wirenut'd for testing, the audio was very.. eh.. yeah.. but I solder them and its perfect, no issues, in my benz I have it the same way.
for this head unit, what did you have for mic input? i had a mic with a traditional 3.5mm plug, but that seems to be too small to connect to the female plug that came with the unit?
for this head unit, what did you have for mic input? i had a mic with a traditional 3.5mm plug, but that seems to be too small to connect to the female plug that came with the unit?
I believe I had a pin attachment with 3.5mm input. Attach a pic. Does your unit have a front mic built in?
Porsche's Top 5 Most Questionable Naming Decisions
Slideshow: For a company obsessed with engineering precision, Porsche has occasionally named its cars in ways that left even loyal enthusiasts scratching their heads.
Pogea Racing's 964 Porsche 911 Reimagination Stands Out in a Crowded Field
Slideshow: Pogea Racing's latest Porsche 964 project blends carbon-fiber construction, modern chassis upgrades, and up to 500 horsepower while keeping the air-cooled 911 experience firmly analog.
Talos Takes Your 991 Porsche 911 GT3 to the Next Level for a Cool $1.13 Million
Slideshow: Talos Vehicles has transformed the Porsche 911 GT3 RS into a carbon-bodied, race-inspired machine that costs well over $1 million before the donor car is even included.
9 Vehicles Porsche Helped Engineer that Aren't Porsches
Slideshow: Long before engineering consulting became trendy, Porsche was quietly helping other automakers build everything from supercars to economy hatchbacks.
9 Features and Characteristics That Only Porsche People Understand
Slideshow: Some brands build cars. Porsche builds traditions, obsessions, and a few habits that stopped making sense decades ago but somehow became part of the charm.