When you click on links to various merchants on this site and make a purchase, this can result in this site earning a commission. Affiliate programs and affiliations include, but are not limited to, the eBay Partner Network.
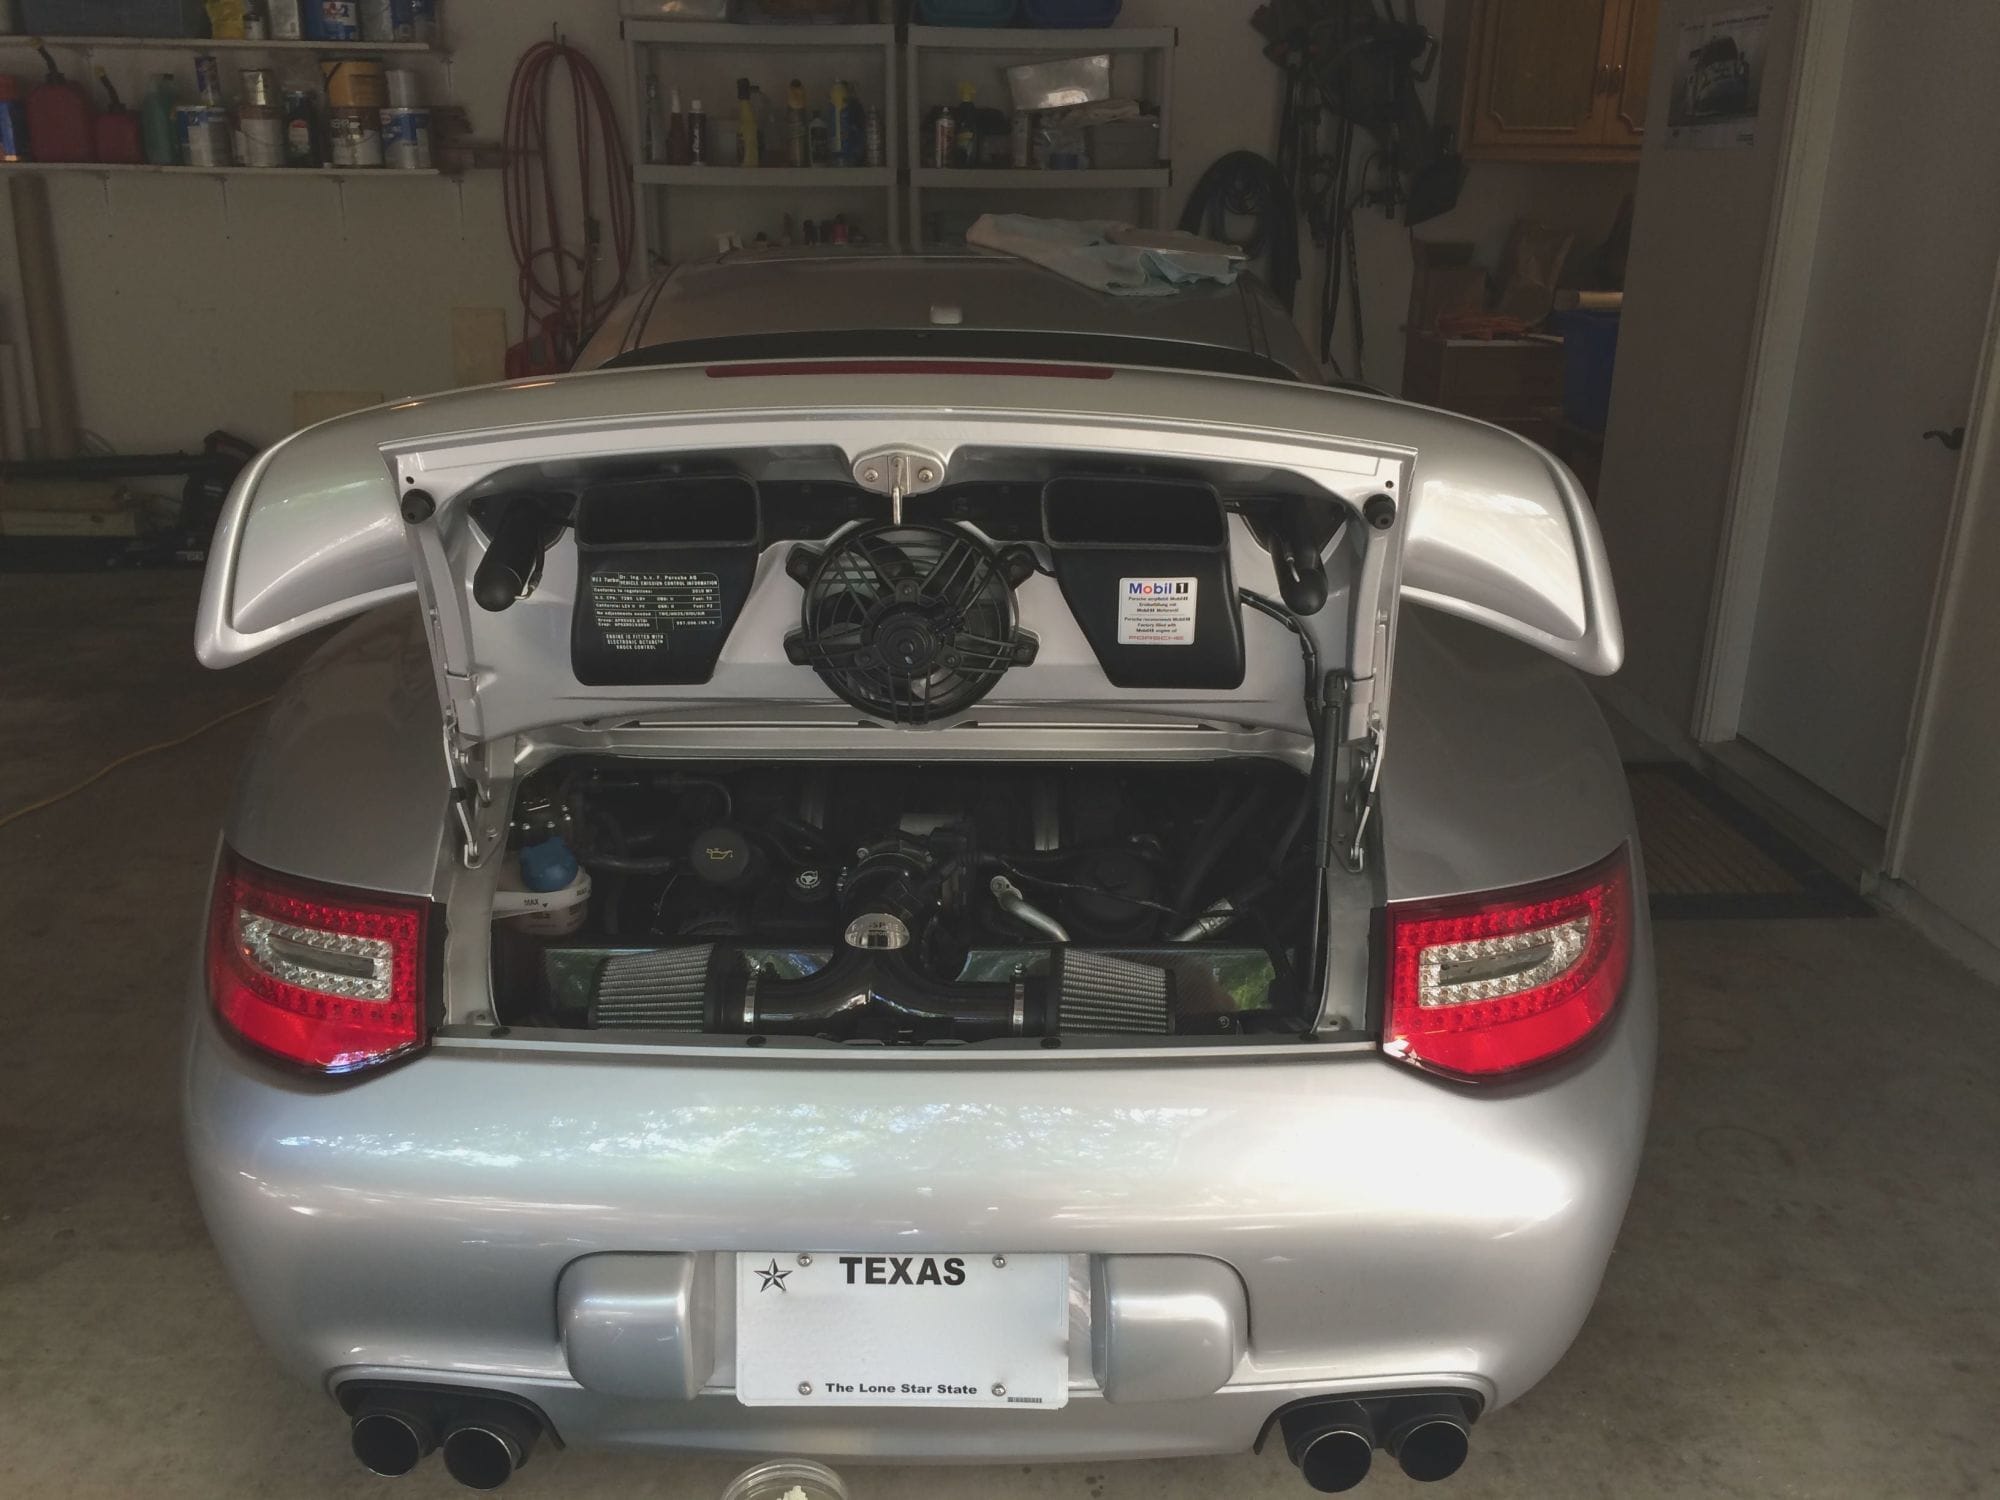
Way back in post 54 you can see how the Fabspeed carbon intake for the 997.2 sits without modification. Here is the photo again just so you don't have to go back to that post. The photo isn't as good as Pete's but you can see that it's quite a bit different and clears the hydraulics well.
You'll also notice that the ducting from the Turbo lid drops air right on top of them, and the carbon fiber heat shield seen in front of the cones provides a fair amount of protection from hot air in the engine bay. The gap between it and the bottom of the deck lid is less than you'd think when the deck lid is closed. The hot air is less of an issue when the car is moving since the air flow from the ducts will help create higher pressure in the area of the cone intakes. I know this is a concern for many, but my tests with MAF temperature readouts show that at speed the heat increase isn't as large as you'd expect. Another Rennlister did a much more elaborate study that can be dug up around here somewhere. My bottom line conclusion was any loss from the relatively small amount of extra heat was offset by improvements in intake flow and the joy of the much improved intake howl... which was worth at at least another ten mental horsepower just due to the sound!
Yes, it's a much more centrally located and straighter path in on the .2 than the .1. I'd just go with the proven Fabspeed one for a .2. Might even find a used one for sale in The Marketplace here, on 6speed, or maybe eBay.
I had done this mod after reading posts & lots of discussion with mickfluff, Petza & Stormrune. I had found a used spoiler with hydraulics however no wiring - not a problem just had it hard wired into my C2S's loom.
After a few months of use I started to notice hydraulic fluid leaking out of one of the rams, thought I'd have it refilled & bled when I got it serviced, it didn't last longer than 1 week and I got the spoiler fail warning & while the spoiler would extend it wouldn't retract automatically - I pulled the fuse & left it in the down position.
I could see that it was leaking from the banjo bolt so started at looking if there was a way to improve/replace the copper washers, I spoke to lots of different companies looking at stat-o-seals and aviation grade washers, however, none are manufactured to the correct specifications for the turbo wing.
In the end I decided to send it to company for a complete overhaul as use can damage the internals of the pump.
I removed the wing, that was a PITA not being able to lift it with the switch but lifting it manually and supporting it with towels and off it went for its refurb!
Got the report back & thankfully there was no pump damage and all that was needed was a refurb of the rams � as someone previously had not used the correct tool to remove the spoiler & there was some damage, all new o rings and seals � which were hard & had lost their elasticity, a pump refresh, new fluid, balanced, bled and ready for install.
The system was pressure tested at higher the normal loads for 24 hrs & now all that is left is for me to put it back on!
OP do you know the history of the spoiler? You said that someone checked it over, how did they check it? It might be worth having new fluid and it bled before you install it.
A few pics of the pump internals and mine being prepped
Glad you got your leak sorted out. If the hydraulics on either of my cars ever fail, I'd just replace them with the electric versions (eRam) offered by Dave at Rennkit (http://rennkit.com). Seem very well built, a little pricey, but no hydraulic mess to deal with.
OP sold his car. The recent posts are relative to my project.
I do not know the history of the wing. I bought it from another RLer who had bought from another.
I tested the wing's functionality by hooking it up to the harness on my car, and used the manual switch to activate it. Up and down, no issues. And all clean, that is, no leaks.
Like said somewhere else on here I bought Storm's car, still here in Texas. Need any measurements, photos etc. glad to share. It is an excellent car. Usually pass on modded cars but this one was done right. Might change out the wheels some day is all. Not black.
Let me know what your thoughts are on the wheels. I've got a lot of contacts in the wheel industry and would love to work with you to come up with a game plan, which we can move forward on it whenever you're ready
Originally Posted by Petza914
Petza
Originally Posted by StormRune
StormRune
Too much to quote, but you guys are an exceptional source of information on this project! I want to thank you very much for your support, not only for Joe and the rest taking this one, but for our intake contributing to the fun haha.
If there is anything I can to to assist in this project...measurements, product availability, etc I am just a phone call/email/PM away. I'd love to help in any way I can
Glad you got your leak sorted out. If the hydraulics on either of my cars ever fail, I'd just replace them with the electric versions (eRam) offered by Dave at Rennkit (http://rennkit.com). Seem very well built, a little pricey, but no hydraulic mess to deal with.
Thanks Petza! I started out trying to rebuild the hydraulics and about ruined my back bumper with a major Pentosin leak after the rebuild. That's when I started thinking about a better solution. Some think the eRam kit is pricey, but if you eliminate the dozen or so things that can go wrong with the factory system (how about engine fire for one?), and the fact that a new factory OEM hydraulic system is double the cost...nuff said. I continue to gather info on the conversions - the turbo back lid on the Carrera looks outstanding IMHO. Here is what the eRams look like under the lid:
Glad you got your leak sorted out. If the hydraulics on either of my cars ever fail, I'd just replace them with the electric versions (eRam) offered by Dave at Rennkit (http://rennkit.com). Seem very well built, a little pricey, but no hydraulic mess to deal with.
I looked at that kit as well Pete, and with the electric kit it actually extends higher than the OEM spoiler!
I was waiting to see what kind of problems I was going to encounter with the rebuild & the $$, in the end I've got a 5 year guarantee so I've got peace of mind for now.
Originally Posted by ltcjmramos
Ni_Mo,
OP sold his car. The recent posts are relative to my project.
I do not know the history of the wing. I bought it from another RLer who had bought from another.
I tested the wing's functionality by hooking it up to the harness on my car, and used the manual switch to activate it. Up and down, no issues. And all clean, that is, no leaks.
My reply was directed at you ltcjmramos just got you a bit mixed up with the OP, but anyway, if all is working as it should with no leaks and you don't want the extra expense of going for a fluid change, balance & bleed then once its on there I'm sure you going to love it and you can see it raise in the rear view mirror
I looked at that kit as well Pete, and with the electric kit it actually extends higher than the OEM spoiler!
NiMo True That! The eRam kit is available in 2", 3" and 4" extensions. In my opinion the OEM 1.4" extension is pitiful... ha ha. There are videos at my website of 3" and 4" eRam kits on 997 turbos.
I'm completing this mod and I wanted to share a little trick I did. In order to remove the upper blade, you need to align the holes in the shafts of he pistons. Storm Rune put duct tape on the cylinders and used a wrench to align the holes. I had a PITA time getting tape around the cylinders an didn't want to scratch them, so I tried to use the spanner wrench that ltcjmramos sent me. You don't need to engage the post of the spanner completely, just enough to have it make contact with the outer sleeve. Turn accordingly, slowly and gently until the post of the spanner wrench falls in the the hole in the inner shaft. Mine moved quite easily and there weren't any marks on the inner shaft.
I'm completing this mod and I wanted to share a little trick I did. In order to remove the upper blade, you need to align the holes in the shafts of he pistons. Turn , slowly until the post of the spanner wrench falls in the the hole in the inner shaft. Mine moved quite easily and there weren't any marks on the inner shaft.
Good instructions. Sometimes a prior owner or mechanic leaves the holes lined up. That is a no-no as the inner hollow cylinder will become wet and further corrode and cause other problems. The pin spanner is really needed to get leverage to unscrew the bolts in the wing. The factory uses a good thread locker! I had to use a 12" socket extension placed over the pin spanner to get enough leverage. Love this mod, wish more C4S and CS guys would go for it.
Don't know how I missed getting back on this thread. I usually hang out with the guys up in OT and the merry band up from that. Need to drop in here more regular. Still got the car. Still love it. Still no wheel upgrade. Still looking. Also maybe considering a GT3 style front but then again, maybe not. Seem to get other projects in front on any 911 projects. Like finally got my old '86 951 back on the ground with suspension on it. Now to get it running. Also just a coupe days away from getting my dads old '53 Ford Jubilee tractor running again. Carry on.
So after finally completing this mod, and with the help of Petza914, I've got a few things to add. For those of you who are going to use the EVOMS intake, it'll work, but there will be some modifications necessary to make it fit properly.
First off, the mounting bracket that comes with the EVOMS will not be used. It puts the whole system too far to the right hand side (looking from the rear of the car). With Petza's help, I utilized the small holes where the pegs on the stock intake fit into.
I went to the hardware store and bought a few of these plugs with a threaded insert in them. The stock plugs are 5/16", but all my local hardware store had was 3/8", so I got those. I also bought 2" long bolts to work with the inserts.

 11-16-2016, 06:41 PM