When you click on links to various merchants on this site and make a purchase, this can result in this site earning a commission. Affiliate programs and affiliations include, but are not limited to, the eBay Partner Network.
I can't answer the clamp ring question as neither of my front struts had them. I just finished a B12 kit and my struts were the yellow Bilsteins. You say you already have these mounted?
Yes I mounted them yesterday without that clamp ring as I don't have it. I see lots of other people also don't have it.
One rear is out. It was a pain to the remove the lower bolt holding the strut, just about enough clearance under the rear lower control arm.
I had to completely remove the sway bars (GT3 adjustable) to get enough clearance to the the strut out.
@coaldrag413 How did you get enough clearance to install the new B12 rears? I didn't have time today to work much on it but with a spring compressor lightly applied to the outside I still lack at least an inch.
I worked it out by disconnecting the sway bar and just used some leverage to push the hub down and work the bolt out. You just have to work it out. Getting it in can be tricky too but it can be done without disconnecting the control arm
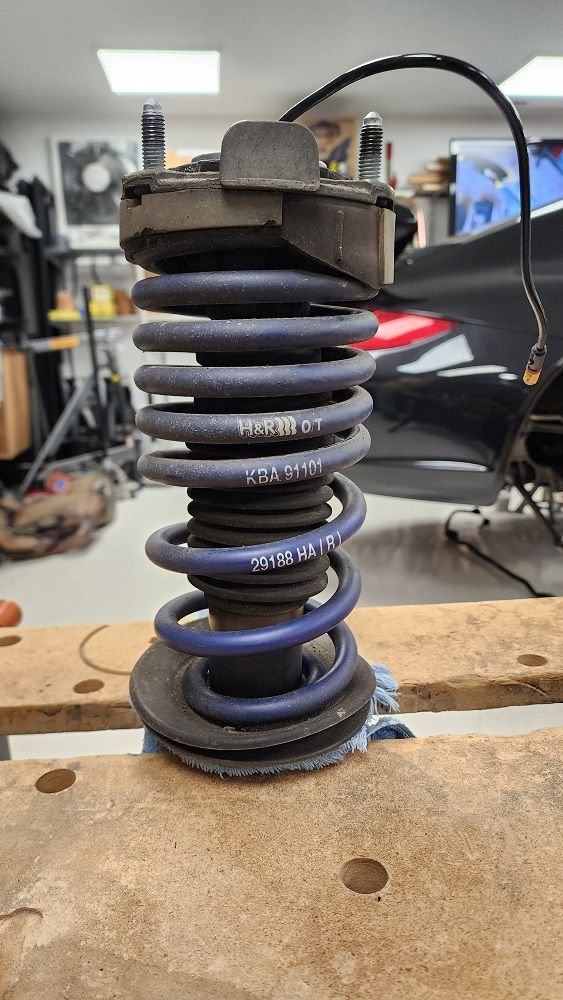
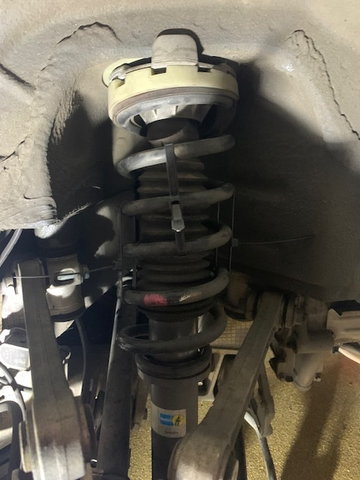
I'm installing TechArt springs on my wife's 2009 Carrera S after having installed them on my 2012 Carrera GTS. The rears have a completely different lower spring seat. And the parts diagrams are not enlightening.
The lower spring seat here is parts 997 333 523 00 (rubber pad) and 997 333 513 01 (seat) from the 2009 Carrera S. Supposedly for option/equipment codes 030 sports suspension and 756 Special model "911 Sport Classic".
The lower spring seat here is 997 333 513 00 from the 2012 Carrera GTS. Supposedly for option code 475 "PASM" electronic damper control.
I haven't found any photos on line that show the upper arrangement with the large diameter seat and rubber pad. The seat is also marked with the date 01.08.2008 so perhaps it's a very early 997.2 assembly. At any rate, 997 333 513 01 has been discontinued.
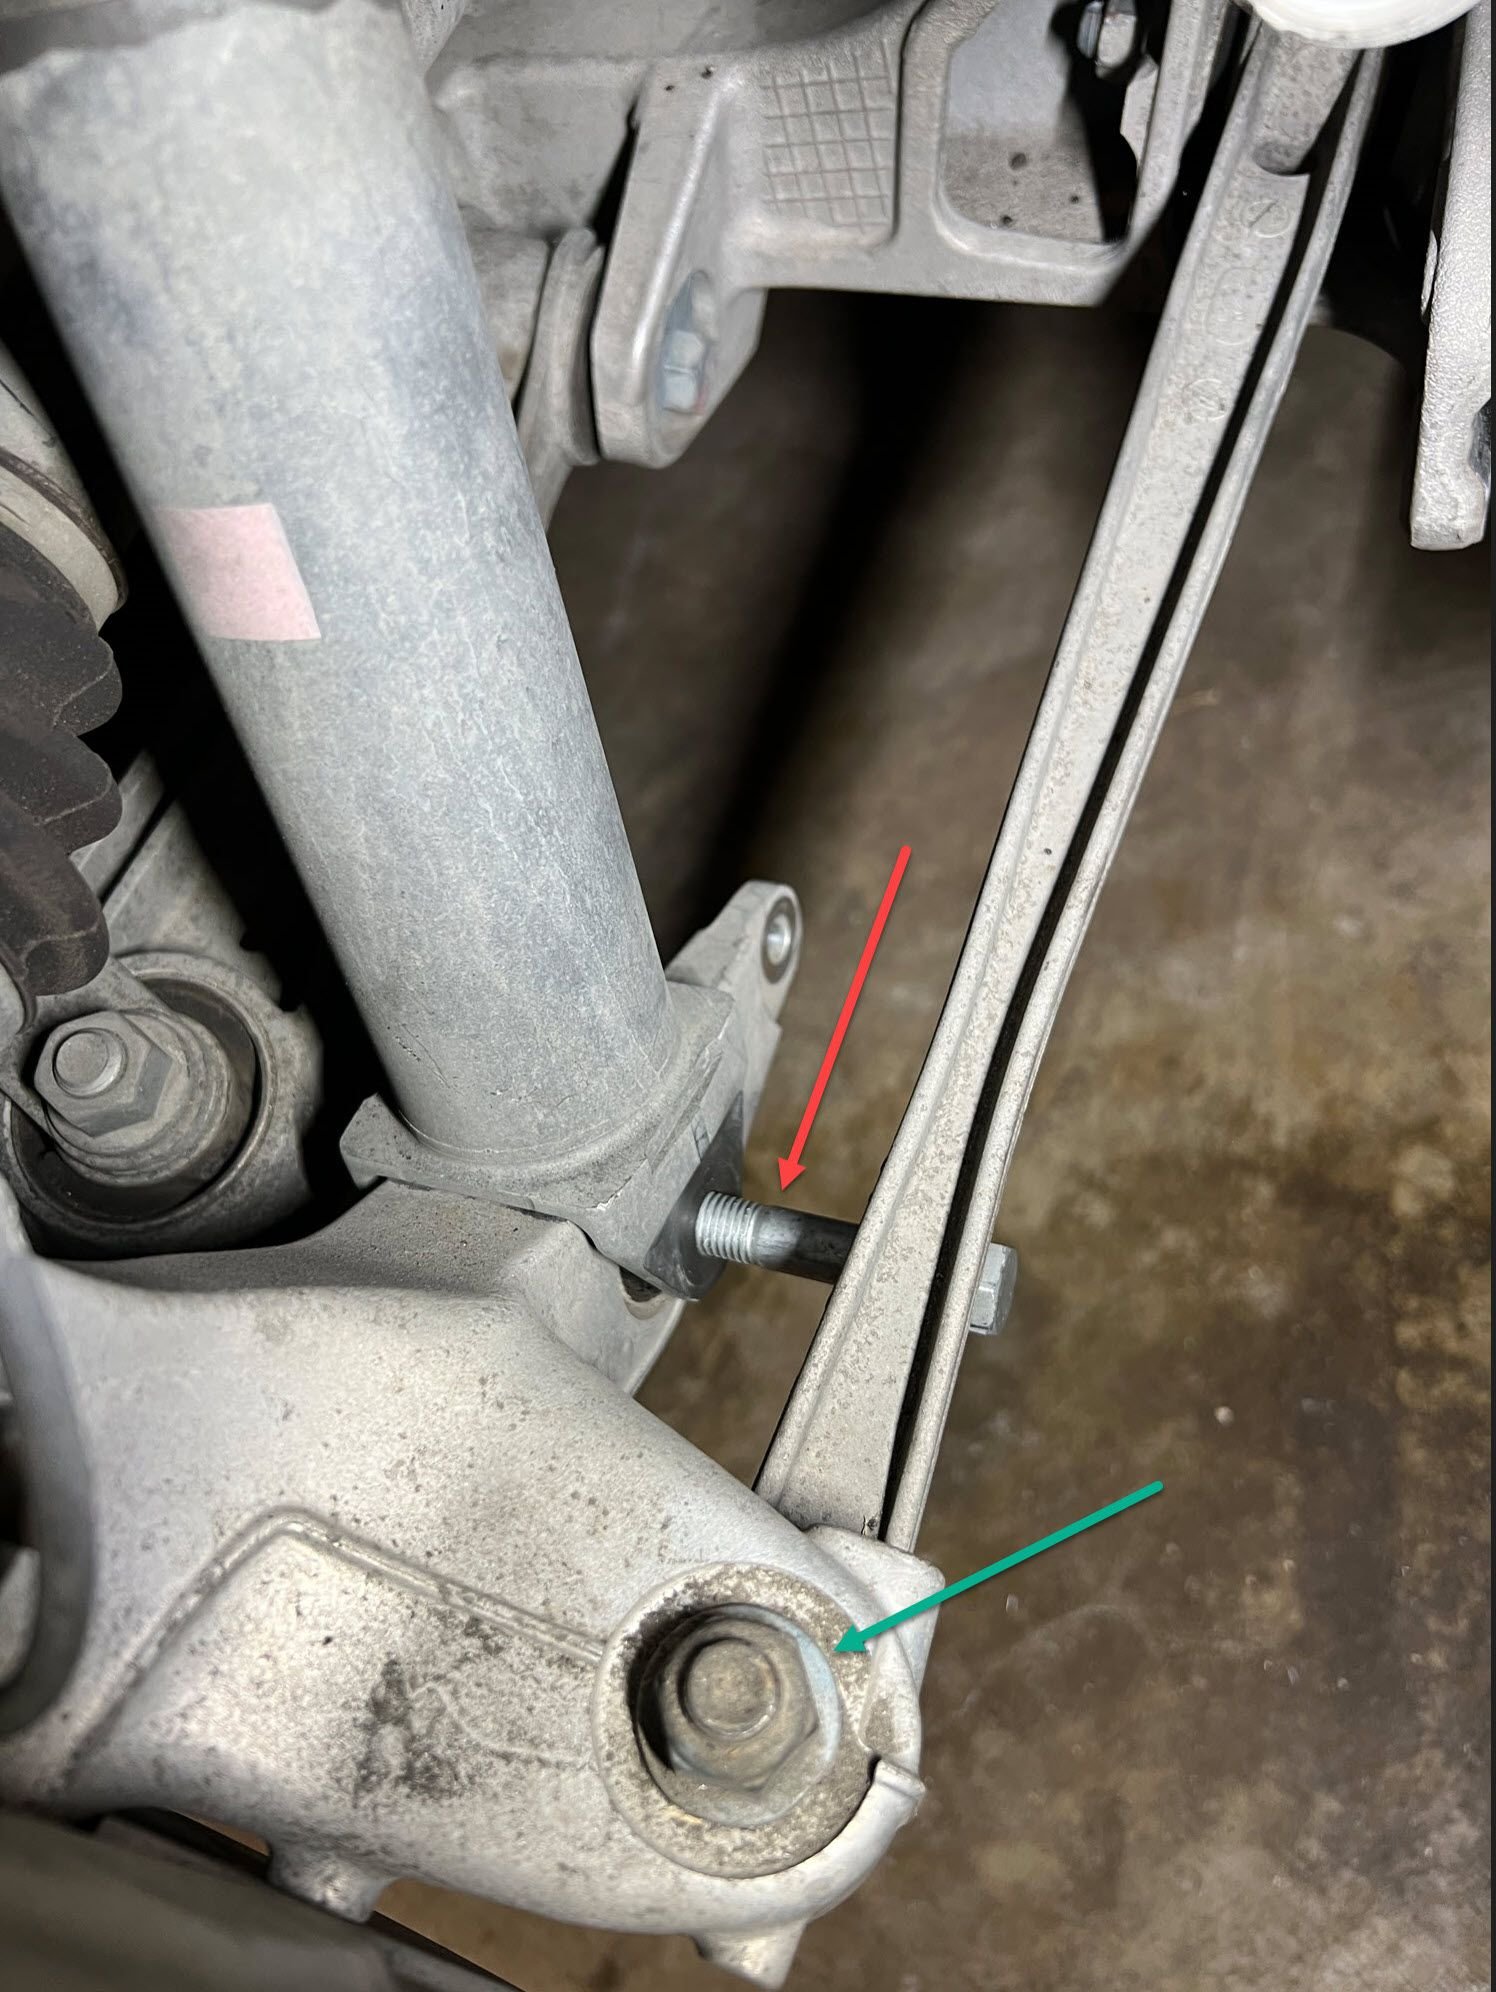
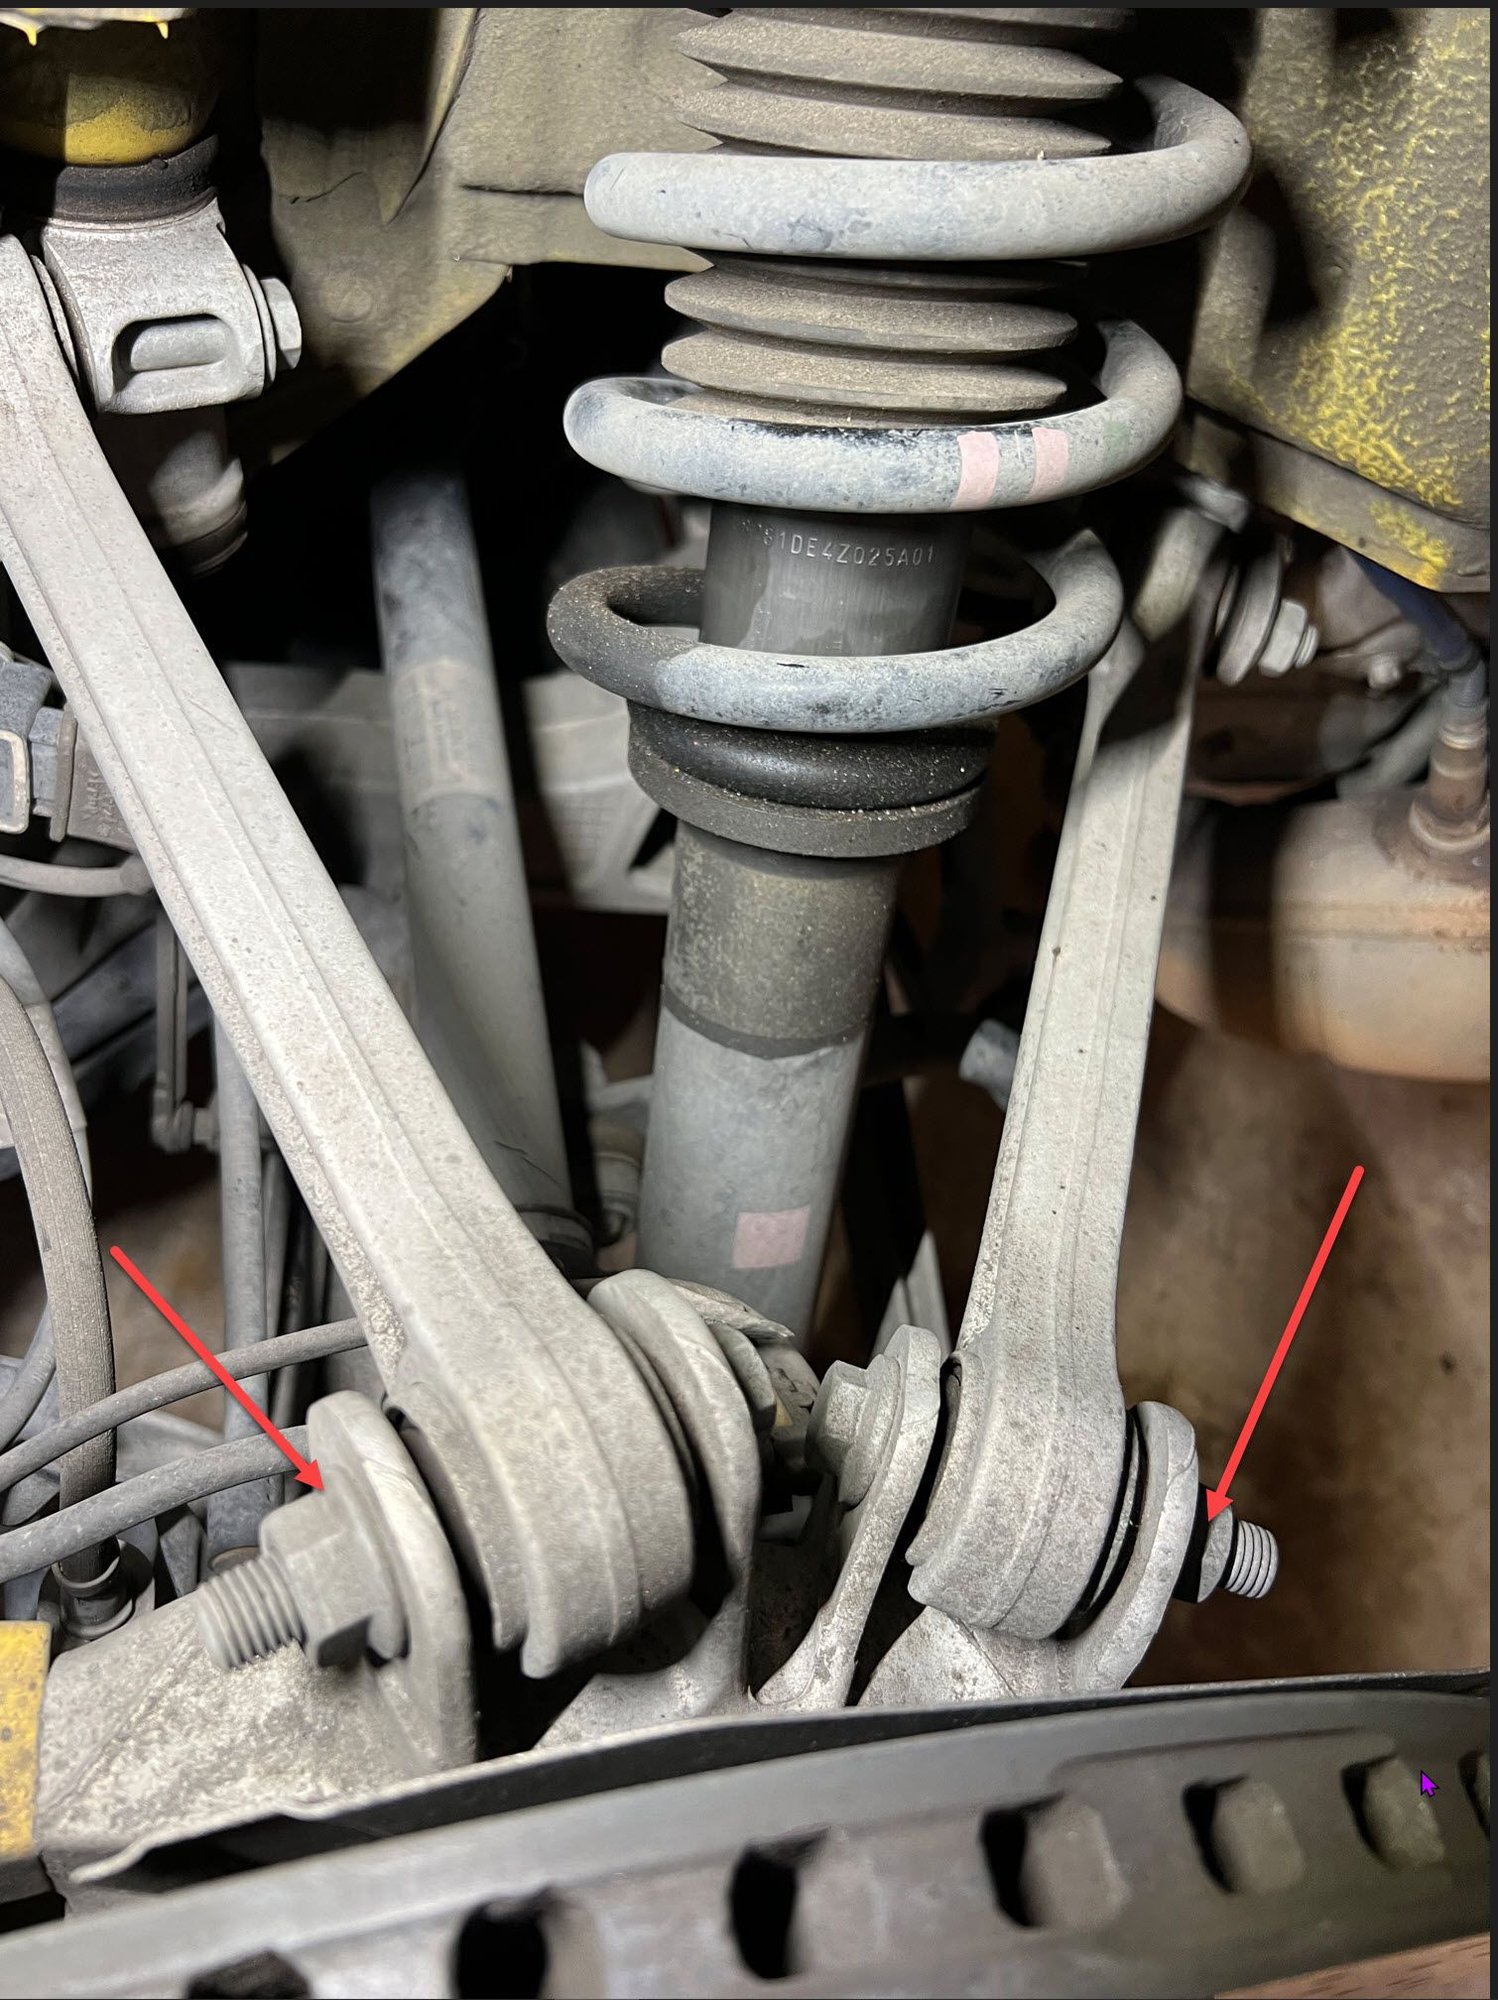
I'm having trouble to remove rear shock on my 2009 T4S. Replacing stock with Bilstein B4's due to leaking. It is a pain to the remove the lower bolt holding the strut, not enough clearance under the rear lower control arm.
Loosened 3 bolts from shock mount inside the car
Lift car on Quick jack
Removed Wheels
Removed two bolts from upper control arms near wheel carrier
Removed sway bar links and moved to side
Removed Nut from lower Shock bolt.
Wiggled wheel carrier as much, still not getting enough room for shock bolt to come out. about 2mm additional clearance is required.
Hesitate to remove the ball joint from wheel carrier (green arrow in pic). Worried about damaging the rubber boot.
@Pors968 When I did this last year I ran into the same clearance issues. As soon as I fully removed the strut nuts from the top mounts inside the car the entire wheel carrier could articulate enough to free the lower shock bolt.
@Pors968 When I did this last year I ran into the same clearance issues. As soon as I fully removed the strut nuts from the top mounts inside the car the entire wheel carrier could articulate enough to free the lower shock bolt.
Thanks for the tip, I removed top 3 nuts from inside, entire shock moves up and down little when pull down holding the spring, still bolt is not coming out. Such a pain.
Yes, you need to loose the LCA to frame bolt. Loosening the LCA to wheel carrier doesn't remove any tension on the LCA bushing, which is where the primary resistance is.
Yes, it allows you to remove/install the springs this way too. You have enough clearance into the wheel well to manipulate the springs out/in. Im not sure about removing the entire strut. But I think you can by just pivoting the carrier to point out of the wheel well.
And yes, you are correct. You just reassemble the strut in the wheel well - minus the strut mount. Slide that in and bolt in place. They guide the strut rod into it, compress the strut with the floor jack and tighten down the strut nut from the top.
One thing you can also do to get the closest alignment is torque the strut mount down before you put the strut back in. That will make it a bit easier to align.
Lastly...dont forget to slide your cup washer in above the strut mount. It will flop around a bit until you guide the strut rob back into it.
Just did the fronts over the weekend and can tell you that removing the strut using Dan Tsuchiya's method should be the only method for removing the front struts. It took me just over an hour to do this job per side. The worst part of doing any strut removal/installation is if you have to remove/install with spring compressors. Man handling the strut with spring compressors makes the job almost impossible to do. This method doesn't require the use of spring compressors at all! The real challenge really just comes from reinstallation because lining up the strut to fit into the strut mount can be tricky since you have to use your floor jack to support the wheel carrier. Takes a few minutes, but it can be done. Anyway, here's my notes on the job.
When you are in the act of removing the strut from the mount be sure you remember the order (and orientation) of the parts that are coming off the mount. They will fall out if you're not careful. One of those parts is the strut bearing. I don't see it mentioned anywhere, but I do see that a lot of people replace this part along with the strut mount, bump stop, shock boot, etc. I, however, chose to clean up the bearing, regrease and reinstall it.
As mentioned earlier, you'll want to loosen bolts attached to the hub carrier, but not remove them. It will give the whole unit the most articulation which you'll need to remove the spring.
Lastly, get some end link specific tools for this job (unless there's the option to use a Torx T30). You can get away with a standard 18mm wrench, but you still risk damaging the rubber boot of the end link when counterholding.
Can't wait to tackle the rear suspension. I plan to use zip ties to hold the spring before removal to make things even easier (Can you tell I hate spring compressors? Will use them when the struts are on the bench, of course). Especially given that I may have to remove a ball joint as mentioned earlier. Hopefully because the spring strut assembly would still be compressed by the zip ties, it will come out easy.
Still torn which way I'll go to remove the rear struts, there's the simpler remove lower control arm method but you have to use a ball joint tool or remove both upper control arms but you have to wriggle the lower strut bolt because it will be striking the lower control arm. Decisions, Decisions...
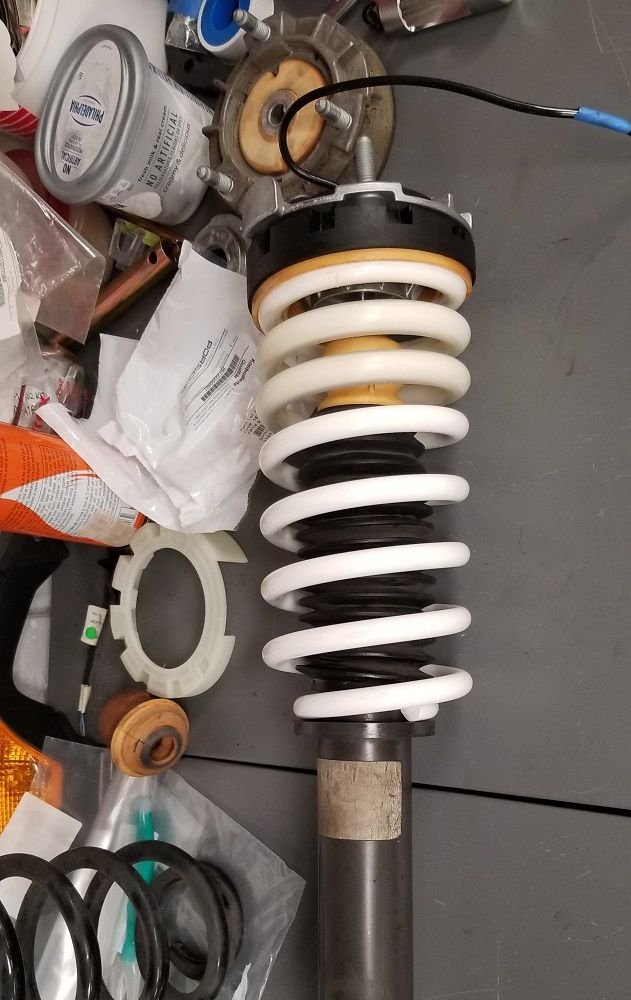
Just did the rear suspension yesterday and it's definitely harder to do than the front mainly because you can't remove the spring and shock on it's own from the strut top mount. I used 4 150lb Zip ties assuming it would help me when it came time to removing the strut assembly and it did. I did jack up the suspension, but didn't compress the spring fully before using the zipties. I would say I went about half way in terms of compression.
I just had to rock the hub carrier down a bit and the lower strut worked it's way out just using my hands on the strut itself and guiding it out. No drama! And way easier than trying to remove the strut assembly with spring compressors attached to it.
Also, at least for me, I had a very difficult time removing the lower strut bolt. I used the method where I removed the upper control arms attached to the hub carrier. This meant that the lower control arm was still attached and blocking the removal of the nut for the lower strut. I assumed I should attempt to remove the nut using an open ended wrench because that's all you can use and counter hold the bolt, but this did not work for me. I came dangerously close to rounding out the nut, stretching the opening of my open ended wrench and stopped. What did work was counter holding the nut and removing the bolt with a ratchet/socket.
When I got the strut assembly out, I put it on the work bench, removed the zip ties and put actual spring compressors on it, removed the stock spring and replaced it with the H&R spring. I did have to use the spring compressor again to get strut mount to sit low enough so I could put the upper nut on the strut shaft, but did not have to use the zip ties or spring compressors to fit the strut assembly back in the rear. The act of putting the strut assembly back in was quite a pain though. What ultimately worked for me was jacking up the rear suspension while still having the hub assembly rock back and forth. This allowed me to tap the rear shock using a rubber mallet back into place.
Also, I did retorque the upper control arms only after raising the strut assembly using a jackstand to mimic ride height. Actually, the FCPEuro video on YT that covers this process for 997's is pretty spot on for the rear suspension job.
Using hand tools, this took me almost two hours to do for one side.
Thanks for all the members who provided helpful guardedness. Here's my contribution for a 997.2 Turbo. I'm covering the key steps for removal. I didn't go through this entire thread as it's quite long but thought this would be helpful for someone with an AWD or Turbo. Several thread noted to remove ball joints which I did not follow.
Fronts:
Disconnect sway bar from struts
Disconnect brake calipers and electrical connections from strut assembly.
Secure the caliper assembly to prevent damage to the brakes lines.
Remove axle nut(32MM), I used a impact, (350ft lbs.). If you don't have one, you'll need to do this before disconnecting brakes as you'll be using the calipers to hold the axle from rotating.
Knock drive axle loose from hub
Loosen main suspension arm bolt to allow a little more travel to clear fenders.
Loosen strut pinch bolt
Support suspension arm with jack.
Make sure all the items noted are disconnected from strut assembly, then it's time to work strut tower section on top.
Disconnect PASM wire and remove 3 bolts from strut hat.
Slowly lower the strut assembly
Pivot the strut assembly out.
Rear:
Disconnect sway from suspension arm
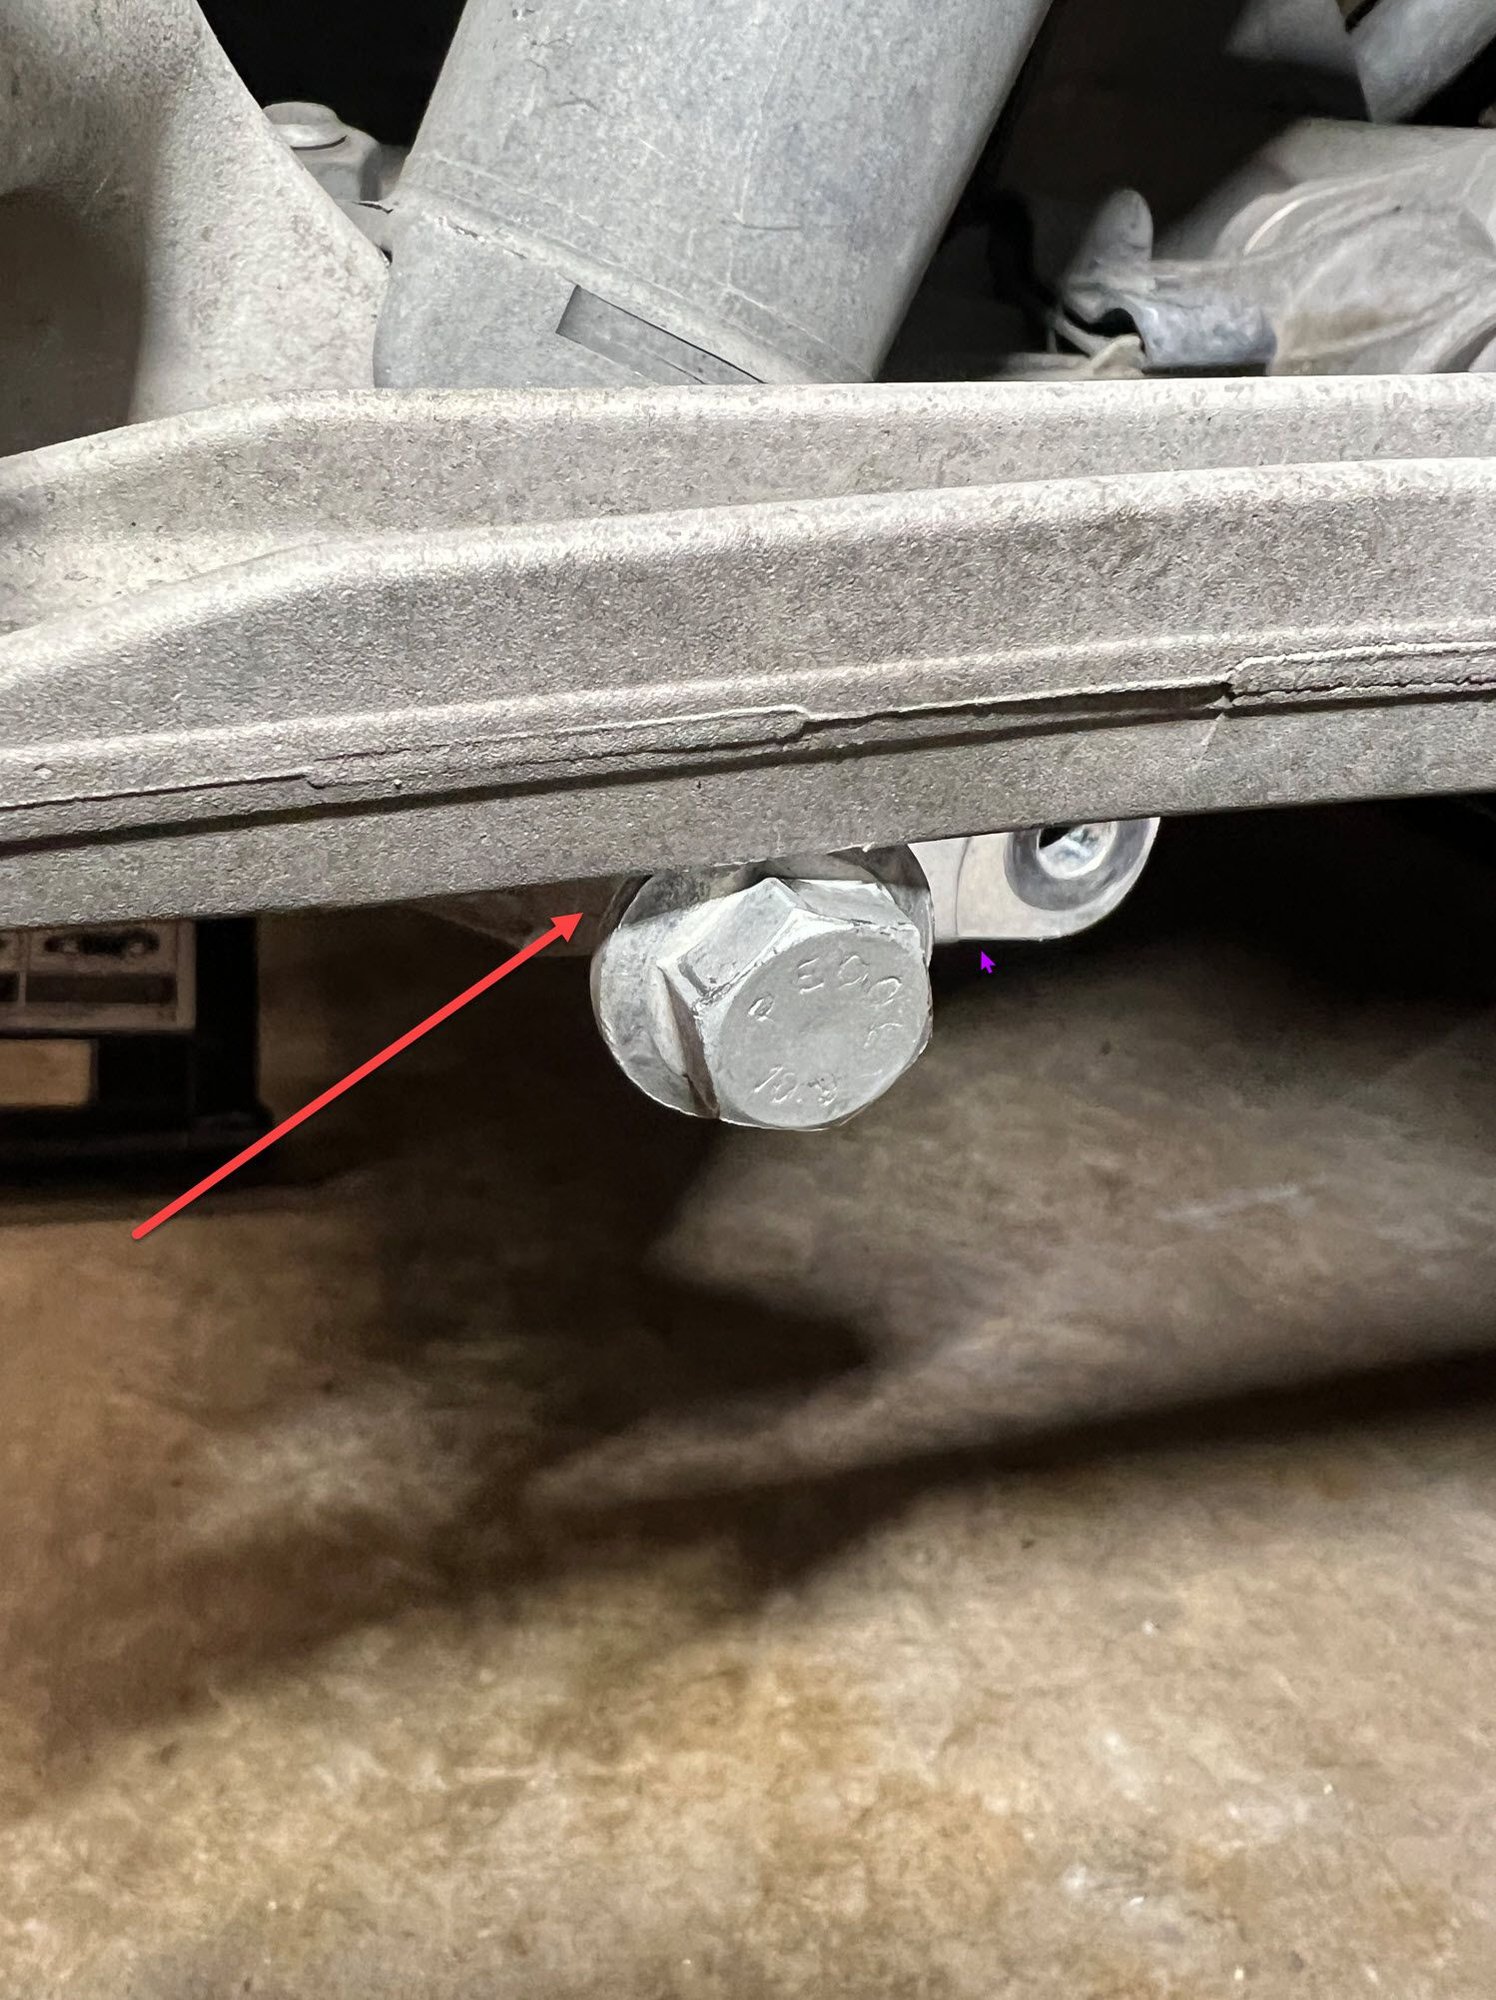
Remove top 2 bolts as shown.
Loosen lower shock bolt
Support suspension arm lightly with a jack
Work on upper section and remove strut hat bolts,
Lower the jack and arm will follow.
Use pry bar as needed to remove shock assembly.
@AltVelo looks like your car has centerlocks based on those photos. If so, how do you get to the axle nut given the locking mechanism is sitting there? I assume it can be removed but not sure how and cant find anything.
I was going to try the method where you dont remove the front strut, just unbolt it but my nut does not sit cented in the hole, not sure why.
@JackieDaytona, The centerlock mech just sits in the pocket. To access the axle nut, ,simple remove.
If you do not want to remove the strut from the carrier, just pivot the strut assembly out with the strut hat in place. I had enough room by just loosening the suspension arm pivot bolt.. but.. that changes how you unload the spring.
Yeah AWD (TTS) with centerlocks
I watched a video of a guy doing coilovers on a turbo and he indicated that one had to remove either the axle nut our one of the other components (don't remember which, as he recommended the axle nut) to pivot the assembly out. That said , his didn't have center locks and i didn't see anything on removing that mechanism to expose the nut on CL. Ill try pulling it out tomorrow and bug you if i can't figure it out
edit-wow the mechanism literally just pops out, not attached at all
Last edited by JackieDaytona; 02-11-2024 at 12:36 PM.

 01-24-2021, 12:05 PM