
996 GT3 4 Liter
 10-05-2011, 01:05 PM
#136
Admin
Lifetime Rennlist
Member
Lifetime Rennlist
Member
I stopped at 79-80mm..(but I didn't have the right tools..)
And how you are going to deal with the flange? Cut it? it's kind of brittle. If you pushed to 83-84, we are talking 1-2mm left to seal. Don't use it at all?

 10-07-2011, 12:43 AM
#137
Rennlist Member
Thread Starter
Since there was some skepticism regarding boring out the 996 plenum to fit the 997 throttle body, here are some pictures of the fitup.
Unfortunately, I don't have any tools handy to get accurate measurements of the wall thickness...I'll try to get a micrometer when I have time and get thicknesses around the perimeter behind the flange.
In addition to this, the rubber boot between the MAF housing and throttle body will be modified. There is a landing molded into the rubber for the end of the throttle body to seat. The landing will be trimmed a couple mm to allow a smooth transition to the throttle body. In addition, we're going to attempt to retrofit the 997 MAF housing, as the 996 housing will be the choke point (the diameter is smaller than 72mm). Maybe I'm splitting hairs, but these are inexpensive modifications...
10-09-2011, 02:22 AM
#138
Rennlist Member
Thread Starter
Time to time the cams. Dial gauge is used to determine cylinder 1 TDC.


Factory cam locking plates are used to position the cams relative to crank position.


Chain tensioning tool is removed and the original tensioners are bolted in.

Mating surfaces are cleaned religiously and Dreibond is used to seal the cam covers.

Valve covers on. Clearly I was bored and spent too much time cleaning them.


Rear cam seals.

Cooling pipes are in. No effort was wasted cleaning the piston housings.

Oil scavenge pumps.

Oil scavenge pumps are in...that's all for tonight. It's second Saturday...time to go party.
Factory cam locking plates are used to position the cams relative to crank position.
Chain tensioning tool is removed and the original tensioners are bolted in.
Mating surfaces are cleaned religiously and Dreibond is used to seal the cam covers.
Valve covers on. Clearly I was bored and spent too much time cleaning them.
Rear cam seals.
Cooling pipes are in. No effort was wasted cleaning the piston housings.
Oil scavenge pumps.
Oil scavenge pumps are in...that's all for tonight. It's second Saturday...time to go party.
10-09-2011, 09:40 AM
#140
So, as I understand it... You get TDC on #1, use factory tool to lock cams from rear, use a chain tensioning tool (one on each bank) to take up slack and then? Are there bolts that you tighten up on each cam to set timing? I've done this a number of times on aircooled engines and is such a PITA! This seems to be much simpler assuming you spend the $ for the factory tools... Thanks!
10-09-2011, 01:31 PM
#141
Rennlist Member
Thread Starter
So, as I understand it... You get TDC on #1, use factory tool to lock cams from rear, use a chain tensioning tool (one on each bank) to take up slack and then? Are there bolts that you tighten up on each cam to set timing? I've done this a number of times on aircooled engines and is such a PITA! This seems to be much simpler assuming you spend the $ for the factory tools... Thanks!
At this point, you have bank 1 set. You rotate the engine 360 degrees and then you position the cam locks on bank 2, and repeat the above.
And you're right - those cam locking plates are like $500 for a pair, or something ridiculous.
10-10-2011, 04:01 AM
#142
Rennlist Member
Thread Starter
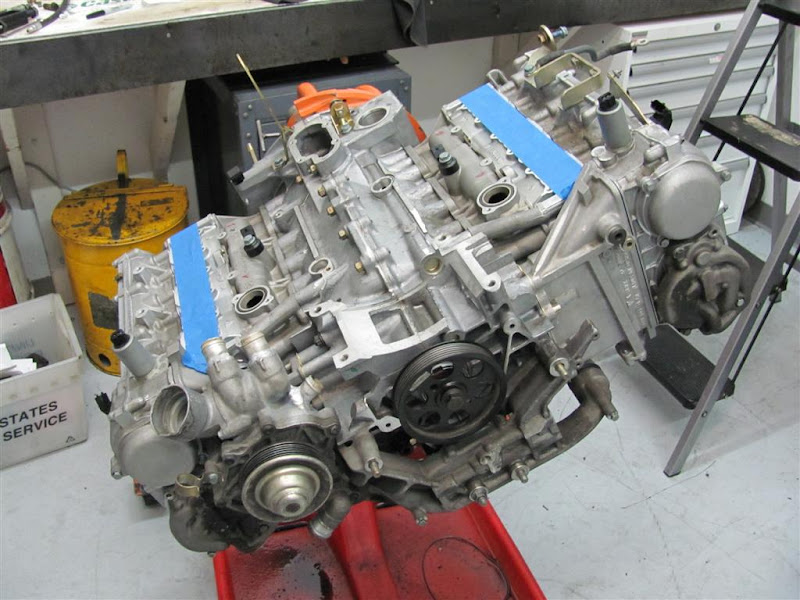
It's been a productive Sunday. Accessories come on.

Ported intake manifolds to match the 997 heads are on.

Close up. It's not perfect, but pretty close.

That's all for tonight, onto the intake and oil system next time.

Ported intake manifolds to match the 997 heads are on.
Close up. It's not perfect, but pretty close.
That's all for tonight, onto the intake and oil system next time.
10-10-2011, 06:10 PM
#144
Addict
Rennlist Member
Rennlist Member
WOW Serge! You are right, I need to visit the 996 GT3 section more often. I totally missed your 4.0 L build. What a great project. DO give em a heads up when you fire her up for the first time. I like to stop by to take a look. You doing some of the work or just Ron?
How much does this whole exercise cost? $15K? $20K? Any corresponding/aero/wing suspension upgrade?
How much does this whole exercise cost? $15K? $20K? Any corresponding/aero/wing suspension upgrade?
10-10-2011, 06:52 PM
#145
Rennlist Member
Thread Starter
Oh dear, do I even want to add it all up?? And you thought I was full of **** when I told you all about this at Laguna.
Not going to do anything wild to the suspension yet. Maybe when the dampers get tired, I'll revalve and go with a slightly higher spring rate.
We've installed a factory cup rear bumper and cargraphic cup-style wing/decklid. 997 gt3 headers and 2008 GT3 cup muffler will go on. This compliments some of the other cup parts on the car (front splitter, brake ducts). The LSD was rebuilt with Guard parts. Clutch and flywheel will be off the factory 4.0 RS.
No other mods anytime soon...I'm anxious to spend some time actually driving the car.
10-10-2011, 07:04 PM
#146
Addict
Rennlist Member
Rennlist Member
Oh dear, do I even want to add it all up?? And you thought I was full of **** when I told you all about this at Laguna.
Not going to do anything wild to the suspension yet. Maybe when the dampers get tired, I'll revalve and go with a slightly higher spring rate.
We've installed a factory cup rear bumper and cargraphic cup-style wing/decklid. 997 gt3 headers and 2008 GT3 cup muffler will go on. This compliments some of the other cup parts on the car (front splitter, brake ducts). The LSD was rebuilt with Guard parts. Clutch and flywheel will be off the factory 4.0 RS.
No other mods anytime soon...I'm anxious to spend some time actually driving the car.
Not going to do anything wild to the suspension yet. Maybe when the dampers get tired, I'll revalve and go with a slightly higher spring rate.
We've installed a factory cup rear bumper and cargraphic cup-style wing/decklid. 997 gt3 headers and 2008 GT3 cup muffler will go on. This compliments some of the other cup parts on the car (front splitter, brake ducts). The LSD was rebuilt with Guard parts. Clutch and flywheel will be off the factory 4.0 RS.
No other mods anytime soon...I'm anxious to spend some time actually driving the car.
What an exciting project and look forward to mix it up with you on the track and see you take off on the straight ... and catch up with you on the turns

Any celebration party planned when you fire up the beast for the first time? I will bring a jug of 100 octane gas to wake up the monster

 10-12-2011, 12:55 AM
#148
Rennlist Member
Thread Starter
Fuel rail and wiring harness are split from the intake manifold to allow room for a proper install.

New fuel pressure regulator goes in place.

New injector seals are in place and wiring harness is installed.

New fuel pressure regulator goes in place.
New injector seals are in place and wiring harness is installed.
10-14-2011, 02:25 AM
#150
Rennlist Member
Thread Starter
The remaining intake pieces came in today. All are sourced from the 997 GT3, to complement the 997 throttle body. This includes the larger throttle body to plenum gasket, coupler, and MAF housing. I went on a limb and hoped that the MAF housing would fit the 996 airbox, and it does.

The new (left) vs old coupler and MAF housing.

Coupler difference in diameter.

MAF housing difference.

Intake assembly.

In summary - the intake has the following modifications:
997 GT3 Cup Heads
Ported 996 manifolds
997 GT3 throttle body
997 GT3 coupler
997 GT3 MAF housing
On the exhaust side:
997 GT3 header/cats
2008 997 GT3 Cup muffler
The engine is now near completion. The oil container and related lines need to go on. We still need to order the lightweight pulley and clutch parts.


The new (left) vs old coupler and MAF housing.
Coupler difference in diameter.
MAF housing difference.
Intake assembly.
In summary - the intake has the following modifications:
997 GT3 Cup Heads
Ported 996 manifolds
997 GT3 throttle body
997 GT3 coupler
997 GT3 MAF housing
On the exhaust side:
997 GT3 header/cats
2008 997 GT3 Cup muffler
The engine is now near completion. The oil container and related lines need to go on. We still need to order the lightweight pulley and clutch parts.