When you click on links to various merchants on this site and make a purchase, this can result in this site earning a commission. Affiliate programs and affiliations include, but are not limited to, the eBay Partner Network.
Did this today, very happy with the result! Great job to everyone adding their spin on the procedure, really helped me understand what to expect when I got contorted into place!
Wow, this thread is still going after 10 years! Looks like it's still somewhat controversial as it was when I started it. To be honest, I never noticed the clutch at all hard to depress without the spring. My answer here is, hit the gym and work on leg presses, you must be a real softie, lol.
Muscle cars and trucks in the '60's and '70's had clutches that could be hard to depress, same with commercial heavy equipment.
I still stand by my original thoughts that this mod makes the car 100X better to drive and eliminates that "no feel" zone the the booster spring creates.
To those that prefer the spring, that's OK. Porsche would have not put it in there if no one felt the need. Too stiff a clutch pedal would definitely be a reason to not buy the car. A nebulous pressure point and light clutch feel would be seen as being correctable with experience. Too bad it was not for me, so I sought a solution that worked for me and this thread resulted.
I did the helper spring delete and am pretty happy with the results. Definitely a more natural clutch feel.
However - I may like to experiment with the softer spring some here tried. Any chance anyone still has one of the extras that came due to the minimum purchase of six?
Cheers
Last edited by RSflared72e; 10-16-2018 at 11:33 PM.
I don't know how I found this thread, but I'm glad I did. I'm a new 996 owner (~2 weeks) and haven't liked the clutch feel since the test drive. I didn't like the squeak either. This past weekend I replaced the factory spring with the Home Depot version and I agree with most people that clutch engagement/feel is dramatically improved. Yes, the clutch is heavier than it was, but I can now feel the engagement point. As a bonus, the squeak is gone. For me, very much worth it.
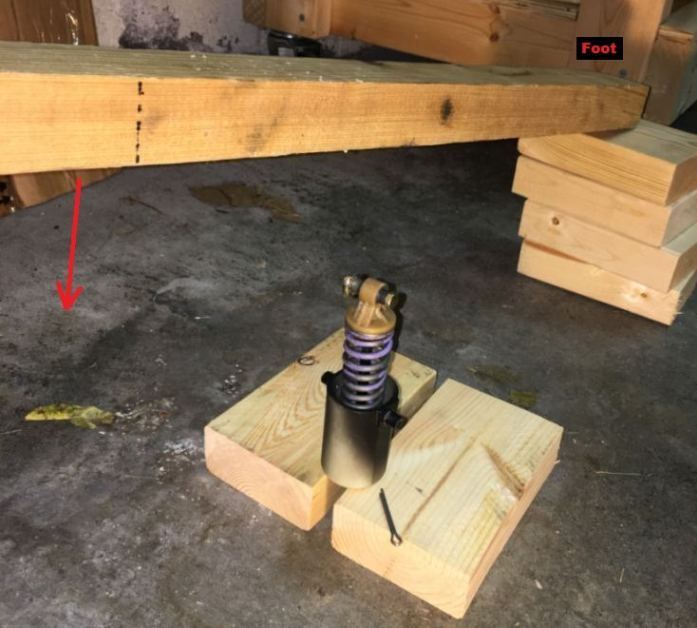
And here is my contribution to the thread, a picture of how I easily removed the factory spring from the canister:
A length of 2x4, two small pieces of 2x4 to stand the canister on, and a small stack to place one end of the lever on. I put my foot where the label says (upper right corner of pic) to stabilize the lever, one hand on the end of lever (out of pic) to press down with, which left the other hand free to remove the pin/nail from the center shaft. This picture was taken moments after releasing the spring. No fear of flying springs or injuries with this setup and the spring was out in moments. Simple and easy.
Oh, and a tip of the hat to those that got the canister out of the clutch mechanism in 10-15 minutes. I could do it that quickly now that I've done it once, but definitely not the first time.
When I wanted the spring out of mine because it was broken but still under tension I put it in a vise, released the cotter pin and slowly unwound the vice.
When I wanted the spring out of mine because it was broken but still under tension I put it in a vise, released the cotter pin and slowly unwound the vice.
Much safer
Guys, you can easily release the spring by hand. It's a 90lb spring. It's easy to grip using both hands....and then of course the new spring is much easier. If you've ever used a "hard" grip stregnth trainer odds are it was 100lb...and that's just one hand.
When I wanted the spring out of mine because it was broken but still under tension I put it in a vise, released the cotter pin and slowly unwound the vice.
Much safer
Well, I read that others had used a vice, but my vice wouldn't open far enough to accommodate. And like nychase points out above, you can actually compress the spring by hand. However, for me to compress it by hand--with control--took two hands, leaving me with no way to remove the pin.
Therefore my solution seen in the picture. It was extremely safe. The lever is long enough to only require a fraction of the weight necessary to compress the spring, allowing a very easy release of the tension. Paraphrasing Atlas "give me a long enough lever and I can move the world."
However, for me to compress it by hand--with control--took two hands, leaving me with no way to remove the pin.
Sorry, I keep forgetting to mention that I too used two hands and let the pin fall out with gravity. Once you compress the spring a bit all the pressure on the pin releases and it will just fall out.
Ok, I see what you mean. My pin is out far enough now that it hits a nut attached to the gold bracket preventing me from pressing the clutch all the way down. Did you remove the pin with the clutch depressed all the way? I'm kinda stuck.
how did you repair my gold hex bolt is out as far as I could get it but now I ca no longer depress the pedal to get it out or back in at this point.
whoever does this mod make sure you don�t pull the pin unless the pedal is all the way to the floor!!
how did you repair my gold hex bolt is out as far as I could get it but now I ca no longer depress the pedal to get it out or back in at this point.
whoever does this mod make sure you don�t pull the pin unless the pedal is all the way to the floor!!
Been while since i've done this so I might be wrong but with the pedal depressed the spring is under the most amount of stretch and tension with the pedal depressed.
It is not a good idea to pull the pin with the pedal depressed. Not sure whats gone wrong in your scenario but I got the pin out very easily without the pedal depressed.
So I did this mod today. If youre like me...(recently bought the car, hate looking like an idiot who can't shift, researched 996 clutch pedal and landed on this mile long thread)....I can tell you a few things. This whole process is really much easier than some people make it sound. Ill summarize below:
1) Get spring from home Depot. It's actually in the fence/gate hardware section in an orange box. Two large/two small for 4 bucks. Item number 684838.
2) You need needle nose pliers, and a decently solid flat head screwdriver.
3) As described, remove air duct by pulling window side towards passenger (compressing accordian) and then once that's sides free pull other side. Replacing the air duct was the most frustrating part until I just put the window side in first (it's an odd shape and you can only see 1 of the 4 corners).
4) Place a small nail or hook in from the top...use pliars to help drop it in. Note, I used a picture hanging kit eye screw which helped drop it in from the top....I tried with a wimpy picture nail but it bent pretty easily and I didn't like that.
5) You really just have to push the clutch in past the resistance of your nail and with a strong screw driver you can pry the gold screw loose (assuming you followed the directions above telling you to remove the clip with the pliars). It will not fall on you so don't worry.
6) Its just a matter of turning the spring assembly 90 degrees to get the back two pivots to come out...it's pretty intuitive to see what needs to happen to have it come out.
7). My greatest fear was the next part with all these posters saying to use a bench vice or lose an eye....nope. I tested to see if I could compress the spring by hand since you get a great grip with the two black pivot locations....easy enough to compress and just let your nail fall out and let it out slowly. Seriously, it's a 2 second thing easy enough for anyone with hand strength more than a 2 year old.
8) all the posters who talk about the long spring not fitting perfectly are technically right....but don't waste time trying to modify anything....just put it in and push everything back together and reanchor with your nail. Now take the needle nose pliers and tug on the spring a little to get it to seat nice on the end you can still see.
9) Reinstalling the new spring was easy...just twist it back up there and seat the pivot points. Then press the clutch all the way in with one hand and use the screwdriver to position the gold screw and slowly let the clutch out and it will all click into place. Use needle nose to put the clip in. If you didn't catch the most important part...stop trying to reinvent the wheel and just use your hand on the clutch....no crazy dowels or brooms needed....it's not that heavy and you only are pushing it down for a few seconds.
So that's my not so concise advice. I read all 36 pages...decided the HD spring had the best pros/cons breakdown and jumped in. I just wanted to make sure that anyone who was just in my position fully understands it's a pretty easy job and that most people were making a big deal of nothing.
Thank you nychase (and everyone who posted), using this instruction I am able to change the spring on my 2004 40th anniversary edition. Just want to share a few things from my experience in Canada:
1. The HD spring is not available here Misumi USA has a similar spring but shipping kills ($27USD to ship). I ended up buying a brand new assembly from Porsche dealer ($104CAD including HST). Brafasco seems to have springs (INDUS0615290) that could work but without detailed spec (k constant and picture) I rather not risk it.
2. for the assembly to go back in, the hex bolt side needs to point downward. Need lots of patience; getting the pivot points to go into the gold bracket and sit is the hardest part for me. I did the install in 15 minutes.
3. I did get a Check Engine Light while I was driving without the spring. It may not be related as the I am getting Misfired code, but one of the codes is Clutch Pedal Encoder. So I think it is better to have spring installed.
OK. I didn't want to cast necromancy on this thread but after hours of lying upside down, swearing, and my head getting slapped by pedals, I'm calling for help. The damn bolt won't come out! I have the clutch pedal pressed all the way to the floor but the bolt still doesn't clear the bracket. Is there some kind of sorcery that'll allow the bolt to move out of the assembly? I have a pin at the end of the spring, the clip removed, clutch down, and bolt half way out.
OK. I didn't want to cast necromancy on this thread but after hours of lying upside down, swearing, and my head getting slapped by pedals, I'm calling for help. The damn bolt won't come out! I have the clutch pedal pressed all the way to the floor but the bolt still doesn't clear the bracket. Is there some kind of sorcery that'll allow the bolt to move out of the assembly? I have a pin at the end of the spring, the clip removed, clutch down, and bolt half way out.
How do you rotate that part of the assembly? the bolt goes through the black clutch pedal arm and holds it at a horizontal position. The video shows the clutch spring movement, could you explain how to rotate and shimmy that bolt out?


 10-25-2017, 11:48 AM


 Misumi USA has a similar spring but shipping kills ($27USD to ship). I ended up buying a brand new assembly from Porsche dealer ($104CAD including HST). Brafasco seems to have springs (INDUS0615290) that could work but without detailed spec (k constant and picture) I rather not risk it.