When you click on links to various merchants on this site and make a purchase, this can result in this site earning a commission. Affiliate programs and affiliations include, but are not limited to, the eBay Partner Network.
@andy2111 I see you have the floating action button on your screen. That, and the beep, are the first things I took off my unit when I installed it. I couldn't figure out when I would ever use it and I didn't like the looks of it on the screen.
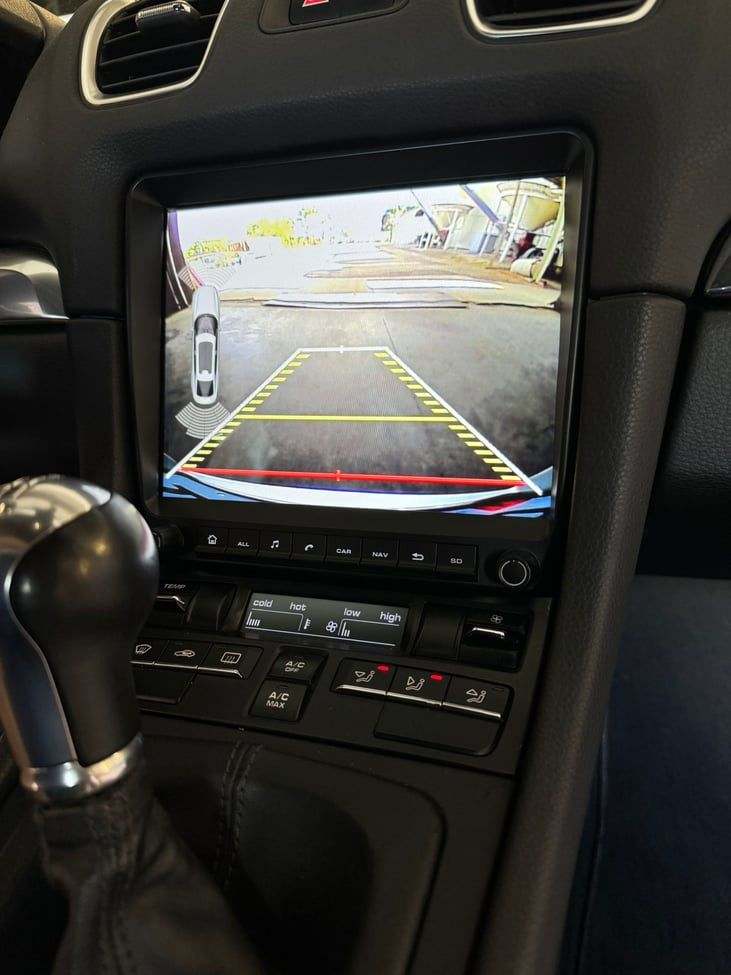
Now I just wish I could figure out how to make my car not look like a limo when I am in reverse and the radar sensors show on the screen, but I'm' guessing that is not possible. The original image was probably formatted for a standard size double din screen, and it stretches to fill the size of this screen. But now I am just nit-picking.
I just realized another benefit of these HUs. I now have RCA outputs so I can easily add a second amp to power a shallow mount subwoofer that I can hide behind the passenger seat on my Cayman. I have the Bose system with fiber optics, so there wasn't an easy way to do that in the past. I already have an amp and a sub that was in my last pickup, so all I need to do is make a box, and since I own a woodworking plant, I have to tools and knowhow for a low-cost solution.
Will the projects ever end? My wife says that I am supposed to finish painting the house before spending all my time on the car. But if I work on it while I am at work, will she ever know?
Will the projects ever end? My wife says that I am supposed to finish painting the house before spending all my time on the car. But if I work on it while I am at work, will she ever know?
Now I just wish I could figure out how to make my car not look like a limo when I am in reverse and the radar sensors show on the screen, but I'm' guessing that is not possible. The original image was probably formatted for a standard size double din screen, and it stretches to fill the size of this screen. But now I am just nit-picking.
Hi, this is from the soon to be published next version of the guide:
Under Settings > Factory
Factory > Original Car Agreement > Radar Display ON/OFF (ensure set to ON)
Factory > Local Radar switch (choose whether to put radar display on full screen)
Factory > Radar Window (choose whether to display radar overlay - my preferred option)
@ZedZed , @andy2111 and @ratt359 are pleased to announce a new version of the Android Head Unit guide! (v1.3)
Note again that the guide and the other materials within remain a work in progress - and many thanks to those that have contributed ideas and solutions since the previous version.
This continues to be a really collaborative and supportive thread - long may it continue.
There is an appendix in the guide which contains items yet to be properly incorporated into the body of the document. Our hope is that this detail nevertheless proves useful.
Hi There, great job on the guide and thanks for updating! For the "non-bose audio" section, I don't think you added the fact that the wiring loom as shipped by CHSTEK does not turn on the amplifier. There is a cable labeled AMP that needs to connect to switched +12V for any sound to come out of the unit. I used another cable in the wiring loom to accomplish this and posted a picture earlier in this thread.
(if this info is in the guide and I missed it, I apologize, I just did a quick read for now)
Great job on the Guide update. Thanks for doing that. I just installed my unit this week, so I re-read the last 750 posts to make sure I wasn't missing anything because so much has been put on this thread. I made some notes and see that there are some things that are not yet in the guide that might be helpful to add.
- A photo of the back of the PCM 3.1 with labels from Post 2799. This helped me figure out which antenna wires were which.
- You reference that sometimes you need to reset the unit with a full power cycle after a Canbus update. You talk about pulling the quadlock connector to do that. You should also state that it can be done by pulling the fuse and show a photo of which fuse to pull in the right footwell. This will be helpful to those who do the Canbus update with the unit and trim already completely installed.
- Those with a non-Bose amp might have to hook up the remote power wire for their amp. The blue wire from the HU. Posts 2818 - 2831.
- Manual camera hookup. Your second paragraph says "(right hand?) seat", but the quote below it states left seat for the location of the wire loom. Mine was under the left seat. The Bose amp is located under the right seat.
Once again Thank You for doing this guide. It is a great help since this thread is so long it is hard to find what you are looking for. There is so much great information that everybody has contributed. It blows me away how long this thread is and how helpful everyone has been when anyone has a question. What a GREAT community we have here.
That warning needs to be writ large! I have had a similar issue in the past (nothing to do with HUs or cars) where I managed to turn the screen output OFF altogether. As you can imagine, this makes it quite tricky to find any icons or settings that need to be changed to get things back to normal. If the screen goes black, there is every chance you are screwed. It may also cause actual physical damage, as implied by CHSTEK's support person.
If the low default is 30, and 21 seems to be acceptably dim, I would go down in single incremental steps from 29, through 28, 27 etc and stop when the brightness was about right. I'd do it in my pitch dark garage. I would not go below 21 in any circumstances based on @cjrhoades findings above.
I've just done this on my unit - it's certain nice to have a wider range of brightness without using third party apps.
I also changed the lower threshold to 21 and left upper threshold unchanged. I noted that a config file is written to the HU when you save a changed config (/mnt/sdcard/customercfg/customercfg.txt). Contents as below. I'm wondering if the adb tools (per replacement of Android boot animation in the guide) may be a means to roll back the dreaded black screen. I will try to find time to test this recovery process this weekend.
Great job on the Guide update. Thanks for doing that. I just installed my unit this week, so I re-read the last 750 posts to make sure I wasn't missing anything because so much has been put on this thread. I made some notes and see that there are some things that are not yet in the guide that might be helpful to add.
- A photo of the back of the PCM 3.1 with labels from Post 2799. This helped me figure out which antenna wires were which.
- You reference that sometimes you need to reset the unit with a full power cycle after a Canbus update. You talk about pulling the quadlock connector to do that. You should also state that it can be done by pulling the fuse and show a photo of which fuse to pull in the right footwell. This will be helpful to those who do the Canbus update with the unit and trim already completely installed.
- Those with a non-Bose amp might have to hook up the remote power wire for their amp. The blue wire from the HU. Posts 2818 - 2831.
- Manual camera hookup. Your second paragraph says "(right hand?) seat", but the quote below it states left seat for the location of the wire loom. Mine was under the left seat. The Bose amp is located under the right seat.
Once again Thank You for doing this guide. It is a great help since this thread is so long it is hard to find what you are looking for. There is so much great information that everybody has contributed. It blows me away how long this thread is and how helpful everyone has been when anyone has a question. What a GREAT community we have here.
Thanks for this feedback - we'll aim to incorporate asap.
Re: non-Bose - already added.
Re: manual camera hook-up - is the loom always under the left seat of the car, regardless of whether it's RHD or LHD?
Thanks for this feedback - we'll aim to incorporate asap.
Re: manual camera hook-up - is the loom always under the left seat of the car, regardless of whether it's RHD or LHD?
I guess I don't know for sure that it is always under the left seat. The wiring diagram that is shown does say under the driver's seat, so maybe it is different in the UK.
I guess I don't know for sure that it is always under the left seat. The wiring diagram that is shown does say under the driver's seat, so maybe it is different in the UK.
IDK if this is any help, but I had a LHD 911 followed by a same model RHD 911 and all the parts* were, as far as I could tell, in the same place on each car. So I guess Porsche work on 'left' or 'right' rather than driver side or passenger side. But it's only a guess based on those two cars. There's a 50-50 chance of getting it right first time anyway, and having to remove an extra seat isn't much of an issue if the coin-toss goes against you.
*Obviously excluding things like steering wheel, pedals and so on.


 06-06-2024 | 04:21 PM

 I already have an amp and a sub that was in my last pickup, so all I need to do is make a box, and since I own a woodworking plant, I have to tools and knowhow for a low-cost solution.


