
964 Refurb
 05-21-2014, 04:48 PM
#571
Three Wheelin'
Thread Starter

 05-21-2014, 05:28 PM
#572
Three Wheelin'
Thread Starter
Well its been a while since I've updated this thread! And that's because we've actually been using the car whenever we can. Its superb - I love it
A couple of jobs have been finished off tho like the headlining. This proved to be a very tricky and time consuming job. As ever tho, lessons learned and next time it'll be an easier job since I now know what does and doesn't work. I had to go through a few iterations before I reached a level of finish I was satisfied with.
It's kind of difficult to photograph a matt finished textured material so sorry about the poor images. So how did I do it? First off I ignored the main expanse of the roof and and just focused on the perimeter structure. The material I used has a 3mm foam backing and was stuck directly to the metalwork. I managed to do the whole lot it a single sheet with no cut-joins or creases. It wasn't easy. The center section was then cutout and discarded.
I then set about making a template from a piece of vinyl floor covering that filled the main inner roof section and butted perfectly along every edge. This was by far the hardest job. I made 4 different templates before getting it absolutely right. This template was then transferred onto a sheet of 10mm closed cell foam (the same as I used on the rear shelf for sound deadening - it weights nothing). I then cut out the foam, a few trial fits and minor fettling, and it fitted pretty darn good. The foam was then covered in the materal and the whole thing stuck to the roof like a big pad. Judge for yourselves if you like it or not (looks better in the flesh) but I think it looks pretty good. Having the material stuck directly to the perimeter structure means it follows every contour and gives it a kind of racey look. With the centre pad, it also breaks up the roof space of what otherwise would be an expanse of black. Almost like a detail feature.


The next job was to create and fit a rain-light style high level brake light.
So I bought the LED unit, remodeled it a bit and made a mounting bracket. I ran the wire up behind the roof lining. It's also connected up with one of those little velleman flasher circuits (only flashes the first time the pedal is pressed in within a 10-15 second interval)


It may look low, or that it may be an irritation in the rear view mirror but actually most of it is out of view and obscured by the roll bar.

It's darn bright too.
A couple of jobs have been finished off tho like the headlining. This proved to be a very tricky and time consuming job. As ever tho, lessons learned and next time it'll be an easier job since I now know what does and doesn't work. I had to go through a few iterations before I reached a level of finish I was satisfied with.
It's kind of difficult to photograph a matt finished textured material so sorry about the poor images. So how did I do it? First off I ignored the main expanse of the roof and and just focused on the perimeter structure. The material I used has a 3mm foam backing and was stuck directly to the metalwork. I managed to do the whole lot it a single sheet with no cut-joins or creases. It wasn't easy. The center section was then cutout and discarded.
I then set about making a template from a piece of vinyl floor covering that filled the main inner roof section and butted perfectly along every edge. This was by far the hardest job. I made 4 different templates before getting it absolutely right. This template was then transferred onto a sheet of 10mm closed cell foam (the same as I used on the rear shelf for sound deadening - it weights nothing). I then cut out the foam, a few trial fits and minor fettling, and it fitted pretty darn good. The foam was then covered in the materal and the whole thing stuck to the roof like a big pad. Judge for yourselves if you like it or not (looks better in the flesh) but I think it looks pretty good. Having the material stuck directly to the perimeter structure means it follows every contour and gives it a kind of racey look. With the centre pad, it also breaks up the roof space of what otherwise would be an expanse of black. Almost like a detail feature.
The next job was to create and fit a rain-light style high level brake light.
So I bought the LED unit, remodeled it a bit and made a mounting bracket. I ran the wire up behind the roof lining. It's also connected up with one of those little velleman flasher circuits (only flashes the first time the pedal is pressed in within a 10-15 second interval)
It may look low, or that it may be an irritation in the rear view mirror but actually most of it is out of view and obscured by the roll bar.
It's darn bright too.
05-21-2014, 05:57 PM
#574
Burning Brakes
Very impressive. I had a Southbound Alcantara headlining fitted by my bodyshop when they did all the work on my car which included the sunroof delete. It was a tough job, and took them many days to get right. Full respect tackling that. I love this car.
05-21-2014, 07:32 PM
#575
Pro
Join Date: Sep 2010
Location: Epsom, Surrey
Posts: 541
Likes: 0
Received 0 Likes
on
0 Posts
For me, the wind noise was being created by those tiny plastic covers that sit at the lower leading edge of the door quarters. When the door is shut, they're sandwiched between the door window frame and the rubber door seal. The wind was getting under it and making a hissing/whistling noise at speed. I took them off, covered the reverse of them in a non-setting sealant, squidged them back down and wiped of the excess. Works a treat, the wind can't get under them anymore

 05-23-2014, 01:17 AM
#578
wow! this is the best one man build, DIY thread ever! definitely makes you THE MAN! around these parts.
05-24-2014, 10:28 AM
#579
Nordschleife Master

I assume that LED third-brake light is much brighter than the OEM third-brake light (for those of us who have them on our cars).
Have you driven it at night? Does the light glare or reflect onto the rear glass since the surround on the light doesn't come all the way to the glass?
Have you driven it at night? Does the light glare or reflect onto the rear glass since the surround on the light doesn't come all the way to the glass?
 05-27-2014, 04:27 AM
#584
Three Wheelin'
Thread Starter
Thanks for all the kind words chaps
Not driven it at night yet. The unit has quite a narrow beam angle so I'm hoping any reflection is minimal. I'll report back once I've tried it.
Yep, no need top pop the windows. Well, I say that but I did accidently push one of the rear quarters almost out so had to pop over to fuch's so that he could pop it back in for me. Given the sharp pointy tools required to do this and proximity to shiny paint work I'm glad I left that to the pro
As this material/approach is not as stretched as the OEM headliner, the edges of the material can simple be pushed under the rubber seals.
05-27-2014, 07:47 AM
#585
Instructor
Join Date: Jun 2012
Location: Bexleyheath, Kent
Posts: 169
Likes: 0
Received 0 Likes
on
0 Posts
Rob
great work, I really enjoy your thread.
Can I ask did Spectrum refurb the oil line I've highlighted, I'm struggling to find someone local that can do the 90 degree in 22mm
[IMG]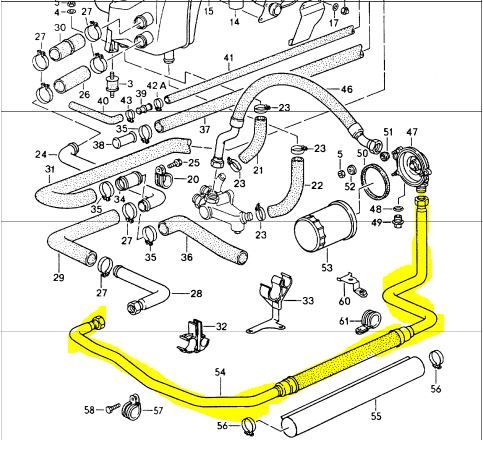 [/IMG]
great work, I really enjoy your thread.
Can I ask did Spectrum refurb the oil line I've highlighted, I'm struggling to find someone local that can do the 90 degree in 22mm
[IMG]
 [/IMG]