

964 Refurb

Thread Starter
Three Wheelin'
Joined: Jan 2013
Posts: 1,609
Likes: 9
From: Bucks
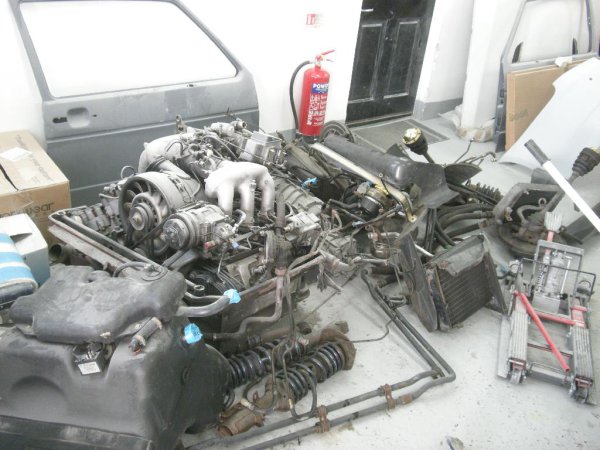
Good progress today  Finally completed all the tunnel services!
You may recall I opted not to use the v-expensive Porsche clutch and fuel lines. This has delayed things a little but I'm now very happy with the result. The fuel lines now take a very different route. On a right-hand car the fuel lines would enter the engine bay on the left. Mine now enter on the right, switching sides towards the end of the tunnel.


The fuel lines sweep up and round in a similar route that the vacuum hose does on the left.

Here you can see the lines entering the engine bay. The return line runs left and out of shot.

This image shows how/where the lines swap tunnel sides.

Clutch line will be trimmed to length and terminated once the engine is aimed up to fit.

This re-routing was a bit of a ball-ache and very time consuming but I now have new lines that will never corrode or need replacing
The oil tank and hoses are up next...
Finally completed all the tunnel services!You may recall I opted not to use the v-expensive Porsche clutch and fuel lines. This has delayed things a little but I'm now very happy with the result. The fuel lines now take a very different route. On a right-hand car the fuel lines would enter the engine bay on the left. Mine now enter on the right, switching sides towards the end of the tunnel.
The fuel lines sweep up and round in a similar route that the vacuum hose does on the left.
Here you can see the lines entering the engine bay. The return line runs left and out of shot.
This image shows how/where the lines swap tunnel sides.
Clutch line will be trimmed to length and terminated once the engine is aimed up to fit.
This re-routing was a bit of a ball-ache and very time consuming but I now have new lines that will never corrode or need replacing
The oil tank and hoses are up next...
Thread Starter
Three Wheelin'
Joined: Jan 2013
Posts: 1,609
Likes: 9
From: Bucks
Thanks guys - I'll update this eve as i should have the oil tank, hoses and lines back in. That's if I can remember how the the lines route over the front RHS wheel well. I can't find any pictures I took of that before removing them.
Thread Starter
Three Wheelin'
Joined: Jan 2013
Posts: 1,609
Likes: 9
From: Bucks
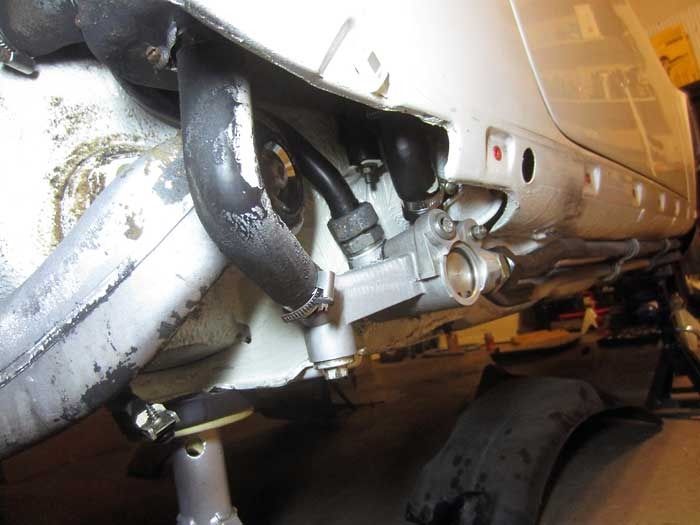
Right chaps! I need your help. I've spent the best part of 2 hours trying to fit the fore/aft metal oil lines. Failed, and have now given up. How hard can it it be! I can't work out which of the two long pipes connects to which of the two forward facing unions on th stat. No matter which, I cannot get the pipes to line up anywhere near close to the two clamps that support them along the sill. Can't see what I'm doing wrong here 
Anybody have any pictures of the pipes in situ? Ideally an image that in the same shot shows the section from the thermostat unions, through to the forward pipe bracket beneath the sill.
Thanks
Anybody have any pictures of the pipes in situ? Ideally an image that in the same shot shows the section from the thermostat unions, through to the forward pipe bracket beneath the sill.
Thanks

Thread Starter
Three Wheelin'
Joined: Jan 2013
Posts: 1,609
Likes: 9
From: Bucks
Thanks guys, I'll compare the images to my lines and hopefully see where I'm going wrong. I'm certain they've not been acidently bent or something. I just don't get why they don't align. There's only two possible combinations of fitting lol
Thread Starter
Three Wheelin'
Joined: Jan 2013
Posts: 1,609
Likes: 9
From: Bucks
Progress...
The thermostate being rebuilt. All new guts and unions.

... and finally in place with those pesky long metal oil lines. All lines with soft sections were rebuilt by a hydraulics shop. The long metal sections were a pig to fit, align and tighten. If these every need to come off again I'm convert over to some kind of aeroquip setup with the appropriate adapters like a few others have done. Getting all the lines refurb'd cost me about �120 quid so less than the cost of aeroquip and 10 times less than porche stuff. When removing all this I found that the nuts and threaded studs of the rubber support mounts for the tank and stat were totally corroded and all needed to be cut out. To protect them in this nasty wheel arch environment I sourced some stainless dome nylocs. The threads are now completely covered and hopefully make later removeal that bit easier.

The nice clean oil tank with all new hoses, sender and stainless clips and fasteners. I'm toying with the idea of coming up with a better form of protection for this area from gravel-rash than the tiny little steel plate that normally just covers the sender.

A view up into the top of the arch at the plumbing mess. Still not happy about this as I can't remember the correct order of laying the hoses. Another area I omitted to snap a picture of because at the time I thought it looked obvious :-)

Next up the refitting of the rear suspension...
The thermostate being rebuilt. All new guts and unions.
... and finally in place with those pesky long metal oil lines. All lines with soft sections were rebuilt by a hydraulics shop. The long metal sections were a pig to fit, align and tighten. If these every need to come off again I'm convert over to some kind of aeroquip setup with the appropriate adapters like a few others have done. Getting all the lines refurb'd cost me about �120 quid so less than the cost of aeroquip and 10 times less than porche stuff. When removing all this I found that the nuts and threaded studs of the rubber support mounts for the tank and stat were totally corroded and all needed to be cut out. To protect them in this nasty wheel arch environment I sourced some stainless dome nylocs. The threads are now completely covered and hopefully make later removeal that bit easier.
The nice clean oil tank with all new hoses, sender and stainless clips and fasteners. I'm toying with the idea of coming up with a better form of protection for this area from gravel-rash than the tiny little steel plate that normally just covers the sender.
A view up into the top of the arch at the plumbing mess. Still not happy about this as I can't remember the correct order of laying the hoses. Another area I omitted to snap a picture of because at the time I thought it looked obvious :-)
Next up the refitting of the rear suspension...

Three Wheelin'
Joined: May 2012
Posts: 1,595
Likes: 0
From: Switzerland
"At the time, it all looked obvious"
I laughed out load when I read that, how many times have we thought the same and come back to it and none of it made any sense!
Congratulations to the fact that you're still fighting your way through it and looking forward to the next steps!
I laughed out load when I read that, how many times have we thought the same and come back to it and none of it made any sense!
Congratulations to the fact that you're still fighting your way through it and looking forward to the next steps!

Burning Brakes

Joined: Aug 2012
Posts: 841
Likes: 0
From: Raleigh, NC
what did you end up making the fuel lines out of?
i will start to take pictures now as I am taking mine apart and feel all is obvious...also, I am relying on finding pics on the forum to help me get it back together, maybe not a good idea
i will start to take pictures now as I am taking mine apart and feel all is obvious...also, I am relying on finding pics on the forum to help me get it back together, maybe not a good idea