

My Engine Rebuild
 03-11-2009, 06:16 PM
#1
Rennlist Member
Thread Starter
Join Date: Sep 2006
Location: Welwyn Garden City, Herts England
Posts: 121
Likes: 0
Received 0 Likes
on
0 Posts
I have asked a lot of questions over the past year of this forum and not given much back. So firstly a BIG Thank You to everyone who has replied to my posts about issues that have arisen.
I have assembled a selection of photos and descriptions of what I have done right and wrong with my rebuild and will post them up over the next few days as time permits.
A bit of background on why I decided to rebuild my engine. I had oil leaks from the through bolts, cylinder base junction and cylinder to head junction. There was also a slight weep from the rear main seal. None of the leaks were terrible, but it was starting to seep into the heat exchangers and smell awful when the heater was on. What capped it off for me was having a leak down test undertaken and finding relatively high losses throughout and particularly high in cylinder one.
I did get a few quotes from independents to undertake at least a top end rebuild, but where is the fun in that, besides why pay for someone else to do something you can (hopefully) do OK yourself.
I started with high aspirations about it only taking a couple of months to complete. Its been ongoing now since April 08 and at last the engine is now finished. I just need to mount the heat exchangers, fan, alternator and injection system before I can refit it to the car. Starting it for the first time will be a VERY nerve wracking experience. Everything will be crossed that day.
Day One
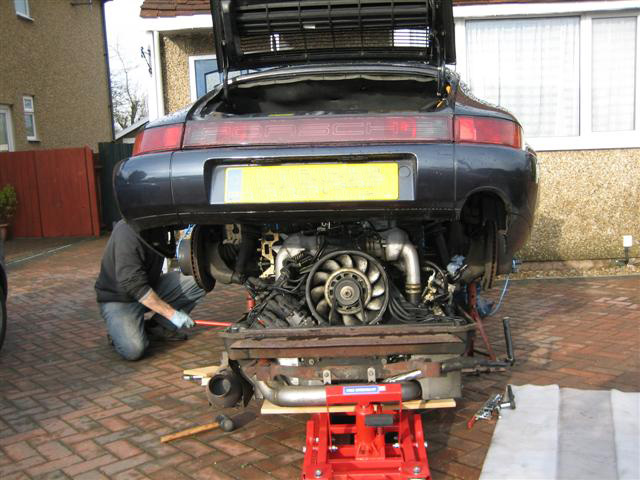
Day Two. The only way I could get the engine into my shed was to strip off the exhaust, fan, injection system etc. Even so it only just fitted with 20mm to spare.
Well its in! Now what
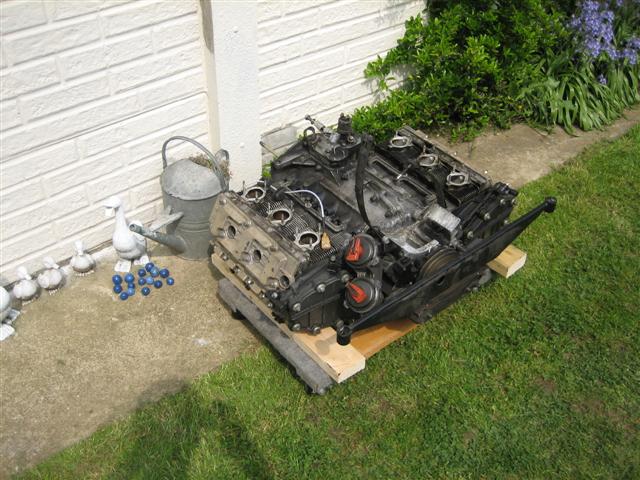
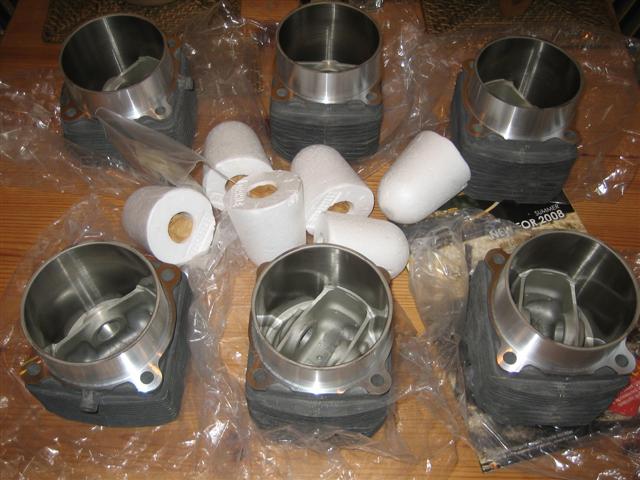
Over the coming weekends I slowly stripped everything down. Photographed it, labelled it and measured what I could. Below is a sample of what all the heads and cylinders looked like when removed.
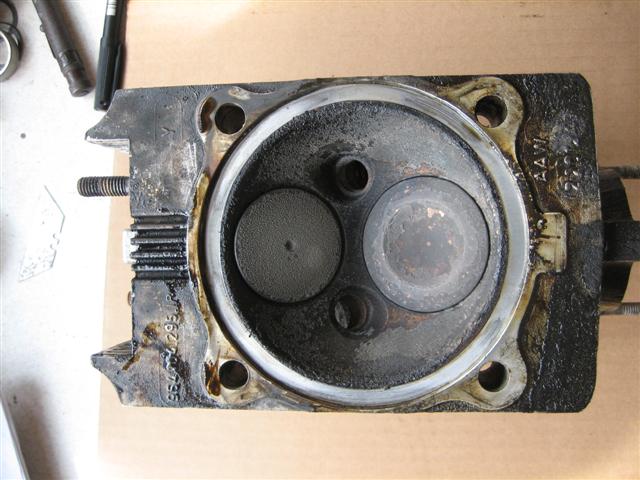

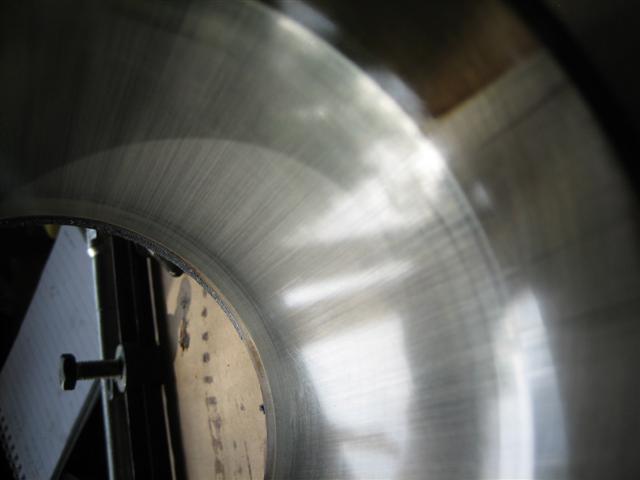
This is cylinder number one. Out of the six it had the most scoring. I found that the end of the top compression ring was also broken and missing, never to be found. I got all cylinders measured professionally and found two to be worn beyond the specified tolerance.
I have assembled a selection of photos and descriptions of what I have done right and wrong with my rebuild and will post them up over the next few days as time permits.
A bit of background on why I decided to rebuild my engine. I had oil leaks from the through bolts, cylinder base junction and cylinder to head junction. There was also a slight weep from the rear main seal. None of the leaks were terrible, but it was starting to seep into the heat exchangers and smell awful when the heater was on. What capped it off for me was having a leak down test undertaken and finding relatively high losses throughout and particularly high in cylinder one.
I did get a few quotes from independents to undertake at least a top end rebuild, but where is the fun in that, besides why pay for someone else to do something you can (hopefully) do OK yourself.
I started with high aspirations about it only taking a couple of months to complete. Its been ongoing now since April 08 and at last the engine is now finished. I just need to mount the heat exchangers, fan, alternator and injection system before I can refit it to the car. Starting it for the first time will be a VERY nerve wracking experience. Everything will be crossed that day.
Day One
Day Two. The only way I could get the engine into my shed was to strip off the exhaust, fan, injection system etc. Even so it only just fitted with 20mm to spare.
Well its in! Now what
Over the coming weekends I slowly stripped everything down. Photographed it, labelled it and measured what I could. Below is a sample of what all the heads and cylinders looked like when removed.
This is cylinder number one. Out of the six it had the most scoring. I found that the end of the top compression ring was also broken and missing, never to be found. I got all cylinders measured professionally and found two to be worn beyond the specified tolerance.

 Looking forward to your updates.
03-11-2009, 06:54 PM
Looking forward to your updates.
03-11-2009, 06:54 PM
#4
Rennlist Member
Thread Starter
Join Date: Sep 2006
Location: Welwyn Garden City, Herts England
Posts: 121
Likes: 0
Received 0 Likes
on
0 Posts
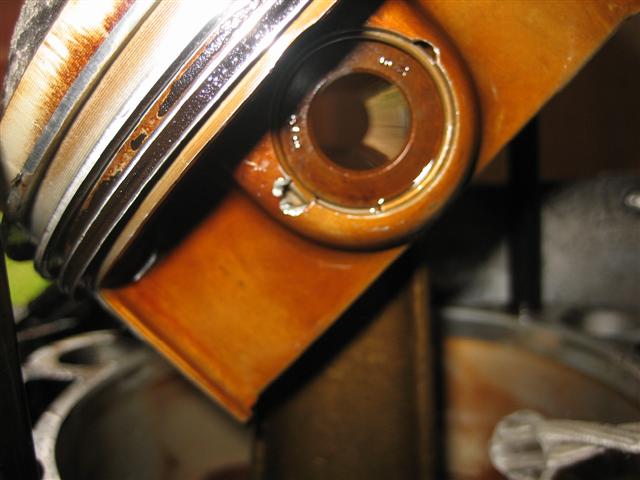
The engine had defiantly been apart before. I had found scoring on the pistons by the wrist pin clips and also dents where the rods had been allowed to fall against the case lip where the cylinders join.
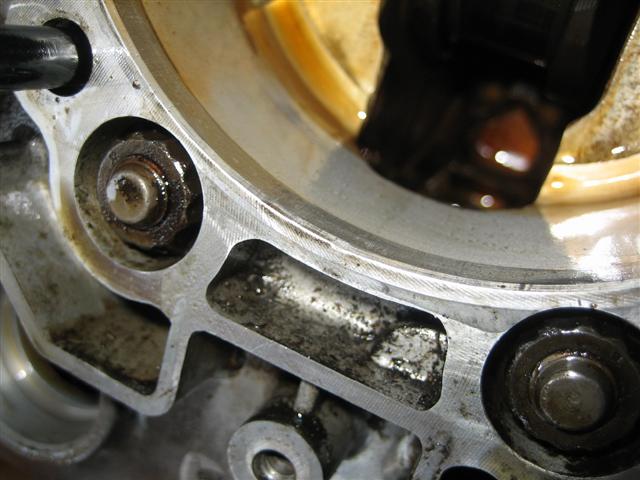
I spoke to a very friendly chap called Colin Belton at Ninemeister (thanks Colin) who gave me some sound advice about the dents. I later dressed these back with a needle file and lightly sanded flush. The dents are just inside the location of the "O" ring at the base of the cylinders, so providing no high spots existed should be OK. I checked my work in these areas by test fitting with engineers blue until I got a nice flat dent free surface.
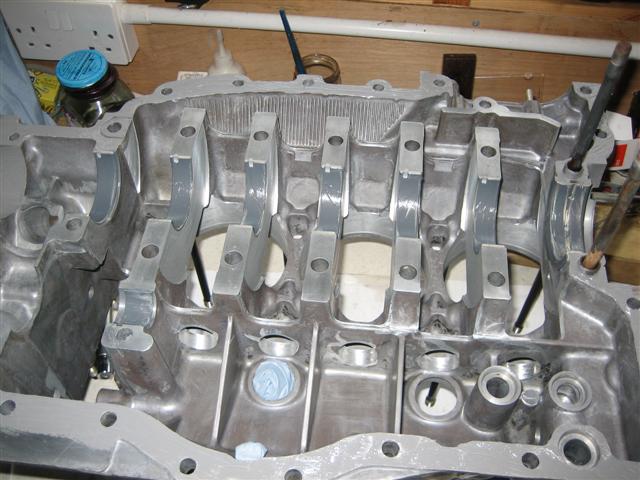
Initially I was not going to split the case, just clean everything up and change the through bolt �O� rings one by one. I priced up the complete bearing sets I would need and the after finding the dents decided to go the whole hog. I don�t think the case had ever been apart.
I did not really find anything too surprising. There was a few bits a black silicone type overspill collected around the oil pump gauze and the through bolts �O� rings where either torn or hard and split. No wonder they were leaking so badly.
Once I had everything apart I set about the joyous task of cleaning then rechecking everything. This was helped immensely by the charitable nature a local independent Porsche garage, who had very kindly offered to help me out with advise and use of their hot parts washer. The case, heads and various other items were hot cleaned by them for me. When I got them back I still spent may an hour re-cleaning everything, knocking out some blanking plugs, cleaning out the galleries and setting in new plugs.
One area I spent a long time on was cleaning out the piston squirters which are located on the bearing webs of the case. On the case half 1 to 3 the squirters can be accessed easily and flushed out with cleaning fluid. I do not have access to a compressor, so I used a bicycle track pump with a tapered plastic adaptor wedged into the oil feed hole for each squirter. After two or three quick pumps enough pressure would accumulate and the squirter would open and spray the fluid out. I repeated this five or six times for each squirter until the fluid sprayed out was nice and clean. I then sprayed a little GT85 into each squirter to stop them sticking before everything was finished. With the other case half, 4 to 6 I needed to block the through bolt holes as the squiter drillings are connected to these. I did this with some silicone tubing and abolt pushed down its centre to expanded it into position. It worked out well.
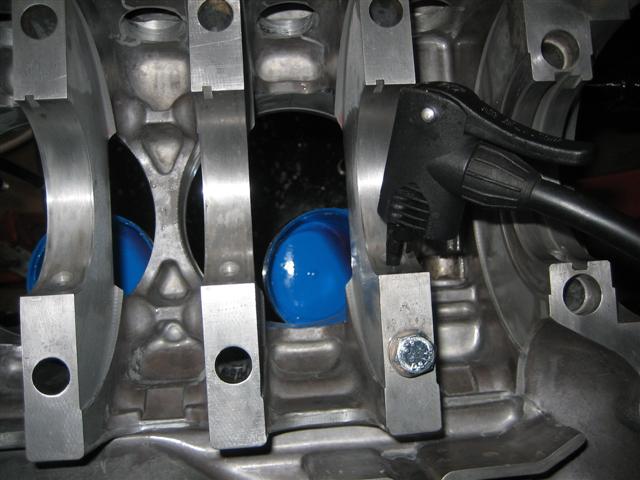
I spoke to a very friendly chap called Colin Belton at Ninemeister (thanks Colin) who gave me some sound advice about the dents. I later dressed these back with a needle file and lightly sanded flush. The dents are just inside the location of the "O" ring at the base of the cylinders, so providing no high spots existed should be OK. I checked my work in these areas by test fitting with engineers blue until I got a nice flat dent free surface.
Initially I was not going to split the case, just clean everything up and change the through bolt �O� rings one by one. I priced up the complete bearing sets I would need and the after finding the dents decided to go the whole hog. I don�t think the case had ever been apart.
I did not really find anything too surprising. There was a few bits a black silicone type overspill collected around the oil pump gauze and the through bolts �O� rings where either torn or hard and split. No wonder they were leaking so badly.
Once I had everything apart I set about the joyous task of cleaning then rechecking everything. This was helped immensely by the charitable nature a local independent Porsche garage, who had very kindly offered to help me out with advise and use of their hot parts washer. The case, heads and various other items were hot cleaned by them for me. When I got them back I still spent may an hour re-cleaning everything, knocking out some blanking plugs, cleaning out the galleries and setting in new plugs.
One area I spent a long time on was cleaning out the piston squirters which are located on the bearing webs of the case. On the case half 1 to 3 the squirters can be accessed easily and flushed out with cleaning fluid. I do not have access to a compressor, so I used a bicycle track pump with a tapered plastic adaptor wedged into the oil feed hole for each squirter. After two or three quick pumps enough pressure would accumulate and the squirter would open and spray the fluid out. I repeated this five or six times for each squirter until the fluid sprayed out was nice and clean. I then sprayed a little GT85 into each squirter to stop them sticking before everything was finished. With the other case half, 4 to 6 I needed to block the through bolt holes as the squiter drillings are connected to these. I did this with some silicone tubing and abolt pushed down its centre to expanded it into position. It worked out well.
 .............
 03-11-2009, 07:19 PM
#6
Burning Brakes
Join Date: Feb 2004
Location: Derbyshire, England
Posts: 898
Likes: 0
Received 0 Likes
on
0 Posts
Blimey! Seeing pictures like that fill me with: 1. terror and 2. absolute admiration. I don't think that I have the ***** or skill to ever undertake that kind of work. Looking forward to seeing it all together and growling.
PS did you do any enhancements while you were in there, especially after talking to Neinmeister?
PS did you do any enhancements while you were in there, especially after talking to Neinmeister?

Trending Topics
03-11-2009, 07:34 PM
#8
Rennlist Member
Thread Starter
Join Date: Sep 2006
Location: Welwyn Garden City, Herts England
Posts: 121
Likes: 0
Received 0 Likes
on
0 Posts
Whilst this was going on, I was trying to decide about how to get around the worn cylinders. They were the early type, without the sealing rings at the head junction. I toyed around with the idea of changing to 102mm cylinders and pistons, making a 3.8, but that was starting to look a bit optimistic for my budget and skills. At the time (last spring) the UK to US exchange rate was good so I took the plunge and ordered a new set of Mahle cylinders, pistons and rings from Pelican Parts in California. Even with the shipping, import and tax I made a considerable saving on these compared to the UK estimates I had received. Unfortunately this was my first of several disasters. The first set had got damaged in shipping and ironically so did the second. After many e-mails and phone calls the third set arrived an were perfect. I have to say the attitude of Pelican and in particular their proprietor Wayne was fantastic, the shipping problems were down to how Mahle had packaged the sets up and nothing to do with Pelican. The third set was inspected an hand packed by Wayne in a fashion fit for organs awaiting human transplant, his words not mine!!!!
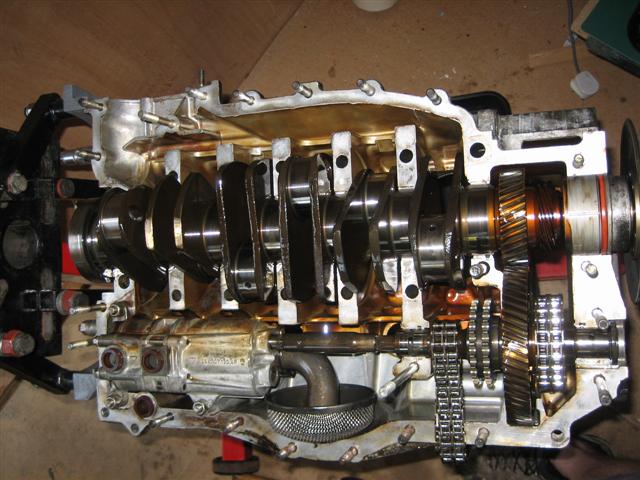
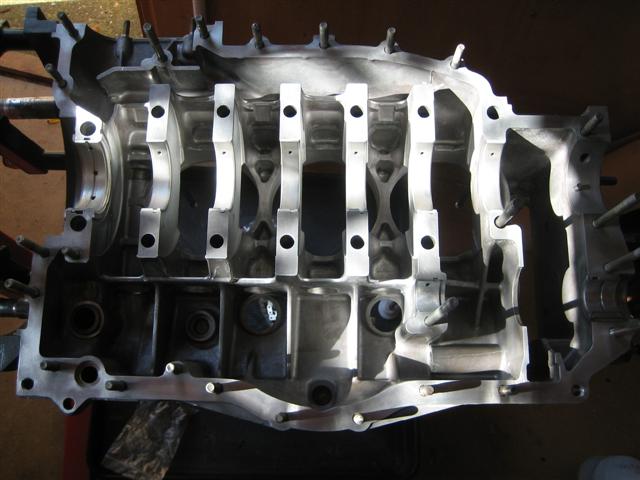
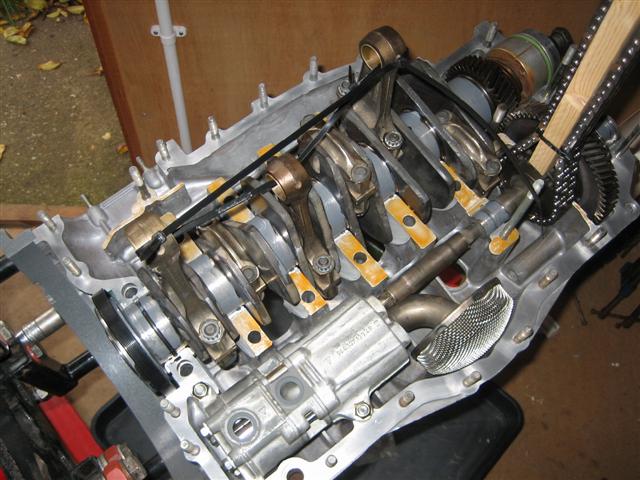
The case halves fully cleaned and ready for assembly. A break away from what Porsche recommend, but appears to be a popular option on the Pelican Parts Forum is to use only Loctite 574 on the bearing webs and Threebond 1215 on the outer half joints. I must have fully degreased the case joints a dozen times with Isopropyl alcohol before finally applying each sealant. I did not want any mistakes.
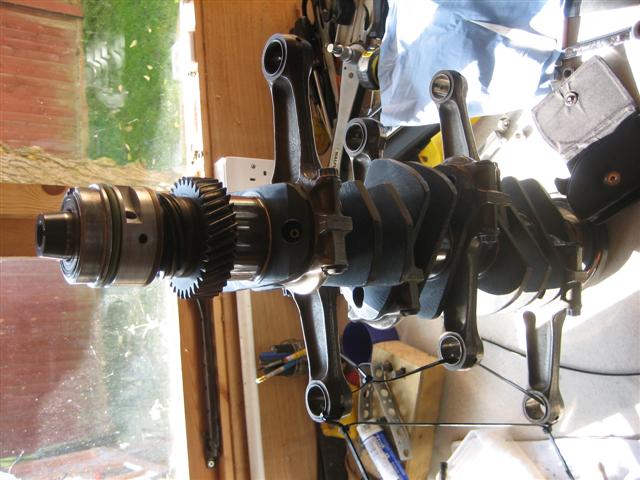
Just jumping back a step. New main bearings, new big end bearings and rod bolts all supplied by Type911 here in the UK. Slightly cheaper than Pelican and EBS.
I changed again here from the norm and assembled the case halves and torqued up the new outer fasteners and the through bolts dry without �O� rings. My theory being that I did not want the 1215 or 574 to skin over before I tightened everything up when messing around with the through bolt �O� rings. I left the case over night and then removed each through bolt one by one. Fitted the �O� ring with a small bead of RTV silicone, torqued up, then did the next.
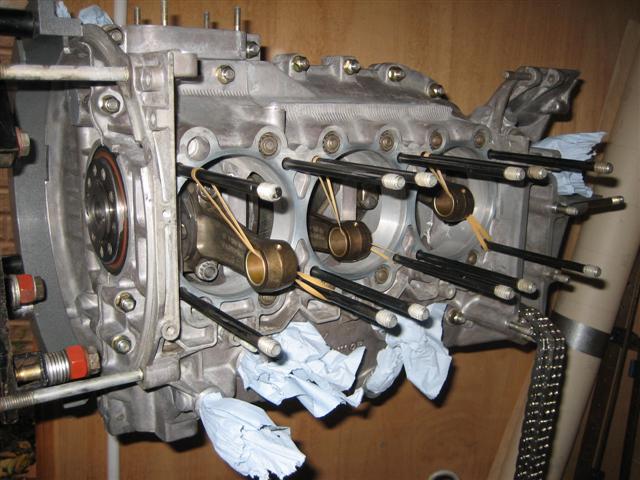
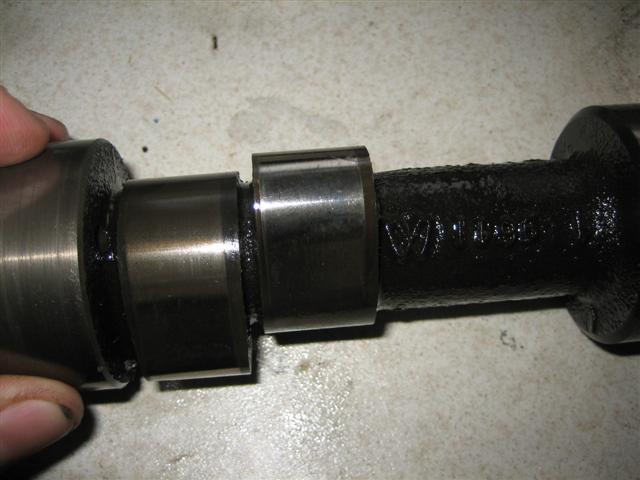
I had made up a small tapered sleeve on my lath before hand to assist in fitting the �O� rings.
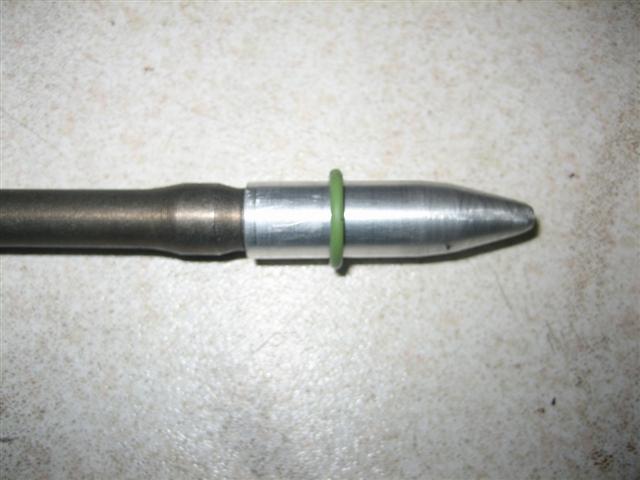
The only possible calamity I have made is that I pushed the �O� rings fully home on the through bolts which is not what Porsche recommend, but I cannot see it making that much difference, time will tell.
Like this....

Instead of like this....
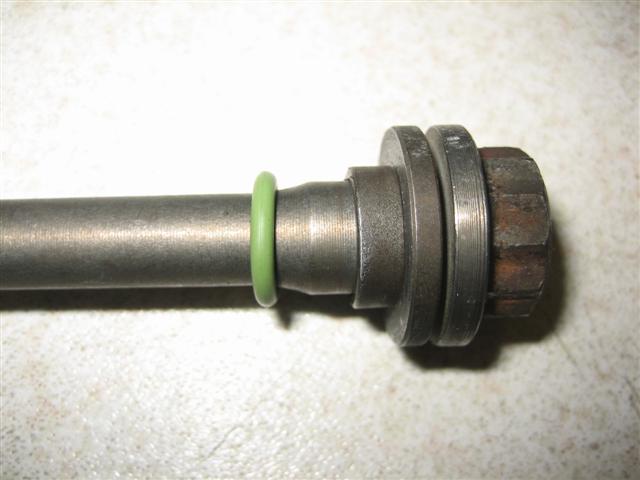
When the through bolt is inserted, the "O" ring is forced up onto the ramp to help it expand and seal. So fingers crossed.
Its bed time now. Hopefully will get time to post some more tomorrow night.
Thanks
Ross
The case halves fully cleaned and ready for assembly. A break away from what Porsche recommend, but appears to be a popular option on the Pelican Parts Forum is to use only Loctite 574 on the bearing webs and Threebond 1215 on the outer half joints. I must have fully degreased the case joints a dozen times with Isopropyl alcohol before finally applying each sealant. I did not want any mistakes.
Just jumping back a step. New main bearings, new big end bearings and rod bolts all supplied by Type911 here in the UK. Slightly cheaper than Pelican and EBS.
I changed again here from the norm and assembled the case halves and torqued up the new outer fasteners and the through bolts dry without �O� rings. My theory being that I did not want the 1215 or 574 to skin over before I tightened everything up when messing around with the through bolt �O� rings. I left the case over night and then removed each through bolt one by one. Fitted the �O� ring with a small bead of RTV silicone, torqued up, then did the next.
I had made up a small tapered sleeve on my lath before hand to assist in fitting the �O� rings.
The only possible calamity I have made is that I pushed the �O� rings fully home on the through bolts which is not what Porsche recommend, but I cannot see it making that much difference, time will tell.
Like this....
Instead of like this....
When the through bolt is inserted, the "O" ring is forced up onto the ramp to help it expand and seal. So fingers crossed.
Its bed time now. Hopefully will get time to post some more tomorrow night.
Thanks
Ross
 03-11-2009, 09:26 PM
#14
Addict
Lifetime Rennlist
Member
Lifetime Rennlist
Member
Amazing............I feel like a real dumass.....................when it comes to these engines...........!
Cheers! way to do it right mate!
Steve
Cheers! way to do it right mate!
Steve