
I am having a H*ll of a time reinstalling the alternator pivot bolt!
 10-02-2015, 08:34 PM
#1
Burning Brakes
Thread Starter
Hi everyone,
Just finished changing the power steering lines on my '87S4.
I am having a terrible time getting the pivot bolt back in.
The problem is that the upper radiator hose (coming from the thermostat elbow) is right in the way, as is the fan shroud.
I am using my iPhone camera to see if the holes are lined up, but with such little clearance I cannot get a good picture.
The last time I did this job (on my 86.5) the radiator hose and fan shroud were off and it still was a b*tch of a job...
Does anyone have a trick? Or do I need to drain the coolant (!@#$%^@#), remove the radiator hose, and remove the fan shroud?
Thank you all in advance.
 10-02-2015, 08:46 PM
#2
Rennlist Member
Many on this list swear that the pivot bolt can be put back in with the radiator fans in place.
My S4 has never been so kind as to allow that to happen.
I feel your pain Scott, and hope that someone can impart the wisdom (with pics) to show how this is accomplished.
My S4 has never been so kind as to allow that to happen.
I feel your pain Scott, and hope that someone can impart the wisdom (with pics) to show how this is accomplished.
10-02-2015, 09:17 PM
#3
Addict
Lifetime Rennlist
Member
Lifetime Rennlist
Member
It is possible to get the bolt in with the fans in place.
Insert the bolt head side into the fan, between two fan blades. Then line the bolt up with the bracket hole. Once the bolt is in a bit, move and pivot the alternator while further inserting the bolt. You will need to 'feel' if the holes are lined up. Sometimes a jack under the alternator helps.
It takes some persuading and a bit of force and is best done from below.
10-02-2015, 09:54 PM
#4

I cuss at this all the time.
Undo the two 10mm bolts that hold the fan shroud in place and make sure it's loose enough to move while you are under the car.
Pop the coolant res cap so the hose moves more freely.
Grab a punch or small screw driver and use that to sorta line up the holes for the alt and it's proper location. Now try and wiggle the bolt in place, pushing the washer engine side of the hose.
Miss the hole a few times as you try. Cuss a bit and put the punch or small screw driver back to hold the alternator in place.
Get up and breath, relax. Then jump in and redo the above. You will eventually get it.
10-02-2015, 11:01 PM
#5
Rennlist Member
it can be done.......infact Tom and I swapped out his alternator in a parking lot.
Patience, good light and another pair of hands......you'll get there.
Patience, good light and another pair of hands......you'll get there.
10-02-2015, 11:36 PM
#6
I use a piece of wood 40mm square by 260mm long wedged between the air pump pulley and the radiator hose to push the hose out of the way.
Then line up the alternator by inserting a shorter bolt of the same size as the long bolt, to make sure it lines up without fiddling with the long bolt. Then while holding the alternator in place, remove the short bolt and insert the long bolt. An old torque tube coupling bolt works for the short bolt to make sure the holes are aligned.
As a tip, the alternator needs to slide up slightly higher than the bracket it is being bolted to.
Hope this makes sense.
10-03-2015, 12:32 AM
#7
Rennlist Member
it is a little bit of a job, but you have to squish the radiator hose and fit the bolt in the hole. the hard thing I found was putting the nut on the end after it fits all the way through.
Trending Topics
10-03-2015, 02:43 AM
#8
Former Sponsor

But there s no nut on the alternator pivot bolt. It threads into the block.
10-03-2015, 04:00 AM
#9
Rennlist Member
I was just offering some suggestion because I just pulled my alternator to replace that noisy bearing.
10-03-2015, 08:45 AM
#10
Rennlist Member
Without pulling the fan shroud I would not like to take on this task. In any case this is easy because when my fan motors bearings went south I replaced the stock shroud with the Spal 12 inch dual fan setup. Now, with a screwdriver I remove the two top retaining bolts and the complete shroud pulls out in seconds.
Even then fitting the alternator is difficult whilst the car is low down [as in "not on a lift"]. In this attitude I find the best way to fit the alternator is to sit it on a piece of wood on top of a scissor jack and use the latter to coax the alternator into position elevation wise and then use a rod of some kind to ease/lever the alternator into exact position so that the bolt can be pushed in and engage the threads in the rear mounting lug of the block.
Did this recently with no problem and after a premature a/c belt failure a few days later had to remove the job lot again- this time it took me all evening to align the alternator correctly despite doing it easily a few days earlier.
I think Sean sums it up nicely- just swear and cuss some and then keep trying until you get it. Cannot say I found the hose getting in the way but maybe that is because I have the fan shroud out of the way every time.
Rgds
Fred
Last edited by FredR; 10-03-2015 at 12:06 PM.
 10-03-2015, 10:53 AM
#11
Rennlist Member
Join Date: Oct 2005
Location: Gatineau, Qu�bec, Canada
Posts: 5,176
Received 1,316 Likes
on
497 Posts
Just changed the high pressure hose on my car two weeks ago and had to remove the alternator to do this.
BTW, thanks Shawn. I read one of your post (on another thread) that guided me to do this.
Regarding the alternator re-installation, I have done this a few times and didn't have to remove anything. Nor the shroud or coolant hose.
Of course it is a tight fit but it works. On my car at least.
With the car on jack stands:
- Like Leon said, with the bolt in my left hand, I insert the bolt head side into the fan, between two fan blades.
- Then, I push the alternator in place. Quite heavy but not too bad. Ain't no big guy here!
- Then, wiggle the bolt in place pushing it against the coolant hose.
If it doesn't work after a few seconds, get up and relax. Then jump in again and redo the above. You will eventually get it. Very good advice Shawn!
Of course, with the fans shroud and coolant hose removed (like when doing a WP/TB job) it is a lot more easy.
Like Shawn said, if the shroud is in the way, move it a bit.
Also, if it came out without moving anything, it has to get in there the same way!
Good luck Scott.
You can do it I'm sure!
10-03-2015, 01:30 PM
#13
Chronic Tool Dropper
Lifetime Rennlist
Member
Lifetime Rennlist
Member

There's a sliding piece that fits into the rear arm of the alternator, with threads at the rear to receive the end of the pivot bolt. When you tighten the pivot bolt, that little sliding piece clamps the cast alternator/PS console as the sliding piece is drawn forward. See the attached pics for details on what I'm describing. The console itself attaches to the block with a large bolt immediately adjacent to where the alternator hangs by the pivot bolt, plus several other bolts. I think that console mounting bolt is the one Greg refers to as threading into the block, and the one that boogers the threads in the block when the alternator intersects a road hazard.
Prior to installing the alternator, thread the pivot bolt into the alternator from the front until there is ~1/8 to maybe 1/4" gap between the head of the bolt and the front alternator arm. Then gently tap the front end of the bolt to push the sliding piece back. This opens the 'clamp' so the alternator can be wiggled some as you insert the bolt. This is critical, since having the alternator a little high means the bolt can pass through the front hole, then lowered slightly to get the bolt started into the hole through the alternator/PS console casting.
The lower radiator hose is [supposed to be] secured to the saddle on the fan supports with a zip-tie. Remove that tie if you need to manipulate the hose. Replace that zip-tie before starting the engine. I've never bothered to loosen the reservoir cap to make it easier to collapse the hose for access, but that's probably a Good Idea.
When the engine is at proper height, the bolt will barely clear the lower rear edge of the fan console. If your motor mounts aren't brand new, options include a jack under the engine to raise it some, or lower the fan console a tad. To lower the fan console, just remove the two lag screws (10mm heads) at the top of the console where it's fastened to the radiator. You should be able to then lift the fan console enough to free the lower tabs from the radiator frame. The console can then 'hang' on the oil and transmission cooler connections.
First image shows the mounting ears, and the split section at the front of the sliding sleeve/nut in the rear arm. It's possible to tap the sleeve/nut all the way back with a plastic mallet, but I find it a lot easier to just pop the bolt in and tap on the head to drive it open. Push it back so that the front face of the sleeve/nut is flush with the front face of the mounting ear.
Second image shows the sliding sleeve/nut in the rear arm, with the threads for the pivot bolt clearly visible.
10-03-2015, 01:41 PM
#14
Chronic Tool Dropper
Lifetime Rennlist
Member
Lifetime Rennlist
Member
Just a reminder that Mark is using a lightweight low-capacity alternator in his racer. His comment about "the hard thing I found was putting the nut on the end after it fits all the way through." does not apply when a "normal" alternator is fitted. See previous post with pics.
10-03-2015, 09:10 PM
#15
Burning Brakes
Thread Starter
Thank you all for your replies. This thread reminds me of the signatures that one would collect (back in the plaster days) from well-wishers.
The good news is that my friend Matt (mkriete on Rennlist) came over and offered his valuable help to help me reinstall the alternator bolt.
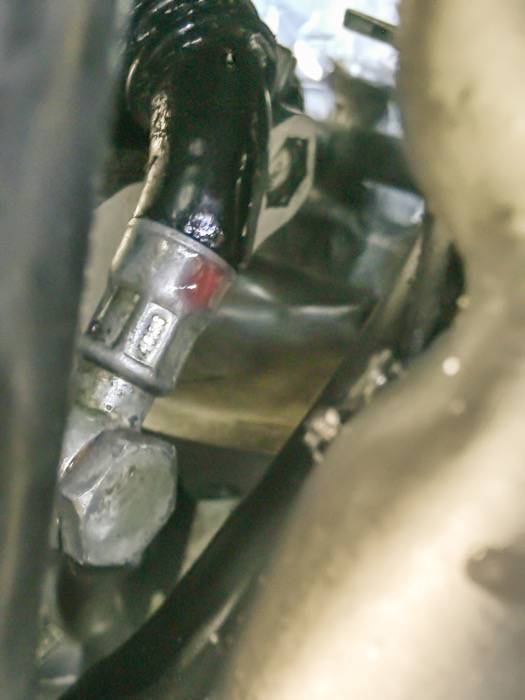
What we did was raise the fan shroud about 2 inches and then struggle like crazy to get the holes to line up. I used my iPhone camera to take pictures of the hole, and then we fiddled with the alternator accordingly.
The bad news is that I found another leak.
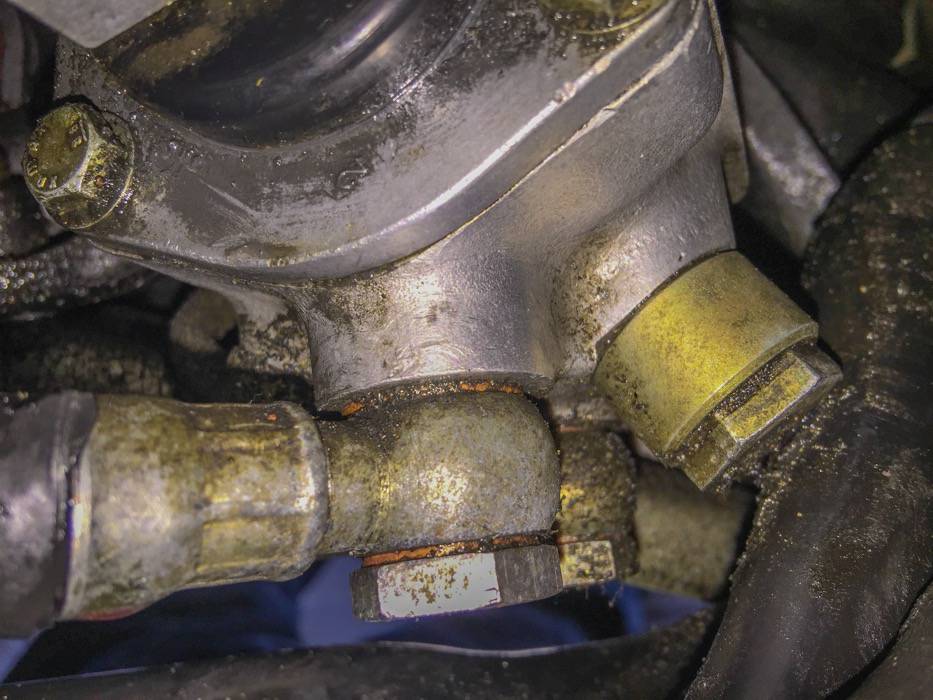
It looks like it is the rubber portion of the hard return line 928 347 449 07. It is hard to see in the pictures, but the rubber at the crimp is torn, and I believe that is where the leak occurs. It looks like it will be $230 or so.
The good news is that my friend Matt (mkriete on Rennlist) came over and offered his valuable help to help me reinstall the alternator bolt.
What we did was raise the fan shroud about 2 inches and then struggle like crazy to get the holes to line up. I used my iPhone camera to take pictures of the hole, and then we fiddled with the alternator accordingly.
The bad news is that I found another leak.
It looks like it is the rubber portion of the hard return line 928 347 449 07. It is hard to see in the pictures, but the rubber at the crimp is torn, and I believe that is where the leak occurs. It looks like it will be $230 or so.