When you click on links to various merchants on this site and make a purchase, this can result in this site earning a commission. Affiliate programs and affiliations include, but are not limited to, the eBay Partner Network.
If you lube the spines at all, all you want is a surface smear of it. Wipe it on thinly, then wipe it off, done. Leave nothing that can sling when it rotates.
Next topic is the guide tube for the throw-out bearing. Slight film of grease there may help the TOB slide, but then again, any grease collects dirt and the abrasives that fall off the clutch as it wears. So, although it may help initially, it likely gets worse as the grease gets dirty and gritty. Its a harsh environment in there. Best to follow the same rules - wipe it on and wipe it off. A very thin film is best if you lube it at all. You want nothing that will become a dirt-magnet.
That's how it went back together yesterday. I cut the cotton end off a Q-tip and used the stick part to wipe the grease out of the splines. Rolled up a paper towel and pulled it back and forth through the friction disc hubs, and wiped off the inside and out of the throwout bearing guide tube.
What remains on any of these is a surface film so they don't feel dry but you can't see any grease.
Drove the car. Engagement and disengagement of the clutch isn't quite as smooth as it was when the splined shaft was overgreased, but seems to work fine, and most importantly, isn't slipping under boost anymore. It's possible I have some wear on my splined shaft and should probably upgrade it with one of Greg's new ones next time it comes apart, along with a new guide tube,
AFR #s:
Under full boost - 11.5 rock steady up to about 5,000 RPM
At idle - 12.5-13
Under light throttle for normal driving 13-13.5
Under vacuum (decelerating while in gear) - 14-14.5
so seems like it might be 1/2 point rich, but not bad. The KnockLink stayed green during all of the boost, higher RPM pulls.
Timing setting is also holding. A trained ear from one of the experts at Rendezvous might help me tweak this a little.
I'm losing boost again at about .4 bar so need to figure out where that's going too, but think the gasket at the metering plate for the intake shoe might be too soft and letting it escape. Will try something different there today to try and achieve a stronger seal. Heat Exchanger pump is also not running so need to free it again or figure out why, but that's not a show stopper.
Still have some oil exiting the crankcase breather system. I'm going to try and rig something up where I can connect my boost gauge to the crankcase vent line and see what kind of pressure is actually going through it. I'm also going to try one of Carl's oil control baffle plates - currently I have Hans' installed and I think Carl's has fewer openings and a different drain back design that might keep more of the oil where it's supposed to be under boost. If the pressure is pretty normal and the other baffle plate doesn't change the situation, I may have to install an AOS instead of a vent setup. Now wish I'd kept the Motorsports version of the 997 AOS I had, but since it wouldn't fit my 997, I sold it.
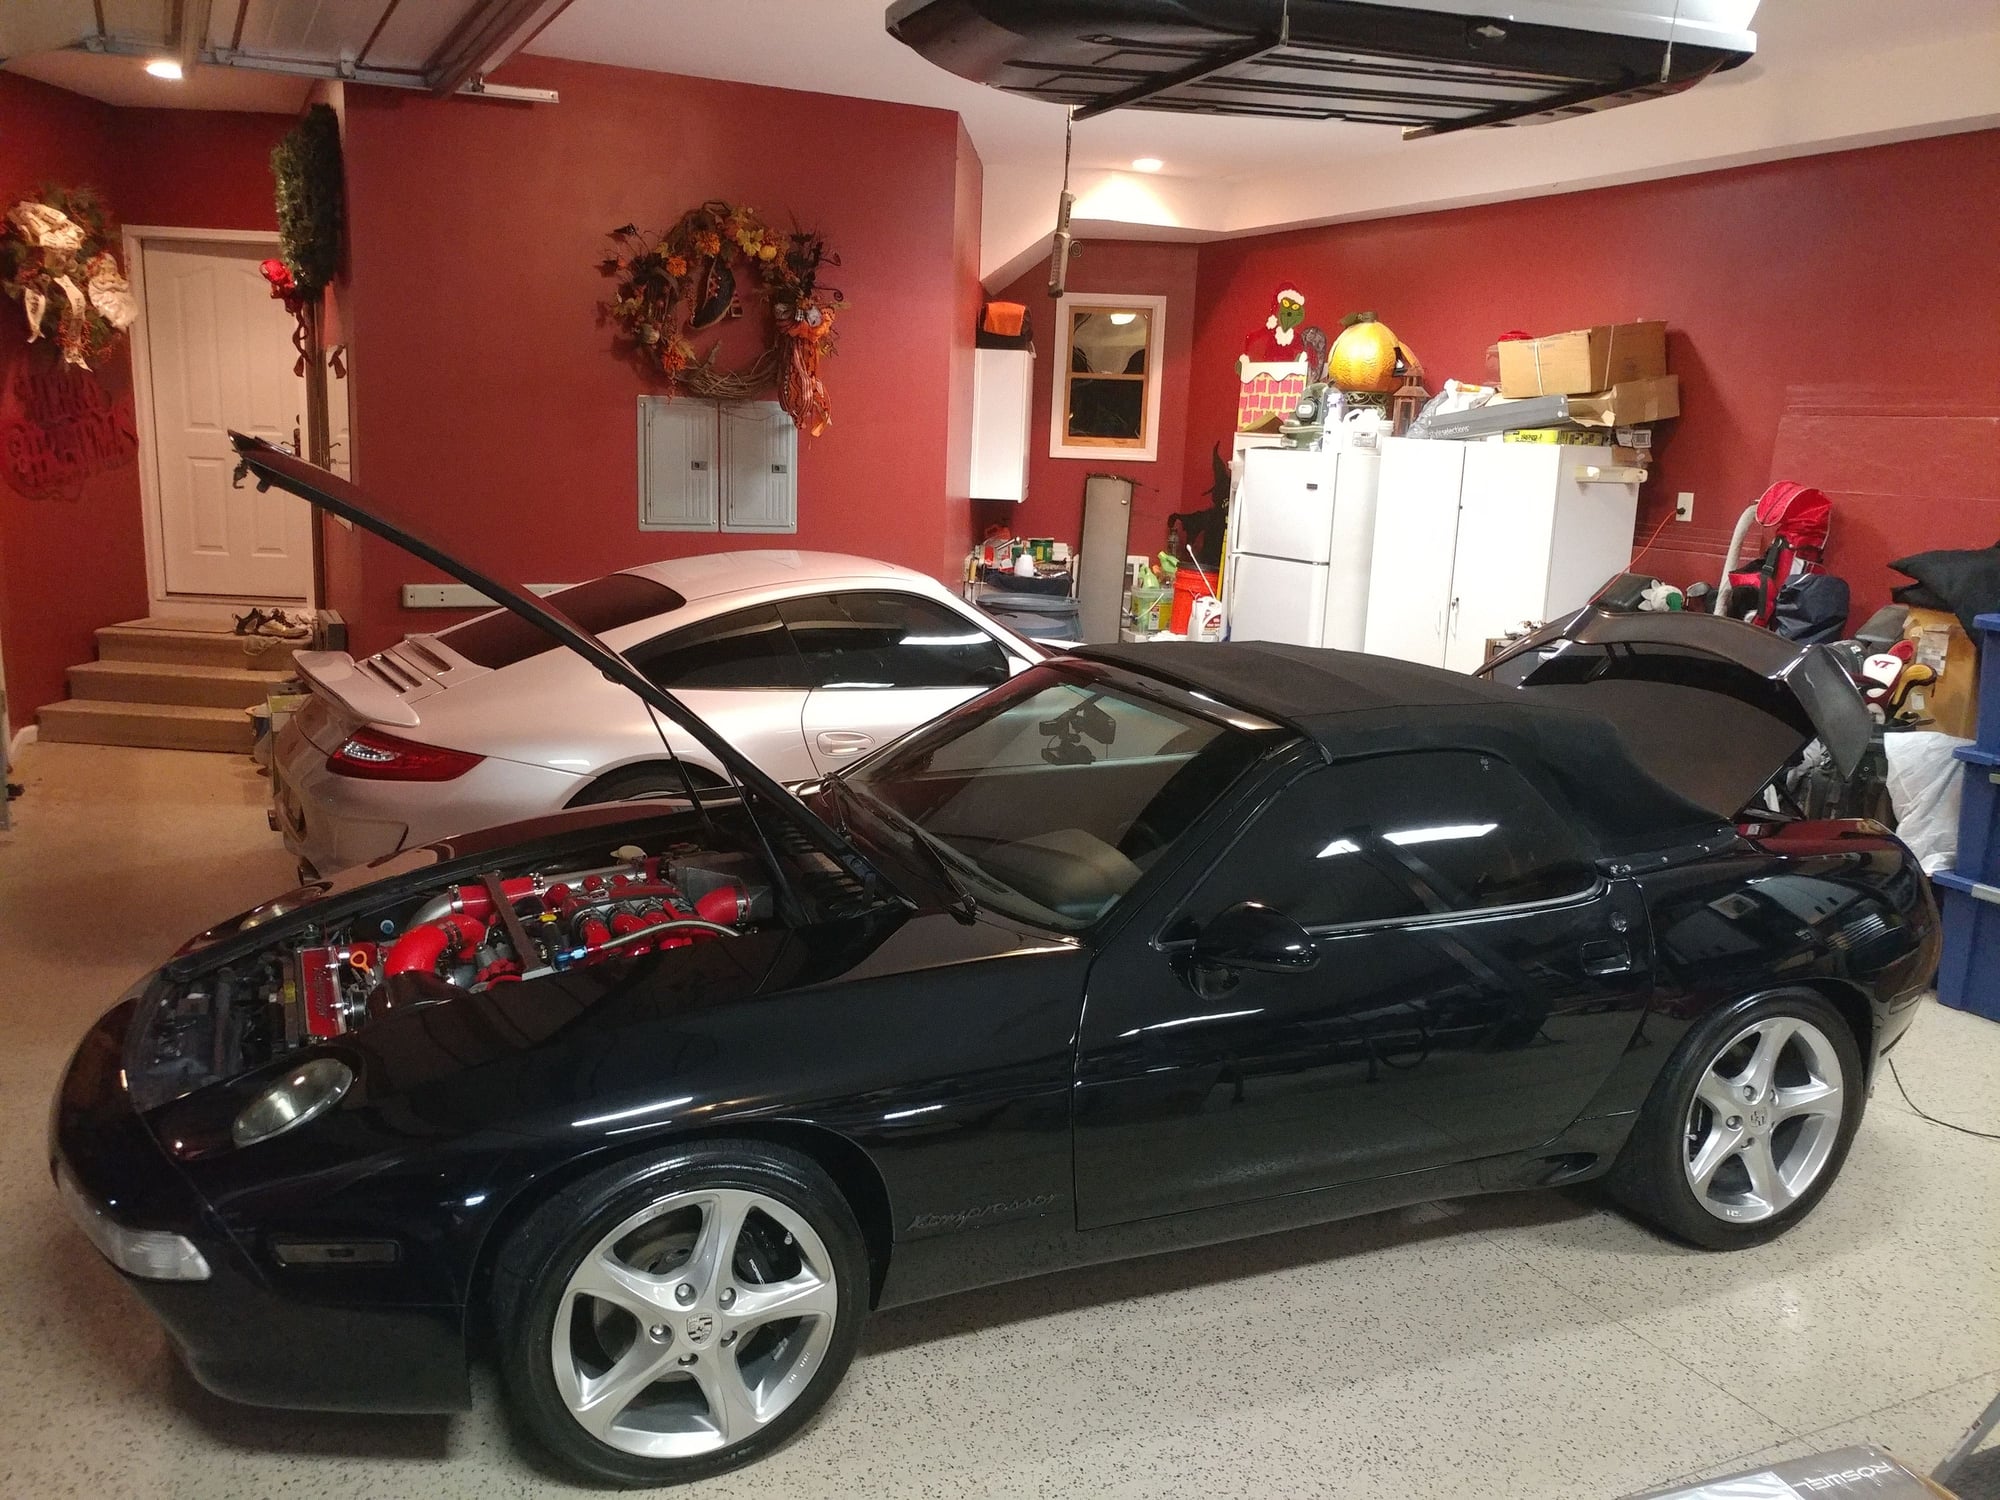
Overall the car runs and drives very well. Cold start worked great, Hot start fired right up. Other than the crankcase pressure / vent issue, I don't see a reason why it wouldn't make it to Atlanta, but will drive it around more today and tomorrow before making that call late Thursday. It won't be as clean and sparkly as I had planned, but I'll give it a regular wash. Wife is taking the Cayenne this weekend so I'd probably bring the RUF 997 if not the 928.
I'd like to get the 928 there though for it to be a part of the event and to let the experts like Carl take a look and see if they'd make some timing or fueling tweaks to make it even better.
My experience has shown that during your drive down, you will have no or nearly no emissions from your crankcase vent.
Its only under WOT that the PCV system on the 16v motor can be over-run, from about 5000 rpm and up if everything else isn't just perfect.
So, partial-throttle driving in 5th gear isn't really an issue. You will be under 3K rpm, shouldn't be a problem.
You know... about "losing boost at .4 bar" translates to just about 6 psi, which is what that kit was designed for. Hmm. When I see you I will help you diagnose it better - whether the boost is leveling off, or peaking and then dropping, I have some ideas.
My experience has shown that during your drive down, you will have no or nearly no emissions from your crankcase vent.
Its only under WOT that the PCV system on the 16v motor can be over-run, from about 5000 rpm and up if everything else isn't just perfect.
So, partial-throttle driving in 5th gear isn't really an issue. You will be under 3K rpm, all good.
Good to know. I can see the vapor coming from that hose at idle, but no drips when idling. I'm going to rig up a hose to move the exit of that vent line to the rear of the car so it doesn't make the bottom all oily until we figure it out or resolve it with the other baffle plate.
Good to know. I can see the vapor coming from that hose at idle, but no drips when idling. I'm going to rig up a hose to move the exit of that vent line to the rear of the car so it doesn't make the bottom all oily until we figure it out or resolve it with the other baffle plate.
Today's test drive went well as far as the engine is concerned. On the last turn I was in moderate boost in a fairly low speed sharp turn and afterwards had this new rattle coming from the drivetrain - the Z06 trans always had a bit of a rattle sound from the solid mounts when the clutch is out, but this is a new rattle sound and it happens whenever the car is moving. Doesn't really happen if the car is stationary whether the clutch is in or out. I'm thinking it's transmission or torque tube.
Anyone have guesses on something that is fixable tonight - shaft not fully seated in pilot bearing, thowout bearing sleeve, etc or is my pursuit of taking it to Rendezvous over?
I have been following along and must say that you have done an outstanding job! Outstanding perseverance! Makes my delays with my car before leaving look like a joke. Finished up on my car, really minor stuff, last night and I�m now halfway to Rendezvous. Looking forward to seeing your car and meeting you. Thanks for all of the updates.
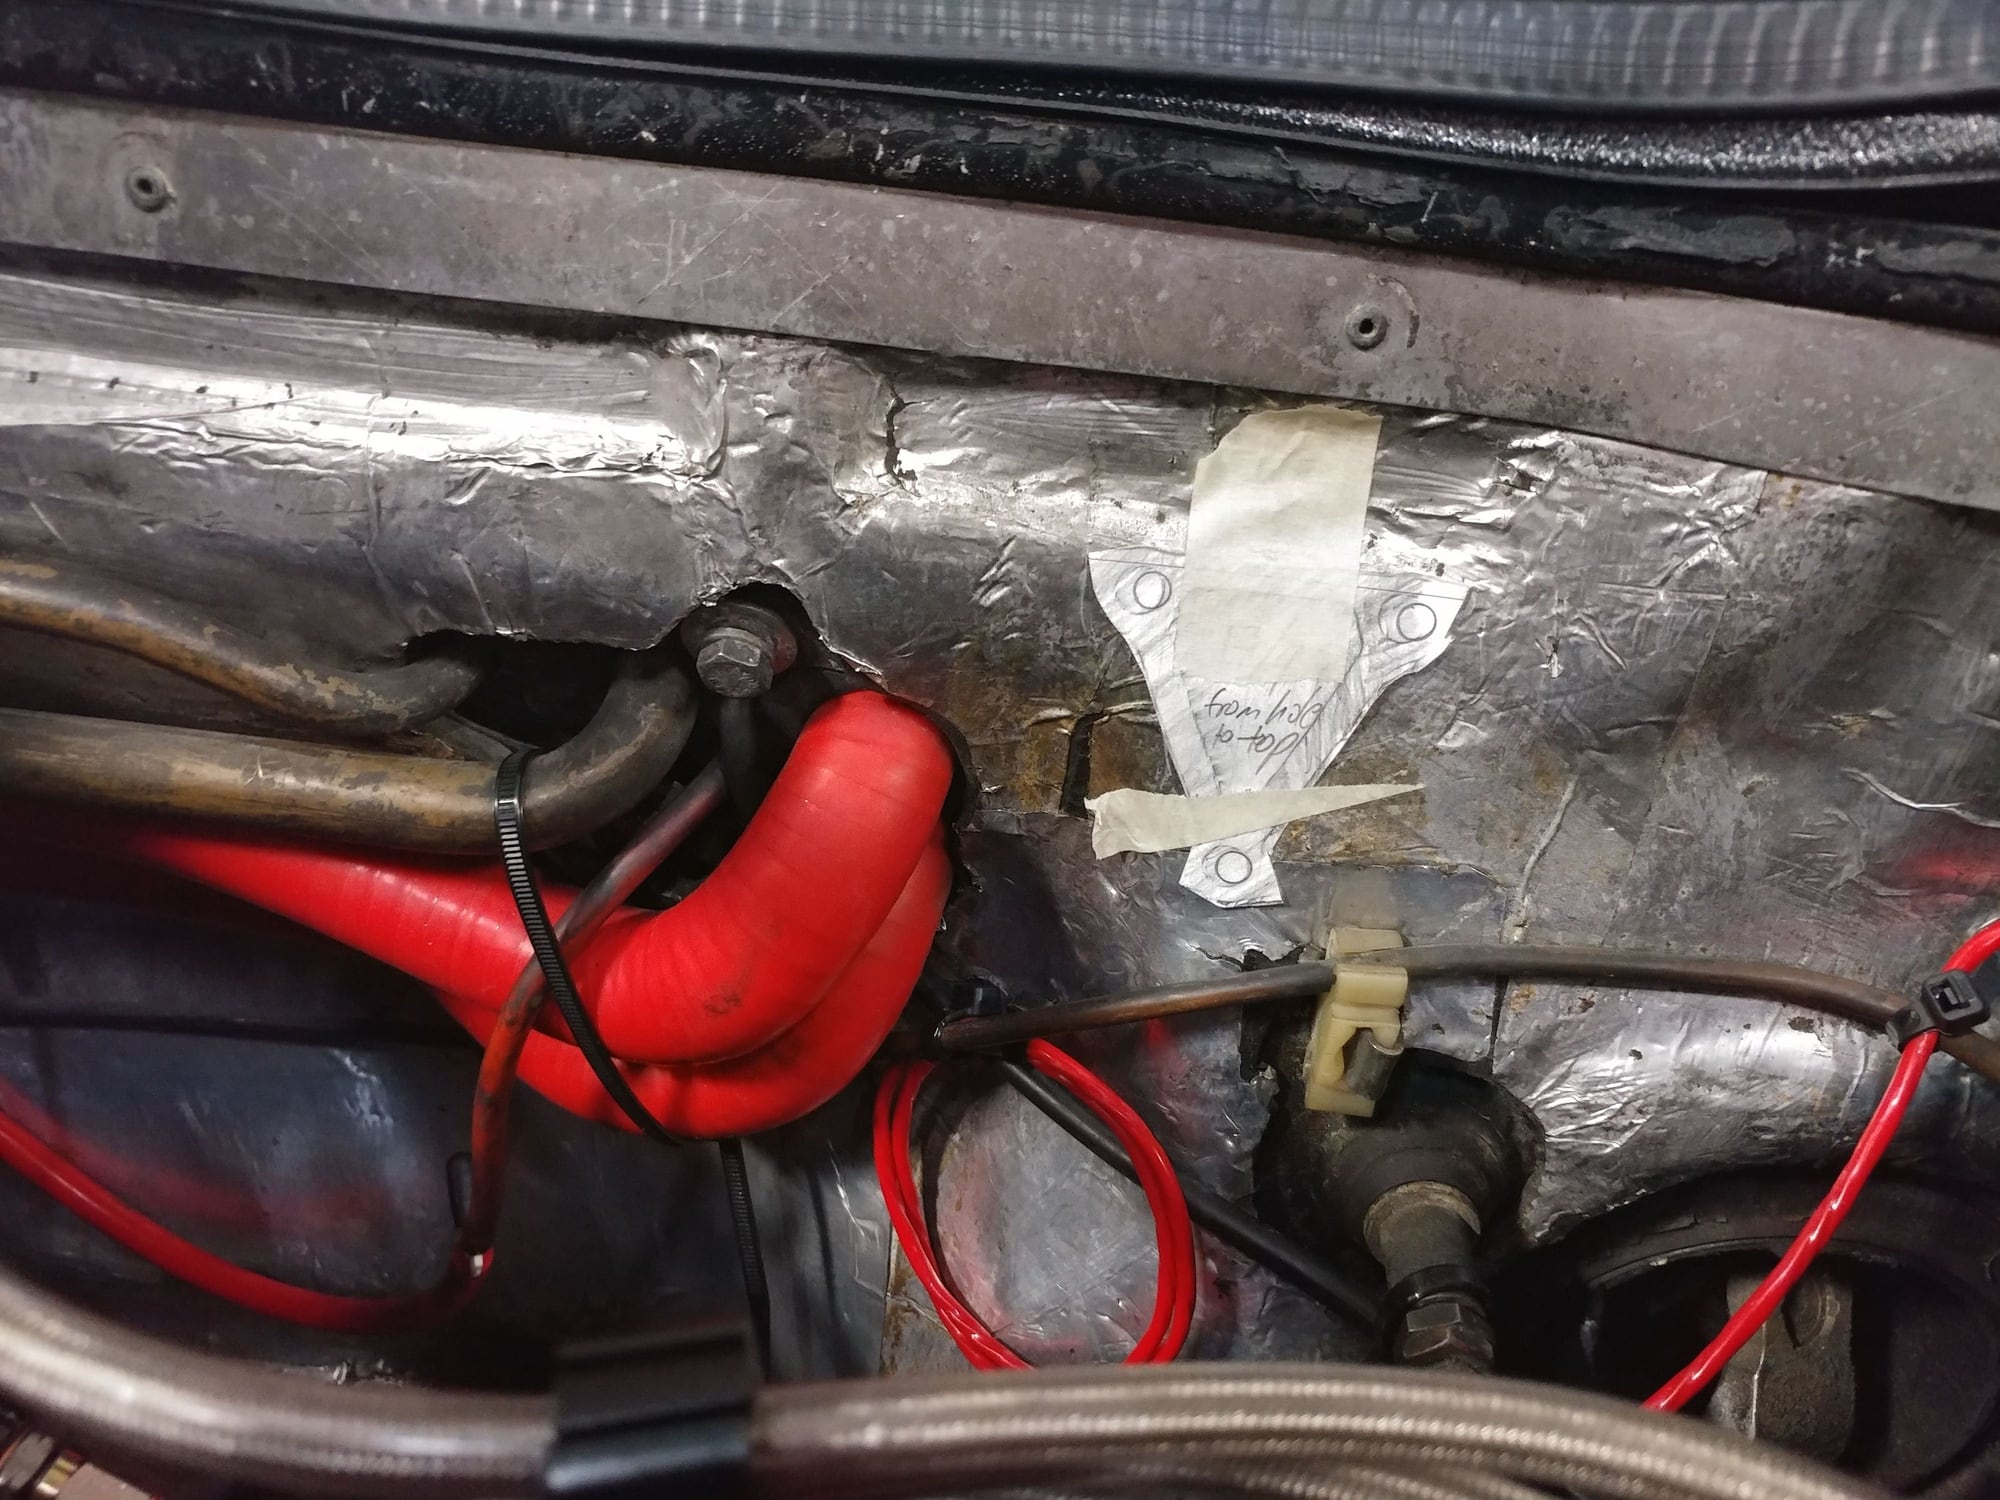
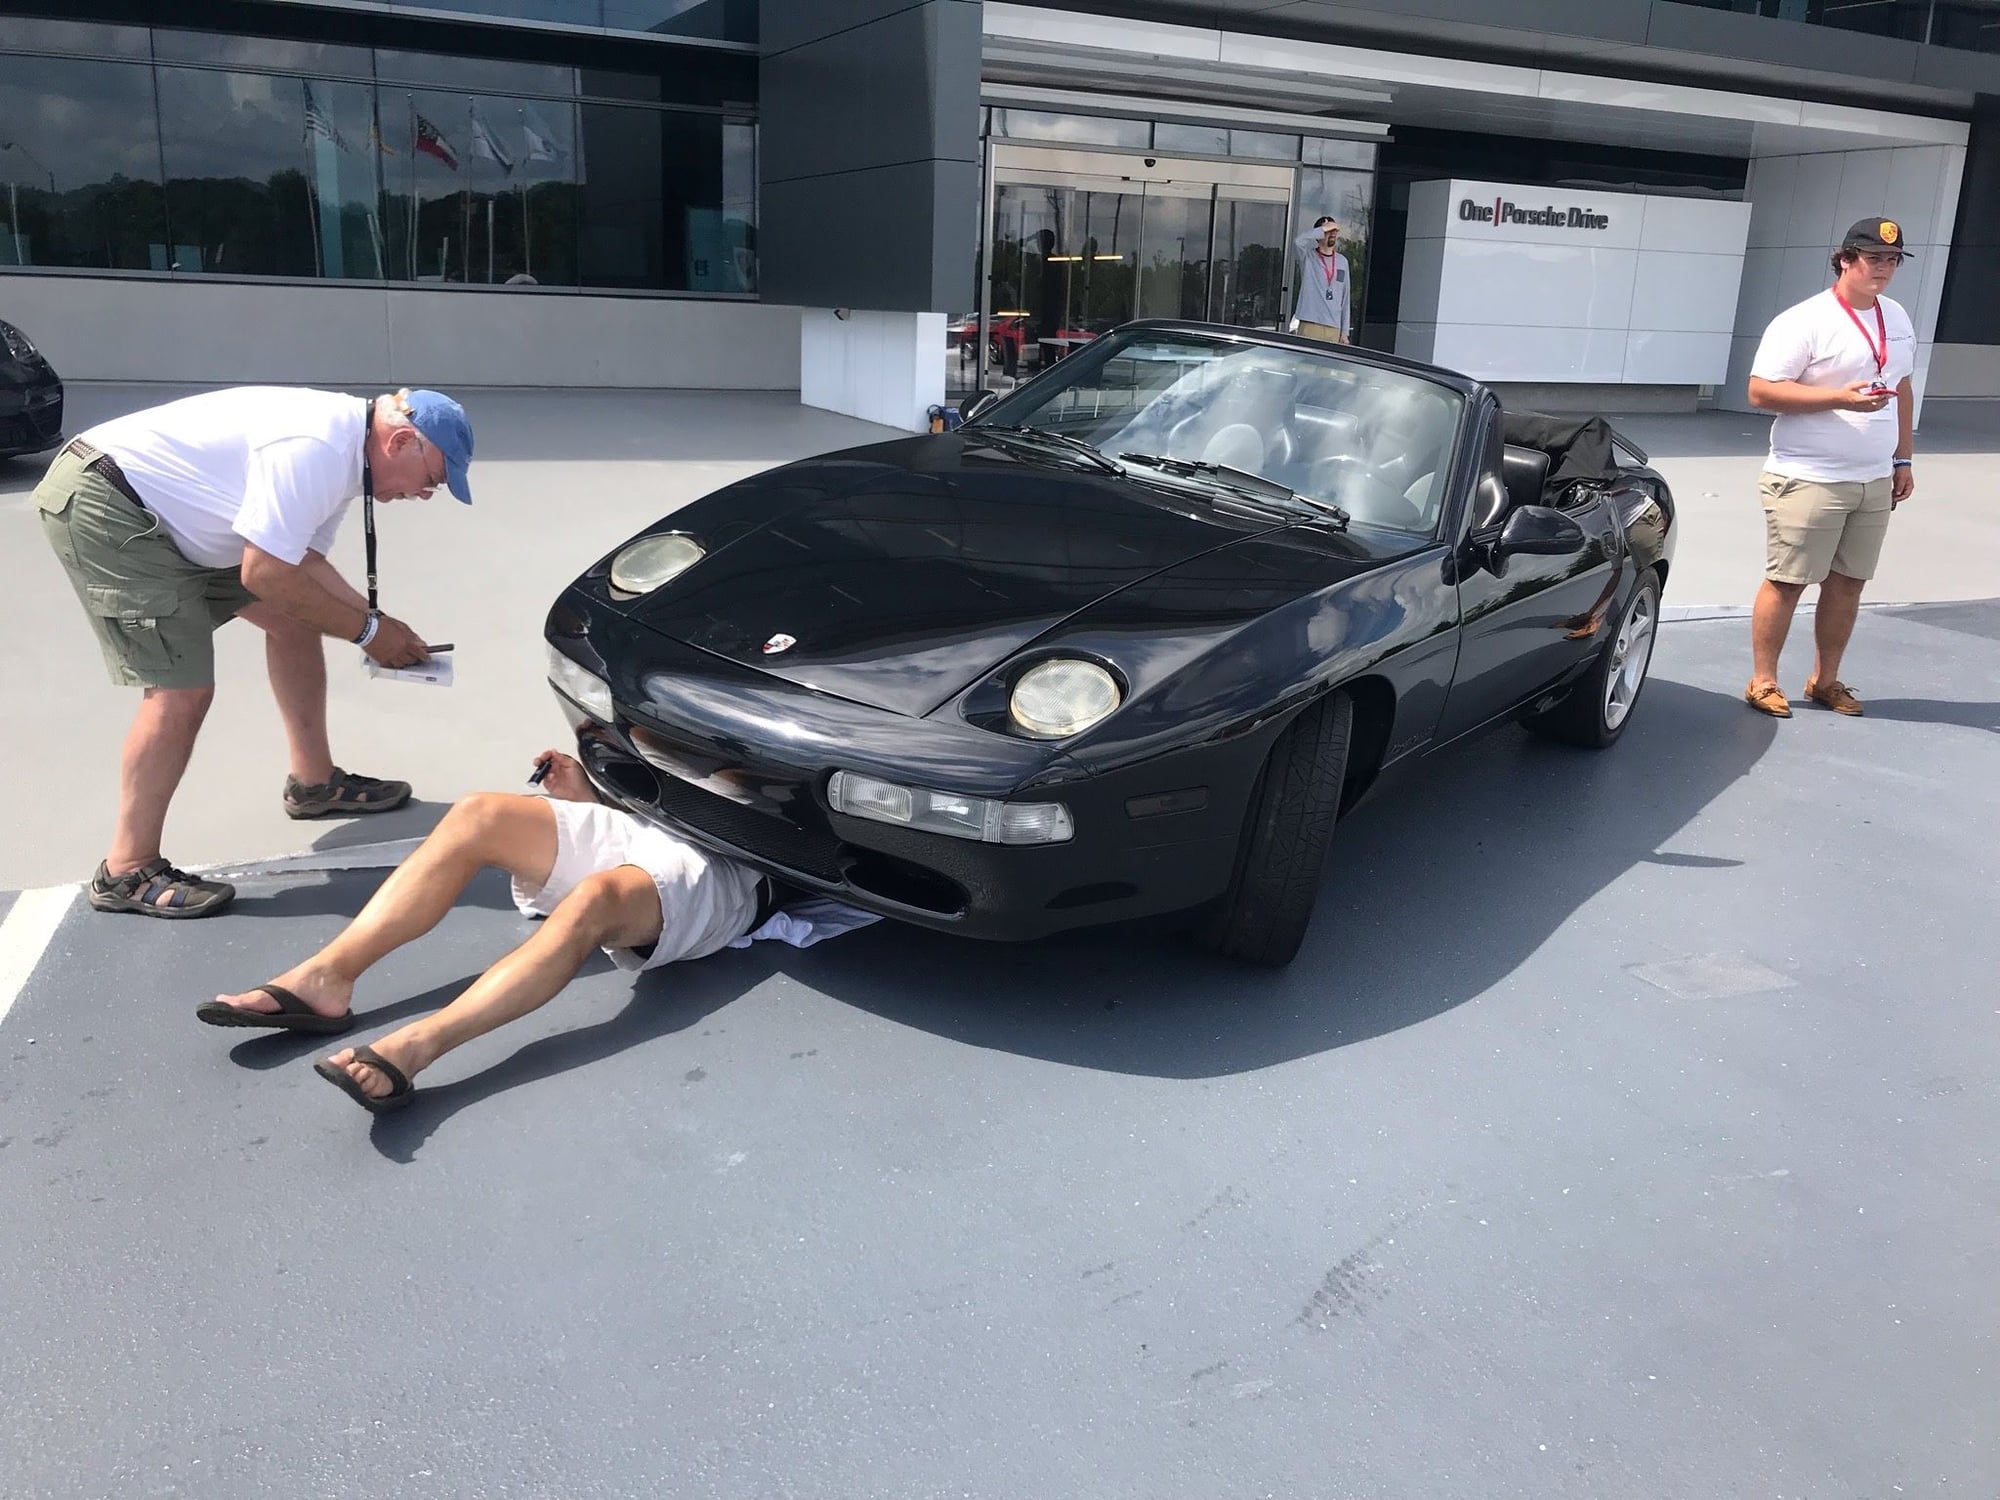
For those of you who made it to Rendezvous, you know I had a noise issue with the drivetrain that started when I got into Atlanta. It was very similar to the noise I had the day before leaving when the guide tube bolts came loose. I thought that happened again so once the noise started, I drove the car gingerly the rest of the way to Rendezvous.
Then with Bob Voskian's boroscope and the use of the curb at PEC as a makeshift lift, I slid under the car to see if I could get a look at the guide tube bolts to see if in fact, that was the problem.
Made for a good picture of a "shark" eating it's owner, but wasn't very effective, as I couldn't get a good look through the lower bell housing access hole.
Not wanting to put additional miles on the car with the hopes of making it home under it's own power, or at least to get within 100 mile range for a free AAA tow, I skipped the Tech session and drive on Saturday afternoon.
Good news is that the car would only make the noise under fairly hard acceleration or when turning, so made it home on Sunday without issue.
Pulled the lower bell housing at home to find that the guide tube bolts and the lock nuts I added to the back side were still intact and nice and tight, so that was not the cause of the noise, like it seemed to be before I departed for Rendezvous.
Started doing some research on the Corvette Z06 6s-speed transaxle I have in my Spyder and discovered other Corvette owners describing a similar noise that turned out to the the differential as it was more likely to make the noise during turns, which is when my noise first appeared. So I replaced my differential fluid that was not a few years old and had maybe 15-20k miles on it, then went for a test drive.
Good news - no noise, even under heavy acceleration in corners and some full boost, higher RPM pulls.
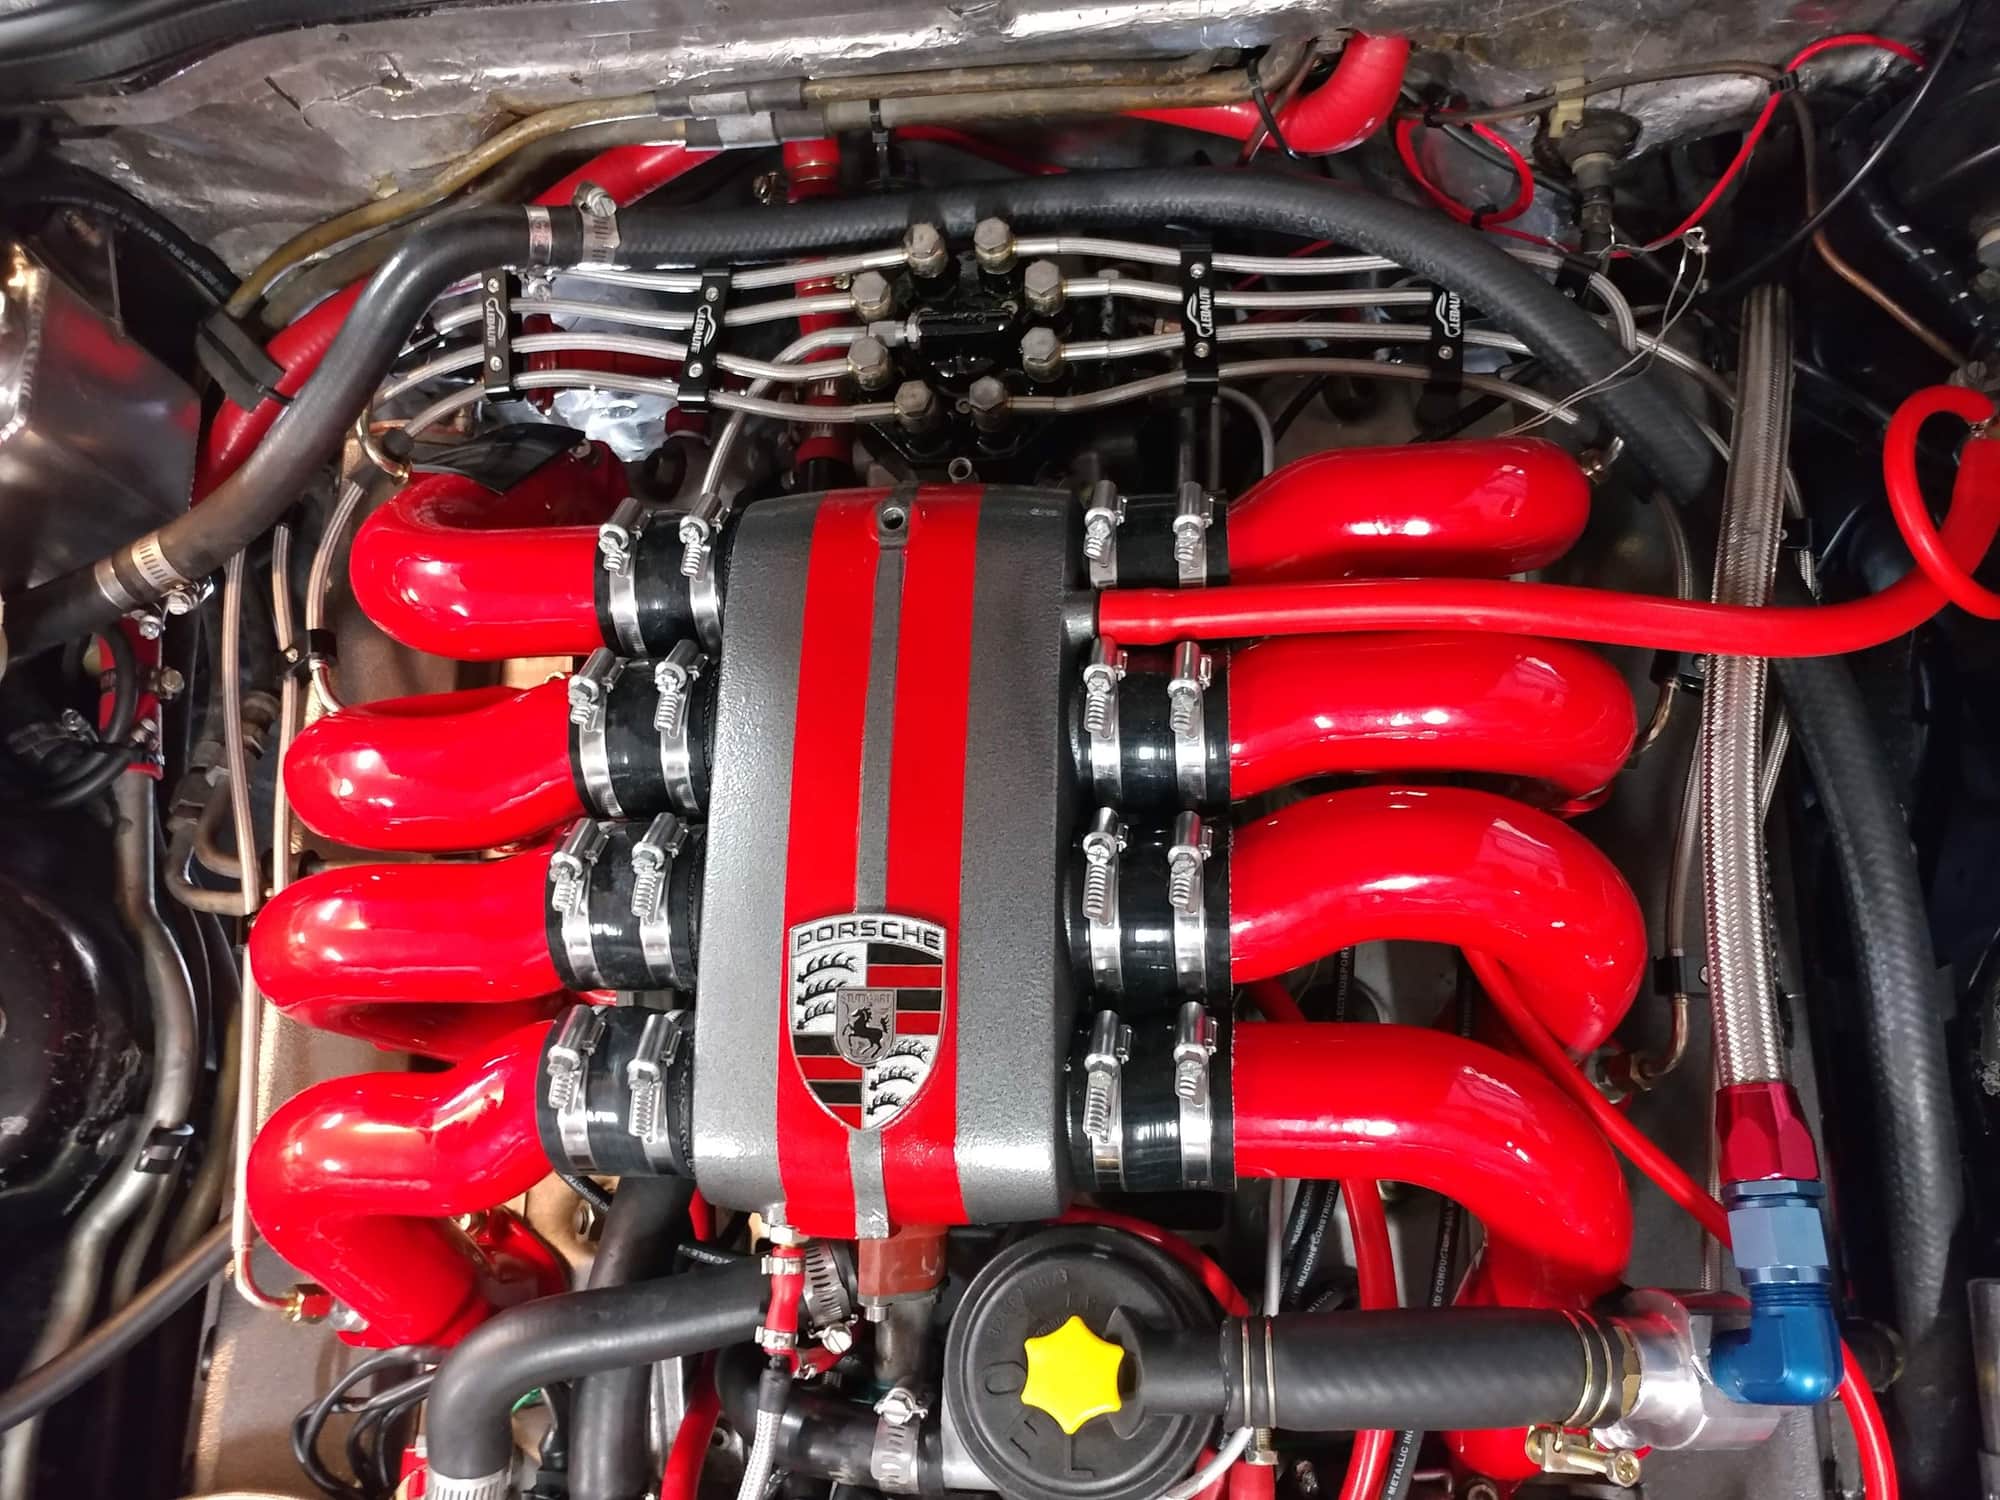
Bad news - got back and the engine valley had about 1/8" of orange fluid sitting in it. Fluid kind of smelled like coolant, but also kind of didn't. Not thinking my fluid protocol thought when putting the car back together, I did something kind of dumb. Since the engine and radiator were completely empty from the build, I had flushed it with water, then changed from the previous green ethylene glycol coolant I had been using to newer orange Dexcool to have better anti-corrosion characteristics. Unfortunately, the windshield washer fluid I use that get gets pumped through my supercharger heat exchanger is also orange, so I then had to figure out which fluid was in my valley. Because the washer fluid gets hot when pumping through the intercooler and the washer bottle cap doesn't really seal, therse is always a slight smell of hot washer fluid with the car. Since the valley fluid didn't have a totally strong coolant smell and I smelled the washer fluid, I thought maybe I had an issue or leak with my intercooler - so took that apart and tested it. Thought maybe the lower inlet clamp was loose so tightened that when putting it back together. I dried up the orange liquid in the valley and when for another test drive.
Guess what - a new layer of orange liquid in the valley and this time I could tell it was coolant. Further inspection shows a coolant streak from the main fitting of the water bridge down the back side and into the valley - this is the large round fitting that takes a large o-ring and although I replaced the o-ring during my build, it still leaked - guess that's why when I took this off the old motor it was well coated with silicone gasket material, as this must be a known leak point.
In addition, I also saw an oil streak in the same area and it's coming from where the water bridge mates with the oil control baffle I have installed. I don't know if the crankcase pressure was forcing that out or if I didn't get the water bridge and oil fill assembly tight enough when initially installing. Hans' oil control baffle uses a nice o-ring gasket in a groove on the bottom side and then the stock gasket on the top side between it and the water bridge. I had even silicone coated the gasket when I reassembled it. Since I have to take the water bridge off again to fix the coolant leak, I'll also get to fix the oil leak at the same time.
Another contributor to the oil leak could be the pressure I'm trying to vent to atmosphere while I route the oil from that vapor back into the cam tower. The 90 degree cam tower fitting might be creating back pressure in the hose and enough of that can't escape out the vent hose and may have built up pressure in the oil baffle and water bridge junction.
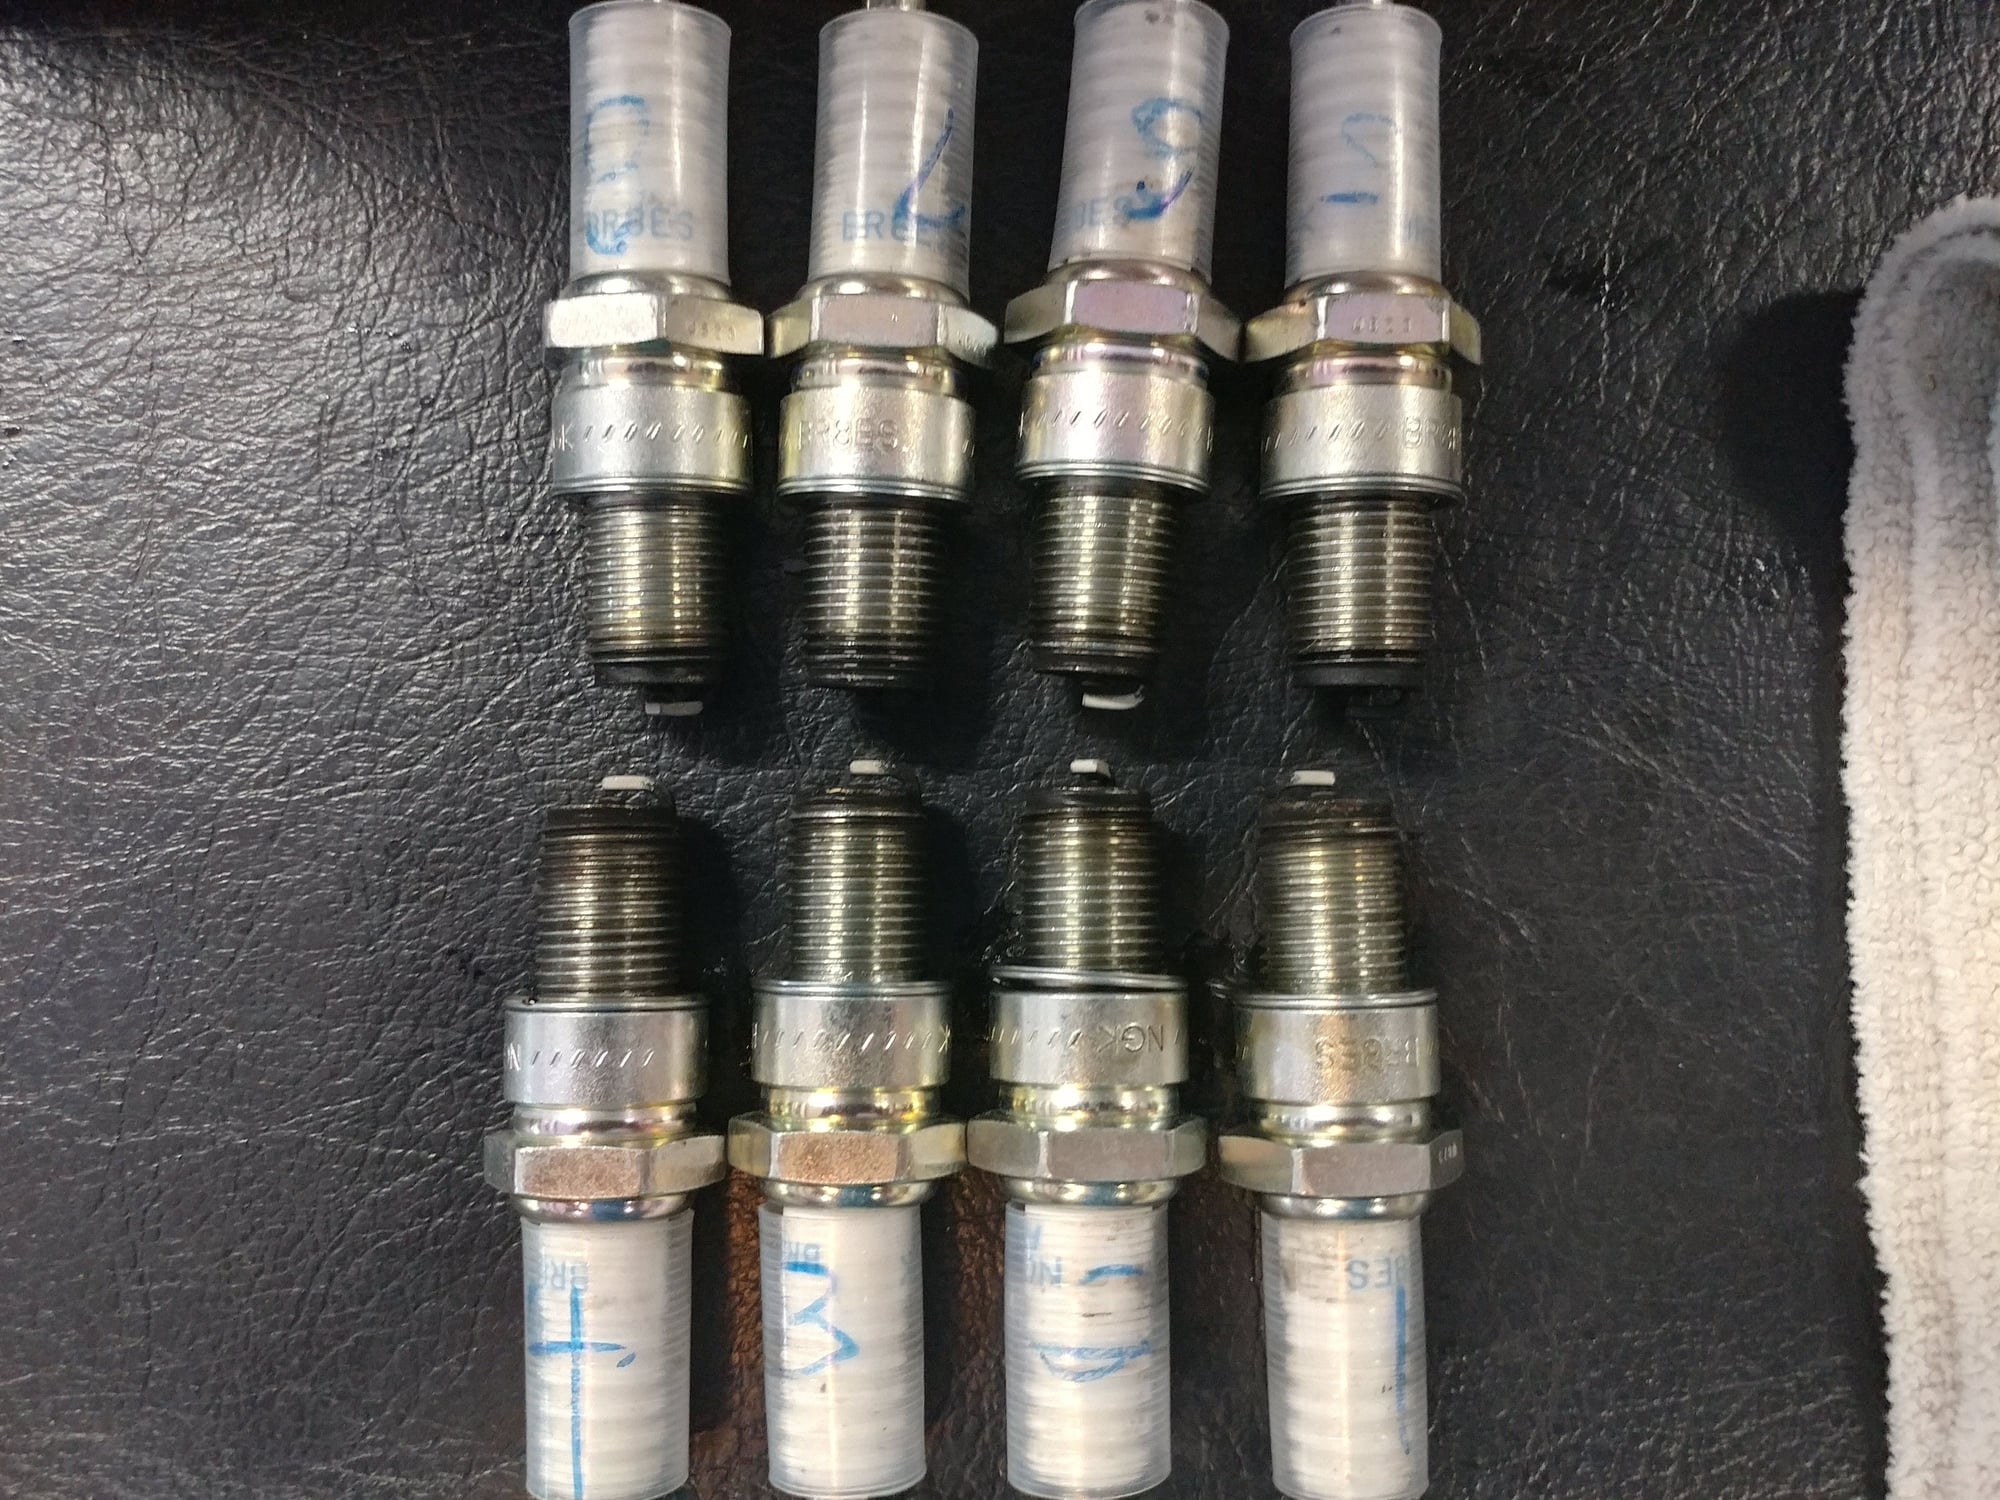
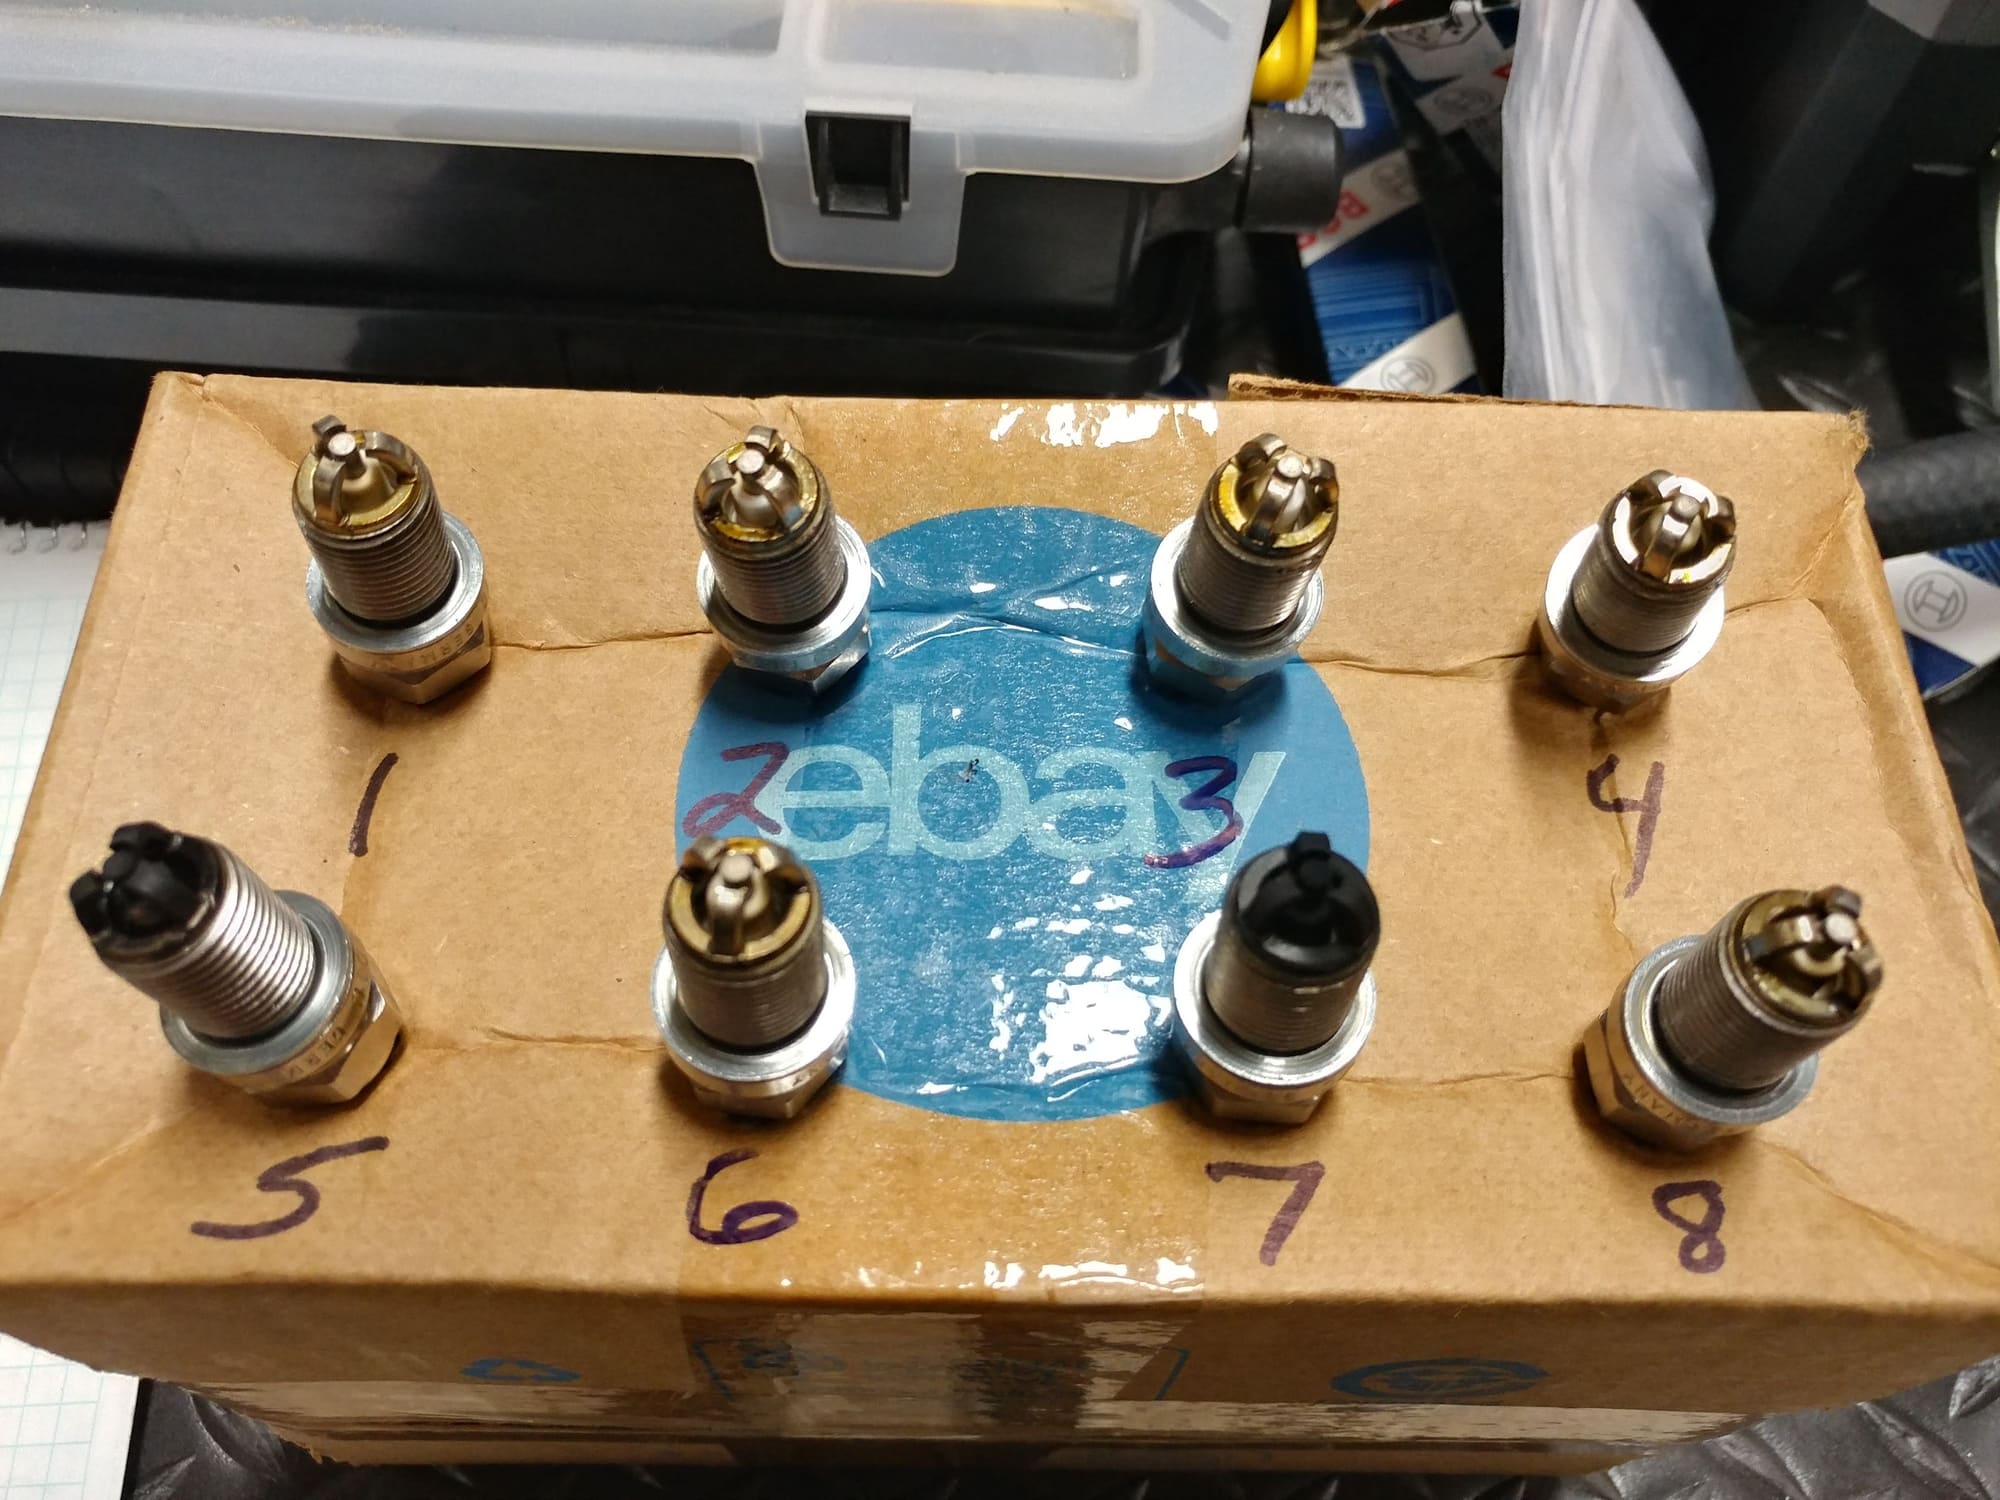
Next problem is that Carl discovered I was only running on 7 cylinders when he listened to my car at Rendezvous, and when I pulled the plugs, sure enough, #7 didn't look good and #5 didn't look much better. When I returned from Rendezvous, I pulled the plugs, so these have about 250 miles on them.
x
I reinstalled a set of copper, triple electrode Bosch plugs in the same heat range to see if they would run longer between fouling. These are factory gapped at .030 which is a little on the open side, but at the top end of the acceptable 928 range. These are the plugs that were in the car for the couple of test drives when I discovered the coolant leak and tested whether the differential fluid change resolved the drivetrain noise, so had about 40 miles on them.
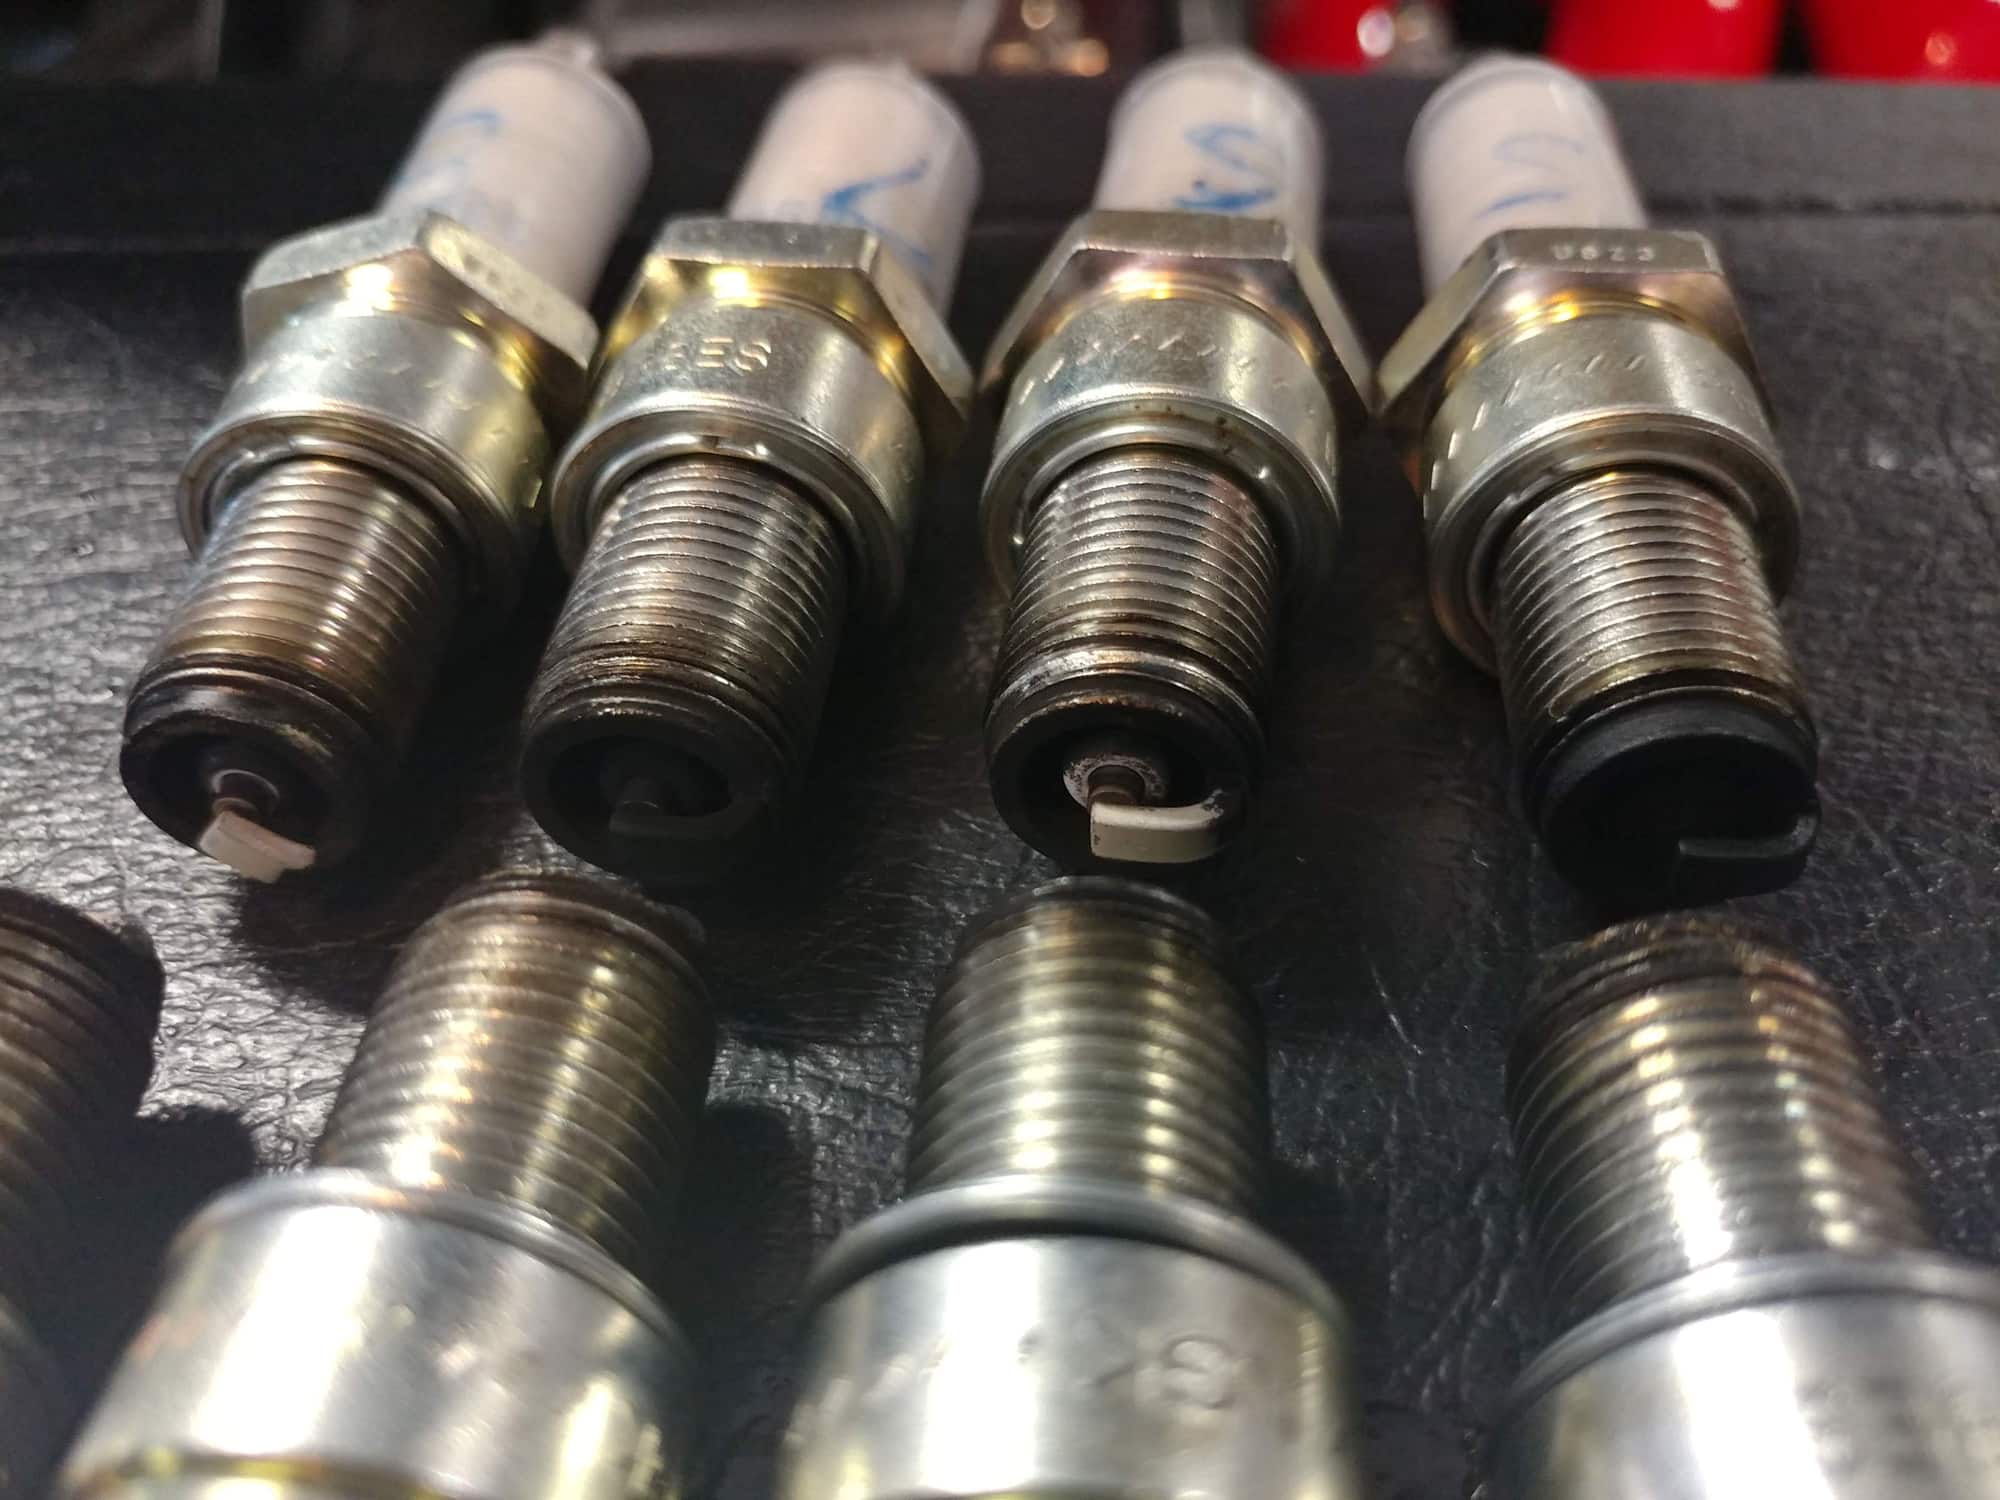
Pulled them out and same exact coloring, so have a problem with 5 and/or 7.
x xx
Since my compression test was good cold and dry - 150-160 psi in all cylinders, I'm assuming the problem is likely fuel and/or spark on those two cylinders.
So, I've now installed another new set of NGK BR8ES plugs gapped at .028. I've also swapped the 2 new fuel injectors for these cylinders with 2 of the non-rubber contaminated ones from my 4.5L engine that ran great. I also removed the new Magnecore ignition wires I had installed and reinstalled the set from my 4.5L motor. With new plugs, different injectors, and different ignition wires, if this set gets colored the same way, then I likely have bigger engine issues and will have to do a leak-down test to see if that sheds any light, but I'm hoping maybe I'm good now.
When I get my next block of time, I'll be pulling the water bridge, installing Carl's oil control baffle and sealing the coolant tube and O-ring with silicone and putting it all back together, but I need to resolve my oil venting issue as well since my vent line is dripping actual oil and not just evacuating vapor....
Not sure this applies to your engine, but my 87 had similar fouling on #8 and it was due to a stuck piston ring. The engine in question sat under a tarp for years before I acquired it. The bores looked perfect so I saw no need to pull the pistons - that was a fatal mistake that resulted in a broken rod and trashed engine.
The previous post got long, so starting a new one for the oil vapor / crankcase venting project.
I need a more effective setup for the crankcase ventilation and think the current setup has a couple issues.
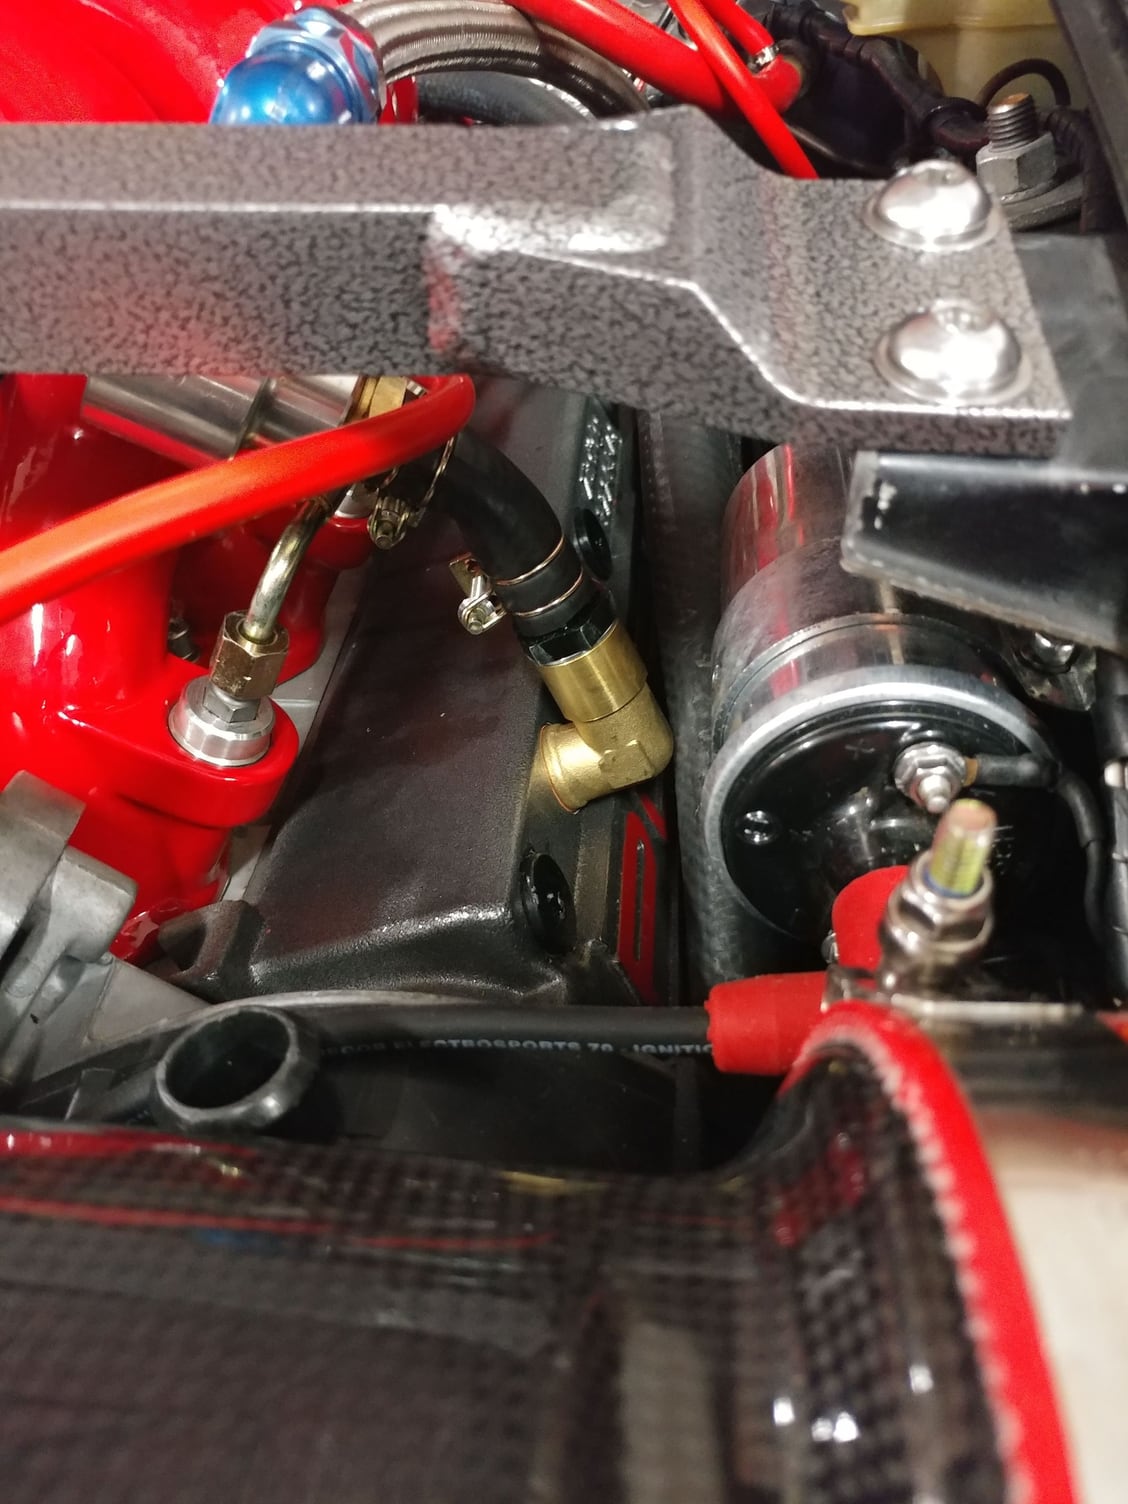
Issue #1 is that the line that should return the separated oil droplets back into the cam tower has a 90 degree fitting at the cam tower and the pressure coming through that line hitting the 90 degree bend is forcing oil seepage out of the fitting there and it's oozing along the ridge of the cam tower.
Issue #2 is that I think this 90 degree bend may backing up the line with pressure that's not allowing the pressurized vapor coming from the crankcase to exit efficiently and that may be a contributor to the oil leak on the water bridge and oil baffle plate.
The way the current setup is designed to work, the crankcase vent line goes to the left side of the oil fill canister assembly that has a solid cylinder in it now to help separate the oil from the vapor. The vapor then exits out the right side of the oil fill cap and oil that is separated should run down the hose and into the cam tower, while the pressurized vapor goes out the stainless line and vents to atmosphere underneath the car.
...except, I'm getting oil droplets out the vapor evacuation line. It was enough to spray Ron's windshield with a light coating over just a few miles while he was following me.
So, I started looking into oil catch-cans and air/oil separators to better manage the vapor flow and separation of the oil from the vapor. Ideally I wanted an AOS and not a catch-can so that it wouldn't have to be emptied periodically and the separated oil can just return to the motor.
The challenge with this type of setup is that the drain fitting on the bottom of the AOS has to be higher than the drain back point so the oil can flow down back into the motor. It is very difficult to find an effective and compact AOS that would fit in the open area on the driver's side firewall but still allow a downward flow back into the cam tower, but I thought I found a couple.
I read very positive reviews on the IAG Competition AOS and the Perrin AOS. One of the problems with some AOS units is that when used in cold weather, because of condensation during engine warm up going through the AOS, then mixing with the oil, it creates a foam that then clogs up the drain line and the AOS making a mess and killing it's functionality. There are some good photos of this issue that some people have had with the Grimmspeed AOS, which looked compact enough to actually work for my application The solution to the foaming and clogging problem is to heat the AOS so that even in cold weather, it allows the oil (and condensation) to flow and not clog up the drain lines and the AOS itself. This is cleverly accomplished by the better AOS units having ports that circulate warm coolant from the motor, through a chambered off section of the AOS to keep the AOS unit warm. This is why I liked the IAG & Perrin units, but unfortunately, after contacting those companies for dimensions, no way they would fit.in my selected location.
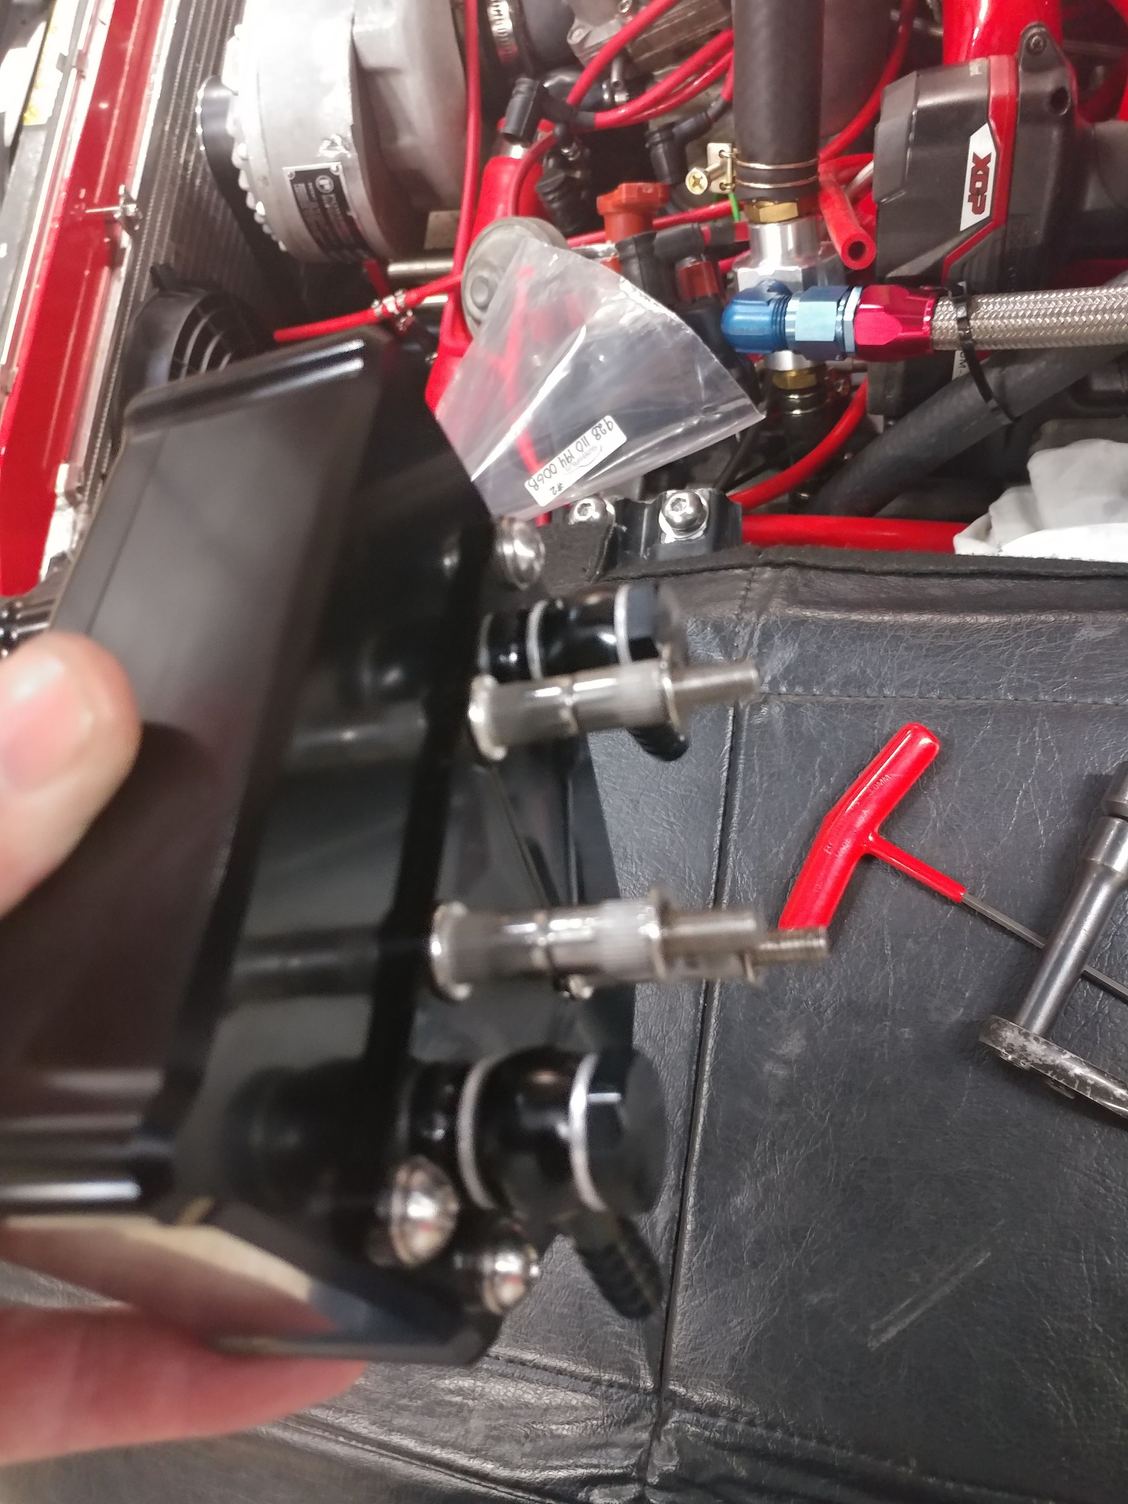
Now that I knew what some of the important features I wanted for my AOS were, I had just about given up and resigned myself to using a simple catch-can rather than an AOS but then came across a unit from Verus Engineering used primarily with Miata race cars. It was compact, had a warming coolant cavity, had an optional drain kit available and looked like it would fit where I wanted it to, so I ordered one with the coolant kit and the drain kit from Eric at Verus, who was super responsive to my initial request for information and my follow-up questions.
The Verus unit is designed to supplement a normal PCV system so has inlet ports for crankcase ventilation and the PCV line, then outlets back to the intake manifold and the bottom drain line back to the oil reservoir. If you examine the internals of the unit, it's actually a dual-chamber setup with inlets and outlets to the non-connected sides, so really two AOS units in a single housing. It is offered in 3 anodized colors. I almost went with the red, but it's a different color red than the rest of my powdercoated engine parts and was also on backorder, so went for the black version instead. Here are the units opened up where you can see the dual chamber design with the chamber shape that slows the air and takes it through the stainless mesh to separate the oil from the vapor.
In my 928 application, I only need to vent the 1 crankcase line through the AOS, so I'm going to split the line into two inputs to the AOS with a Y or T connector - one into each inlet chamber of the AOS (either both outside ports or both inside ports) - and have dual outlets venting to atmosphere.
One of the reasons I chose the driver's side firewall for the fitment is because my heat exchanger to intercooler fluid line runs right under there already. I'm going to T into that line for the fluid inlet to the AOS and outlet from the AOS so rather than creating a breach in my cooling system which could an additional point of failure for a critical engine subsystem, I'm going to use the intercooler fluid, which isn't critical as the car and supercharger will run fine without any fluid should a leak develop, it just won't generate as much boost by not cooling the charge air. The Ts in the fluid line will allow the majority of the fluid to pass straight through the larger 3/4" hose while a little bit gets routed up the 5/16" hoses to the chamber in the AOS.then back out. The larger through fittings will keep most of the fluid passing straight to the intercooler where the volume moving through is important. Routing it only up through the chamber in the AOS would compromise or restrict the fluid flow through the intercooler.
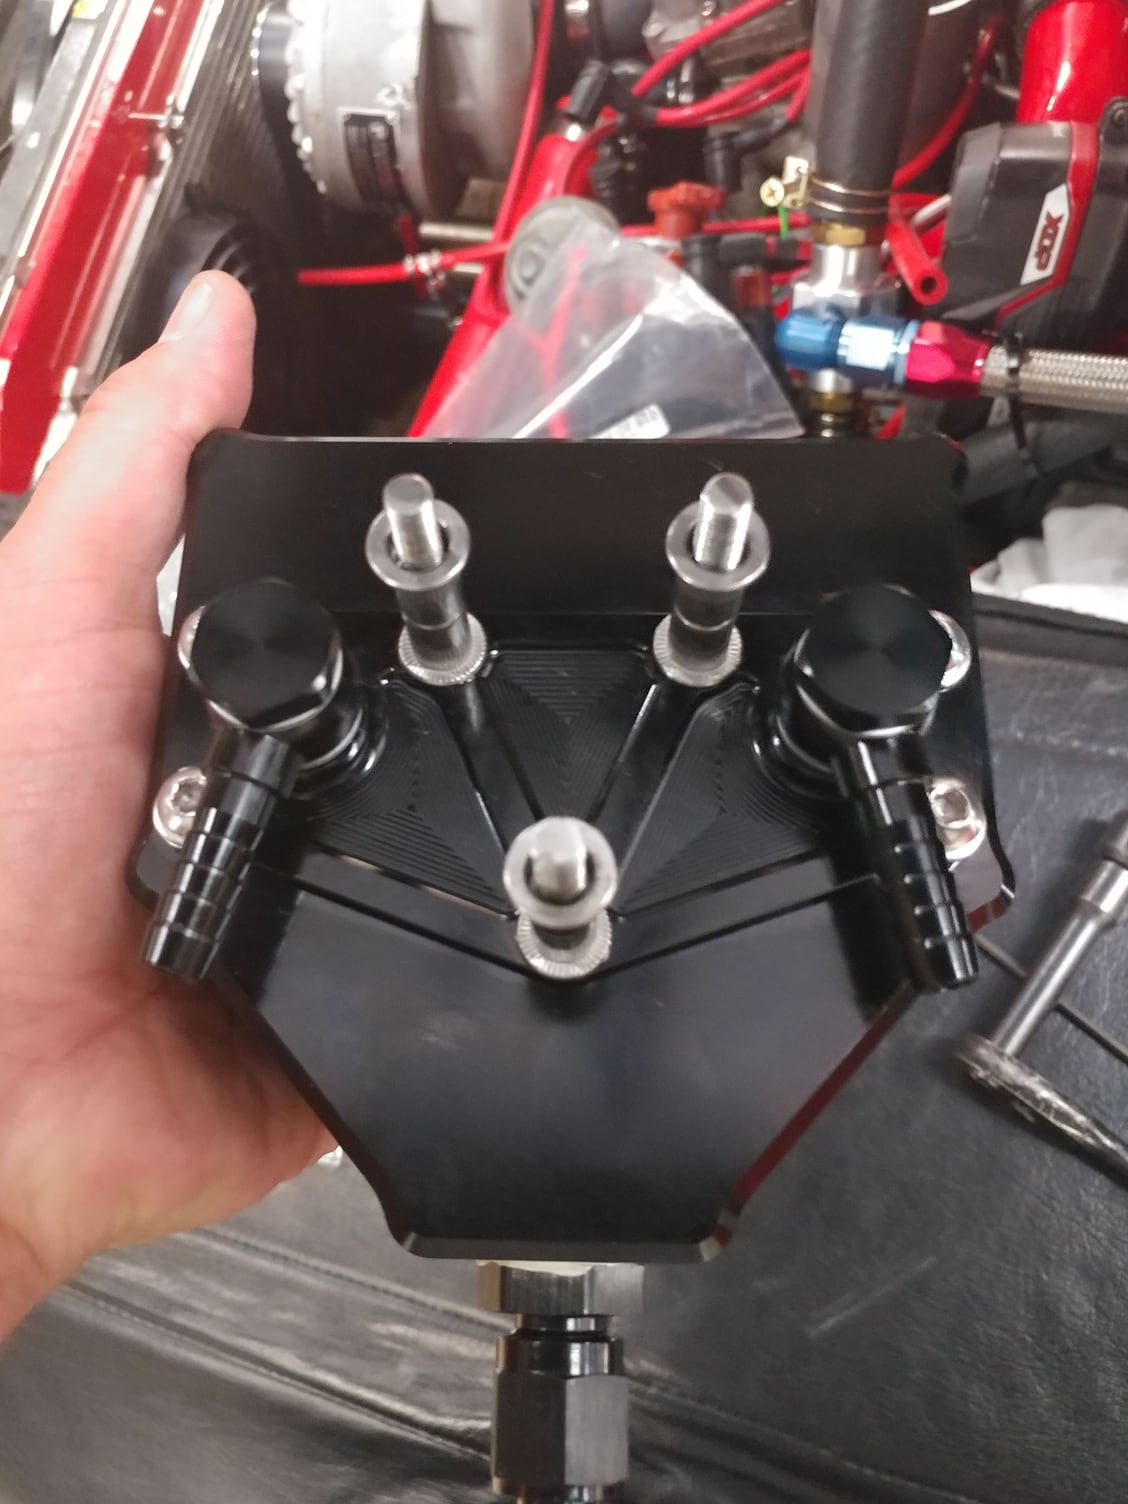
Here's what that separate chamber in the back of the AOS looks like.
I've figured out the location and mounting position. First I took a stencil of the back cover for the AOS in the center and am going to mount it using 3 studs in the center V bolt holes. Once I made the stencil, I taped it to the firewall so I could get the AOS as high as possible, but have the drain valve and body clear everything in that area.
Then I used a punch to mark the holes, reached through the backside of that wall to be sure my drill wasn't going to hit anything and drilled the clearance holes for the M6 bolts I'd be using.
In order to create clearance between the AOS body and firewall for the curves in the wall, I used two T-nuts threaded onto a stud. Since I didn't have studs long enough, I first threaded on an M6x1.0 die, then screwed the T-nuts onto long M6 stainless bolts, put some loctite on the threads, then screwed the bolt into the AOS, then tightened the T-nuts against the cover plate of the AOS. After the bolt and T-nuts were tight, I cut off the end of the bolt using a cut-off wheel and then worked the die back off the screw to clean up the threads so I would be able to easily screw a nut onto that end once I pass them through the holes I drilled in the firewall. Using the T-nuts as the standoffs allowed me to secure the back cover to the AOS just like the original button head screws did, which is important, as there will be fluid flowing through that cavity and I don't want it to leak.
Here's what that assembled setup looks like with the banjo fittings for the intercooler fluid line and the dual T-nut stand-offs installed.
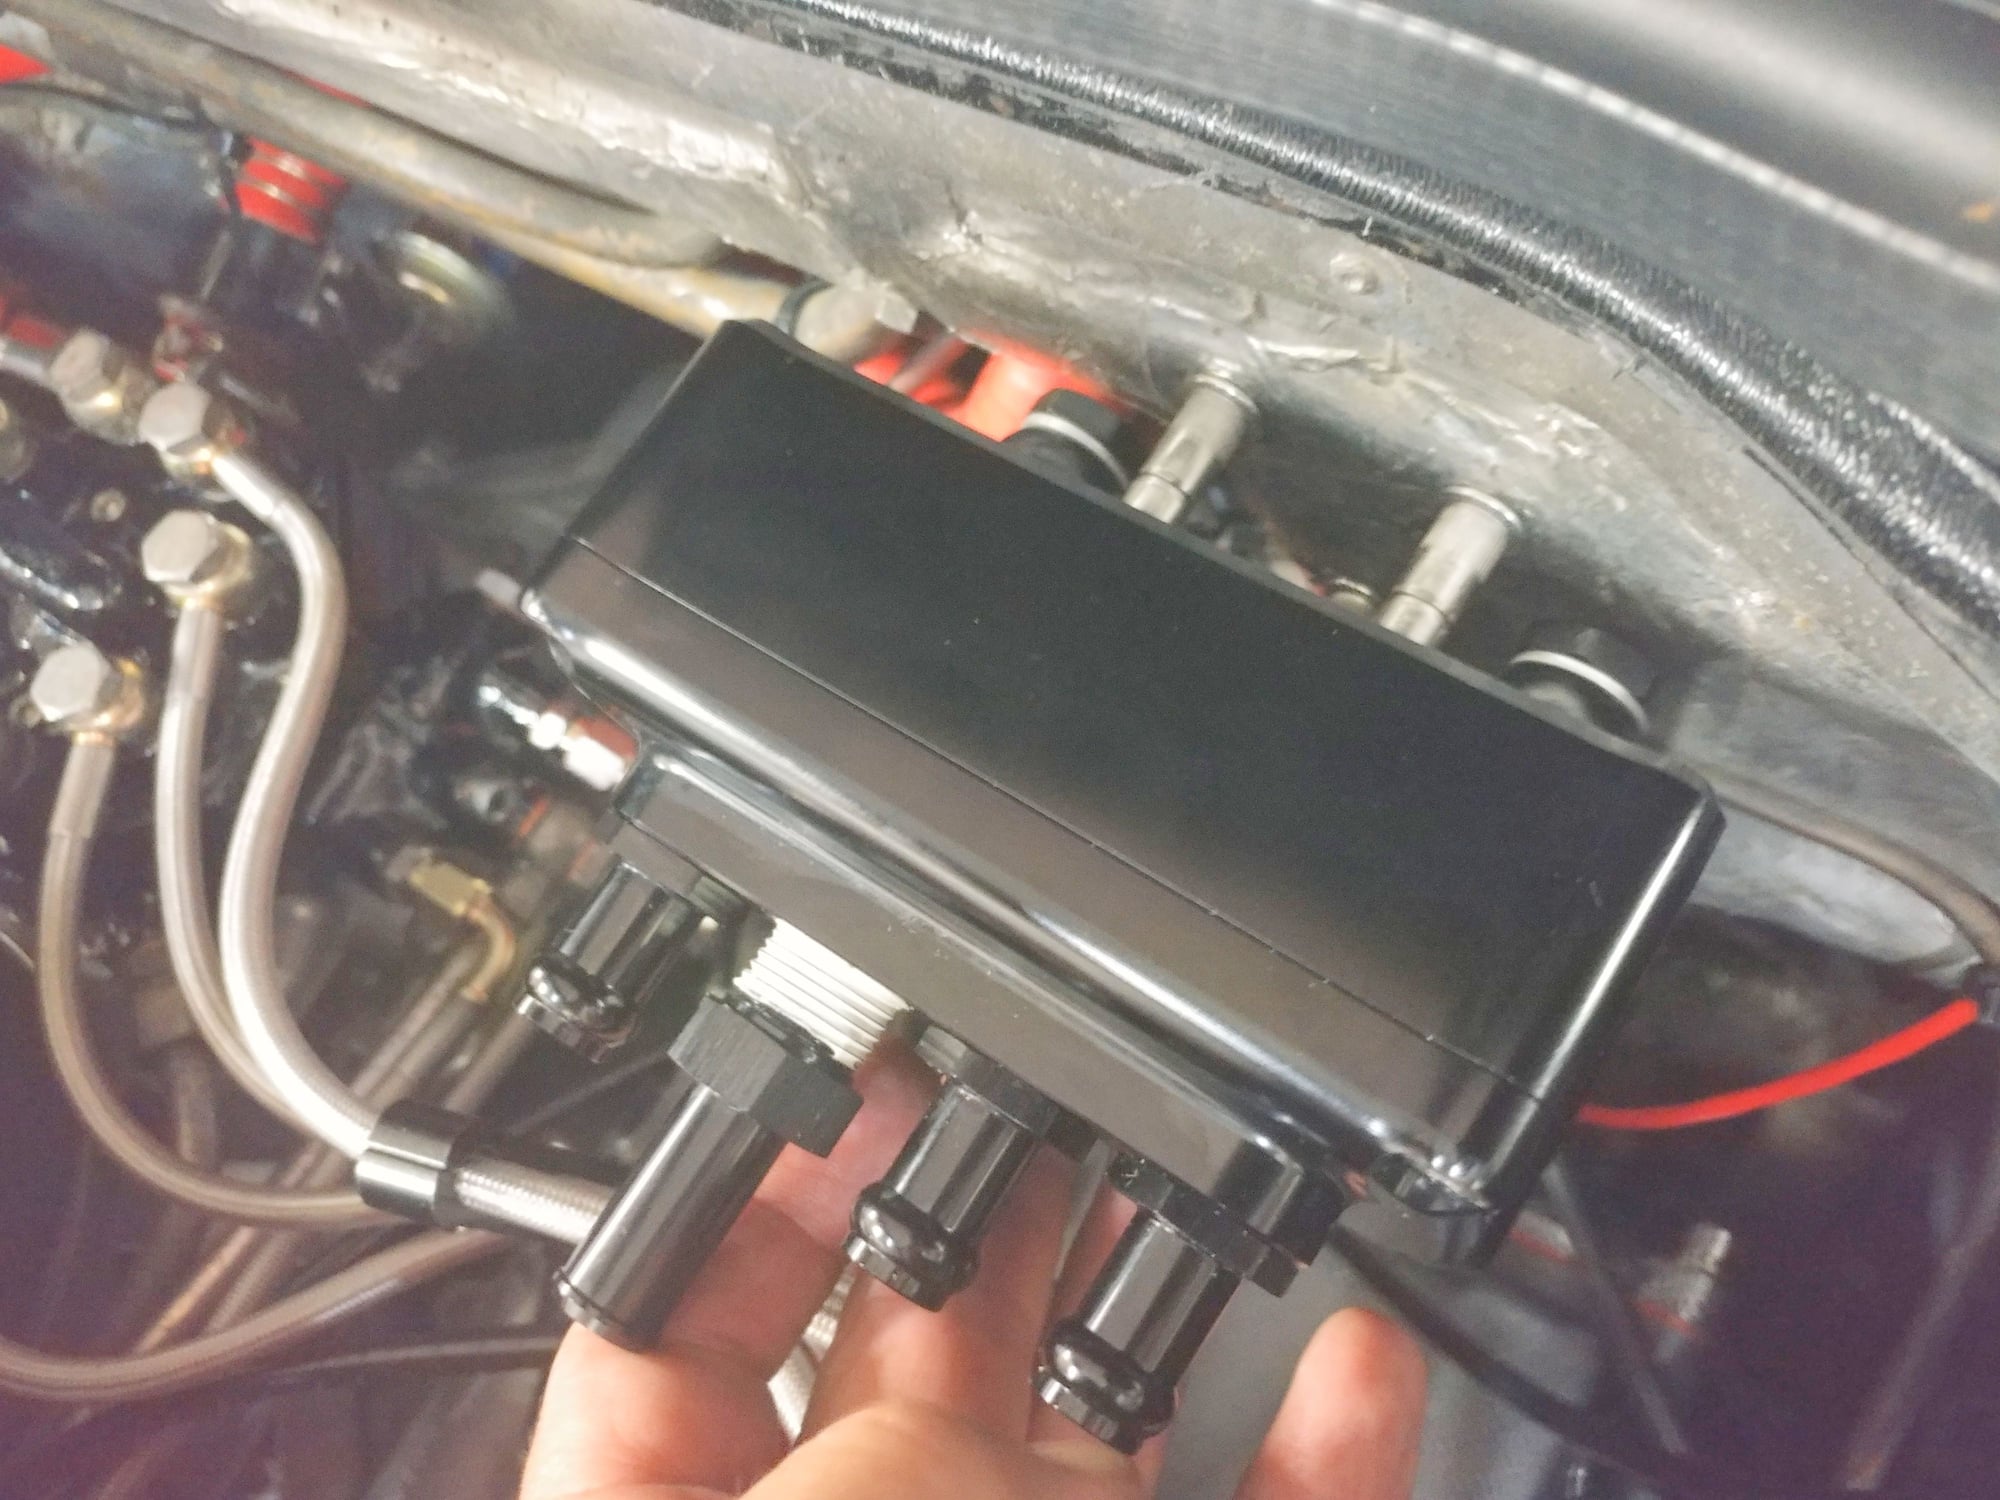
Here it is positioned in the holes but not fully installed yet as I'm going to do my hose connections and routing before fastening it to the wall, but need to wait for all the fittings to arrive before I do that.
As it turns out, I'm not comfortable that the bottom drain fitting is high enough to drain the oil back into the cam tower bolt so I'm going to tie in into the hose that runs from the oil filler assembly down the front of the motor into the metal line that feeds into the oil pan. The Verus AOS seems to be a well though out design as the drain kit also includes a 1-way check valve. It's installed so any pressure from the crankcase or oil pan back into the AOS drain line can't force oil back into the AOS, but when the car is not running the check valve drops open so accumulated oil can run back into the pan.
The plumbing is going to look like this.
22mm cranckase vent hose feeds the inlet to the oil fill assembly just as it does today, but the 24mm oil cap outlet hose will now be split into two 12mm lines running to the two AOS inlet ports - either both outside or both inside ports. BTW, if by looking at the internals of the AOS, if anyone has any advice as to whether the inlets should be the two outer ports or the tow inner ports, please let me know. I'm also thinking about capping off the oil fill inlet port and venting the 22mm cranckase vent line directly to the AOS after splitting it which will eliminate further crankcase pressure by not putting that back into the oil fill port. Which is the better configuration?
Two 12mm outlets from the AOS will Y together into a single 22mm line and vent to atmosphere down the driver's side firewall, just like the current line does. This hoses will be fire-sleeved since it runs in the vacinity of the header on that side
The 3/4 heat exchanger to intercooler fluid hose will be T'd so the 3/4" line continues through but has a 5/16" offshoot to the fluid cavity banjo fitting barbs on the back of the AOS
The 10mm AOS oil drain line with the 1-way check valve in it will exit the bottom of the AOS with a 90 degree open curve fitting Varus supplied, go around the back side of the drivers side cam tower, then come through the wireway space in the timing covers on that side of the motor and Y into the rubber line that feeds the oil return to the pan.
I'm looking for input on the 2 red items above or any additional suggestions or comments if anyone has any. I'm hoping once I get this setup installed and the coolant and oil leak taken care of that the car is back in business so I can enjoy some beautiful top-down driving as the cooler weather approaches.
Not sure this applies to your engine, but my 87 had similar fouling on #8 and it was due to a stuck piston ring. The engine in question sat under a tarp for years before I acquired it. The bores looked perfect so I saw no need to pull the pistons - that was a fatal mistake that resulted in a broken rod and trashed engine.
Hope I'm wrong.
I hope you're wrong too - yikes. Wouldn't a stuck ring result in poor compression in that cylinder or do the other rings compensate for that and make a good seal for compression. Since this engine sat for a bit before I installed it, I actually put some Marvel Mystery Oil into the top of each cylinder through the plug hole to give it some top end lubrication and help anything that might be stuck, get unstuck before starting.
I'm hoping it was bad injectors or plug wires, but I guess we'll see. Not sure I have the heart, nor the funds to start this process over again.


 06-26-2019, 10:51 AM


 The solution to the foaming and clogging problem is to heat the AOS so that even in cold weather, it allows the oil (and condensation) to flow and not clog up the drain lines and the AOS itself. This is cleverly accomplished by the better AOS units having ports that circulate warm coolant from the motor, through a chambered off section of the AOS to keep the AOS unit warm. This is why I liked the IAG & Perrin units, but unfortunately, after contacting those companies for dimensions, no way they would fit.in my selected location.