When you click on links to various merchants on this site and make a purchase, this can result in this site earning a commission. Affiliate programs and affiliations include, but are not limited to, the eBay Partner Network.
recently had an Indy do plugs and air filter for $843.82 (including plugs and air filter)... also had to have the blower motor regulator replaced (I supplied the regulator) - added $312.50 to the tab for a total of $1166.32 (2016 Carrera Cabriolet Black Edition) .. this was in Coos Bay Oregon
I just replaced the air filter and plugs thanks to all the feedback and advice on this thread. Especially thanks to @polobai and @VacantSky . Huge kudos to you both! I found a couple of things to share which I did a little differently and some experiences which flat out scared the sh*t out of me. Photos added for clarity.
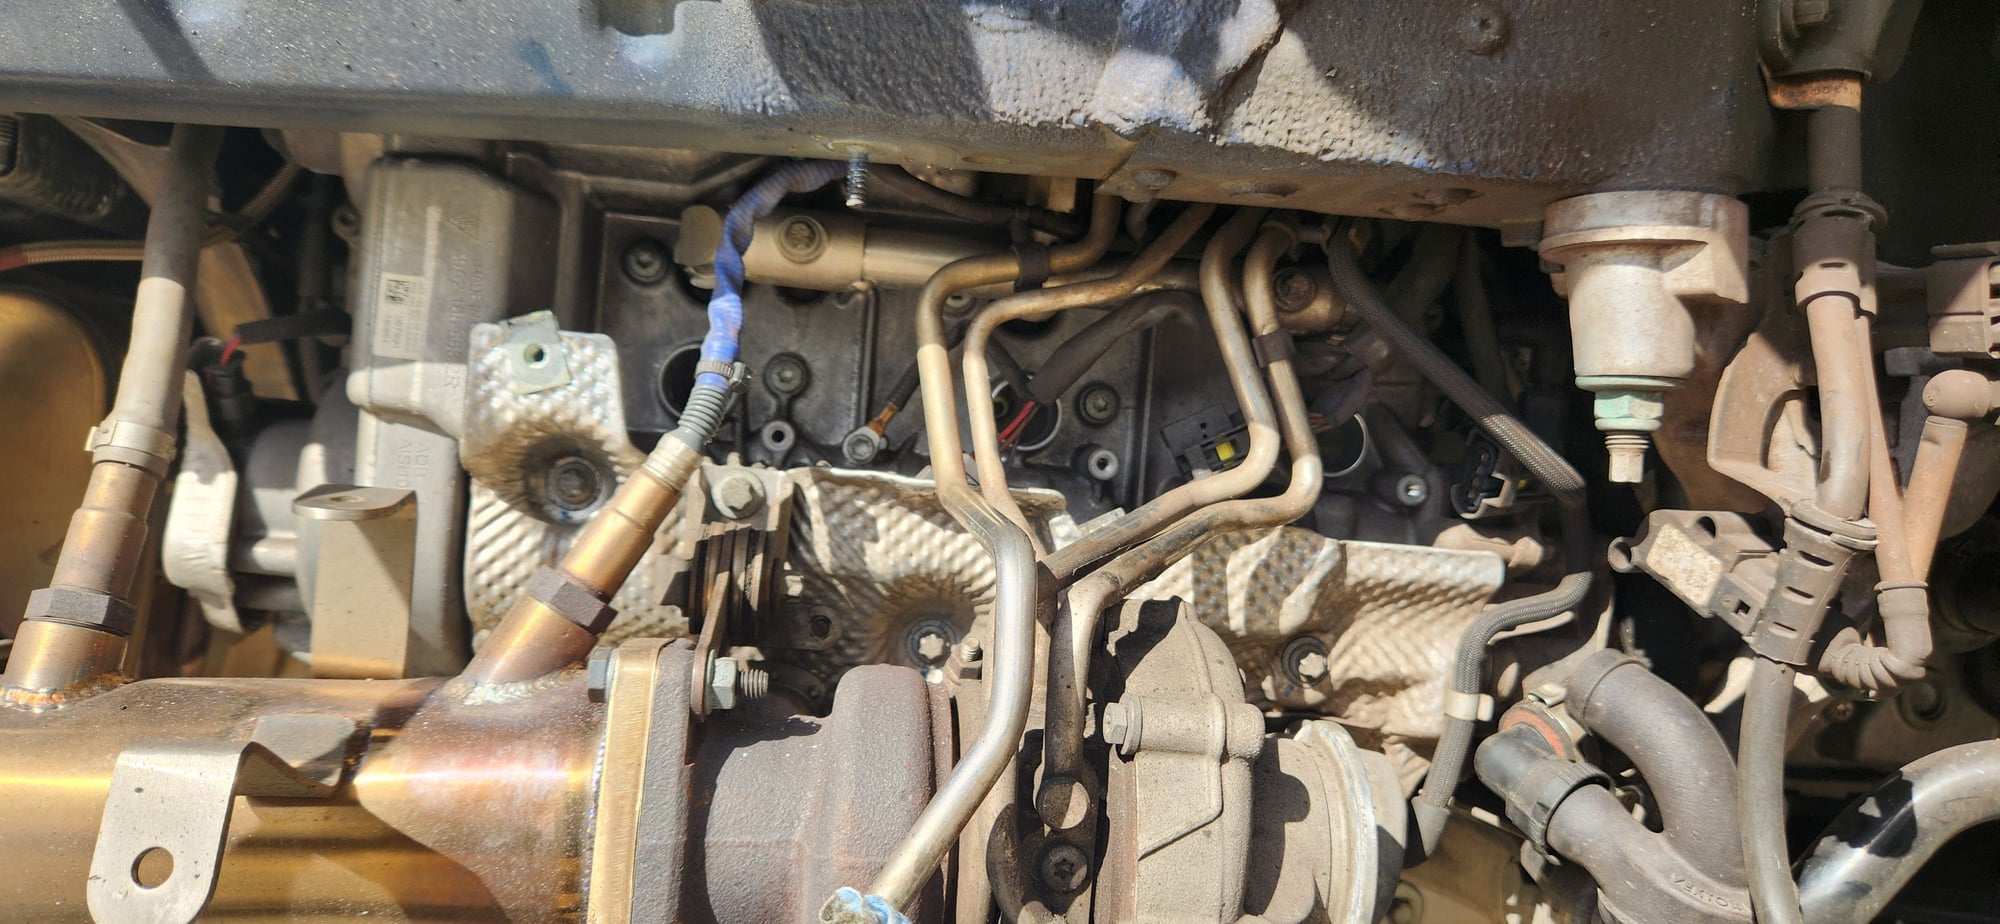
1. I found that removing the wheel well liner made things a lot easier to see, especially with the aft plug.
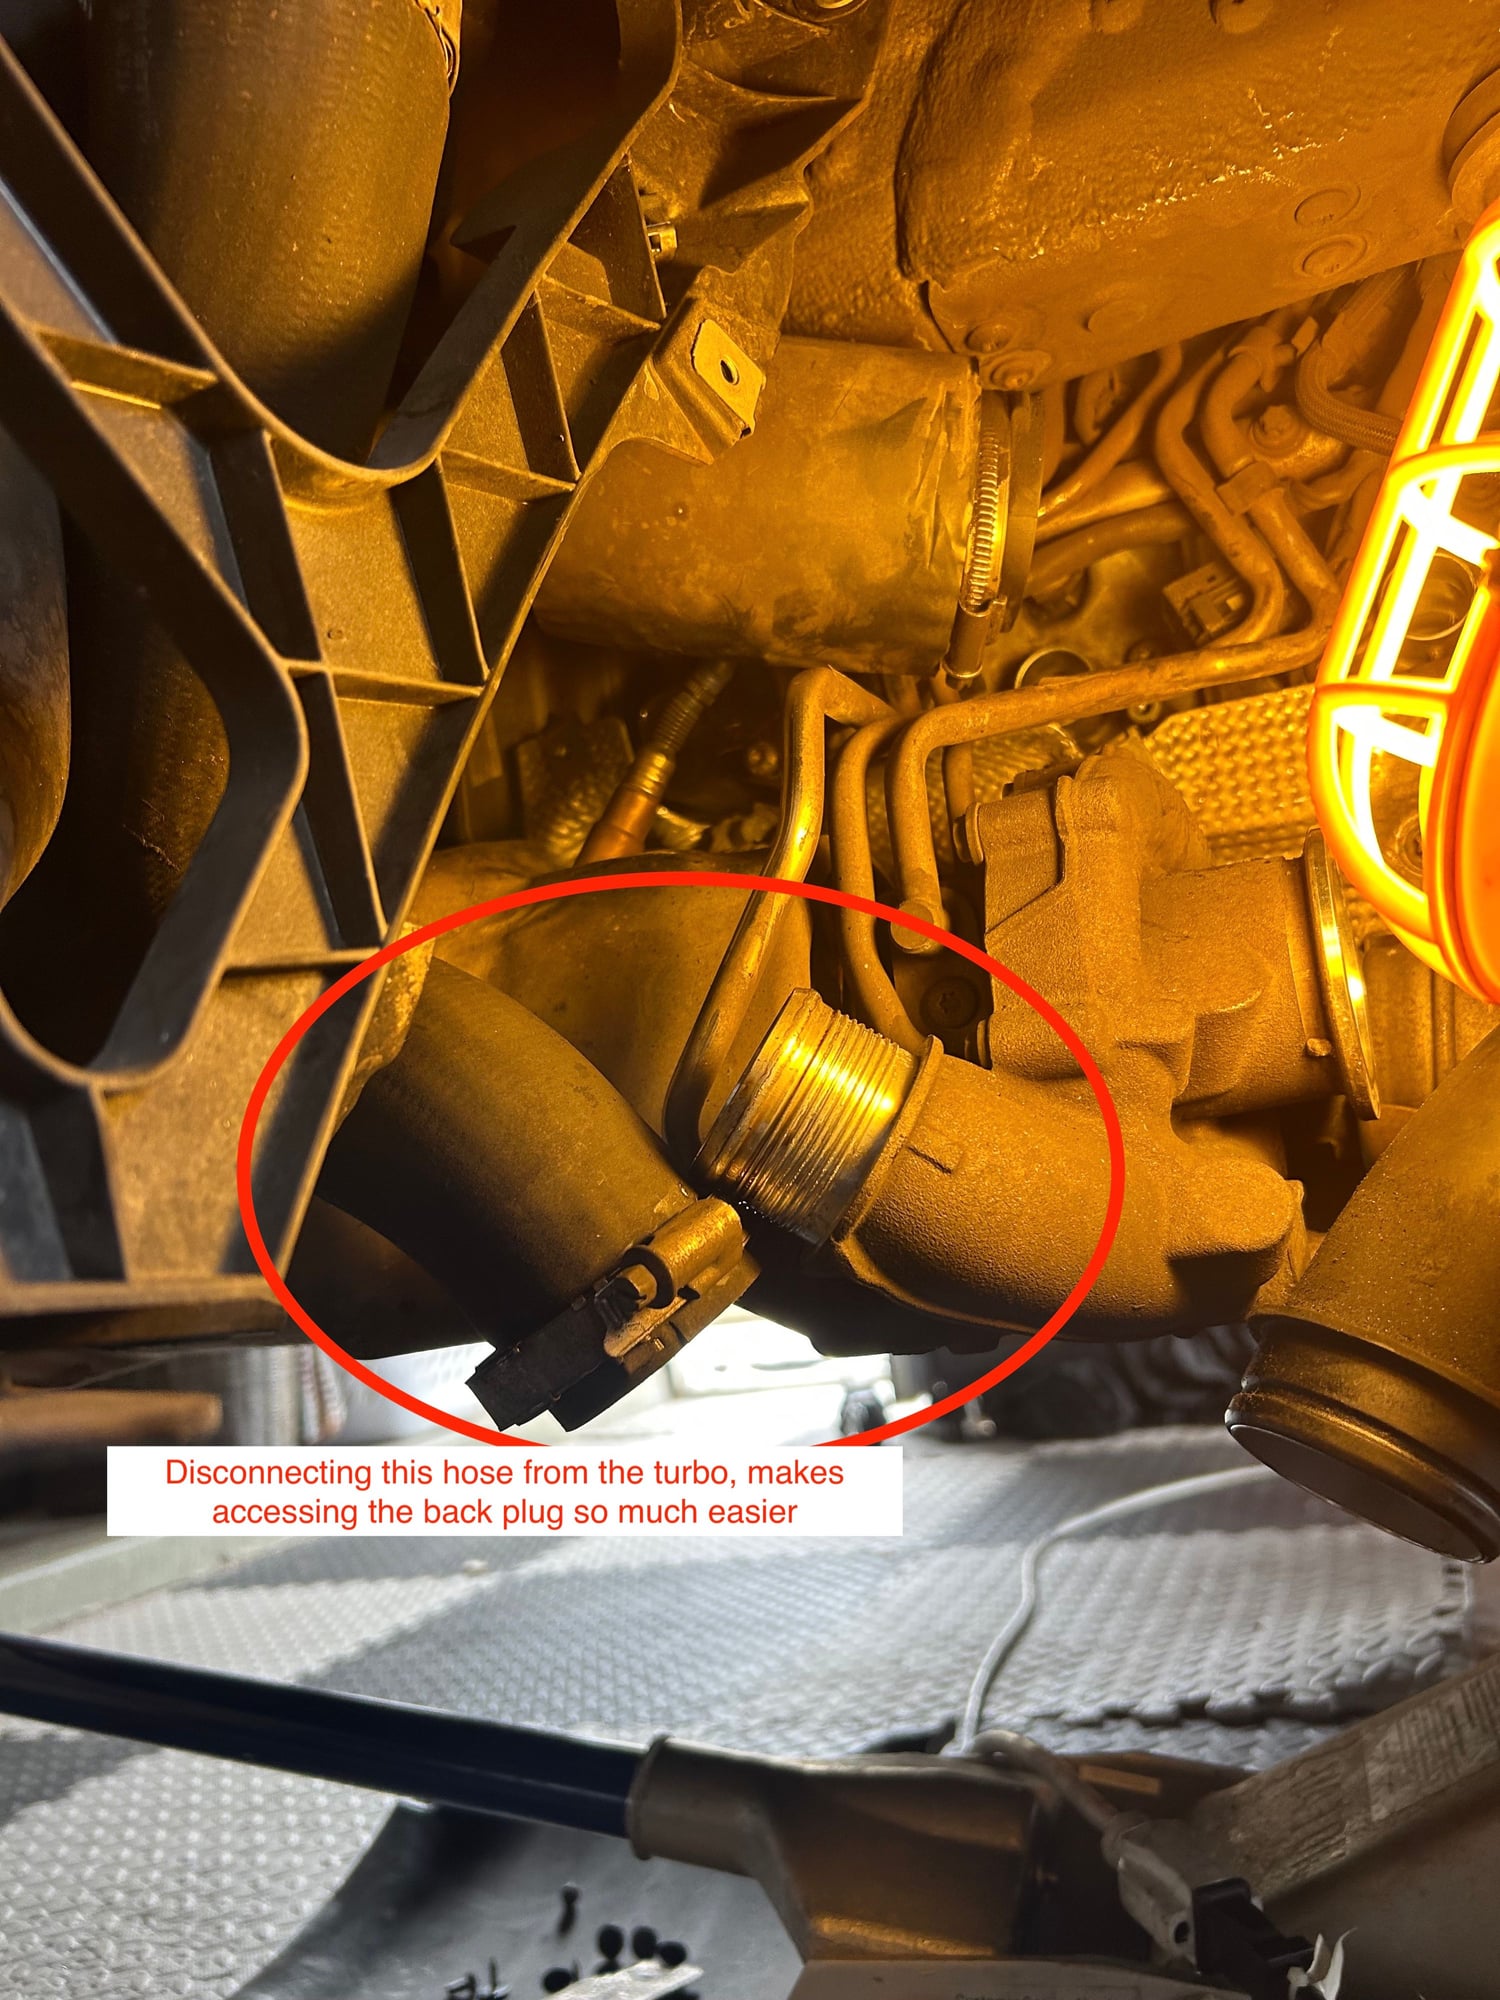
2. Disconnecting the other turbo hose is difficult, but well worth it. I didn't do this on the drivers side, but after doing it on the passenger side, I wished I had done so before. Made things a lot easier to see, otherwise it's navigating by feel.
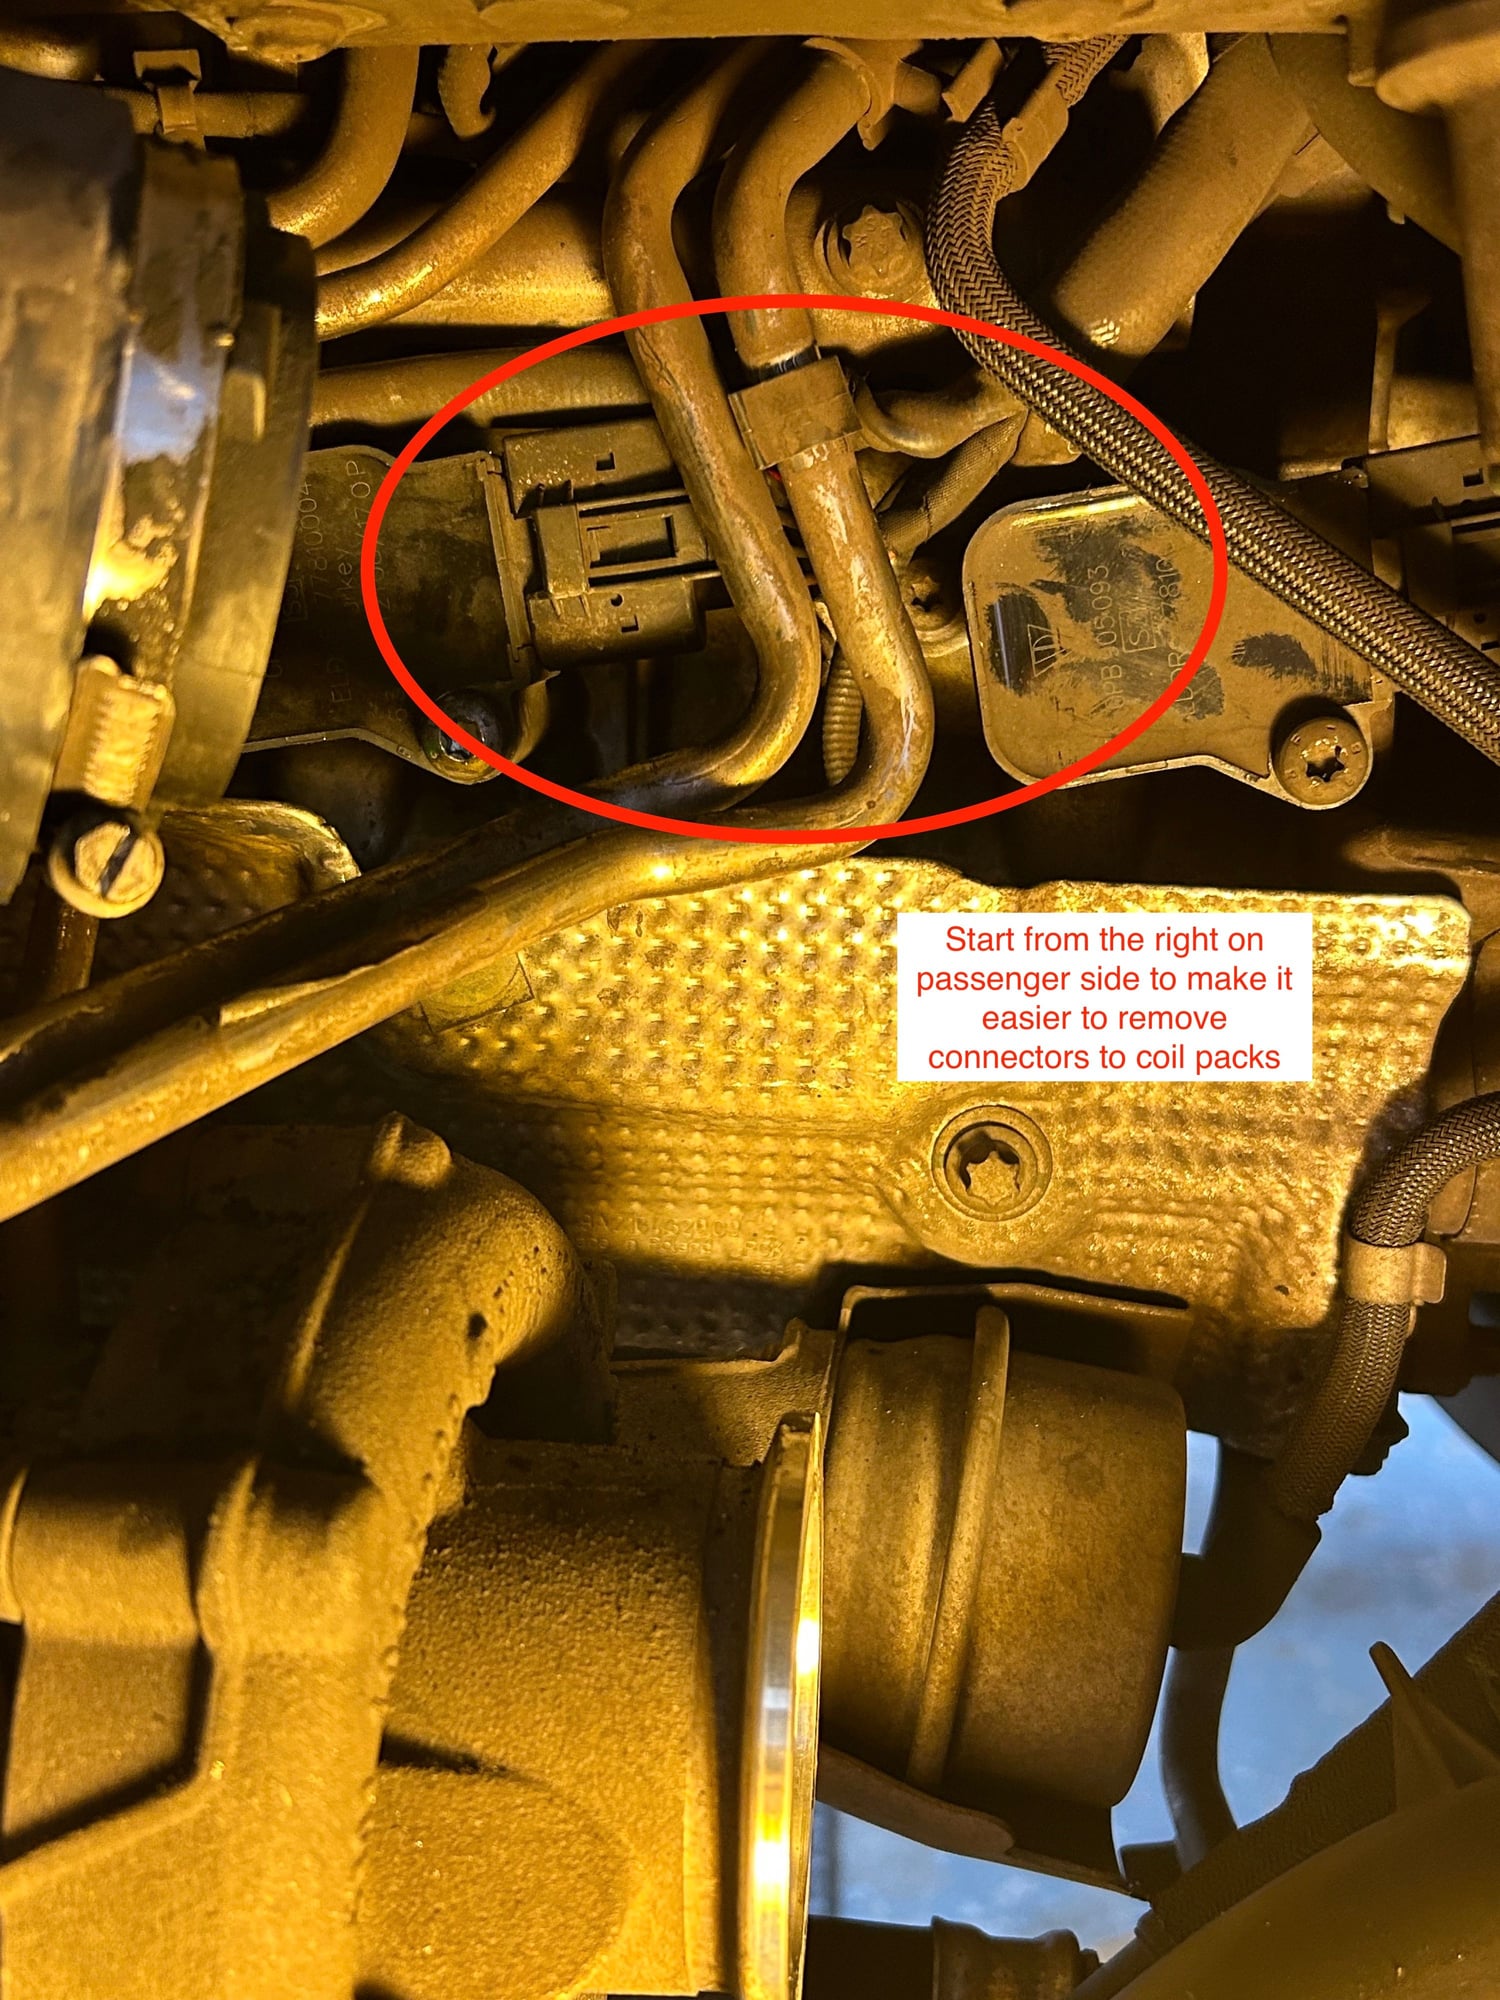
3. I saw that others removed all the coil packs before removing the spark plugs. I wished I had done this on the drivers side, rather than doing each one individually like the video showed. Reason being is that it sets up for a sequence of easier coil pack removal especially when trying to remove connector clips and getting the room to move. To that end, especially so if this is your first time, start on the passenger side first and work right to left to allow easy connector disconnection, one after the other. This also allows your first spark plug removal to be so much more visible too.
4. The spark plugs are in there VERY tight. So much so that on the passenger side, aft plug, it was so tight I was super worried I was about to strip the thread. Had to take breaks and walk around to just calm myself down. Upon eventual removal, found the plugs were kinda rusty in the threads. They all came out fine, but be prepared to go slow and uncomfortable creaking noises that will make you wish you had just spent the $2k the indy quoted you to do the job. Make sure when you put the new ones back in, to use some anti-seize on the threads. It will make replacement a lot easier.
5. As others have said, make sure you put the new plugs in without a ratchet. Just screw in by hand. There was one that was tricky to get in, and I kept getting the angle wrong. But eventually after moving it around and getting the angle right, it went in fine. Another tense moment though....
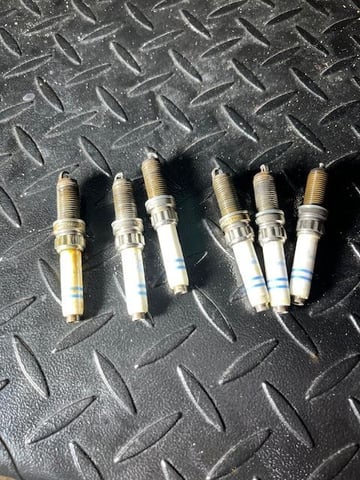
6. My 991.2 plugs were definitely in need of replacement. It has 37k miles.
My thanks again to all who paved the way forward. Can't thank you enough.
Note the proximity of the connector to the next coil pack. For that reason, start right to left on the passenger side.
I just replaced the air filter and plugs thanks to all the feedback and advice on this thread. Especially thanks to @polobai and @VacantSky . Huge kudos to you both! I found a couple of things to share which I did a little differently and some experiences which flat out scared the sh*t out of me. Photos added for clarity.
1. I found that removing the wheel well liner made things a lot easier to see, especially with the aft plug.
2. Disconnecting the other turbo hose is difficult, but well worth it. I didn't do this on the drivers side, but after doing it on the passenger side, I wished I had done so before. Made things a lot easier to see, otherwise it's navigating by feel.
3. I saw that others removed all the coil packs before removing the spark plugs. I wished I had done this on the drivers side, rather than doing each one individually like the video showed. Reason being is that it sets up for a sequence of easier coil pack removal especially when trying to remove connector clips and getting the room to move. To that end, especially so if this is your first time, start on the passenger side first and work right to left to allow easy connector disconnection, one after the other. This also allows your first spark plug removal to be so much more visible too.
4. The spark plugs are in there VERY tight. So much so that on the passenger side, aft plug, it was so tight I was super worried I was about to strip the thread. Had to take breaks and walk around to just calm myself down. Upon eventual removal, found the plugs were kinda rusty in the threads. They all came out fine, but be prepared to go slow and uncomfortable creaking noises that will make you wish you had just spent the $2k the indy quoted you to do the job. Make sure when you put the new ones back in, to use some anti-seize on the threads. It will make replacement a lot easier.
5. As others have said, make sure you put the new plugs in without a ratchet. Just screw in by hand. There was one that was tricky to get in, and I kept getting the angle wrong. But eventually after moving it around and getting the angle right, it went in fine. Another tense moment though....
6. My 991.2 plugs were definitely in need of replacement. It has 37k miles.
My thanks again to all who paved the way forward. Can't thank you enough.
Note the proximity of the connector to the next coil pack. For that reason, start right to left on the passenger side.
Michael - Thank for providing your real-world feedback. Super helpful. I'm guessing that the reason the plugs felt so tightly in is a factor of both time and mileage. I can relate to that feeling of having to walk away for a little bit and then come back. I've had to do that on numerous DIY projects out of fear for breaking something by not being too careful.
I wonder... and perhaps someone with greater knowledge can comment here... if spraying a little bit of PB blaster around the plug before starting removal process is advisable or not? The other thing that I wonder if using anti-seize on the threads of the new plug, while intuitively seems like a good idea to prevent them from getting stuck, could also alter correct torquing of the plugs as I believe that anti-seize does offer a bit of lubricity. Just curious what other think of that.
I'm in the midst of my spark plug replacement. This thread including the video by VacantSky has been very helpful. I'm really struggling to get the top end of the turbo inlet pipe fully seated before I tighten down the clamps. I've lightly greased the outside of the tube and the inside of the hose that the tube fits inside. It's easy for me to get the bottom section of the tube in and get the top section about half way in, but I just can't get the lip flush with the edge of the hose. Any tips/tricks?
I'm in the midst of my spark plug replacement. This thread including the video by VacantSky has been very helpful. I'm really struggling to get the top end of the turbo inlet pipe fully seated before I tighten down the clamps. I've lightly greased the outside of the tube and the inside of the hose that the tube fits inside. It's easy for me to get the bottom section of the tube in and get the top section about half way in, but I just can't get the lip flush with the edge of the hose. Any tips/tricks?
you're probably done by now but do you have photos? I didnt havw any issues but was definitely a wiggle to get back on.
I'm in the midst of my spark plug replacement. This thread including the video by VacantSky has been very helpful. I'm really struggling to get the top end of the turbo inlet pipe fully seated before I tighten down the clamps. I've lightly greased the outside of the tube and the inside of the hose that the tube fits inside. It's easy for me to get the bottom section of the tube in and get the top section about half way in, but I just can't get the lip flush with the edge of the hose. Any tips/tricks?
I remember that being difficult the first time of many takes to make it look easy for a better video, but it�s just a lot of pressure and a slight twisting motion and it will go all the way home!
sorry on the slow reply, I�m not overly active on the forum and my good emails get buried in a sea of junk/spam. Hopefully you got it figured out but if not just push a little harder with a slight twisting motion
Thanks for the reply. I did get it done by using some diagonal pliers and alot of cussing. ThEN, I watched the rest of the video where you seated the top of the turbo tube separately before inserting the bottom keyed portion. NEXT time I'll try that...
Cheers!
Hi everyone. Thanks for this thread. Looks great! The only thing that I cannot find is the torque value for the plugs. I am going to work on a 2019 911 GTS 991.2. Online I�ve seen different torque values for the plugs from 24 ft lbs, 22 ft lbs and 17 ft lbs. Trying to gain access to the Porsche online manuals but no success. Anyone have the correct torque value for the spark plugs 991.2? Thanks.
Hi everyone. Thanks for this thread. Looks great! The only thing that I cannot find is the torque value for the plugs. I am going to work on a 2019 911 GTS 991.2. Online I�ve seen different torque values for the plugs from 24 ft lbs, 22 ft lbs and 17 ft lbs. Trying to gain access to the Porsche online manuals but no success. Anyone have the correct torque value for the spark plugs 991.2? Thanks.
I will admit that I don't have the manual handy, but I do keep a detailed maintenance log.
I have a 2018 Targa GTS and my notes from what I used for the Spark plugs a couple of years ago was
17 ft-lb new (16 ft-lb reinstalled used plugs)
Ignition Coil screws: 7.5 ft-lb
Will be installing Soul cats soon, since I'll be under there anyways, I think I'll attempt the plugs as well. Which style spark plug socket do y'all recommend (long vs short):
I replaced the plugs on the passenger side today. All went well. A little difficult at times but it's done and no misfires. Tomorrow I'll do the drivers side. The only strange thing that I noticed is on the passengers side, although there was an indent on the heat shield, I didn't see any wire clip attached to it. On the written threads above in this forum it appears that others had this clip with wires attached. Perhaps it will be on the drivers side? My 911 GTS is a 2019 and was built mid year so I wonder if things changed? Thanks for everyone's input into this thread.
Thought I asked this question but I don�t see it now. First off, Thank you to everyone who posted here. I did the plugs on the passenger side of our 2019 911 GTS. While I ran into a few time consuming issues, all went well. My only question is that based on the postings, I was under the impression that there was a wire clip on the heat shield on the passenger side. I could see the indentation on the heat shield but no clip or wires. Perhaps it�s only on the driver side? Anyone remember? Thanks again. Tomorrow I�ll do the drivers side.
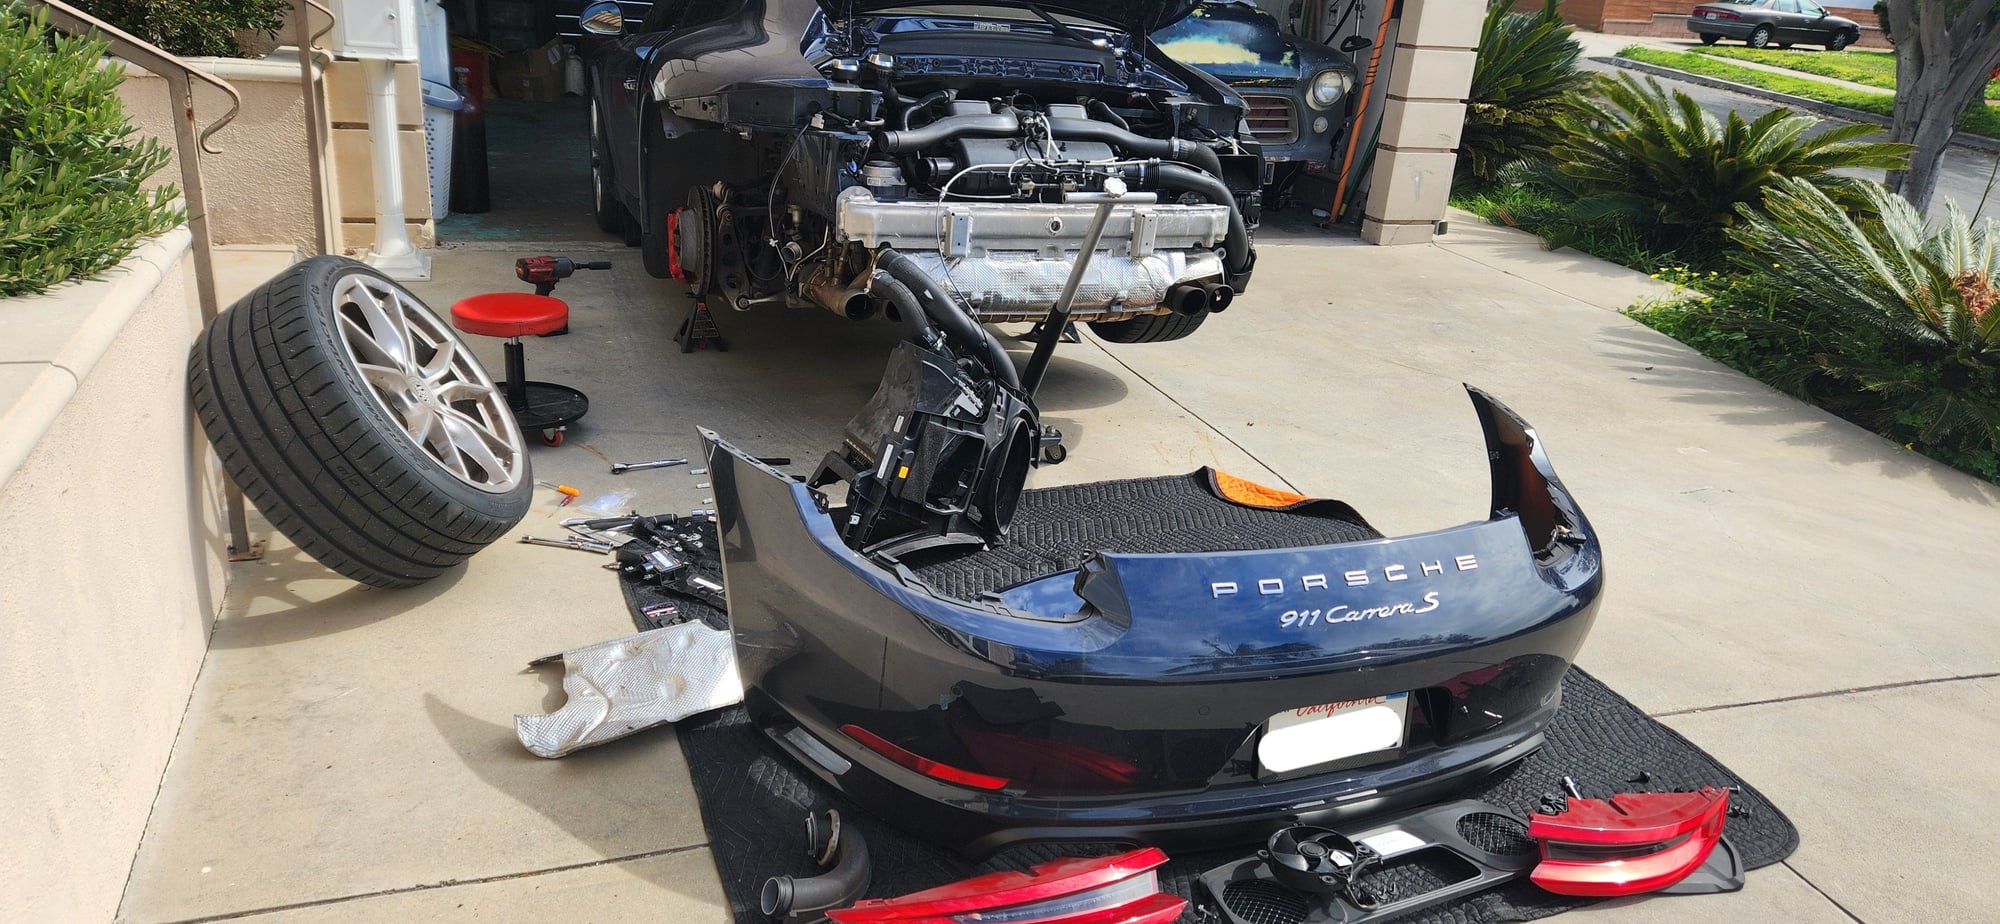
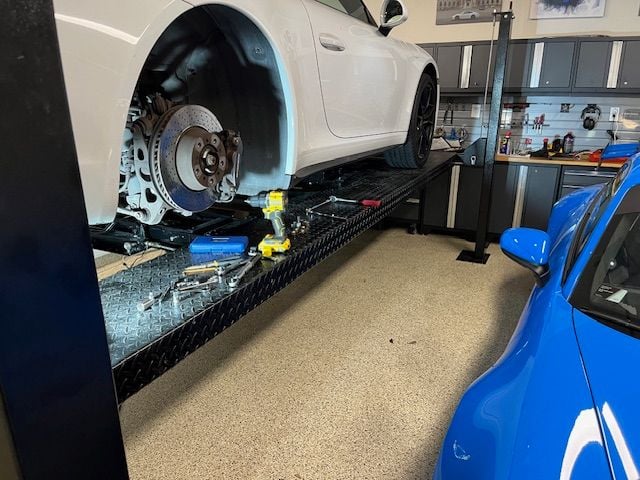
Thanks to everyone that contributed to this DIY. I just replaced all the plugs on my 2019 C2S yesterday and it wasn't as hard as I expected --- took me about 3-4 hours or so. I didn't want to deal with a combination of extension, wobbles, swivels in order to remove/reinstall the various blind bolts and plugs. I've turned enough wrenches in my life that sometimes it's better to remove stuff in the way than to work around it. I removed the bumper and ended up removing intercooler cages as an assembly to get easy access and it paid off. I had a straight shot to all the coils and plugs. In fact, that was the easiest part of all of this --- about 10 min per side once I removed the intercooler cage assembly.
If you're contemplating removing the intercooler cages, don't hesitate.. just do it. It's about a dozen fasteners per side (torx & 10mm) as well as a 4 hose clamps. For the electrical module on the outside of the IC cage, remove the 3 torx bolts, wiggle it out and remove the plug from it. Once you do all that, just swing the assembly out of the way -- you don't even need to disconnect the diverter valve tubing.
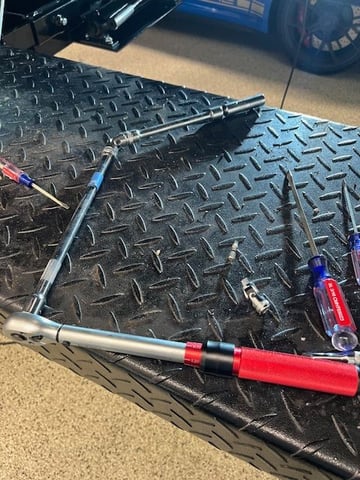
The only special tool I used was this spark plug tool I bought on Amazon. Everything else I had in my roll away.
I just did this job and wanted to share some additional thoughts. Big thank you to VacantSky's video that was shared in post #98. It was extremely useful as well as some of the other posters who shared. I have a 2018 C4 bought in July 2017. Second plug replacement. Some thoughts:
1. I didn't find the job that difficult. It took <6 hours. I could do it in 3 next time. I don't have a ton of experience either. The only plug job I have done other than on a lawn mower was on my 992 GT3 last December.
2. There is absolutely no need to take off the bumper and turbo cages. Just follow his video. You only need two extensions and a wobble to get the rear plugs out and in. Picture of it below. The painters tape on it is just for my reference on how much progress I am making as the plug comes out.
3. The hardest part for me was to get the top of the turbo intercooler hose reinserted. However, once I looked more closed at the video on how he did it and adding a bit of lubrication, it went right in on both sides.
4. Take the wheel well liner off. It makes visibility and access easier for the rear plugs as well as the screws for the heat shields.
5. I had a tough time getting the passenger side rear plug out. It was stuck and popping as I backed it out. I was over worried about breaking it so I was careful and took breaks to calm down and pace. I sprayed in penetrating oil and let it sit over night. I also had to work it in and out which is what helped. One turn in followed by two turns out etc. It came out and the new one went in very smoothly. I suspect that the the mechanic at the dealership who did it the first time skipped this plug? Lol. Maybe not but I can't explain why it was so hard to get out relative to the others.
I found this unexplained powder on the seal on the bottom of the driver's side intercooler. It was on the outside and not on the inside. No idea what it was. I wiped it off.
Extensions and wobble and torque wrench.
Obligatory plug picture. The one on the far left was the one that was hard to get out. The oil on the ceramic part is the penetrant spray residue.
My setup.
Thank you everybody for contributing to this DIY thread!
 12-22-2022, 01:53 PM