
Traqmate/Shift-I/Sound Switch Install
 02-02-2011, 11:59 PM
#1
Drifting
Thread Starter
Join Date: Jul 2009
Location: Black Sheep Racing World HQ
Posts: 3,278
Likes: 0
Received 25 Likes
on
14 Posts
I finally completed a big installation on Gisele recently. I hardwired three unique items: the Traqmate HD complete data acquisition system, a Shift-I tachometer LED light bar and Mikymu's famous sound switch.
First of all, I need to thank many of you for your hard work in posting DIYs and write-ups of your own installations. I am merely standing on the shoulders of giants! Mikymu for your numerous and excellent DIYs on many of the topics that helped me; TRAKCAR for photos and inspiration of your Traqmate installation, especially the display unit bracket; and RSS (Road Sport Supply) in Costa Mesa for the cool work-in-progress photos they posted showing a Shift-I light and the custom mounting bracket they made for a car they nicknamed "the Colonel".
My goal was to make the installation of all these items as close to factory as possible. Everything had to be mounted as robustly as possible; hardwired, with the cable harnesses sleeved in a protective sheath and crimped connections where ever possible for maximum reliablity; and routed in the car so as to not be visible and to protect them from wear and tear.
After having done all the research, wiring diagrams, leg work on sourcing parts and products, and designing the custom parts, I decided that the scope of the actual installation was more than I was willing to take on at the time. Besides, I had a track event coming up soon, and I wanted to be able to make use of all this cool stuff! I decided I needed to tap a professional shop with experience in data acquisition. So, I contacted TC Design in San Jose. Joe Colicchio at TC Design has vast experience in all the areas I needed help in, and Joe stepped up to the plate, and then went even beyond my expectations! I took out the passenger seat and the center console. Here are the links to my DIYs on those topics:
https://rennlist.com/forums/997-gt2-...moval-diy.html
https://rennlist.com/forums/997-gt2-...moval-diy.html
I then drove the car over to TC Design to let Joe work his magic.
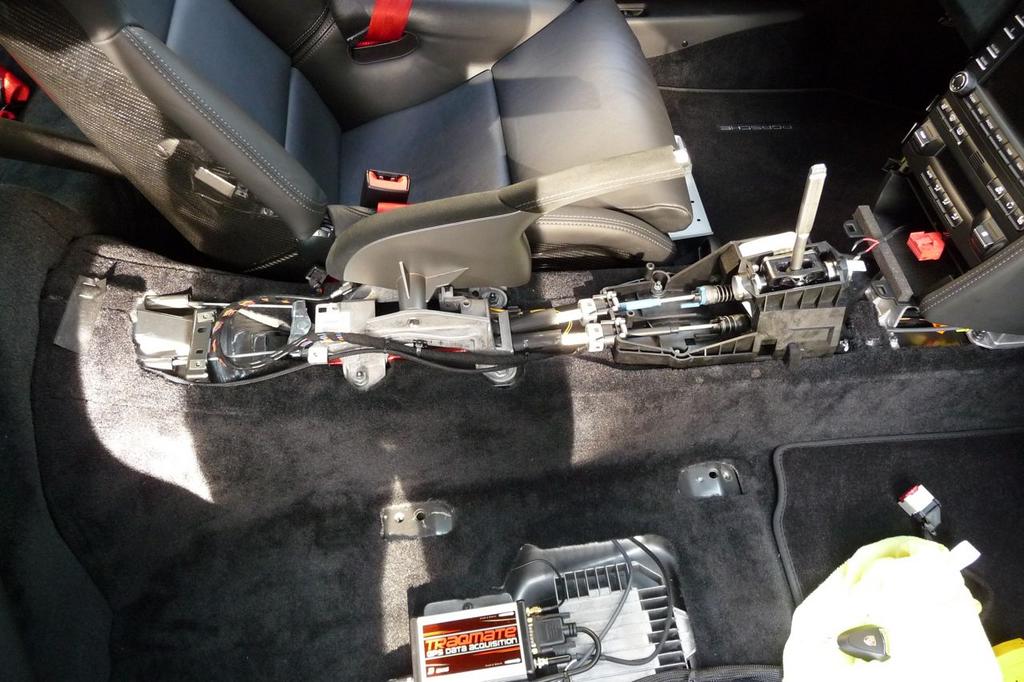
The Traqmate is tied into Gisele's electrical system to record engine RPMs, throttle position and braking. Here you can see the wire harness running along the center console to the ECU at the rear of the car.
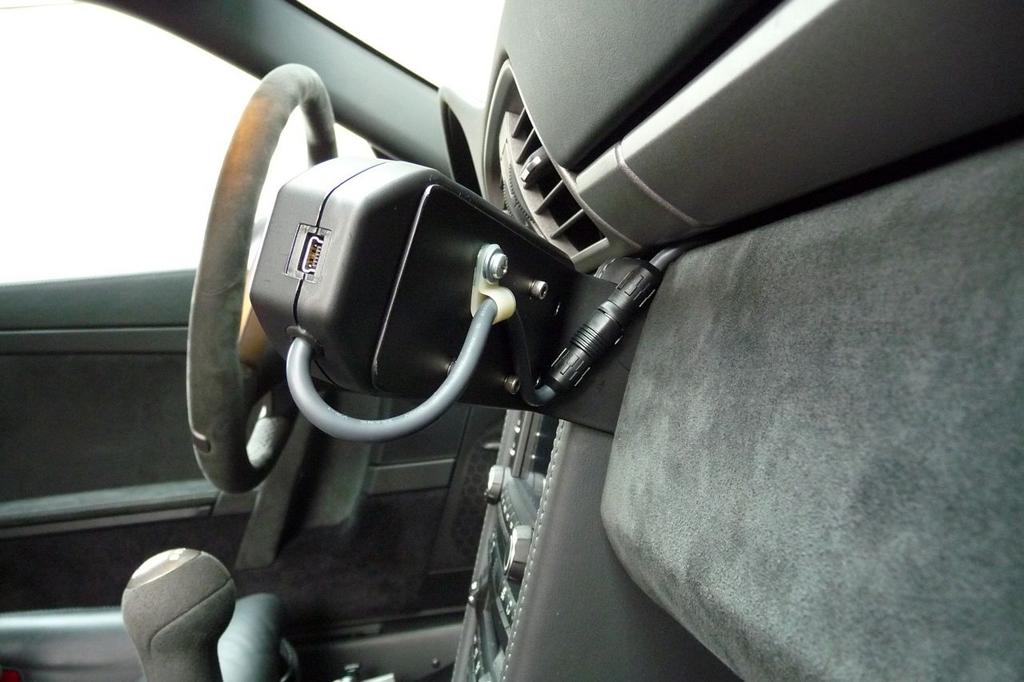
The display unit is mounted to custom bracket that Joe made from my drawing and cardboard mock-up.

It mounts to the interior of the glove box. The display unit's cable runs between the glove box and the leather side panel of the center console and back to the main module underneath the passenger seat.
Here you can see the custom bracket Joe made to hold the main module and the camera/input module.

The bracket is attached to the car's chassis. The modules are secured to the bracket with 3M "VHB" double sided tape. This keeps them relatively out of harms way and they won't slide around, so the accuracy of accelerometers (measuring G forces, as well as lateral acceleration) is assured.
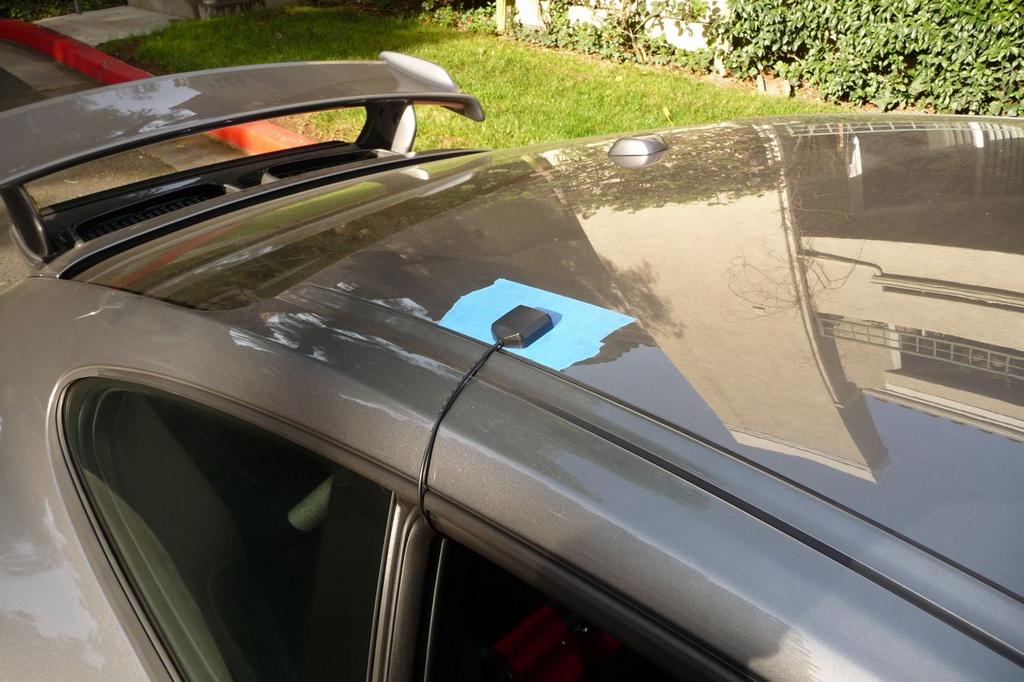
I purchased the magnetic version of Traqmate's GPS receiver, so it is simply mounted to the cars roof during track sessions. Painters tape protects the cars paint.
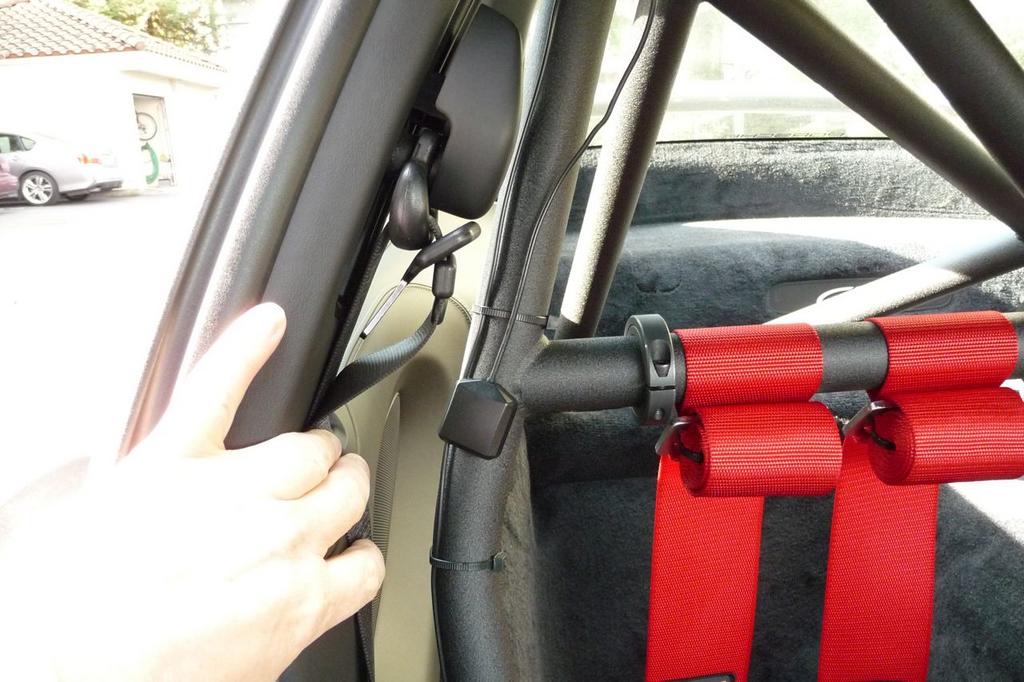
When I'm not at the track, the GPS receiver merely attaches to the rollbar (it's steel - perfect for a magnet!).
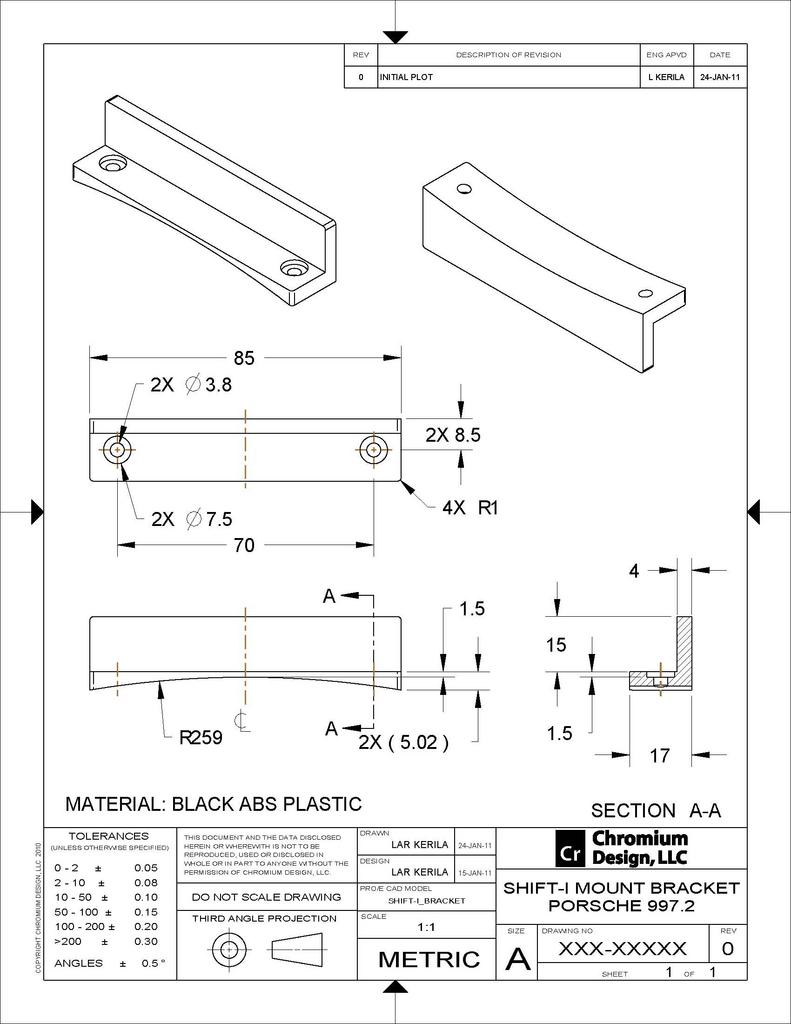
The Shift-I light is a fully customizable shift indicator. It uses the same engine RPM wire as the Traqmate. I designed a custom bracket to fit perfectly on top of the contour of the steering column cowling.
The wire harness tucks down into the dash along the column.
Mikymu's sound switch DIY is well documented here:
https://rennlist.com/forums/997-gt2-...inger-tip.html
The only major revision to his installation is the connection at the engine bay. Joe sourced the actual connector for a perfect factory connection (connector, crimp terminals and rubber boot). He also used high-temperature wire for the portion of the harness that resides in the engine bay (you don't want to start a fire because of the cheap wire you used on a DIY mod!).
Joe used heat shrink tubing on all the joints and connections throughout the entire installation. Mind you, not just ordinary shrink tubing - but the type of tubing with glue in it so that it bonds to the wire and/or sleeving to keep it securely in place. This also makes those joints more water proof as well. Just an extra measure of security!
The best part about taking it to TC Design (as if all this wasn't enough already!) was that Joe spent time with me to explain how to use the Traqmate system. From how to turn it on and off at the track, to how to get the data into my computer, to helpful tips on how to analyize the data to make the best use of it.
I couldn't be happier with the whole set-up. It was well worth the time and effort and it was a pleasantly surprising experience to work with a shop who's commitment to quality and customer satisfaction is without peer. I'm a perfectionist and I've met my match! TC Design FTW!!!
http://www.tcdesignfab.com/
First of all, I need to thank many of you for your hard work in posting DIYs and write-ups of your own installations. I am merely standing on the shoulders of giants! Mikymu for your numerous and excellent DIYs on many of the topics that helped me; TRAKCAR for photos and inspiration of your Traqmate installation, especially the display unit bracket; and RSS (Road Sport Supply) in Costa Mesa for the cool work-in-progress photos they posted showing a Shift-I light and the custom mounting bracket they made for a car they nicknamed "the Colonel".
My goal was to make the installation of all these items as close to factory as possible. Everything had to be mounted as robustly as possible; hardwired, with the cable harnesses sleeved in a protective sheath and crimped connections where ever possible for maximum reliablity; and routed in the car so as to not be visible and to protect them from wear and tear.
After having done all the research, wiring diagrams, leg work on sourcing parts and products, and designing the custom parts, I decided that the scope of the actual installation was more than I was willing to take on at the time. Besides, I had a track event coming up soon, and I wanted to be able to make use of all this cool stuff! I decided I needed to tap a professional shop with experience in data acquisition. So, I contacted TC Design in San Jose. Joe Colicchio at TC Design has vast experience in all the areas I needed help in, and Joe stepped up to the plate, and then went even beyond my expectations! I took out the passenger seat and the center console. Here are the links to my DIYs on those topics:
https://rennlist.com/forums/997-gt2-...moval-diy.html
https://rennlist.com/forums/997-gt2-...moval-diy.html
I then drove the car over to TC Design to let Joe work his magic.
The Traqmate is tied into Gisele's electrical system to record engine RPMs, throttle position and braking. Here you can see the wire harness running along the center console to the ECU at the rear of the car.
The display unit is mounted to custom bracket that Joe made from my drawing and cardboard mock-up.
It mounts to the interior of the glove box. The display unit's cable runs between the glove box and the leather side panel of the center console and back to the main module underneath the passenger seat.
Here you can see the custom bracket Joe made to hold the main module and the camera/input module.
The bracket is attached to the car's chassis. The modules are secured to the bracket with 3M "VHB" double sided tape. This keeps them relatively out of harms way and they won't slide around, so the accuracy of accelerometers (measuring G forces, as well as lateral acceleration) is assured.
I purchased the magnetic version of Traqmate's GPS receiver, so it is simply mounted to the cars roof during track sessions. Painters tape protects the cars paint.
When I'm not at the track, the GPS receiver merely attaches to the rollbar (it's steel - perfect for a magnet!).
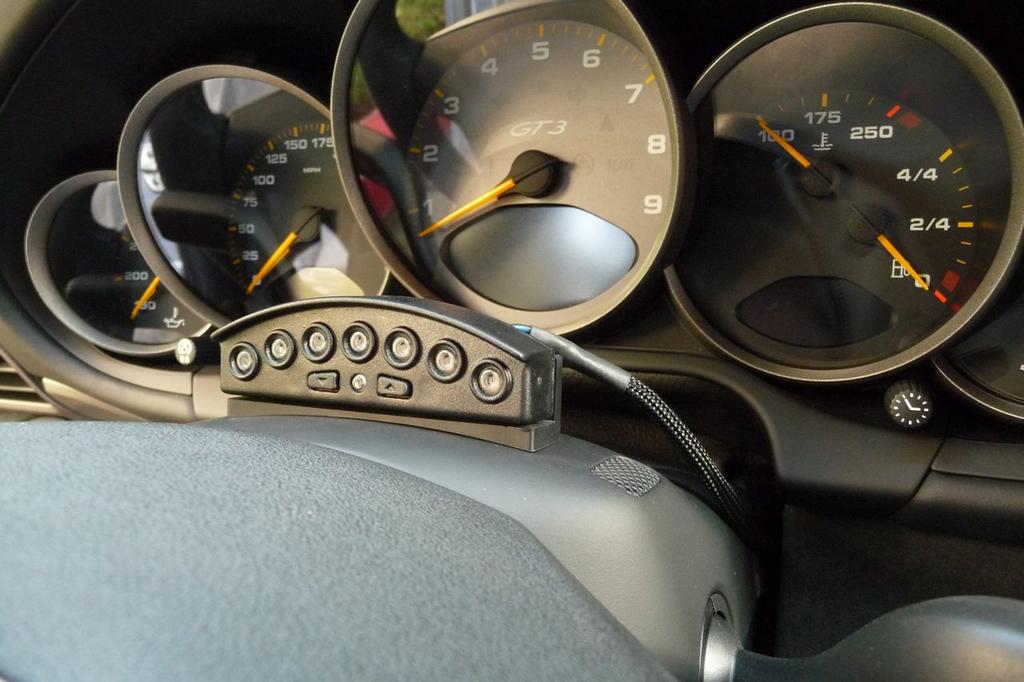
The Shift-I light is a fully customizable shift indicator. It uses the same engine RPM wire as the Traqmate. I designed a custom bracket to fit perfectly on top of the contour of the steering column cowling.
The wire harness tucks down into the dash along the column.
Mikymu's sound switch DIY is well documented here:
https://rennlist.com/forums/997-gt2-...inger-tip.html
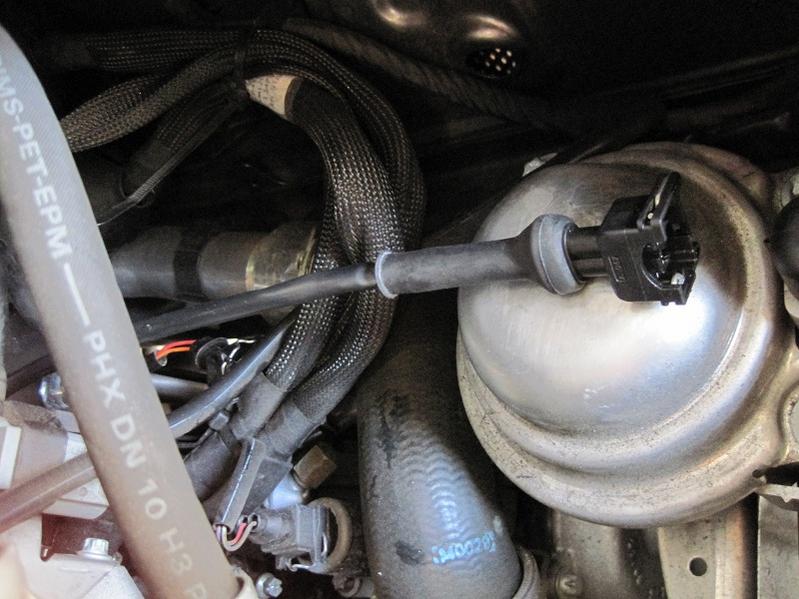
The only major revision to his installation is the connection at the engine bay. Joe sourced the actual connector for a perfect factory connection (connector, crimp terminals and rubber boot). He also used high-temperature wire for the portion of the harness that resides in the engine bay (you don't want to start a fire because of the cheap wire you used on a DIY mod!).
Joe used heat shrink tubing on all the joints and connections throughout the entire installation. Mind you, not just ordinary shrink tubing - but the type of tubing with glue in it so that it bonds to the wire and/or sleeving to keep it securely in place. This also makes those joints more water proof as well. Just an extra measure of security!
The best part about taking it to TC Design (as if all this wasn't enough already!) was that Joe spent time with me to explain how to use the Traqmate system. From how to turn it on and off at the track, to how to get the data into my computer, to helpful tips on how to analyize the data to make the best use of it.
I couldn't be happier with the whole set-up. It was well worth the time and effort and it was a pleasantly surprising experience to work with a shop who's commitment to quality and customer satisfaction is without peer. I'm a perfectionist and I've met my match! TC Design FTW!!!
http://www.tcdesignfab.com/
Last edited by 24Chromium; 02-03-2011 at 12:42 AM.
 02-03-2011, 12:05 AM
#2
GT3 player par excellence
Lifetime Rennlist
Member
Lifetime Rennlist
Member
TC design did my data install on my BSR as well.
now lar, i need you to fab some sort of angle plate for my TBD data system from apple.
now lar, i need you to fab some sort of angle plate for my TBD data system from apple.
02-03-2011, 01:02 AM
#3
Instructor

Join Date: Aug 2009
Location: Roseville, California
Posts: 248
Likes: 0
Received 0 Likes
on
0 Posts
Beautiful! Tastfully modded GT3. I want that car! ;>)
Would like to see the shift lights in action someday. If you could post a video that'd be great. I'm just wondering how the sight line is as far as being able to clearly recognize the lights during the times where 'eyes out' is predominant. Again, the car looks awesome.
Would like to see the shift lights in action someday. If you could post a video that'd be great. I'm just wondering how the sight line is as far as being able to clearly recognize the lights during the times where 'eyes out' is predominant. Again, the car looks awesome.
02-03-2011, 07:13 AM
#4
Rennlist Member
Lar, thank you for the kind words and another very cool DIY writeup!
My GPS antenna is routed (Don't know how, but I can find out) to the plastic part between the windshield and hood. Just glued on with double sided tape I think.
There is a nice flat part in between the wipers. It's black so no one ever notices it there and it makes it permanent.
My GPS antenna is routed (Don't know how, but I can find out) to the plastic part between the windshield and hood. Just glued on with double sided tape I think.
There is a nice flat part in between the wipers. It's black so no one ever notices it there and it makes it permanent.
02-03-2011, 09:09 AM
#5
Rennlist Member
You can actually put the antenna beneath the wiper cover motor area. Works perfect. I have sat radio and nav antennas mounted under there to a large metal cross. They're zip tied on to the brace. Receives a signal through the plastic with no issue whatsoever.
I'm a little disappointed that Chromium sourced out the labor I had hoped for a DIY article so I could attempt it. Looks like I'll be writing a check as well as I don't want to experiment. I have a bad habit of breaking things.
I'm a little disappointed that Chromium sourced out the labor
I had hoped for a DIY article so I could attempt it. Looks like I'll be writing a check as well as I don't want to experiment. I have a bad habit of breaking things.
02-03-2011, 09:19 AM
#7
Rennlist Member
Beautiful! Tastfully modded GT3. I want that car! ;>)
Would like to see the shift lights in action someday. If you could post a video that'd be great. I'm just wondering how the sight line is as far as being able to clearly recognize the lights during the times where 'eyes out' is predominant. Again, the car looks awesome.
Would like to see the shift lights in action someday. If you could post a video that'd be great. I'm just wondering how the sight line is as far as being able to clearly recognize the lights during the times where 'eyes out' is predominant. Again, the car looks awesome.
Trending Topics
02-03-2011, 10:01 AM
#8
Nordschleife Master
You can actually put the antenna beneath the wiper cover motor area. Works perfect. I have sat radio and nav antennas mounted under there to a large metal cross. They're zip tied on to the brace. Receives a signal through the plastic with no issue whatsoever.
I'm a little disappointed that Chromium sourced out the labor I had hoped for a DIY article so I could attempt it. Looks like I'll be writing a check as well as I don't want to experiment. I have a bad habit of breaking things.
I'm a little disappointed that Chromium sourced out the labor
I had hoped for a DIY article so I could attempt it. Looks like I'll be writing a check as well as I don't want to experiment. I have a bad habit of breaking things.
02-03-2011, 01:55 PM
#10
Drifting
Thread Starter
Join Date: Jul 2009
Location: Black Sheep Racing World HQ
Posts: 3,278
Likes: 0
Received 25 Likes
on
14 Posts
LOL
You're the second person to ask me for my brackets! I made mine myself.
But, I can source them for you. They are not cheap, though. $115 for the Shift-I bracket and $200 for the display unit bracket. PM me know if you want them and I can have them made and drop-shipped to you.
If I can get 4 people or more to commit, then the price goes down a lot. One-offs are expensive!
02-03-2011, 02:02 PM
#11
Drifting
Thread Starter
Join Date: Jul 2009
Location: Black Sheep Racing World HQ
Posts: 3,278
Likes: 0
Received 25 Likes
on
14 Posts
Only one track day, and already I rolled up the passenger window mistakenly, pinching the GPS receiver cable pretty good. I don't think that cable is going to survive for long with me doing that a few more times. Traqmate tells you that the part and cable is a "consumable", so beware.
I saw another RL'er had his GPS receiver mounted on the rear of the car, on the permanent portion of the body just below the rear window. Also a cool idea, but I chose not to do it this way for fear of it getting broken during car washes and such.
02-04-2011, 10:11 AM
#12
Rennlist Member
You can mount the antenna under the windshield wiper housing (the black plastic). No problems with reception there. I have sat radio and gps atennas zip tied to the metal cross bar under the plastic on the passenger side. Works great! You do have to obviously run the cable through the firewall.
07-25-2014, 10:59 AM
#13
Rennlist
Basic Site Sponsor
Basic Site Sponsor
Join Date: Jun 2008
Location: Durham, NC and Virginia International Raceway
Posts: 18,966
Received 3,066 Likes
on
1,794 Posts
Time for a TraqDash touch screen update! Bolt-in using your existing bracket!
__________________
-Peter Krause
www.peterkrause.net
www.gofasternow.com
"Combining the Art and Science of Driving Fast!"
Specializing in Professional, Private Driver Performance Evaluation and Optimization
Consultation Available Remotely and at VIRginia International Raceway
-Peter Krause
www.peterkrause.net
www.gofasternow.com
"Combining the Art and Science of Driving Fast!"
Specializing in Professional, Private Driver Performance Evaluation and Optimization
Consultation Available Remotely and at VIRginia International Raceway