

Exhaust sound control at your finger tip
 02-28-2010, 07:27 PM
#1
Addict
Rennlist Member
Rennlist Member
Thread Starter
It will be nice to control the loudness of our exhaust at our finger tip especially for those of us with after market exhaust or track time at Laguna Seca since it impose sound limit of 92 db. Wait, if you drive with the sport button off should solve the problem right? Well, no. Even with sport button off, the lower exhaust valve open up to allow better exhaust flow past 4K RPM. This is why you can't pass the 92 db sound limit at Laguna Seca even with stock exhaust and sport button off.
So far the only solution is manually connect the lower exhaust flap vacuum line together so the lower exhaust valve remained closed all the time which mute the exhaust by directing exhaust flow through all chamber of the two main side muffler. Restrict the exhaust flow lead to 8.2 lb-ft of torque and 9.3 hp loss but most importantly 17.2 lb-ft loss of torque at 4300 RPM but sometime you have to pay to play.
So I set out to find ways to make the exhaust flow control less painful and easy with a flip of a switch. First I need to know what voltage trigger the electronic vacuum valve and also find out ways to route the wire from driver compartment to engine compartment.
Blue collar way to manually close the lower exhaust flap as demonstrated by my earlier Laguna sound buster write up

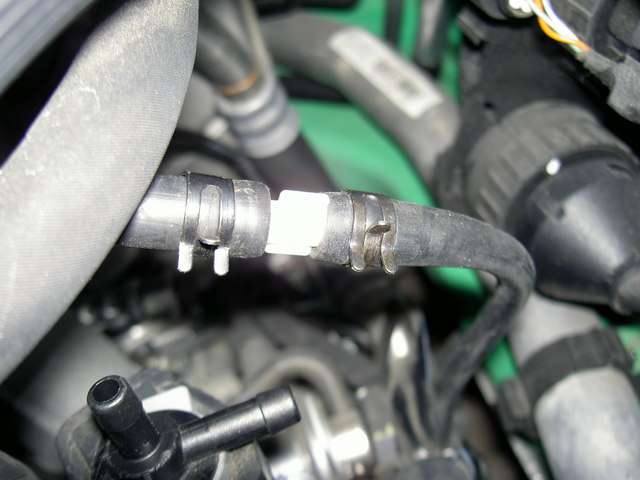
Let's tap into the electronic vacuum valve to find out what voltage turn it on and off
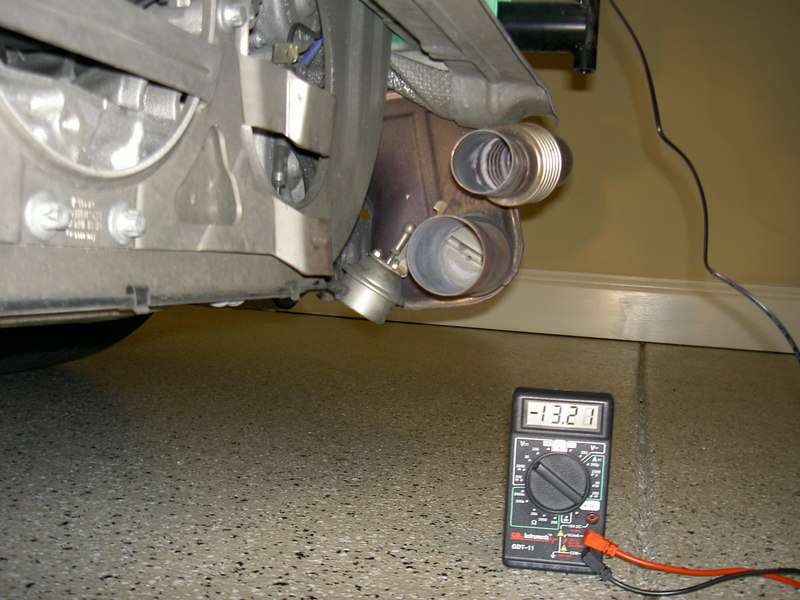
13 volts to the electronic vacuum switch close the lower exhaust flap. It turns out 12V from inside of the car also works
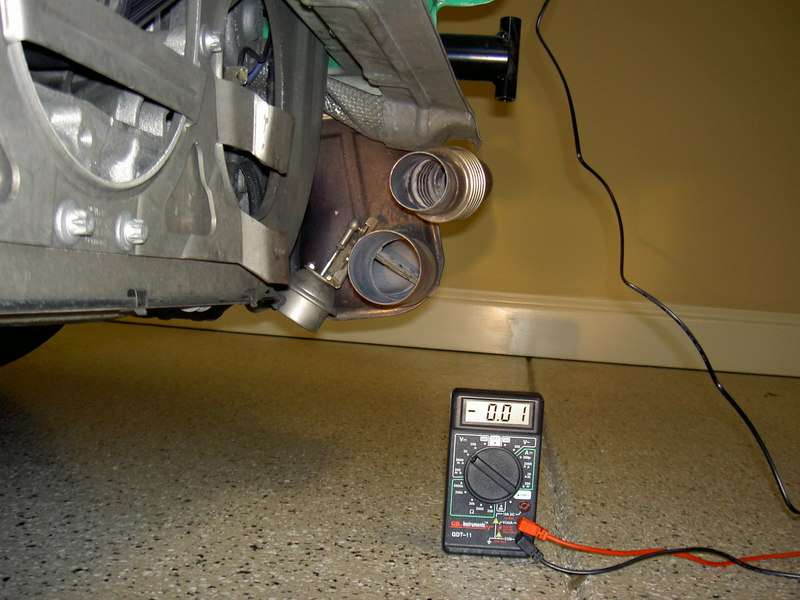
Zero volt turn the lower exhaust flap open regardless if you have sport button on or off
Here is a video of the lower exhaust flap in action with voltage change to the electronic vacuum valve
http://www.youtube.com/watch?v=3Bwyqg3NrTA
Now we need to find ways to control the electronic vacuum valve with a simple switch from inside of the car. Radio Shack is a great source for the occasion
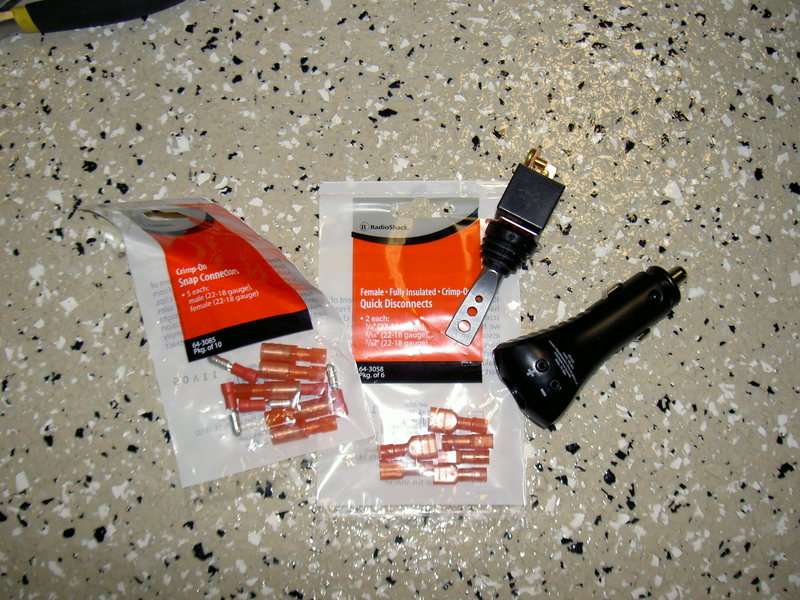
The 12 volt outlet on the passenger side is a good source for the juice needed to control the vacuum valve. A simple cigarette lighter plug does the job
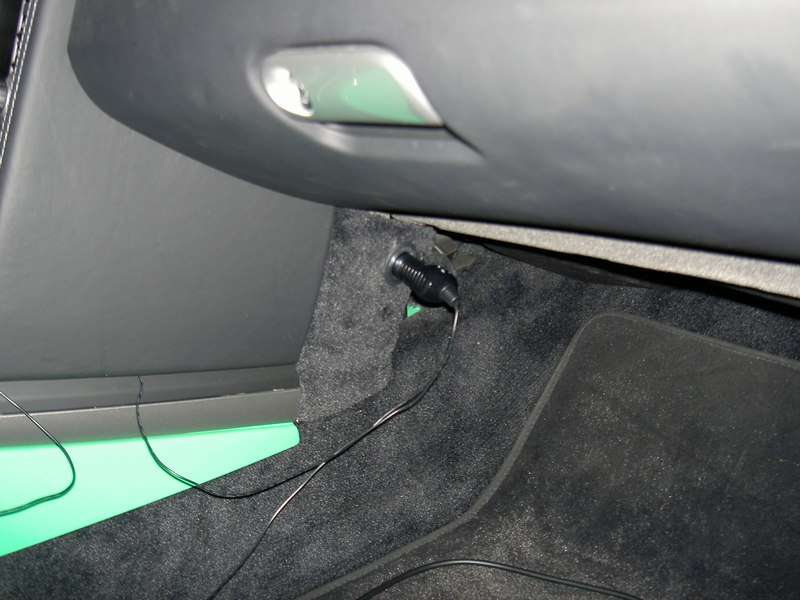
Lift the flat rear carpet and expose the panel that house the DME. Remove three 10 mm nut and lift the panel away to reveal a round plastic body plug. Remove the plug then you can gain access to the engine compartment.
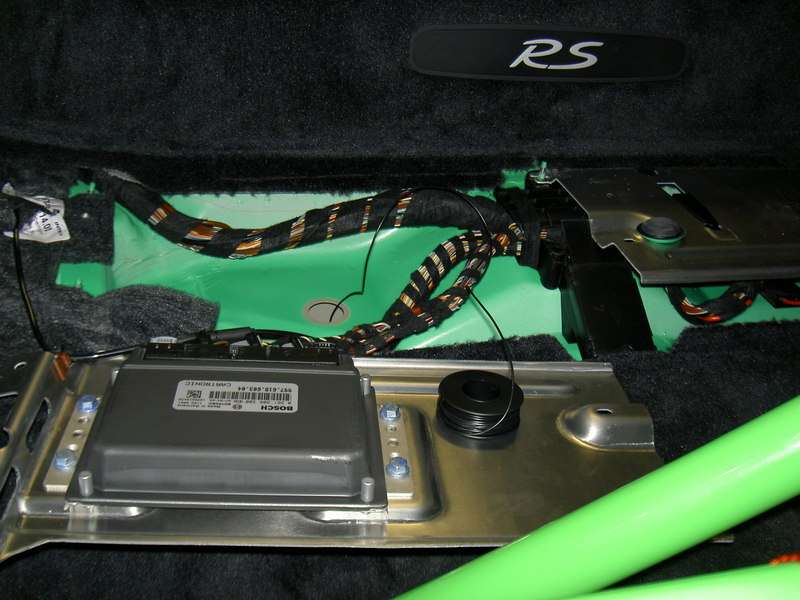
Thread the wires down through both round openings and it will pass next to the transmission
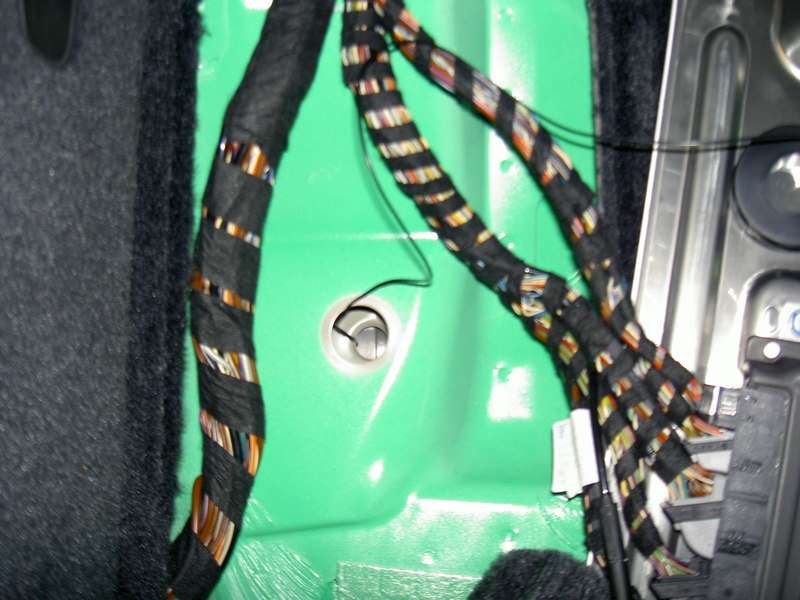
Route the wires to the electronic vacuum valve and try to avoid moving suspension parts and contact with the engine

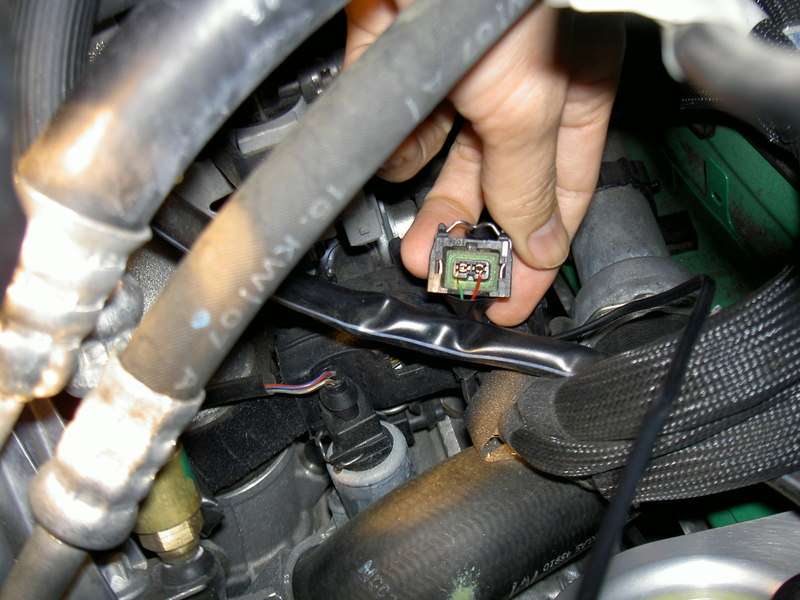
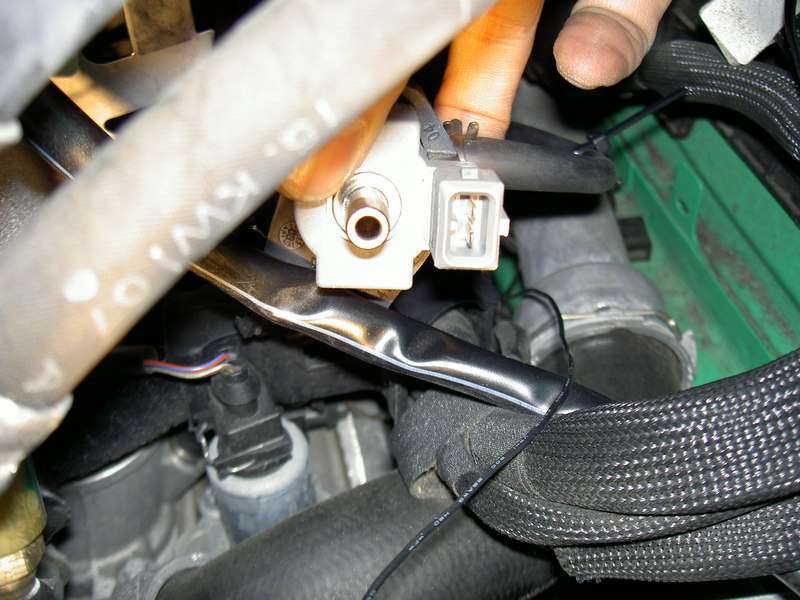
Lift up the electronic vacuum valve from the metal bracket. to reveal the under side of the plug receiver. I used two small insulated plugs and cup away the insulation at the top of the pug to make it fit in the vacuum valve plug receiver. I tested the polarity of the original plug and made sure the modified plugs also carry the same DC polarity. I don't know if the electronic vacuum valve can be damaged if polarity is switch around. Best to play it safe since they are $135 each to replace!

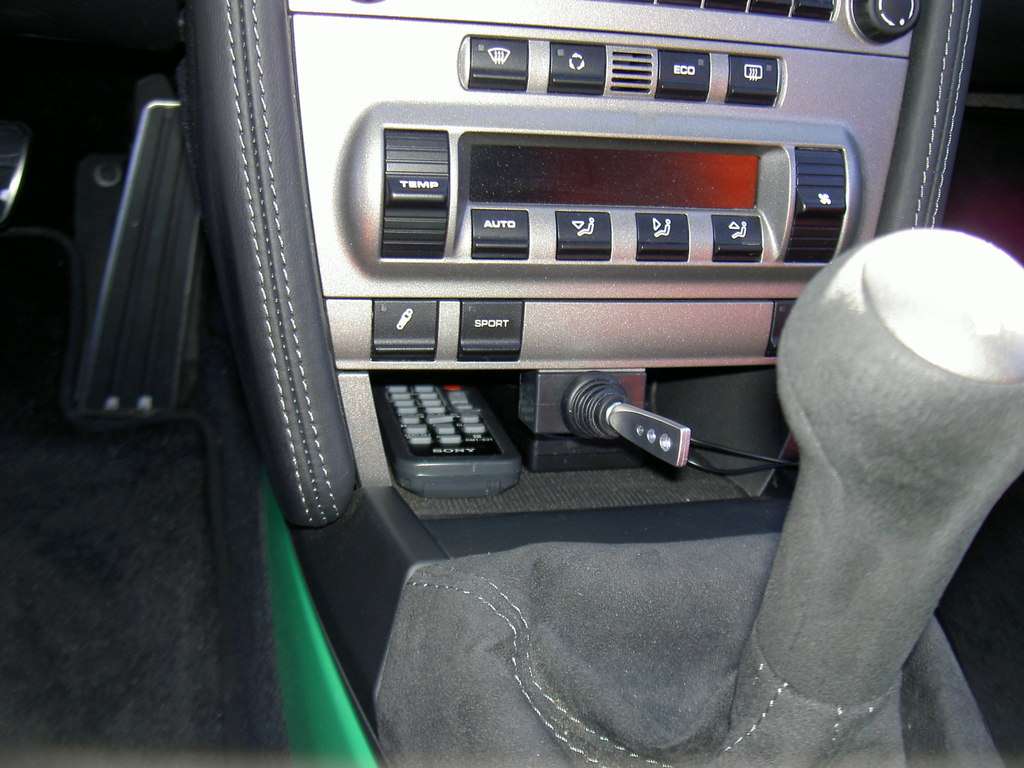
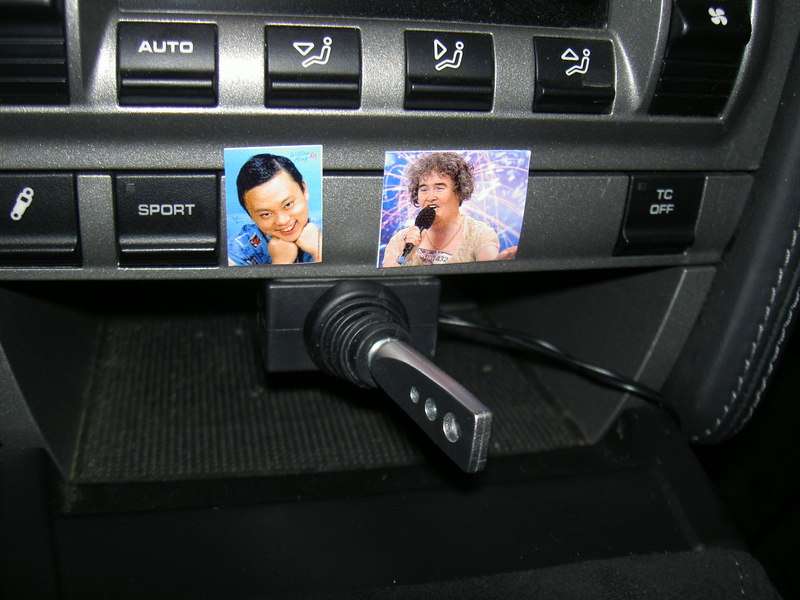
I used a simple on and off switch with a long handle that you can toggle from side to side. It was secure to the underside of the center console with double sided tape. These double sided tape can be had from any hardware store (I got mine form home depot) and it will not fall off. I had one heck of a time removing it to reposition the switch. The whole setup was perfect even on the track. Super easy to operate just by touch!
Here is a video demonstrating the switch operation
http://www.youtube.com/watch?v=rI_VFuACtjg
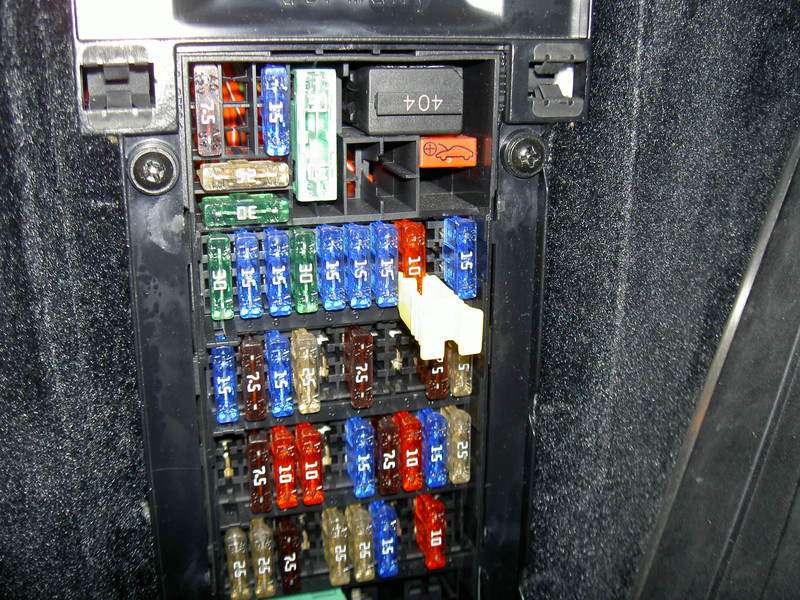
I had so much fun with this switch and kept on toggling back and froth driving to Laguna Seca couple days ago and end up burning the 12V outlet fuse lol. It did not help that both 12V outlet were being used in the same time (the other one was connected to traqmate). I swap out the 7.5A fuse with a beefier 10A fuse and switch my traqmate to the center console cigarette plug and had no issue with the fuse since. Here is a picture of the 12V power outlet fuse if you need to gain access. It is the one with the yellow fuse puller - I replaced it with a 10A fuse
Now we need to label the toggle switch to help ID the correct side for on and off operation. Right side = more power and sound. Left = quiet and less adrenaline. I made a few suggestion as follow
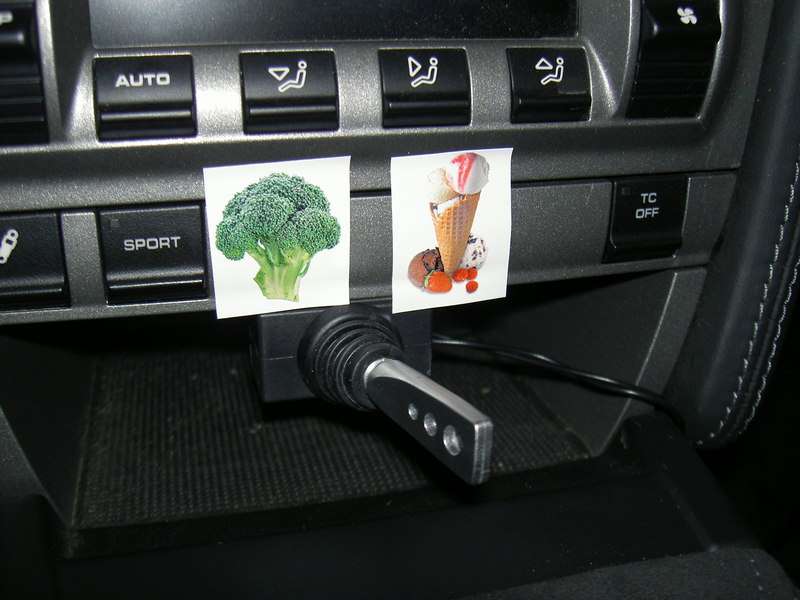

I think I like this one the best

So far I am super pleased with this in-car exhaust sound switch and it has been a blast! With a flip of a finger you can reduce the exhaust note for long trip comfort and Laguna Seca sound requirement. Toggle it back if you are trying to pass a CHP lol. This give us another option to control our exhaust note at the touch of our finger.
So far the only solution is manually connect the lower exhaust flap vacuum line together so the lower exhaust valve remained closed all the time which mute the exhaust by directing exhaust flow through all chamber of the two main side muffler. Restrict the exhaust flow lead to 8.2 lb-ft of torque and 9.3 hp loss but most importantly 17.2 lb-ft loss of torque at 4300 RPM but sometime you have to pay to play.
So I set out to find ways to make the exhaust flow control less painful and easy with a flip of a switch. First I need to know what voltage trigger the electronic vacuum valve and also find out ways to route the wire from driver compartment to engine compartment.
Blue collar way to manually close the lower exhaust flap as demonstrated by my earlier Laguna sound buster write up
Let's tap into the electronic vacuum valve to find out what voltage turn it on and off
13 volts to the electronic vacuum switch close the lower exhaust flap. It turns out 12V from inside of the car also works
Zero volt turn the lower exhaust flap open regardless if you have sport button on or off
Here is a video of the lower exhaust flap in action with voltage change to the electronic vacuum valve
http://www.youtube.com/watch?v=3Bwyqg3NrTA
Now we need to find ways to control the electronic vacuum valve with a simple switch from inside of the car. Radio Shack is a great source for the occasion
The 12 volt outlet on the passenger side is a good source for the juice needed to control the vacuum valve. A simple cigarette lighter plug does the job
Lift the flat rear carpet and expose the panel that house the DME. Remove three 10 mm nut and lift the panel away to reveal a round plastic body plug. Remove the plug then you can gain access to the engine compartment.
Thread the wires down through both round openings and it will pass next to the transmission
Route the wires to the electronic vacuum valve and try to avoid moving suspension parts and contact with the engine
Lift up the electronic vacuum valve from the metal bracket. to reveal the under side of the plug receiver. I used two small insulated plugs and cup away the insulation at the top of the pug to make it fit in the vacuum valve plug receiver. I tested the polarity of the original plug and made sure the modified plugs also carry the same DC polarity. I don't know if the electronic vacuum valve can be damaged if polarity is switch around. Best to play it safe since they are $135 each to replace!
I used a simple on and off switch with a long handle that you can toggle from side to side. It was secure to the underside of the center console with double sided tape. These double sided tape can be had from any hardware store (I got mine form home depot) and it will not fall off. I had one heck of a time removing it to reposition the switch. The whole setup was perfect even on the track. Super easy to operate just by touch!
Here is a video demonstrating the switch operation
http://www.youtube.com/watch?v=rI_VFuACtjg
I had so much fun with this switch and kept on toggling back and froth driving to Laguna Seca couple days ago and end up burning the 12V outlet fuse lol. It did not help that both 12V outlet were being used in the same time (the other one was connected to traqmate). I swap out the 7.5A fuse with a beefier 10A fuse and switch my traqmate to the center console cigarette plug and had no issue with the fuse since. Here is a picture of the 12V power outlet fuse if you need to gain access. It is the one with the yellow fuse puller - I replaced it with a 10A fuse
Now we need to label the toggle switch to help ID the correct side for on and off operation. Right side = more power and sound. Left = quiet and less adrenaline. I made a few suggestion as follow
I think I like this one the best
So far I am super pleased with this in-car exhaust sound switch and it has been a blast! With a flip of a finger you can reduce the exhaust note for long trip comfort and Laguna Seca sound requirement. Toggle it back if you are trying to pass a CHP lol. This give us another option to control our exhaust note at the touch of our finger.
Last edited by mikymu; 03-09-2010 at 04:05 PM.
 03-01-2010, 12:33 AM
#4
GT3 player par excellence
Lifetime Rennlist
Member
Lifetime Rennlist
Member
03-01-2010, 01:40 AM
#5
Addict
Rennlist Member
Rennlist Member
Thread Starter
I brought my kids to Laguna for the ALMS race thinking same sound restriction will apply and I was so wrong! I had to cover my sons ears the whole time. My exhaust is always on mute ... your kids are safe

now with this mod any GT3/RS will pass sound
 03-01-2010, 01:49 AM
#6
Drifting

Mikymu, I'm loving your DIY articles!! How hard is it to remove the carpet on the rear deck above the ECU? I'm thinking of mounting the data acquisition ECU down there and will need access to the unit to hook up the dash at track events. Wondering if it's a pain to remove the carpet or if it's trivial.
Thanks!
Thanks!
03-01-2010, 02:27 AM
#7
Addict
Rennlist Member
Rennlist Member
Thread Starter
Mikymu, I'm loving your DIY articles!! How hard is it to remove the carpet on the rear deck above the ECU? I'm thinking of mounting the data acquisition ECU down there and will need access to the unit to hook up the dash at track events. Wondering if it's a pain to remove the carpet or if it's trivial.
Thanks!
Thanks!
It is super easy. The carpet cover can be easily removed by lifting up the center portion and the carpet piece will fold slightly and out it comes. It will go in the same way. Hope that helps
Mike
Trending Topics
03-01-2010, 03:11 AM
#8
Advanced
Join Date: Jul 2009
Posts: 55
Likes: 0
Received 0 Likes
on
0 Posts
You have the most useful mods. Unfortunately I won't be able to do this before the next event at Laguna Seca March 4&5. As you noted, I got a black flag at 95.9 dB. Short shifting to 4th and reducing throttle got me through the next four sessions safely.
Mike
Mike
03-01-2010, 03:35 AM
#9
Addict
Rennlist Member
Rennlist Member
Thread Starter
03-02-2010, 04:21 AM
#11
Addict
Rennlist Member
Rennlist Member
Thread Starter
06-02-2010, 01:36 AM
#12
Rennlist Member

Join Date: Nov 2009
Location: Seattle
Posts: 351
Likes: 0
Received 0 Likes
on
0 Posts
I made this mod over the weekend and have to say it was the best $30 and 4 hours I could have spent. I took apart the center console and hid all the wires appropriately. Once installed you can barely notice anything different from the appearance...but the sound...oh the sound!
I was tired of pulling the plug when I wanted the car to be a bit louder and then wound up not being able to take a call or keep the police from staring, so I figured I'd give this a shot and see how it worked. Well, it's perfect. Now, at the flick of a switch I can have the untamed beast from 0-redline. I have the RSS exhaust bypass and it's got a great sound uncorked. When I am on a call or my wife is in the car with me, I keep the exhaust closed and it remains relatively quiet (for a GT3). So now I have the best of both worlds with the flip of a switch, rather than having to drive the car in a certain manner based on the occasion.
Thanks for the post Mikymu!
 06-02-2010, 03:09 PM
#15
Racer
Join Date: Dec 2009
Location: norcal
Posts: 394
Likes: 0
Received 0 Likes
on
0 Posts
Mikymu you did not have an '04 VW R32 previously did you? Similar procedure for modifying the flapper valve actuation, although I used the cheap $1 beer clamp method to pinch the vacuum line that controlled the exhaust flapper when I wanted it loud/more torque throughout the rev range. Nice work!