

New Vendor Intro: Heavy Knobs

Three Wheelin'
Joined: Feb 2017
Posts: 1,870
Likes: 367
From: San Diego <->Knoxville
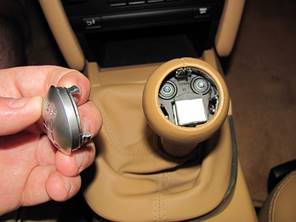
http://billswebspace.com/Porsche987ShortShiftDIYNOTE:Several forum members were nice enough to point out that the shift **** can be removed in one piece, I was following someone else�s guide to remove the **** and didn�t think twice about it. Several good comments and pictures on this forum thread to replace below step highlighted in RED in order to remove shift ****/boot in one piece. In summary, you can skip the below step and just pull straight up on the **** AFTER rotating the boot as illustrated in the next step.
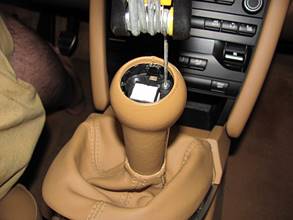
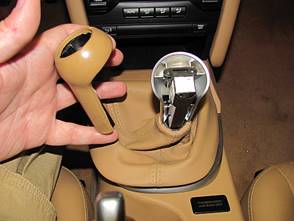
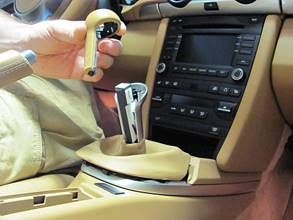
Next, I used a small pick to remove the shifter cap by carefully prying up to release clips. Two small screws are removed using a T9 Torx driver (I actually did not have a driver that small so I had to make do with a multi-tool). After the two small screws are removed the rear shifter piece can be removed by pulling back, up, and out:
Pro

Joined: Apr 2020
Posts: 580
Likes: 166
From: Sugar Land Texas
What did you use the remove the plastic cap? The plastic interior tools? I'm going to try this method.
http://billswebspace.com/Porsche987ShortShiftDIYNOTE:Several forum members were nice enough to point out that the shift **** can be removed in one piece, I was following someone else�s guide to remove the **** and didn�t think twice about it. Several good comments and pictures on this forum thread to replace below step highlighted in RED in order to remove shift ****/boot in one piece. In summary, you can skip the below step and just pull straight up on the **** AFTER rotating the boot as illustrated in the next step.
Next, I used a small pick to remove the shifter cap by carefully prying up to release clips. Two small screws are removed using a T9 Torx driver (I actually did not have a driver that small so I had to make do with a multi-tool). After the two small screws are removed the rear shifter piece can be removed by pulling back, up, and out:
blade opposite the 6.
Had to really jam it down at 45 degrees and pried very gently upwards. When the cap started to separate, I put the second driver in ant it came out easily.


The shift cap was in terrible shape, so I am attempting to paint it silver, guards red shift pattern.
Last edited by David Berry; Apr 8, 2021 at 07:23 PM.

Thread Starter
Former Vendor
Joined: Mar 2021
Posts: 238
Likes: 63
If anyone's thinking it - simply adding "weight" to the rod won't work because you need to be able to add mass at the top of the ****, rather than the base.
Thread Starter
Former Vendor
Joined: Mar 2021
Posts: 238
Likes: 63
What did you use the remove the plastic cap? The plastic interior tools? I'm going to try this method.
http://billswebspace.com/Porsche987ShortShiftDIYNOTE:Several forum members were nice enough to point out that the shift **** can be removed in one piece, I was following someone else�s guide to remove the **** and didn�t think twice about it. Several good comments and pictures on this forum thread to replace below step highlighted in RED in order to remove shift ****/boot in one piece. In summary, you can skip the below step and just pull straight up on the **** AFTER rotating the boot as illustrated in the next step.
http://billswebspace.com/Porsche987ShortShiftDIYNOTE:Several forum members were nice enough to point out that the shift **** can be removed in one piece, I was following someone else�s guide to remove the **** and didn�t think twice about it. Several good comments and pictures on this forum thread to replace below step highlighted in RED in order to remove shift ****/boot in one piece. In summary, you can skip the below step and just pull straight up on the **** AFTER rotating the boot as illustrated in the next step.
Fear not however - I'll post updated instructions prior to everyone getting their sets.

Rennlist Member
Joined: May 2013
Posts: 1,530
Likes: 568
From: North/Central, NJ
Come on, if your complaining about $115 for a specifically engineered product for a Porsche then maybe you should not be driving one. This guy went to a lot of trouble to develop this and we should be appreciative.

Racer

Joined: Dec 2011
Posts: 289
Likes: 187
I�m not complaining, nor did I mean any disrespect. It just seemed like a lot for what it is.
Thread Starter
Former Vendor
Joined: Mar 2021
Posts: 238
Likes: 63
I've been on this board since 2005 and owned quite a few Porsches - I've seen all the vendors, gone through all the parts and done no shortage of mods.
At the end of the day there are a few things I set out to do:
1) Solve a problem that everyone was experiencing but where no one had sought to seek out the root cause
2) Design a solution that was inherently unique and got to the core of the problem - in this case the feel of shift *****, but that most people did not want to go the aftermarket route for
3) Build something that I designed from the ground up myself, and produced in the United States. No outsourcing, no cost cutting, no mass volume here.
4) Produce it at a price point that was a no brainer for the value it delivered - and I stand by this. My material and manufacturing costs may fluctuate, but I'm confident that most people on here will be able to afford $115 or so for a product that does so much in so little. I'm sure of that - almost 50k of driving my 911 and spending 13 years on this forum, I have enough data points to justify this. Oh, and I make stuff for a living, so maybe that helps.
Rennlist Member
Joined: Oct 2018
Posts: 660
Likes: 286
From: Richmond Hill, Ontario
Hey, I get it.
I've been on this board since 2005 and owned quite a few Porsches - I've seen all the vendors, gone through all the parts and done no shortage of mods.
At the end of the day there are a few things I set out to do:
1) Solve a problem that everyone was experiencing but where no one had sought to seek out the root cause
2) Design a solution that was inherently unique and got to the core of the problem - in this case the feel of shift *****, but that most people did not want to go the aftermarket route for
3) Build something that I designed from the ground up myself, and produced in the United States. No outsourcing, no cost cutting, no mass volume here.
4) Produce it at a price point that was a no brainer for the value it delivered - and I stand by this. My material and manufacturing costs may fluctuate, but I'm confident that most people on here will be able to afford $115 or so for a product that does so much in so little. I'm sure of that - almost 50k of driving my 911 and spending 13 years on this forum, I have enough data points to justify this. Oh, and I make stuff for a living, so maybe that helps.
Pro
Joined: Feb 2015
Posts: 551
Likes: 186
From: Chino Hills
I understand you. Just put 4 oz (112 g additional weight) of tungsten putty neatly into the same empty spaces for ($8 per oz) to achieve the same outcome. The putty is really easy to work with into the space and has the same density as lead (non toxic). Brass has density of 8.73 g/cm3 and tungsten putty is 10 g/cm3. Pure tungsten is even denser at 17.3 g/cm3. Pine Derby crowds and the fishing community have been using this heavy putty for years. I didn't want to comment earlier out of respect for the new vendor, but now I do see the need to share the info as $115 may still be out of comfort for a lot of folks. Just consider this as a "bush mod" if you want, but do support the OP if you have the means. I have to say that the OP does have a very nice looking product and took the initiative to invest and invent. Kudos to him.
Last edited by speedracerf4i; Apr 9, 2021 at 07:00 PM.
Thread Starter
Former Vendor
Joined: Mar 2021
Posts: 238
Likes: 63
^ there are always alternatives much more in the DIY realm of things. And I respect that.
You can remove your mufflers, drop them off at a shop, instruct them what to weld, bring the muffler home and then install it - or you can call up Fister and do a core exchange without the manual effort. You might save maybe 30% doing it yourself, but for many of us with the fortune of driving these cars, time is precious.
I've also tested different putties, metal powders, metal powder infused plastics, and at the end of the day this was the simplest plug and play solution worth doing - but really, valuable at the end of the day for those willing to buy the product. With any product development there has to be a balance of how much value is delivered to the end user and the amount of effort invested to bring that thing to fruition.
For most who have not taken these ***** apart, there are lots of nooks and crannies inside where if you stick a putty or paste inside, will make it a PITA to remove/scrape out. Most folks with beautiful carbon/leather/wood/alcantara ***** probably don't want to risk getting goop anywhere near those surfaces, which is where Heavy ***** makes it brainless to use.
But to reiterate how much time and effort went into this process, the cost of purchasing all the different iterations of Porsche ***** and assessing what works and what doesn't, testing different manufacturing methods, and not to mention having spun up a reliable process to cast these out of metal... below is just a snapshot of some of that effort:
sb0V1eZ.jpg
At the end of the day - I love constructive input from folks and that's why I'm happy to also be engaged in this dialogue.
Cheers!
Rennlist Member
Joined: May 2013
Posts: 1,530
Likes: 568
From: North/Central, NJ
I understand you. Just put 4 oz (112 g additional weight) of tungsten putty neatly into the same empty spaces for ($8 per oz) to achieve the same outcome. The putty is really easy to work with into the space and has the same density as lead (non toxic). Brass has density of 8.73 g/cm3 and tungsten putty is 10 g/cm3. Pure tungsten is even denser at 17.3 g/cm3. Pine Derby crowds and the fishing community have been using this heavy putty for years. I didn't want to comment earlier out of respect for the new vendor, but now I do see the need to share the info as $115 may still be out of comfort for a lot of folks. Just consider this as a "bush mod" if you want, but do support the OP if you have the means. I have to say that the OP does have a very nice looking product and took the initiative to invest and invent. Kudos to him.
Thread Starter
Former Vendor
Joined: Mar 2021
Posts: 238
Likes: 63