When you click on links to various merchants on this site and make a purchase, this can result in this site earning a commission. Affiliate programs and affiliations include, but are not limited to, the eBay Partner Network.
Double-Din Stereo Install Retaining Bose & MOST Interface (Long)
TThis writeup describes the steps to integrate a Double-DIN carplay unit while still retaining the factory Bose amp/speakers with the MOST fiber-optic interface in my '03 996TT.
Parts Required
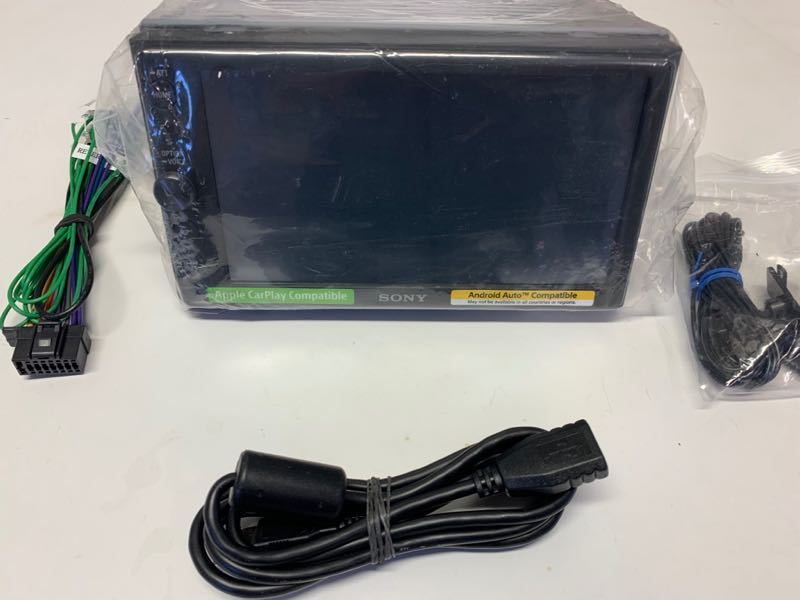
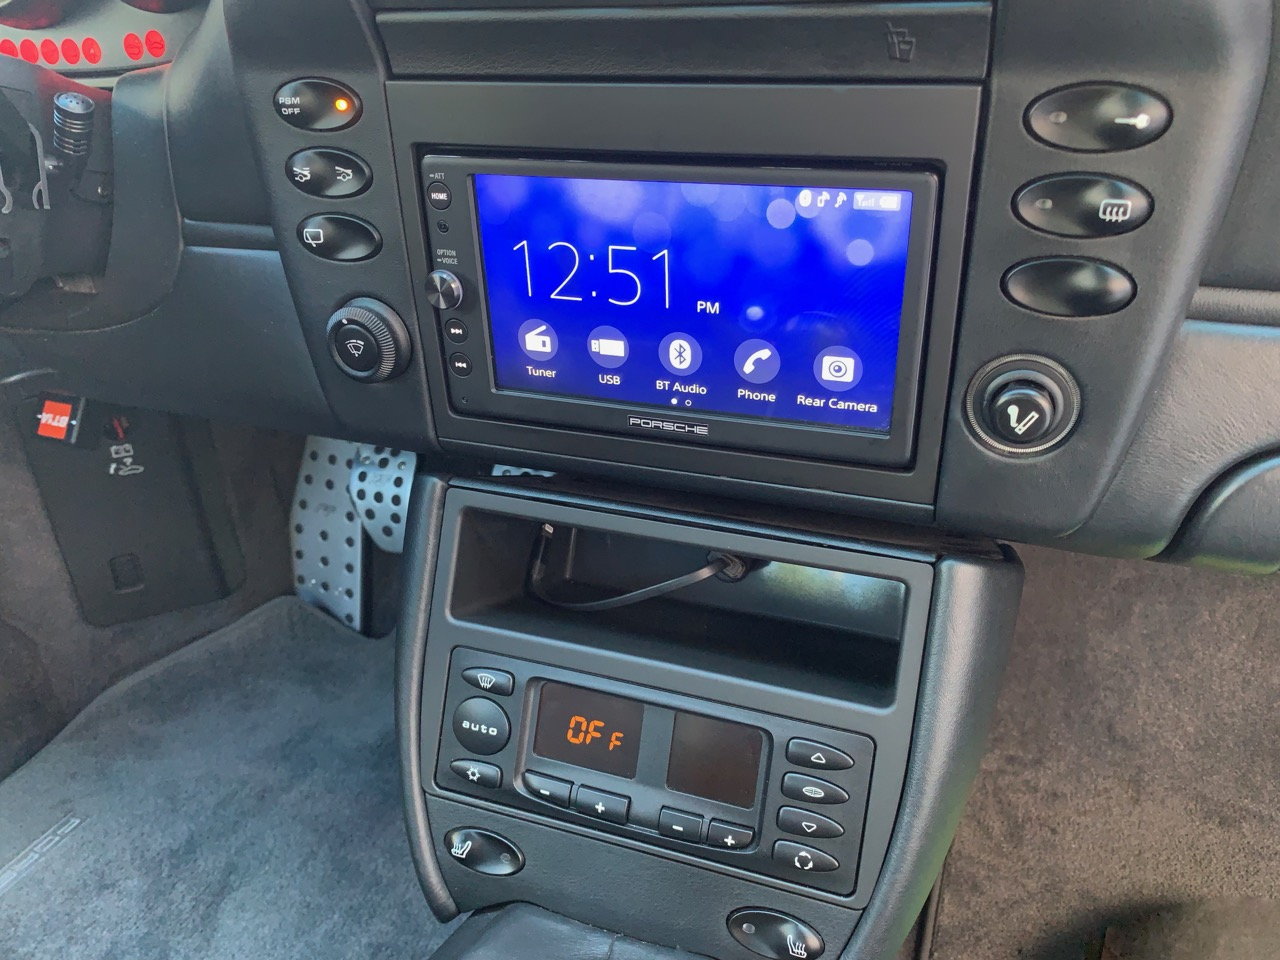
I went with a Sony XAV-AX100 unit as it had CarPlay and, importantly, a volume ****. The buttons, etc., also match pretty well against the look of the dash.
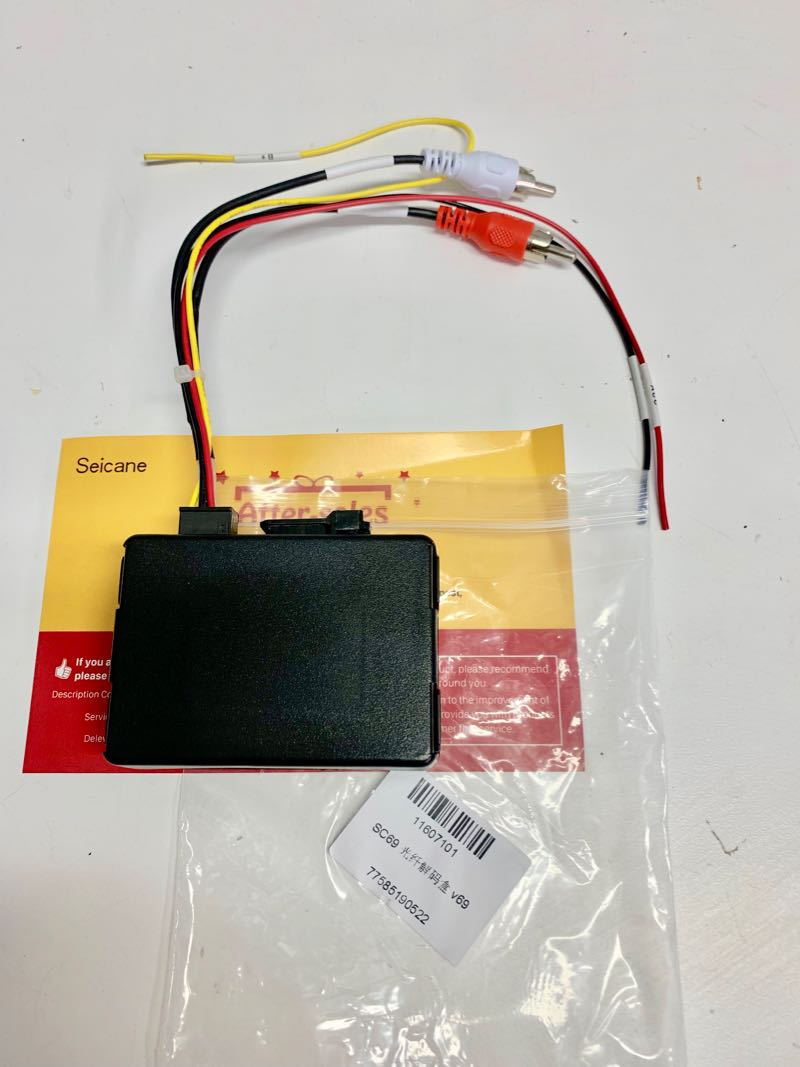
Seicane SC69 2003-2012 Porsche Cayenne Car Optical Fiber Decoder Most Box Bose Harmon Kardon Digital Audio Amplifier Optic Interface Converter
To convert the analog RCA output from the radio to optical. It says it's for Cayenne, but it works for 911 too.
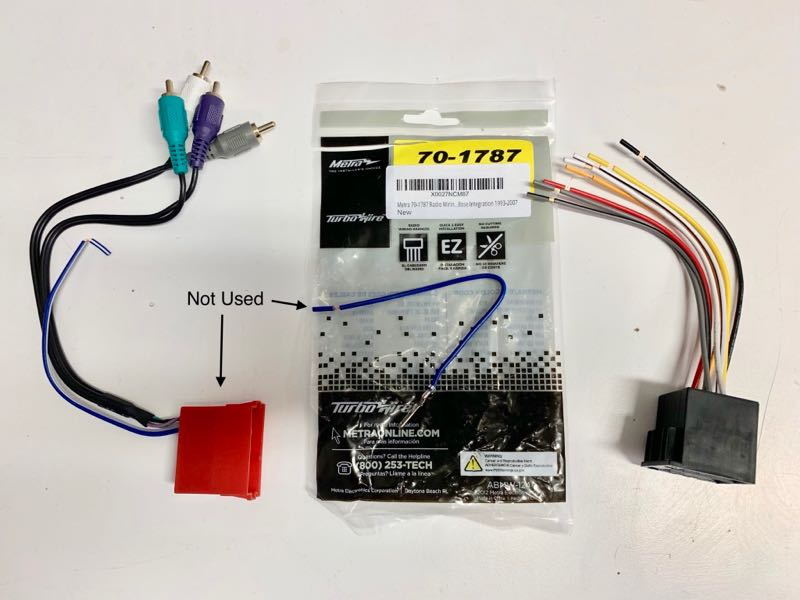
Metra 70-1787 Radio Wiring Harness for VW/Audi Bose Integration 1993-2007
This harness fits between the radio harness and the OEM harness so you don't need to cut into the factory wiring. Only the one on the right is required. It also requires some rewiring discussed below.
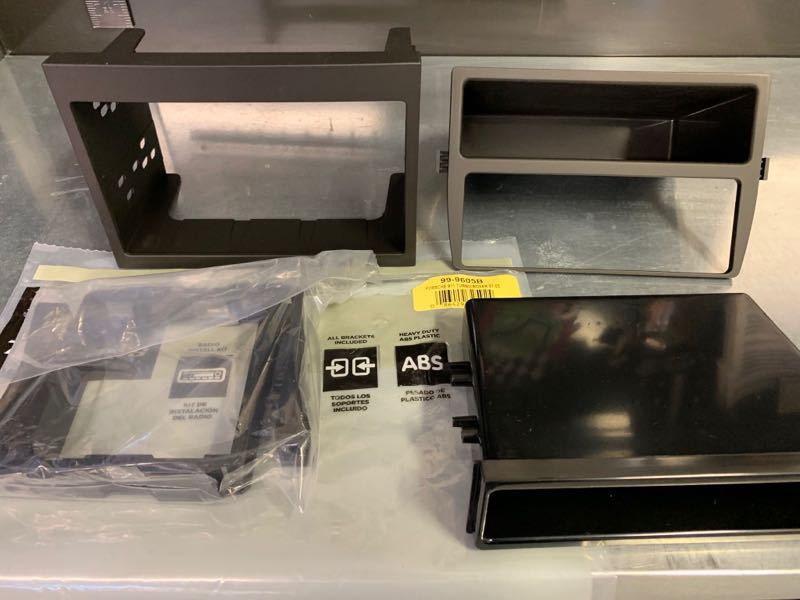
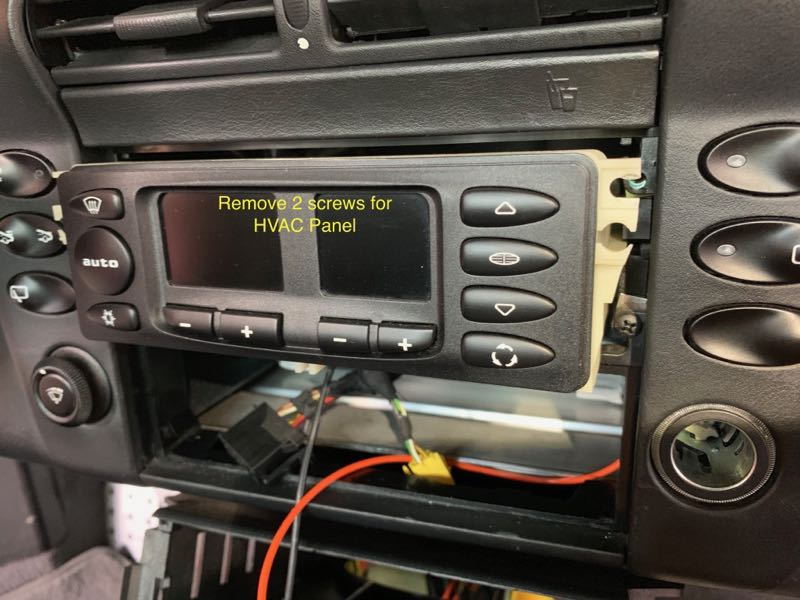
This includes everything necessary to mount the double-DIN unit. You'll end up moving the HVAC control to the very bottom slot (hereby known as #4), the new cubby that comes with the kit above in #3, and the Stereo occupying slots #1-2. I wanted to keep my nice leather wrapped cubby in #4, and put the HVAC in slot #3, but the way the OEM trim fits it's not possible to do this without a lot of fabrication and grinding down of the trim. Look closely at the size and edges of the factory parts and you'll see what I mean. There are some forum posts from people who've done it.
Frivolous Extra
Sticker to complete that "OEM Look" from BergvillFX
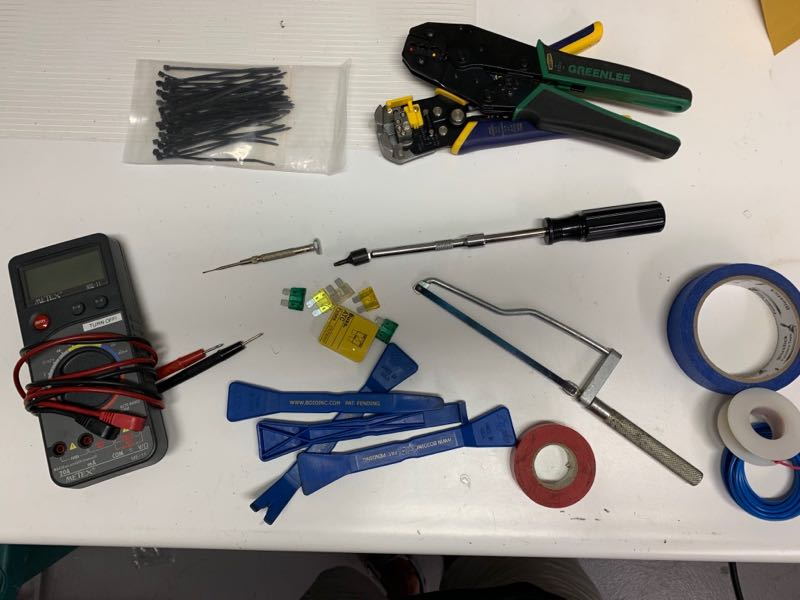
Helpful Tools
None of these are absolutely required except the multimeter, unless you really know what you're doing.
Basics
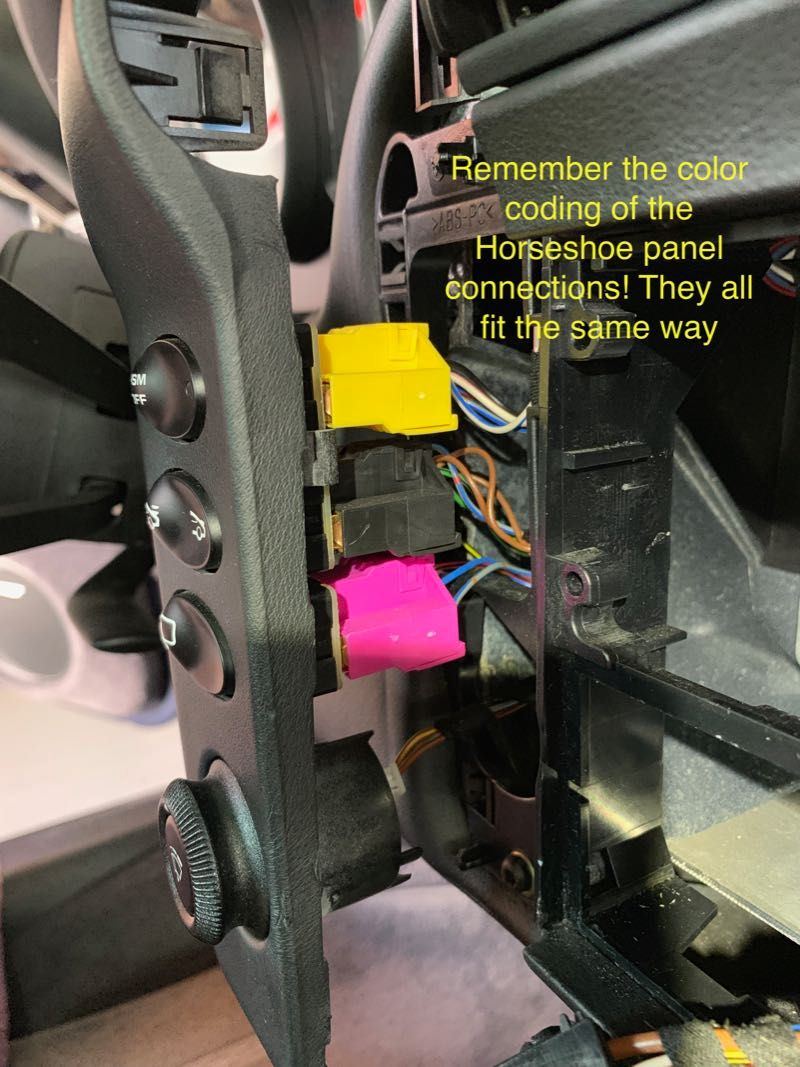
I'm amazed when people post about doing this in a an hour. It took me all day. But that involved a lot of looking stuff up online and sorting out wiring, etc. You end up dismantling the entire center console. Most pieces just snap out, but if you don't know *the way* they snap out, you are likely to break stuff. There are great articles on trim removal on Renntech. Take pictures as you go along, especially as some of the wire plugs are identical, and it would be easy to misconnect them putting them back in. Everything on the inside of the dash is sharp edges, and I found wearing rubber gloves really helped prevent cutting up my knuckles. Also put towels down everywhere as you remove the interior trim. Those same sharp edges will easily scratch up your nice leather trim and seats.
Before you disconnect the battery, turn on your existing radio and set the fader and subwoofer as you like it, and set your volume ~ 25-30 as apparently these settings are held in memory as the baseline for the new system, and you lose fader and subwoofer control since the Seican unit only outputs 2 channels.
Disassembly
Won't go int a lot of detail here besides the pictures.
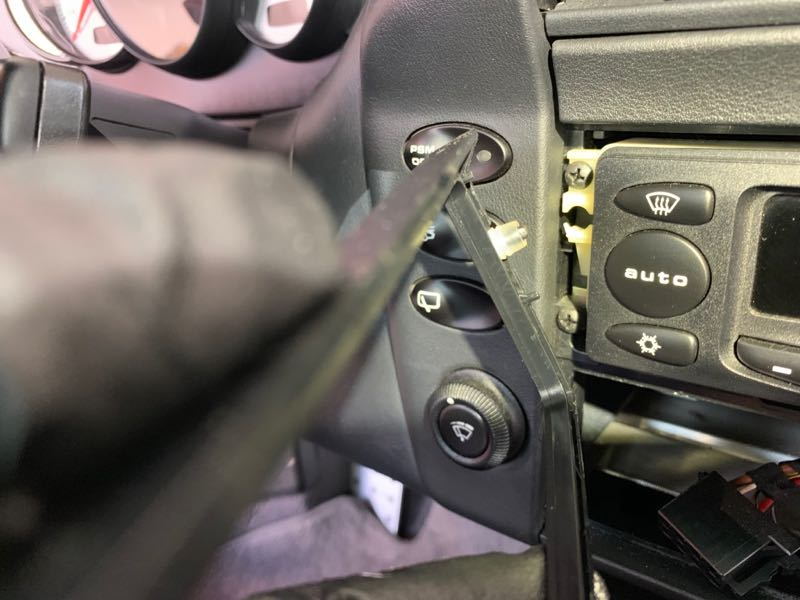
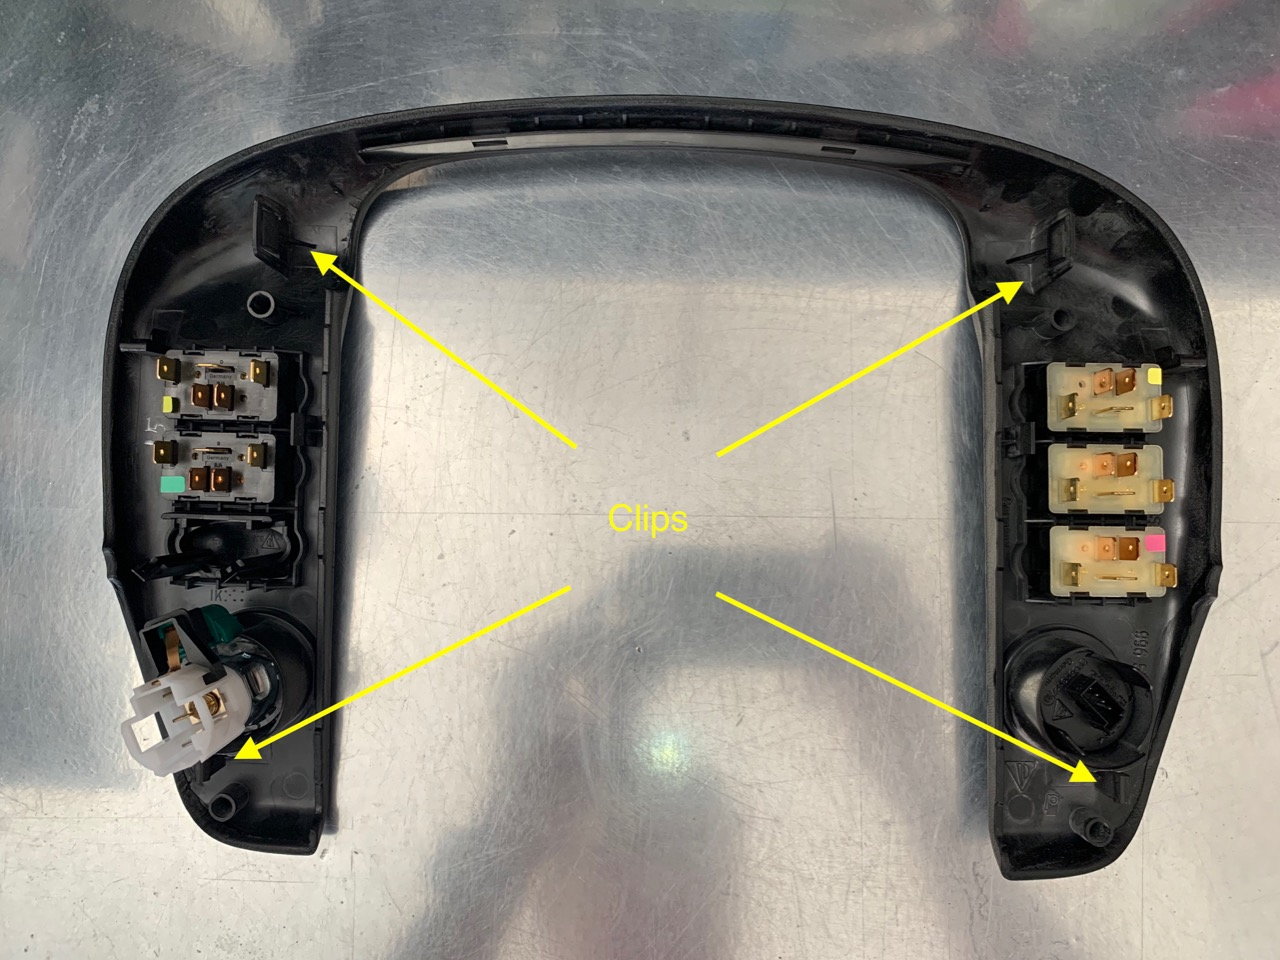
The trick to get the upper vents out, which is required to get to the bolts holding the stereo frame, is to get behind the two clips with a small screwdriver and push DOWN.
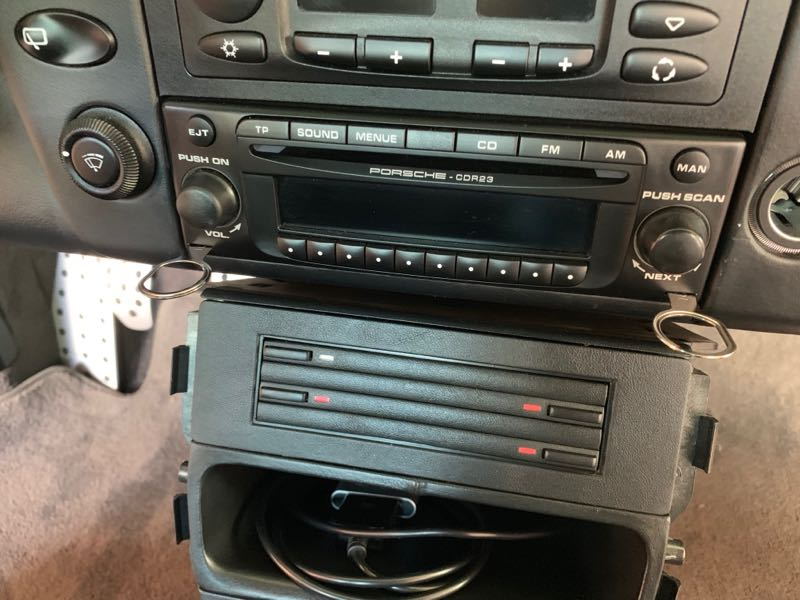
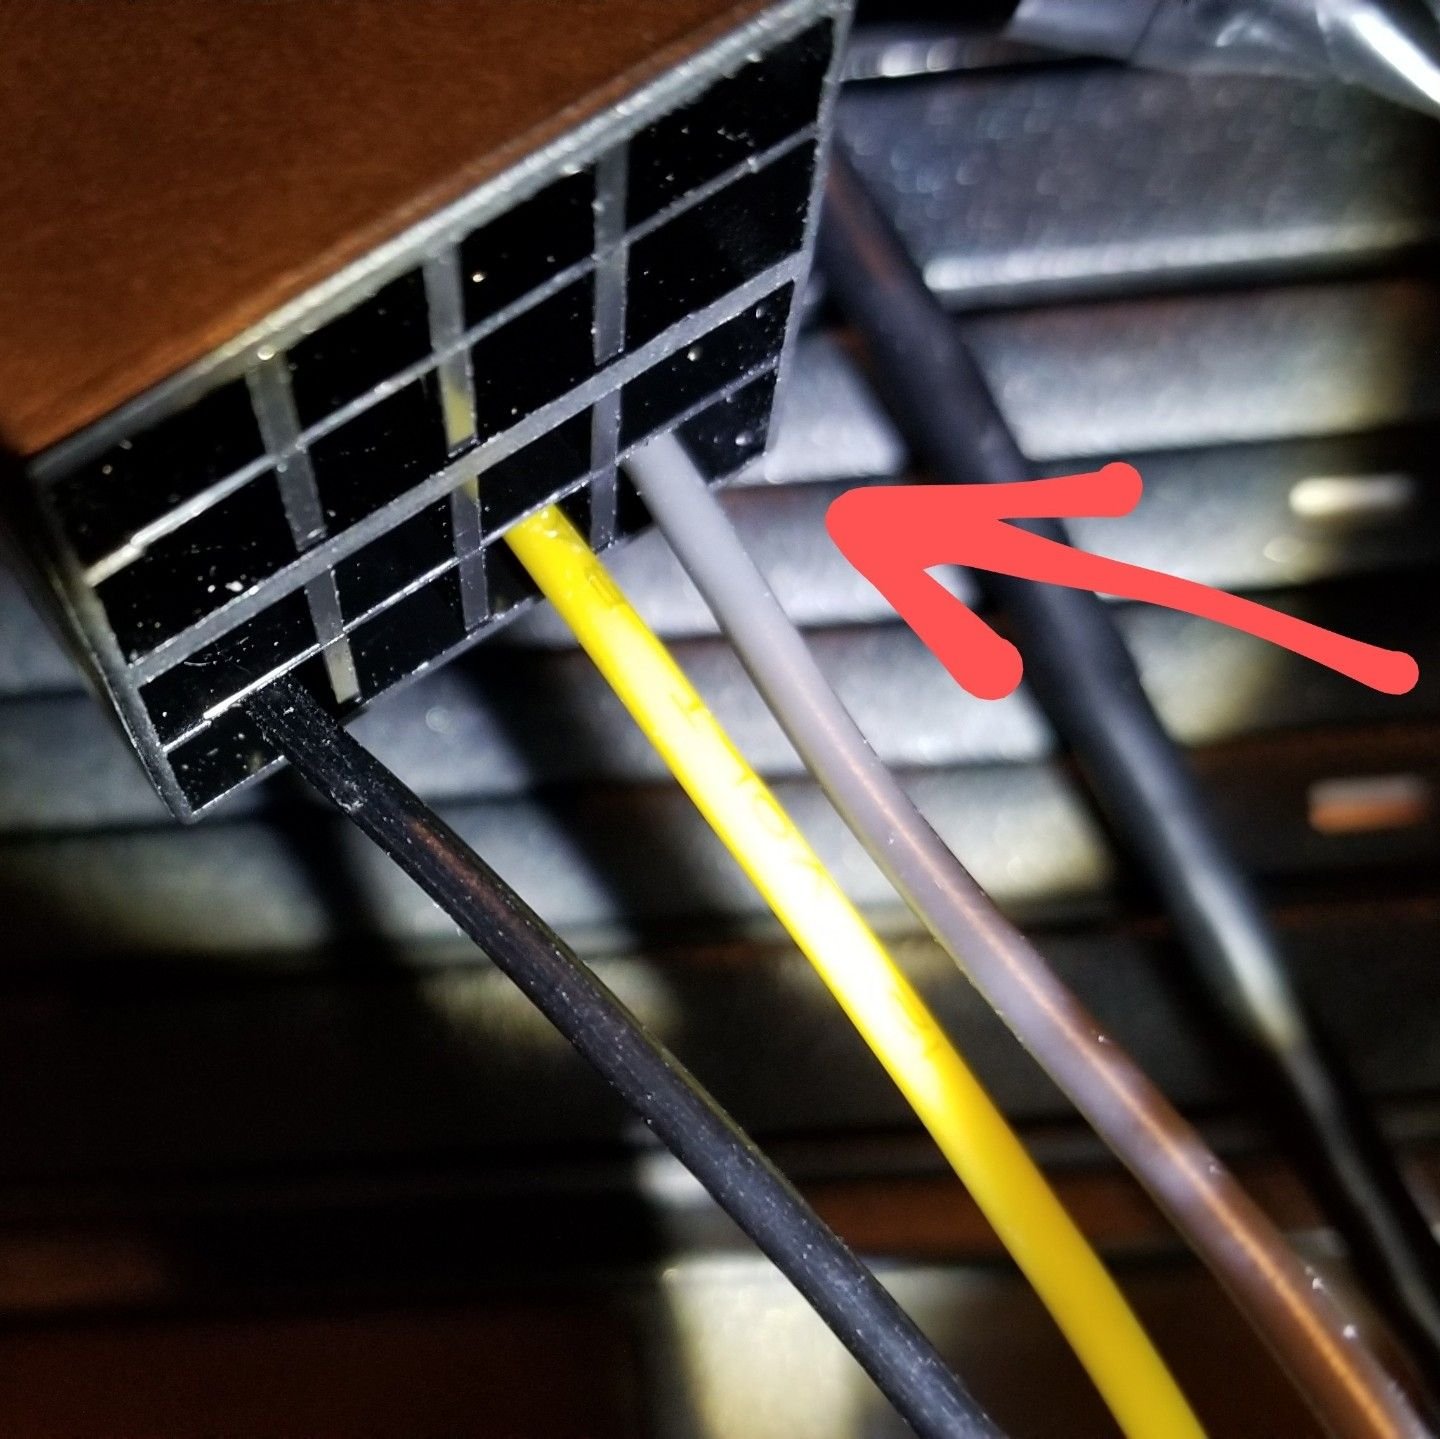
CDR-23 wiring
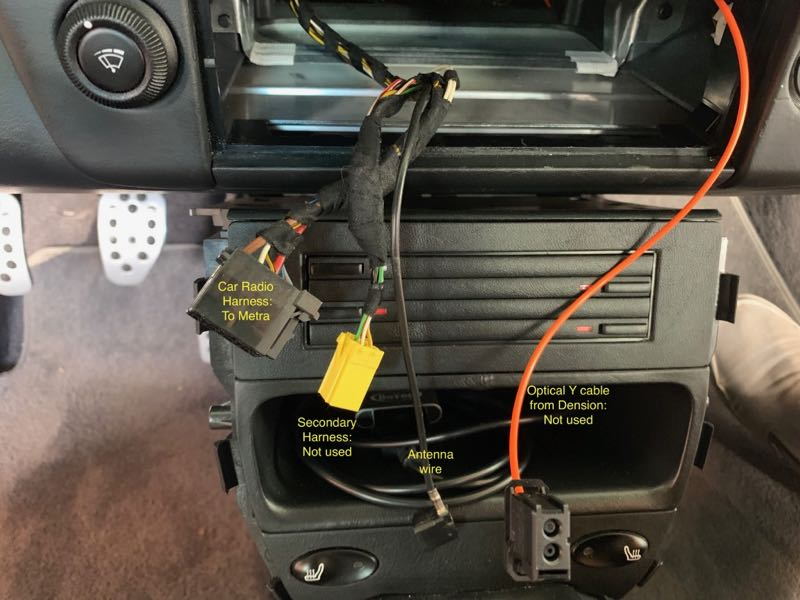
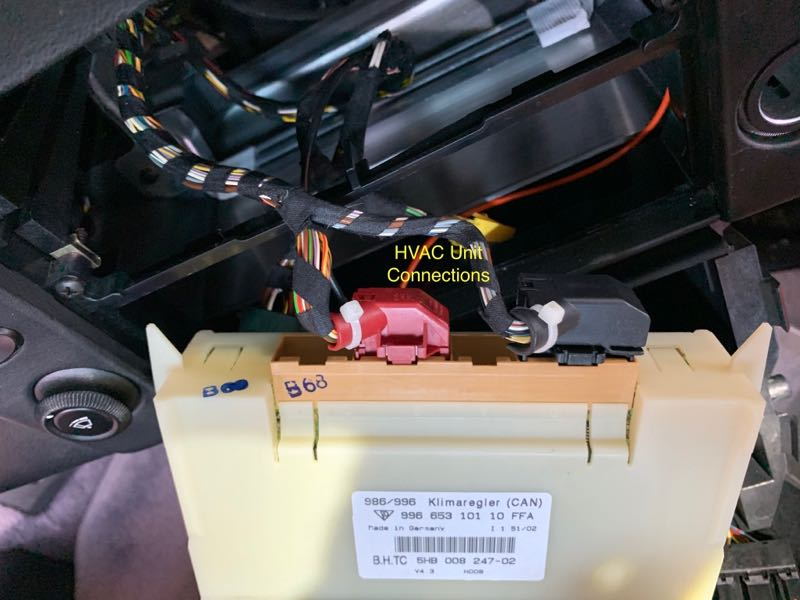
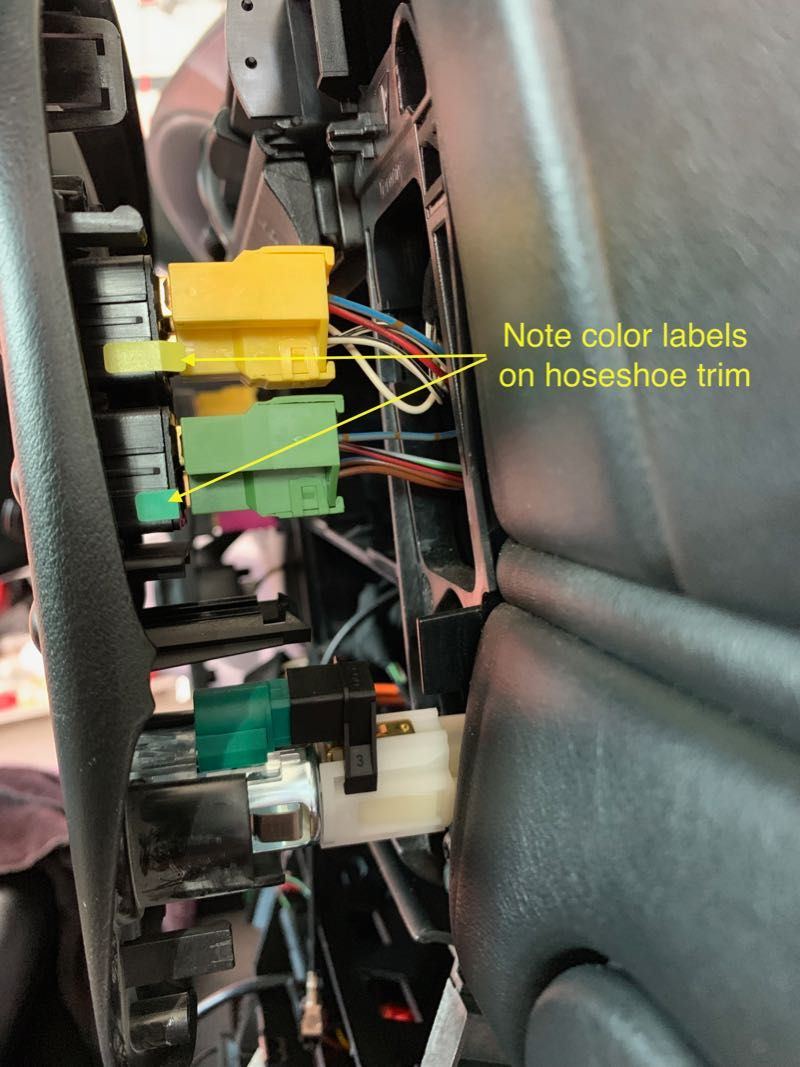
There are four connections on the OEM head unit: the main harness, a secondary yellow harness, the Fiber-optic connector, and the antenna.
Using A Hack Saw on Your Porsche
The only step where you have to irreversibly modify a part in the car is in trimming down the inner frame of slots #1-2 to accommodate the double-Din unit. The instructions in the Metra kit are very good, and they indicate exactly what plastic needs to be removed. I tried at first to cut less, but in the end had to do it just like the instructions said. Remove the entire frame from the car so you don't get the fines everywhere while cutting it down.
Wiring
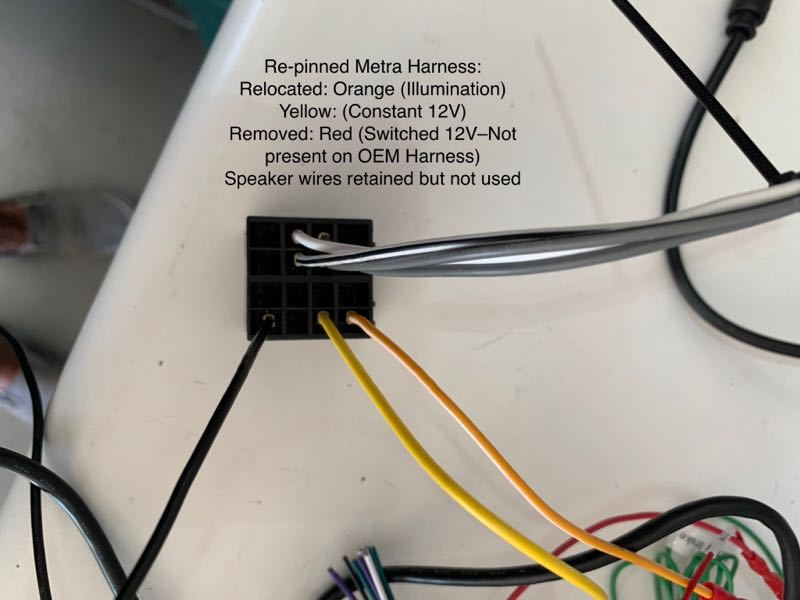
The Metra harness requires some re-pinning. Specifically, the Illumination wire is in the wrong place, and harness has a red wire (usually used for the switched/ACC power–that is, it powers up only when the ignition is on) in the spot where the the yellow wire for constant 12v should be. The OEM harness has no ACC wire, so you have to get that elsewhere. I removed the red wire entirely and replaced it with the yellow so the wire color coding was correct. You can release the pins with a very small blade screwdriver in an eyeglass repair kit (use the smallest blade in the kit). The speaker wires on the Metra harness and the new radio's harness are redundant as the signal is going via the Seicane box, but I retained them in case I ever rip out the Bose entirely and need to wire in new speakers. I found a wiring diagram for the factory harness here–the colors seem correct but the placement was different on my factory harness.
This is what the Metra harness wiring looks like after re-pinning looked like. I don't have any pics of the connections to the radio harness, but it's dead simple–connect the Metra harness wires to the same color wires on the radio harness (if you switched red/yellow as I did) and cap off the speaker wires so they don't short anything.
Correction: The item labeled as illumination noted above never worked for me. Apparently it is actually the backup camera signal input. User hotchalupa posted a corrected method of getting illumination to work that I added at the bottom of this post.
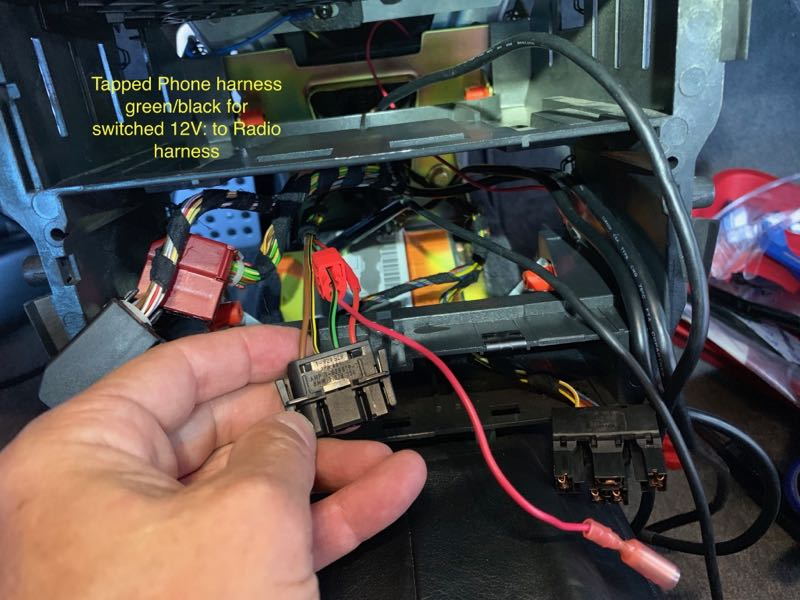
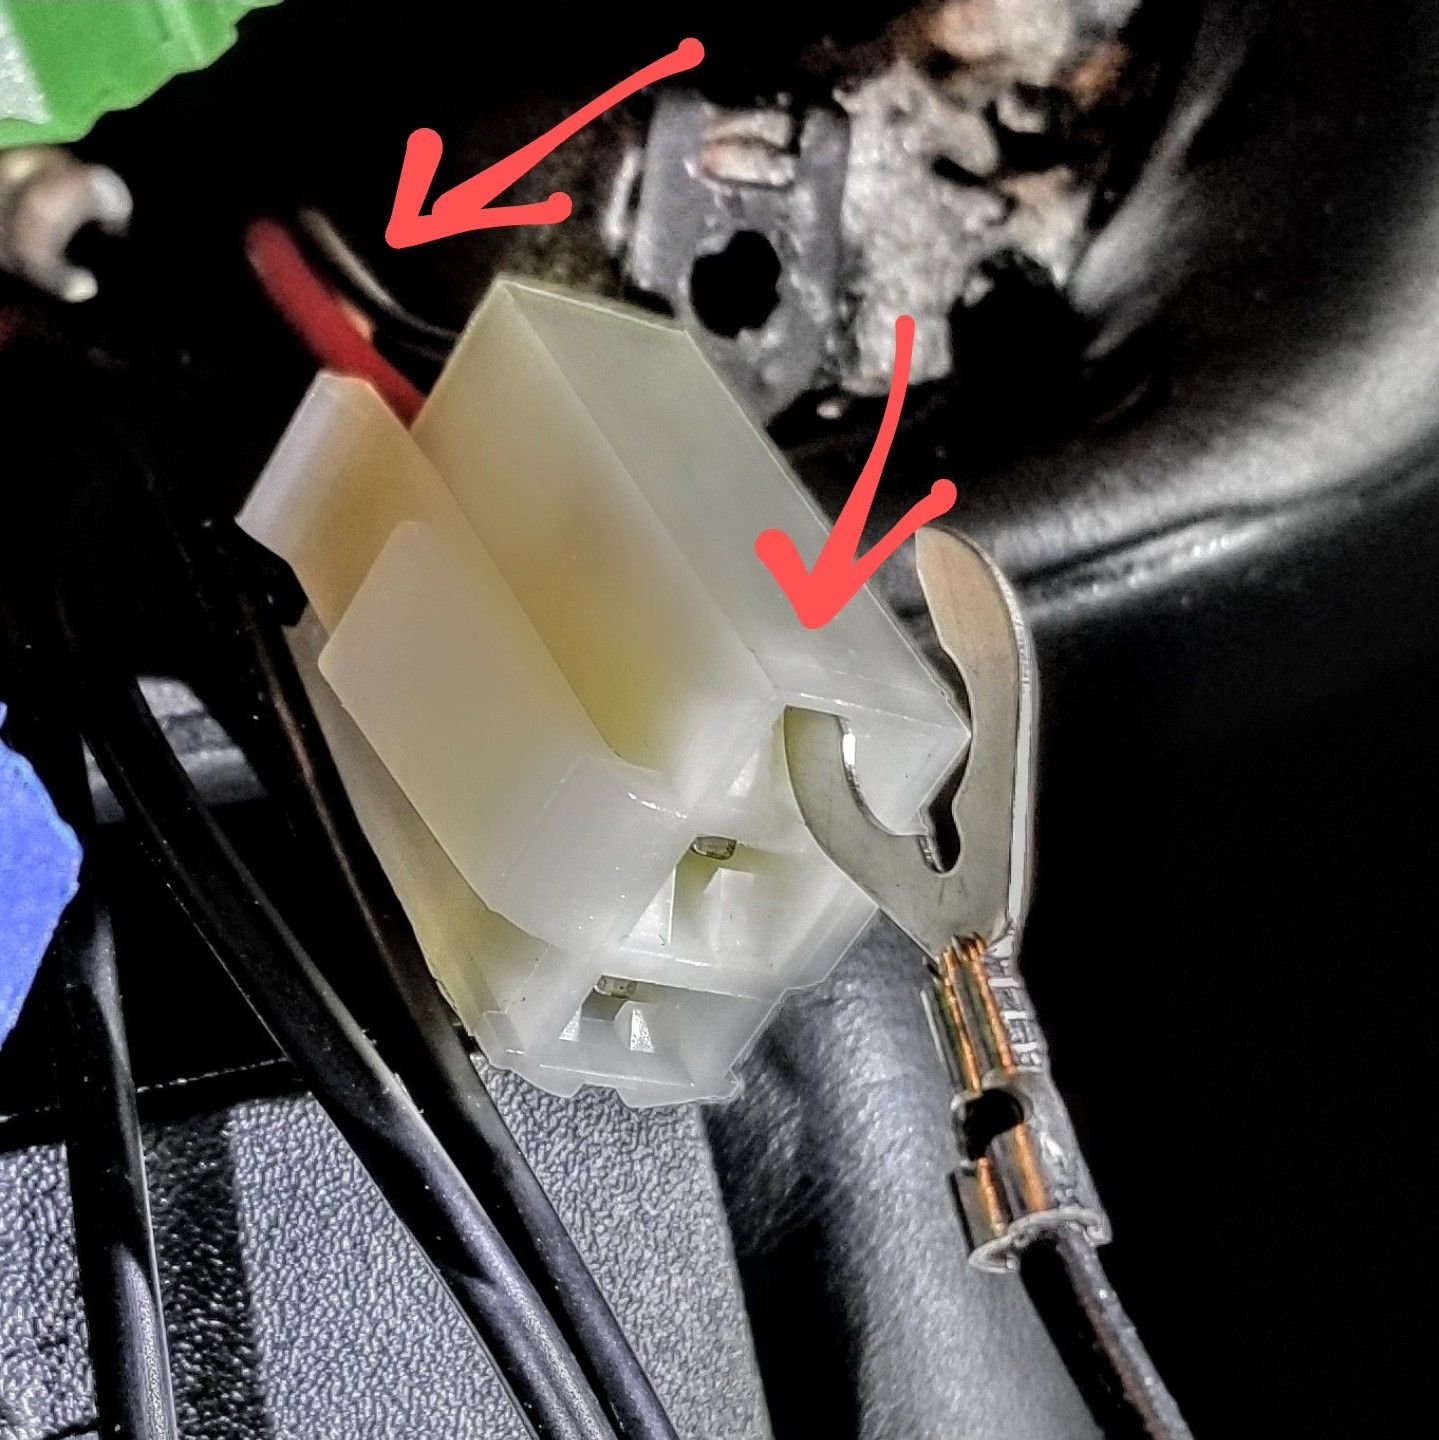
You need to source a switched 12v for the radio. You can either find one at the fuse box, or tap into the phone harness that all cars have mostly sitting unused in the dash.
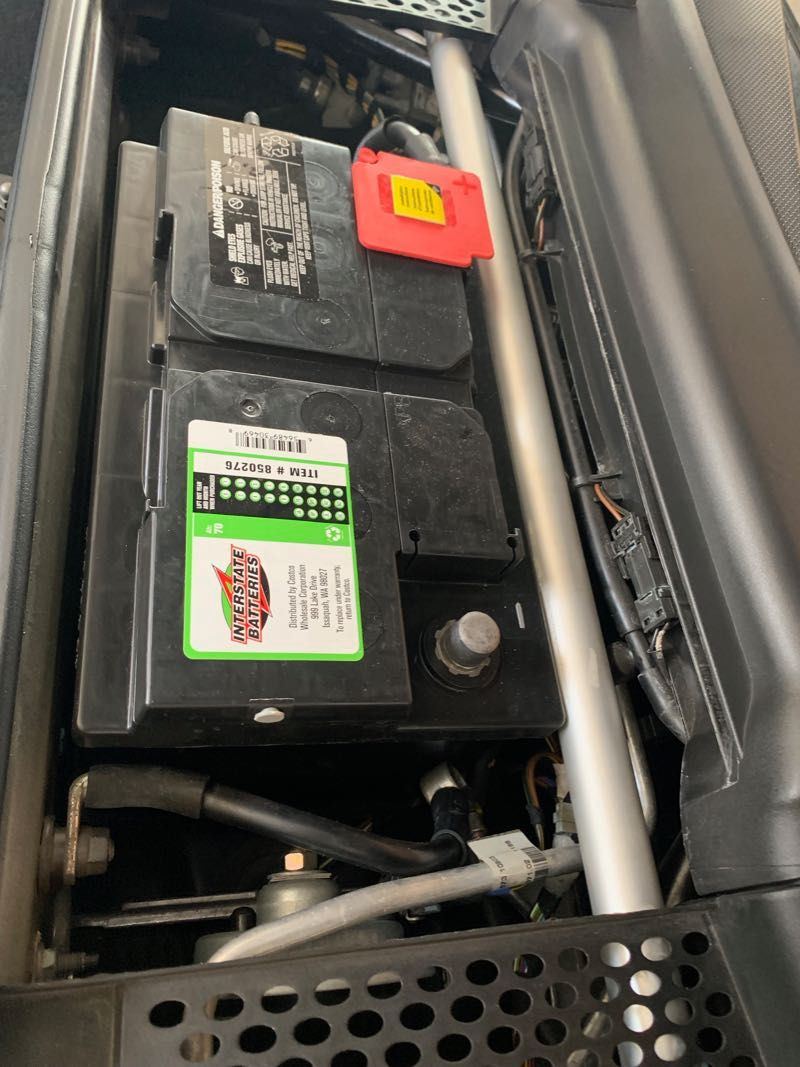
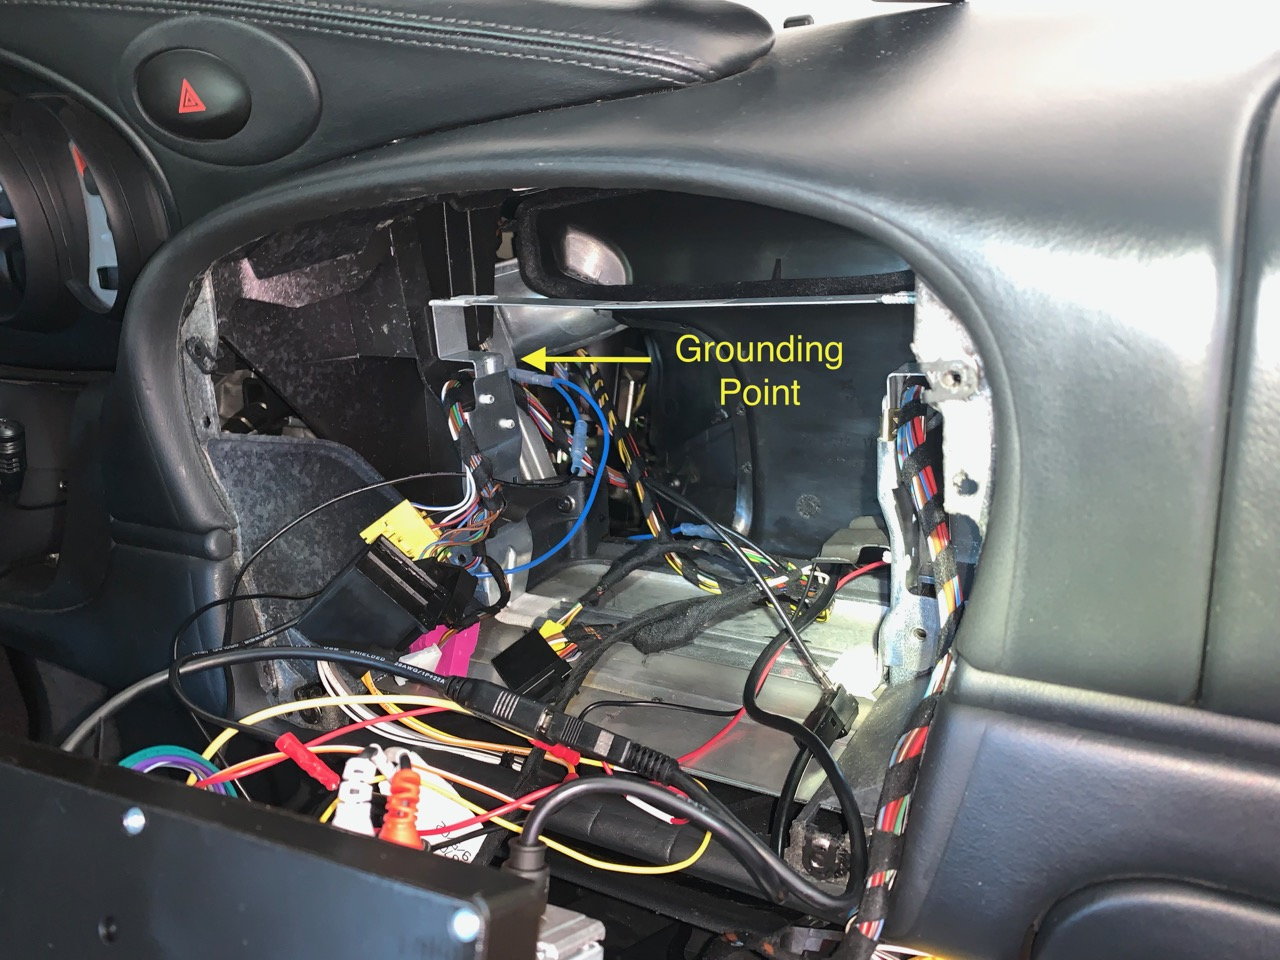
You also should find a nice ground to the frame rather than just using the harness ground. This spot seems like a pretty good one. Very solid bolt in the upper left side of the cavity where the radio sits
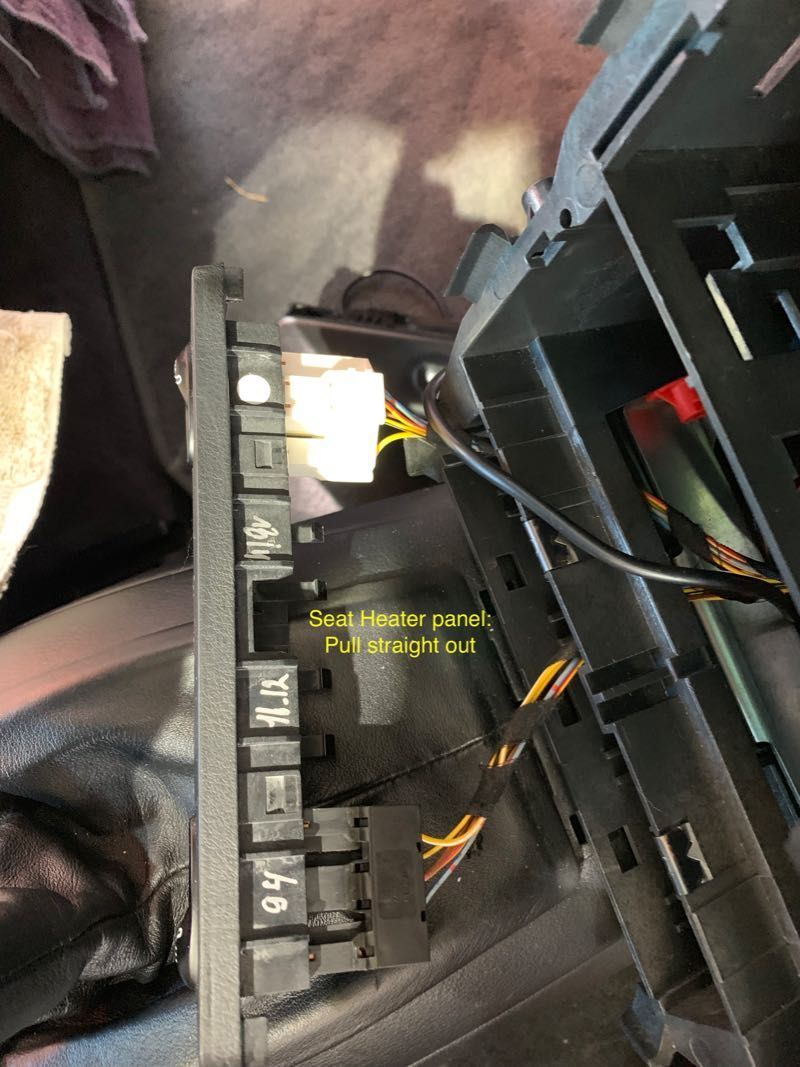
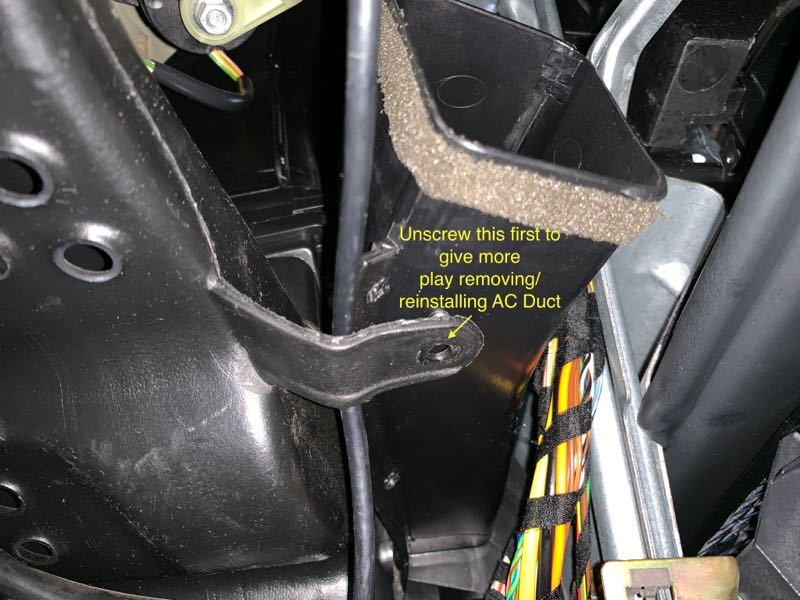
I read a lot of complaints about relocating the HVAC connectors down the the bottom of the console. It wasn't that big a deal in my case. It definitely helps/probably mandatory to remove the heater duct under the driver dash to have enough room to reroute the wires.
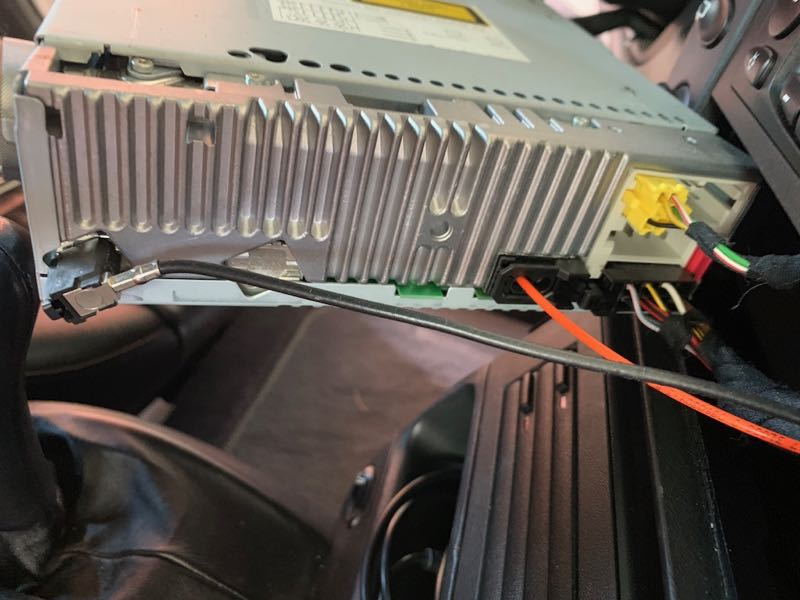
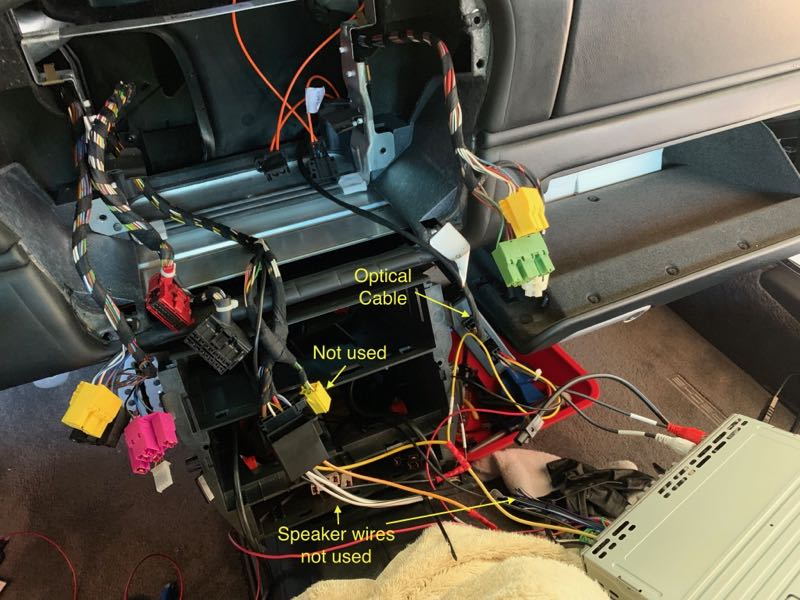
Showing test-connections in the car (the orange optical cables are from the old Dension, so you won't have these). I wasn't sure if the yellow plug was needed, but it seems it's not as my stereo works without it. Maybe I missed something here.
Reassembly
I drilled a hole in the back of the cubby to run the USB cable to charge/do CarPlay on the phone. Otherwise, it's just reverse of removal.
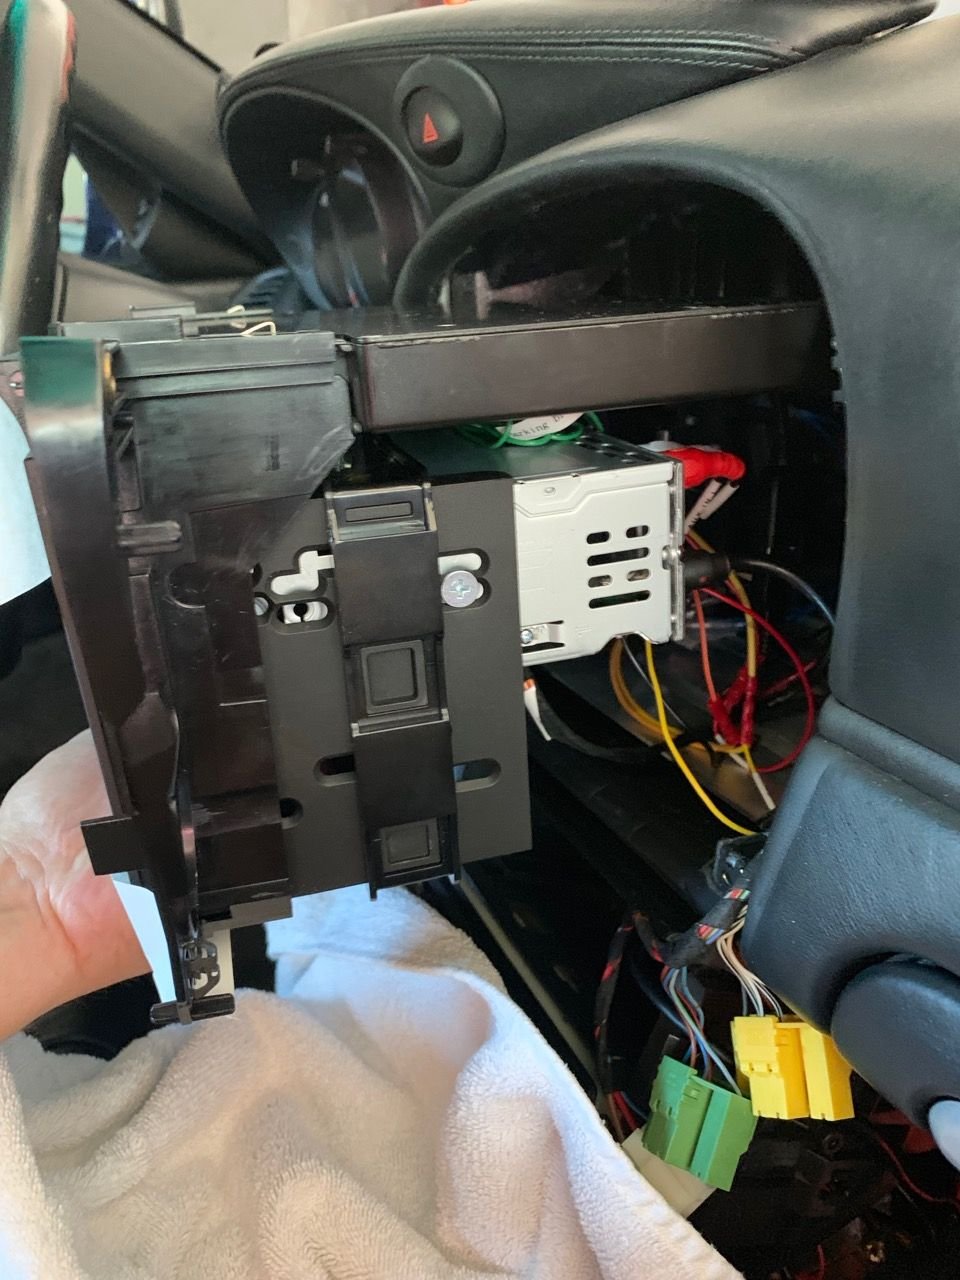
Sliding in the assembled radio frame
Outcome
It works! It sounds better than the old unit (though I wonder if that's just self delusion, by all rights it shouldn't matter). For some reason the illumination (i.e., turns down the backlighting when the car headlights are on) doesn't seem to work, but the radio has its own ambient light sensor, so not that big a deal. You can see on the left where I just hung the microphone on the washer stalk. I may relocate it later, but it seems to work well here and is pretty much invisible sitting inside the car.
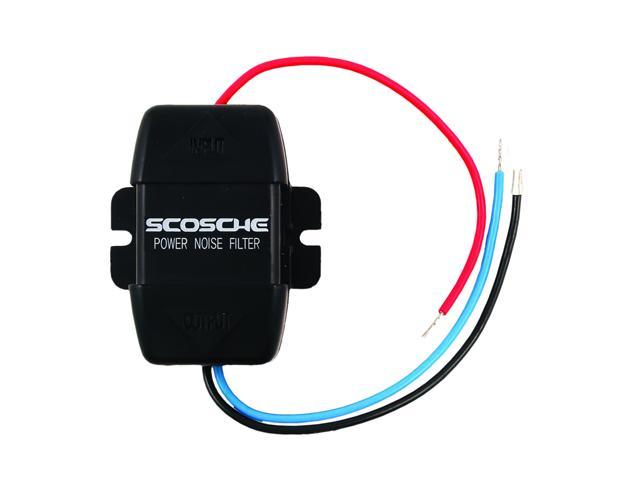
I had a bit of alternator noise that I thought at first was minimal, but started driving me crazy. After reconfirming, beefing up, and trying various ground combinations it was still there. The Scosche noise suppressor seems to have solved it. This is the kind that wires into the power circuit, not the output RCAs. I wired it into the constant.
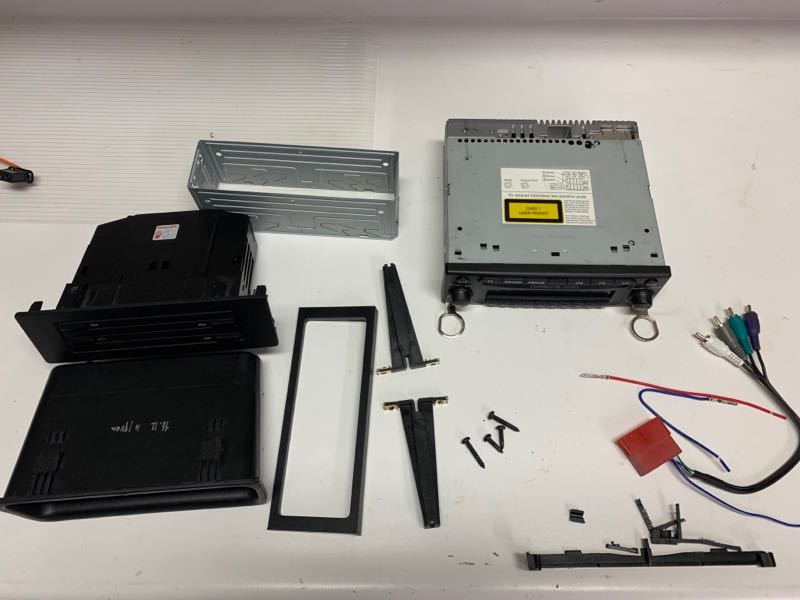
Left Overs
What's left at the end. Old/unused parts and pieces of the radio frame that were cut out. I later found out where 2 of these extra screws went!
Hope this helps someone!
The following addendum was posted by user hotchalupa to get the radio illumination working. Correction to illumination wiring and adding reverse input signalI wanted to add an update as a form of addendum to anyone doing this on a 2003+ car... It might be applicable to earlier cars, but since the OP and I both have MOST systems, I can't guarantee the factory harness will map the same on pre-03 cars.
The wiring changes to the Metra harness outlined in the original post are not entirely functional. The orange wire location meant for illumination by the OP is actually the Reverse signal wire meant for PCM backup camera functionality. I replaced the orange wire with a gray one (all I had on hand) in order to make it less related to power and mated it to the "Reverse In" on my Sony HU.
To actually make illumination functionality work (only used for auto Dimmer function on the Sony HU), I tapped into the illumination terminal from the cigarette lighter plug... It is the top-most terminal wire on the plug (this plug can only go in one way so orientation can't be mistaken). Oddly enough, when the headlights switch is in the parking lights or headlights on position, it provides just a tad over 10V... not 12V or even 5V/12V like in some systems. I even tried adjusting the dimmer dial on my instrument cluster and saw no variance in my multimeter. Any voltage above 0V sent to the Sony HU illumination wire will trigger the Auto Dimmer functionality, so it won't matter much and works as intended as soon as you turn the headlights switch to any position other than off.
Here's a picture I took of the terminal in question while I was testing it:
The two above changes should give you working Reverse signaling as well as auto dimming. Hope that was helpful and added some additional value to the excellent original walkthrough of the HU replacement process!
Will be doing this exact thing shortly. You didn't want to use a spade connector for the +12v red wire vs a vampire clip? That way you could back you way out of the install cleanly...
Will be doing this exact thing shortly. You didn't want to use a spade connector for the +12v red wire vs a vampire clip? That way you could back you way out of the install cleanly...
You caught the one hacky aspect of it all that bothers me too. Worst of all, I actually did it twice since I tapped the wrong wire the first time. But I don't understand how I could use a spade connector without first cutting off the factory phone harness? Just sort of mash a female spade connector onto the pin in the harness connector?
Isn't the phone harness plug male spades? Like the switches in the horseshoe? If not, than the clean way would be to buy the phone harness for the other side and just use the one wire off it. Hmm.....
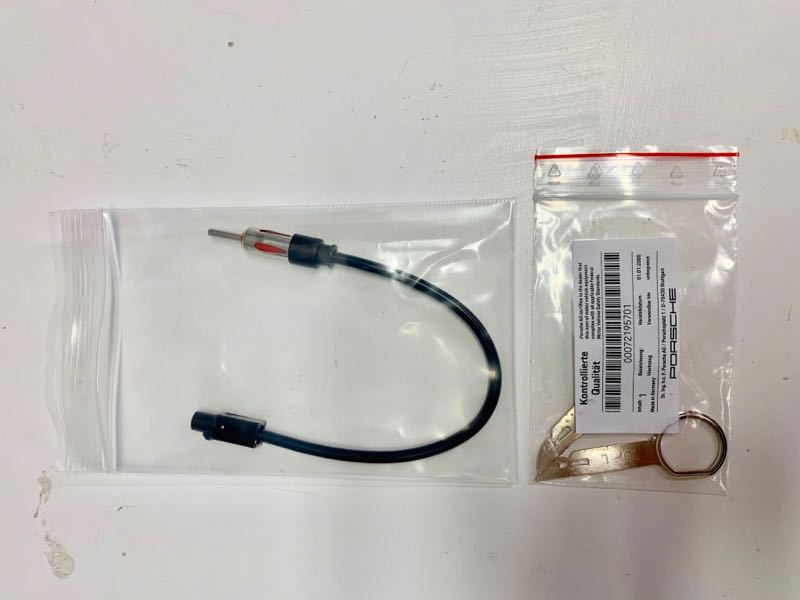
Which radio antenna adapter is that? I've ordered the Seican bose adapter, I want to start gathering all the other bits and pieces I need...
Isn't the phone harness plug male spades? Like the switches in the horseshoe? If not, than the clean way would be to buy the phone harness for the other side and just use the one wire off it. Hmm.....
Which radio antenna adapter is that? I've ordered the Seican bose adapter, I want to start gathering all the other bits and pieces I need...
I think the phone harness has more of a molex-style plug with round pins rather than spades. I remember searching through my parts box and at the auto parts store and couldn't find any plug that would mate with the phone harness, so resorted to the wire tap.
Here is link to the antenna adapter (for 03+ it says, but the site has them for all years). I updated the post as well with this.
Phone connector is a round-pin style without an easily found match... The part you want is Becker 5001.524-276, but good luck finding one. I haven't seen any OTS Molex connectors that are a match.
I am all for being able to restore to 'oem', but that phone plug is a bit of an exception in my opinion. Vampire to it, or just cut it off. Or try and find the Becker cable. Becker audio used to sell them, maybe they still have some.
On the antenna adapter, there are quite a few varieties... Basically you just need to converter that has a German style female and a US style male. Some are a single piece, some have a bit of cable in between. They all should work on a smaller deck like the Sony.
Nice install! I�ve just had bestbuy put in a Kenwood DNX575S and located everything like yours, and alpine amp. In drunk, every thing works great except HD2-3 radio stations, most of them cut out and back on, even sitting still at light. I had a loaner MB suv w/ HD stations and it worked perfectly herein the DFW area. I can�t seem to figure out what I need to make mine work properly. We�ve tried many antenna boosters and nothing has worked. I�m at a loss for how to fix this, we�ve got maybe 50 HD channels here and I really want to be able to get them on my Kenwood deck. I hate to go over to Porsche dealer asi get a runaround there and usually not much help. I see Porsche antenna boosters on eBay,pelican and other Porsche outlets, but I don�t want to blow money unclassified I�ve found something that works. Any help? Thanks. Harley42
Last edited by Harley42; 08-22-2019 at 03:08 PM.
Reason: Insert pictire
It might be that the antenna (is it in the windshield?) just doesn�t work as well as a regular mast like most cars have. My Sony doesn�t have had HD radio, so sorry I don�t have any comparison. The regular radio reception seems fine.
Getting any alternator noise? I�m glad I don�t have cracking/popping noise others have cited, but the whine is noticeable on quiet tracks. I bought a noise isolator for next time I rip into it, but also thinking maybe my ground point wasn�t as solid as I thought.
every thing works great except HD2-3 radio stations, most of them cut out and back on, even sitting still at light.
I can't remember the last time I listened to broadcast radio in any of my cars... If for no other reason than the intolerable amount of commercials and other crap they broadcast.
Just pick your favorite streaming service, download some huge playlists plus some live streaming channels and never listen to another ad again.
Great write-up and TY! I am in process right now, only difference is Alpine unit and I relocated HVAC to 3rd bin as I don't like it that low in 4th (some manual work but not difficult). I've been hunting for those stickers....great find!
I don’t have any whine, but I really am trying to figure out the HD 2-3 channel problem. If newer cars have tuners with HD2-3 capability, and their tuners don’t drop out then what do they do to make their radios work ok? I’d really like to find out. I see a lot of other Porsche reports of the same problem, and no way to fix this.
Are you happy with the Metra kit I have read others felt it was a cheap and didn't blend in. It looks fine in the pics, just need 1-2 Porsche stickers. I don't have MOST but am going to add a double din with Carplay.
 08-17-2019, 01:09 AM