When you click on links to various merchants on this site and make a purchase, this can result in this site earning a commission. Affiliate programs and affiliations include, but are not limited to, the eBay Partner Network.
Feed The Wire From The Windshield Roof Liner To The Passenger Side A Pillar Up To The Passenger Side Door Weather Stripping Then B Pillar To The Side Glass Roof Liner To Finally The Rear Glass Roof Liner
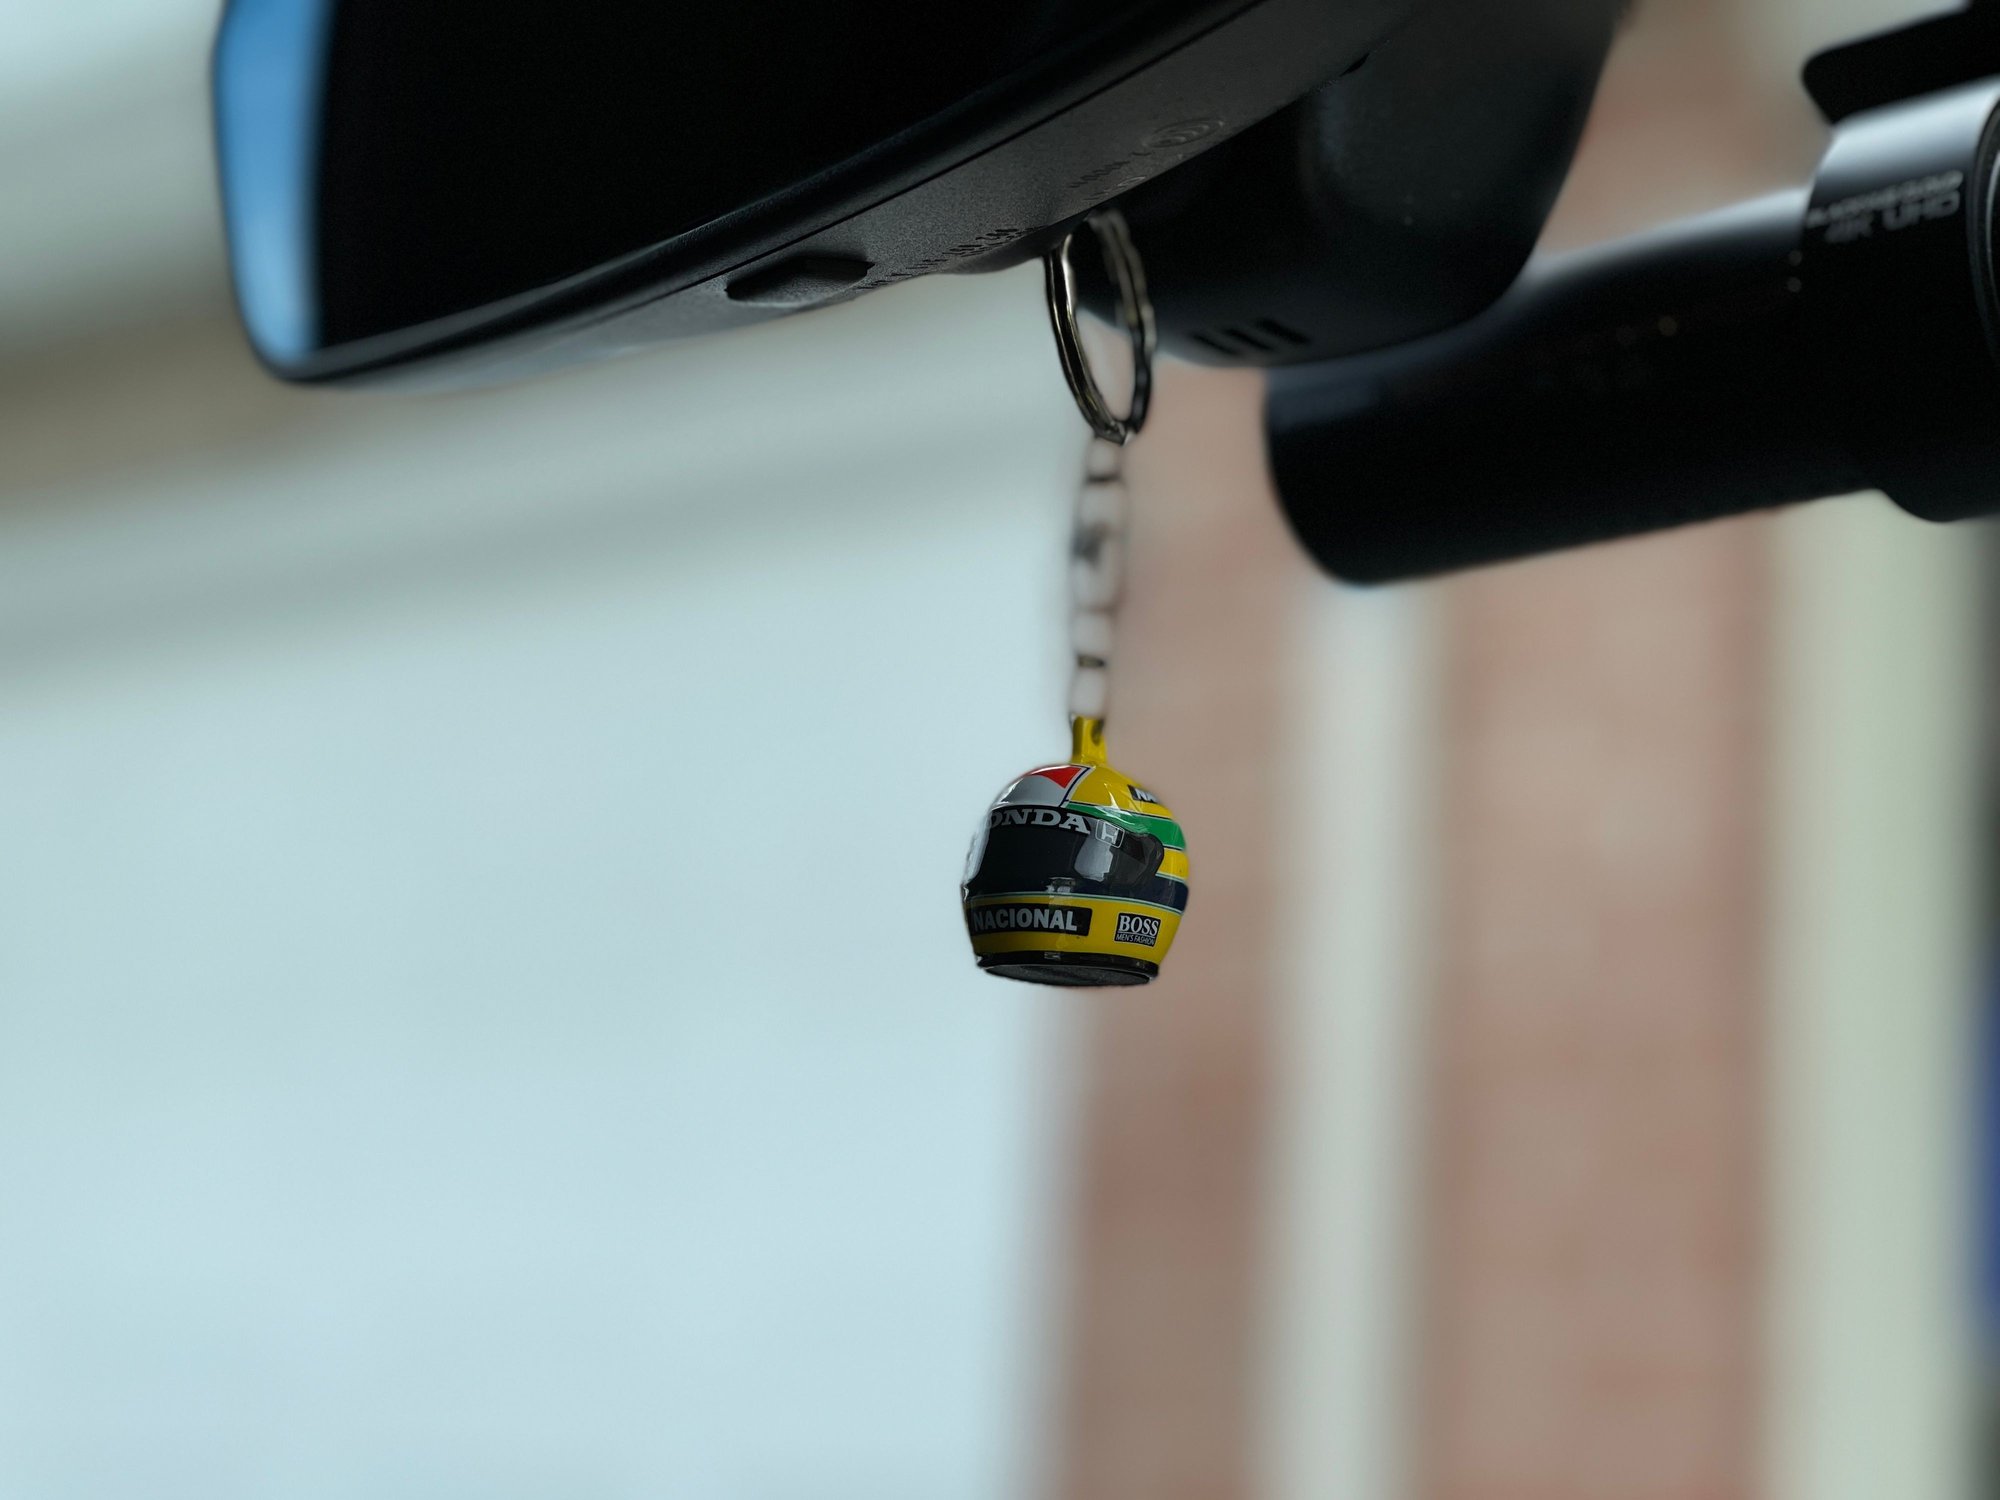
Nice instructions, especially since the DR900X uses a different power cord than the older DR900S and is no longer compatible with the BlendMount MirrorTap product.
I assume that you did not install 'power magic pro', which works in parking mode and cuts off power when it goes below certain battery charge level?
I recently ordered BlackVue DR750 LTE version. Anyone else used this setup yet?
I assume that you did not install 'power magic pro', which works in parking mode and cuts off power when it goes below certain battery charge level?
I recently ordered BlackVue DR750 LTE version. Anyone else used this setup yet?
The DR900X now has a built-in power/voltage monitor negating the need for the Power Magic Pro which was a separate module to perform the same function on previous model dashcams without the built-in voltage monitor.
Please let us know how you like the 750 LTE. I was contemplating on either the 750LTE and 900X which I ultimately chose.
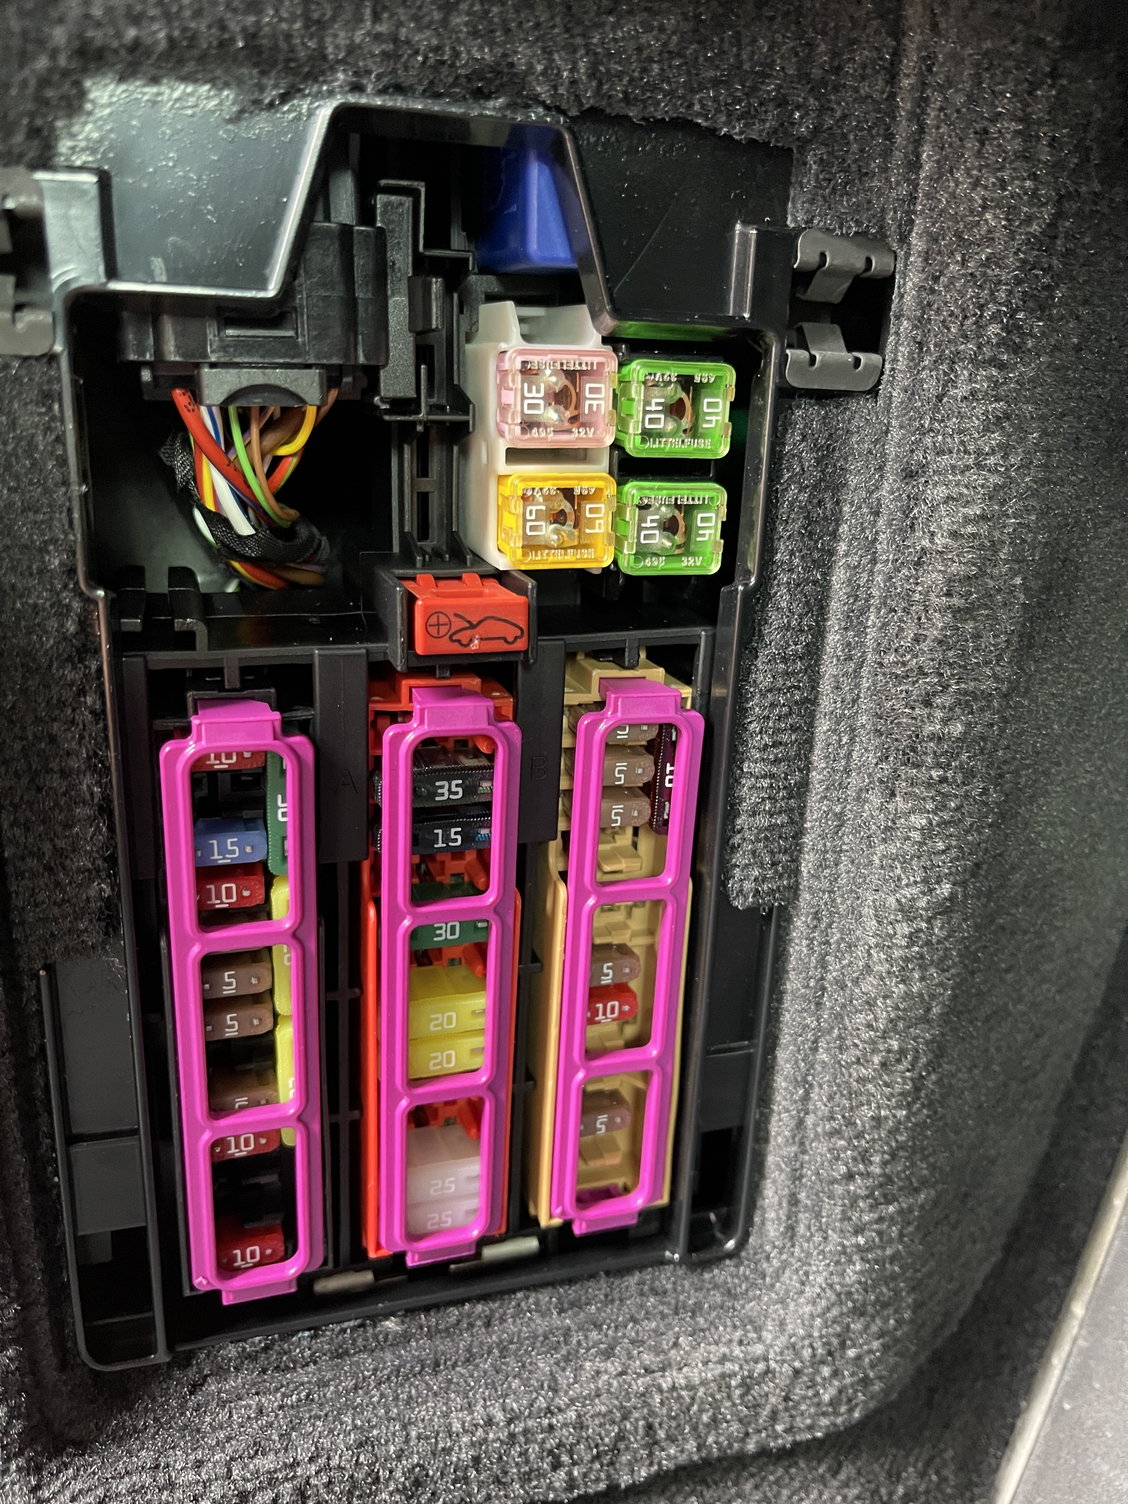
North American Car - Left-Hand Drive
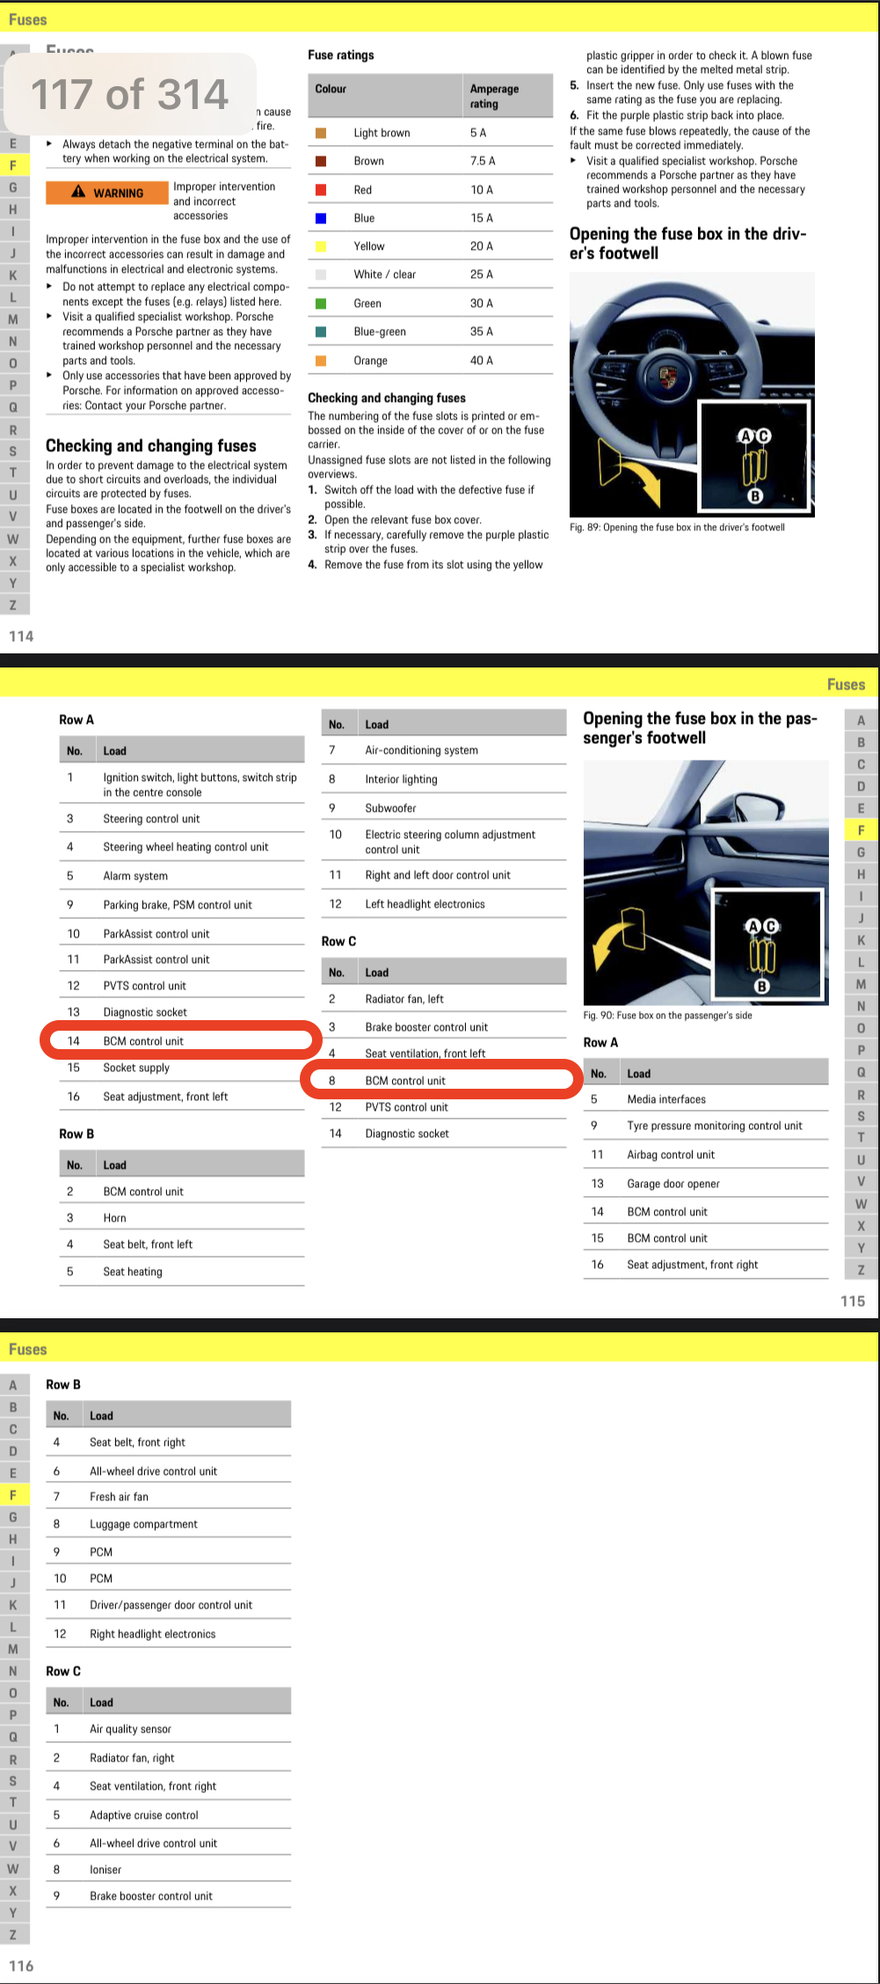
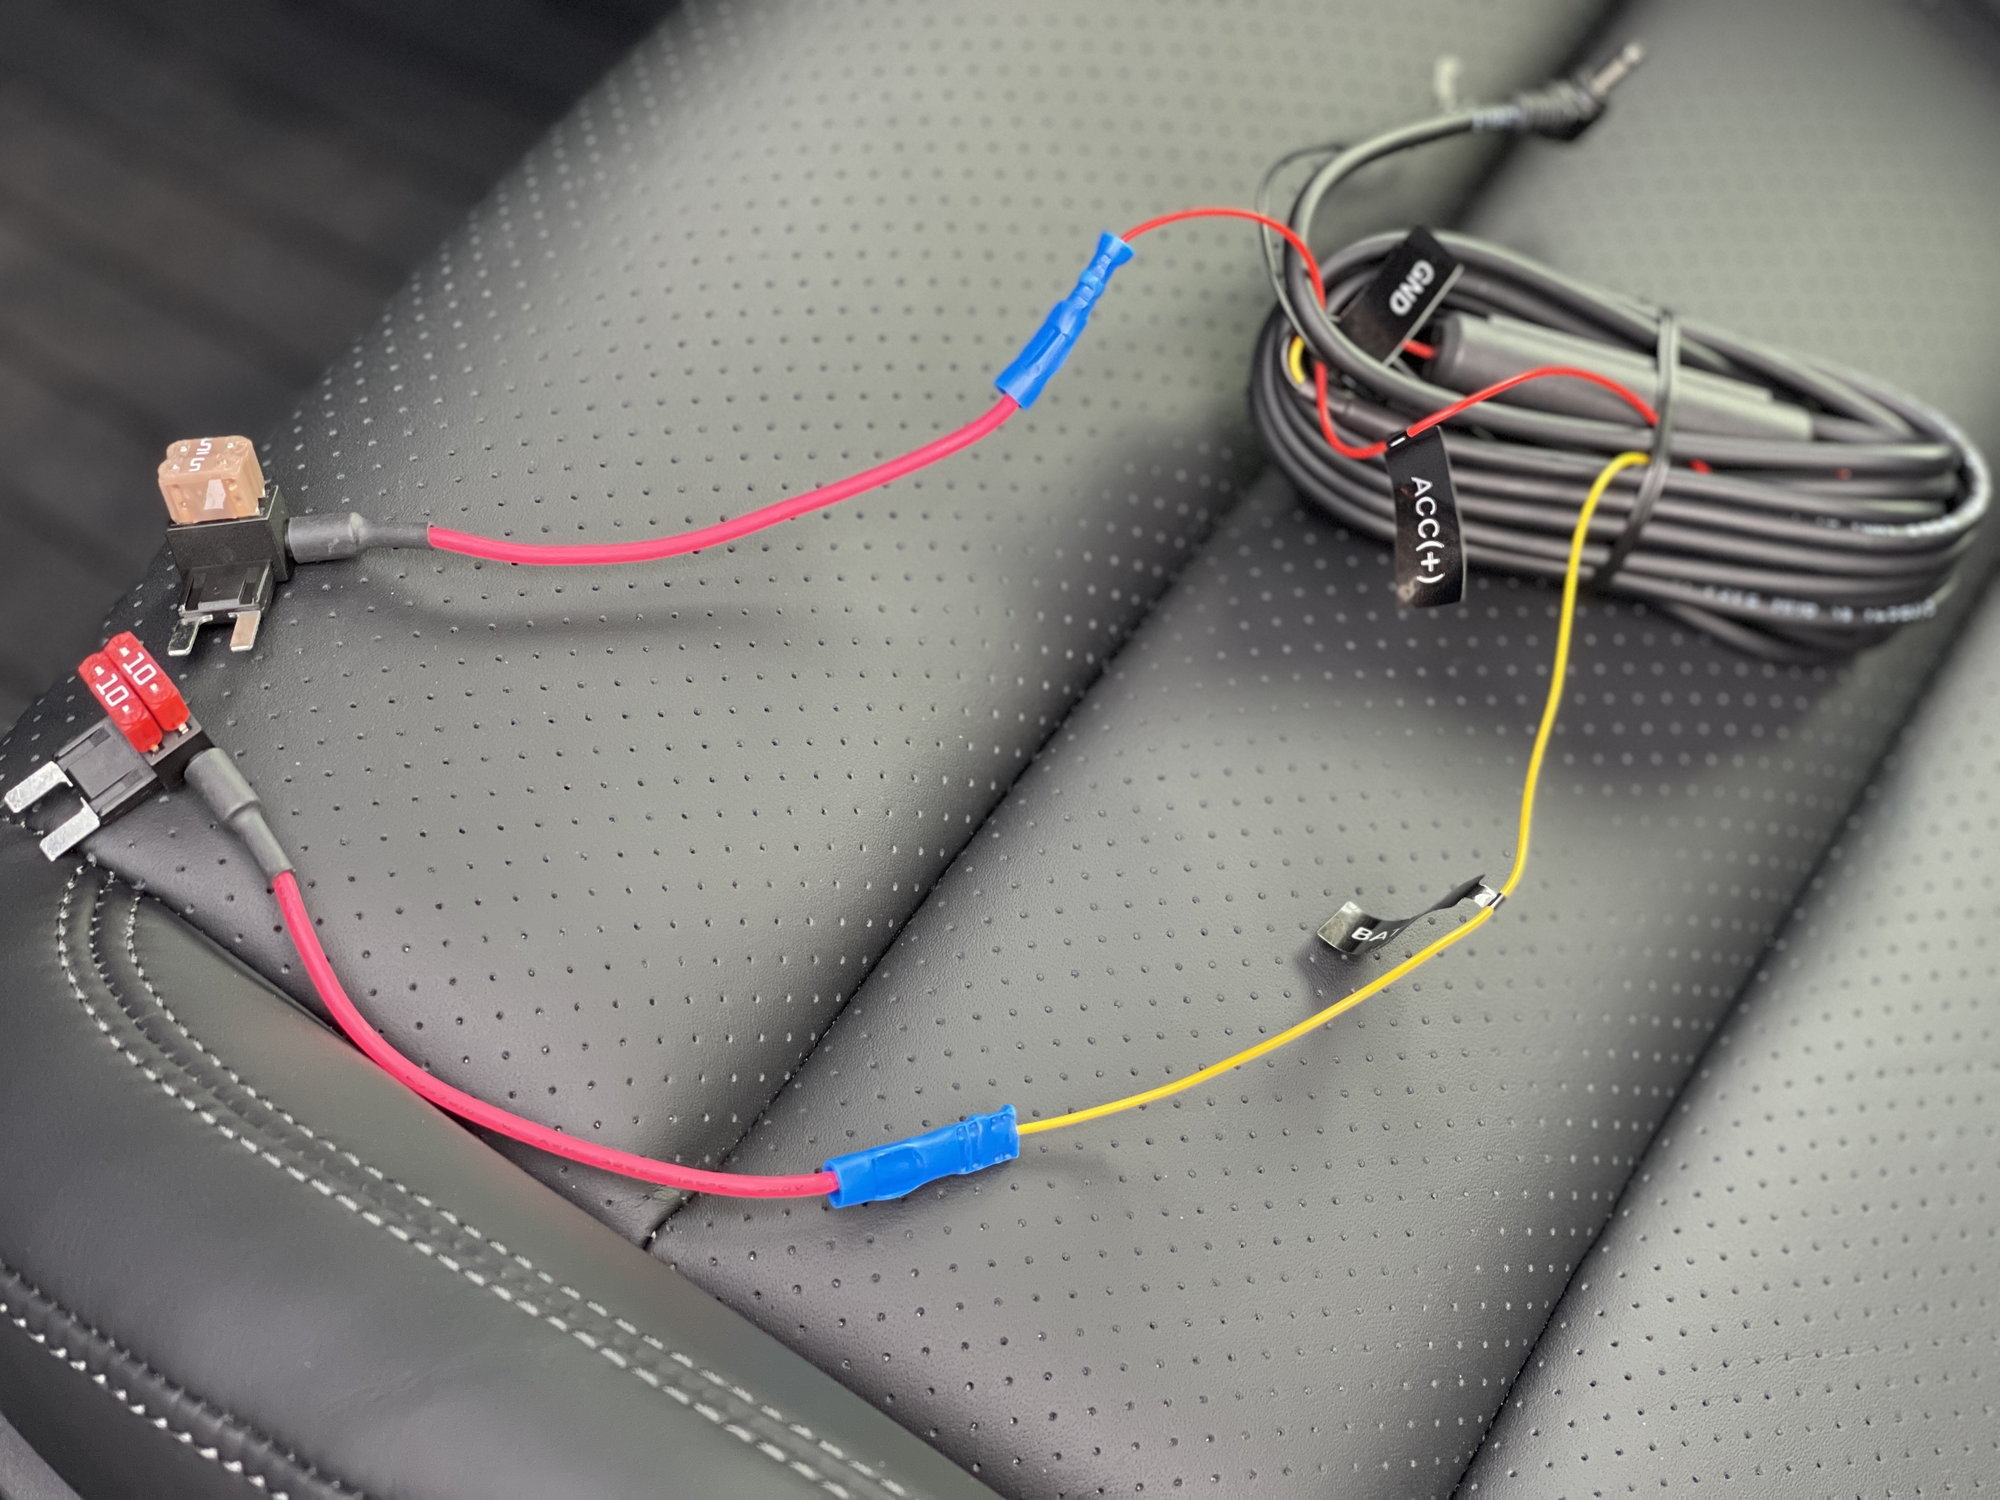
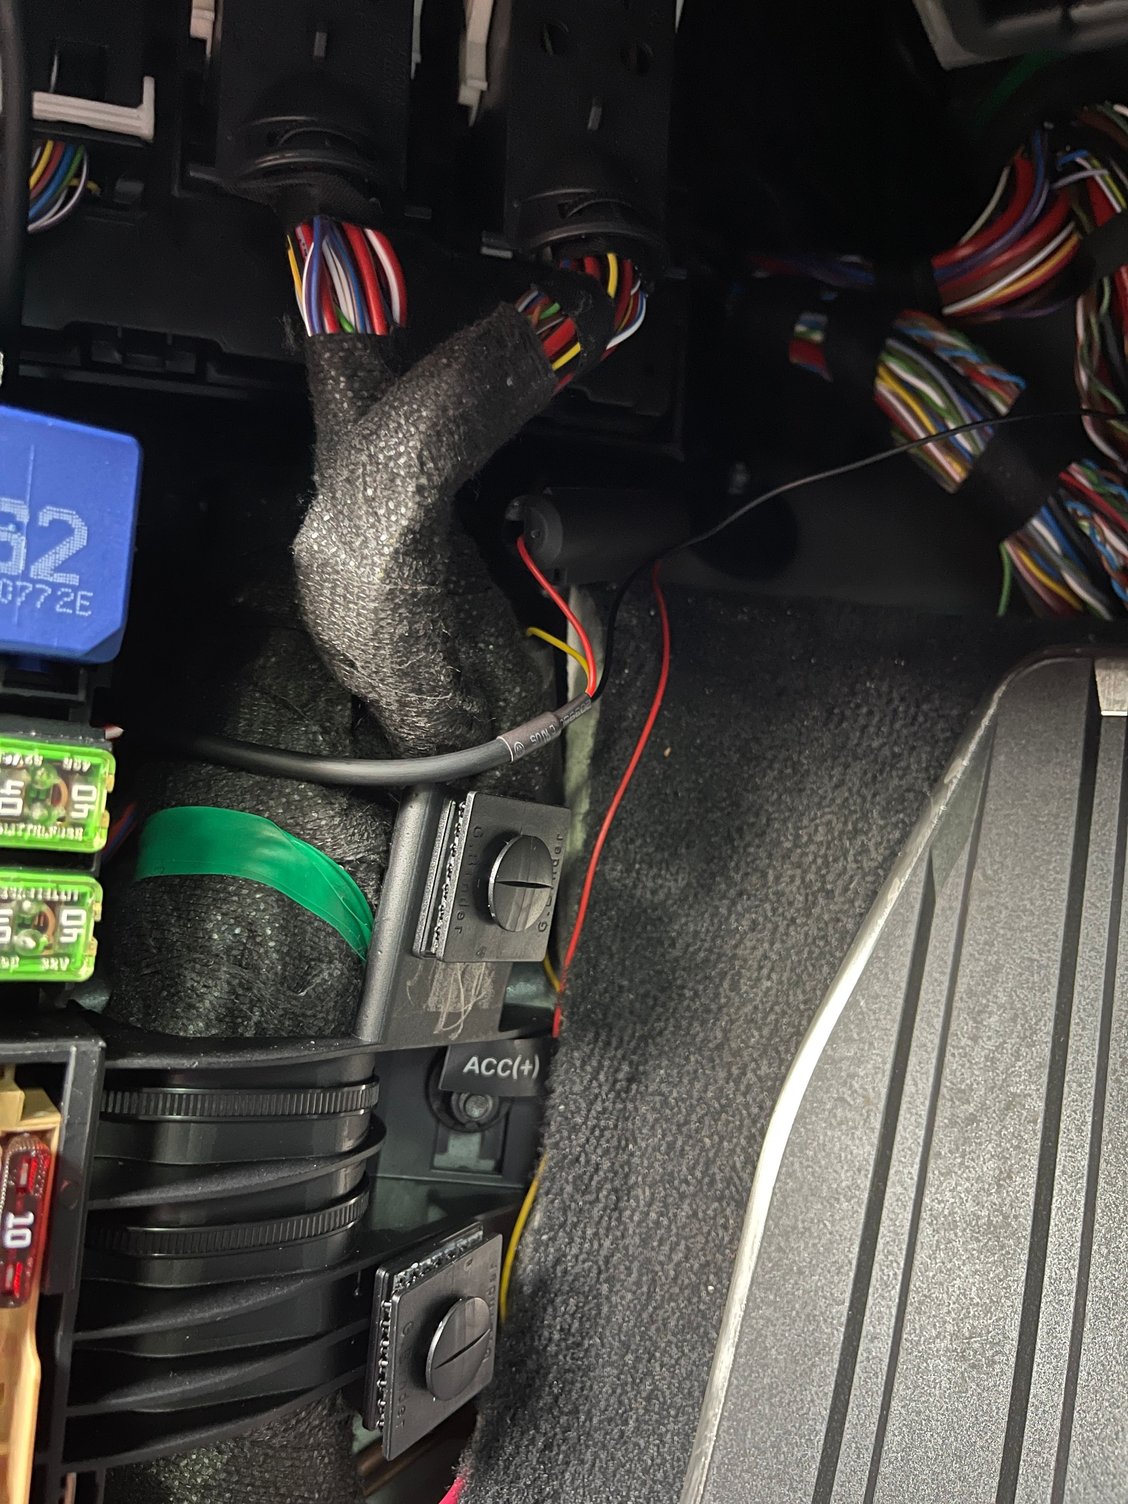
Row A #14 BCM Control Unit (Battery Wire Tap) & Row C #8 BCM Control Unit (ACC Wire Tap)
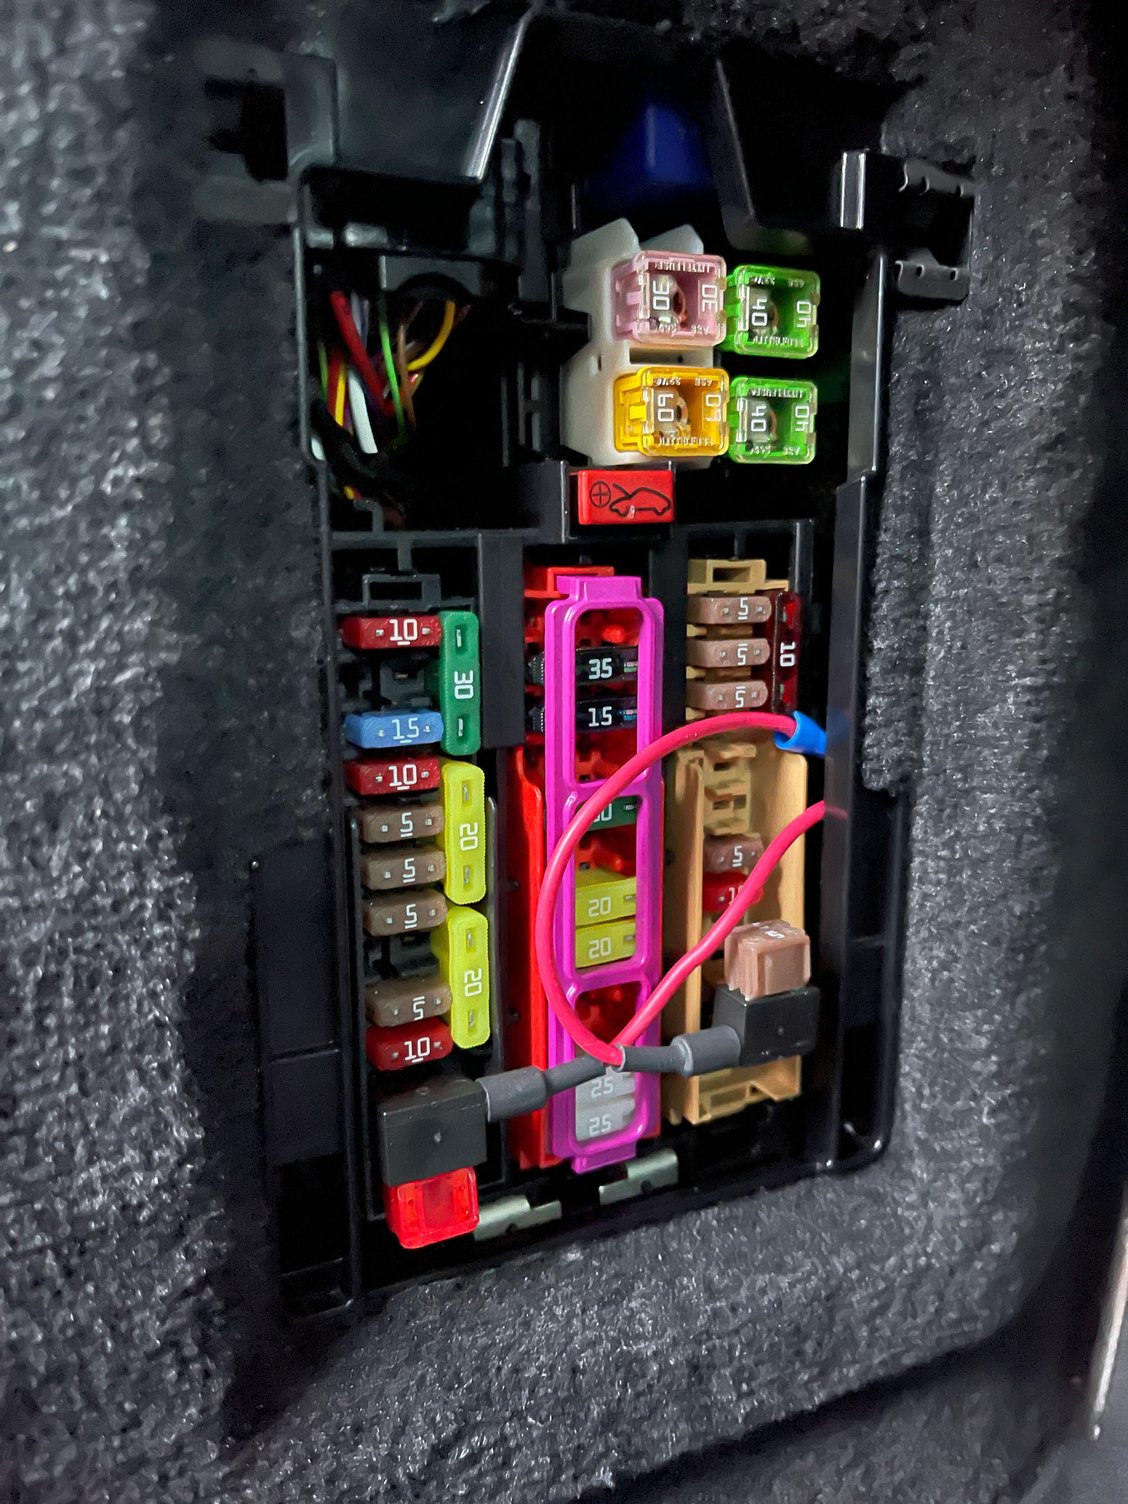
Are you sure that you got the right fuses? according to the fuse panel covering the number one starts from the top and ends with #13 on columns A and C, then you have 14, 15, and 16 on the side. In your case, it seems you plugged #13 column A and #11 column C. Unless I totally didn't get the diagram on the fuse panel (in that case I apologize in advance!)
In addition, the fuse holder on column A is not plugged correctly, you should have the load on the external pin (the one opposite to the cable), otherwise, you will just bypass the fuse.
I honestly find the manual very confusing and inaccurate, the fuses do not correspond at all. That fuse on column C, the 5A at the 11th slot, I'm quite sure it is the PVTS because it turned off Wifi/Bluetooth and LTE as soon as I unplugged it. Unfortunately, the manual says that PVTS is on the 12th....very confusing.
In column B, I found PCM is the 7th and the 8th slots (20A). When I unplug one of them, the PCM goes to factory reset... On the manual, it says that PCM is on the passenger side, slots 9 and 10!
Did anyone figure out the right layout of the fuses?
I gave up plugging my Cellink battery directly to the fuses and opted for the cigarette lighter option. It is slower but much safer...
Wire Routing:
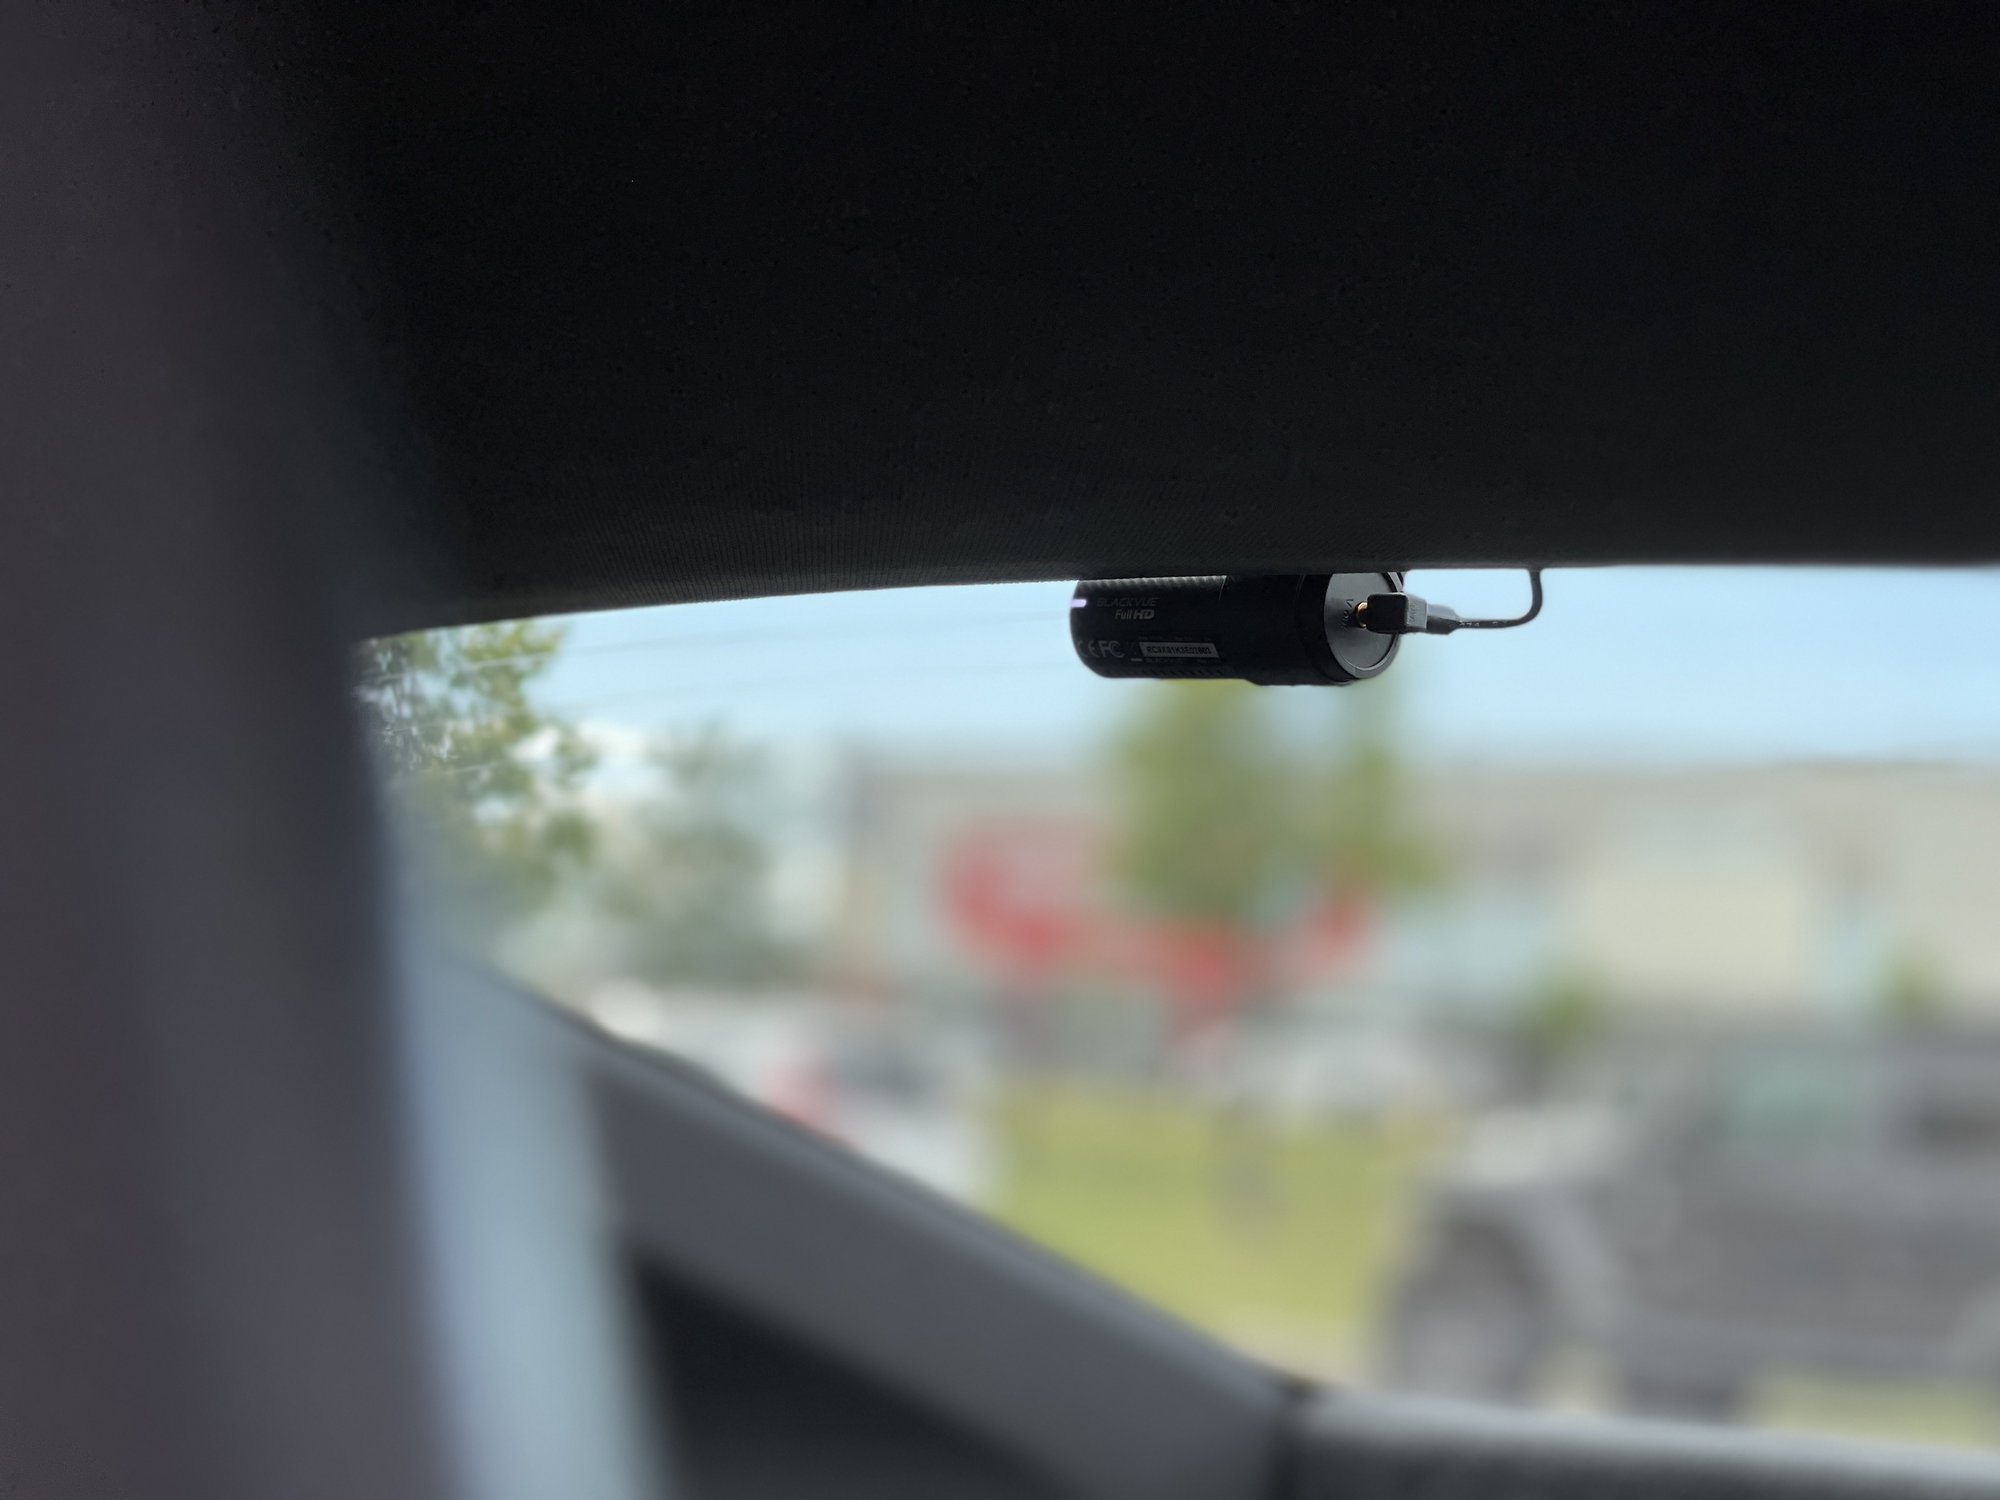
Front Camera
Feed The Wire From The Windshield Roof Liner To The Driver’s Side A Pillar Down To The Weather Stripping Then Into The Fuse Area
Feed The Wire From The Windshield Roof Liner To The Passenger Side A Pillar Up To The Passenger Side Door Weather Stripping Then B Pillar To The Side Glass Roof Liner To Finally The Rear Glass Roof Liner
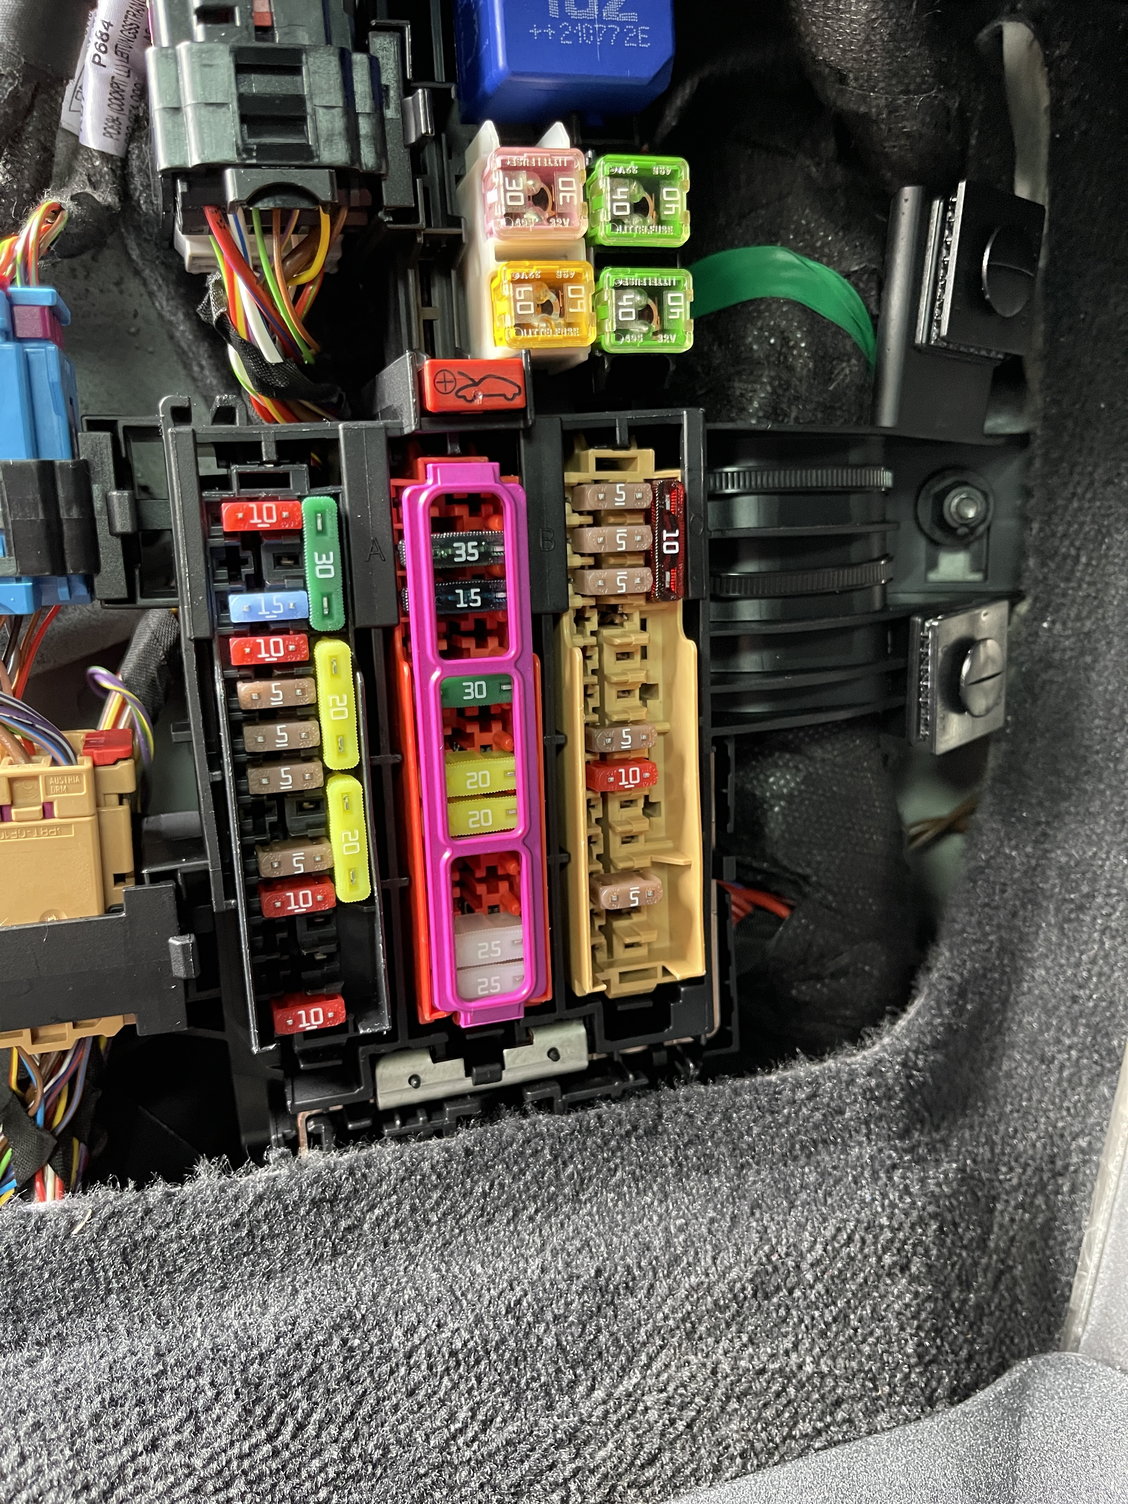
Open The Full Fuse Panel Covering
Remove The Pink Fuse Holder Left & Right
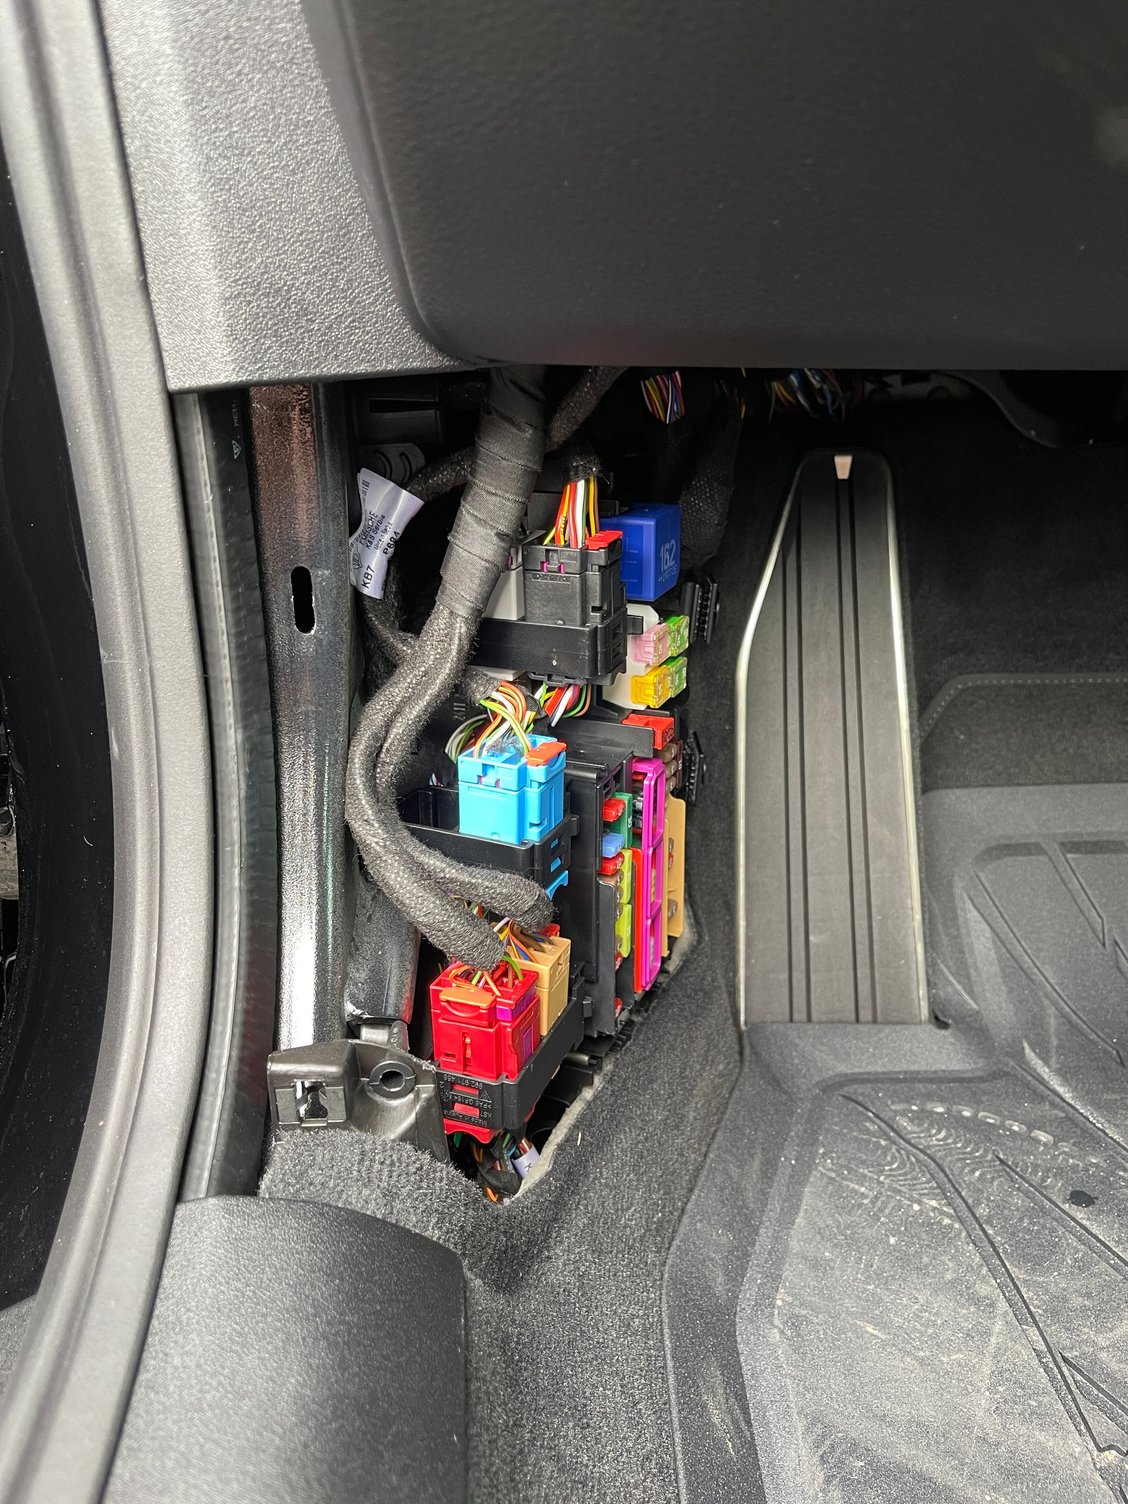
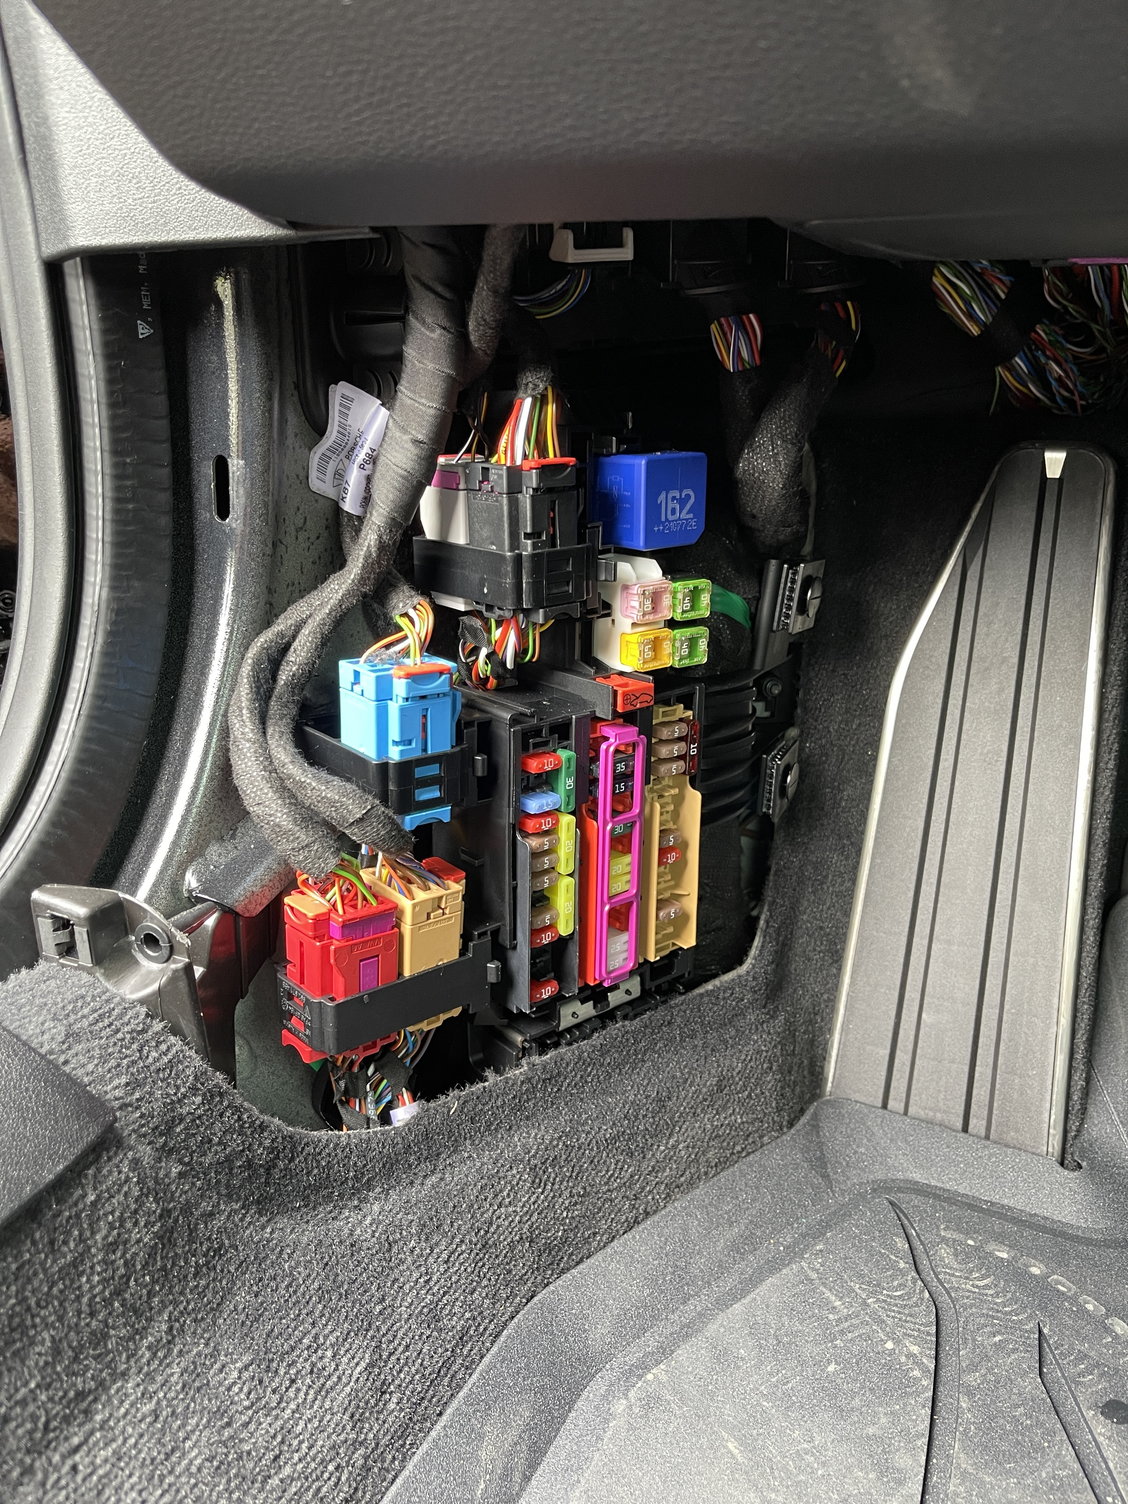
Driver Side Fuse Box:
Row A #14 BCM Control Unit (Battery Wire Tap) & Row C #8 BCM Control Unit (ACC Wire Tap)
Ground Wire Taps Into Underneath of The Steering Colom Where There Is A Bolt Between The Dead Peddle & Break Peddle
All Done Now Enjoy!!!
this is a great write up, thank you! wish we had more DIY how tos here. One question for you is this- are you sure that bolt serves as a ground? i think the black thing it backs onto is plastic, so if i were to put a ring connector on it, i'm not sure how well it would make chassis contact to serve as a ground. Or does touching the bolt and nut serve well enough?
I've been trying to find a good ground bolt without using one that the other wiring uses just in case i mess something up, so this would be a great one.
Last edited by achilleas101; 12-10-2021 at 01:17 PM.
Figure I'll add to this thread what i did and keep it all in one place
I ended up installing my single camera by running the wire down the passenger side A pillar and installing in the passenger fuse box.
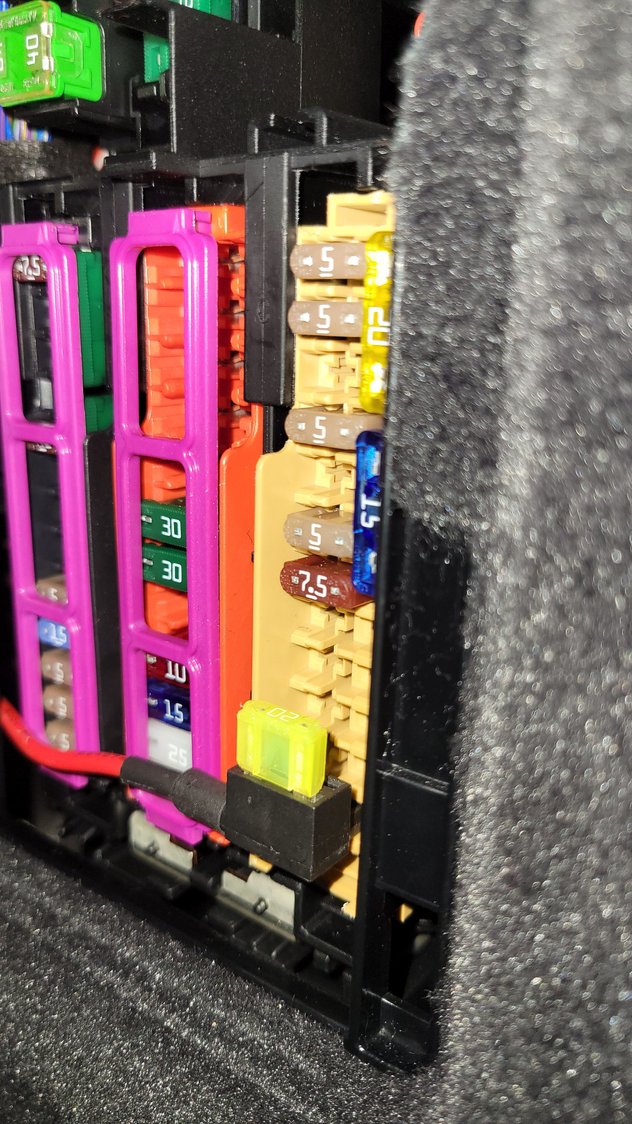
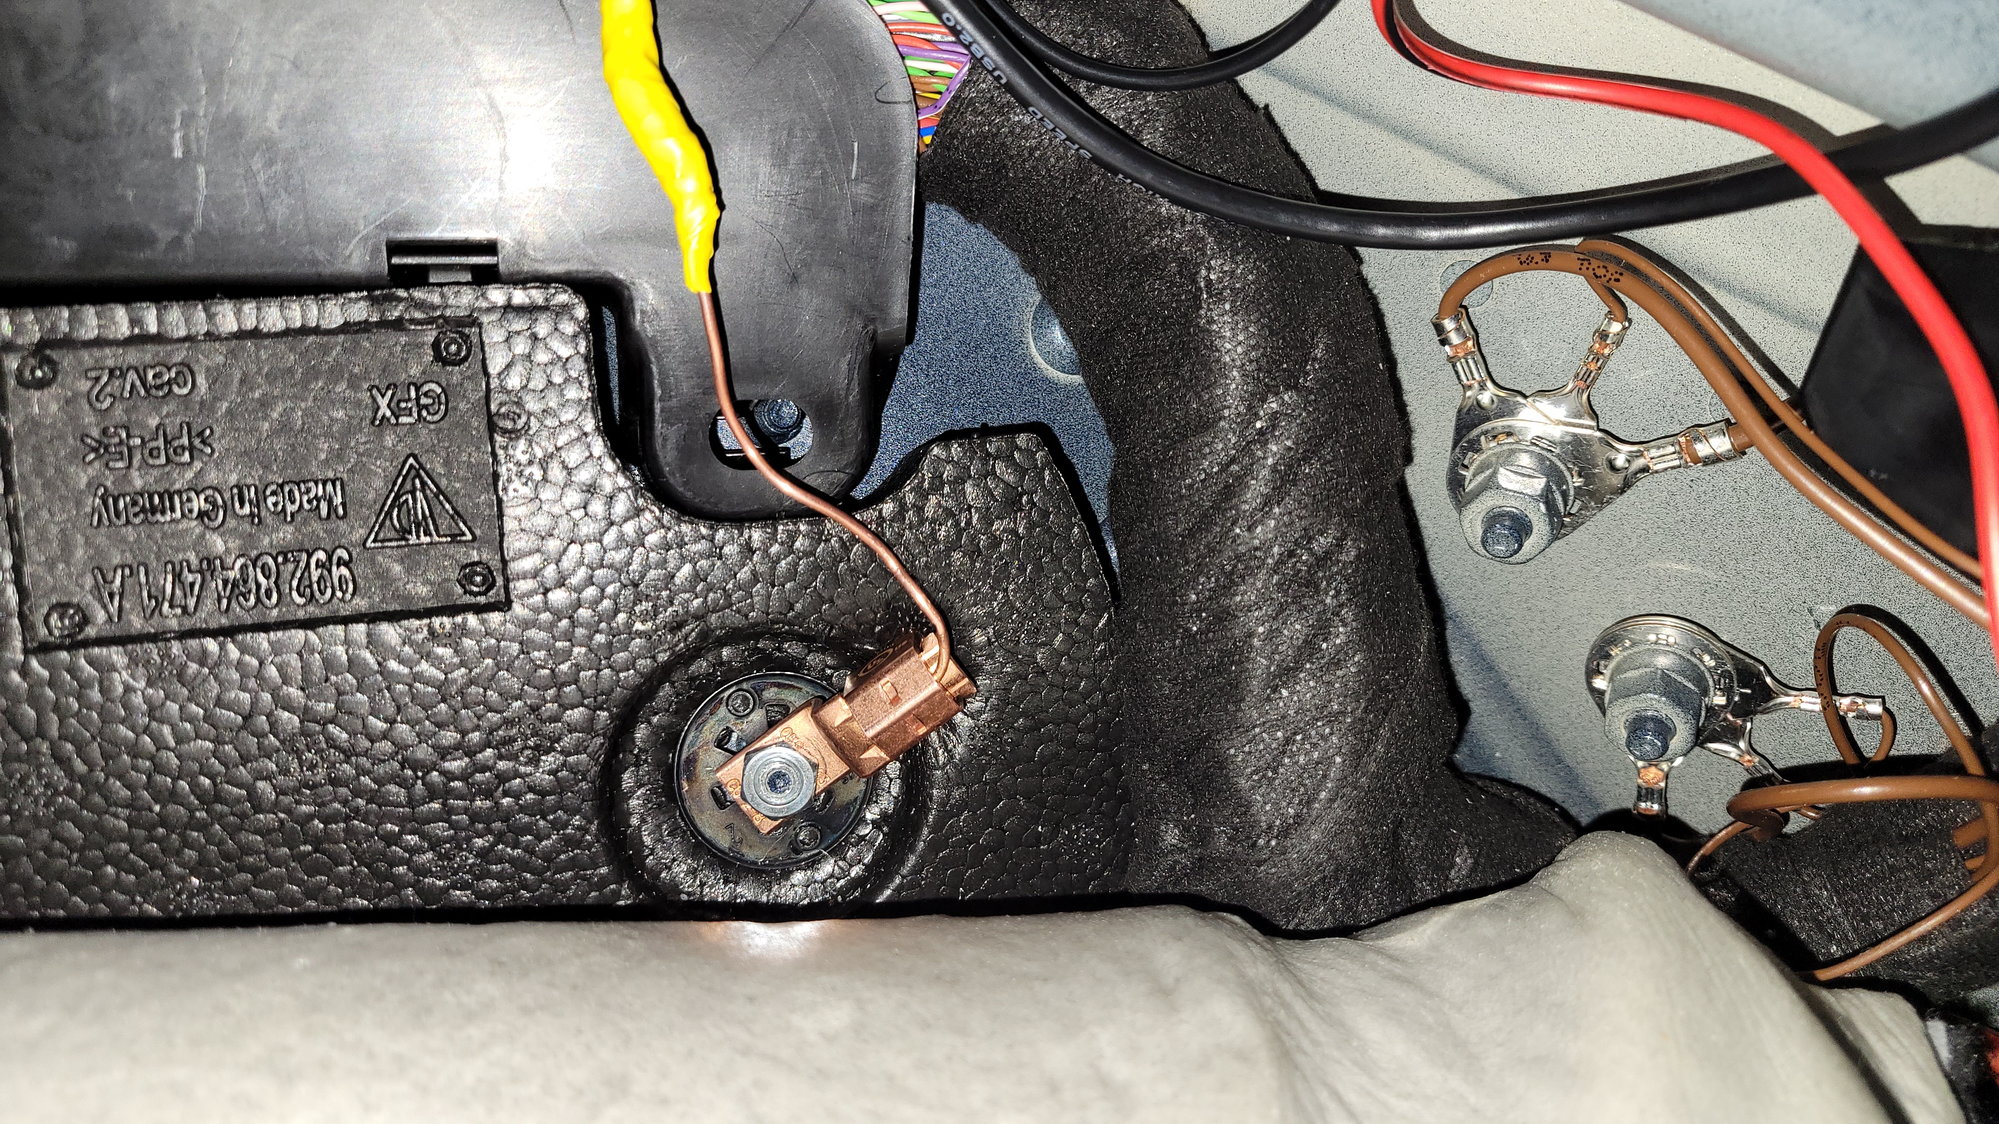
I found this slot that has switched power but no fuse. The manual doesnt say what it could be, but it works. Its 12th down in the C bank.
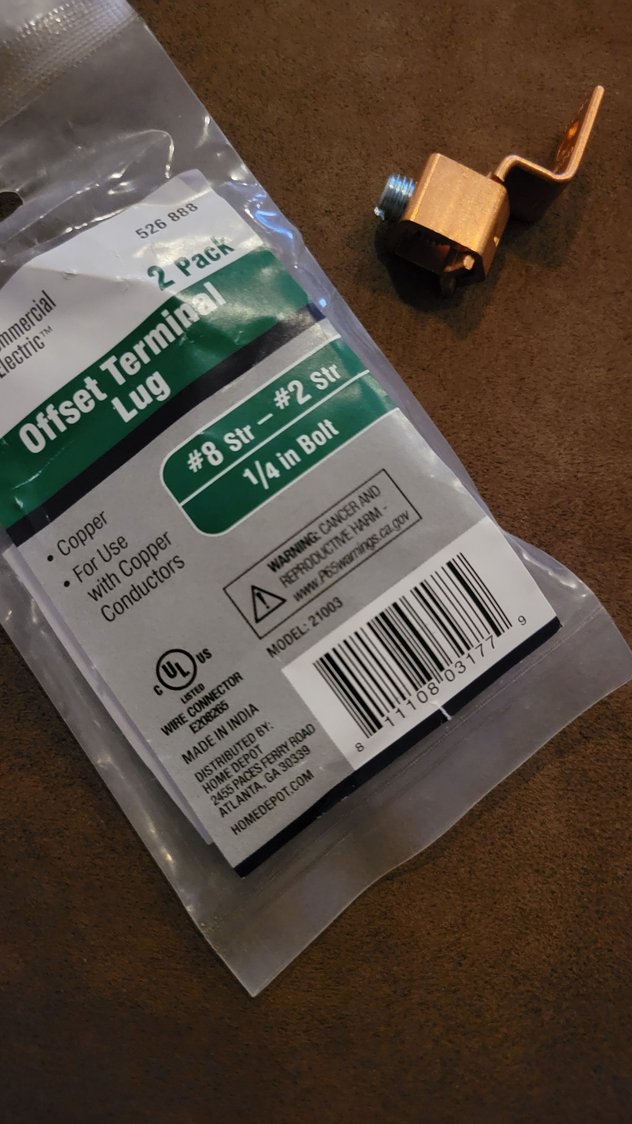
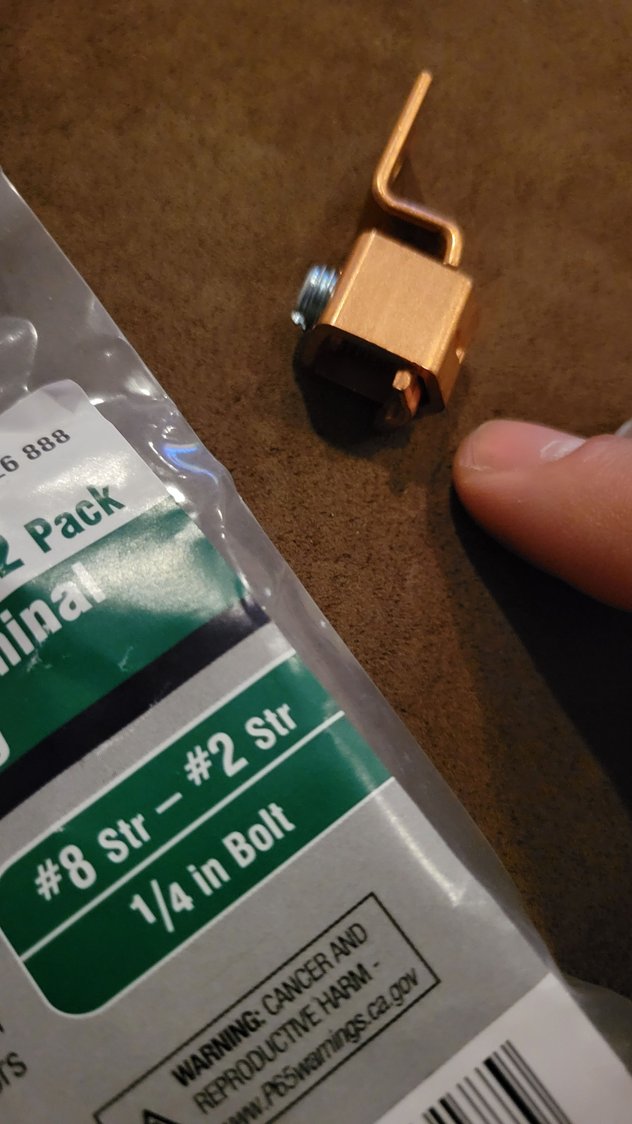
The hard part was the ground, but this is what i figured out. There are 2 bolts behind the footwell insulation but they have some plastic blocking the metal chassis. So i used an offset terminal lug and locked in a 14 gauge solid copper wire to it. Had to flip the little retaining piece upside down in order to secure it right
I soldered the other end to the ground wire of the camera, put the lug over the bolt and secured it with a nut sized 1/4-20 coarse. Now, the bolt has paint on it, so i used and tap and die kit to clean it up a bit. The thinking here was that the nut makes contact to the bolt, and the nut contacts the copper lug, which contacts the ground wire. Using a multimeter the wire seems to make enough of a ground contact, and the camera seems to be working.
Last edited by achilleas101; 12-12-2021 at 07:36 PM.
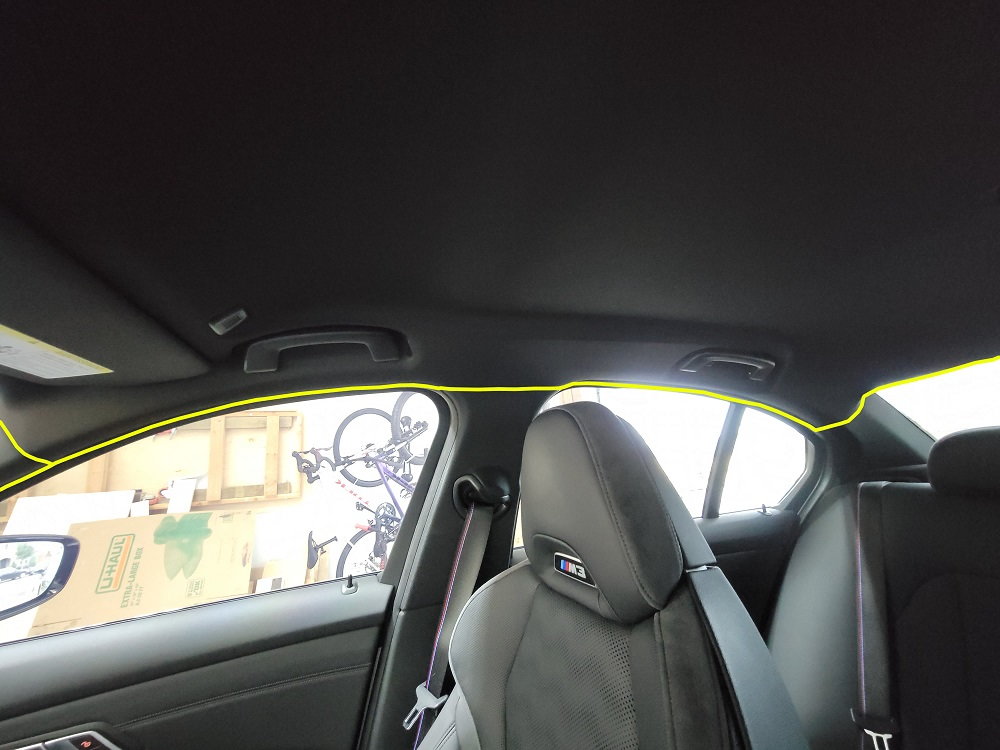
just wanted to give an alternative routing for the rear camera wire routing.
found this on the bmw forums. instead of routing the rear cable through the headliner, just use a trim tool to squeeze the wire in between A-pillar and headliner gaps, weather stripping, and B-pillar trim gaps. Makes for an easy route to the rear. see the picture below.
also, if you're willing to do a mirror tap, then you don't even need to run the wire to the footwell fuse box.
just added the 2 way on my cab mouting both cameras to the front windshield. For the ground wire, I did find a bolt next to the fuse box near the driver's door.
just wanted to give an alternative routing for the rear camera wire routing.
found this on the bmw forums. instead of routing the rear cable through the headliner, just use a trim tool to squeeze the wire in between A-pillar and headliner gaps, weather stripping, and B-pillar trim gaps. Makes for an easy route to the rear. see the picture below.
also, if you're willing to do a mirror tap, then you don't even need to run the wire to the footwell fuse box.
when i think running it via the headliner, that's what i'm referring to. The hesitation for me is, i don't know where the airbags are, and if the wire would interfere with the side curtain airbags during a collision.
Do you (or anyone here?) know anything about the airbags? i've tried but failed to find any info.

 07-19-2021, 03:55 AM