When you click on links to various merchants on this site and make a purchase, this can result in this site earning a commission. Affiliate programs and affiliations include, but are not limited to, the eBay Partner Network.
+1 for Paolo and Rennlights, installed blacked out headlights on my 2013 C2S last week and the quality was top notch. Purchase process was simple and he was always very communicative.
Very nice. Plan to pick up a set of black outs for my GT3.
Are you able to replace Macan lenses? Need a new set for my 2017, and lots of other owners having crazing/fading issues.
Have been getting several inquiries about Macan and Cayenne headlights and so I have ordered the replacement covers for those models and will be doing a trial run soon. Waiting on a dismantler to have a bad set that I can use.
Paolo
__________________
We Renew Cracked, Chipped, Crazed, or Clouded Headlights
1491 Polaris Pkwy. Unit 121
Columbus, OH 43240
email: info@RENNLIGHTS.com www.RENNLIGHTS.com
Have been getting several inquiries about Macan and Cayenne headlights and so I have ordered the replacement covers for those models and will be doing a trial run soon. Waiting on a dismantler to have a bad set that I can use.
Paolo
Excellent. I'll be first in line for black out and new lenses on the Macan headlights!
just installed my new lenses...what a JOB...but they look great!!!
Faced with a very expensive replacement on the lights, I looked far and wide for another solution and found these lens replacements on ebay for 180$ for a pair.
I figured for 180$ it was worth the risk so I ordered them. Nearly forgot about the order because it took over a month before the box arrived from China.
I opened them up and they were well packed with lots of bubble wrap and protective film. I unwrapped one and it looked perfect, I would swear they were OEM they
looked so good!
Not sure how to proceed, I began looking for videos, but there was very little out there, certainly non for a Porsche but finally I found something on Youtube that was really informative:
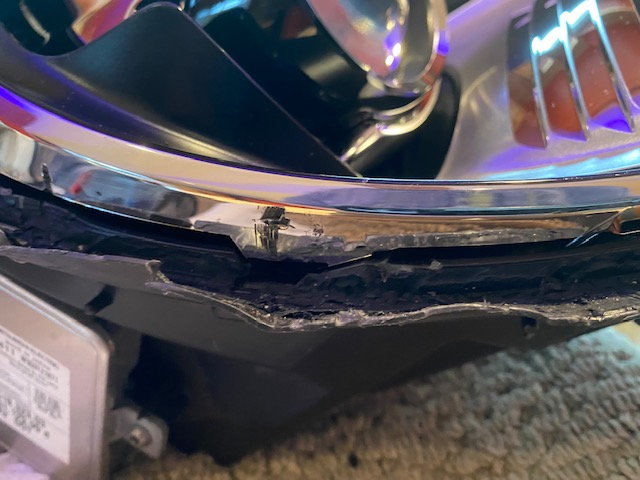
Finally weeks later I got the courage to try, the video was helpful but I soon found out that it was NO WAY NEAR as easy as it looked. After struggling with the removal of the lens
I decided to try more heat and put it back in the oven at 270F. I figured I was too far along now to retreat, the housing was quite mangled, so I may as well keep trying.
After 15 min at 270 I took it out and tried again, it was still very difficult and I just was hoping that any "damage" would not be seen after its installed.
Finally after a LOT of muscle power, screwdrivers, wedges it came free! I placed the lens over the compartment and it fit like a glove! Once apart I looked at it to see if there was something I was doing wrong, but
I could not see what else I might have done to make it easier, it was simply very strong butyl and the design of the lense and housing. The way the hooks were, you would theoretically have to slide the lens downward, and I tried this
on the second lens, but the butyl was just too strong.
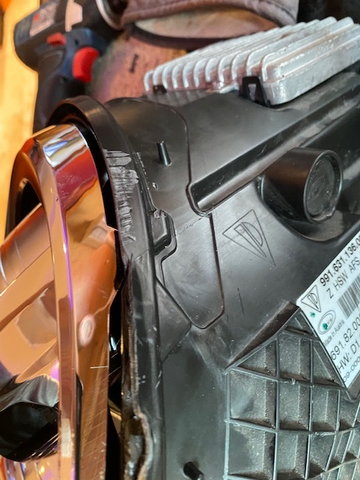
Once apart I then worked on repairing the mangled housing. I used a heat gun to gently put the ridges of the housing back in place as best i could, softening a little at a time and using my gloved hand to reform it as close I could to the original shape.
Then I placed the butyl in the recessed area, gave a last blast of compressed air to be sure that there was no dust inside, then put the lens on, then pressed it into place as good as I could and put it back into the oven at 270 for 15 minutes.
Took it out then used a couple of large clamps to clamp it down for 10 minutes until it cooled and the butyl became stiff. Because of the shape of the lens, clamping it was very
difficult and I also used vice grips to go around the housing and make sure it was tight. Unlike other lights, there are NO screws or clips to keep it in place, they obviously use
a VERY tough butyl to hold it together, no way was it coming apart like that Youtube video!!!
The second one went the same way, but this time I knew that I needed to go medieval on it, and use tremendous muscle and prying power to get it apart, so I had it open within 15 minutes.
One note of caution, the chrome paint on the inside reflector comes off VERY easy, so you have to try to be as careful as possible. On the first lens I discovered that if I got butyl on the chrome reflector portion, it would take off the chrome by sticking to it. So not only
did I have a little damage from the prying, but also the butyl. I was more careful with the butyl on the second one, but it was inevitable getting some scraping from the prying tools.
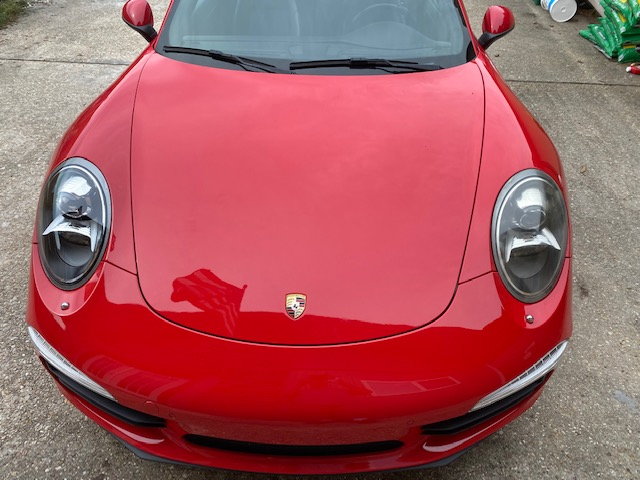
Finally I placed the light back on the car.....it looked magnificent except for where some of the chrome came off, but in truth I doubt anyone would see it unless they were examining it close up.
Summary: It's definitely worth the $180 for the kit, but it was a LOT of work getting the lens apart. Glad I did it, but I hope I don't ever have to do it again.
One thing that might work, if I were to do this again, I would cut the lens in half or portions then pull the sections off opening it like a clam shell. So if I were to do it again, I would cut off the lens with a cutting tool like a dremel.
Maybe someone has figured out a better way, maybe I could raise the temp of the oven higher to make it easy but then you might risk melting the housing or damaging the electronics, but whats done is done now and I'm happy.
damage while taking apart damage while taking apart damage while taking apart Left done right old New Lens Old Lens
Hi Paolo! Are you doing headlight lens replacemente for the 991.2 generation? Mine have the led ring with 4 leds in the roundel. I was thinking on getting the lenses replaced (broken edge covers) and may be replacing the 4 white leds with 4 yellow leds. Do you make this upgrade?
Regards
Edson.
Originally Posted by RENNLIGHTS
Have been getting several inquiries about Macan and Cayenne headlights and so I have ordered the replacement covers for those models and will be doing a trial run soon. Waiting on a dismantler to have a bad set that I can use.


 05-15-2022, 09:21 AM