

Replacing Evaporator

Thread Starter
Professor of Pending Projects
Rennlist Member
Rennlist Member

Joined: Nov 2001
Posts: 9,898
Likes: 35
From: Ocala, FL
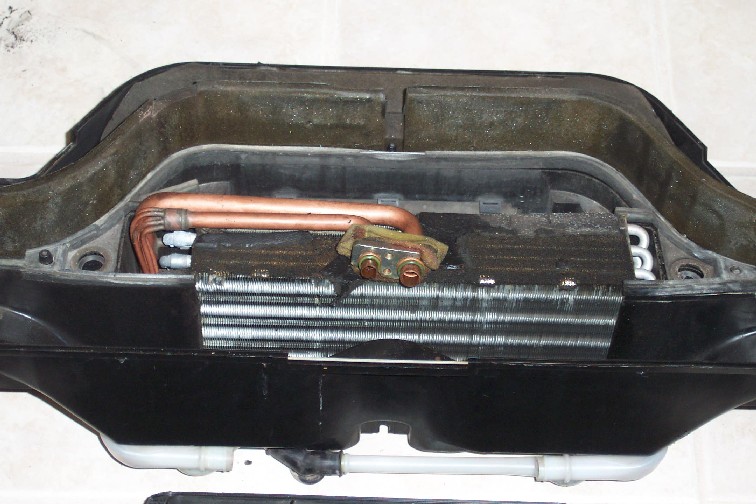
Air box apart:

old one before taking out:
old vs. new

Most likely leaking from here...

I could save it... NOT!! To the garbage!

New one installed...
Just drop it in put some of the strips of foam that comes with the evaporator (so it does not vibrate or rub against the borders)

And start putting clips back.
Install the blowers...and do not forget the two small bolts on each blower or you will have to remove the covers to do it again (ask me how I know )
)
I also installed the new dryer. Here is removing the old one:

Remember to oil the O-rings when installing the new one.
old one before taking out:
old vs. new
Most likely leaking from here...
I could save it... NOT!! To the garbage!
New one installed...
Just drop it in put some of the strips of foam that comes with the evaporator (so it does not vibrate or rub against the borders)
And start putting clips back.
Install the blowers...and do not forget the two small bolts on each blower or you will have to remove the covers to do it again (ask me how I know
)I also installed the new dryer. Here is removing the old one:
Remember to oil the O-rings when installing the new one.
Last edited by Wachuko; Mar 16, 2007 at 01:35 AM.
Thread Starter
Professor of Pending Projects
Rennlist Member
Rennlist Member
Joined: Nov 2001
Posts: 9,898
Likes: 35
From: Ocala, FL
On of those "while you are in there" - I had purchased a tank filter for the 951 (sitting for so many years the stuff in the gas tank is no longer gas...  ) Turns out it is the same part number so I went ahead and used it for the 964... I will get one later for the 951 when I start working on it again.

That is all for now back to work...
) Turns out it is the same part number so I went ahead and used it for the 964... I will get one later for the 951 when I start working on it again. That is all for now back to work...
Last edited by Wachuko; Mar 16, 2007 at 01:37 AM.
Addict
Rennlist Member
Rennlist Member
Joined: Nov 2001
Posts: 223
Likes: 0
From: Arizona, USA
Jaime,
Now you know why I recommended new heater hoses. It's impossible (IMHO) to keep them intact, especially when you consider they are 10+ years old now.
You're doing a great job with this thread. Keep it up!
Now you know why I recommended new heater hoses. It's impossible (IMHO) to keep them intact, especially when you consider they are 10+ years old now.
You're doing a great job with this thread. Keep it up!
Thread Starter
Professor of Pending Projects
Rennlist Member
Rennlist Member
Joined: Nov 2001
Posts: 9,898
Likes: 35
From: Ocala, FL
Originally Posted by Rich W
Jaime,
Now you know why I recommended new heater hoses. It's impossible (IMHO) to keep them intact, especially when you consider they are 10+ years old now.
You're doing a great job with this thread. Keep it up!
Now you know why I recommended new heater hoses. It's impossible (IMHO) to keep them intact, especially when you consider they are 10+ years old now.
You're doing a great job with this thread. Keep it up!
Thank you for the help Rich.
OK, as they say... assembly is the reverse. Everything is back in place. I left the bottom cover to the gas line uncovered to check for fuel leaks when I put gas back in the car and start it.
New dryer is in place. Remember to use new GREEN O-rings as the old black ones are not compatible with R134a. As someone recommended here I will hold back in putting oil in the compressor and leave that to the A/C Shop tomorrow. I installed the compressor but without the drive belt (to avoid accidental damage of running the thing without oil).
There is really no additional gotchas from putting it all back together... just be careful you plug all conectors back where they belong. There was a plug that I failed to notice, it was the one the connects to the heaters in the wiper nozzle. not easy to reach once the air box is in place but nothing a good set of loooong nose pliers could not handle. (I tell you ... tools is what set us apart from monkeys, LOL).
One more thing, there is a probe/sensor that goes in through a plastic bracket in the middle of the evaporator... this sensor goes all the way in the evaporator between the fins. Make sure you check, before final assembly of the air box cover, that the sensor goes in without problems. Initially I overlooked this and had some difficulty getting the sensor to go in since the fin right in front bent to the wrong way blocking the path... I had to use a very thin and long flat screwdriver to bend the fin back to allow the sensor to go in. The sensor sits right below the expansion valve (to the lower left of the expansion valve).
Time for a
 before I go to bed. Again, I will take the car tomorrow to the A/C shop for oil, vaccum creation, and R134a charge. Will post the final chapter after that.
Also notice that I need new front disc brakes and pads... so order place for those parts. This is an easy task. Not sure if people will be interested in photos of that process...

Thread Starter
Professor of Pending Projects
Rennlist Member
Rennlist Member
Joined: Nov 2001
Posts: 9,898
Likes: 35
From: Ocala, FL
Still waiting for the heater hoses... but went to an A/C shop... for US$104.68 (that includes tax) they did the vac, put in the oil I had, charge of R134A (some 30oz)... I was so happy when the guy told me that the system was holding the vac good... uuuhhhooo!!! So far so good. A/C is working fine (will know exactly once the heater hoses are in place since I am getting cold air from the vents and hot air from the floor duct holes! )
I think I can safely say this was a success... the car is not lighter thanks to the work done (meaning I did not have any parts left when I was done and there is always that feeling of accomplishment when working in the car...
I did notice that a bolt was loose... seems to be the bolt that holds the front differential rubber mount. I need to check PET and determine the part number and tackle that when I do the front brakes. For now I just adjusted the thing back to spec.
Can I safely cover the holes where the heater hoses connect while I wait for the parts???? I would like to use the car tomorrow... since the R32 is in the shop. Maybe use some thin metal and make a cap and hold it in place with the same clamp... any suggestions?
I think I can safely say this was a success... the car is not lighter thanks to the work done (meaning I did not have any parts left when I was done
and there is always that feeling of accomplishment when working in the car...I did notice that a bolt was loose... seems to be the bolt that holds the front differential rubber mount. I need to check PET and determine the part number and tackle that when I do the front brakes. For now I just adjusted the thing back to spec.
Can I safely cover the holes where the heater hoses connect while I wait for the parts???? I would like to use the car tomorrow... since the R32 is in the shop. Maybe use some thin metal and make a cap and hold it in place with the same clamp... any suggestions?
Thread Starter
Professor of Pending Projects
Rennlist Member
Rennlist Member
Joined: Nov 2001
Posts: 9,898
Likes: 35
From: Ocala, FL
Originally Posted by jimq
depending on what size maybe a PVC cap or maybe a rubber cap like they sell in the plumbing at Home D. would work temporarly.
Thread Starter
Professor of Pending Projects
Rennlist Member
Rennlist Member
Joined: Nov 2001
Posts: 9,898
Likes: 35
From: Ocala, FL
And here are the last photos for this post:
Everything but the carpet back in place...

New dryer in place:

A quick wash before going out to the A/C shop:

and now on to the next task... replacing the brake pads and rotors:

Bye now! Let me know if there is an area that needs more details and I will try to add to it.
Everything but the carpet back in place...
New dryer in place:
A quick wash before going out to the A/C shop:
and now on to the next task... replacing the brake pads and rotors:
Bye now! Let me know if there is an area that needs more details and I will try to add to it.
Thread Starter
Professor of Pending Projects
Rennlist Member
Rennlist Member
Joined: Nov 2001
Posts: 9,898
Likes: 35
From: Ocala, FL
Originally Posted by Arjan B.
...Why in the hell replace the rotors???
I will start a new thread for that. Cheers!

