

Should I replace these cam gears?
 04-14-2015 | 03:30 PM
#1
Thread Starter
Drifting
I'm getting deeper into a TB job and have the cam covers off.
Was planning to replace the gears with a brand new pair I picked up for a bargain on eBay years ago. But should I change them now or hold them back till a future change?
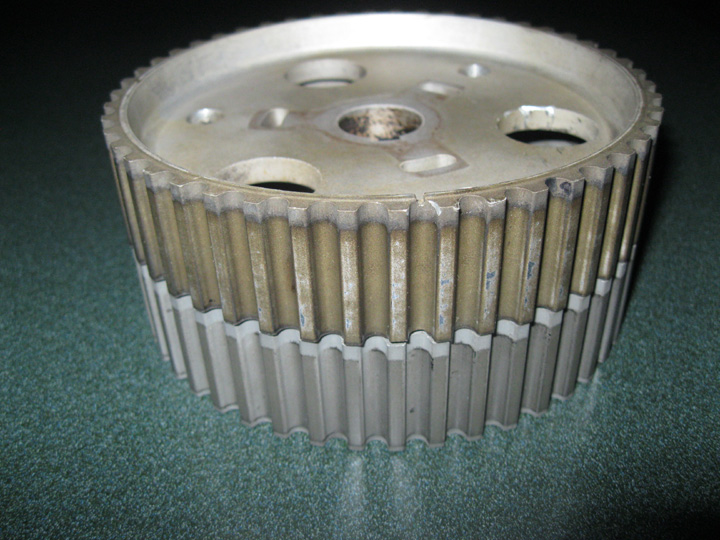
The teeth are beginning to go shiny in the middle of each tooth, but the edges look OK to my inexpert eye.
Normally I would just go ahead and install new parts, but I checked the timing of the original gears using the 32vR tool I bought with new gears in my mind. The timing at the moment is spot on (RHS is 2 retarded, LHS 0 which I believe is stock timing for a cold engine), so I don't want to risk disturbing it and not being able to set it back to exactly the same specs even with the tool (since gears may slip etc as I'm trying to adjust them). Oh the belt looks to be riding slightly forward on the gear on the RHS, but I can try to get this correct when I fit the new belt.
What would you do?
Was planning to replace the gears with a brand new pair I picked up for a bargain on eBay years ago. But should I change them now or hold them back till a future change?
The teeth are beginning to go shiny in the middle of each tooth, but the edges look OK to my inexpert eye.
Normally I would just go ahead and install new parts, but I checked the timing of the original gears using the 32vR tool I bought with new gears in my mind. The timing at the moment is spot on (RHS is 2 retarded, LHS 0 which I believe is stock timing for a cold engine), so I don't want to risk disturbing it and not being able to set it back to exactly the same specs even with the tool (since gears may slip etc as I'm trying to adjust them). Oh the belt looks to be riding slightly forward on the gear on the RHS, but I can try to get this correct when I fit the new belt.
What would you do?
04-14-2015 | 04:45 PM
#3
Looks like a pretty typical wear pattern. I would not hesitate to use those - you might also consider re-coating them if you believe that system works.
Interesting comment from Mark about the belt being a bit tight and causing that wear pattern. You might think that the valleys would show some polish given the teeth are supposed to cause "traction" to stop the belt from slipping but I have yet to see that happen. My thinking was that perhaps some wear has to take place on the crown before the teeth can seat "correctly" in the valleys.
It will be interesting to see what others have to say.
Regards
Fred
04-14-2015 | 05:22 PM
#5
Rennlist Member
Gears look good but coating looks to be pretty worn. General consensus is that once coating goes, gears will start to wear in fairly short order. There are conflicting opinions on whether or not recoating is advised. Most people recommend recoating. I seem to recall that Greg Brown does not. You may want to do some digging and form your own opinion. I had my oil pump gear and cam gear recoated with DFL-1 at the last timing belt job, but that was only 4 months ago so I can't speak to the longevity of the coating, but I was happy with the appearance and texture of the finished product. My cam gears were too far gone and had to be replaced.
It would be great if some people that have had gears recoated would chime in as to the durability of the DFL-1 coating.
Here is a good thread if you are a DIYer. https://rennlist.com/forums/928-foru...roject-16.html
I sent mine to Finish Line Coatings to have my oil pump and crank gear done since I did not want to deal with the mess of coating them myself. It was pretty affordable considering the price of new gears from what I remember. But turnaround did take a couple weeks including shipping.
04-14-2015 | 05:33 PM
#6
Rennlist Member
IMHO I would replace those Gears NOW, and get the old one re-coated w/ a "Dry Lube" type coating, about 35 bucks a gear, I do all 4 when I get them done.
Theory being that it reduces the belts running temp too, was told the coating is similar to what Belt drive systems use on motorcycles.
Have had great success doing them as long as you catch them before "cupping" on the teeth, then they are shot.
Dave
Theory being that it reduces the belts running temp too, was told the coating is similar to what Belt drive systems use on motorcycles.
Have had great success doing them as long as you catch them before "cupping" on the teeth, then they are shot.
Dave
Last edited by davek9; 04-14-2015 at 05:36 PM. Reason: pic added
04-14-2015 | 05:49 PM
#7
Archive Gatekeeper
Rennlist Member
Rennlist Member
Dave, any data on how the coating holds up? I remember asking AO a while back and IIRC he said he'd done 40k miles on coated gears. If I have the thread right, pics are here:
https://rennlist.com/forums/928-foru...l#post11023681
https://rennlist.com/forums/928-foru...l#post11023681
Trending Topics
04-14-2015 | 05:52 PM
#8
Thread Starter
Drifting
OK thanks all. Looks like I'm going to get a chance to fit those new gears!
Will look out for long 17mm wrench for better control of the cams using Porken's tool. I have an extendable ratchet I can use so maybe that is enough leverage.
I will now also be checking timing with a new belt, so will have to research threads on compensating for this. I think I read before that Porken recommends +2 to allow for belt running in, so on 1-4 I think the target should be 0 (factory spec) +2 (run in belt) +2 (valve backlash) -2 (cold retard) = grand total of +2
04-14-2015 | 06:26 PM
#9
Three Wheelin'
OK thanks all. Looks like I'm going to get a chance to fit those new gears!
Will look out for long 17mm wrench for better control of the cams using Porken's tool. I have an extendable ratchet I can use so maybe that is enough leverage.
I will now also be checking timing with a new belt, so will have to research threads on compensating for this. I think I read before that Porken recommends +2 to allow for belt running in, so on 1-4 I think the target should be 0 (factory spec) +2 (run in belt) +2 (valve backlash) -2 (cold retard) = grand total of +2
Will look out for long 17mm wrench for better control of the cams using Porken's tool. I have an extendable ratchet I can use so maybe that is enough leverage.
I will now also be checking timing with a new belt, so will have to research threads on compensating for this. I think I read before that Porken recommends +2 to allow for belt running in, so on 1-4 I think the target should be 0 (factory spec) +2 (run in belt) +2 (valve backlash) -2 (cold retard) = grand total of +2
04-15-2015 | 02:35 AM
#10
OK thanks all. Looks like I'm going to get a chance to fit those new gears!
Will look out for long 17mm wrench for better control of the cams using Porken's tool. I have an extendable ratchet I can use so maybe that is enough leverage.
I will now also be checking timing with a new belt, so will have to research threads on compensating for this. I think I read before that Porken recommends +2 to allow for belt running in, so on 1-4 I think the target should be 0 (factory spec) +2 (run in belt) +2 (valve backlash) -2 (cold retard) = grand total of +2
Will look out for long 17mm wrench for better control of the cams using Porken's tool. I have an extendable ratchet I can use so maybe that is enough leverage.
I will now also be checking timing with a new belt, so will have to research threads on compensating for this. I think I read before that Porken recommends +2 to allow for belt running in, so on 1-4 I think the target should be 0 (factory spec) +2 (run in belt) +2 (valve backlash) -2 (cold retard) = grand total of +2
The manuals for both the 32VR and Bumpstick are available on line and there is a method for doing the 1-4 bank if you have to retard the timing at all. As others have already stated do not try to turn the cams using the camshaft bolt. The 32VR tool also allows you to set the cam timing with the engine locked at 45 BTDC so you can fully rotate the cam [in the correct direction] if you have to- independent of the crank position.
The 1/4 bank seems to be the problem child as it has a tendency to jump under valve spring pressure- the bumpstick deals with this and helps make life very easy doing this job.
You now have to make a decision as to whether you retain the cam wheels "as is" or use your back up set and re-coat the existing ones as a shelf spare. I have no position on the viability of the coating approach but I do have a pair of wheels re-coated for potential future use.
Regards
Fred
04-15-2015 | 03:21 AM
#11
Thread Starter
Drifting
Fred I have checked the existing timing with 32V'r and it's spot on -2 LHS, 0 RHS.
But I'm getting more confused. Advice is not to turn 17mm bolt but turn the washer instead. I don't have the Bumpstick, and all the instructions for 32V'r are to use the 17mm bolt.
I am also not sure at what point I change the gears - with crank locked at 0 or 45 - and when to remove the flywheel lock. The instructions for retarding timing require turning the crank, but obviously can't do this with flywheel locked. The 32V'r does have a 45 position key, but there's nothing in instructions about using this.
Can anyone please advise on installing and timing up new gears using 32V'r but no Bumpstick, and with new belt?
If I'm going to get into problems then I am tempted to keep the old gears on with the existing good timing.
04-15-2015 | 04:54 AM
#12
Thread Starter
Drifting
I have found this method from Fastest928 that looks promising:
1 Mark belt and sprockets
2 remvoe distributor rotor
3 insert 5mm screws
4 measure distance between screw head and leading face of cam sprocket slot. This locks the sprocket to the spyder
5 Remove old sprocket
6 Mark new sprocket with "belt marks"
7 Install sprocket onto spyder and locate with 5mm screws to the distance measured above in step 4
Just not sure what is meant by "leading face of cam sprocket slot", and whether that has to be measured at all 3 slots, or do you just pick one and measure that for old and new gears?
I can't find anything in WSM Vol 1 on replacing the cam sprockets, unless I've missed it. been through the whole section on valve gear/timing.
Last edited by StratfordShark; 04-15-2015 at 07:06 AM.
04-15-2015 | 08:19 AM
#13
Fred I have checked the existing timing with 32V'r and it's spot on -2 LHS, 0 RHS.
But I'm getting more confused. Advice is not to turn 17mm bolt but turn the washer instead. I don't have the Bumpstick, and all the instructions for 32V'r are to use the 17mm bolt.
I am also not sure at what point I change the gears - with crank locked at 0 or 45 - and when to remove the flywheel lock. The instructions for retarding timing require turning the crank, but obviously can't do this with flywheel locked. The 32V'r does have a 45 position key, but there's nothing in instructions about using this.
Can anyone please advise on installing and timing up new gears using 32V'r but no Bumpstick, and with new belt?
If I'm going to get into problems then I am tempted to keep the old gears on with the existing good timing.
But I'm getting more confused. Advice is not to turn 17mm bolt but turn the washer instead. I don't have the Bumpstick, and all the instructions for 32V'r are to use the 17mm bolt.
I am also not sure at what point I change the gears - with crank locked at 0 or 45 - and when to remove the flywheel lock. The instructions for retarding timing require turning the crank, but obviously can't do this with flywheel locked. The 32V'r does have a 45 position key, but there's nothing in instructions about using this.
Can anyone please advise on installing and timing up new gears using 32V'r but no Bumpstick, and with new belt?
If I'm going to get into problems then I am tempted to keep the old gears on with the existing good timing.
Before you remove anything a trick is to index the tooth that aligns with the timing mark at the back of the casing and then mark the same tooth on the replacement wheel and set this initially somewhere in mid adjustment range. Then when the belt is on you can put the 32VR on.
Ironically I have just got back from the car port where I was checking my cam timing today. 5/8 bank was spot on but 1/4 was retarded about 5 degrees instead of 2 degrees so I reckon I did not allow for the new belt correctly when I fitted it. I now have minus 3 on 1/4 and minus 1 on 5/8 bank.
The whole point of having the crank locked at 45 degrees is so that you can turn the cam a full 360 if you have to by moving forwards- not backwards- apparently the latter being a no no.
I think Ken covers what to do if you have a new belt and he recommends a correction factor of 2 degrees advanced on bank 1/4 to allow for initial stretch during the settle in process so when you have set the cam timing and spun the engine on the starter motor it should initially read zero both sides. Then after the belt has settled it should read minus 2 and zero. I do hope someone will correct me if I have that wrong in any way.
Just read the 32VR manuals carefully and it will make sense- it is just a little confusing initially.
Just remember if the cam timing is out a few degrees initially it will not harm anything but do not change the cam wheels with the crank in anything but locked at 45 degrees BTDC no matter what.
The trick bit of the bumpstick is not the wrench but the holder piece that locks the 30mm washer to the cam wheel- that is a really clever piece of kit. The wrench is neat because it is narrow and has good leverage- a conventional open ender is just bulky but no problem as long as your 17mm socket fits inside the 30mm wrench jaws which it should do.
Do let me know if there is anything else I can help confuse you with.
Regards
Fred
04-15-2015 | 08:28 AM
#14
Rennlist Member
I have zero experience on the topic but I'd be afraid to run those. I'm replacing one of mine with much less wear. I plan to time with dial indicator method.
Good luck with your project.
Here are mine:
Good luck with your project.
Here are mine:
04-15-2015 | 09:55 AM
#15
Thread Starter
Drifting
The bumpstick kit tends to take the trial and error out of the process but it can be done without the bumpstick. If you are going to change the cam wheels you must set the crank at precisely 45 degrees and lock it. when putting things back you can then use 32VR to time the cams using the 45 degree BTDC position-simple and you get the timing you want by moving the cams forward driving them with the 30mm captive flange- then bolt everything together, remove the crank lock and spin the motor on the starter [EZ unit unplugged] for a few seconds. Then recheck the timing with 32VR and if it is out a tad then readjust at the zero [or 45 BTDC] position.. Advancing the cam timing is relatively easy I believe it is retarding that is a bit more tricky as the cam has to be moved backwards a bit.
Before you remove anything a trick is to index the tooth that aligns with the timing mark at the back of the casing and then mark the same tooth on the replacement wheel and set this initially somewhere in mid adjustment range. Then when the belt is on you can put the 32VR on.
Ironically I have just got back from the car port where I was checking my cam timing today. 5/8 bank was spot on but 1/4 was retarded about 5 degrees instead of 2 degrees so I reckon I did not allow for the new belt correctly when I fitted it. I now have minus 3 on 1/4 and minus 1 on 5/8 bank.
The whole point of having the crank locked at 45 degrees is so that you can turn the cam a full 360 if you have to by moving forwards- not backwards- apparently the latter being a no no.
I think Ken covers what to do if you have a new belt and he recommends a correction factor of 2 degrees advanced on bank 1/4 to allow for initial stretch during the settle in process so when you have set the cam timing and spun the engine on the starter motor it should initially read zero both sides. Then after the belt has settled it should read minus 2 and zero. I do hope someone will correct me if I have that wrong in any way.
Just read the 32VR manuals carefully and it will make sense- it is just a little confusing initially.
Just remember if the cam timing is out a few degrees initially it will not harm anything but do not change the cam wheels with the crank in anything but locked at 45 degrees BTDC no matter what.
The trick bit of the bumpstick is not the wrench but the holder piece that locks the 30mm washer to the cam wheel- that is a really clever piece of kit. The wrench is neat because it is narrow and has good leverage- a conventional open ender is just bulky but no problem as long as your 17mm socket fits inside the 30mm wrench jaws which it should do.
Do let me know if there is anything else I can help confuse you with.
Regards
Fred
I am crank locked at exactly 45 BTDC so can mark the old sprockets (the V on the backing plates lines up with valleys 3 ahead of the big square notch on both sides, so I know I'm at 45 btdc). I will also measure 5mm screw heads relative to slots as another reference.
So presumably I use the clamp ring set so the 45 key points up if I time gears in this position? It's good to know I can just keep advancing cam if necessary, as the instructions for retarding timing did look tricky with turning crank while holding cam bolt steady.
Only have minor issue in that I only drained rad not block for TB change, as new pump was installed last change only 10000 miles ago. So if I spin the starter the pump is going to hurl a lot of water out of the water bridge I think! Unless with cold engine and t-start closed, all the water will stay circulating in the block?
Thanks a lot.
Adrian