

After buying this kit..my rear end CRREEAAKKKS!
 05-22-2011, 08:29 PM
#76
Developer
Now the nut can turn with the pin, and it should not twist loose or creak.
The problem is, I dont have a 928 to drive to test this on. The car I fitted them on for these photos is waiting for an aluminum flywheel so it could be another week before I can drive it.
The other car is my race car and I couldn't hear it creak if I tried.
I think this "solution" needs to be driven for a while, then check torque on the pins, and report back. Then we can endorse it or not.
Who would like me to send them a set of these washers for testing?
Just PM me your name and address and I'll get them in the mail. I can make them up pretty fast.
No charge. Just tell me if they helped a) stop the creaking, or b) stop the driver's side nut from working loose.
 05-22-2011, 08:39 PM
#77
Nordschleife Master
Carl,
The pin is lower than the bushing because it needs that compression.
Here is a test for you to do, which will allow you to better understand as to how it works.
Take the factory washer and turn it down so that the OD is the same as the OD of the inner bonded steel sleeve shown in the picture above. Then put it on and tighten to spec. Once this is done, actuate the suspension from full droop to full compression.
You will note that the inner bonded sleeve rotates with the pin, hub carrier, and inner bonded shock sleeve. All of the 15 deg that you noticed are taken up in the rubber bushings on the lower control arm. Likewise in the lower shock bushing for its actuation.
The creaking comes from the hub trying to turn against the conical washers, and the pin itself.
I believe from your post above that you understand that the bolt needs to be able to spin independent of the plate. But I dont feel that you understand that the bolt does NOT want to spin in the rubber bushing. The only way to achieve this is to make a steel sleeve which has an OD the same as the original washer, and an OD equal to that of the inner bonded sleeve in the rubber bushing.
Then you need to make the hole in the plate with a reamer to ensure proper tolerances. You want roughly .0005 to .001" between the OD of that sleeve, and your plate. If you have more than this, you will loosen the outer holding bolt as the plate wiggles up and down. It will also give a nice clunking noise.
It would be wise to make this bushing .001-.005" thicker than the thickness of your plate.
Then use the factory washer on the outside and torque to spec.
As said though, if you have more than .001" between this sleeve and your plate, the outer bolt (original drop link attachment point), will be slowly undone from the up/down motion of the plate. Though the effects will be less drastic than those of that lower pin coming loose.
05-22-2011, 08:42 PM
#78
Nordschleife Master
You did your second post with pictures while I was typing my response.
Your solution is not a valid one I am afraid. The pin needs to be LOCKED to the inner bonded sleeve of the lower control arm bushing. So long as your plate is covering that piece this cannot happen.
Your solution is not a valid one I am afraid. The pin needs to be LOCKED to the inner bonded sleeve of the lower control arm bushing. So long as your plate is covering that piece this cannot happen.
05-22-2011, 08:43 PM
#79
Rennlist Member

The method you used will NOT solve the problem you NEED to transfer the compressive load from the tightened nut to the aft LCA bushing with out putting the tie down bracket into compression. To ilustrate proof of concept you should be able to remove the inboard bolt that tiws the bracket to the control arm then if the assembly is transferiing compression correctly you should be able to freely rotate the plate about the pivot pin assembly.
05-22-2011, 08:51 PM
#80
Nordschleife Master
Carl,
Watch this youtube video.
http://www.youtube.com/watch?v=X03h2gE4Rao
This is not the best explanation, but it does give you an idea as to how a rubber bushing is actually supposed to work in an active suspension.
On the 928 rear lower control arm. The pin is not ever supposed to rotate in any of the items. When the bolt is tightened all parts lock together preventing that pin from turning. The 15 deg of rotation that it may see is completely absorbed in the rubber bushings at the end of the pin.
This is why anyone who understands how suspension components work does not use poly urethane in the stead of rubber bushings and that if rubber bushings are to be replaced in a suspension setting the only replacement is with steel spherical bearings.
05-23-2011, 05:56 AM
#81
Rennlist Member
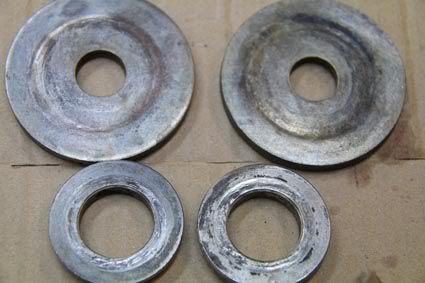
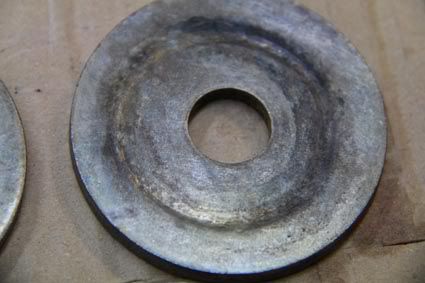
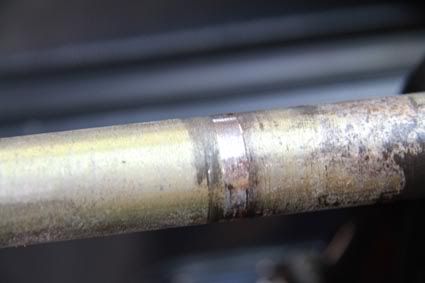
I am showing photos of the change in my washers since the TDP was installed.
I can't remember which side they came out of, but they clearly show movement! The pin photo showing wear is the RHS, but both sides show this wear, but only one side has the cone washer and flat washer wear wear.
I don't remember my nuts coming loose , but as i can't get a torque wrench on the front nut, I most likely did them up FT! Used my chicken legs to do it up....
I do think that I needed do use a anti sieze as the grease seems to have gone dry, there were small metal flakes being shed from the cone washers.
Now is this what the proposal is? I am trying to understand the descriptions, but I am visual! IF, so all we need is a good holesaw!!
However I gather its close tolerances that will prevent the TDP now banging, making noise and wearing on the washer or shim. Also will the plate be strong enough to take the loads from the sway bar if its only attached by the allen bolt into the rear LCA??
Seems like more problems arise as mods are made.
I am pretty sure I have read that the nuts on the pin have loosend on cars without a TDP. Some cars including my own used to twitch to the side at the rear until the nut was tightened, but as my nuts were tightened in conjunction with the fitting of the TDP , I am only presuming they were loose. The twitch disappeared when I fitted the plate. A good wheel align also helped it even more!
I have a particular man hole cover on my street that does this to many cars, so its a good repeatable test.
May I suggest RHS and LHS as we all don't drive on the wrong side of the road,
 , so driver or passenger sides just confuse.
Ta muchly..

Last edited by blazing928; 05-23-2011 at 06:15 AM. Reason: more info
05-23-2011, 06:39 AM
#83
Addict
Rennlist Member
Rennlist Member
Nigel
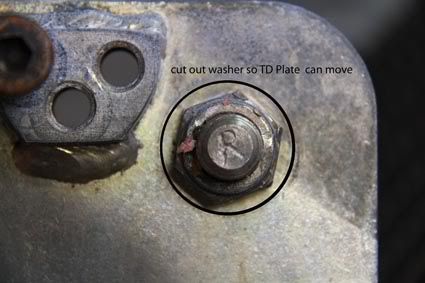
What you suggest would work in so far as the TDP would be free to rotate relative to the pin. (The TDP being fixed to the pin is the reason the nuts come undone.)
However the OEM design incorporates a big fat washer on each end of the pin to contain the rubber bushings (Porsche presumably felt that there was some risk of the rubber bushing becoming unbonded and without the big fat washer it could all come apart)
What is needed as I think Colin suggested is a pair of top hat shaped washers each side of the TDP to retain the TDP without clamping it so TDP can rotate but not fall of the aft end and at the same time the clamping force from the torque on the Nut is transmitted to the afte end of the crush tube in the rear most rubber bushing thus keeping all the oriingal bits firmly clamped together.
05-23-2011, 07:23 AM
#84
Rennlist Member
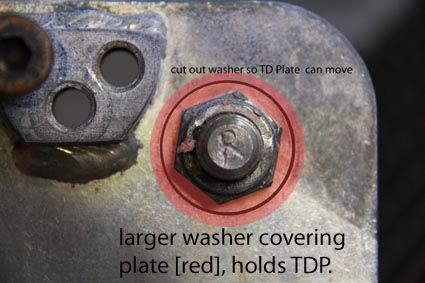
Thanks Jon, I think I get it now, basically the original washer would do as long as the cut out in the TDP is big enough and then another larger washer to gently hold the TDP in place. However Colin suggests the washer is slightly thicker so the TDP holding washer doesn't bind on the TDP. Correctamundo?
a bit more Photoshop...
I will sit back and wait the outcome.....

a bit more Photoshop...
I will sit back and wait the outcome.....
Last edited by blazing928; 05-23-2011 at 08:41 AM.
05-23-2011, 11:00 AM
#85
i will hold off machining my plates till we get a consensus. i will try to make some hat bushings today, and or bushing "extensions" that can poke out a little from the TDP so the nut/washer tightens but allows the plate to move.
05-23-2011, 01:09 PM
#86
Developer
Colin and others- thanks for the explanation.
If you are right (and I am thinking you are) then the hat bushing is the best/right improvement.
I am swamped today, but I can put a guy on it tomorrow and lathe up some bushings. Let me do that, mount them up, and show photos.
If you are right (and I am thinking you are) then the hat bushing is the best/right improvement.
I am swamped today, but I can put a guy on it tomorrow and lathe up some bushings. Let me do that, mount them up, and show photos.
05-23-2011, 01:32 PM
#87
Nordschleife Master
Carl,
To do this right, you really need to insure that you drill the hole and then use a reamer to ensure a perfect hole dimension on the plate. Without that hole being a proper size, it will allow it to move too much which will then allow the outer bolt to be worked loose.
To do this right, you really need to insure that you drill the hole and then use a reamer to ensure a perfect hole dimension on the plate. Without that hole being a proper size, it will allow it to move too much which will then allow the outer bolt to be worked loose.
05-23-2011, 01:50 PM
#89
Nordschleife Master
If you build it with the clearance stated above. .0005 to .001" you will have no clunk.
You think that .001" = .0005" top and bottom.
So .0005" = .00025" top and bottom. No one will be able to notice that especially once you have a little neversieze in there.
You think that .001" = .0005" top and bottom.
So .0005" = .00025" top and bottom. No one will be able to notice that especially once you have a little neversieze in there.
05-23-2011, 01:57 PM
#90

Someone might have tried this already, but why not eliminate the connection to the drop link and just use the pin connection alone? It is a pretty strong point and with it free, wouldn't it just rotate as the outer washer does?