
S4 A/T rebuild thread
 07-30-2008, 05:40 AM
#16
Under the Lift
Lifetime Rennlist
Member
Lifetime Rennlist
Member
Adam:
Thanks for trying the diff removal in situ so I didn't have to be the one to find out.
Oh, and thanks for the shift kit info, too!
You seem to have gotten lucky with the pinion nut. Shocki or Borland had to build a rig to hold the tranny so he could use a huge beaker bar on that nut.
Watching with interest.
 07-30-2008, 01:09 PM
#17
Rennlist Member
Thread Starter
Me too. LOL
Last edited by atb; 07-30-2008 at 06:33 PM.
07-30-2008, 01:27 PM
#18
Rennlist Member
Thread Starter
 07-30-2008, 02:09 PM
#19

This is so cool Adam.
07-30-2008, 02:24 PM
#20
Under the Lift
Lifetime Rennlist
Member
Lifetime Rennlist
Member
I've been using an air gun to break loose the nuts and bolts that I can't untorque by hand. I basically have the tranny balancing on the edge of a couple of 2x4's, and with the air gun it can apply the torque to the nut/bolt without spining the tranny itself. Works out very nice.
07-30-2008, 07:57 PM
#21
Former Vendor

Join Date: Feb 2004
Posts: 2,139
Likes: 0
Received 0 Likes
on
0 Posts
Hi Bill,
I removed that nut with a Harbor Freight 3/4 inch, 500 ft lb (IIRC) airgun. No issues and it spun off surprisingly easy with no bracing needed.
Now, to re-torque to the correct specs with a torque wrench was a different story. A friend helped to stabilize the trans as I cranked down on the torque wrench. We looked like to monkeys having their way with a football on the garage floor. Good thing no women or children were present during this procedure!
Regards,
Constantine
08-03-2008, 02:54 AM
#22
Rennlist Member
Thread Starter
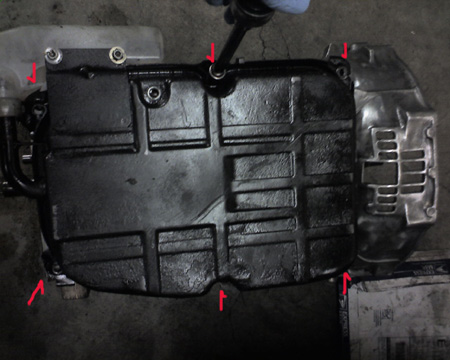
So from here on out I'm pretty much following the WSM from 37-144. This is in Volume III, not Volume II.
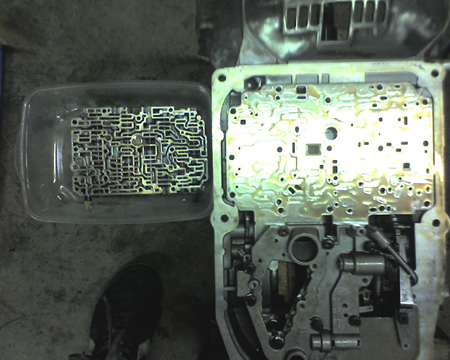
Start by removing the pan by unbolting the six bolts around the perimeter:
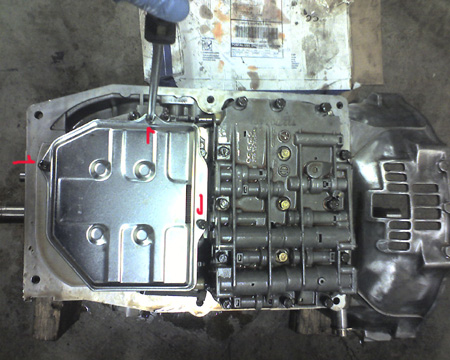
This exposes the valve body and filter. The filter is removed by unscrewing the three phillip head screws:
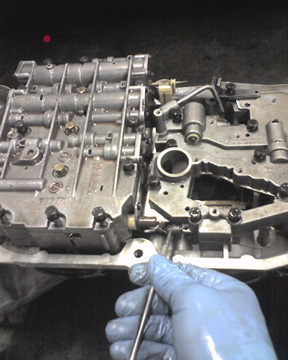
Unhook the bowden cable linkage return spring:
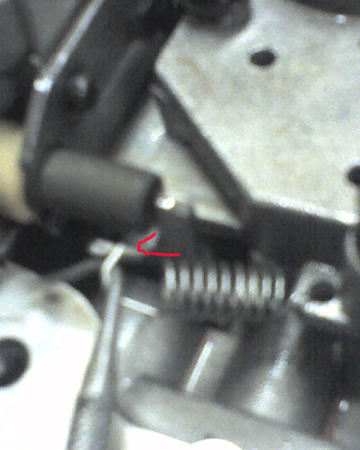
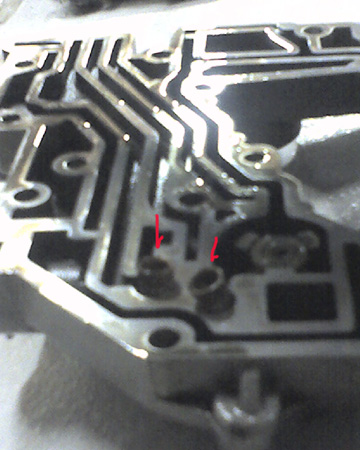
Here's a close up (sorry it's blurry), I've shown in red where the spring originally hooks:
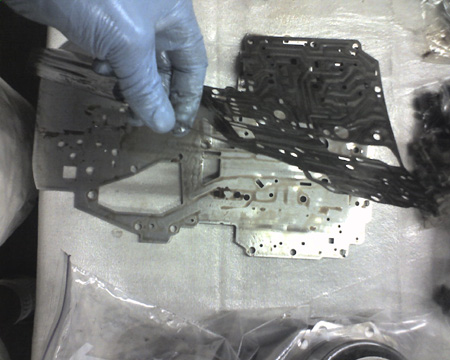
There are 15 bolts in all holding down the main valve body, they all need to come out:

I pulled the valve body out and laid it face up in a tupperware pan. It's good to get a couple of these to keep the tranny parts for later disassembly:
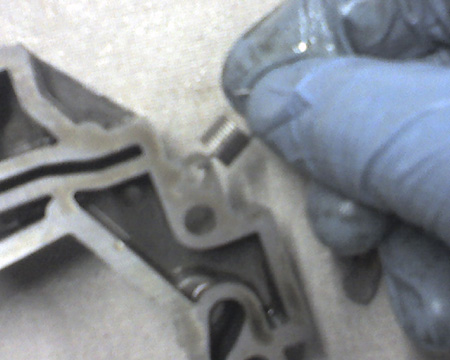
Next, unbolt the mounting bolt for the leaf spring roller:
Here's what it looks like removed, note the separate hold down clamp:
Next, undo the nine bolts holding down the "lower cover".
With the bolts removed, lift up on the lower cover and it will take the "back plate" with it.
Flip the assembly over, and you will see a small plate holding the lower cover onto the back plate with four slot head screws. Removing them releases the lower cover, so make sure you are working on a flat clean surface.
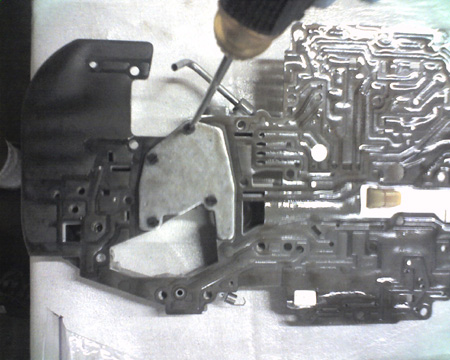

So here's the first dose of "little stuff in an A/T that if you didn't see where it came from you wouldn't know where to put it back" that I experienced in this tear down. I've indicated where two little filter screens reside. They sit flush in these two holes.
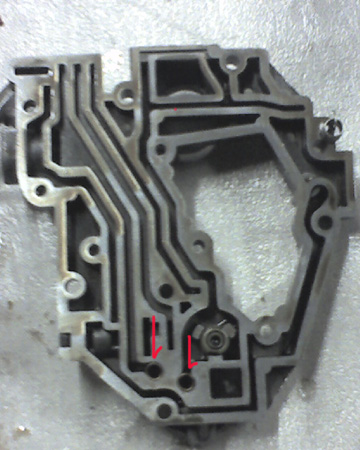
I propped them up a little in this pic:
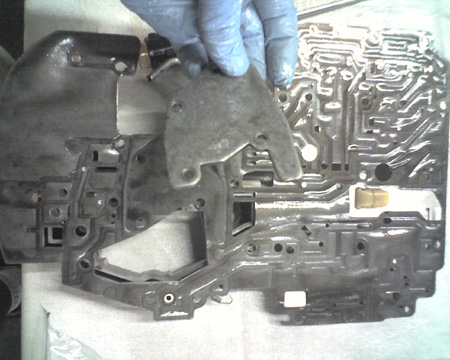
Now is also a good time to unhook the other end of the bowden cable linkage return spring and remove it.
With the lower cover done and set aside, you can turn your attention again to the backing plate and remove the gasket.
So now that the valve body is done, we can move on to removing stuff on the outside of the tranny.
Start by removing the pan by unbolting the six bolts around the perimeter:
This exposes the valve body and filter. The filter is removed by unscrewing the three phillip head screws:
Unhook the bowden cable linkage return spring:
Here's a close up (sorry it's blurry), I've shown in red where the spring originally hooks:
There are 15 bolts in all holding down the main valve body, they all need to come out:
I pulled the valve body out and laid it face up in a tupperware pan. It's good to get a couple of these to keep the tranny parts for later disassembly:
Next, unbolt the mounting bolt for the leaf spring roller:
Here's what it looks like removed, note the separate hold down clamp:
Next, undo the nine bolts holding down the "lower cover".
With the bolts removed, lift up on the lower cover and it will take the "back plate" with it.
Flip the assembly over, and you will see a small plate holding the lower cover onto the back plate with four slot head screws. Removing them releases the lower cover, so make sure you are working on a flat clean surface.
So here's the first dose of "little stuff in an A/T that if you didn't see where it came from you wouldn't know where to put it back" that I experienced in this tear down. I've indicated where two little filter screens reside. They sit flush in these two holes.
I propped them up a little in this pic:
Now is also a good time to unhook the other end of the bowden cable linkage return spring and remove it.
With the lower cover done and set aside, you can turn your attention again to the backing plate and remove the gasket.
So now that the valve body is done, we can move on to removing stuff on the outside of the tranny.
Last edited by atb; 08-11-2008 at 02:55 AM.
08-03-2008, 01:24 PM
#23
Rennlist Member
Thread Starter
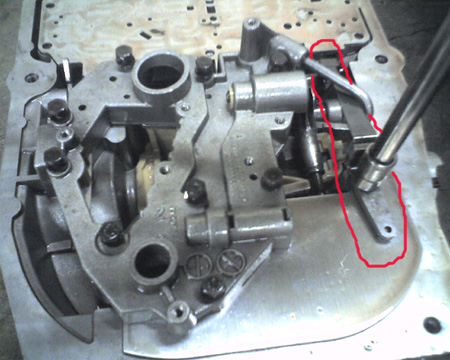
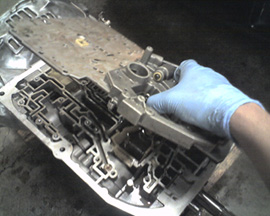
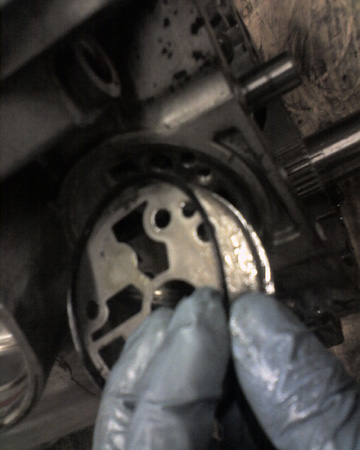
With the valve body removed, the Brake band pistons can be removed.
Push in the B2 brake band piston cover, I was able to do this with my thumb.
This will expose circlip that holds it in place. Rotate the circlip until one of the ends is exposed in the notch in the casing. That will give you access to pry it out with a dental tool.
The circlip doesn't have a lot of tension. I was able to remove it by hand after getting about half of it out of the slot.
The cover itself takes a little work. There's a pretty decent seal holding it in place. I used two sets of needle nose pliers and rotated the cover back and forth in the bore as I pulled it out. Try to keep it level as you are removing it.
Reach in and pull out the B2 piston. I'll post back later whether or not this is the updated version when I get a chance to double check the part no.
Next, reach in and pull out the pin. (Don't know the technical term for this part)
The B2 is done, now on to the B1.
08-03-2008, 03:21 PM
#24
Rennlist Member
Thread Starter
There is a special tool used in the WSM to press the B1 piston cover into the tranny case so that you can remove the circlip, and then slowly back out the cover. The tool is used because the B1 has two support springs which the cover holds compressed in place. I will need to fabricate a tool for assembly, but for disassembly , I went ahead and just removed the circlip. I don't recommend this. I was able to remove the circlip in the same manner as the B2, but had to maintain pressure on the cover as I worked the circlip out. Upon working out the circlip, the piston popped out of the hole like a jack in the box.
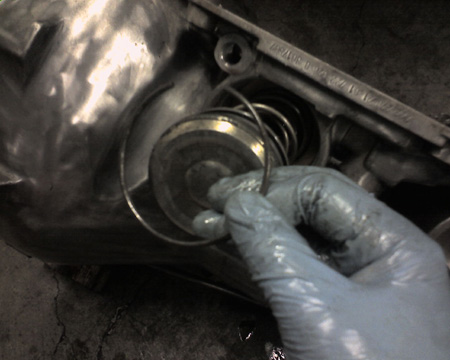
Here you get a good view of the two springs that will need to be compressed upon reassembly.
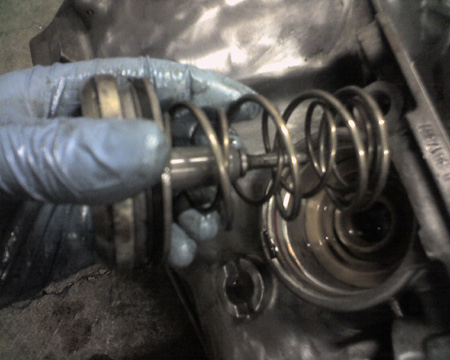
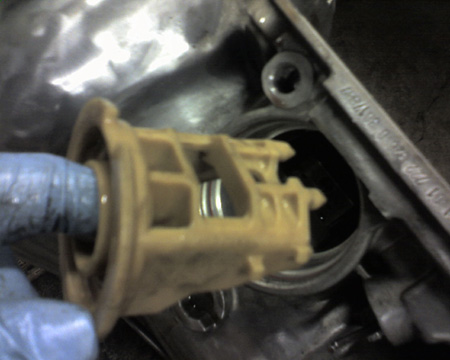
After the piston and spring assembly is removed, reach in and pull out the plastic spring seat.
Done. We can now move to the other side of the tranny.
Here you get a good view of the two springs that will need to be compressed upon reassembly.
After the piston and spring assembly is removed, reach in and pull out the plastic spring seat.
Done. We can now move to the other side of the tranny.
Last edited by atb; 08-05-2008 at 03:35 AM.
08-04-2008, 12:15 AM
#25
Drifting

I saw the shift kit. Do you have info/part numbers for a valve body seal kit (for rebuilding the complete valve body)?
You'll be amazed at how many parts you have when completely disassembled. To keep parts segregated by disassembly steps, I purchased large stackable plastic storage containers at the local Big Lots store.
Keep the old o-rings for sizing purposes, as they could easily be mismatched.
You'll be amazed at how many parts you have when completely disassembled. To keep parts segregated by disassembly steps, I purchased large stackable plastic storage containers at the local Big Lots store.
Keep the old o-rings for sizing purposes, as they could easily be mismatched.
08-04-2008, 03:41 AM
#26
Rennlist Member
Thread Starter
Hey Borland,
I've been using zip lock bags of various sizes to store parts, but stackables would definitely be nice.
I've actually got the tranny all torn apart, but getting it all posted here takes a fair amount of time. I'm in the process of deciding whether I'll be modding the tranny or just putting it back together stock.
I wasn't plannning on splitting the valve body until the internals of the tranny has been reassembled. I'll post part numbers of all the parts I use. I don't have the parts catalog here, next time I'm at the shop I'll see if there is a valve body seal kit part no. and forward it to you if its available.
Thanks for the heads up on the o-rings, I'll definitely hold on to them until they are swapped out.
Last edited by atb; 08-05-2008 at 03:34 AM.
08-04-2008, 02:19 PM
#28
Rennlist Member
Thread Starter
Thanks Chris, it will be truly great if 1) I can put it back together, and 2) it works correctly.
I'm currently looking into sources for modifying the tranny. I have a client that recently sold his local transmission repair service shops and have been seeing what advice he has to offer. Constantine has also sent some useful info. I've also done some hunting online.
Here's what I've got so far for potential mods - don't have sources for parts yet:
1) Adding additional frictions and steels to the clutch packs
- There seems to be two schools of thoughts on this. When setting clearances for the clutch packs there are different thickness steels you can use to dial in the tolerance. Using thinner steels to create more "room" for the additional plates is one way (I'm assuming there may be some other mods to incorporate into making this work), or just machining to create room for more plates.
2) Installing Kevlar Brake Bands - Don't know how useful this will be in a street application. I've read that the Kevlar bans burn up quicker than stock. I haven't inspected my bands yet, but at first glance they seem to be in decent shape especially considering how hard I am on my tranny. My odo gear died a few years ago at 150K. My car probably has around 175K on it now.
3) Install Shift Kit as mentioned in earlier posts.
4) AMG gear sets - Not likely I'll find a source on these, but I'm seeing what's out there.
5) Converter Upgrade - A few folks have done this mod with good results (except the vibration issue that some have mentioned) so nothing new here. I've sent an email to Edge to get some more info.
The whole topic of posting mods of the tranny is kind of a tough subject for me.
Steve C. is the specialist in this area and has contributed greatly to this forum regarding all of our A/T ailments. The last thing I want to do is make him feel that this thread will impact him in any way, but in looking at the situation I think the reality is that it won't. I purposely haven't asked Steve for any contributions from him at this point as he's got a business to run, and its altogether possible that this whole mess is going to be put in a crate and shipped off to him to be finished correclty anyway.
That being said, the A/T seems to be a black hole of mystery for most of us, even guys like me that were gearheads growing up, and so it made sense to me that when my tranny started acting up, it was worth seeing how deep the "hole" is. Its definitely a deep one, but I feel good that I've managed to get the tranny completely disassembled into its main components (I'll post the rest of the disassembly over the course of the next few days) and now have a general understanding as to how the thing works.
All I know is that whomever invented the sun and planetary gear set must have taken a large dose of hallucinagens, it is pure genius. LOL.
08-05-2008, 03:08 AM
#29
Rennlist Member
Thread Starter
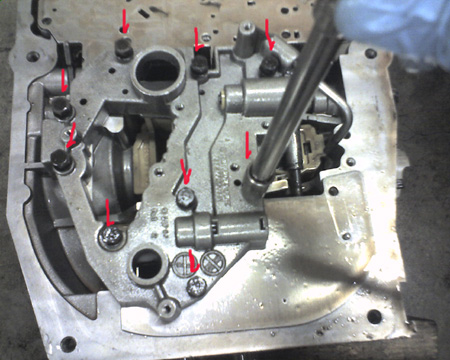
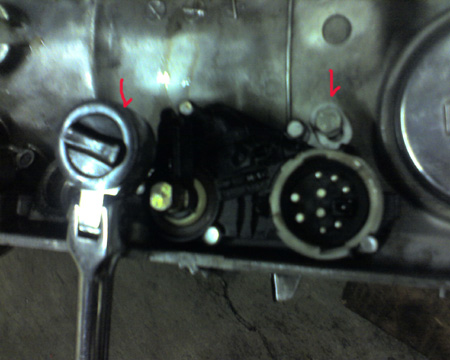
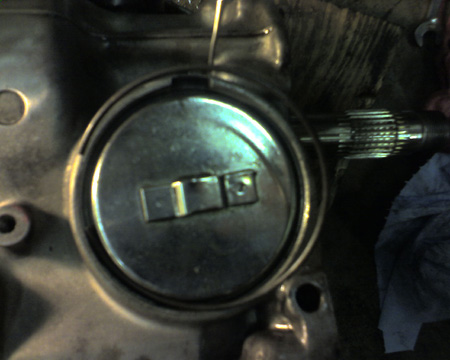
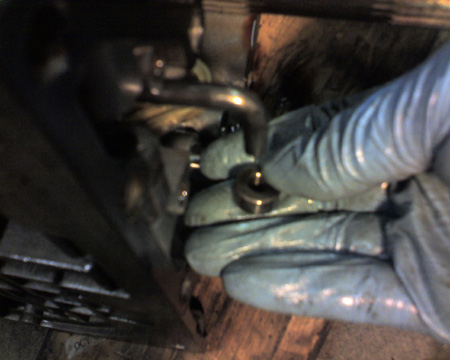
Rolling the tranny over to expose the left side, we start with the safety switch.
Its a 36mm, same as the pinion nut.
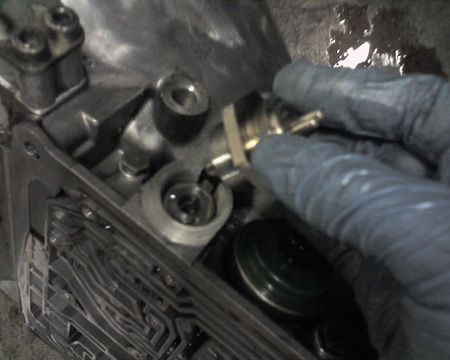
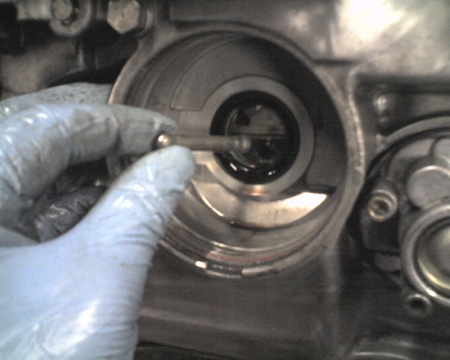
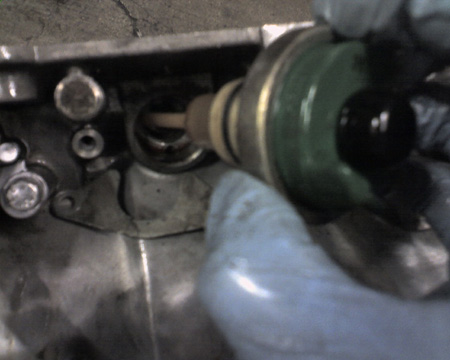
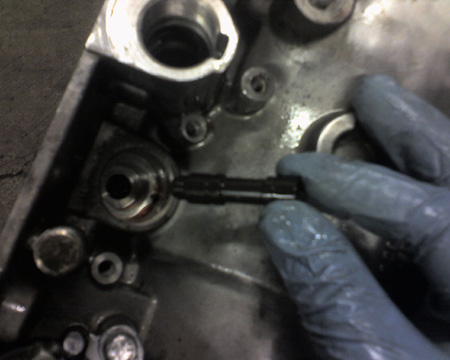
Pull out the pressure control valve.
A magnetic probe helps to extract the control valve pin.
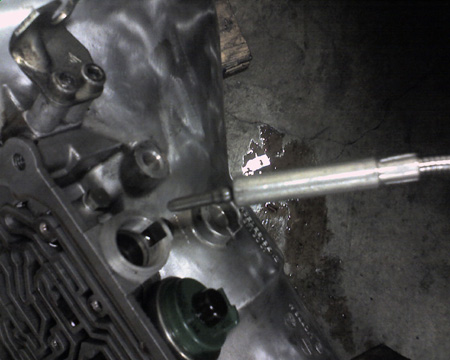
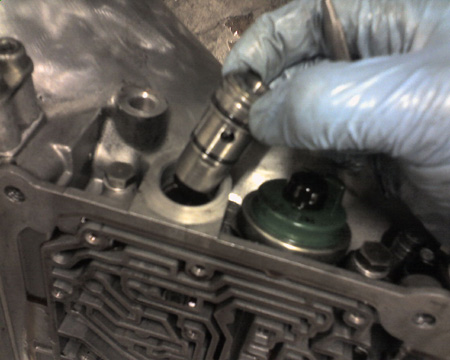
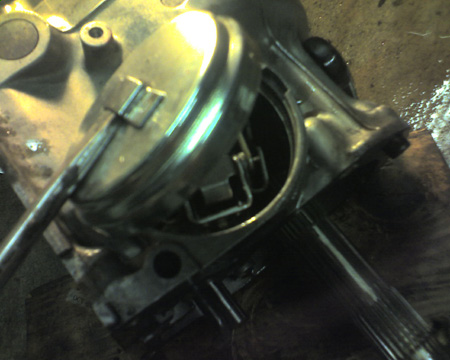
Moving on to the vaccuum modulator. It is held on by two bolts:
After removing the bolts, firmly grasp the modulator and pull it out of the tranny case. It helps to twist it slightly from side to size.
Upon removal of the modulator, reach in the hole and extract the modulator valve.
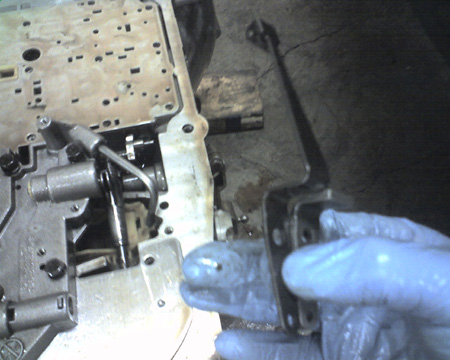
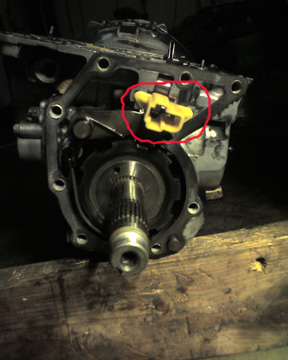
Next is the shifter linkage and switch.
Unbolt the lock nut at the base of the shifter linkage.
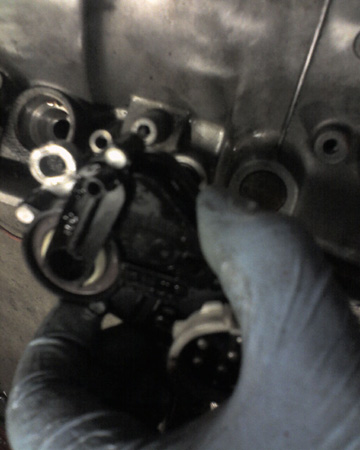
Before removing the gear indicator switch, I indexed the location against the transmission case. I don't know how necessary this is, but you can see that the mounting bolts are ovaled to allow for some kind of adjustment.
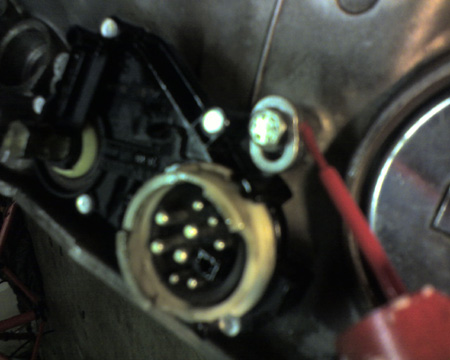
From there its just a matter of removing the two mounting bolts.
For those of you who have seen this part up close, the white plastic twist lock collar on mine has a piece that is broken off so your's may looke a little different.
Pull the switch off the shifter rod.
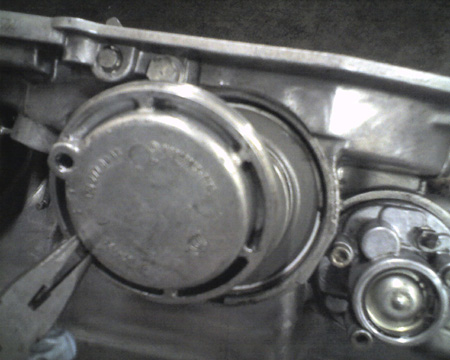
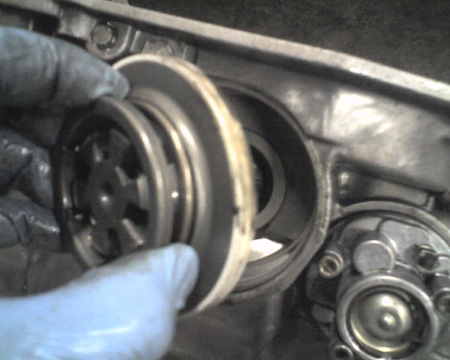
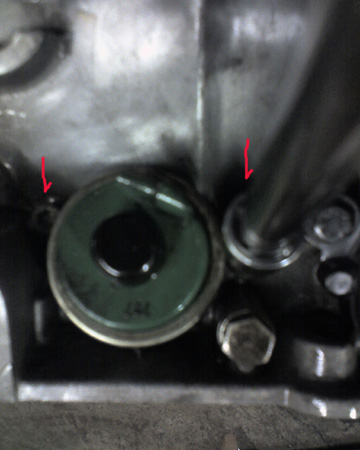
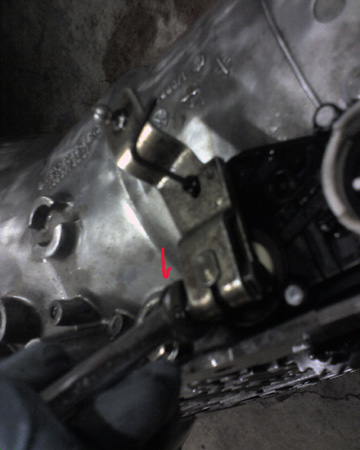
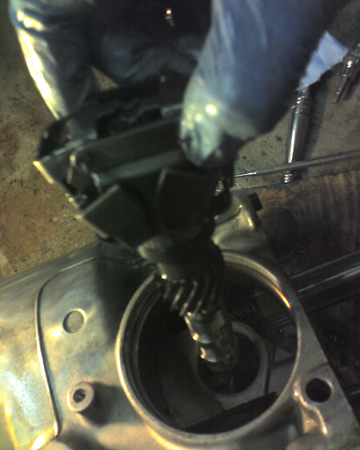
The secondary pump is held on by three bolts and one nut. The nut, indicated by the double barb arrow, actually anchors the end of the axial holder, which is a coat hanger hook shaped piece of plastic that will be removed a little later.
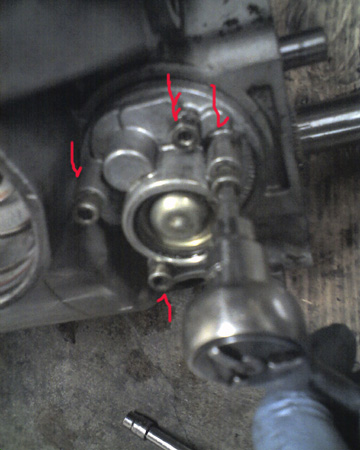
The pump comes away with ease. Be careful in that the small gear is not held in place and will fall out.
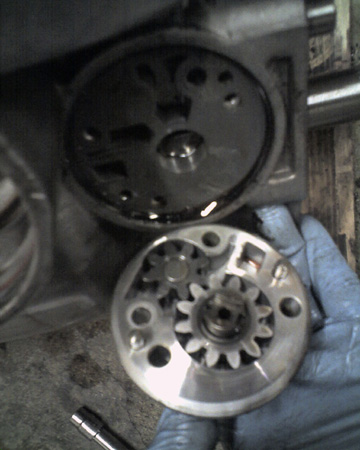
Next, the O-ring and backing plate come out of the hole. Done.
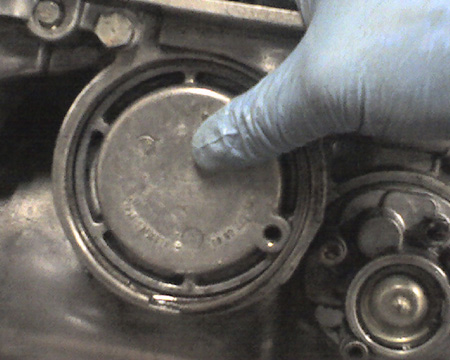
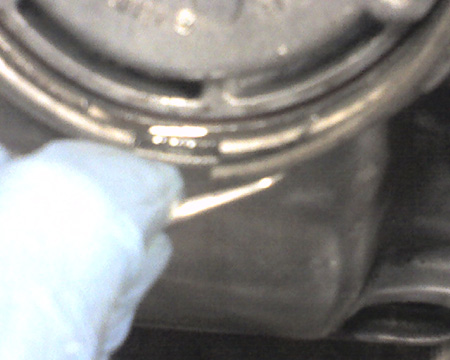
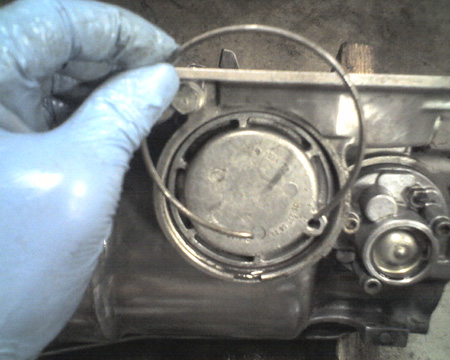
Like the brake band piston covers, the governor cover has a circlip that needs to be removed.
I used a screwdriver to twist the cover side to side to aid in removal.
Sitting in the hole, the governor gear looks like a bear trap ready to spring, but just reach in and pull it out, no problems.
Right about this time the govenor roller fell off its shaft at the back of the tranny.
For reference, the plastic piece that I showed in the rear housing removal section (post #15) holds this roller in place.
(In retrospect it probably wouldn't be a bad idea to remove the roller at the same time you remove the plastic holder)
Okay, we're done pulling stuff out the sides of this beast, time to move on to the innards.
Its a 36mm, same as the pinion nut.
Pull out the pressure control valve.
A magnetic probe helps to extract the control valve pin.
Moving on to the vaccuum modulator. It is held on by two bolts:
After removing the bolts, firmly grasp the modulator and pull it out of the tranny case. It helps to twist it slightly from side to size.
Upon removal of the modulator, reach in the hole and extract the modulator valve.
Next is the shifter linkage and switch.
Unbolt the lock nut at the base of the shifter linkage.
Before removing the gear indicator switch, I indexed the location against the transmission case. I don't know how necessary this is, but you can see that the mounting bolts are ovaled to allow for some kind of adjustment.
From there its just a matter of removing the two mounting bolts.
For those of you who have seen this part up close, the white plastic twist lock collar on mine has a piece that is broken off so your's may looke a little different.
Pull the switch off the shifter rod.
The secondary pump is held on by three bolts and one nut. The nut, indicated by the double barb arrow, actually anchors the end of the axial holder, which is a coat hanger hook shaped piece of plastic that will be removed a little later.
The pump comes away with ease. Be careful in that the small gear is not held in place and will fall out.
Next, the O-ring and backing plate come out of the hole. Done.
Like the brake band piston covers, the governor cover has a circlip that needs to be removed.
I used a screwdriver to twist the cover side to side to aid in removal.
Sitting in the hole, the governor gear looks like a bear trap ready to spring, but just reach in and pull it out, no problems.
Right about this time the govenor roller fell off its shaft at the back of the tranny.
For reference, the plastic piece that I showed in the rear housing removal section (post #15) holds this roller in place.
(In retrospect it probably wouldn't be a bad idea to remove the roller at the same time you remove the plastic holder)
Okay, we're done pulling stuff out the sides of this beast, time to move on to the innards.
Last edited by atb; 08-11-2008 at 03:01 AM.
08-05-2008, 01:43 PM
#30
Addict
Lifetime Rennlist
Member
Lifetime Rennlist
Member
 your a brave man Adam!
Great write up so far. Do yo have anytype of "service guide" or somehting for reference during assembly.
Im defintiely not going to "polish" mine....see what happened
