
PorKensioner installation for Dummies, '90 GT edition
 10-13-2009, 04:11 PM
#46
Three Wheelin'
Mike -
1) I opted to remove them. In my case they had never seen use hence questioned their need in a modern tensioning system with the PKsion'r. If the piston had catostrophic failure, the lower idlers won't save much as the passenger cam would likely skip first any way.
2) I put the 10mm set screw with Loctite Red and upon revisiting my install, it's fine. The pivot post is in the way in most applications hence recommend its removal.
I am almost finished with my Porkensioner install, and have a couple of questions.
1) Regarding the lower idler pullys. Why is it optional to remove them? Won't they still prevent the belt from skipping a tooth (or more) on the crank gear if the tensioner begins to lose oil or pressure? I'd assume that if they are in good shape, they might as well stay on the engine. What is the benifit of removing them? Weight?
2) As in Rob's notes above, is there any detrimental problem with leaving the pivot post to seal the water pump as opposed to removing it and injstalling the 10mm set screw?
Best regards,
Mike
 10-13-2009, 04:19 PM
#47
Inventor
Rennlist Member
Rennlist Member
1) They serve no purpose on a constant tension system. The pulley(s) are band-aids for cold starting with the factory system. (The Audi tensioner/damper has a spring inside. AFAIK, it's not gas charged.) The pulley(s) do help keep the belt on the right tooth if you have to loosen the belt for some reason, but don't want to take off the balancer. (Changing a cam gear, for example.) Otherwise, they are just crud collectors.
2) No detriment, but it looks nicer without. You have to R&R the support bracket to fit the belt, S4-up.
2) No detriment, but it looks nicer without. You have to R&R the support bracket to fit the belt, S4-up.
10-13-2009, 06:14 PM
#49
Rennlist Member
I installed this last weekend and made an "adjustment" to the ground wire attachment. On an '85, the plug going through the TB cover and the attaching wire inside was close to the belt. If you were careful with the orientation it was no problem. The instructions call for using the old female plug which means grounding inside the cover, right? I was confused at this point b/c the instructions are for S4 and refer to the bolt holding the dip stick cover. The '85 doesn't have this bracket bolt. I removed the plug, cut it off the harness, spliced the new ground wire to the harness wire and bolted it to one of the center TB cover bolts, nearest the passenger cam. Black tape over the old access hole in the TB cover.
She ran fine. Should get a shake-down cruise next weekend to Kevin Michael's for Rick's PPI.
She ran fine. Should get a shake-down cruise next weekend to Kevin Michael's for Rick's PPI.
10-14-2009, 12:54 AM
#50
Inventor
Rennlist Member
Rennlist Member
Early '85 still have a threaded dipstick tube, and don't have the 6mm bolt attachment to the center cover. I never figured out an elegant solution for this.
After some serial number in '85, the parts are updated to '86-style. The dipstick tube is push in with an o-ring, and there is a new center cover. Also, the left upper cover can be removed without unbolting the PS and alternator assembly. The changeover might also correspond with the diagnostic connector swapping places with the TPS extension harness plug.
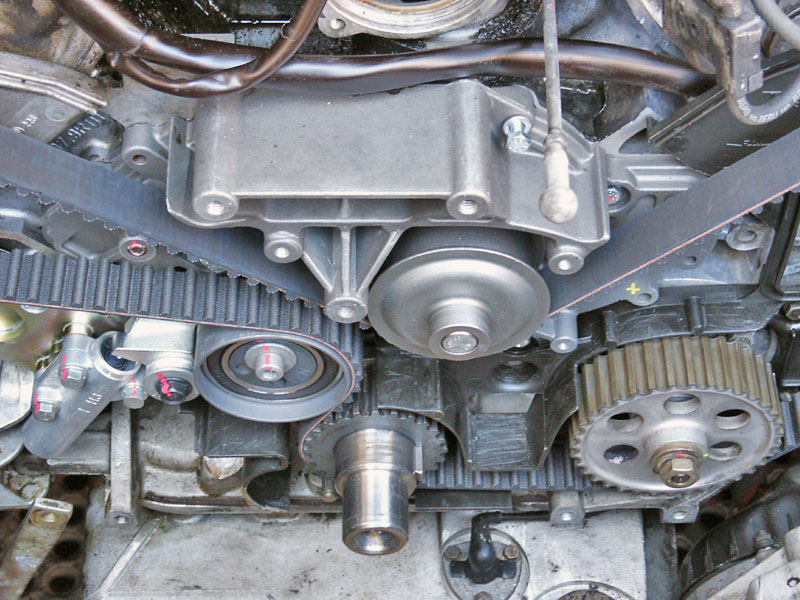
Mine is a late '85 (#1972) with the '86 upgrades, but it still has an early right side upper cover. Notice the left/5-8 '86-style cover breather is more forward, so that you can see a matching indentation in the front of the cam gear at TDC #1.

After some serial number in '85, the parts are updated to '86-style. The dipstick tube is push in with an o-ring, and there is a new center cover. Also, the left upper cover can be removed without unbolting the PS and alternator assembly. The changeover might also correspond with the diagnostic connector swapping places with the TPS extension harness plug.
Mine is a late '85 (#1972) with the '86 upgrades, but it still has an early right side upper cover. Notice the left/5-8 '86-style cover breather is more forward, so that you can see a matching indentation in the front of the cam gear at TDC #1.
02-18-2011, 09:16 PM
#51
Drifting

Here’s my comments after installing the PKsn’r and Gates Racing Belt, a few weeks ago, on my 90’ S4…
- After purchasing the PKsn’r (air pump version) in December (2010), I had asked Ken by email about the non-removable air pump bracket (product design changes not shown in product literature) in which pump swing bolt was binding. I was able to bend the arm out to eliminate the bolt binding problem. After removing the stock tensioner, I could see that PKsn’r bracket spacing for the air pump is identical to the stock tensioner. The stock tensioner has a roll pin to take up any extra unused space between the air pump and the bracket. Since your PKsn’s doesn’t include this feature, I added a single M8 washer at the front to take up the extra space.
- Installing the air pump was no simple task, as the larger A/C hose interferes with installing the long swing bolt. With PKsn’s already installed to the engine block, one needs to temporarily unbolt one A/C line clamp attached to the engine bay in order to flex the A/C hose fitting away to allow fitting the long air pump bolt and my extra M8 washer.
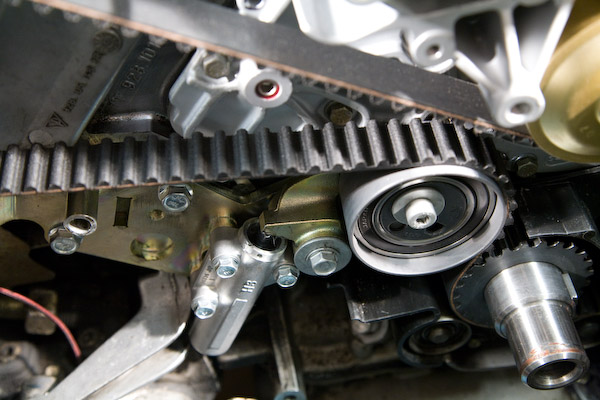
- I used Roger’s Gates Racing Belt. I had no problems with installing the timing belt with the roller and Audi tensioner installed per the PKsn’s install guide. With the sprockets properly aligned, the belt fits nicely and was easy to slip on. However, I noticed that the Gates Racing Belt is thicker than the Conti that I removed. The Racing belt’s added thickness causes the damper rollers below the crank sprocket to maintain constant contact. I don’t think those rollers should contact the belt if properly tensioned, so I left them off for the installation. This is consistent with the PKsn’r install guide, that states the damper roller reinstallation is optional.
- I also installed Roger’s new LASO water pump (for years 87'-95') with plastic impeller. These later pumps come with a pivot pin and support bracket. This support bracket comes installed on the pump with two M6 bolts. But after installing the pump on the engine, one needs to remove one of the supplied M6 bolts to allow for installing center plastic timing belt cover which bolts to this location. Without having the pivot support bracket installed, there would be too much clearance between the pump and the center cover. I kept the pivot pin and support bracket installed on the water pump. The PKsn’s installation guide implies that the bracket is not needed.
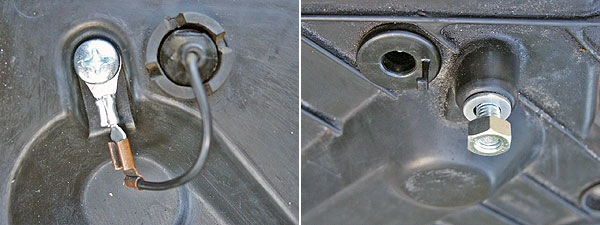
- For the timing belt warning sensor wire, I attached the supplied defeat ‘widget’ (made up blade connector) directly between the pivot pin and the pivot pin support bracket, at the 9:30 clockwise position facing the front of the engine, using blue Loctite on the counter sunk screw. This is much simpler than the dip stick wiring method.
- After purchasing the PKsn’r (air pump version) in December (2010), I had asked Ken by email about the non-removable air pump bracket (product design changes not shown in product literature) in which pump swing bolt was binding. I was able to bend the arm out to eliminate the bolt binding problem. After removing the stock tensioner, I could see that PKsn’r bracket spacing for the air pump is identical to the stock tensioner. The stock tensioner has a roll pin to take up any extra unused space between the air pump and the bracket. Since your PKsn’s doesn’t include this feature, I added a single M8 washer at the front to take up the extra space.
- Installing the air pump was no simple task, as the larger A/C hose interferes with installing the long swing bolt. With PKsn’s already installed to the engine block, one needs to temporarily unbolt one A/C line clamp attached to the engine bay in order to flex the A/C hose fitting away to allow fitting the long air pump bolt and my extra M8 washer.
- I used Roger’s Gates Racing Belt. I had no problems with installing the timing belt with the roller and Audi tensioner installed per the PKsn’s install guide. With the sprockets properly aligned, the belt fits nicely and was easy to slip on. However, I noticed that the Gates Racing Belt is thicker than the Conti that I removed. The Racing belt’s added thickness causes the damper rollers below the crank sprocket to maintain constant contact. I don’t think those rollers should contact the belt if properly tensioned, so I left them off for the installation. This is consistent with the PKsn’r install guide, that states the damper roller reinstallation is optional.
- I also installed Roger’s new LASO water pump (for years 87'-95') with plastic impeller. These later pumps come with a pivot pin and support bracket. This support bracket comes installed on the pump with two M6 bolts. But after installing the pump on the engine, one needs to remove one of the supplied M6 bolts to allow for installing center plastic timing belt cover which bolts to this location. Without having the pivot support bracket installed, there would be too much clearance between the pump and the center cover. I kept the pivot pin and support bracket installed on the water pump. The PKsn’s installation guide implies that the bracket is not needed.
- For the timing belt warning sensor wire, I attached the supplied defeat ‘widget’ (made up blade connector) directly between the pivot pin and the pivot pin support bracket, at the 9:30 clockwise position facing the front of the engine, using blue Loctite on the counter sunk screw. This is much simpler than the dip stick wiring method.
02-18-2011, 09:29 PM
#52
Addict
Rennlist Member
Rennlist Member
I also installed Roger’s new LASO water pump (for years 87'-95') with plastic impeller. These later pumps come with a pivot pin and support bracket. This support bracket comes installed on the pump with two M6 bolts. But after installing the pump on the engine, one needs to remove one of the supplied M6 bolts to allow for installing center plastic timing belt cover which bolts to this location. Without having the pivot support bracket installed, there would be too much clearance between the pump and the center cover. I kept the pivot pin and support bracket installed on the water pump. The PKsn’s installation guide implies that the bracket is not needed.
Quoting from that post (Are we talking about the same thing? I think we are.):
Another related thing to point out here: if you don't leave on (or reinstall) that three hole bracket on the WP (the one that supported the outside part of the shaft (pivot bolt/pin/whatever it's called) that supports the idler roller / tension roller assembly, then you'll regret it when you attempt to reinstall your center timing belt cover. The center bolt goes through the timing belt cover, and if that bracket is missing, you'll discover that there's no backing when you attempt to torque down that bolt. It'll distort the cover by a little more than three mm (the thickness of the now-missing bracket) if you decide to torque it down anyway. Luckily, I noticed something bad was happening and went back and reinstalled the bracket (minus the left end that originally attached to the end of the roller assembly; I just left the "roller assembly pin end" hanging in space). I contemplated just putting a thick washer back there, but that seems unwise, as I can see forgetting about it and then during some future maintenance, pulling the cover off and having that washer dropping unnoticed into the crank gear or something; just too risky.
Now I regret not having just gone back and removing the set screw, reinstalling the shaft and bracket, and everything would have been cool.
As long as that set screw doesn't leak, I guess there's no harm done.
Anyway, IMHO, I'd recommend that the PKsn'r instructions be updated to recommend leaving that bracket and shaft intact; it's likely to cause more trouble by leaving it off than leaving it alone.
02-18-2011, 09:39 PM
#54
Rest in Peace
Rennlist Member
Rennlist Member
Great now I have to go and take mine apart again to add the little red paint lines 
That was not in the PDF to do.
That was not in the PDF to do.
These issues are explained in the manual, but may be unclear - http://liftbars.com/docs/PKsnr.pdf
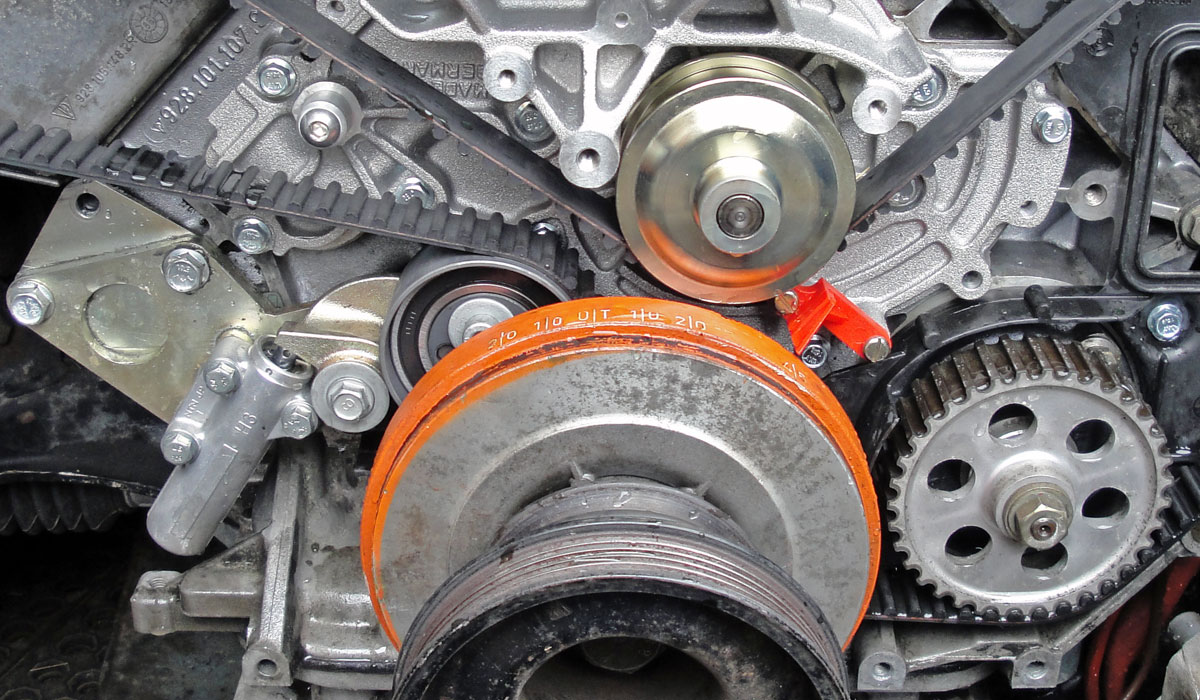
1 - the pulley pin is sometimes pressed in too far. Tap the pin in with a hammer until there is >0.5mm clearance, and the pulley rotates freely. (Note: the pulley bolt is torqued to 17 ft lbs.)
2 - there should be a philips head screw which bolts through the center cover, a terminal combination (widget) and a wire. The old tension light wire plugs into the widget. The wire goes on the outside of the cover, from the new screw to the 8mm bolt which goes through the center cover. (The headless bolts {stainless steel set screws} are for plugging the water pump hole.)
3 - remove the axle and pulley. S4-up, use the 10mm set screw to plug the bolt hole. Use silicone or red Loctite to glue the set screw in place. (The 8mm set screw is for 78-86 water pumps.) The pulley(s) and mounting bracket under the crank gear can also be removed, but this is optional.
06-02-2011, 08:53 PM
#55
Addict
Lifetime Rennlist
Member
Lifetime Rennlist
Member
All good info and my next purchase...thnx for sharing!
side note: I had drawn up an idea for a belt warning system many years ago that involved some breakaway saftey wire that lays just over the surface of the belt above one of the cam gears. When the belt started to shred the centrifugal force would throw the shredded belt parts/strands etc outward and into the near by wire, breaking it and the associated ground signal....thus triggering the belt warning light.
with the PKensioner system maintaining constant tension i think i may see if i can actually rig such a warning wire on my car since the stock one will no longer used. First things first though.
06-02-2011, 08:58 PM
#56

I know it shows that you should use the plugs that come with the kit, but I recommend that you do not. Keep this bolt in on the later cars. If you have the early cars that have a hole that needs to be plugged, reinsert the bolt that you took out.

06-02-2011, 10:38 PM
#57
Inventor
Rennlist Member
Rennlist Member
What Sean said, with a twist.
'87-'95, (re)use the stock hardware to plug the hole.
'78-'86, there is now a 8mm SS dome head bolt and a copper washer in the hardware kit.
(BTW: I have taken a complete set of photos for a new manual, but have yet to write the copy.)
'87-'95, (re)use the stock hardware to plug the hole.
'78-'86, there is now a 8mm SS dome head bolt and a copper washer in the hardware kit.
(BTW: I have taken a complete set of photos for a new manual, but have yet to write the copy.)
06-02-2011, 10:41 PM
#58
That must be the bolt with the copper crush washer that I had no idea why it was in there. I like the new bracket, today was the first one I've installed.
06-03-2011, 10:37 AM
#60
Nordschleife Master
Nice pics - I've been wondering for a few days whether it would be easy to mount a contact switch to the Porkension'r bracket.
From the pic above it looks like it might be possible to drill and tap the tensioner pivot to add a small arm which can contact such a switch.
Losing the warning system is the only thing preventing me from installing my Porkension'r (well that and a to-do list longer than all my limbs) - some means of detecting when the hydraulic tensioner extension goes out of range which may indicate a problem with the belt, water pump or cam nose/sprockets.
I'll have to check out switches next time I'm placing an order with my components supplier for something suitable.

