
PorKensioner installation for Dummies, '90 GT edition
 06-24-2008, 02:39 AM
#1
Archive Gatekeeper
Rennlist Member
Rennlist Member
Thread Starter
Well, now that I’ve actually gone and flogged on it a couple of times without anything exploding, I can put down my idiot-proof version of the installation of a PorKensioner (PKsn’r) on my 1990 GT. I can only say that having played with this thing, Ken is one creative ****!
Ken’s instructions seemed skeletal to me at first, but they’re actually nice and complete, Any way, onto the protocol:
I had to laugh when I saw Ken’s first instruction, which is a very WSM-esque: Remove factory tensioner parts and water pump pulley. This of course entails the first half of a timing belt R&R, so refer to your favorite front-of engine-teardown protocols:
http://www.billsworkshop.com/P928S4/...Resources2.doc
http://members.rennlist.com/pirtle/tbelt.html
and/or John Kelly’s manual, which I bought and is fantastic.
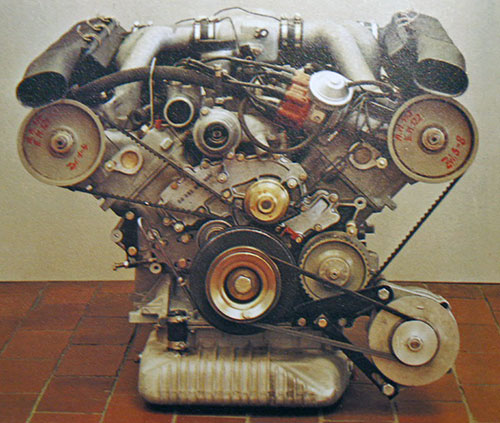
I pulled the fan shroud, radiator, all belts, loosened the air pump, the PS pump/alternator and their mounting cassette, the distributor caps and rotors, dipstick, timing belt covers, engine harness, locked the motor at 45 BTDC, undid the crank bolt, pulled the pulleys and balancer, and finally the tensioner and belt.
So here’s the motor in various states of undress:


Upon removing the factory tensioner, and was greeted by a dried residue of varnish. I replaced the TB as soon as I bought this car in June 2006, and have lost all my tensioner oil in under 5000 miles of driving. I suppose I don’t know how to install a gasket properly…..

So I cleaned up the block in anticipation of mounting the PKsn’r bracket.

PKsn’r Assembly:
Here are the contents of the kit:

and the annotated hardware list that comes with the kit designed to retain the airpump. Please note the two threaded hex plugs in the plastic bag with the tensioner warning ground wire- I think (THINK!) that the hex plugs are for the 78-86 waterpumps, to plug the water pump hole where the tensioner shoulder bolt used to mount. Not needed in my case.

The first step is mounting theAudi tensioner lever 078 109 487A to the bracket using its supplied M6 flange head bolt with some blue loctite, torque to 15 lbs (EDIT on 7-14-09- Instructions now say 17 ft-lbs. Verify with Ken's latest instructions at liftbars.com!) :


EDIT, 10-4-09:
The tensioner pulley comes in a box with two washers, you will need to mount BOTH of them on the bolt so that the pulley can spin freely. IGNORE the instruction sheet that comes with the pulley (which shows the use of only 1 washer....)

Here’s the front of the Audi pulley 078 109 243R, the off-center silver pin juts out the back and is pushed upon by the end of the lever, thereby rotating the pulley about 75 degrees counterclockwise and moving it up and out, lengthening the pathlength of the belt, thereby tightening it.

Here’s an aerial shot of the head of the lever pushing down on the pulley pin:

The pulley fully ‘relaxed’:

And fully ‘extended':

Then mount the Audi pulley to the bracket, with its included 6mm hex bolt, blue loctite and 15 ft lbs o’ torque. ((EDIT on 7-14-09- Ken's instructions now say 24 ft-lbs. Verify with Ken's latest instructions at liftbars.com!)
Next: Put an M8 x25mm SS flange head bolt through the upper bracket hole and slip the gasket over it. Then slime some gray RV on it: (I think I used a bit too much….)

Install another M8 x 25 flange head bolt in the lateral-most hole, then the 5mm allen flathead countersunk bolt, and the M6x70 bolt (from the right TB cover that goes through the ‘post’ on the bracket, like so:
Front view:

Rear view:

Install the tensioner on the block and torque the flange heads and the countersunk bolts to 15 ft lbs.
Here’s the Audi tensioner 078 109 479E itself, it mounts to the bracket with three M6x30 flange head bolts, torqued to 7 lbs with blue loctite :

All installed on the engine:

As Ken says, DON’T PULL THE PIN!
Time to re-route the timing belt, as shown in Ken’s instructions. The crank is locked at 45o BTDC, so my cam gear timing marks are about 3 teeth counterclockwise to the timing notches, as viewed from the front of the car. The cam gears didn’t move at all for me, so no issues there. I never really removed the belt from the crank gear, so I loaded it tight around the driver’s side cam gear, the WP pulley, and then onto the passenger side cam gear. I did have to rotate this cam gear a tiny amount clockwise (maybe a degree or 2) to get the right belt tooth engaged.
I centered the belt on the gear. My cam gears are only 4000 miles old but there’s already a mild darkening of the surface about 3 mm back from the front edge where the belt had been riding.
I rotated the pulley clockwise with an 8mm allen key to compress the tensioner piston, and pulled the pin:

Then pretensioned the belt by rotating the pulley counterclockwise, I just gave it a gentle tug. Ken says 11 ft lbs…..
Then I measured the piston extension, from the body of the piston housing to the lever arm, it was 7.24 mm (Spec = 2 to 9 mm)

Next,install the balancer and pulleys (torque the crank bolt semi tight, maybe 60-70 ft lbs), remove the flywheel lock, then rotate the engine a few times to make sure that the balancer and cam gear timing marks line up. They did in my case, I checked 3 times over 6 rotations of the motor.
Then I re-attached the engine harness to the 14 pin connector at the jump post, pulled fuse #38 (fuel pump fuse, check your years’ diagram for the proper fuse #), made sure everything was out of the belt path, re-connected the battery, and turned the key on for 3-5 seconds to turn the motor. After 5 minutes the piston extension was 6.24 mm (my belt is used, spec = 2-9 mm
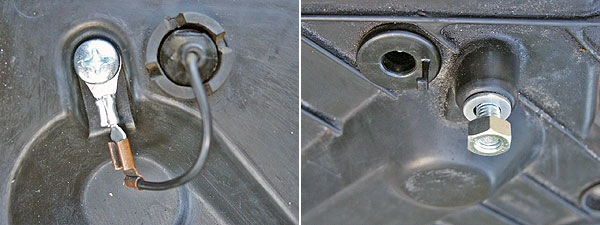
Next I installed the Philips head machine screw (from the inside out) into the center timing cover, in order to ground out the tensioner warning system (this stud doubles as the dipstick mounting bolt, time to resintall the dipstick too….). The female plug from the engine harness plugs into its jack in the timing belt cover, and the brown ground wire runs from the dipstick bolt over to the long timing belt cover bolt:


Last, I installed the air pump bracket and the air pump, using the M8x16 and M8x100mm bolts each torqued to 15 ft lbs. Actually, before mounting the air pump, re-route the engine harness back under the passenger side cam gear backing plate, and up and around to the 14 pin connector, you’re less likely to mess up the Hall sensor connector with the extra room this affords. Then bolt up the air pump.
Engine reassembly is the reverse of disassembly.
The end result: Nodifference, nothing, nada. The car starts, idles, drives, and pulls to redline just the same as before the PKsn’r. What more could you want?
Thanks 1x10^6 for coming up with this thing, Ken! Oh, and PLEASE let me know if anyone sees any errors or inconsistencies in this writeup and I’ll fix it pronto.
Ken’s instructions seemed skeletal to me at first, but they’re actually nice and complete, Any way, onto the protocol:
I had to laugh when I saw Ken’s first instruction, which is a very WSM-esque: Remove factory tensioner parts and water pump pulley. This of course entails the first half of a timing belt R&R, so refer to your favorite front-of engine-teardown protocols:
http://www.billsworkshop.com/P928S4/...Resources2.doc
http://members.rennlist.com/pirtle/tbelt.html
and/or John Kelly’s manual, which I bought and is fantastic.
I pulled the fan shroud, radiator, all belts, loosened the air pump, the PS pump/alternator and their mounting cassette, the distributor caps and rotors, dipstick, timing belt covers, engine harness, locked the motor at 45 BTDC, undid the crank bolt, pulled the pulleys and balancer, and finally the tensioner and belt.
So here’s the motor in various states of undress:
Upon removing the factory tensioner, and was greeted by a dried residue of varnish. I replaced the TB as soon as I bought this car in June 2006, and have lost all my tensioner oil in under 5000 miles of driving. I suppose I don’t know how to install a gasket properly…..
So I cleaned up the block in anticipation of mounting the PKsn’r bracket.
PKsn’r Assembly:
Here are the contents of the kit:
and the annotated hardware list that comes with the kit designed to retain the airpump. Please note the two threaded hex plugs in the plastic bag with the tensioner warning ground wire- I think (THINK!) that the hex plugs are for the 78-86 waterpumps, to plug the water pump hole where the tensioner shoulder bolt used to mount. Not needed in my case.
The first step is mounting theAudi tensioner lever 078 109 487A to the bracket using its supplied M6 flange head bolt with some blue loctite, torque to 15 lbs (EDIT on 7-14-09- Instructions now say 17 ft-lbs. Verify with Ken's latest instructions at liftbars.com!) :
EDIT, 10-4-09:
The tensioner pulley comes in a box with two washers, you will need to mount BOTH of them on the bolt so that the pulley can spin freely. IGNORE the instruction sheet that comes with the pulley (which shows the use of only 1 washer....)
Here’s the front of the Audi pulley 078 109 243R, the off-center silver pin juts out the back and is pushed upon by the end of the lever, thereby rotating the pulley about 75 degrees counterclockwise and moving it up and out, lengthening the pathlength of the belt, thereby tightening it.
Here’s an aerial shot of the head of the lever pushing down on the pulley pin:
The pulley fully ‘relaxed’:
And fully ‘extended':
Then mount the Audi pulley to the bracket, with its included 6mm hex bolt, blue loctite and 15 ft lbs o’ torque. ((EDIT on 7-14-09- Ken's instructions now say 24 ft-lbs. Verify with Ken's latest instructions at liftbars.com!)
Next: Put an M8 x25mm SS flange head bolt through the upper bracket hole and slip the gasket over it. Then slime some gray RV on it: (I think I used a bit too much….)
Install another M8 x 25 flange head bolt in the lateral-most hole, then the 5mm allen flathead countersunk bolt, and the M6x70 bolt (from the right TB cover that goes through the ‘post’ on the bracket, like so:
Front view:
Rear view:
Install the tensioner on the block and torque the flange heads and the countersunk bolts to 15 ft lbs.
Here’s the Audi tensioner 078 109 479E itself, it mounts to the bracket with three M6x30 flange head bolts, torqued to 7 lbs with blue loctite :
All installed on the engine:
As Ken says, DON’T PULL THE PIN!
Time to re-route the timing belt, as shown in Ken’s instructions. The crank is locked at 45o BTDC, so my cam gear timing marks are about 3 teeth counterclockwise to the timing notches, as viewed from the front of the car. The cam gears didn’t move at all for me, so no issues there. I never really removed the belt from the crank gear, so I loaded it tight around the driver’s side cam gear, the WP pulley, and then onto the passenger side cam gear. I did have to rotate this cam gear a tiny amount clockwise (maybe a degree or 2) to get the right belt tooth engaged.
I centered the belt on the gear. My cam gears are only 4000 miles old but there’s already a mild darkening of the surface about 3 mm back from the front edge where the belt had been riding.
I rotated the pulley clockwise with an 8mm allen key to compress the tensioner piston, and pulled the pin:
Then pretensioned the belt by rotating the pulley counterclockwise, I just gave it a gentle tug. Ken says 11 ft lbs…..
Then I measured the piston extension, from the body of the piston housing to the lever arm, it was 7.24 mm (Spec = 2 to 9 mm)
Next,install the balancer and pulleys (torque the crank bolt semi tight, maybe 60-70 ft lbs), remove the flywheel lock, then rotate the engine a few times to make sure that the balancer and cam gear timing marks line up. They did in my case, I checked 3 times over 6 rotations of the motor.
Then I re-attached the engine harness to the 14 pin connector at the jump post, pulled fuse #38 (fuel pump fuse, check your years’ diagram for the proper fuse #), made sure everything was out of the belt path, re-connected the battery, and turned the key on for 3-5 seconds to turn the motor. After 5 minutes the piston extension was 6.24 mm (my belt is used, spec = 2-9 mm
Next I installed the Philips head machine screw (from the inside out) into the center timing cover, in order to ground out the tensioner warning system (this stud doubles as the dipstick mounting bolt, time to resintall the dipstick too….). The female plug from the engine harness plugs into its jack in the timing belt cover, and the brown ground wire runs from the dipstick bolt over to the long timing belt cover bolt:
Last, I installed the air pump bracket and the air pump, using the M8x16 and M8x100mm bolts each torqued to 15 ft lbs. Actually, before mounting the air pump, re-route the engine harness back under the passenger side cam gear backing plate, and up and around to the 14 pin connector, you’re less likely to mess up the Hall sensor connector with the extra room this affords. Then bolt up the air pump.
Engine reassembly is the reverse of disassembly.
The end result: Nodifference, nothing, nada. The car starts, idles, drives, and pulls to redline just the same as before the PKsn’r. What more could you want?
Thanks 1x10^6 for coming up with this thing, Ken! Oh, and PLEASE let me know if anyone sees any errors or inconsistencies in this writeup and I’ll fix it pronto.
Last edited by Rob Edwards; 10-04-2009 at 07:09 PM.
 06-24-2008, 03:46 AM
#2
Pro
Join Date: Jun 2008
Location: Philadelphia, Pennsylvania - Rittenhouse Neighborhood
Posts: 501
Likes: 0
Received 0 Likes
on
0 Posts
So, with this system, which is the "part" which is likely to fail first? The tensioner part itself, I'm guessing, right?
Is there any data on how long that component should be expected to reliably last? If it failed, would it be sudden, or the sort of thing you can catch before disaster???
I'm leaning towards one of these in my automatic 1989 928 S4. Scares me that they are so untested, relative to decades of the Porsche design, but most installers seem to rave about them, and I'm doing the belt job now...
Why didn't they retain some form of warning light device? I'd have a lot more faith in this design if it retained a sensor of some sort, as long as the most likely piston failure of the tensioner, if that's whats to be expected to go first, wouldn't be sudden and catastrophic...
Nick - Hazleton, Pennsylvania
06-24-2008, 03:53 AM
#3
Drifting
There are many other cars on the road with interference engines that don't have timing belt warning lights. The parts used come from a Audi/VW engine and I think they probably received more testing then anything Porsche designed in the 70s.
06-24-2008, 04:51 AM
#4
Pro
Join Date: Jun 2008
Location: Philadelphia, Pennsylvania - Rittenhouse Neighborhood
Posts: 501
Likes: 0
Received 0 Likes
on
0 Posts
True, and maybe this system is superior, but despite my ignorance, I still feel that if there is a warning light installed in the car, I'd prefer and certainly pay for a sensor that can be retrofitted that may give fair warning if something is going wrong - Especially with a lowish volume after market solution to a potentially disastrous problem.
I just feel that with its other innovations, these cars already had much more than most other cars. Like the intensive clean cycle for the windshield wipers in addition to a normal reservoir, etc. It's electrical sophistication. "Neat" little unique features, especially with the 89 and upwards models, with the computers, even though they are a bit retro by todays standards... Know what I mean?
Nick - Hazleton, Pennsylvania
06-24-2008, 11:50 AM
#5
Drifting
This is NOT AFTERMARKET! How many Audi's are out there running this exact tensioner??? A HECK of a lot more than ever used the old style oil filled tensioner I bet.
Ken says the pulley needs replacing...thats it. I think checking with Audi would be a good idea as far as the tensioner life expectancy. On mine ( I have 2 cars with this on it ) I will replace pulley next time and both pulley and tensioner the next go around....and never worry with the belt being tensioned incorrectly.
From what I have read the "warning light" rarely saves anyone. ( I know...some times it does ...and sometimes a blind hog finds a acorn too ) It either comes on inadvertently or seconds before a faulure. The light gives a false sense of security IMHO.
Let the rock throwing begin!
06-24-2008, 12:16 PM
#6
Inventor
Rennlist Member
Rennlist Member
Rob,
What a great writeup! It surely fills in some of the gaps in my threadbare manual.
One plug is 8mm for the early shoulder bolt. The larger, 10mm plug replaces the S4-up water pump stud.
...
For those watching at home:
Rob has an original PKsn'r bracket (serial numbered). The current brackets look slightly different.
I keep adding to the manual, so it's best to check the electronic version before starting your install. As of this post, the rev# is 0.9: (PKsn'r manual)
What a great writeup! It surely fills in some of the gaps in my threadbare manual.
...
For those watching at home:
Rob has an original PKsn'r bracket (serial numbered). The current brackets look slightly different.
I keep adding to the manual, so it's best to check the electronic version before starting your install. As of this post, the rev# is 0.9: (PKsn'r manual)
06-24-2008, 12:18 PM
#7
Nordschleife Master
WOW ROB
I don't think anyone could make a more descriptive write up then you have. Those guys should discount your next Tensioner on the next 928 you buy.
I haven't read (I just looked at the pictures) but thats very nice. I like the plated bracket too.
I don't think anyone could make a more descriptive write up then you have. Those guys should discount your next Tensioner on the next 928 you buy.
I haven't read (I just looked at the pictures) but thats very nice. I like the plated bracket too.
Trending Topics
06-24-2008, 12:31 PM
#8
Inventor
Rennlist Member
Rennlist Member
I don't think this thread was meant to start a debate on whether to replace the original factory tensioner, which in practise, wasn't a big jump up from the 1974 prototype.
larger
In talking with Audi mechanics, and researching the internets, I found that the pulley is usually all that is replaced. The tensioner is only replaced if it is leaking oil, and the lever is usually fine. The Audi parts are pretty inexpensive, so replacing all three with the belt isn't a deal killer.
The original timing belt interval for the Audi engine was 90-100K miles! AFAIK, they've since reduced that to a more reasonable 60K.

larger
The original timing belt interval for the Audi engine was 90-100K miles! AFAIK, they've since reduced that to a more reasonable 60K.
 06-24-2008, 01:50 PM
#10
Rennlist Member
True, and maybe this system is superior, but despite my ignorance, I still feel that if there is a warning light installed in the car, I'd prefer and certainly pay for a sensor that can be retrofitted that may give fair warning if something is going wrong - Especially with a lowish volume after market solution to a potentially disastrous problem.
Personally I like the P'Ksnr design a lot and I am glad that I installed it-- not because I was uncomfortable in any way with the factory tensioner but because I think it is a fundamentally better way to maintain constant belt tension. Good vs. better, not bad vs. good. And because the P'Ksnr hasn't been in use for 20 years it took some research (here and elsewhere) before I got comfortable with it. It is not something that you need to do because someone told you to.
If I were you, I would be awfully anxious to get the car on the road. You need to get a new belt in there (along with some new fuel hose) so quit agonizing and start wrenching. Once you get done with a TB job you will understand the system and everythig will be much more clear than it is now. And if you then want to fit Ken's tensioner the disassembly will be a snap the second time, and you will have Rob's brlliant instructions to go by.
Cheers, Jim
06-24-2008, 02:12 PM
#11
Drifting
Nick, it's a simple question-- if you are not comfortable in any way then stick with the factory tensioner, it works fine.
Personally I like the P'Ksnr design a lot and I am glad that I installed it-- not because I was uncomfortable in any way with the factory tensioner but because I think it is a fundamentally better way to maintain constant belt tension. Good vs. better, not bad vs. good. And because the P'Ksnr hasn't been in use for 20 years it took some research (here and elsewhere) before I got comfortable with it. It is not something that you need to do because someone told you to.
If I were you, I would be awfully anxious to get the car on the road. You need to get a new belt in there (along with some new fuel hose) so quit agonizing and start wrenching. Once you get done with a TB job you will understand the system and everythig will be much more clear than it is now. And if you then want to fit Ken's tensioner the disassembly will be a snap the second time, and you will have Rob's brlliant instructions to go by.
Cheers, Jim
06-24-2008, 03:05 PM
#12
928 OB-Wan
Rennlist Member
Rennlist Member
the tensioner Porken is using was designed for the 2.7/2.8 Audi and is dang near bulletproof, we change them during the tb/wp job which is about 90k and most of them have tons of life left in them
I personally would change it every other time you do the tb/wp
most Audi tensioner failures are on the 1.8T engine, which uses a diff tensioner
I personally would change it every other time you do the tb/wp
most Audi tensioner failures are on the 1.8T engine, which uses a diff tensioner
06-24-2008, 04:06 PM
#13
Fleet of Foot
Rennlist Member
Rennlist Member
This style tensioner is being used on a lot of production cars, Toyota, Nissan, Mitsubishi, Audi... the list goes on. You can't beat it for simplicity and ease of maintenance. I too had initial reservations about Ken's setup as it was 'un-tested' in our application. My concern was the if the tensioner will be securely mounted. He has done his homework and I am sold, can't wait to get mine from Roger.
Nice writeup Rob!
Nice writeup Rob!
06-24-2008, 05:12 PM
#14
Archive Gatekeeper
Rennlist Member
Rennlist Member
Thread Starter
One plug is 8mm for the early shoulder bolt. The larger, 10mm plug replaces the S4-up water pump stud
I didn't intend for this to be a debate on the factory unit vs. PKsn'r- there were 60,000 928's built, how many of them had a TB failure directly atributable to the tensioner unit itself? The factory unit served my car just fine for 18 years, including (at least) the last 2 when there was no oil in it, given my inability to install it properly....
So I think the bigger issue, especially in this era where much of the maintenance is being done by novice DIY'ers like myself, is that perhaps the PKsn'r is indeed a little more idiot proof in its setup, and there's less for a dummy to screw up. To get my Kempf tool to the high side of the window, I had the tensioner bolt screwed in most of the way, and it left a little niggling worry in the back of my mind that I didn't have it installed right, even though I rebuilt the tensioner, counted and oriented the washers, tried to fill it with oil, etc.
Now I don't need to worry about all that, I just need to remember to check the belt tracking regularly and replace it in 22 years when I get to 45,000 miles.....
 06-24-2008, 06:31 PM
#15
Race Car
And it's used on the Porsche 968, so even Porsche started using it in the early 90's. They would have put it into the 928 as well if they were adding anything new to it, but they were not (except for the 5.4 liter) because it was a sinking ship sales-wise. That's just one example of newer technology that was applied to the 968 that never made it into the 928.
Dan
'91 928GT S/C
Dan
'91 928GT S/C